Eloquent Images by Gary Hart
Insight, information, and inspiration for the inquisitive nature photographer
Something Extra
Posted on June 26, 2024

Autumn Moonset, Oxbow Bend, Grand Tetons
Sony a7R III
Sony 24-105 f/4 G
ISO 200
f/11
1/6 second
Way back when I started getting into photography as a hobby, my subject selection criteria were pretty basic: is it visually appealing, and can I get there relatively easily? This worked well enough, because the world is full of relatively appealing subjects that are relatively easy to get to, and I was content with merely pretty pictures.
But my decision more than 20 years ago to elevate my serious photography hobby into my actual food-on-table livelihood meant I had much more at stake, and merely pretty pictures would no longer cut it. For starters, choosing my subjects could no longer prioritize convenience. To that point I’d had some success concentrating on under-appreciated beauty in everyday natural elements like flowers and trees, but I also wanted to pursue the more heralded scenes that draw gawkers (and photographers) from around the world (like Yosemite), and knew I’d need to do something to distinguish my images from others’.
I started studying the work of other landscape photographers I admired, and soon realized that most successful images of familiar subjects include something extra that sets them apart from the millions of other beautiful images that preceded them. In other words, to up my photography game enough to pay the bills, I too would need to seek that extra something to distinguish my own images of popular photographic icons. And while that realization alone didn’t spawn instant success, it was an important insight that guided me as I honed my craft and sought subjects.
So, armed with new motivation, after choosing a primary subject, I wouldn’t attempt to photograph it until I could identify an ephemeral element that would (I hoped) set my image apart. Rarely, that extra something might be a beautiful sunset or dramatic light, but I really wanted to match my target subject with something more special, and soon found that this process became much easier when I sought to include things that move me personally.
This helped me understand that a photographer’s best path to creative success is to concentrate on the scenes that cause a reflexive, “Oooh, look at that!,” when sharing time in Nature with a loved one. For me, that long list includes (in no particular order) things like rainbows, reflections, lightning, the Milky Way, and the moon.
Not only do these ephemeral gifts from Nature have the ability to elevate a scene from (merely) beautiful to truly special, each resonates with me personally. Instead of being a chore to pursue, the extra effort, no matter how extra, that’s necessary to incorporate them into already beautiful scenes actually becomes part of the appeal and is never a burden.
One of my very first pursuits was the moon, whose phase and position could be timed with mathematical precision. Soon I was targeting iconic subjects, or identifying striking (but anonymous) landscape features near home, doing the calculations (in the days before computer or smartphone apps could do it for me), and traveling to photograph the convergence. And even if the goal of a trip wasn’t the moon, I’d never visit a location without knowing the moon’s phase and when and where it would appear.
In 2018 I was assisting Don Smith with his annual autumn Grand Tetons workshop. I’d been to the Tetons a few times, mostly with Don, and find the entire park absolutely spectacular, but hadn’t really spent enough time there to make images that really excited me. But this year, at some point before my departure, I checked the moon and discovered that it would be full during the workshop. With a little plotting, I found that from Oxbow Bend we’d be able to align it perfectly with the Tetons and Mt. Moran at sunrise on one particular morning. Since this trip is always timed for peak fall color, the full moon was just a fortuitous confluence, but I was absolutely going to take full advantage.
Speaking of fortuitous confluences, when we got the group out there on the appointed morning, not only did we find the moon in place as expected, we had peak fall color, a reflection, a thin sheet of fog hovering above the water, and another layer of low clouds beneath the peaks.
I don’t really remember a lot of specifics from that morning, but I do remember that there were a lot of people (no surprise). Fortunately, there’s also a lot of room to spread out, and I took full advantage, moving up and down the riverbank to set the moon’s position relative to Mt. Moran and the other peaks. This image came about 15 minutes before sunrise, not long after the foreground had brightened enough to enable me to get detail in the moon and the landscape. (As always, it’s a single click, not a composite.)
I love this image, but believe it or not, I only just processed it 4 days ago. I think what happened was that I had just returned from my Hawaii workshop before doing a quick turnaround for the Tetons, then immediately after returning from there, headed off for my Eastern Sierra workshop. Since I usually prioritize the images from my own workshops, and I was suddenly buried with those, the Teton images just fell off my radar. But a couple of weeks ago, someone else from that workshop posted their own image from that morning (thanks, Bernie!), and my first reaction was, “Holy crap, that’s beautiful!” And then it dawned on me that I was there too—so on the 15-hour San Francisco to Sydney leg of my New Zealand flight, I pulled it up, processed it, and here it is.
Something Extra


")


, Yosemite")


New Zealand After Dark
Posted on June 19, 2024

Dark Night, Milky Way and Tasman Lake, New Zealand
Sony a7S II
Sony 12 – 24 f/4 G
ISO 10,000
f/4
30 seconds
This week I have New Zealand on my mind. In preparation for the New Zealand Winter photo workshop that begins next week, I started going through unprocessed images from prior New Zealand visits. I was actually looking for something else when I stumbled upon this Milky Way image from the 2019 trip, when Don Smith and I guided a group of Sony influencers around the South Island. I’d already processed a virtually identical composition of this scene back then, but since my Milky Way processing has evolved (improved), I decided to give it another shot.
Day or night, I love this Tasman Lake scene in particular because it so beautifully captures what I love most about New Zealand. We only do this workshop in winter, which of course leads to the inevitable question: “Why?” The simple answer is that the modest sprinkling of tourists, consistently interesting skies, and snowy peaks I love so much, are only possible in winter. I could go on and on with my answer, but since a picture is worth a thousand words, I’ll just save you some time and give you six-thousand words worth of examples. (You’re welcome.)


But even once I convince skeptics that winter in New Zealand is in fact quite beautiful, I’m usually hit with a follow-up: “But isn’t it cold?” Sure it’s cold, but by most people’s expectations of winter, New Zealand’s South Island is actually quite mild—with average highs in the 40s and 50s, and lows in the 30s, it’s similar to winter in Northern California and Oregon. I would venture that there’s not a single person reading this who doesn’t already have in their closet enough winter warmth to ensure cozy comfort in a New Zealand winter. Also like Northern California and Oregon, in winter New Zealand’s South Island gets rain and fog in the lowlands, and snow in the mountains, conditions I find so much better for photography (and for just plain being outside) than the sweltering blank-sky California summers I left back home.
All that said, for me the strongest argument for winter in New Zealand is Southern Hemisphere’s night sky. Inherently pristine air and minimal light pollution makes New Zealand is an astrophotographer’s paradise any season. But winter is when the Milky Way’s brilliant core shines in the east after sunset, already much higher above the horizon than my Northern Hemisphere eyes are accustomed to. The galactic core remains visible all night, ascending further and slowly rotating westward, before finally fading on the other side of the sky in the pre-sunrise twilight. That means more than 12 hours of quality Milky Way time, and the ability to place it above landscapes facing east, north, or west, by simply choosing the time of night you photograph it. And joining the celestial show are the Large and Small Magellanic Clouds—satellite galaxies of our Milky Way, only visible in the Southern Hemisphere.
Benefiting from our years of experience on the South Island, Don and I have identified many very nice locations for photographing the Milky Way, but our two favorites feature the galactic core above glacial lakes that are bounded by snowy peaks. One of these is on the shore Lake Wakatipu near Queenstown; the other is a vista above Tasman Lake in Mt. Cook / Aoraki National Park. This week’s image, from the 2019 trip, is of the Tasman Lake scene.
From the very first time my eyes feasted on it, I marveled at what a spectacular place the Tasman Lake view would be to photograph the Milky Way. In 2019, Don and I were especially pleased to be guiding this group of young photographers who were as excited about photographing the Milky Way as we were, so this shoot was in our plan since before the workshop started.
The sky this evening was crystal clear, but as the sky darkened, I found myself still down at the foot of the lake (just out of the frame on the far right), where I’d photographed sunset with most of the group. The majority decided to stay put for the Milky Way shoot, and while I couldn’t deny that this spot would likely be no less spectacular, I couldn’t pass the opportunity at the elevated lake view that had been on my radar for so long. I also thought the Milky Way would align better with the most prominent peaks from this vantage point. So I scrambled back up the boulders to the trail and race-walked more than a mile, then scaled more than 300 stairs in near darkness, to get in position.
I expected to find the few who weren’t down at the lakeside sunset spot (this group always scattered) would already be up here, but I arrived to find the view empty. While I was happy to eventually have the company of a couple of others, the utter solitude I enjoyed for the first 30 minutes felt downright spiritual.
Going with my dedicated night camera, the Sony a7S II, I started with my default night lens at the time, the Sony 24mm f/1.4. But the scene was so expansive, I quickly switched to my Sony 16-35 f/2.8 GM for a wider view. While that did the job for a while, it wasn’t long before I found myself wanting an even bigger view, so I reached for my Sony 12-24 f/4 G lens. Because light capture is the single most important factor in a Milky Way image, in general I find f/4 too slow. (Today I’d use my 14mm f/1.8 or 12-24 f/2.8, but back then those lenses were still at least a year away.) But really wanting the widest possible view, I rationalized that since the a7S II can handle 10,000 ISO without any problem, and the star motion of a 30-second exposure at 12mm would be minimal, and just went for it. Mitigating the f/4 exposure problems was the fact that the best parts of the scene’s foreground, the snow and water, were highly reflective, while the dark rock wasn’t really essential to the scene.
The result as processed in 2019, while noisier than ideal, was still usable. But as time passes, I’ve become less and less thrilled with many of my old Milky Way processing choices—that image was no exception. Since I’ve been pretty thrilled with the results reprocessing old Milky Way images with Lightroom’s latest noise reduction tool, I thought this might be a great time to reprocess this old scene to see if I could do it better.


For no reason in particular, I chose different image to process, but the compositions are nearly identical. As expected, the new Lightroom noise reduction did a much better job minimizing the inevitable noise that comes at 10,000 ISO, so I was already ahead of the game. The only other major processing improvement I made was the color of the sky, which, as my night sky processing evolves, I’m making much less blue.
Because no one knows what color the night sky supposed to be when given the amount of exposure necessary bring out foreground detail, I’ve always believed that the color of the sky in a Milky Way image is the photographer’s creative choice. I mean, scientists might be able to tell you what color it should be (there’s a very strong case for green), but to me the bottom line is image credibility (and green just won’t do it).
Whatever night sky color I’ve ended up with has entirely a function of the color temperature I choose when I process my raw file in Lightroom—no artificially changing the hue, saturation, or in any other way plugging in some artificial color. Since I do think the foreground (non-sky) of a night image looks more night-like (I don’t want a night image that looks like daylight with stars) with the bluish tint I get when the color temperature is cooled to somewhere in the 3000-4000 degrees range (photographers will know what I’m talking about—non-photographers will just need to take my word), for years I cooled the entire image that way—hence the blue night skies. But Lightroom now makes it super easy to process the sky and foreground separately and seamlessly, so I no longer cool my night skies nearly as much as before (or at all). Now my night skies tend to be much closer to black, trending almost imperceptibly to the purple side of blue (avoiding the cyan side).
Oh, and the color of Tasman Lake you see in this image is real, I swear—the color of the South Island’s glacial lakes is another reason to love this country, but that’s a story for another day.
Workshop Schedule || Purchase Prints || Instagram
This year’s New Zealand workshop is full, but Don and I will do it again next year.
New Zealand After Dark


Channeling Your Camera’s Vision
Posted on June 13, 2024
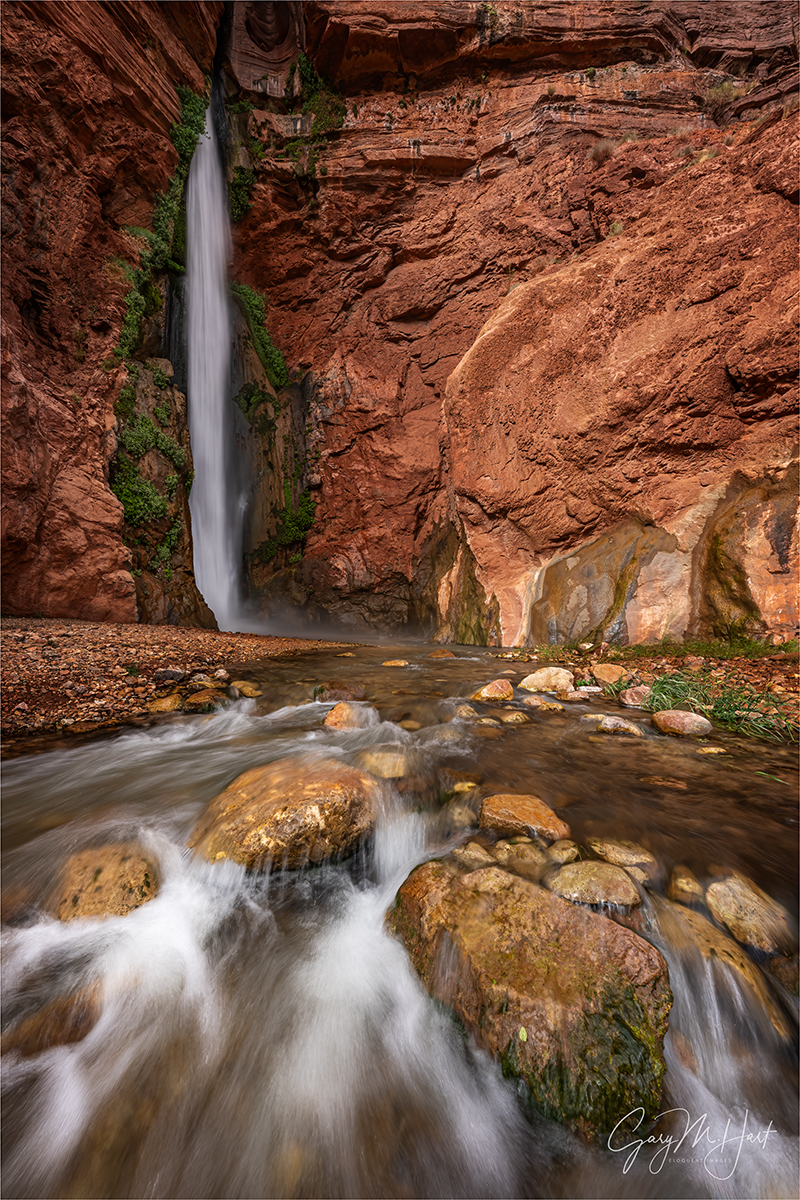
Whitewater, Deer Creek Fall, Grand Canyon
Sony α1
Sony 12-24 GM
1/5 second
F/16
ISO 50
About a month ago I wrapped up my ninth Grand Canyon raft trip. As my guides and I get better at identifying the best spots and when to be there, there’s an aspect of similarity from trip to trip, but thanks to group dynamics, weather conditions, and the secondary stops we chose to make on any given year, each trip always feels unique.
As with most spectacular locations, Grand Canyon has more worthy subjects than we have time to visit, but there are five primary spots we never miss: Nankoweap granaries, Little Colorado River, Elves’ Chasm, Deer Creek Fall, and Havasu Creek. Additionally, we have a couple of south-facing campsites we target for the best possible Milky Way photography. But making all this happen in the best conditions for photography sometimes feels like three-dimensional chess. Starting with our first evening, our campsite choice (the number of river miles we cover) creates a cascading effect on the timing of our photo stops and campsites for each subsequent day of the trip—not enough, or too many, miles on any given day and we’re completely out of synch.
But my guides and I have gotten really good at it, and I’ve really grown to appreciate the rhythm of this trip. The moderate pace and not too crazy rapids of our first two days allows everyone to get comfortable with the whole rafting experience—both on the river and in camp. That’s a good thing, because Day 3 is Rapid Day! To set us up for downstream stops, on that third day we cover nearly 60 miles and navigate dozens of large to massive rapids (the vast majority of the canyon’s largest rapids). Finishing with a celebratory party in camp that evening, the entire day is a blast, and the bonding is complete.
Given the frenetic pace of Day 3, everyone is ready for our (relatively) relaxing Day 4. Without too many miles to cover, we make it to Deer Creek Fall early enough (fingers crossed) to snag the campsite directly across from the fall—this year we made it by lunchtime—where we can hang out (kick back) in camp, waiting for the crowds to clear out so we have the fall to ourselves for the rest of the day.
Of course rafting Grand Canyon isn’t all river and campsites. The photography down here is downright spectacular, and we get to do quite a bit of it. As with every workshop I lead, I try to get an idea of what everyone hopes to accomplish and do all I can to accommodate them. But since safety and schedule have to take priority on the river, and the conditions are beyond my control, I can’t always grant everyone’s wish—but I can’t imagine anyone ever being disappointed.
Having done this trip as many times as I have, I’ve become a little more selective about my own photo choices, with many of those decisions depending on the conditions. But one subject I never miss, regardless of conditions, is Deer Creek fall. Gushing from a red rock slot canyon, Deer Creek Fall is truly one of the most beautiful waterfalls I’ve ever seen. But, as with most natural beauty, the real challenge here is doing it justice.
Every nature scene worthy of a photograph possesses inherent beauty—the nature photographer’s job is to identify that beauty and figure out the best way to convey it with a camera. Anyone who has been disappointed by their images from a beautiful moment in nature (that would be pretty much everyone) knows that a good picture isn’t a simple matter of pointing a camera and clicking the shutter. There are just too many differences between the human and camera views of the world to expect a point and click approach to succeed reliably.
Subjects like Deer Creek Fall, especially at first sight, are surprisingly difficult to photograph well because of the instinctive tendency to just frame up the first beautiful thing we see and start clicking, wrongly assuming that our pictures will look just like what our eyes see. But that’s literally impossible.
The better approach starts with understanding the camera’s unique vision and accepting that it is no less valid than the human perspective. Once we start channeling our camera’s vision (rather than trying to force our camera to submit to our vision), we can leverage the exposure variables (that control depth, motion, and light), subject relationships, and creative framing, to provide a fresh view of familiar subjects.
Since this Deer Creek Fall image from the most recent raft trip illustrates many of the differences between human and camera vision, I thought sharing my approach to its capture would be a good opportunity to (once again) distinguish the camera’s vision from human vision. But first, let me cite the significant human/camera vision differences I had to deal with this afternoon:
- Boundaries: While my own world was unbounded, the world in my viewfinder was surrounded by a rectangular box. To a certain extent I can control the size of that box with focal length choice, and where I point it in the scene, but every image has a boundary.
- Depth: Photography is an attempt to render a 3-dimensional world in a 2-dimensional medium. Of course that’s impossible, but there are things we can do to create the illusion of depth.
- Dynamic range: The human eye can see a much wider range of tones, from the darkest shadows to the brightest highlights, than the camera can. The many ways to handle this difference are a creative choice.
- Motion: A still image can’t display actual motion, but it can create an illusion of motion that stimulates the viewer’s brain into imagining the scene’s motion. While nothing like our experience of the world, a camera can freeze the extreme chaos of a single instant, or combine a series of instants into a blur that conveys patterns in the motion indistinguishable to the eye.
Though this image isn’t high dynamic range, that doesn’t mean I didn’t have to factor dynamic range into my calculus this afternoon. Despite a fair amount of cloud cover, some of it rather threatening, Deer Creek Fall spent most of the afternoon in full sunlight. And while my camera can handle this extreme dynamic range, I try to avoid mixing brilliant highlights and deep shadows whenever possible. Studying the clouds, I decided there was a decent chance that they’d eventually provide the shade on the fall necessary to shrink the dynamic range, then went to work searching for my composition while I waited.
I wanted to feature the waterfall, but I also wanted to take full advantage of the abundant foreground subjects that would significantly enhance the illusion of depth. I explored many options, from looking up at the base of the fall, as close as I could get without soaking myself and my camera, to scaling a nearby slippery rock ledge for a different perspective. I finally decided the perspective that worked best was actually in the creek. Once I made that decision, I spent nearly 10 minutes micro-positioning myself relative to the nearby rocks until I was satisfied with the way the rocks and rapids moved the viewer’s eyes through the frame. Finally, to emphasize the rocks and shrink the (less interesting) open rocky beach, I dropped as low as I could go—less than a foot above the water—without merging the large nearby boulders with the smaller ones behind them.
With my perspective established, it was time to frame up the scene. There were other photographers in my group just out of the scene on the left; on the right was a large boulder and unattractive shrubs, and above the fall was bright sky that really didn’t add anything. Adjusting my focal length, I was able to use my frame’s boundaries to completely eliminate these distractions and distill the image to the most important visual elements: Deer Creek Fall, the whitewater of Deer Creek itself, and the array of boulders protruding from the creek.
My final decision was how to handle the extreme water motion. With the fall in full sun, I played with some images that froze the water in place, but those turned out to be practice shots that just helped me refine my composition. Since most of the creek was already in shade, and the fall would soon be as well (even if the clouds didn’t come through for me, I was willing to wait for the sun to drop behind the rocks), I knew my real decision wasn’t whether or not to blur the water, it was how much to blur it. When the clouds finally delivered, my composition was ready, and all I had to do was click. But I didn’t just click once—I ran through a range of shutter speeds so I’d have a variety of motion effects to choose from later—when I wasn’t standing on slippery rocks in chilly whitewater.
Grand Canyon: The View From the River


(Mostly) Unrelated Ramblings on Editing and Color in Nature
Posted on June 5, 2024
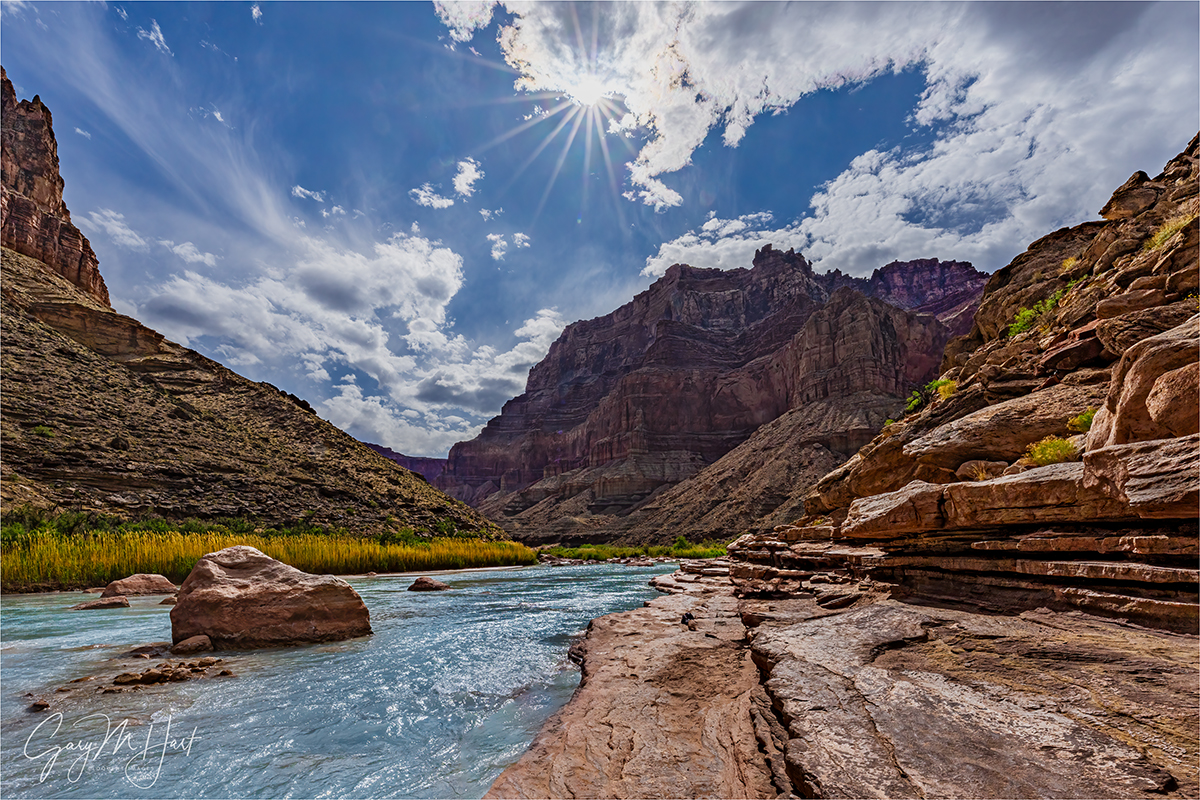
Brilliant, Little Colorado River, Grand Canyon
Sony α1
Sony 12-24 GM
1/800 second
F/18
ISO 100
Lately I’ve been on a bit of a crusade against manufactured images in general, and AI use in particular. But, lest you perceive me as a luddite and old-school photography codger (“In my day, every shoot was a 5-mile uphill walk through snow in both directions, and sunrise always came at 1:00 a.m.”), let me just say that I am all-in on digital capture and all most of its benefits, from instant image review, to the histogram, to the ability to dodge and burn my color captures. It’s been more than 20 years since my digital conversion, and I can’t think of a single thing I miss about shooting film. (Okay, maybe my Olympus OM-2, and being able to use the same camera for more than 25 years.)
Most of my digital editing is stuff like setting the color temperature, simple dodging and burning, and an occasional crop. But one capability that I’ve grown especially fond of is the ability to remove things that don’t belong. But before I talk about that, let me set the scene for this image.
I’ll never forget the first time I laid eyes on the Little Colorado River where it intersects with the Colorado River. Prior to my Grand Canyon raft trip, my only exposure to the Little Colorado came far up stream, where I’d get a quick view of its muddy brown puddles or (in wet years) thin brown stripe, briefly visible from the bridge as I zipped through Cameron, Arizona, on my way to and from the North Rim or Page.
By the second day of my first Grand Canyon raft trip, I was already completely blown away by the unique and completely unexpected features at the bottom of the canyon. That day had been a mix of clouds and sun—ideal for photography, but since I still wasn’t completely sure that the guides knew what was important to us photographers, I stayed vigilant for worthy subjects as we floated beneath the towering walls. After spending most of the trip to this point in relatively narrow Marble Canyon, just upstream from (what I now know to be) the confluence with the Little Colorado River, the canyon walls separated a bit and I could tell the geology was changing. When we tied up at a nondescript sandy beach, I remember looking around and thinking, Really? Surely we can find a better spot to take advantage of this great light.
When Wiley, my lead guide, suggested that we grab our cameras and go explore for 45 minutes or so, at first I wasn’t even sure whether I wanted to lug my camera bag, but since this was my group, I decided needed to set a good example. Camera bag in tow but still skeptical (me, not the camera bag), I followed a short trail through the shrubs with the rest of the group on my heals like a string of ducklings. Rounding a corner, I emerged from the brush and stopped like I’d slammed into a brick wall. Unable at first to process what I was seeing, I finally turned and managed to call back to Wiley, “Uh, we’re going to need more time here.”
Defying expectations
This might be a good time to mention that there is nothing subtle about color in nature. Perhaps you’ve noticed? In fact, the vivid natural hues that surround us may just be my favorite thing to photograph. I’m afraid most of us live our lives taking for granted a certain range of natural color constants: that the sky will feature a familiar blue throughout the day, bracketed by certain shades of red or orange at sunrise and sunset, before darkening to something close to black at night. Our daytime clouds are white or gray, and water is some predictable shade of green or blue, depending on light and clarity. Even when nature’s color intensifies to a hue and brilliance that moves us to pause and take note (or photograph), it’s reliably within our range of expectations—a crimson sunset, spring wildflowers, or the extra rich blues of a mountain lake.
But sometimes nature throws us a curve. It’s impossible not to be gobsmacked the greens and reds of an aurora; Death Valley’s aptly named Artist’s Palette features a bizarre array of purple, green, and pink rocks; smoke from wildfires can turn the midday sky an otherworldly orange, sometimes thousands of miles distant. And I’ll never forget the first time I laid eyes on the green and blue glacial lakes of the Canadian Rockies and New Zealand. But for me, none of these sights were as disorienting as my first view of the Little Colorado River’s azure hues.
So what’s going on?
What happened to the familiar brown puddles I remember upstream? Clearly, somewhere in the 55 or so river miles between Cameron and Grand Canyon, the Little Colorado had gotten an upgrade. Not only was there a lot more water, its shade of blue was not a color I’d ever seen in water.
As it turns out, after leaving Cameron, the Little Colorado twists along a scenic canyon of its own creation, carving deep enough to puncture a travertine-laced aquifer that recharges, and colors, its meager flow. The travertine (limestone formed by mineral springs) is infused with magnesium and calcium that adds the blue hue to the water, and deposits other minerals that paint the rocks and riverbed a reflective white, creating a complementary contrast to the azure hue. Adding to all this magnificence is the rich red of the surrounding Grand Canyon walls.
Threading the needle
Of course like most things in nature, the Little Colorado’s color is not guaranteed. When the source of its flow is runoffs, either from snowmelt or the summer monsoon, the Little Colorado’s natural blue is overpowered by reddish brown sediment washed downstream. So each year I try to thread the needle between the end of the snow runoff and start of the monsoon runoff, scheduling my raft trips for May. Not only does May usually ensure a blue LCR, we also get to enjoy the Colorado River at its translucent green best by avoiding the Colorado River’s monsoon sediment that’s not unlike chocolate pudding.
Since I have to schedule this trip more than a year in advance, there’s no way of knowing whether the LCR will be blue until we arrive at it. Even the guides can do no more than guess at its current status because there’s no webcam or other direct monitoring at the confluence, and reports from prior trips need to wait until they’ve navigated the final 200 miles downstream.
The other tricky thing is the sky—without clouds, midday visits aren’t great for photography, so in recent years we try to time our LCR arrival for late afternoon. This puts large segments in deep shadow, even on sunny days, and also pretty much guarantees that we’ll be the only ones there.
I’ve only found the LCR brown once—that year we could tell as we approached the LCR confluence and saw the brown mixing with the Colorado’s deep green. We just aborted our landing and continued on downstream.
This year’s visit
This year’s trip enjoyed a really nice mix of clouds and blue sky throughout. Most of the clouds were of the puffy, photogenic variety, but we did have a few that looked pretty threatening. And aside from a handful of raindrops one night (not enough that anyone who wasn’t already awake would have even noticed), we stayed completely dry—while we were on solid ground.
There was a small disagreement among the guides about our chances for a blue LCR—Lindsay was skeptical because of brown water a couple of weeks prior; Wiley said there had been enough time for the brown runoff to abate. I couldn’t tell if Wiley’s take was just whistling in the dark optimism, or if he really believed it, so I held my breath as we approached the LCR confluence. When I heard his reaction at the first sight of distinctive blue (“Gary, you’re the luckiest guy I know!”), I could tell he hadn’t been quite as confident as he’d sounded.
This year’s LCR visit was a preview of the mix of sky and clouds we’d enjoy all week, and we took full advantage. For most of the group, the reaction to their first view of the otherworldly blue was similar to my reaction the first time I saw it. But the scene here is about far more than striking blue water—towering buttes, jutting red boulders, polished sandstone shelves, and green-gold reeds create an abundance of compositional variety. But with an open campsite directly across the river, we had the schedule flexibility to enjoy plenty of quality time there before setting up camp.
As soon as we were off the boat people scattered. With so much going on visually, scenes like this can be a little overwhelming to first time visitors, so I took my time wandering upstream, answering questions and making suggestions on the way. It was really cool to see people using everything from ultra-wide to telephoto—all valid approaches.
At first the clouds dominated the sky, but I couldn’t really take advantage and only managed a handful of shots, none of which especially thrilled me. But when the clouds started to break up, I saw an approaching opportunity to create a sunstar and looked around for a composition to go with it. With little time to spare before the sun emerged, I found something nearby that would work—the only problem was, one of the people in my group was set up and firing away at his own scene no more than 10 feet in front of me.
Since my personal rule when I’m with a group is that my images always take backseat to my groups’, I never ask anyone to move when they’re actively working on something. So I just framed up my shot anyway, and waited for the sun. It popped out about 30 seconds later, long enough for me to get a half-dozen or so frames with a beautiful sunstar, as well a not so beautiful photographer, before the clouds swallowed the sun and I moved on to other opportunities.
The sun came and went several times that afternoon, and I got a few more sunstar images that didn’t include another photographer, but when I got home and loaded my images, that first one was my favorite. Enter Content-Aware Fill.
In a matter of seconds—just the time it took to circle the offending subject in Photoshop and hit my Delete key—I ended up with the scene you see here. The resulting replacement was amazingly close to what it would have been had he not been there, and I defy anyone to tell me exactly where the replacement happened.
Of course this opens another can of worms that I don’t want to get into today: what’s an “appropriate” edit? All I’ll say is that each photographer draws his or her own line, and there are no absolute rules besides honesty. Where’s my line? I will remove things that (in my opinion) don’t belong—e.g., contrails, other people, car lights—as long as I can do it in a way that doesn’t noticeably alter the scene from what it would have been had those unnatural elements not been there. I absolutely don’t add or move things.
As someone who tries to photograph the natural world as it would be without human interference, Lightroom/Photoshop remove tools are a godsend. Just don’t get me started AI fabrication…
Workshop Schedule || Purchase Prints || Instagram
Color in Nature
Click any image to scroll through the gallery LARGE


, Yosemite")


