Eloquent Images by Gary Hart
Insight, information, and inspiration for the inquisitive nature photographer
Ode to joyful photography
Posted on July 9, 2014

Revelation, Kauai, Hawaii
Canon EOS-5D Mark III
19 mm
4 seconds
F/16
ISO 100
Photography is a source of joy, right? You know it and I know it. I mean, why else would we spend thousands of dollars on equipment, stagger out of bed hours before the sun, skip dinner, stand all afternoon in freezing rain, or hike three miles in the dark, just to take a picture? If you’ve experienced (or witnessed) the ecstasy evoked by an electric sunrise, rising moon, or vivid rainbow, you understand.
But if photography is such a joyful endeavor, what’s with all the miserable photographers? When that joyful photographer who stood in the rain or hiked in the dark shares the fruits of her labor online, she somehow incites a swarm of miserable photographers who believe that:
- Any photographer using a (Canon, Nikon, Sony, whatever) is a moron
- The horizon line never belongs in the center
- Nobody (else) knows how to process an image
- And a host of other photographic myths
To the miserable, insecure souls who believe they can “elevate” their stature by diminishing others, the next time you feel like criticizing a fellow photographer, fueling the fray on a photography forum, or pontificating at the local photo club, do yourself (and the world) a favor: Pick up your camera, go outside, and take a picture. Then walk around a little bit and take a few more. In fact, just stay outside until you feel better—it won’t take long.
About this image
There’s a direct relationship between the amount of discomfort (misery, sacrifice, or whatever you want to call it) endured to capture an image, and the amount of joy the image manifests. Case in point: This sunrise on Kauai.
It was the last morning of the photo workshop I was co-leading with Don Smith. The group rose dark and early and we drove in a constant rain to our sunrise location about 30 minutes away. On the drive we all had serious concerns that the rain would shut us down entirely, but there were no thoughts of turning back.
As we assembled our gear and prepared for our short hike, the rain eased and a gentle breeze separated the clouds to reveal a few stars and thin crescent moon. But during the ten minute trek out to the ocean view, our breeze stiffened to a gusting, face pummeling wind. We fanned out along the cliffs and waited for the morning to swell on the eastern horizon. The daylight revealed a wall of rain heading our direction, brightening as it advanced, pushed by a wind that was now gale strength, so strong that I hooked my camera bag to my tripod to keep it anchored. As the light of this rising sun filled the oncoming squall, the sky throbbed with color. But despite the ominous signs, we persisted, mesmerized by the fire that now stretched from horizon to zenith.
For about five minutes we were in photographer heaven, and then the weather was on us. As if dowsed by the flood, the light disappeared with the downpour’s arrival. Instantly soaked, we all immediately and independently turned and sprinted toward the cars in a mad panic—with my umbrella powerless against the horizontal raindrops and rain gear warm and dry back at the hotel, I heroically led the retreat (picture George Costanza at the sight of smoke).
No photographer, article of clothing, or piece of a equipment was dry on the drive back, but the mood was unanimous joy. We all knew we’d just shared five minutes of special—not really what you expect when you drive through the dark in a pouring rain, stand on a cliff in a gale, or subject yourself to a thorough soaking, but the reason we do it anyway.
A gallery of joyful captures
-

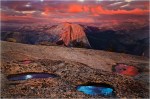
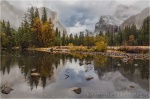
- Moonlight Cathedral, Valley View, Yosemite
-

- Autumn Moonrise, Half Dome and the Merced River, Yosemite
-

- Three Strikes, Bright Angel Point, Grand Canyon
-
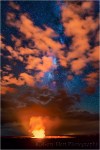
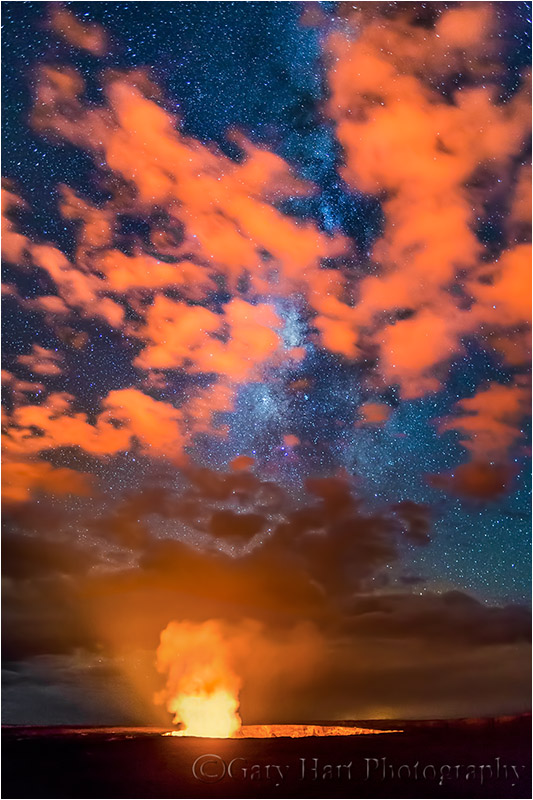
- Fire on High, Kilauea and Milky Way, Hawaii
-

- First Snow, El Capitan, Yosemite
-
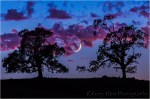
- Crescent and Oaks at Dusk, Sierra Foothills, California
-
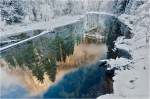
- Winter Reflection, El Capitan, Yosemite
-

- Bridalveil Dogwood, Valley View, Yosemite
-
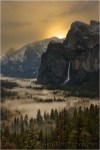
- First Light, Yosemite Valley, Yosemite National Park
-
- Sunset Palette, Half Dome from Sentinel Dome, Yosemite National Park
-
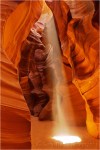
- Divine Spotlight, Upper Antelope Canyon, Arizona
-
- Autumn Snow, Valley View, Yosemite
-

- Moonlight, Whitney Arch, Alabama Hills, California
-

- Champagne Glass Poppies, Merced River Canyon, California
Eye on the sky
Posted on July 7, 2014

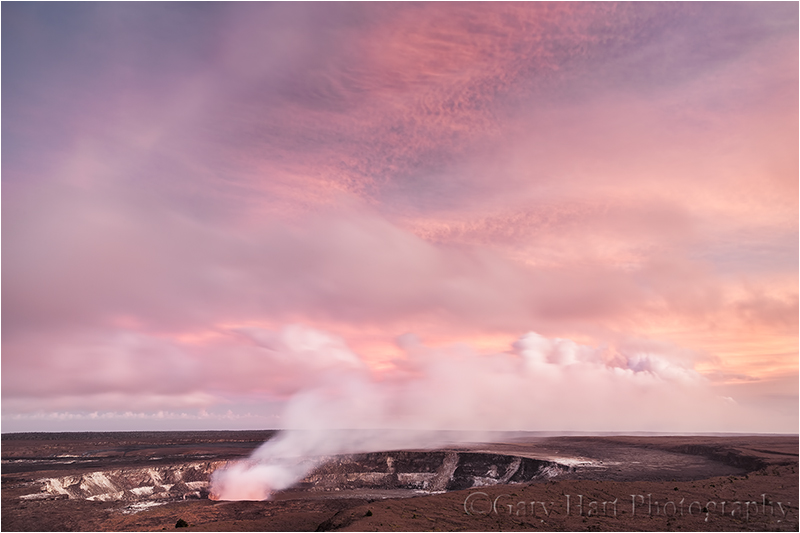
Infinite Sunrise, Kauai, Hawaii
Canon EOS-5D Mark III
16 mm
2 seconds
F/16
ISO 100
I returned couple of weeks ago from a week on Kauai where I assisted Don Smith with his workshop. Kauai used to have the reputation as Hawaii’s “quiet” island, and while it still may be a little more peaceful than Oahu or Maui, Kauai is certainly no longer a secret. But extensive and ongoing (painstaking) research has shown me that despite the crowds, it is possible to enjoy quiet on any of the Hawaiian Islands.
We were based near Kapaa, at a beachside resort teaming with people throughout the day and well into the night. Most of our Kauai sunrise locations had been a 30-45 minute drive to fairly remote spots, but following a fairly late night, Don and I gave the group a break and scheduled our sunrise shoot for the beach behind our resort—just hop out of bed, throw on some shorts, a tank top, and flip-flops, and we’d be in business.
As far as I know, this east-facing beach doesn’t have a name. While its pure white sand is dotted with volcanic rocks and lava shelves that wax and wane with the tide, this is not a destination that draws photographers on its own merits. But despite its lack of notoriety, this a pretty little beach was more than worthy of our attention. And concern about competing for turf with the crowds at our resort turned out to be completely unfounded. As I’ve learned in Yosemite, and verified at many other crowded locations, rise at sunrise and you can pretty much have the world to yourself. “Our” beach that morning was no exception.
Send in the clouds
I call what I do “landscape” photography, but “land” is really only half the picture (literally). It’s easy to focus so much on the scene we came to photograph that we completely overlook what’s going on overhead. While the physical qualities of most landscapes are pretty static, the sky can change, sometimes dramatically, from one frame to the next. Clouds, moon, stars, color—some or all of these dynamic features are often primary subjects in need of a foreground, no matter how prosaic. Put a rainbow over any tree, or a small moon over a small New Mexico town, and you might just end up with something special.
Our sky this morning was a tapestry of dark rainclouds overlain by a diaphanous veneer of thin clouds, broken by patches of blue. I walked up the beach looking for a foreground to complement the quickly changing sky, finally settling on a solitary lava pyramid protruding from the pristine, surf-wash beach. Setting up my shot I noticed that the receding waves left a glossy sheen that reflected the sky. The calm simplicity of the foreground juxtaposed against the complex beauty of the sky was more than just visually appealing, the quiet beach, warm air, cooling breeze, and elegant sky were personally soothing and I wanted an image that conveyed that.
Discard the “rule” of thirds
One of the creative decisions a landscape photographer needs to make with each image where to put the horizon. Near the top? Near the bottom? In the middle? Or maybe no horizon at all. Many photographers, especially those constrained by the shackles of camera club competitions, will automatically put the sky at the 1/3 or 2/3 line of their image’s vertical axis. This may be great for beginners who automatically bullseye every scene, but aspiring photographers need to graduate from prescribed formula to creative choice.
My feeling has aways been to favor the aspect of the scene with the most appeal. Great sky? Low horizon. Great foreground? High horizon. How low or high? That depends on the relative merits of the sky and foreground—80/20 or 90/10 splits (in either direction) create a dramatic emphasis to the right scene. And is it okay to put it in the middle? Absolutely! Which is what I did here. Not only do the two halves of the scene move me equally, balancing them in the frame subconsciously conveys the tranquil equilibrium I felt that morning.
I’d love to say that the small white rock in the lower right quadrant was a conscious part of my compositional strategy, but it wasn’t. I was aware it was there, but its inclusion was a subconscious choice. This tiny rock is a great illustration of the rule of thirds true value. While I don’t think it should dictate composition, the rule of thirds often does explain why things work. In this case, without really thinking about it, I stacked two very different scenes to make this image. Place rule of thirds grid atop the bottom scene and it’s immediately clear that my two rocks (one large, one tiny) occupy balancing intersections. The large rock has enough mass to provide significant visual weight pretty much anywhere in the scene, but by virtue of its strong position, the small rock is able to balance its much larger counterpart.
Rule of thirds or no rule of thirds? Am I contradicting myself here? I don’t think so. Photographic “rules” earned their status for a reason and are not without value—we just shouldn’t be slaves to them. When you turn off your internal rule monitor and allow your creative instincts to take over, the organic compositions that follow will more uniquely reflect your experience of the moment and your emotions of at capture.
Join me in Hawaii
Workshop Schedule || Purchase Prints ||Instagram
A Gallery of Horizons
Click any image to scroll through the gallery LARGE


My photography essentials, part 3
Posted on March 23, 2014

Dawn, Puna Coast, Hawaii
Canon EOS-1Ds Mark III
10 seconds
F/11
ISO 100
19 mm
A couple of weeks ago the editors at “Outdoor Photographer” magazine asked me (and a few other pros) to contribute to an upcoming article on photography essentials, and it occurs to me that my blog readers might be interested to read my answers. Here’s how I answered the third of their three questions:
What three things contribute to keeping you inspired, energized and creative on your shoots and why does each keep you inspired, energized and creative?
- When I’m photographing a particularly beautiful moment—such as a moonrise over Yosemite, lightning and a rainbow at the Grand Canyon, or the Milky Way I force myself to turn off my photographer brain and for a few minutes just become a regular human who might be witnessing the most beautiful thing happening on Earth at that moment. The sense of appreciation and marvel is a vital connection to my subjects that fuels my photography.
- Throughout the year I plan excursions that keep me motivated: Each spring I’m recharged by drives through the Sierra foothills and its rolling green hills, studded with poppies and oak trees and cut by brimming creeks and rivers, that just beg to be photographed. My calendar is loaded with the days I’ll find a crescent moon dangling in the amber/blue transition separating night and day. And nothing exhilarates me more than a dark sky dotted with stars. Since so much of my photography time is spent guiding others to my favorite locations (at my favorite times), these personal trips establish an essential balance in my life.
- And most of all, I’m inspired by viewing the work of other photographers:
- Ansel Adams is an obvious inspiration—not only was he a great photographer, Adams navigated uncharted territory to pave the way for all who followed. I chuckle when other photographers defend their captures with, “That’s the way it really looked,” because Adams’ absolute connection with his camera’s reality, and the synergy between his capture and processing, proved that duplicating human (visual) reality is absolutely not a nature photographer’s goal.
- Galen Rowell is another inspiration, for his understanding of light, his obsessive inquisitiveness, and his willingness to explore photography’s physical and mental boundaries. Rowell possessed a synergy between his brain’s creative and logical capabilities—an ability to understand, anticipate, and calculate, combined with an instinctive ability to turn all that off and simply create. From him I learned to follow the light to the exclusion of all distractions, no matter how tempting.
- David Muench, was an influence long before I entertained thoughts of becoming a photographer. I have memories dating back to my childhood of paging through Muench’s massive coffee-table books and being awed by the beautiful scenes he’d witnessed. At the time I had no idea of how much skill those images required—I just thought he was incredibly lucky to have been there to see it. Of course now I appreciate Muench’s unique ability to see and manage the front-to-back aspect of a scene to create the illusion of depth, an approach I’m now convinced was made easier for me by a lifetime of exposure to those images.
- Charles Cramer’s meticulous compositions extract beauty from simple scenes and subtle light and can transfix me for hours. Each of Cramer’s images feel to me like personal discoveries, as if he’s uncovered nature’s true beauty while everyone else’s camera was pointed in the other direction. Browse his galleries and note how many images use indirect light and no sky. More than any other photographer, Charles Cramer’s images inspire me to grab my camera and run outside.
About this image
On every visit to Hawaii’s Big Island I visit this unnamed beach on the Puna coast south of Hilo. I’ve photographed it in a variety of dramatic conditions: colorful sunrises and sunsets, crashing surf, rainbows, but this nearly monochrome image beneath heavy gray clouds is my favorite.
In addition to the color and light, the scene varies greatly with the tide and surf. This morning, finding pillows of basalt cradling still pools that reflected the morning sky, I dropped low and moved close with a wide lens to fill my foreground. Working in shadowless, pre-sunrise light, I used a long exposure to smooth the water and create a serenity to more closely matched my state of mind.
Day’s End, Ke’e Beach, Hawaii
Posted on November 29, 2013

Day’s End, Ke’e Beach, Hawaii
Canon EOS-1Ds Mark III
3/5 seconds
F/16.0
ISO 200
17 mm
Is there ever a bad sunset in Hawaii? My preliminary investigation seems to indicate that the answer is probably no, but I think a definitive answer requires more research—a task for which I’m more than happy to volunteer (that’s just the kind of guy I am). As far as I can determine, most every day in Hawaii seems to include some combination of clouds and sunlight—enough clouds to make gorgeous skies, and enough sunlight to make spectacular color. In other words, a photographer’s paradise.
In case you missed it, I recently returned from Hawaii where I assisted Don Smith’s Kauai workshop. Each day we’d rise before the sun, head to some east-facing beach (either by car or simply by taking the 50 yard stroll to the beach behind our room), pick a composition, and wait for the inevitable show to begin. Color, shafts of light, rainbows–we saw it all, and while each was different, it was pretty difficult to say any one was better than any other. In the evening we’d repeat the process at a west-facing beach, then go to dinner. Not a bad gig.
Ke’e Beach is a sunset destination, literally the end of the road, a spectacular exclamation point punctuating Hawaii’s State Highway 560 on the northwest side of Kauai. Just beyond, accessible only by foot, water, or air, the sheer Nā Pali cliffs jut from the Pacific and disappear into the clouds. A coral reef protects the beach, calming the surf and creating an ideal environment for swimming, snorkeling, and fishing. Many visitors forego those activities in favor of simply sitting on the beach waiting for the sun to disappear.
This was the evening before the workshop began, my first visit here. Scanning the scene for composition options I decided frames including the bay and cliffs would require working around too many people, so I turned my attention the beautiful sky around the sun. As nice as the sky was, I still wanted something in the foreground for depth. The pristine sand was a good start, but wanting more I chose this flat rock outcrop as my foreground anchor. I set up my tripod close enough to the surf that an occasional wave would swirl about my ankles, etching ephemeral arcs in the sand. I went with my 17-40 lens, dialing it wide to exaggerate the beach and give the background an expansive feel.
While waiting for the sun to drop to the horizon I readied my graduated neutral density filters, set my camera to f16 to ensure a sunburst, and determined that ISO 200 would give me the shutter speed with just the right amount of motion blur. Next I played with compositions, deciding that (despite “rules” to the contrary), I wanted the horizon in the middle and the sun bullseyed. With everything ready, I was able just stand and enjoy the view.
When the sun popped from the clouds I started clicking, timing my exposures with the waves, some with the surf flat and others with of motion around the rock. After a few frames I’d adjust the composition, keeping the scene centered but playing with variations between horizontal, vertical, wide, and tight. I ended up with several I like, and who knows, maybe tomorrow I’ll decide I like the vertical version better.
Workshop Schedule || Purchase Prints || Instagram
More Hawaii
Click an image for a closer look, and to view a slide show.


Literally breathtaking
Posted on July 6, 2013

Under the Milky Way, Kilauea Caldera, Hawaii
Canon EOS-1Ds Mark III
30 seconds
F/2.0
ISO 800
28 mm
Even with the number beautiful things I get to photograph, certain natural wonders will forever thrill me. Near the top of that list is the view into the Kilauea Caldera on Hawaii’s Big Island. I thought I knew what to expect, but even after a lifetime of National Geographic specials and an occasional “Breaking News!” disaster video, I was little prepared for the in-person experience of peering into an active volcano.
Approaching Kilauea from Hilo, the first sign that something unusual is in store is the plume of thick smoke and vapor rising in the distance and spreading with the wind. If you didn’t know a volcano was nearby, you might mistake the smoke for a forest fire. The billowing plume becomes more prominent as you draw closer to the volcano, and once in Hawaii Volcanoes National Park you’re soon surrounded by white puffs of steam rising from the ground on both sides of the road.
On the drive to the caldera you’ll be tempted by several vista opportunities, but the best perspective is from the Jaggar Museum at the end of the road (the loop road that once circumnavigated the caldera is now closed at the museum due to the risk of noxious fumes beyond). For first-time visitors I recommend foregoing the preliminary views in favor of the Jaggar view, which makes the most impactful first impression—you can return to the other views on the drive out.
When visiting during the day you’ll see white smoke pouring from a large hole on the caldera’s floor, but no sign of orange flame—the sunlight simply overpowers the volcano’s fire. While any view of a volcano is memorable (trust me), nothing compares to the experience of seeing the caldera after dark. I usually arrive at the caldera in time for sunset, go to dinner, then return once darkness is complete. Not only does this break allow time for darkness, I also find that the clouds that frequently obscure the sunset sky dissipate once the sun is down (in other words, don’t forego a night visit simply because your daytime visit was cloudy).
Even if you do find clouds after dark, the clouds beautifully radiate the caldera’s glow to bathe the entire scene in orange, a subtle effect to the naked eye that comes alive in a long exposure. If you’re lucky enough to visit on a night with few or no clouds, you’ll be treated to the churning lava’s orange fire, reflected by belching white smoke, beneath a sea of stars. My first time seeing the caldera beneath the Milky Way I literally gasped, and it was several seconds before I realized I was holding my breath. Breathtaking indeed.
* * * *
Let me add that finding the Milky Way above the caldera isn’t without its difficulties. Even if the clouds cooperate, simply showing up at the Jaggar Museum after dark isn’t enough because the properly aligned vantage point varies with the date and time of night you visit. In the Northern Hemisphere the best views of the Milky Way are moonless summer nights (moonlight washes out the sky as much as city lights). If you find yourself there with the Milky Way visible, aligning it with the caldera is usually a matter of driving or walking the rim until you find the spot.
We’ll be photographing the Milky Way above Kilauea in my upcoming Hawaii Big Island workshop is September 2-6. While it filled several months ago, a recent cancellation leaves me with one opening. And I still have lots of openings in my 2014 Hawaii workshop, September 15-19.
Earth on Fire, Kilauea Caldera, Hawaii :: The sunset light had dimmed just enough that the lava lake’s fiery orange is just visible. Even just few minutes earlier the scene was too bright to see any color in the caldera.
Milky Way and Clouds, Kilauea Caldera, Hawaii :: Here the clouds reflect the lava’s glow, but part just enough to reveal the Milky Way behind.
Juggling Cats on Maui
Posted on April 10, 2013

Facing West, Molokai from West Maui, Hawaii
Canon EOS 5D Mark III
3 seconds
f/16
ISO 100
Canon 17-40 f/4 L
20 mm
Coordinating all of the rapidly changing exposure and composition variables sometimes feels like juggling cats (thankfully without the bloodshed). The difficulty is compounded by the unfortunate need to simultaneously process input from two sides of the brain (creative and logical) that don’t often play well together.
For me an image usually starts with a feeling or connection, not just the scene’s now, but also for its what-might-be. Using that seed, a general idea for a composition emerges. Next, I evaluate the scene’s exposure, depth, and motion variables, and how to best manage them with my camera’s aperture, shutter, and ISO settings. Usually compromises are required, as one need usually contradicts another (see “cat juggling,” above). And finally, when I think everything’s in place, I return to my creative instincts and allow my intuitive side to actually click the shutter—that is, it has to feel right. Often this is a multi-click process requiring multiple frames, with analysis and refinement in between, each frame informing the next until I’m satisfied.
Below is a summary of my mental process as I tried to turn this beautiful Maui sunset into a photograph. Its genesis came long before the final click (and the beautiful color that made this moment special).
- Hmmm—beautiful scene, with real potential for sunset color -> Wander around a bit in search of a foreground to go with the Pacific sunset.
- Love these pools—would love to balance them with the setting sun and Molokai in the distance -> If I stand here, this long pool creates a nice diagonal pointing toward Molokai, and connecting the background pool on the left with the sun creates a corresponding (balancing) diagonal in the other direction.
- Don’t want to cut Molokai off -> Definitely need the 17-40.
- But if I go too far right with my composition, I crowd the sun and cut off part of the reflective pool on the left -> Go super-wide with the 17-40.
- Don’t want to go all the way out to 17mm and risk losing sharpness at the corners -> 20mm will work.
- Yeah, I think I can do something with this composition -> Set up the tripod.
- Lots of dynamic range here -> Time for the Singh-Ray graduated neutral density filters. Three soft? Horizon still too bright. Two hard? Maybe. Three reverse? Even better. Will deal with disguising the GND transition in Photoshop.
- Need to be sharp from front to back -> Small aperture, but not so small that diffraction or softness (lenses tend to be less sharp at their extreme apertures) is a problem. Hmmm, at this wide focal length (20mm) my hyperfocal app says f11 will give me “acceptable” sharpness. To increase my margin for error I stop down to f16 because I know from experience, at f16 on my camera, diffraction and lens softness will be tolerable.
- But there’s only one plane of perfect sharpness, so even at f16, I need to make sure the perfectly sharp plane is in my foreground -> Live-view focus on the small rock jutting diagonally near the front of the large pool at my feet.
- Great sunset color reflecting in the background pool -> With my polarizer, dial reflections up. But…
- Love the green translucence of the foreground pool -> Dial reflections down.
- Sigh -> Find middle point with the polarizer.
- My GND darkens the clouds on the right too much -> Will need to dodge in Photoshop, but dodging could expose noise—make sure ISO is 100 despite the fading light.
- Without direct sunlight, these black rocks are sure dark -> Push exposure (increase shutter speed because aperture and ISO are already decided) as far to the right (in the histogram) as possible.
- The timing of the waves completely changes the image -> Monitor the waves’ break and action; time exposures for the desired effect.
- At 3.2 seconds the motion blur in the waves creates a nice, dynamic texture, but be careful that the waves don’t overrun the foreground pool -> Wait for a large wave to break on the farthest rocks, pause for a second, then click. (If my shutter speed had been too long for the desired wave effect, I’d have bumped my ISO and dealt with the noise in processing.)
- The setting sun is a ticking clock leaving only a small window when everything comes together -> Expose too soon and the sun blows out and the color fades; expose too late and the sun is gone (tick, tick, tick…).
- Click, review, adjust, repeat until satisfied (or time’s up).
- Move on to another scene and start over.
Join me in a future Hawaii photo workshop
A Hawaii gallery
Click an image for a closer look, and a slide show. Refresh your screen to reorder the display.


Comet Dreams Fulfilled
Posted on March 13, 2013

Comet PanSTARRS & New Moon, Haleakala, Maui
(The moon was a thin crescent; because of the extra light my camera took in, it “saw” lunar detail in the shadow.)
Canon EOS 5D Mark III
3 2/3 seconds
F/5.6
ISO 1600
320 mm
I’ve been a huge comet geek since I was ten years old (details here), so when I heard about Comet PanSTARRS almost a year ago, I was pretty excited. I became even more excited when I learned that PanSTARRS would be a little more than three degrees left of a new moon on March 12. Checking my calendar, I discovered I’d be on Maui for a workshop that week. Sweet.
Fast forward to March 12: I’m on Haleakala, the location of the PanSTARRS telescope that discovered the comet, with my Maui workshop group. After a sunset that colored the swirling clouds in all directions, the clouds close in and completely shut down the sky. We stick it out for a while, but when the cold saps the group’s enthusiasm (it’s 35 degrees with 35 mph winds), I reluctantly honor their wishes. Could I really have gotten so close to this event I’ve been anticipating for nearly a year, only to be denied. Descending the mountain with one eye on the sky, I hope for a break.
Less than two miles down the road we suddenly pop into the clear and see a thin slice of moon dangling like a Christmas ornament in the blue/orange band separating day and night. While PanSTARRS isn’t bright enough to be visible the twilight, I know I can use its proximity to the moon to guide my lens. I pull the car over and we yank out our cameras and start firing, wider shots at first, then tighter to zero in on the comet and moon. As a bonus, the amount of light necessary to reveal PanSTARRS also exposed exquisite detail in the moon’s shadow area.
I’ll write more when I have time but I just had to share. Now, off to Hana….
More Comet Images (mostly NEOWISE)


Paradise Found
Posted on March 10, 2013

Waterfall and Pool, Road to Hana, Maui
Each time I visit a location, no matter how many times I’ve been there, I make a point of finding something new. On Maui several days in advance of my workshop (which starts Monday), I took the drive to Hana with the express purpose of exploring some of the unmarked, intriguing, jungle canyons that I’d “rushed” (a relative term on the serpentine Hana Highway) by on previous visits.
The Hana Highway, also known (less ironically) as The Road to Hana, clings to the intersection of Haleakala’s windward slopes and the relentless Pacific surf. Navigating this harrowing track makes me marvel that it was ever built in the first place—it’s easy to understand why the engineers who carved the route opted whenever possible for hacking into the lush jungle over chiseling into the volcano’s precipitous basalt cliffs. The result is long stretches of road tunneling through a dense green canopy, suddenly interrupted by a vertigo inducing explosion of blue sky and sea.
Along the way each bridge encountered marks that stretch of road’s deepest plunge into the jungle before climbing back toward the ocean. These bridges are also where the waterfalls are. Many can be viewed without exiting the car—lower the windows and hear the roar; others are up or down the canyon, accessible with varying degrees of effort.
Somewhere on the midpoint of the trip I squeezed my car into a wide spot next to a bridge crossing a quiet stream. The lack of parking combined with the rush of oblivious cars indicated that this was not a location of note—exactly the kind of thing I was looking for, so I figured I’d at least check it out. Without my camera I scrambled over some rocks and dropped down to the stream bed. The stream flowed past water-rounded rocks that ranged all the way up to refrigerator-size. From my initial vantage point I saw the canyon had promise but it soon bent left and disappeared. I hopped to the far side and scrambled upstream—as soon as I rounded the bend the canyon’s vertical walls squeezed tighter and several times I wasn’t sure I could go on. But each time I encountered barrier it seemed the solution was to cross to the other side and keep moving forward (there’s metaphor there).
As I advanced I started seeing pictures everywhere: little cascades spilling over rocks, graceful ferns arcing from the mossy walls. What had started as quick feasibility study had somehow evolved into an actual exploration and I was starting to regret leaving my camera in the car. But the canyon seemed to be pulling me forward and I continued, hoping for a more open view that would give me more insight into what lay ahead. Fortunately that came soon enough, when I rounded and came face to face with the end of the road: a vertical cliff, at least 100 feet tall, trimmed by a diaphanous veil of water tumbling into a translucent turquoise pool. Paradise found.
It took me exactly ten minutes to hop back to the car (I timed it), and (distracted by the opportunities along way) maybe thirty minutes to make my way back up with my camera. But despite the distractions there was never any doubt about where I was going to spend the bulk of my time—finding a scene like this is more thrilling to me than the most colorful sunrise or vivid rainbow. The persistent overcast was ideal for the intimate photography I love so much, so most of my efforts concentrated on aspects of the scene, balancing the exposed and submerged rocks with the waterfall’s white strand.
I can’t even tell you that this is my favorite image from that shoot—I just grabbed an image that pleased me and processed it quickly because wanted to share something. I have no illusions that I’m the first person at this spot, not even close. But for the two hours I spent, in the middle of primetime on the Hana Highway, I was completely alone in Paradise and that was enough for me.
An unexpected treat (and a good lesson)
Posted on November 7, 2012

Sunrise, ‘Ohe’o Gulch, Maui
* * * *
The drive to Hana is an adventure of crowded, winding, narrow roads. The drive to the Seven Sacred Pools of ‘Ohe’o Gulch, Maui, about twelve miles beyond Hana, is even more unnerving—the road narrows further and the crowds are replaced by miles of empty road interrupted infrequently and abruptly by careening locals in vehicles just slightly too large for the blacktop.
On my latest Maui visit I rose in the Hana darkness and headed to the Seven Sacred Pools for sunrise. Doing this drive in the pre-dawn dark only adds to the tension, but I arrived unscathed to find the parking lot empty. Perfect! Following my headlamp along the quarter-mile trail, I continued mulling compositions I’d been plotting since my last visit (when light and crowds didn’t permit anything particularly creative). So imagine my surprise to find a padlocked gate blocking the stairs down to the pools. Hmmm. After a few minutes of reconnaissance, I decided they really, really didn’t want me down there and set out in search of other opportunities.
‘Ohe’o Gulch empties into the Pacific, draining rain that falls on the slopes of Haleakala high above. In addition to the main trail along the gulch are a number of smaller, less defined trails that trend out toward the surf. I followed one of these and soon found myself making my own path along broken lava toward the waves. The sky had brightened just enough to render my headlamp unnecessary, but footing was treacherous and I had to step carefully—a fall likely wouldn’t have resulted in death or even severe injury, but the rocks would have sliced me pretty good, not to mention what it would have done to my camera, so my focus was more on the ground at my feet than the larger scene.
When I made it out to where the surf met the rocks (I can’t call it a beach), I was quite pleased to find several reflective pools nestled in the lava, guarded by a prominent lava outcrop. The rising sun had already started to color the sky, so I set up quickly, finding various compositions that balanced the largest pool with the rising sun and outcrop. Working the scene, I was treated to a sunrise palette of magenta, red, and gold punctuated by an explosion of crepuscular rays as the sun crested the horizon. I couldn’t help thinking that I’d probably have missed it all had I concentrated on the shots I’d planned for that morning—a gentle reminder not to get so locked into my agenda that I lose sight of the larger world around me.
On the drive out of the parking lot I encountered the park ranger opening the entrance station. I asked her about the locked gate at the pools and she explained the flash flood risk forces them to restrict access when the weather forecast calls for heavy rain on Haleakala.
Glow in the dark
Posted on September 25, 2012

Kilauea Caldera, Hawaii
* * * *
An unfortunate reality of photographing the things I photograph, at the times I photograph them, is the doubt the results foster—“Is that real?” Sigh. That skepticism is compounded by the (understandable) ignorance of people who expect cameras to duplicate human reality, a fallacy no doubt perpetuated by photographers who proclaim each image to be, “Exactly the way the way my eyes saw it.” And then there are those unscrupulous photographers who alter images for personal or financial gain by adding or moving objects (the moon seems to be a popular subject), cranking up the color, and embellishing the hardship the capture required. It’s no wonder people don’t know what to believe.
So let’s take a look at this night shot of the Kilauea Caldera, captured during my recent Hawaii Big Island photo workshop. Is this the way I saw it? Absolutely not. First, my experience was three dimensional. It included wind motion in the caldera’s vapor plume, a dome of sky saturated with thousands of stars, the Milky Way stretching from horizon to horizon, and clouds wafting in and out, intermittently revealing and obscuring parts of the sky. The magic I experienced was far beyond my camera’s capability.
But my camera has reality of its own, and its own magic. By increasing my ISO (the sensor’s sensitivity to light), aperture (the size of the opening that allows light to reach the sensor), and exposure time, I was able to capture more light in one frame than my eyes could see at any instant. All this additional light on my sensor gave me a section of sky containing even more stars than my eyes saw, and clouds fully illuminated by the volcano’s glow.
This particular image was captured on the second of three nights on the rim. My first workshop group nailed it on the first attempt (see my September 9 post), but the second group’s first attempt was largely thwarted by the large cloud you see in this image. Nevertheless, as you can see, we had a small window of opportunity on this night as well, so while the group wrestled with their camera’s and tripods in the dark, I took a test exposure and gave everyone exposure values. As I moved around making sure they all had their settings dialed in and focus set, it was a blast listening to the gasps up and down the rim when the first image popped on each person’s LCD. But once that cloud settled in, the show was pretty much over. After waiting nearly two hours for more sky we packed it in, but by then everyone was hooked, so we returned a couple of nights later to smashing success.
The processing for this image was minimal. In fact, what you see here is pretty much we all saw on our LCDs, with mostly minor tweaks. In Lightroom I brushed a little color temperature reduction to cool the sky, made some slight exposure adjustments, and bumped the clarity to help the stars stand out. In Photoshop I did moderate noise reduction with Topaz DeNoise (love the high ISO performance of my new 5D III) and dodged the underside of the trailing vapor plume a little. And so intense was the color in the clouds that I desaturated the red channel somewhat. None of these adjustments were major, and in fact I was already mostly satisfied with the raw image and Adobe Standard processing (my Lightroom default) that I started with.
The one significant adjustment I did make in Photoshop was to fix the blown highlights at the caldera’s core, at the very center of the fire where it burned hottest, an area the width of the fire in length and about 2/3 of that width high (about 3/4 of the bright area you see beneath the smoke). That core area, while yellow to my eyes, was hopelessly blown (no color or detail) by the extreme exposure the rest of the scene required. To fix it I used Photoshop’s Eyedropper tool to select the yellow just beneath the cooler orange, and the Paint Bucket tool at about 20 percent opacity to replace the pure white with (very) pale yellow.
The objective of any art form is not to show us exactly what we can all see with our own eyes, but rather to expand our perception of reality and and help us see the world differently. While this is not they way my eyes saw it, it is the way my camera saw it (with the one exception noted above). As with a moonbow that’s not visible to the naked eye, streaking stars or blurred water recorded with a long exposure, and the enhanced contrast and shape of a black-and-white image, the camera gives us fresh insights into the natural world. That’s why I choose not to lament perceived “limitations” such as my camera’s inability to capture the range of light my eyes see, preferring instead to celebrate its ability to reveal things my eyes can’t see—in this case faint stars and the fiery, natural light illuminating the clouds and Kilauea’s plume. Nothing can compete with the experience of being there, but I’m thrilled to have images to remind me of that experience, and to show me what my eyes missed.
* * * *
Join me next September as I try to duplicate this shot in my Hawaii Big Island Volcanoes and Waterfalls photo workshop, September 2-6, 2013.

