Eloquent Images by Gary Hart
Insight, information, and inspiration for the inquisitive nature photographer
All’s well that ends well
Posted on July 30, 2017

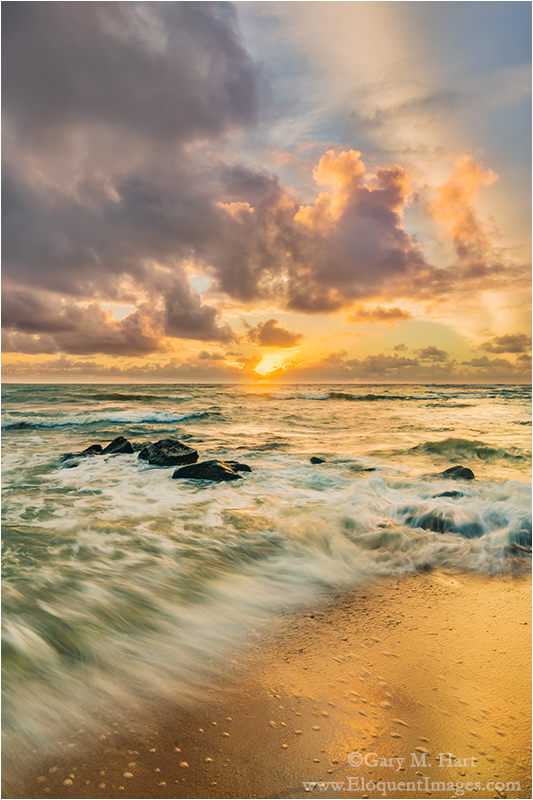
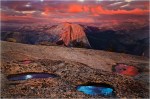
Rainbow Reflection, Queen’s Bath, Kauai, Hawaii
Sony a7R II
Sony/Zeiss 16-35
1/15 second
F/11
ISO 100
Most photographers will tell you that some of the best locations are a bit of a pain to get to. Not necessarily death-defying dangerous, just a pain. Not only is Queen’s Bath on Kauai one of those locations, this year getting there required dealing with the Hawaii equivalent of the troll who lives under the bridge.
For many years I’ve been helping my friend Don Smith with his Kauai workshop (it’s a tough job, but, well, you know…). One of the highlights of the Kauai trip is Queen’s Bath, a surf-pounded lava shelf accessed by a short but steep trail through dense rainforest. When it’s dry the trail isn’t a big deal if you can avoid the deep ruts and protruding roots, but after any rain the route down is more waterslide than trail. We’ve had enough falls (including a broken bone that happened when someone who had been in the group tried to go down on her own after the workshop), that we won’t even attempt the hike if it has rained.
Queen’s Bath is on the wet side of Hawaii’s wettest island. Most years we pull up to the trailhead in the dark (well before sunrise), inspect the conditions, and move on to another location because the QB trail is too slippery. But after last year’s disappointment it occurred to me that maybe the funky tire-chain-like shoe attachments (AKA, YakTrax) that I use in winter to keep from slipping on ice might be worth a try. Don took that suggestion and ran with it; after a little research he found actual crampons on sale on Amazon, sent the upcoming group the link, and told them crampons or YakTrax would be required footwear for Queen’s Bath.
On our scouting mission to Queen’s Bath before the workshop started we negotiated the slick slope like velcroed mountain goats. While congratulating ourselves on our genius down at Queen’s Bath, we were warned by a couple who had arrived a little after us that there was a “crazy lady” (their description, not ours) yelling at everyone parking in the Queen’s Bath parking area for making too much noise. (Mind you, this is Kauai, where the roosters are at full volume well before sunrise.) We shook our heads and chuckled, but didn’t think much about it.
Driving away later that morning, we discovered that our SUV had a flat tire—weird, but stuff happens. We soon learned that there’s only one AAA truck on all of Kauai, so rather than wait, Don and I decided to answer the age-old question, “How many photographers does it take to change a tire.” (FYI, it’s two: one to change the tire, and one to make sure everyone knows he’s doing it all wrong.)
Fast forward to the next morning when, group in tow now, we charged down slope in the rain without a single slip. (Score one for genius.) The rain intensified soon after we arrived on the lava shelf, and for a while it looked like we might need to retreat. But soon we saw brightening clouds in the east, and not much later the rain stopped and out popped a full rainbow. The rainbow lasted at least 15 minutes, and the light stayed nice much longer than that. Thanks in no small part to the crampons, no one fell on the muddy trail or rain-slickened basalt, and everyone ended up with some fantastic photos and the morning seemed a huge success.
We were still basking in the glow of our beautiful morning as we returned to the cars—until someone noticed that the license plates were missing from our three vehicles. Huh? Suddenly yesterday’s ranting neighbor and our flat tire took on an entirely new meaning: Crazy Lady had vandalized our cars. I understand that photographers can be a little insensitive to their impact on their surroundings, but in our defense, Don and I always lecture the group about being quiet in the Queen’s Bath parking area, then monitor closely to ensure that no one forgets. We don’t allow any conversation or laughter in or near the parking area, so the only sounds we make are doors closing and feet shuffling—not completely silent, but certainly quieter than Kauai’s ubiquitous chicken population.
It’s possible that our nemesis was interrupted in her vile act, because we soon found the license plates and screws, as if they’d been haphazardly stashed as she made a hasty retreat. We recovered our property and with the help of someone’s screwdriver reinstalled the plates and departed without further incident. I have no idea how regularly this neighbor’s crazy manifests, but since it happened to Don and me on consecutive days (and we had exchanged our rental car with the flat tire, so there’s no way she knew it was the same people), I suspect she’s a serial vandal. But the bottom line is, no real harm was done, and we ended up with a great story and some fantastic images. So I guess all’s well that ends well.
A few words about this image
Rainbows feel like random gifts from heaven, but there’s really nothing random about them. Monitoring the conditions, you can usually anticipate the rainbow and get yourself in the best position to photograph it. What’s the best position? Successful photography is all about juxtaposition of visual elements, and (as much as we wish it were so) very rarely is the perfect relationship between the various elements in a scene exactly where you happen to be standing right now.
When a rainbow is one of your elements, it helps to understand that the rainbow’s center will always be at the anti-solar point (where your shadow points) and the rainbow will move with you. If you want your rainbow over that tree, or mountain, or lake, just move until they align.
In Hawaii, or any location where rain showers are possible, the first thing I do is figure out where the rainbow will appear, and identify compositions to put with it. On this morning at Queen’s Bath, when I arrived I made a mental note of where the rainbow would appear, and when the sky near the eastern horizon started to brighten while the rain continued falling in the west, I moved closer to the ocean to get as much ocean and rainbow as possible in my frame. I also shifted toward an area with a collection of small reflective pools that I thought would make a great foreground, rainbow or not.
When the rainbow appeared, I was ready. After photographing it with a variety of foregrounds for a few minutes, I thought it would be pretty cool to get a reflection of the rainbow. I didn’t have to move far to align myself with the little pool you see in my image; from there it was about micro-positioning, moving closer/farther and up/down to maximize the rainbow’s reflection without cutting off the pools with the edge of my frame. For this image, I ended up about three feet from the pools and just a couple of feet above the rocks.
Read more about rainbows
A Rainbow Gallery
Click an image for a closer look and slide show. Refresh the window to reorder the display.


From One Second to the Next
Posted on July 10, 2016
Here Comes the Sun, Lydgate Beach, Kauai, Hawaii
Sony a7R II
Sony/Zeiss 16-35 f4
1/5 second
F/16
ISO 50
I don’t know about you, but my earliest memories of photography are of Dad pulling the family wagon up to an iconic vista, beelining to the railed viewpoint, and snapping a few frames (that would be quickly forgotten, until the slides came back from the lab and Dad sequestered the family in our darkened living room until each Kodak Carousel had completed its cycle). Though Dad’s photo stops were never timed for light or conditions (you can’t plan a family vacation around the best time for photography), he loved recording nature’s beauty, and I think we all felt comfort in the knowledge that the next time we went to Yosemite, the beach, or wherever, everything would still look pretty much as it did in Dad’s pictures.
I suspect many photographers had a similar start, snapping pictures simply content to record the experience of being there. But those of us who grew frustrated with the similarity of our captures to all the other images of the same locations longed for more. Looking for ways to make our efforts unique, we took advantage of the predictability of nature’s permanent features, and tried to pair them with nature’s more dynamic elements, like a sunrise or sunset, the moon, fresh snow, a rainbow, the Milky Way, and so on.
Melding these static scenes with nature’s changing conditions is a great start, but sometimes we get so caught up in the thrill of seeing Half Dome with fresh snow, or the first rays of a Hawaiian sunrise, that we overlook our scene’s most dynamic features, its scooting clouds and flowing water that literally change by the second.
Nowhere do I need to be more vigilant about my scene’s transient features than Hawaii, where the ubiquitous clouds form, transform, and scoot through a scene with startling speed, and where even a fraction of a second can mean the difference between lapping surf and an exploding wave.
The image at the top of the screen was captured at Kauai’s Lydgate Beach, less than 20 minutes after the image in my July 4 post. As you can see, the compositions are quite similar, but the overall feel is very different. Not only has the color changed significantly, the surf is completely different, and the clouds have very little in common.
Though my position on the beach was more or less the same, I did make adjustments to accommodate the changing conditions. I started with the rapidly shifting clouds, with each frame recomposed slightly from the previous to account for the clouds’ movement as I sought the best place for the frame’s border, trying not to cut the clouds awkwardly (or at all).
The other consideration was the wave motion. In the earlier image, wave timing was less important because my 5-second exposure smoothed the activity. Though I didn’t freeze the motion in this image, my 1/5 second exposure stopped the water enough to make timing important.
I liked the sunlight’s gold reflection on the wet sand, but that required a receding wave to capture the most reflective water (an advancing wave was just non-reflective white foam; between waves, the sand wasn’t wet enough). I also wanted a wave that moved diagonally across the bottom of my frame. While most waves arrived more straight-on, I’d been living with these waves for at least a half hour and knew that every once in a while one would sweep the beach at an angle. And of course while waiting for the ideal wave to arrive, I had to continue monitoring the clouds to ensure that they didn’t shift enough to alter my composition. After about a half dozen or so clicks, I finally got all the elements to align.
From One Second to the Next
Images where timing was essential


There’s no “never” in photography
Posted on July 4, 2016

Hawaiian Daybreak, Lydgate Beach, Kauai, Hawaii
Sony a7R II
Sony/Zeiss 16-35 f4
5 seconds
F/16
ISO 50
One question that comes up in just about every workshop is, where do I put the horizon (or in more general terms, where do I break my frame)? Behind these questions seems to be a feeling (fear?) that there’s one “best” way to treat a scene. And I’ve noticed that many beginning photographers are constrained by two “rules” they’ve heard at their camera club or online:
Never put the horizon in the middleAlways put the horizon 1/3 of the way down from the top of the frame, or 1/3 of the way up from the bottom
In general, when someone tells you that you should “always” do this, or “never” do that, run (don’t walk) to the nearest exit: If you’re not breaking rules, you’re not being creative. While well-intended advice like this might benefit the person who automatically puts everything in the center, most people who have owned a camera for more than a day are way beyond that point. And this 1/3 from the top or bottom of the frame thing? Forget about it. I have no problem giving 80 percent, 90 percent, or even more of my frame to my sky or foreground, and neither should you.
Here’s my (comprehensive) list of guidelines for how to split your frame:
- Give the area with the most visual interest the most room.
That’s it. If your scene is all about the clouds, put the horizon in the bottom half and celebrate the clouds—the better the sky (or the less interesting the foreground), the lower the horizon can go. Conversely, if the sky is boring, by all means, minimize it. And if you’re lucky enough to have a sky and foreground of equal beauty, feel free to split the frame.
It’s important not to overthink these creative choices. Freeing yourself from rules creates more room for your instincts to take over. (And by all means, feel free to deviate from my frame splitting guideline to.) We all the see the world a little differently, and where I choose to put my horizon may be completely different from where you put yours. Just trust your instincts (and if you’re not sure, shoot it different ways and decide later).
About this image
I just returned from Kauai, where I helped my friend Don Smith with his workshop there. For our penultimate sunrise we were at Lydgate Beach, between Lihue and Kapaa. I like to find relationships between the elements in my frame and often struggle at Lydgate because there’s just so much going on here: rocks in the surf, driftwood on the beach, and a point of land that juts in on the left (I have a thing about stuff sticking into my frame). But the sky this morning was so beautiful that I forced myself to find something that worked.
Avoiding the driftwood because it was just a pile of logs to my eye (though others in the group found nice images there), I set up in front of a group of rocks protruding from the surf just up the beach. Orienting my camera vertically, I was able to avoid the intruding point on the left, and the heap of logs on the right.
The clouds that morning wouldn’t stay still, but just as the color started to kick in a large cumulus cloud aligned perfectly with my foreground. Wanting to smooth the surf, I dialed my ISO to 50 and stopped down to f/16, then used my Singh-Ray 2-stop hard graduated neutral density filter to subdue the bright sky and brighten the surf with a 5-second shutter speed. I oriented my polarizer to maximize the color reflecting on the water.
Just as I avoid having objects intrude from outside my frame, I avoid (as much as possible) cutting objects off at the borders as well. To include all of my cumulus cloud and as much colorful sky and surf as possible, I went as wide as possible (16mm) and put the horizon in the middle. Over the next minute or so I clicked about a half dozen frames before recomposing, monitoring the waves and timing my clicks to capture a variety of wave action. I chose this frame for the way the diagonal line of spreading surf (more or less) mirrors the clouds.
I offer workshops on Hawaii’s Big Island and Maui
Eye on the Horizon
(Note how many of these scenes break the “rule” of thirds)


When it rains…
Posted on July 17, 2014

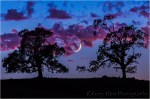
Night Shadow, Kauai, Hawaii
Canon EOS-5D Mark III
28 mm
30 seconds
F/2
ISO 3200
I suspect that nature photographers get themselves into more predicaments than the average person. Case in point:
Following a long day on Kauai that started with a 4:30 a.m. wakeup and continued pretty much nonstop through sunset, I’m not sure why I thought it would be a good idea to extend my day further, especially given that we had another 4:30 a.m. wakeup set for the next day. But there I was, picking my way alone across the wet sand in pitch dark.
I’d wanted to do some night photography on this Kauai visit but had been thwarted by clouds the previous nights. On this night, however, the clouds held back and when I hit the beach it felt like ten thousand stars rushed to welcome me. Living my entire life in areas of light pollution, camera or not I’m always moved by the sight of a truly dark sky. A few thin clouds mingled with the stars, but they were clearly no match for the legions of stars—what could possibly go wrong?
I made my way north along the beach searching something for my foreground. With no moon, the darkness was pretty complete, but once my eyes adjusted I found the easiest going right along the water line, where I could use contrast of the shifting line of lapping surf to keep me on course. Every once in a while a warm wave would wash up and clean the sand from my between my toes.
After a couple hundred yards I came upon a few chunks of wave-worn basalt protruding from the surf and decided I needed to go no further. Exposures between 15 and 30 seconds not only smoothed the waves, they also created a pleasing motion blur in the clouds. I tried a variety of compositions with no illusions I’d get anything special—I just welcomed the excuse to be alone with the stars on a warm Kauai beach. In fact, I was having so much fun that I wasn’t really paying attention to the fact that each frame contained a little less sky and a little more cloud.
The image you see here was one of my last captures. Shortly after clicking it the wind kicked up—spend any time in Hawaii and you learn that a sudden increase in the wind usually means rain isn’t far behind. I looked up. Hmmm. The stars were about gone—when did that happen?
While collapsing my tripod a large raindrop slapped my cheek, then another on my leg. Soon the drops were pelting me and the sand like bullets on Omaha Beach. Getting caught in the rain in Hawaii isn’t nearly as unpleasant as it is most other places (go figure), but Hawaii rain is just as wet as any other rain and I’d gone out with just my camera, one lens, and tripod—sans camera bag I was without rain gear for myself and had nothing to protect my camera (I never claimed to be smart).
I hustled a short distance further up the beach to what I thought would be a shortcut through the condo community situated just above the beach but was blocked by a creek emptying into the ocean—in daylight this wouldn’t have been much of an obstacle, but trying to negotiate rocks and water in the dark wouldn’t have been wise (having already lost one camera to a Hawaii creek this year). I considered scrambling up the hill, but separating me and the easiest route back was a twenty-foot wide, one-foot high groundcover of unknown composition. So I turned and sprinted back down the beach, mindful of the rocks I’d just photographed and suddenly aware that the tide and come in. Surprise number two (see “smart” comment above). My camera was getting a drenched, but to stumble in the dark would risk giving it a saltwater bath.
I considered shoving my camera inside my shirt, but my shirt was about as dry as a bucket of water. Desperate, I looked for a path up the slope and through the ground cover separating me from the manicured lawn (and a quick, illuminated route to safety). Spying a possible gap, I darted into the brush. Dead end. But propelled by momentum and concern for my camera I didn’t break stride, leaping into the brush like Peter Rabbit into a briar patch. (Peter Rabbit I’m not, and I have the scratches to prove it.) Once onto the lawn it was only about a three minute dash back to the resort.
It doesn’t rain like this in California—I’m pretty sure it would have taken a full day to accumulate the amount of rain I got in less than fifteen minutes that night on Kauai. Not only that, it usually takes about a day to build up to it, and then another day to decide it’s done. But of course my rain (it somehow felt personal) stopped right after I made it to the room, before I’d even stopped dripping and huffing.
The next day, while reviewing the images on my computer, I was pleased to find a couple that might have more value than merely the excuse I needed to get out to play with the stars that night. Because it had been so dark while I was out there, it took me a few seconds to sort out the layers in my images, but what you see here, from bottom to top, is the dark, wet sand on which I stood; the white surf washing up on the beach in front of me; an area of dark, calmer water; more waves where the surf hits a volcanic shelf less than 100 yards from shore; a thin stripe of open ocean; and finally sky, clouds, and stars.
The real treat in this image is the unexpected shadow of a tree painted on the nearby surf, cast I’m guessing by the faint light from the condos behind me. I’d love to say this shadow and its perfect position against the white surf was part of my plan, but it wasn’t. Not only did the motion in the surf, which shifted continuously between dark-calm and white-waves, create a constantly changing background, it was just too dark out there for my eyes to register the shadow anyway. But my camera, with its ability smooth motion and absorb more light than my eyes can, gave me something invisible to my eyes. And this ability to capture reality that my eyes miss really is my favorite thing about photography.
* * *

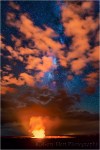
Milky Way and Halemaʻumaʻu Crater, Kilauea, Hawaii
We do night photography in almost all of my photo workshops, including Hawaii
Ode to joyful photography
Posted on July 9, 2014

Revelation, Kauai, Hawaii
Canon EOS-5D Mark III
19 mm
4 seconds
F/16
ISO 100
Photography is a source of joy, right? You know it and I know it. I mean, why else would we spend thousands of dollars on equipment, stagger out of bed hours before the sun, skip dinner, stand all afternoon in freezing rain, or hike three miles in the dark, just to take a picture? If you’ve experienced (or witnessed) the ecstasy evoked by an electric sunrise, rising moon, or vivid rainbow, you understand.
But if photography is such a joyful endeavor, what’s with all the miserable photographers? When that joyful photographer who stood in the rain or hiked in the dark shares the fruits of her labor online, she somehow incites a swarm of miserable photographers who believe that:
- Any photographer using a (Canon, Nikon, Sony, whatever) is a moron
- The horizon line never belongs in the center
- Nobody (else) knows how to process an image
- And a host of other photographic myths
To the miserable, insecure souls who believe they can “elevate” their stature by diminishing others, the next time you feel like criticizing a fellow photographer, fueling the fray on a photography forum, or pontificating at the local photo club, do yourself (and the world) a favor: Pick up your camera, go outside, and take a picture. Then walk around a little bit and take a few more. In fact, just stay outside until you feel better—it won’t take long.
About this image
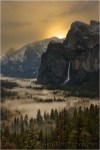
There’s a direct relationship between the amount of discomfort (misery, sacrifice, or whatever you want to call it) endured to capture an image, and the amount of joy the image manifests. Case in point: This sunrise on Kauai.
It was the last morning of the photo workshop I was co-leading with Don Smith. The group rose dark and early and we drove in a constant rain to our sunrise location about 30 minutes away. On the drive we all had serious concerns that the rain would shut us down entirely, but there were no thoughts of turning back.
As we assembled our gear and prepared for our short hike, the rain eased and a gentle breeze separated the clouds to reveal a few stars and thin crescent moon. But during the ten minute trek out to the ocean view, our breeze stiffened to a gusting, face pummeling wind. We fanned out along the cliffs and waited for the morning to swell on the eastern horizon. The daylight revealed a wall of rain heading our direction, brightening as it advanced, pushed by a wind that was now gale strength, so strong that I hooked my camera bag to my tripod to keep it anchored. As the light of this rising sun filled the oncoming squall, the sky throbbed with color. But despite the ominous signs, we persisted, mesmerized by the fire that now stretched from horizon to zenith.
For about five minutes we were in photographer heaven, and then the weather was on us. As if dowsed by the flood, the light disappeared with the downpour’s arrival. Instantly soaked, we all immediately and independently turned and sprinted toward the cars in a mad panic—with my umbrella powerless against the horizontal raindrops and rain gear warm and dry back at the hotel, I heroically led the retreat (picture George Costanza at the sight of smoke).
No photographer, article of clothing, or piece of a equipment was dry on the drive back, but the mood was unanimous joy. We all knew we’d just shared five minutes of special—not really what you expect when you drive through the dark in a pouring rain, stand on a cliff in a gale, or subject yourself to a thorough soaking, but the reason we do it anyway.
A gallery of joyful captures
-

- Champagne Glass Poppies, Merced River Canyon, California
-

- First Snow, El Capitan, Yosemite
-

- Moonlight Cathedral, Valley View, Yosemite
-
- Crescent and Oaks at Dusk, Sierra Foothills, California
-
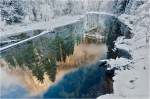
- Winter Reflection, El Capitan, Yosemite
-
- Fire on High, Kilauea and Milky Way, Hawaii
-

- Bridalveil Dogwood, Valley View, Yosemite
-
- Sunset Palette, Half Dome from Sentinel Dome, Yosemite National Park
-

- Moonlight, Whitney Arch, Alabama Hills, California
-
- First Light, Yosemite Valley, Yosemite National Park
-

- Three Strikes, Bright Angel Point, Grand Canyon
-
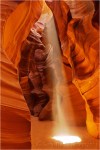
- Divine Spotlight, Upper Antelope Canyon, Arizona
-
- Autumn Snow, Valley View, Yosemite
-

- Autumn Moonrise, Half Dome and the Merced River, Yosemite
Eye on the sky
Posted on July 7, 2014

Infinite Sunrise, Kauai, Hawaii
Canon EOS-5D Mark III
16 mm
2 seconds
F/16
ISO 100
I returned couple of weeks ago from a week on Kauai where I assisted Don Smith with his workshop. Kauai used to have the reputation as Hawaii’s “quiet” island, and while it still may be a little more peaceful than Oahu or Maui, Kauai is certainly no longer a secret. But extensive and ongoing (painstaking) research has shown me that despite the crowds, it is possible to enjoy quiet on any of the Hawaiian Islands.
We were based near Kapaa, at a beachside resort teaming with people throughout the day and well into the night. Most of our Kauai sunrise locations had been a 30-45 minute drive to fairly remote spots, but following a fairly late night, Don and I gave the group a break and scheduled our sunrise shoot for the beach behind our resort—just hop out of bed, throw on some shorts, a tank top, and flip-flops, and we’d be in business.
As far as I know, this east-facing beach doesn’t have a name. While its pure white sand is dotted with volcanic rocks and lava shelves that wax and wane with the tide, this is not a destination that draws photographers on its own merits. But despite its lack of notoriety, this a pretty little beach was more than worthy of our attention. And concern about competing for turf with the crowds at our resort turned out to be completely unfounded. As I’ve learned in Yosemite, and verified at many other crowded locations, rise at sunrise and you can pretty much have the world to yourself. “Our” beach that morning was no exception.
Send in the clouds
I call what I do “landscape” photography, but “land” is really only half the picture (literally). It’s easy to focus so much on the scene we came to photograph that we completely overlook what’s going on overhead. While the physical qualities of most landscapes are pretty static, the sky can change, sometimes dramatically, from one frame to the next. Clouds, moon, stars, color—some or all of these dynamic features are often primary subjects in need of a foreground, no matter how prosaic. Put a rainbow over any tree, or a small moon over a small New Mexico town, and you might just end up with something special.
Our sky this morning was a tapestry of dark rainclouds overlain by a diaphanous veneer of thin clouds, broken by patches of blue. I walked up the beach looking for a foreground to complement the quickly changing sky, finally settling on a solitary lava pyramid protruding from the pristine, surf-wash beach. Setting up my shot I noticed that the receding waves left a glossy sheen that reflected the sky. The calm simplicity of the foreground juxtaposed against the complex beauty of the sky was more than just visually appealing, the quiet beach, warm air, cooling breeze, and elegant sky were personally soothing and I wanted an image that conveyed that.
Discard the “rule” of thirds
One of the creative decisions a landscape photographer needs to make with each image where to put the horizon. Near the top? Near the bottom? In the middle? Or maybe no horizon at all. Many photographers, especially those constrained by the shackles of camera club competitions, will automatically put the sky at the 1/3 or 2/3 line of their image’s vertical axis. This may be great for beginners who automatically bullseye every scene, but aspiring photographers need to graduate from prescribed formula to creative choice.
My feeling has aways been to favor the aspect of the scene with the most appeal. Great sky? Low horizon. Great foreground? High horizon. How low or high? That depends on the relative merits of the sky and foreground—80/20 or 90/10 splits (in either direction) create a dramatic emphasis to the right scene. And is it okay to put it in the middle? Absolutely! Which is what I did here. Not only do the two halves of the scene move me equally, balancing them in the frame subconsciously conveys the tranquil equilibrium I felt that morning.
I’d love to say that the small white rock in the lower right quadrant was a conscious part of my compositional strategy, but it wasn’t. I was aware it was there, but its inclusion was a subconscious choice. This tiny rock is a great illustration of the rule of thirds true value. While I don’t think it should dictate composition, the rule of thirds often does explain why things work. In this case, without really thinking about it, I stacked two very different scenes to make this image. Place rule of thirds grid atop the bottom scene and it’s immediately clear that my two rocks (one large, one tiny) occupy balancing intersections. The large rock has enough mass to provide significant visual weight pretty much anywhere in the scene, but by virtue of its strong position, the small rock is able to balance its much larger counterpart.
Rule of thirds or no rule of thirds? Am I contradicting myself here? I don’t think so. Photographic “rules” earned their status for a reason and are not without value—we just shouldn’t be slaves to them. When you turn off your internal rule monitor and allow your creative instincts to take over, the organic compositions that follow will more uniquely reflect your experience of the moment and your emotions of at capture.
Join me in Hawaii
Workshop Schedule || Purchase Prints ||Instagram
A Gallery of Horizons
Click any image to scroll through the gallery LARGE


Day’s End, Ke’e Beach, Hawaii
Posted on November 29, 2013

Day’s End, Ke’e Beach, Hawaii
Canon EOS-1Ds Mark III
3/5 seconds
F/16.0
ISO 200
17 mm
Is there ever a bad sunset in Hawaii? My preliminary investigation seems to indicate that the answer is probably no, but I think a definitive answer requires more research—a task for which I’m more than happy to volunteer (that’s just the kind of guy I am). As far as I can determine, most every day in Hawaii seems to include some combination of clouds and sunlight—enough clouds to make gorgeous skies, and enough sunlight to make spectacular color. In other words, a photographer’s paradise.
In case you missed it, I recently returned from Hawaii where I assisted Don Smith’s Kauai workshop. Each day we’d rise before the sun, head to some east-facing beach (either by car or simply by taking the 50 yard stroll to the beach behind our room), pick a composition, and wait for the inevitable show to begin. Color, shafts of light, rainbows–we saw it all, and while each was different, it was pretty difficult to say any one was better than any other. In the evening we’d repeat the process at a west-facing beach, then go to dinner. Not a bad gig.
Ke’e Beach is a sunset destination, literally the end of the road, a spectacular exclamation point punctuating Hawaii’s State Highway 560 on the northwest side of Kauai. Just beyond, accessible only by foot, water, or air, the sheer Nā Pali cliffs jut from the Pacific and disappear into the clouds. A coral reef protects the beach, calming the surf and creating an ideal environment for swimming, snorkeling, and fishing. Many visitors forego those activities in favor of simply sitting on the beach waiting for the sun to disappear.
This was the evening before the workshop began, my first visit here. Scanning the scene for composition options I decided frames including the bay and cliffs would require working around too many people, so I turned my attention the beautiful sky around the sun. As nice as the sky was, I still wanted something in the foreground for depth. The pristine sand was a good start, but wanting more I chose this flat rock outcrop as my foreground anchor. I set up my tripod close enough to the surf that an occasional wave would swirl about my ankles, etching ephemeral arcs in the sand. I went with my 17-40 lens, dialing it wide to exaggerate the beach and give the background an expansive feel.
While waiting for the sun to drop to the horizon I readied my graduated neutral density filters, set my camera to f16 to ensure a sunburst, and determined that ISO 200 would give me the shutter speed with just the right amount of motion blur. Next I played with compositions, deciding that (despite “rules” to the contrary), I wanted the horizon in the middle and the sun bullseyed. With everything ready, I was able just stand and enjoy the view.
When the sun popped from the clouds I started clicking, timing my exposures with the waves, some with the surf flat and others with of motion around the rock. After a few frames I’d adjust the composition, keeping the scene centered but playing with variations between horizontal, vertical, wide, and tight. I ended up with several I like, and who knows, maybe tomorrow I’ll decide I like the vertical version better.
Workshop Schedule || Purchase Prints || Instagram
More Hawaii
Click an image for a closer look, and to view a slide show.


Aloha!
Posted on July 10, 2011

Sunset, Any Beach, Hawaii
The last few years I’ve spent quite a bit in Hawaii, but I really can’t say which island I prefer. All have gorgeous around-the-clock weather, more waterfalls than you can count, dense and colorful rain forests, and spectacular volcanic beaches. More recently my photographic attention has been focused on the Big Island and Maui, but I feel like I’ve just scratched the surface. Both have lots of rain forests and waterfalls. The Big Island has Kilauea and is much less crowded (especially the more photogenic Hilo side); Maui has Haleakala and the breathtaking Road to Hana. But rather than leave you hanging, I’ll continue my extensive research on this question and will gladly keep you apprised of my findings.
I return to Hawaii’s Big Island for one or two workshops each September, and starting March 2013 I’ll offer a four-day Maui workshop that includes two nights in Hana. There are more places to photograph on Hawaii than there’s time to photograph, so my Hawaii workshop schedule is a bit problematic. We certainly squeeze in lots of photo time, both day and night, but the Islands’ slow pace is infectious–it’s simply impossible not to spend time hanging by the pool and strolling by the beach, so I need to factor in quality downtime for my participants. And then there are those Mai Tais….
Check out my website for more info on my Hawaii photography workshops.

Akaka Fall is the centerpiece of Akaka Falls State Park, a lush, tropical rainforest splashed with reds and yellows so vivid they almost hurt your eyes.

Hawaii isn’t just endless sand beaches. The Big Island and Maui in particular have miles and miles of volcanic beaches like this–short on sand, but long on drama.

This is just one of what seems like hundreds of waterfalls on the Road to Hana, Maui—you’ll quickly realize that some waterfalls exhilarate, while others soothe.

This is the Kilauea Caldera on the Big Island. I can’t imagine anything more breathtaking than peering into an active volcano, unless maybe it’s peering into an active volcano at night.

