Eloquent Images by Gary Hart
Insight, information, and inspiration for the inquisitive nature photographer
Yosemite Valley: Worth getting up for
Posted on November 11, 2014

Autumn Glow, Cook’s Meadow, Yosemite
Canon EOS-5D Mark III
35 mm
.4 seconds
F/20
ISO 100
Yosemite isn’t an inherently great sunrise location. Because most of the views in Yosemite Valley face east, not only are you looking up from the bottom of a bowl, you’re composing toward the brightest part of the sky, at the shady side of your primary subjects (Half Dome, El Capitan, Yosemite and Bridalveil Falls). This is one reason I time my workshops to include one more sunset than sunrise. But I’ve come to appreciate Yosemite Valley mornings for its opportunities to create unique images that don’t resemble the beautiful but oft duplicated afternoon and sunset pictured captured when the iconic subjects are awash with warm, late light.
Over the years I’ve accumulated a number of favorite, go-to morning spots for Yosemite. I love the first light on El Capitan, which starts at the top about 15 minutes after the “official” (flat horizon) sunrise and gradually slides down the vertical granite, is a particular treat when reflected in the shaded Merced River. Other morning favorites include pre-sunrise silhouettes from Tunnel View (especially when I can include a rising crescent moon), the deep shade of Bridalveil Creek beneath Bridalveil Fall, and winter light on Yosemite Falls.
And then there’s Cook’s Meadow. Each spring you can photograph the fresh green of the meadow’s sentinel elm, Yosemite Falls booming with peak flow, and Half Dome reflected in still, vernal pools. In winter the tree is bare, exposing the twisting outline of its robust branches. The highlight each autumn is the few days when the tree is bathed in gold. On the chilliest fall mornings, sparkling hoarfrost often decorates the mounded meadow grass, and if you’re really lucky, when the air is most still, you’ll find the meadow hugged by an ephemeral mist that rises, falls, disappears, and reappears before your eyes.
On last week’s workshop’s opening morning, after a nice sunrise silhouette shoot at Tunnel View, I rushed my workshop group to Cook’s Meadow in time for the first light there. We hit the autumn big three: a hoarfrost blanket, the elm’s autumn gold still going strong, and even a few wisps of mist. The image here I captured toward the end of our shoot, just as the sun kissed the valley floor. My wide, horizontal composition emphasized the foreground, which was far more interesting than the bland (and contrail scarred) sky. I dialed in a small aperture to enhance the sunstar effect, and used a Singh-Ray 2-stop hard-transition neutral density filter to moderate the bright sky.
Within minutes the light was flat and the mist was gone, but the group was happy. Not a bad start to what turned out to be a great week of photography.
Workshop Schedule || Purchase Prints
A Yosemite Morning gallery
Click an image for a closer view, and to enjoy the slide show


Roll over Ansel
Posted on August 25, 2014
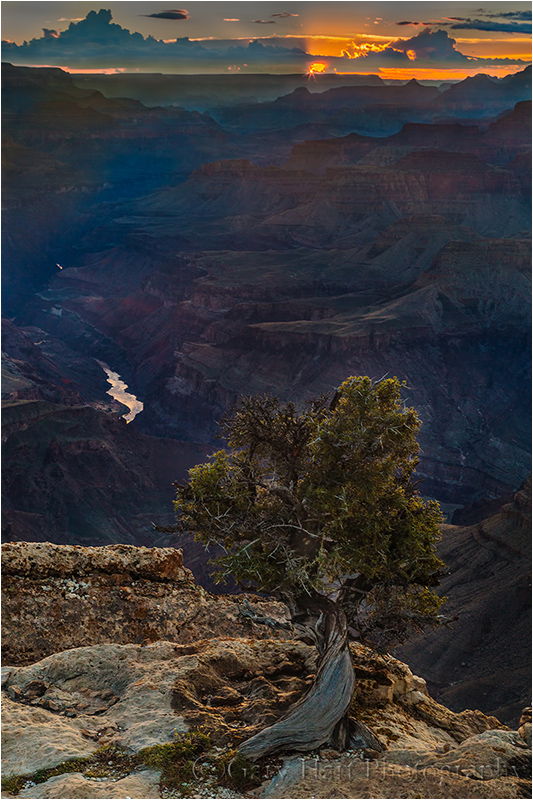
Solitude at Sunset, Lipan Point, Grand Canyon
Canon EOS-5D Mark III
65mm
1.3 seconds
F/20
ISO 100
A few days ago I was thumbing through an old issue of “Outdoor Photographer” magazine and came across an article on Lightroom processing. It started with the words:
“Being able to affect one part of the image compared to another, such as balancing the brightness of a photograph so the scene looks more like the way we saw it rather than being restricted by the artificial limitations of the camera and film is the major reason why photographers like Ansel Adams and LIFE photographer W. Eugene Smith spent so much time in the darkroom.” (The underscores are mine.) Wow, this statement is so far off base that I hardly know where to begin. But because I imagine the perpetuation of this myth must send Ansel Adams rolling over in his grave, I’ll start by quoting the Master himself:
- “When I’m ready to make a photograph, I think I quite obviously see in my minds eye something that is not literally there in the true meaning of the word.”
- “Photography is more than a medium for factual communication of ideas. It is a creative art.”
- “Dodging and burning are steps to take care of mistakes God made in establishing tonal relationships!”
Do those sound like the thoughts of someone lamenting the camera’s “artificial limitations” and its inability to duplicate the world the “way we saw it”? Take a look at just a few of Ansel Adams’ images and ask yourself how many duplicate the world as we see it: nearly black skies, exaggerated shadows and/or highlights, and skewed perspectives. And no color! (Not to mention the fact that an image is a two-dimensional approximation of a three-dimensional world.) Ansel Adams wasn’t trying to replicate scenes more like he saw them, he was trying to use his camera’s unique (not “artificial”) vision to show us aspects of the world we miss or fail to appreciate.
You’ve heard me say this before
The rest of the OP article contained solid, practical information for anyone wanting to come closer to replicating Ansel Adams’ traditional darkroom techniques in the contemporary digital darkroom. But it’s the perpetuation of the idea that photographers are obligated to photograph the world like they saw it that continues to baffle me.
The camera’s vision isn’t artificial, it’s different. To try to force images to be more human-like is to deny the camera’s ability to expand viewers’ perception of the world. Limited dynamic range allows us to emphasize shapes that get lost in the clutter of human vision; a narrow range of focus can guide the eye and draw attention to particular elements of interest and away from distractions; the ability to accumulate light in a single frame exposes color and detail hidden by darkness, and conveys motion in a static medium.
No, this isn’t the way it looked when I was there
While this sunset scene from Lipan Point at the Grand Canyon is more literal than many of my images, it’s not what my eyes saw. To emphasize the solitude of the lone tree, I allowed the shaded canyon to go darker than my eyes saw it. This was possible because a camera couldn’t capture enough light to reveal the shadows without completely obliterating the bright sky (rather than blending multiple images, I stacked Singh-Ray three- and two-stop hard transition graduated neutral density filters to subdue the bright sky).
To convey a mood more consistent with the feeling of precarious isolation of this weather-worn tree, I exposed the scene a little darker than my experience of the moment. The sunstar, which isn’t seen by the human eye but was indeed my camera/lens’ “reality” (given the settings I chose), was another creative choice. Not only does it introduce a ray of hope to an otherwise brooding scene, without the sunstar the top half of the scene would have been too bland for me to include as much of the shadowed canyon as I wanted to.
I’m not trying to pass this image off as a masterpiece (nor am I comparing myself to Ansel Adams), I’m simply trying to illustrate the importance of deviating from human reality when the goal is an evocative, artistic image. Much as music sets the mood in a movie without being an actual part of the scene, a photographer’s handling of light, focus, and other qualities that deviate from human vision play a significant role in the image’s impact.
A Gallery of My Camera’s World
(Stuff my camera saw that I didn’t)


A star is born
Posted on September 17, 2013

New Day, Bright Angel Point, North Rim, Grand Canyon
Canon EOS 5D Mark III
3.2 seconds
F/20
ISO 200
16 mm
Truth be told, I’m not a huge fan of sunstars (a.k.a. starbursts). Cool as they are, sunstars have become ubiquitous to the point of cliché. So why do I shoot them? Because sometimes there’s little else you can do when the sun intrudes on the scene you came to photograph. In other words, they’re often more of a lemonade-from-lemons kind of thing.
Despite their ubiquity, sunstars work because there’s universal resonance to witnessing the sun kiss the horizon—I mean, who doesn’t have a warm memory of watching from a special location as the sun begins or completes its daily journey? These moments touch us on a literal, visual level (they’re beautiful), but I think more significantly they serve as a metaphor for the hope or closure we all long for.
Unfortunately, doing justice to these moments in a photograph is difficult: Including the sun in your frame introduces lens flare, extreme (often unmanageable) contrast, and an unattractive eye magnet that overpowers the rest of the scene. And while a sunstar doesn’t capture the literal experience, it does do a pretty good job of conveying the metaphor.
The good news is, despite the difficulties, creating a sunstar is relatively straightforward. Here’s a quick recipe:
- Start with a brilliant, fine point of light: The sun is the most logical candidate, but you can do it with the moon, stars, and pretty much any bright artificial light (lighthouse, headlights, and so on). The finer the light source the more precise the star effect will be, and the less lens flare and blown highlights you’ll have. If it’s the sun you’re using, virtually all of it needs to be hidden to get the delicate, symmetrical distribution of beams that generally work best. In this image the horizon hides most of the sun, but you can use a cloud, tree, rock, or whatever.
- The smaller your aperture, the finer your sunstar will appear: I generally use f16 or smaller (larger f-number).
- Do something to control the highlights: When the sun is entering your frame, you’re invariably dealing with a sky that’s much brighter than your foreground and will need to take steps to avoid the foreground of murky shadows. If you have a foreground shape or shapes against the sky, you could turn the foreground into a silhouette. But when I want to capture foreground detail, I use graduated neutral density filters to hold back the brilliant sky. My 3-stop reverse is my go-to GND in these situations; in particularly difficult light I’ll stack it with a 2-stop hard GND. Whenever I use a GND, I find Lightroom or Photoshop dodging/burning is a great way to disguise the telltale GND transition. HDR blending of multiple images is another way to mitigate extreme sky/foreground contrast (but I don’t do HDR, so you’ll need to Google this).
- Different lenses will yield different results: Experiment with your lenses to see which one gives the most pleasing sunstar effect. For example, I recently replaced my faithful 17-40L lens with a 16-35L Series II lens, and while I was satisfied with the sunstars from my 17-40, the 16-35 results are clearly better.
- Practice: You can practice sunstars any time the sun’s out. Just go outside with your camera, dial in a small aperture, and hide the sun behind whatever object is convenient (a tree, your house, etc.).
On the morning of this image from last month at the Grand Canyon, I had no plan to photograph. But I was working with a workshop student and we found this nice little scene off the trail to Bright Angel Point. The clouds had assembled into an organized formation that seemed to emanate from just beyond the horizon, and when they started to vibrate with sunrise color, I couldn’t resist. I quickly composed my scene, dialed down to f20, metered on the foreground, and stacked my 3-stop reverse and 2-stop hard graduated neutral density filters. The sun appeared a few seconds later and I fired off several frames before its brilliance overcame my filters’ ability to hold it back.

