Eloquent Images by Gary Hart
Insight, information, and inspiration for the inquisitive nature photographer
A Photographer’s Vision
Posted on February 9, 2026

Day’s End, Hell’s Gate, Death Valley NP
Sony α1
Sony 16-35 GM II
1/80 second
F/20
ISO 100
I just returned from a spectacular workshop in Death Valley, one of the most fascinatingly unique locations on Earth. After missing Death Valley last year, it was especially nice to return. (Of course it didn’t hurt that I had a great group that enjoyed fantastic conditions from beginning to end.)
I first got to know Death Valley as a kid, when my family camped there several times over the Christmas school break. We’d spend a most of the week between Christmas and New Year’s Day exploring all kinds of cool stuff that would thrill any young boy: Scotty’s Castle, Rhyolite (a ghost town), and collections of abandoned mining equipment scattered about the desert. We also went to all the standard vistas like Zabriskie Point and Dante’s View, and hiked some of the shorter, most popular trails (Golden Canyon, Mosaic Canyon, Natural Bridge). But with all the cool old stuff, I was much less interested in the scenery and hiking part of those trips, and never really registered Death Valley’s spectacular natural beauty.
About 20 years ago I returned with a camera and saw Death Valley in a completely different way. Suddenly, beauty was everywhere. It would have been easy to—and I probably did—think to myself some version of, “Gee, I don’t remember Death Valley being this beautiful.”
When traveling more with my camera to other childhood family vacation destinations kept eliciting similar epiphanies, I started noticing the way photography was enhancing my overall view of the world. Suddenly, I was seeing the world as a photographer and finding beauty everywhere.
Today, camera or not, my eyes naturally scan my surroundings for scenes, large and small, that resonate personally. Even without a camera, I now seem to unconsciously create compositions in my brain, mentally identifying striking features and their relationships to one another, and figuring out the best way to position myself and frame the scene.
This photographer’s vision isn’t limited to a scene’s physical objects, it also extends to weather and light, both current and potential. What conditions will complement this scene best, and how do I get here to enjoy them? Warm early/late light, moonrise or moonset, fall color, overcast, the Milky Way, a reflection, sunstar—anything that might elevate the scene.
I don’t think this makes me especially unique—in fact I’d venture to guess that many (most?) serious nature photographers view the natural world similarly. And for those who don’t, I believe it’s a quality that can be cultivated with a little conscious practice until it comes naturally.
A great example of putting this mindset to use came the day before this year’s Death Valley workshop, while checking out the conditions at Hell’s Gate on Daylight Pass Road. At the end of an 8-hour drive that started a 7:00 a.m. (to ensure I could get here before dark), I pulled up to Hell’s Gate about 15 minutes before sunset.
I’ve been taking my groups here on my workshop’s first night for many years, but despite that familiarity, there are a few variables I always like to check out for their current status. And with heavy rain earlier this winter washing out many Death Valley roads and locations, I was especially keen to make sure there would be no surprises here.
What I like about Hell’s Gate is that it’s not commonly shot view, and it has a variety of photography options in multiple directions. Directly across the road from the Hell’s Gate parking area is a small mound dotted with photogenic rocks and shrubs that all make nice foregrounds for the long view down the valley toward Telescope Peak and beyond, and west toward pyramid-shaped Death Valley Buttes. There’s even a mini-canyon—7-foot vertical walls and no more than 30-feet long—that can be used to frame the view of the Funeral Mountains to the east and south.
Uphill from this little canyon is a short (100 yards or so) but steep (-ish) trail to an elevated prominence with a similar view. Foreground options up here include more striking rocks, plus an assortment of very photogenic cacti. My favorites are the many clumps of barrel cactus sprinkled around the surrounding slopes. Depending on the year, the condition of the barrel cacti can range from fresh pink with small flowers, to a dried out brown-gray. Though there were no flowers this year, I was happy to see that they were all beautifully pink and alive.
Walking up the trail on this visit, my eyes picked out the best cacti and I started making mental pictures without really realizing it. A little later, visualizing a potential sunstar I took note of exactly when and where the sun would drop behind the nearby buttes and distant Cottonwood Mountains.
Satisfied all was well, I hopped in my car and, instead of making the 30-minute drive to my hotel in Furnace Creek, I added 2 hours to my already long day by detouring to Pahrump so I purchase essential grocery items I’d foolishly left at home. (This is actually an improvement over my prior Death Valley workshop, when I forgot to bring my computer. And in my defense, that’s the only time in my 20 years of leading workshops I’ve done that, and I now triple-check to ensure it never happens again.)
But anyway… When I returned to Hell’s Gate with my group the following evening, I was able to point out all the possibilities and describe exactly what the light would do as the sun dropped. I encouraged everyone to identify the views they like best, as well as foregrounds to put with them, so they wouldn’t be scrambling around looking for shots when the light was at its best. (I’ve noticed that this kind of anticipation doesn’t happen naturally for some people at the start of a workshop, so it’s become a particular point of emphasis.)
On the first shoot of any workshop I try to get around to everyone and therefore rarely shoot, but as the sun dropped and I saw that everyone was quite content, I returned to a composition that I’d identified the prior evening.
Earlier I’d pointed out to my group the very large barrel cactus clump perched on the hillside about 20 feet above the trail, but I think the steep slope covered with loose rock, not to mention lots of easier access compositions nearby, had discouraged them from scaling the hill. So up I went. Reaching my target cactus, I checked out the even larger barrel cactus clump farther up the hill and maybe 20 feet away.
My vision on the first visit was to frame Death Valley Buttes and the sunstar (if the clouds permitted it) with these two cacti; once I was actually in position in front of the closest barrel cactus, I was pleased to confirm that what I’d visualized would in fact work. I just had to tweak my composition to account for the rocks at my feet and clouds near the horizon. The other thing I had to be careful about was my camera bag, which could very easily tumble down the hillside if I didn’t plant it firmly braces and balanced on the rocks.
To deemphasize the (ugly) brown foreground, I dropped my tripod to about a foot above the ground, which made the foreground all about the beautiful cactus and interesting rocks. And though scenes rarely fully cooperate with my goal for clean borders, I took special care to find the best place to cut the rocks at the bottom and sides of the frame, and the clouds at the top.
When I was satisfied with my composition, I picked my focus point—with the closest rocks about 18 inches away, it helped that I already needed to stop way down for the sunstar. Since I wanted everything in this frame sharp, I applied my tried-and-true seat-of-the-pants focus point technique: pick the closest thing that must be sharp (the rocks), then focus a little bit behind it—because focusing on the closest thing gives me sharpness in front I don’t need. (“A little bit” varies with the scene, focal length, f-stop, and subject distance, but the more you do this, the better you get at deciding what “a little bit” is.) I chose f/20 and focused on the close cactus, about 2 feet away.
When the sun reached the horizon, I started with a shutter speed that the balanced black shadows and white highlights as much as possible (knowing I’d be able to recover some of each in processing), and started clicking. After each click, I adjusted my exposure in 2/3 stop increments—first up about 3 stops above my starting point, then back down to 3 stops to below, continuing until the sun disappeared. This gave me a broad range of exposures to choose between on my computer later.
When we were finished, everyone seemed pretty happy with our start. Though I didn’t get a chance to process my own images until after the workshop, from what I saw in the image review, I’d say their excitement was justified.
Workshop Schedule || Purchase Prints || Instagram
A Death Valley Gallery


, Death Valley")


Danger in Paradise
Posted on September 21, 2024
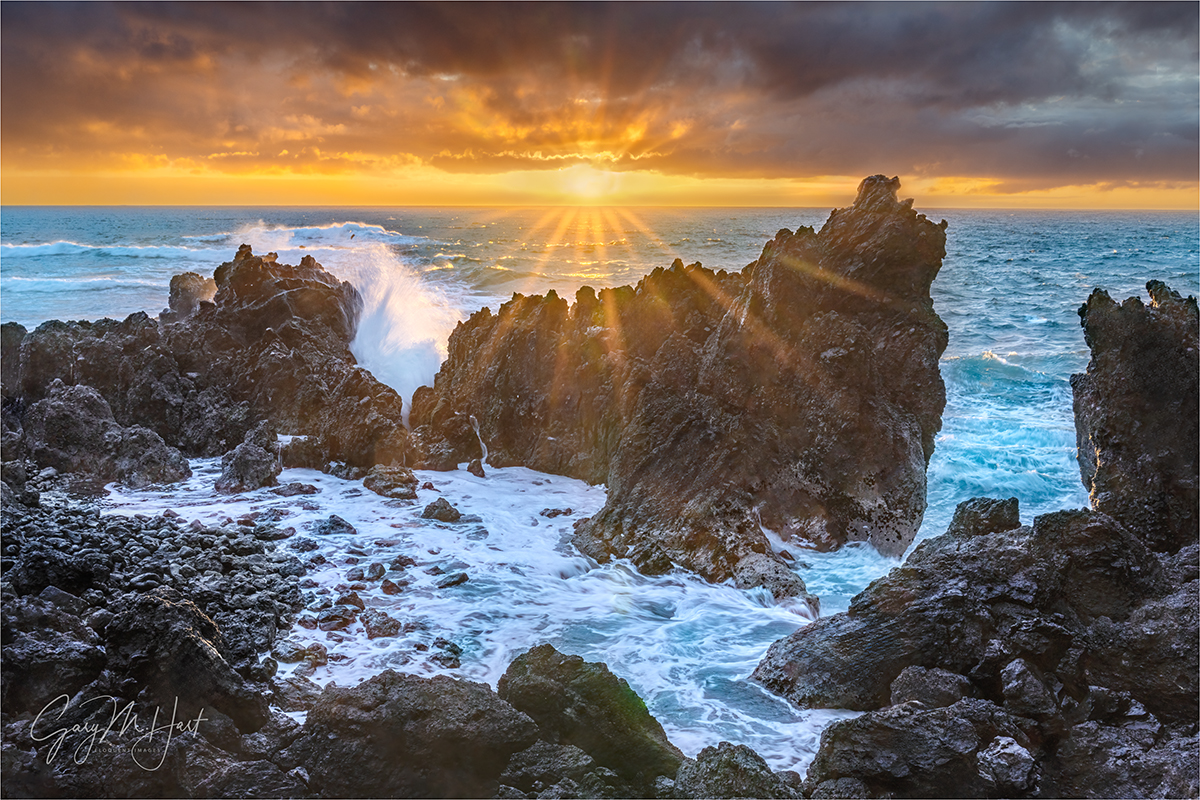
Sunrise, Laupahoehoe Point Sunstar, Hawaii
Sony a7R V
Sony 24-105 f/4 G
ISO 100
f/18
1/13 seconds
Battered for millennia by earthquakes, floods, volcanic eruptions, and tropical cyclones, it’s no wonder Hawaii’s residents keep one eye on the ocean, the other on the mountains—all while closely monitoring the sky overhead. I’ve visited each of Hawaii’s major islands many times (okay, so technically, on Oahu I haven’t been outside the airport, which is its own sort of disaster), and have personally experienced a veritable smorgasbord of these natural events. (Yet somehow I keep returning—go figure.)
The Hawaii earthquakes I’ve felt have been relatively minor jiggles to my earthquake-hardened California bones, but each served as a reminder that Hawaii has a history of large earthquakes, with magnitudes at least into the high 7s. Active volcanism makes the Big Island particularly vulnerable: as recently as 2018 it was shaken by a magnitude 6.9 earthquake; in 1975 a magnitude 7.7 quake rocked the Puna Coast just south and west of Hilo. Moving north, the Hawaiian Islands’ earthquake risk decreases: Maui has experienced a couple of magnitude 6 quakes in historic times (just offshore), while Oahu only gets a moderate jostling from time to time (but does get a pretty good jolt from the strongest Big Island quakes)—only Kauai, the oldest island, is (relatively) seismically stable.
Hawaii’s volcanoes are sexier than its earthquakes, actually attracting visitors (you don’t see too many people rushing toward an earthquake). I missed the recent Mauna Loa eruption, but have witnessed numerous Kilauea eruptions, in many forms: many time I’ve enjoyed standing on the rim at night to view the glow and smoke emanating from the lava lake bubbling just out of sight on the caldera floor far below; last year, I stood on the edge of (the recently seismically remodeled) Kilauea caldera with my workshop group and peered down at dozens of towering lava fountains less than a mile away. In 2010, Don Smith and I hiked close enough to a Kilauea lava flow that we felt its heat and heard trees explode. But despite their dramatic aesthetic appeal, Hawaii’s volcanoes are still too powerful to be taken lightly. While most of its eruptions lack the explosiveness of many more dangerous volcanoes around the world, as recently as 2018 Hawaii’s effusive lava flows have wiped out entire towns, destroying hundreds of homes on their way to the ocean.
And then there are the tropical cyclones that lash the islands several times each decade. By far the most significant storm damage to a Hawaiian island was inflicted by Hurricane Iniki in 1992, striking Kauai as a Category 4 storm with winds up to 140 miles per hour. While I’ve never experienced anything that extreme on my visits, in September of 2018, each of my two workshops was altered by a different hurricane: first on the Big Island when, a few days before that workshop started, a close brush with Category 5 Hurricane Lane deposited up to 58 inches of rain that flooded many of my locations. I departed Hawaii for Maui and my second workshop, only to have Hurricane Olivia (downgraded to a tropical storm just before landfall) force me to relocate the workshop’s two nights in Hana, and find replacement locations for those days.
I’ve also learned firsthand that it doesn’t take a hurricane to generate floods in Hawaii. In 2016 I was on Maui when just regular old torrential rainfall caused a 500-year flood in the Iao Valley and Central Maui, destroying homes and swamping cars. While driving through Central Maui after the water receded, I saw cars still mired in water to their doors.
Even given this history of disasters, compounded by my own personal experience with some of Hawaii’s most extreme natural elements, I would argue that Hawaii’s greatest natural risk is tsunamis. Despite their relative rarity, tsunamis have killed more people than all other Hawaiian natural disasters combined. The islands’ position smack in the middle of the Pacific Ring of Fire, which happens to be the source of nearly 3/4 of Earth’s tsunamis, means Hawaiians need to think in terms of when, not if, the next tsunami hits, and plan accordingly.
Unlike conventional waves, which are wind-generated and affect only the ocean’s surface, a tsunami is formed when a cataclysmic event displaces water from the ocean surface all the way down to the ocean floor. Potential ocean-moving events include submarine landslides, volcanic eruptions, and meteor impacts. But by far the most frequent force behind a tsunami is subduction earthquakes, when one tectonic plate thrusts beneath another and displaces the overlying plate and all the water above it.
In the simplest terms possible, the energy of an ocean wave is the product of its amplitude (maximum height) and wavelength (the distance between amplitudes). In the open ocean, with deep water and no obstructions, a tsunami’s energy is almost entirely committed to spreading outward at 400-600 miles per hour (around the speed of a commercial airliner). At those speeds, a tsunami’s wavelength could be 100 miles, with amplitudes of a foot or two. In fact, with an open ocean amplitude of just a foot or so, when a tsunami passes beneath a boat, the boat’s occupants feel nothing.
But as a tsunami approaches land, it starts dragging on the ocean floor, eventually slowing to around 30 miles per hour. Since the next waves in line are still racing through open ocean at hundreds of miles per hour, when the wave in front of them slams on the brakes, water begins piling up as most of the forward energy is suddenly transformed into wave-building energy: A massive wave is born.
As we’ve seen in recent, and not so recent, history, the power and suddenness of a tsunami can be catastrophic. The Indian Ocean tsunami of 2004 killed over 230,000 people, some as far away as 3,000 miles. The 2011 Japan tsunami killed 10,000 people in Japan, and was directly responsible for the meltdown at the Fukushima nuclear power plant. (It also caused some minor damage in Hawaii, among other places.)
Hawaii’s long tsunami history includes many small and moderate events, and a handful that can be labeled major (and tragic). Since the beginning of the 20th century, three especially significant tsunamis stand out:
- April 1, 1946: Generated by a magnitude 8.5 in the Aleutian Islands, this tsunami is considered as Hawaii’s most significant for the 159 lives it took, and the major damage dealt to every Hawaiian island.
- May 23, 1960: Generated by a magnitude 9.5 earthquake near Chile—the largest earthquake ever measured and more than 30 times stronger than the 1946 Aleutian earthquake. Despite the lessons of 1946, many lives were lost by Hilo residents who didn’t heed warnings.
- November 29, 1975: Generated by a magnitude 7.7 earthquake south of Hilo. on the east flank of Kilauea—though its damage was mostly limited to Hawaii’s southeast coast, this tsunami arrived too quickly following the quake for its victims to flea to safety.
I’m reminded of Hawaii’s tsunami history each time I visit Laupahoehoe Point on the Big Island’s east coast. This is where the 1946 tsunami took the lives of 24 residents, including 16 students and 5 teachers who were waiting at the local schoolhouse for school to start. Adding to the tragedy, warnings of the approaching peril were ignored as April Fools’ Day jokes.
Based on the inexplicable inability to warn people thousands of miles, and many hours, from the tsunami’s source, the US Tsunami Warning Center was formed. Another response to this tragedy was the significant upgrade of local building practices. For example, the 8-story Hilo Hawaiian Hotel, where my Big Island workshops are based, is right on Hilo Bay (you could literally hit the water with a rock from our balconies) and potentially ground-zero for the next tsunami. Constructed in 1975 atop (extremely reinforced) concrete columns, significant sections of the Hilo Hawaiian’s bottom two floors are completely open to the elements, with no walls on either side, designed specifically to allow any large wave to sweep right through rather than push against the structure. Throughout Hilo are tsunami warning sirens that are tested once each month, and evacuation routes are clearly signed.
In 2015 I actually got a firsthand look at how seriously tsunamis are taken in Hilo when, while there for a workshop, a magnitude 8.3 earthquake near Chile triggered a Pacific tsunami warning. Fortunately, today’s satellite technology and ocean buoy network enables much better tsunami tracking than was available in 1946 and 1960, so not only did we get many hours notice, by the time the wave reached Hawaii it was measured in inches and the warning had been long suspended (and I enjoyed a peaceful sleep rather than spending the night in an evacuation shelter).
About this image
Sunrise, Laupahoehoe Point Sunstar, Hawaii
In most of my workshops, our first sunrise is at Laupahoehoe Point. Before we start, I emphasize to my group the location’s tsunami history, and point out some of the tsunami damage still visible. In fact, the location where we photograph is just a few hundred feet from the location of the teachers’ cottages that were swept away in the 1946 tsunami.
You may (or may not) notice that I have several very similar images of this scene. That’s partly because it in fact provides a very nice composition that I always enjoy photographing, but mostly because we’re at Laupahoehoe at the beginning of the workshop, making it especially important that I stay tethered to my group. Which means the variety I get at Laupahoehoe Point is more about conditions than compositional inspiration.
This morning was especially nice for a couple of reasons: first, recent hurricane near-misses had seriously stirred up the Hawaiian surf; second, getting a break in the clouds right on the horizon isn’t especially common in Hawaii. Seeing the opening this morning, I was able to anticipate the opportunity for a nice sunstar and believed I was ready for it.
Unfortunately, I made a couple of mistakes because I’d spent most of the morning working with my group. The first was that I thought I was using my 16-35 f/2.8 lens that provides a much better sunstar than the 24-105 f/4 lens I was actually using. The second mistake was forgetting to remove the ND filter I’d been using earlier in the morning to smooth the waves. After helping people in my group prepare for their sunstar opportunity, I rushed to my camera and started clicking as soon as the sun appeared, realizing with the first click that I’d need to wait out the 20-second exposure my camera had started. Fortunately, it all worked out, and I was actually able to get a couple of frames like this one, capturing the instant of an explosive wave’s impact.
At the risk of stating the obvious, another thing I want to point out is how hard it is to photograph directly into the sun. When I got around to processing this image at home, not only did I have serious dynamic range problems to deal with, I also had tons of nasty lens flare blobs to clean up. Fixing lens flare was mostly just a tedious process with the Remove tool; the dynamic range was a matter of processing the sky and foreground separately. Since I no longer use graduated neutral density filters, and I never blend multiple exposures, my margin for exposure error was extremely small, but by monitoring my histogram and pushing my highlights to the limits of recoverability when I captured the image, I ended up with shadows that still contained enough clean detail to work with.
Workshop Schedule || Purchase Prints || Instagram
Lots More Sunstars


")


Watch Your Backup
Posted on March 12, 2024

Sunrise Gem, Diamond Beach, Iceland
Sony a7R V
Sony 12-24 GM
1/13 second
F/22
ISO 50
A funny thing happened to me on the way to this image. And when I say “on the way,” I don’t mean taking the picture, I mean after it was safely loaded onto my computer and fully processed, it seems that someone (who wishes to remain anonymous), accidentally overwrote it with a completely different image. Oops.
Establishing a backup mindset
Overwriting an image is an easy thing to do; without a backup, it’s lost forever. In this case, I still had the raw file, but I’d have lost all the time and effort I’d put into processing the image, with no guarantee that I’d ever perfectly duplicate my original processing. Not the end of the world, but a real pain. Instead, since I did have a backup, I was simply able to restore the image and go about my business.
Though whole experience was just a blip in my day, it made me think about the data management practices that made it a non-event. These data practices I acquired in my previous life in the tech industry (way back when megabytes were big), but practices that might not be quite so second nature to others (especially those who don’t yet know the devastation of lost irreplaceable data). Which led me to thinking that perhaps some would be interested knowing how I keep my data safe. So I’ll share my own image (and data) workflow as an example of good data practices—not to advocate for my specific approach, but simply as an example.
However you choose to implement your own backup scheme, you should be fine long as you follow a few basic principles:
- Backup everything that’s important: Duh.
- Backup regularly—Ideally that will be automatically and as instantly as possible: Your data is only as good as your most recent backup.
- Redundant backups: Relying on a single backup of important data is playing with fire, and I daresay even two backups might not be not enough.
- At least one offsite backup: You never know what catastrophe might befall your abode.
- Multiple storage types: There is no “perfect” storage technology, so whatever your preference—spinning drives (cheaper but prone to crashing without warning); SSD drives (faster, relatively crash-resistant, and extremely compact, but expensive and not forever); CDs/DVDs (cheap, but also not forever); or the cloud (convenient but slow to populate, and even slower to restore—especially if you need to restore a lot of data at once)—never put all your backup eggs in one basket.
I’m going to concentrate on my image storage and backup, but since photography is my livelihood, there’s lots of non-image data that’s just as important and treated with the same care.
To the extent that it’s possible, for me a regular backup means an immediate backup. Because all of my cameras have two card slots and I write each image I capture to both cards, my image backups start the second I click my shutter. Card failures are rare, and usually survivable with the help of recovery software, but usually isn’t good enough. Not only that, media failure isn’t the only threat to my images. Don’t forget user error. For example, I know a photographer (the same one who overwrote the image above) who one time pulled a card out of his camera intending to upload the images from a recent weekend in Yosemite, stuck it in a pocket for the short walk down to his nearby Starbucks, and somehow lost the card. Instead of freaking out about a lost weekend, he simply pulled the other card from his camera and used it to import the weekend’s images. The stray card never did turn up, so he was out the cost of its replacement—a temporary bummer, but far from the crushing letdown losing a weekend’s worth of irreplaceable photography would have been.
As much as I’d like to automate the step of importing my images from my camera to my computer, my own import workflow does require some intervention because I use Lightroom’s Import program to name and organize my images. Without getting too deep into the weeds, I let Lightroom rename each image—retaining the camera-assigned image number and adding descriptive info—before copying them into a trip-specific folder on a 4TB SSD drive that always travels with me. And because I use two computers, my Lightroom catalog also lives on this drive—I just plug the drive into whichever computer I’m working on and away I go.
Once this Lightroom upload is complete, I immediately copy that trip’s newly populated folder onto a 10TB spinning hard drive that lives on my desk, and also to a RAID 6 configured NAS array (a possibly overkill but much appreciated backup set-up by my IT professional son-in-law). Only when all this is done do I format the camera’s media cards.
That sounds pretty good—3 copies (computer, hard drive, NAS array)—but it’s not enough. Consider the plight of Francis Ford Coppola, who lost 15 years worth of writing and images when his computer and its backup were stolen. Then think about the unthinkable things that could happen to your home—theft, fire, flood, nuclear missile, etc.—that might jeopardize everything inside. You need an offsite backup.
Places to host an offsite backup(s) include the home of a friend or relative, a safe deposit box, a storage facility, the office, to name a few. All those options are better than nothing, but not only are these manually generated backups only as good as the most recent update, updating them frequently enough to be worthwhile requires more discipline than I can take credit for.
Which is why my offsite backup uses a cloud service: Backblaze. There are many cloud backup options, but I chose Backblaze because it’s computer-based (it backs up every hard drive attached to my computer for the same price), not size limited (they’ll backup as much data as I connect to my computer), and not expensive (around $100/year). Almost the instant I add images to the 10TB drive on my desk, Backblaze recognizes the new data and starts backing it up—I never have to think about it again. With so much redundancy in my local backups, I consider this Backblaze backup to be my backup of last resort—I’ll probably (fingers crossed) never use it, but the peace of mind I get from the knowledge of its existence is worth far more than the service’s relatively small cost.
A de facto backup (it does backup my data, but that’s not why use it) is Dropbox, which holds every piece of data I might want to access regularly—processed images (but not raw files), documents, presentations, etc.—and syncs it all between my various devices. This allows me to work on something at home, then relocate to my remote “office” (Starbucks) without skipping a beat. I can also access all this essential data on my iPhone and iPad if when I find myself separated from my computers. I actually sync all of my Dropbox data to each of my computers, so once its synced I can still access it when I’m off the grid (I’m looking at you, Grand Canyon North Rim); on my iPhone and iPad, I pull most of my Dropbox data from the cloud when I need it, but do have a few important folders and files permanently downloaded for offline access.
The final piece of my backup paradigm is Mac OS Time Machine, which comes installed on every Mac, stores history for each file (I can go back to any date and recover a copy of any given file on that date), and is so easy to set up and use, I don’t understand why any Mac user wouldn’t use it. My primary Time Machine backup is a dedicated (not used for anything else) 5TB spinning hard disk that lives on my desk and is always connected. Because spinning hard drives can fail without warning, I also have a duplicate Time Machine backup on my NAS array.
In this case, when I someone overwrote a this fully processed image file, I didn’t panic, I just went to my backup. I had multiple options, but my Time Machine backup was right there on my desktop, so in less than a minute I was back in business with a fully restored image file.
One more very specific case
No example illustrates how backup obsessed I am than my workflow on a trip that requires flying. Since I’ll be so far from my whole home office backup paradigm, when I fly I carry a second 4TB SSD drive. After uploading the images onto my regular image drive and into the Lightroom catalog, I copy that folder onto that second drive, and hide it deep in my suitcase. If, God forbid, someone breaks into my room and steals my (insured) camera and computer bags, it’s unlikely they’ll find the second backup drive.
When I fly home, I make sure my images are in three different places: the primary image drive is in my computer bag over my shoulder and then under the seat in front of me; the backup drive is safely tucked into my checked suitcase; the SD cards containing the original raw files are in my cameras, which are in my camera bag on my back, and then in the overhead bin. The only way I’ll lose all three is if the plane goes down, in which case I likely have bigger problems.
About this image

Sunrise Gem, Diamond Beach, Iceland
The day after our aborted visit to Diamond Beach, this year’s Iceland workshop group enjoyed a far more successful return visit. It seems every time Don Smith and I bring a group here, it’s a little different. Last year there was much less ice; the year before the surf was so rough that we didn’t dare get close to the water—and still ended up being too close. Some years the advancing and receding surf gently wraps each ice chunk, and other years most of the ice is high and dry.
This year the tide was out, so most (but not all) of the ice was up the beach and rarely touched by the surf. I started here trying to get the standard Diamond Beach motion blur shots on the few ice cubes the waves reached, but when the sun arrived turned my attention to the much larger ice slightly (20 feet) inland from the waves’ farthest approach.
I love the way the ice lights up with the warm hues of the sun’s first rays, so to fill the screen with this beautiful translucent natural ice sculpture, I went with my 12-24 lens, dropped low, and positioned my tripod no more than two feet away. Because I was going for a sunstar, I dialed to f/22, then spent the time waiting for the sun micro-positioning myself to get all the elements in place. I liked the smooth rocks embedded in the black sand, and though that distant block of ice in the upper left was quite tiny at 12mm, I knew as soon as the sun hit it, it would stand out enough to create a little visual interest in that corner of the frame. I put the top of my frame just above the clouds to minimize the amount of blank sky.
As soon as the sun popped out, I started shooting. On my camera’s LCD the foreground looked nearly black—not just the sand, but the shaded part of the ice as well. But I didn’t want to blow out the sky, and knew my Sony a7RV well enough to be confident I could pull up the shadows in Lightroom/Photoshop. I’d love to say that the feathery sun-kissed waves were intentional, but I didn’t even notice them until I started working on the image.
Don Smith and I return to Iceland in 2025
Here Comes the Sunstar
Click any image to scroll through the gallery LARGE


A (Big) Mistake, and a (Small) Rant
Posted on January 29, 2024

Sunstar and Reflection, Lake Wanaka, New Zealand
Sony a7R IV
Sony 12-24 GM
1/320 second
F/18
ISO 100
By the time you read this, I’ll be done with my break and well into my Death Valley Winter Moon workshop. I’ll have gone from a stretch of two-and-a-half months with no workshops, to a stretch of one month with four workshops (and all the travel that entails): Death Valley, Iceland (10+ days), and two in Yosemite. And while I’ll kind of miss going through my old unprocessed images, I’m also really looking forward to creating new stuff—and there’s comfort in the knowledge that I only scratched the surface of my old images, and they’re not going anywhere.
I wrote that paragraph more than a week ago, on the day before I left for Death Valley, fully intending to complete last week’s blog post during workshop breaks. The plan was to expand on a prior post about how I seek and create new takes on scenes I’ve photographed many times, using the above newly discovered and processed image of the solitary Lake Wanaka willow tree in New Zealand.
So. Imagine my alarm (among other things) when I arrived in Death Valley at around 8:00 p.m. Sunday night (the day before the workshop started), and realized that I’d forgotten my computer. Oops. Suddenly, how to squeeze this week’s blog into my busy workshop schedule was the least of my worries, replaced in a heartbeat by concerns about how I’d run my workshop, and my ability to run my business.
I’ve been doing 12 to 18 workshops per year for more than 15 years and have forgotten many things, ranging from dental floss, to my Kindle, to important lenses, but never my computer. I mean, even forgetting my camera bag (which I’m proud to say has never happened…, well, not exactly) would be more frustrating and disappointing than the actual existential crisis this felt like.
Not only was all my workshop material (roster, permits, presentation material, and so on) on my computer, I have to connect my computer to a flatscreen TV to deliver my workshop orientation, training, and image reviews (a major part of the trip). And then there’s the business stuff I need to deal with each day—not just writing my blog, but answering e-mails, organizing upcoming workshops (see list of my next month’s workshops above), website maintenance, social media posts, among many more things that need my attention every day. Some can be accomplished on my iPhone, but at the cost of much time—a rare commodity during a workshop—and great effort.
Following a few minutes of hyperventilation (punctuated with a variety of choice words), I started working on solutions. With my brother Jay assisting me, I reasoned that I could use his computer to display the orientation and training material—which of course is at home on my computer. No problem, since all that material is on Dropbox too, all I have to do is login to Dropbox on his computer and download the files I need. With that insight I started to breath easier, until…
Also in the bag with my computer is the HDMI cable I need to connect to the TV in the meeting room. But surely, even at a place as remote as Death Valley, someone must have an HDMI cable for sale or loan. Apparently not—not even the general store in Furnace Creek (which, it turns out, is pretty much worthless), or the hotel front desk (which I thought must have a box of cables and adapters abandoned by prior guests), could help. My optimism was further dashed when, at some point during my cable search, I realized that even scoring an HDMI cable would be of little value without the USB-C adapter that allows it to connect to the computer.
So I pulled up Google on my phone and searched for the closest Walmart (desperate times), and found one only an hour away, in Pahrump (not a typo), Nevada. Since I’d always dreamed of making the two-hour roundtrip to Pahrump on the morning a workshop starts, you can probably imagine how thrilled I was. But like I say, desperate times…
Workshop solution in place, I went to work on solutions for handling the business stuff. First, I drafted my wife to box up my computer and overnight it first thing Monday morning—UPS Next Day Early ($$$gulp$$$). Next I logged into Dropbox on Jay’s computer, downloaded my business and workshop material, which went refreshingly smoothly. Then I went to bed.
Early Monday morning I made the drive to Pahrump without drama and was back with the necessary cable by 10:00 a.m. This pretty much solved my short term workshop problem, but since Jay’s computer is set up completely differently than mine, and he doesn’t have a mouse (pretty essential for the image review), I was still quite anxious for my computer to arrive.
As simple as that sounds, rest assured, it was not. After dropping the computer with UPS, we learned that FedEx might be better delivering to Death Valley, so my wife retrieved the box from the UPS Store (kudos to them) and drove it to FedEx. So far so good.
Now might be a good time for me to digress and express my overall frustration with national park concessionaires in general, before moving on to Xanterra in Death Valley in particular. Since national park concessionaires win a bid to service their parks, once they’re in they have little competition and, it seems, even less incentive to make their customers happy.
Since I have similar frustrations at all national parks, I can only assume that the concessionaire experience at the parks I don’t visit is similar. But I’ll limit expressing my specific frustrations to the concessionaires at the parks I visit most frequently: Yosemite (Aramark), Grand Canyon (Aramark, Delaware North, Xanterra), and Death Valley (Xanterra).
Most hotels and restaurants out in the real world seem to bend over backward to satisfy their customers, but at the national parks every request seems to be an inconvenience. My latest reminder of this was the difficulty I had simply taking delivery of my computer (that I’d spent significant dollars to get delivered as early as possible on Tuesday) in a timely manner.
For some reason the front desk at Furnace Creek Ranch doesn’t accept packages for customers (maybe this is a thing, but I’ve never encountered this at other hotels), with all incoming shipments going to either the commissary (open 1:00 to 4:00 p.m.) or Post Office (open 8:00 a.m to 4:00 p.m.). Worse still, for any given package, no one seems to know which one will get it.
Since my iPhone wouldn’t connect to the WiFi network (don’t know if the problem was on my end or theirs), and Death Valley cellular service is virtually useless for anything but phone calls, I spent most of my Tuesday break time (between the morning shoots and 1:00 p.m. image review) running around between the front desk, post office, and commissary trying to determine whether my computer had arrived. At each spot all I got was a shrug before being sent to one of the other choices.
It eventually became apparent that I wouldn’t have my computer in time for the Tuesday image review, but surely I’d have it afterward, so I could at least catch up on my business stuff Tuesday evening. When it still hadn’t arrived by the time we departed for our afternoon/sunset shoot, I remained confident that it would be waiting for me when I returned—especially since I’d made it abundantly clear to all parties (front desk, commissary, post office) how important it was that I get it today.
I returned after our sunset/moonlight shoot to learn that my computer had in fact been delivered to the commissary that afternoon (yay!), which as promised had tried to give it to the front desk for me to pick up later, but the front desk refused it (boooooo!) and instead hot-potatoed the package to the post office—which closed at 4 p.m. By the time I picked it up Wednesday I was so far behind with other stuff that finishing my blog was no longer a priority. So here we are, a week late…
So, did anyone die because I didn’t get my computer on Tuesday? No. But I don’t think I could have been more clear (and respectful) expressing my delivery’s importance. Just the slightest effort on the part of the people at the front desk (where my greatest frustration lies) would have meant the difference between an extremely satisfied and an extremely dissatisfied customer. If I treated my customers with the same disregard, I’d be an ex photo workshop leader.
End of rant…
Everything else about this workshop turned out to be wonderful. I had a fantastic group—lots of fun, and across the board extremely good photographers who thoroughly enjoyed each other. And the photography conditions were off-the-charts—between water at Badwater (reflections!), nice clouds (including unprecedented fog!) and great light throughout, spectacular sunrise/sunset color, and a couple of excellent sunrise moonset shoots, this was probably the best overall photography I’ve had in 15 years of Death Valley workshops. But since I haven’t had time yet to process my images, I return you now to the original programming…

Sunstar and Reflection, Lake Wanaka, New Zealand
Rather than duplicate the information in my June Variations on a Tree post, I’ll just add to what I wrote there with a few more words about this New Zealand morning in June 2022.
Every time I Don Smith and I take a workshop group to Lake Wanaka, I try to find a new way to photograph this tree. I’ve featured clouds, sunrise/sunset color, fog, reflections, submerged rocks, the moon, the Milky Way, and stars. I’ve also varied my perspective, focal length, and orientation to vary the background and framing. But for some reason, I’ve never tried a sunstar.
It didn’t take long to realize that this crystal clear morning was ideally suited for checking the Wanaka Tree sunstar box. Not only was the morning sky virtually cloudless, the lake surface was unusually disturbed, making for less than ideal clarity and reflections.
Anticipating the sunstar opportunity with the approaching sun, I put on my 12 – 24 lens (great sunstar lens), dialed my aperture to f/18, and positioned myself for a horizontal frame with the sun offset from the tree. As soon as the sun appeared I started clicking like crazy, adjusting my shutter speed with each click to maximize my exposure options later (not to blend, just so I’d have a lot to choose from). After about 30 seconds of this, I spontaneously decided to race along the lakeshore to align the tree and sun, and had enough time squeeze off a handful of vertical frames before the sun rose too high.
Join Don Smith and me in New Zealand
Workshop Schedule || Purchase Prints || Instagram
Wanaka Tree Collection


Here Comes the Sunstar
Posted on September 4, 2023

Day’s End on the Rim, Desert View, Grand Canyon
Sony α1
Sony 16-35 f/2.8 GM
ISO 100
f/20
1/8 second
As striking as they might be, some people find sunstars (AKA, diffraction spikes, sunbursts, or starbursts) gimmicky and cliché. When I (and pretty much any other landscape photographer) arrive at a location, of course I hope for some combination of dramatic clouds, vivid color, and soft light. But when the sun dominates the scene, it turns out that including a sunstar is usually the best way to get the most out of the moment.
Adding a sunstar to a photograph does have its challenges: Including any part of the sun in your frame introduces lens flare, not to mention extreme (often unmanageable) contrast. And poorly executed, a sunstar creates an unappealing eye magnet that overpowers the rest of the scene. And while a sunstar doesn’t capture the literal experience of watching the sun’s arrival or departure, it’s almost always better than a washed-out blue sky.
For a long time I considered sunstars merely a lemonade-from-lemons solution—the best way to play a poor hand. But over time I’ve come to appreciate a sunstar’s ability to represent the brilliance of gazing directly into the sun—minus the corneal damage. Like blurring whitewater and waves or freezing airborne droplets to convey motion, a sunstar can serve as a proxy for a natural phenomenon that’s impossible to duplicate in a still photo.
The truth is, the sun is a powerful conveyer of emotion. We all have fond memories of watching the day’s first or last rays as the sun peeks above, or slips below, the horizon. And who doesn’t feel relief when moving from sunlight to shade on a blistering summer afternoon, or from shade to sunlight on a chilly winter day? A sunstar can freeze these natural transitions in a still image, subconsciously stirring their associated emotions.
So what’s going on?
A sunstar forms when brilliant, direct sunlight (or any other bright light) diffracts (spreads) as it passes through the overlapping blades of a lens iris (its aperture). These are the blades that open to admit more light (small f-number), and close to limit light (large f-number).
It’s true that the more circular the aperture opening, the more pleasing a lens’s bokeh. But it’s impossible to get past the fact that you can’t make a perfect circle by connecting a series of straight lines (which is what each aperture blade is). Adding blades helps keep the aperture iris more circular, but as the lens stops down (smaller aperture) to allow less light to pass, the angle between adjacent blades steepens and the more the emulated circular shape (remember, it’s never a true circle) becomes a more obvious polygon—connected straight edges, one for each blade, with each blade intersecting its adjacent blades at identical angles totaling 360 degrees.
As sunlight crosses the straight line made by each iris blade, diffraction spreads spikes of light in both directions perpendicular to the blade. If the lens has an odd number of iris blades, each spike will appear in your sunstar—2 spikes for each iris blade. Lenses with an even number of blades consist of pairs of exactly parallel blades opposite each other around the opening; the diffraction spikes of each matching pair overlap, so you’ll see just one spike for each blade. In other words, the amount of spikes in your sunstar is a function of the number of iris blades in your lens: with an even number of blades you’ll see one spike per blade; with an odd number of blades, it will be 2x the number of blades.
Light diffracts (spreads) as it passes through a small opening—the smaller the opening, the greater the diffraction. Since diffraction reduces resolution, we usually we try to choose apertures that minimize diffraction. But when a sunstar is the goal, a small aperture makes the sunstar more distinct.
Sunstar how-to
If you’re still with me, you’ll be happy to know that creating a sunstar is much more straightforward than understanding its optics. Here’s a quick recipe:
- Start with a brilliant point of light: You can create a sunstar with any bright light source—the moon, stars, or even an artificial light such as a lighthouse, or car headlights—but I’m going to talk about the brightest, most ubiquitous, and easiest light source: the sun. Rather than using the entire sun, it’s usually best (but not always—you decide the look you prefer) to block most of the light with the horizon, a cloud, or some terrestrial feature, such as a rock or tree. And clouds and atmospheric haze can reduce the brilliance enough to significantly limit your sunstar. Sometimes I’m not even aware of clouds or haze until I see the sunstar spikes are faint, spread out, or non-existent.
- Different lenses will yield different results: Experiment with your lenses to see which one gives the most pleasing sunstar effect. As a general rule, wide lenses are better, and the better the quality of the lens, the better its sunstar effect. Prime lenses tend to do a better job, but today’s best zooms create beautiful sunstars too, especially at their widest focal lengths. Remember, the number a sunstar spikes is determined by the number of diaphragm blades.
- Remove filters: The more glass between the sun and your sensor, the more reflections and lens flare you’ll get, so remove your polarizer (which has no benefit anyway when you’re pointing at the sun) and UV filter. If you must use a graduated neutral density filter to hold down the dynamic range, go ahead.
- The smaller your aperture, the better your sunstar: A wide-open aperture is a nearly perfect circle (not good for sunstars), but the angle between the diaphragm blades increases as the diaphragm closes down, improving the sunstar as the angles increase. For my sunstars, I generally stop down to f/16 or smaller (larger f-number)—usually f/18 or f/20.
- Size matters: The larger the visible portion of the sun, the bigger the sunstar, but also the more lens flare and blown highlights. Conversely, if most of the sun is blocked, you’ll get a smaller sunstar, but it will also be more precise and delicate. There’s not absolute ideal size, it’s more of a balancing act to find the right mix for your taste and situation.
- Composition: The extreme dynamic range of a sunstar image makes it essential to photograph the scene the way your camera sees it, not the way your eyes see it. I generally set up my composition before I meter, brightening the foreground enough to make it plainly visible in my mirrorless LCD (ideally I do this before the sunstar appears). If you’re new to sunstar photography, or don’t have a camera with lots of dynamic range, a silhouette or high key image are good options. Start with a foreground shape, or shapes, that standout against the sky—for silhouettes, meter on the sky and underexpose; for high key, meter on your foreground subject and overexpose slightly (to turn the sky white or nearly white—see poppy example in the gallery below).
- Manage the highlights: With the sun actually in your frame, you’re invariably dealing with a sky that’s much brighter than your foreground—overexposed highlights and underexposed shadows are virtually unavoidable. To maximize the usable data you capture, start with a raw—a jpeg file just doesn’t have enough dynamic range to handle the extreme highlights and shadows of a sunstar image. Nevertheless, it’s likely the image will look like crap on your LCD—even in a properly exposed sunstar image, the highlights will probably look too bright and the shadows will look too dark. On the other hand, if the sky looks great, the shadows are probably hopelessly dark (unrecoverable); if the highlights look great, the sky is probably hopelessly bright. When I’m exposing for a sunstar, I watch the histogram (a benefit of mirrorless photography is the pre-capture histogram in my viewfinder) and try to find a balance between the extreme highlights near the sun, and the dark shadows of the surrounding scene. In most of my photography don’t bracket for exposure, but sunstars are one significant exception. Since the dynamic range is so extreme that the histogram shows both shadows and highlights completely clipped (blown), I try to start with an exposure where their both more-or-less equally clipped, then bracket over at least a 6-stop range (3 stops up and down from my midway starting point) in 2/3-stop increments, changing exposures as rapidly as possible to give me a good number of different exposures to choose between.
- Processing: I promise that you’ll need to do some processing to get the most out of the highlights and shadows, but take a look at my gallery below—each image was captured with one click (no HDR or any other multi-image blending), and most (all?) were captured without a GND filter. My usual processing approach is to start with one of the frames near the middle of the exposure range that I used, pull the Highlights slider all the way to the left (-100) and pull the Shadows slider all the way to the right (+100). Then I pull the exposure slider to the right until satisfactory detail appears in the shadows. If this brightens my highlights too much, I discard these changes and move to a darker image. Following this approach, I can usually find at least one frame with usable shadow/highlight balance.
- Practice: You can practice sunstars any time the sun’s out. Just go outside with your camera, dial in a small aperture, and hide the sun behind whatever object is convenient (a tree, your house, etc.).
About this image

I captured today’s image on the first sunset shoot of last month’s first Grand Canyon Monsoon photo workshop. You can read all the details of that shoot in an earlier blog post: Where to Draw the Line. Because I was with my group that evening, and especially because this was our first evening, I stayed in one place so I could continue working with anyone who needed help. That kind of limited my composition options, but I was very happy to have this striking tree directly in front of me, so I just tried to find as many ways as possible to feature it.
The Grand Canyon’s expansive views make it especially easy to lock into horizontal compositions, a mistake I almost made. Fortunately, since we were using clouds rather than the horizon to block most of the sun, we had multiple sunstar opportunities as the sun and clouds shifted. And though I was set up for a sunstar, when the sun first appeared, it was the shafts of light that stood out most. For those I’m glad my camera was oriented horizontally. (And I still got a little sunstar.)
But when the shafts faded and the sunstar became more prominent, I’m pleased to have given myself some vertical options. I’m actually surprised how much I prefer the vertical version of this later scene (after the shafts) to the horizontal orientation I was stuck in. In the horizontal version (it’s in the gallery below), I don’t the think the tree stands out nearly as well. This vertical version really becomes all about the tree and the sunstar, connected by the canyon’s receding red ridges.
Join Me at the Grand Canyon
A Star is Born
Click any image to scroll through the gallery LARGE


Where to Draw the Line
Posted on August 7, 2023

Beams of Gold, Desert View, Grand Canyon
Sony α1
Sony 16-35 f/2.8 GM
ISO 100
f/16
1/25 second
I’m in the midst of 11 days and two workshops chasing lightning at Grand Canyon. Despite daily 4:15 a.m. wake-ups, very late dinners, and lots of waiting for something to happen punctuated by bursts of extremely intense activity, I am in fact (to quote Cosmo Kramer) lovin’ every minute of it.
The first workshop group photographed an assortment of monsoon thrills that included lightning, dramatic clouds, and vivid sunrises and sunsets. We also enjoyed skies as clean (haze-free) as I’ve ever seen at the Grand Canyon, which made for a spectacular Milky Way shoot on the North Rim. The second group started yesterday afternoon, and while the lightning spigot has briefly turned, starting this afternoon it’s forecast to return for the rest of the workshop. (Fingers crossed.)
One mantra I find myself frequently repeating to all Grand Canyon workshop groups is, “Less sky, more canyon.” That’s because, even though a landscape photographer’s objective is to maximize beauty (right?), and it’s a rare sky that rivals with the beauty of Grand Canyon, I frequently see photographers here giving too much of their frame to a sky that simply can’t compete with the canyon below.
This doesn’t mean Grand Canyon images should never include lots of sky, but it does mean that the sky you give your Grand Canyon (and other scenic locations) image should be earned. A towering rainbow? Shimmering Milky Way? Horizon-to-horizon sunrise or sunset color? By all means, widen your lens and tilt the camera skyward. But don’t forget that even when the sky is spectacular, it’s the canyon below that makes your image special.
For example, below are a couple of images captured from Hopi Point at different sunsets. The first one was a blank sky day, so I used the absolute least amount of sky possible, and augmented it with a sunstar. The second one was an electric sunset that filled the sky with red. To include even more sky without sacrificing the best part of the canyon, I even went with a vertical composition.


I suspect people’s too much sky choice happens for a few reasons. Many photographers, so focused on their prime subject, tend to forget about the rest of their frame. Less experienced photographers often reflexively split their frame with the horizon, while other photographers, victims of bad advice, have become slaves to rigid rules. These photographers avoid putting the the horizon in the middle with biblical fervor, instead putting it 1/3 of the way down from the top, or 1/3 up from the bottom. But despite what you might have heard from the “expert” judging images at your neighborhood camera club, or viewed from that YouTube photography pro your brother-in-law swears by, there is no rule for where to place the horizon line.
In other words, I’ll put my horizon wherever I want to, thankyouverymuch. If I think the horizon belongs 1/3 of the way down from the top, 1/5 of the way up from the bottom, or straight across the middle of the frame, that’s exactly where it will go.
How do I determine where the horizon belongs? Put simply, that’s entirely dependent on the relative merits of the sky versus the landscape in the scene I’m photographing.
Without doing actual math (heaven forbid), I mentally weigh the landscape versus the sky and arrive at some kind of virtual score: if I like the landscape 4-times more than the sky, the landscape gets 4-times more frame than the sky; if I like the sky twice as much as the landscape, the sky gets twice as much frame as the landscape.
As I said, I don’t actually do this math in my head, I just end up here by feel. You can too, by trusting your instincts. And if you don’t trust your initial instincts, try popping the camera off the tripod (you are using a tripod, right?), pointing it in the direction of your scene, then slowly moving horizon line up and down the scene until a position feels right. Over time you’ll grow to recognize and trust the subtle signals your instincts send.
The image I’m sharing today was captured last Tuesday, on the first sunset of the first workshop. Because I’d started the shoot with my 100-400 lens, the foreground wasn’t a factor in my decision where to set up—I just chose an opening amidst the rest of my group. But as sunset approached, it started to look like something special was possible. Not only had a narrow gap appeared in the clouds near the horizon, the clouds were riddled with small openings with potential to allow sunlight to stream through as the sun dropped.
Because I was with my group and this was our first day, I didn’t do my usual anticipatory exploration for the best foreground, I just worked with the scene right there among my group. After replacing the 100-400 with my 16-35 f/2.8 lens, I started by trying to figure out the best way to handle the dead tree jutting up from below the canyon wall.
By shifting a couple of feet to my left to stand atop a light-color rock platform, I was able to block the less appealing middle foreground hill with the dense green shrub on the right, and to frame the dead tree (which had now become an important foreground element) between the two nearby shrubs. After determining that I wanted as little of the rocky dirt on the left as possible, I went to work on establishing the top of my frame.
The sky above the contiguous cloud bank blocking the sun was a lot of blue with a scattering of individual clouds. It was pretty in an ordinary way, but nowhere near as beautiful as the sunlit clouds and canyon below. That left me with two options for the top of my frame: directly above the clouds to include no more than a thin stripe of blue sky, or somewhere in the clouds with no blue sky.
I photographed it both ways for multiple options to choose between when I review my images on my computer. As you can see, I chose the former because I couldn’t find a good place to cut the clouds without putting a bright spot at the top of the frame and/or cutting off part of the sunstar.
This sunset display continued for about 15 minutes, continually changing as the sun dropped. I’ve actually processed another, very similar, image captured a few minutes later, without beams but with a better sunstar and have added it to the gallery below.
Of course all this advice applies pretty universally to whatever location you’re photographing, but few places provide examples as dramatic as Grand Canyon. Check out the gallery below for proof.
Join me at Grand Canyon
More Grand Canyon Skies
Click any image to scroll through the gallery LARGE


In a Fog
Posted on August 21, 2022

Morning Glory, Point Imperial Sunstar, Grand Canyon
Sony 𝛂1
Sony 24-105 G
.6 seconds
F/20
ISO 100
Born and raised in California, my relationship with fog is both long and complex. I spent the first 12 years of my life in the San Joaquin Valley, where winter “tule fog” could be so thick that sometimes drivers could only navigate by opening the door and hanging their head out to follow the yellow line. Accidents involving dozens of cars were common. In elementary school (we called it grammar school back then), my classmates and I celebrated the “fog days” when school was cancelled because the visibility was too poor for the school buses to safely navigate their routes. On the foggy days school wasn’t cancelled, a favorite recess activity was to venture far enough onto the playground for the school to disappear, spin a few times to erase all sense of direction, then try to find our way back to school before the bell rang. And at least once I actually got lost walking to school in a dense fog.
When we moved to Berkeley the summer before I started middle school (a.k.a., junior high), my relationship with fog changed. No longer a winter phenomenon, fog in Berkeley blew in through the Golden Gate on summer afternoons, turning a shorts and T-shirt lunchtime into a long pants and sweater dinnertime. Most summer days required multiple wardrobe changes.
Playing baseball at Skyline College (San Bruno) and San Francisco State University, I realized that Bay Area fog provided a true home field advantage. I have very vivid memories of sitting in the dugout or bullpen, toasty-warm in my insulated warm-up jacket, and watching our opponent, who had arrived dressed for the comfortable warmth of pretty much any other California location, huddled against the wind and fog in the visitors’ dugout—and, I suspect, contemplating rubbing bats together to start a fire (yes, all baseball bats used to be made of wood, even in college).
Photographing Yosemite in my adult years, I quickly grew to appreciate the fog that hovers on the floor Yosemite Valley on chilly, still mornings. And to many, the shape-shifting fog that wraps Yosemite Valley as a storm clears is the Holy Grail of Yosemite photography.
Though fog comes in many forms, it can be a simple matter of perspective: to the viewer at sea level, a missing mountain peak has been swallowed by clouds; the mountain climber on the summit, however, thinks she’s ascended into a fog bank. Both are right. And while many processes are at play, the bottom line is that fog (and clouds) will form when the temperature of moist air drops to its saturation point.
Despite (or maybe because of) my lifelong relationship with fog, I’m afraid I’ve taken it for granted. This fact became pretty clear one morning at the Grand Canyon earlier this month. On a trip where lightning was the undeniable goal, the most memorable shoot of the first workshop was a foggy sunrise at Point Imperial. To say this wasn’t on my radar would be an understatement.
At 8900 feet above sea level, Point Imperial is the highest vista in Grand Canyon National Park. This extreme elevation provides a top-of-the-world view to the north, east, and south to a who’s who of Northern Arizona landmarks: the Vermillion Cliffs, the Painted Desert, Marble Canyon, and the confluence of the Colorado and Little Colorado Rivers (you can’t see the rivers themselves, but you can see the intersection of their canyons). And as if weren’t enough, Point Imperial’s foreground landscape is dotted with an assortment of prominent mesas, buttes, and other rocky outcrops. My favorite view here is facing east and south, where a natural bowl filled with layered sedimentary prominences is anchored by nearby Mt. Hayden, a towering spire that dominates the view.
Sunrise was still more than 30 minutes away when I guided my first workshop group into the parking lot at Point Imperial. Below us, a few wisps of fog dotted the bowl, but offered no hint of what was in store. With several spots to set up here, in the darkness I was more focused on making sure my group was situated than I was on the scene, but when I looked back toward the view it was pretty clear that the fog was spreading and rising. With everyone in place, I raced back to the car and grabbed my camera bag.
For the next hour or more, we watched (and photographed!) the rocky features become islands in the clouds, submerge completely, then gradually reappear. A couple of times the fog rose enough to completely engulf us and erase the view. The first time this happened, the group was ready to pack up and return to the cabins with the morning’s (already thrilling) spoils, but remembering similar fog formation experiences in Yosemite, I suggested that there’s a good chance the fog will retreat as quickly as it advanced, and that we might be able to photograph everything we just witnessed, only in reverse. Sure enough, within five minutes the rocky island reemerged, and soon the entire view was back. And just when it looked like the show might be over, here came the fog again.
Because my group gets a little spread out at Point Imperial, I wasn’t able to take as many pictures as I otherwise would have, but here are three of the morning’s highlights I did manage to capture (with brief descriptions below).
One Foggy Morning at Point Imperial (July 28, 2022)


Before rising into a cloud layer that covered most of the sky, the sun slipped through a small opening on the horizon long enough to fringe the billowing fog with golden light just as I’d set up for a sunstar. And the sun wasn’t quite done. I’ve always been a fan of the way the rising sun illuminates Mt. Hayden and the surrounding rocks with warm light, but when I glanced in that direction, I saw no direct sunlight on the rocks. I did, much to my surprise, see a small fragment of rainbow that served as a perfect accent to the foggy scene in that direction. The third image came toward the end of the shoot, shortly after the final wave of fog had started to retreat. The rocky spire peaking through the fog in the foreground is Mt. Hayden.
Lots More Fog
Click an image for a closer look, and to view a slide show.


Shoot for the Star
Posted on June 6, 2021

Sunstar, Little Colorado River, Grand Canyon
Sony a7RIV
Sony 12-24 f/2.8 GM
1/160 second
F/16
ISO 100
Cool as they can be, sunstars (AKA, diffraction spikes, sunbursts, or starbursts) border on gimmicky and cliché. So why do I shoot them? Because sometimes it’s the best solution when the sun intrudes on the scene you came to photograph. In other words, as much as I like dramatic clouds, vivid color, of soft light, I’d rather have a sunstar than a blank blue sky—kind of a lemonade-from-lemons approach.
Sunstars do look kind of cool, but maybe another reason they work is the universal resonance that comes with witnessing the sun kiss the horizon—I mean, who doesn’t have a comforting memory of watching from a special location as the sun begins or ends its daily journey?
Unfortunately, doing justice to these moments in a photograph is difficult: Including the sun in your frame introduces lens flare and extreme (often unmanageable) contrast, and creates an unattractive eye magnet that can overpower the rest of the scene. But while a sunstar doesn’t capture the literal experience of watching the sun’s arrival or departure, it can do a pretty good job of conveying the power of the moment.
A sunstar is created when sunlight diffracts (spreads) as it passes the intersection points of a lens diaphragm’s overlapping aperture blades. The smaller the opening, the steeper the angle between the blades, the more the light bends, and the more pronounced the sunstar spikes. The more diaphragm blades, the more spikes in the sunstar (this is a simplification of what actually happens, but you get the idea).
The good news is, despite the physical drawbacks mentioned earlier, creating a sunstar is relatively straightforward. Here’s a quick recipe:
- Start with a brilliant point of light: You can create a sunstar with any bright light source—the moon, stars, or even an artificial light such as a lighthouse, or car headlights—but I’m going to talk about the brightest, most ubiquitous, and easiest light source: the sun. Rather than using the entire sun, it’s usually best (but not always—you decide what looks best) to block most of it with the horizon, a cloud, or some terrestrial feature, such as a rock or tree. And clouds and atmospheric haze will significantly limit your sunstar—sometimes I’m not even aware of clouds or haze until the sunstar I expect is faint or non-existent.
- Size matters: The larger the visible portion of the sun, the bigger the sunstar, but also the more lens flare and blown highlights. Conversely, if most of the sun is blocked, you’ll get a smaller sunstar, but it will also be more precise and delicate. There’s not absolute ideal size, it’s more of a balancing act to find the right mix for your taste and situation.
- The smaller your aperture, the better your sunstar: A wide-open aperture is a nearly perfect circle (not good for sunstars), but the angle between the diaphragm blades increases as the diaphragm closes down, improving the sunstar as the angles increase. For my sunstars, I generally stop down to f/16 or smaller (larger f-number).
- Manage the highlights: When the sun is entering your frame, you’re invariably dealing with a sky that’s much brighter than your foreground and will need to take steps to avoid the foreground of murky shadows. If you have a foreground shape or shapes against the sky, you could turn the foreground into a silhouette. When I’m exposing for a sunstar, I watch the histogram (a benefit of mirrorless photography is the histogram in the viewfinder) and try to find a balance between the extreme highlights in and surrounding the sun and the dark shadows of the surrounding scene. I usually bracket over a 4-stop range in 2/3-stop increments, doing this as rapidly as possible to give me a good number of different exposures to choose between.
- Different lenses will yield different results: Experiment with your lenses to see which one gives the most pleasing sunstar effect. As a general rule, the better the quality of the lens, the better its sunstar effect. Prime lenses tend to do a better job, but a today’s best zooms create beautiful sunstars too. And the number a sunstar spikes will increase with the number of diaphragm blades.
- Remove filters: The more glass between the sun and your sensor, the more reflections and lens flare you’ll get, so remove your polarizer (which has no benefit anyway when you’re pointing at the sun) and UV filter.
- Practice: You can practice sunstars any time the sun’s out. Just go outside with your camera, dial in a small aperture, and hide the sun behind whatever object is convenient (a tree, your house, etc.).
About this image

Sunstar, Little Colorado River, Grand Canyon
This scene from last month’s Grand Canyon raft trip is a perfect example of why I sometimes resort to creating a sunstar—and I nearly missed it because I wasn’t ready. On a raft trip like this, no matter how much we try to time our stops with the best light, other factors often dictate the schedule.
We were fortunate to score a campsite directly across the Colorado River from the confluence with the Little Colorado River. We set up camp in the early afternoon and motored across the river as soon as we saw the other trips clear out. So we had the Little Colorado to ourselves, but with the sun still high in the cloudless sky, I resigned myself to having to wait for the sun to disappear behind the canyon walls before breaking out the camera gear. In the meantime we had a blast navigating a natural waterslide and cooling off in pools just warm enough to be refreshing.
When the non-photographers shuttled back to camp, the photographers remained at the Little Colorado to wait for the shade. While waiting I pulled out my Sony a7RIV put a 6-stop neutral density filter on my Sony 24-105 G, and wandered up and down the river looking for whitewater to play with. This was mostly just an exercise to kill time and familiarize myself with compositions for later, but was having fun I kind of lost track of time.
Not having really thought about the path the sun would take, and whether a sunstar would be an option, I looked up and saw that the sun was about to disappear behind a peak directly downstream and suddenly recognized a perfect sunstar opportunity. But my camera bag, with the Sony 12-24 GM lens I needed to get everything in (and also with the best sunstar), was about 200 yards downstream.
Not sure I had enough time, I sprinted as fast as my flip-flops would carry me, grabbed my bag (which was already in full shade), and sprinted back upstream toward the retreating sunlight. The sunstar happens right at the intersection of sunlight and shadow, but when raced into the sunlight I continued a little farther to give myself enough time before the sun set.
I really couldn’t afford to be picky about a composition but was lucky to find something with a foreground (rock) and middle ground (the blue of the Little Colorado) to go with my background (red-rock peak and sunstar). With the sunstar already in full swing in my viewfinder, I quickly (frantically) framed up a composition (no time for my customary obsessive tweaks, reviews, and refinements), dialed to f/16, metered (have I mentioned lately how much I love having a histogram in my viewfinder?), and clicked.
I only got four decent sunstar frames before the sun was gone. I had no idea if I had anything usable because I don’t usually perform too well when I rush, but was pretty happy to find something that works.
Workshop Schedule || Purchase Prints || Instagram
A Sunstar Gallery


Just Another Day at the Office
Posted on April 18, 2021

Sunset, McWay Fall, Big Sur, California
Canon EOS-1Ds Mark III
Canon 17-40mm f/4L USM
.4 seconds
F/18
ISO 100
With vaccines taking hold and COVID restrictions easing, I’ve suddenly found myself in “be careful what you wish for mode.” I’m currently in Oregon with Don Smith, where we wrapped up our Oregon Coast workshop yesterday, and start our Columbia River Gorge workshop this afternoon. When this stretch is over, I’ll have done five workshops in five weeks. In addition to that, I had an unexpected (but welcome), time-critical project dumped in my lap that has occupied virtually all of workshop down-time. But rather than skip this week’s blog entirely, I’ve pulled one of my most popular from the archives (March, 2011), updated it slightly, and am sharing it today.
As some readers know, fellow pro photographer Don Smith and I partner on many workshops, donating our time as co-leaders for each other’s trips. On a recent trip Don and I stood on a bluff at sunrise gazing at the Big Sur Coast (or was it sunset overlooking Yosemite Valley?) and reminded ourselves of all the people idling in traffic or confined in a cubicle, and how fortunate we are to do what we do for a living.
Not only do photo workshops allow me to see and photograph great stuff, they give me the opportunity to learn from the diverse perspectives of dedicated photographers from every hemisphere on Earth and virtually every state in America. My workshop participants have been, in no particular order, musicians, computer professionals, artists, physicians, writers, lawyers, corporate executives, electricians, accountants, bond traders, active and retired military, other professional photographers, real estate agents, clergy, a classical composer, a Hollywood graphic artist, and a Hooters girl (a very sweet young lady who would completely dash any preconceived impression of what that might mean). One workshop included a rocket scientist and a brain surgeon.
Sometimes the education I gain from this eclectic mix of professions, preferences, and personalities is simply an insight or point-of-view that helps me better understand or inform future workshop participants. And sometimes my education is a bit more, uh, “esoteric.” On the day I captured this image of McWay Fall in Big Sur, I got a little of both.
This was a couple of years ago, on the first day of Don’s spring Big Sur workshop. Driving to the workshop’s first shoot we hadn’t been on the road five minutes when it was discovered my backseat featured a sex therapist and a gynecologist. Uh-oh. While they seemed quite excited by their mutual interest, I was uncertain that the other passengers shared the doctors’ outspoken zeal for the subject and did my best to deflect the conversation into more benign territory. But the doctors were not to be deterred. We spent the duration of the drive listening to these experts compare notes in graphic and excruciatingly uncensored detail. Topics ranged from, uh, well let’s just say we covered everything from oysters to “When Harry Met Sally.” Much to my relief, and after fifty minutes without exhaling, I pulled into the parking area at Julia Pfeiffer Burns State Park with a car-full of laughing (and, it turns out, just a little better informed) passengers. Phew.
Amazingly, it turned out that the drive wasn’t even the most memorable part of the afternoon. That honor goes to the sunset, which I was fortunate enough to capture in today’s image. When we arrived at the view of McWay Fall, the sun was behind a cloud bank that painted land, sea, and sky matching gray. But successful photography is often not as much about what’s happening now as it is about what’s going to happen later. And few opportunities excite me more than watching the sun slip from the clouds just before it completes its dash for the horizon–exactly what was in store this evening.
Don and I rallied the troops and told them not to be deceived by the flat scene, to prepare for a sudden and dramatic change in the color and light when the sun popped from behind the clouds. We told everyone that the display wouldn’t last long and encouraged them to forego the current moment and search for a composition that would work when “the moment” happened. With about ten minutes to pick a spot, refine our compositions, and ready our cameras, I ended up working with about half the group at this location. Don stationed himself with the rest of the group a couple hundred feet up the trail.
After getting everyone situated, I opted for this wide shot that used the fall and sun to balance the frame. To reduce the contrast between the sky and foreground I stacked two graduated neutral density filters (totaling five stops); to get the starburst effect I stopped down to f18. Because everyone in my group was ready and comfortable enough with their camera, we were all able to capture our own version of this special moment.
I’m afraid Don wasn’t so fortunate. Most of his group was successful, but with little warning one of his people decided that this very moment was the absolute best time to learn the manual metering techniques Don and I had covered in our orientation. Despite suggestions from Don (and stronger “urgings” from her husband) to shoot the way she’s most comfortable now and defer the learning to later, she insisted that now is the time to crack the manual metering puzzle.
To Don’s credit, he passed his opportunity at this magic moment to work with her. So while Don didn’t get his shot (kind of the photographer’s equivalent of taking one for the team), we did come away with a great cautionary tale we now spin to all of our workshop participants: Practice, practice, practice, when everything’s static, but when the magic happens, always, always, always revert to what’s most comfortable.
All in all, a very educational (and productive!) day. I don’t remember the drive back up the coast that night, but given the sunset we’d witnessed I’m pretty sure the primary topic was photography. Over the course of the workshop our woman did in fact learn manual metering (as she has demonstrated in subsequent workshops), and Don will forever be able to tell people about “the one that got away.” I, on the other hand, learned how long I can hold my breath.
Workshop Schedule || Purchase Prints || Instagram
A Seaside Gallery


Hold My Gear
Posted on March 21, 2021

Sunstar, Horsetail Fall and El Capitan, Yosemite
Sony a7RIV
Sony 24-105 G
1/6 second
F/20
ISO 100
Most people know how much photographers love their toys. Whether it’s the latest ultra-fast lens, that new space-age composite tripod that’s a full 1/4 ounce lighter, or (especially) a “game changing” camera body with even more megapixels than last year’s game changing camera body (and even though we already have more resolution than we’ll ever need), we can’t wait to get our hands on it and start sharing our new and improved images with the world (while somehow figuring out a subtle way to mention our new gear). But let me share a dirty little secret: Probably the single piece of equipment that most photographers have more versions of than anything else is the camera bag. Yawn. Don’t believe me? Ask any serious photographer how many camera bags they own—if the answer is less than five, they’re lying.
I don’t think anyone can deny that an efficient instrument to store, organize, and transport all this gear is essential. But let’s face it—a camera bag, as essential as it is, isn’t sexy. And when it comes right down to it, what’s the point of having the latest, greatest (and most expensive) gear if it doesn’t foster envy? So we’ll purchase a new bag simply because we can’t imagine living without our newest toy, but never for bragging rights.
Full disclosure: I’m as guilty as the next person of harboring an obscene number of camera bags. More than I can count. In fact, a few years ago I stuffed as many camera bags as I could fit into a 100 gallon garbage bag, shoved it into my attic, and haven’t seen them since.
Here’s my theory
Most photographers fantasize about carrying a compact, lightweight kit in the field (we want all the gear, we just hate carrying it). And to justify the purchase of the next great thing, we convince ourselves that (despite all history to the contrary) this will the final piece of equipment we’ll ever need. Of course since that’s what we told ourselves the last time we bought new gear, our current camera bag is suddenly too small. In other words, our camera bag is always just big enough to carry our current inventory of gear because we never imagine wanting more. Which is all well and good—until we start coveting the next toy.
This cycle repeats many time before the photographer gets wise. And some photographers, even those with a large garbage bag full of slightly used camera bags in their attic, never seem to get wise.
By now you might have guessed…
That’s right, I just got a new camera bag. This time it’s a Shimoda Action X50, to replace the Mindshift Backlight 26L I bought in late 2019. Sigh. In my defense, while I may be a slow learner, I did figure out a few camera bags ago to always get a bigger bag than I think I need. Nevertheless, the need for more space was a factor in this decision because, now that I have two Sony a7RIV bodies, I’ve been trying to store each with a lens attached: my Sony 16-35 GM on one, and my Sony 24-105 G on the other. But this new paradigm suddenly made my Mindshift bag cramped and awkward. Not so bad that I couldn’t have lived with had I loved the bag—but I didn’t, so here we are.
The primary reason to get new bag this time was comfort. While I was originally thrilled with the space and the way my gear fit in the 26L, I made the mistake of not fully loading it and walking around before buying. There are many things to like about the Mindshift bag, but fully loaded comfort over extended distances isn’t one of them. For someone who logs a lot of miles with a camera bag on my back, from trudging switchbacks to scrambling rugged terrain to airport sprints, comfort is essential.
Introducing my new camera bag
I really, really hope the Shimoda Action X50 will be my final camera bag. In case you haven’t figured it out, the numbers both names, the Mindshift 26L and the Shimoda X50, represents the displacement in liters. So the Shimoda has almost twice the capacity. While all of that extra room isn’t just for camera gear (there’s other storage galore), the camera gear section is significantly larger. I can’t imagine either needing, or wanting, to carry any more weight than I currently have, so if I ever decide to replace this one (heaven forbid), it won’t be because I need more space.
The most important thing for me is the X50’s comfort. I had the advantage of test driving a couple in my February workshops. And I’ve been trying mine around the house enough to know that it’s night-and-day better than my Mindshift bag. It feels like an actual back pack, not a camera bag with straps.

Shimoda Action X50 Outside: Yes, that’s my logo on the outside (it’s nice to have generous, talented friends).

Shimoda Action X50 Inside: I’m still tweaking the layout, but as you can see, I have space to spare, even with lenses on both bodies. It has a sleeve that will fit my 16-inch MacBook Pro, and I can also fit my Sony 200-600 in the top compartment if I really want to punish myself.
Let’s look inside
The contents of my camera bag has evolved over the years, from the vanilla 16-35, 24-105, 70-200 lens lineup that most landscape photographer carry, to my current setup that allows covers 12mm to 800mm (1200mm if you factor in the APS-C crop option) at all times—plus the option to go up to 1800mm (factoring in the APS-C crop factor) if I go with my Sony 200-600.
Here’s what’s I carry today (spring 2021):
Always in my bag
- 2 Sony a7R IV camera bodies
- Sony 12-24 f/2.8 GM lens: Though I don’t use it a lot, 12mm allows me to photograph things I never could before, and I love that it’s compact enough to keep with me at all times. (I also can’t wait for the pandemic to end so I can get out and use it for serious night photography this summer.)
- Sony 16-35 f/2.8 GM lens (plus a Breakthrough polarizer): This focal range is covered by other lenses in my bag, but I love the lens too much to leave it behind—crazy sharp, and f/2.8 means it’s fast enough for night photography in a pinch. Plus, it’s a whole lot easier to use with polarizing and neutral density filters than the 12-24.
- Sony 24-105 G lens (plus a Breakthrough polarizer): This is my workhorse—what a fantastic focal range! Really sharp, too.
- Sony 100-400 GM lens (plus a Breakthrough polarizer): Replacing my 70-200 with this slightly bigger lens doubled my focal range—and it’s a fantastic match with the Sony 2X teleconverter.
- Sony 2X teleconverter
- Filters (in a Mindshift filter bag attached to my tripod): 72mm and 77mm Breakthrough 6-stop polarizing ND filters, Breakthrough 2-stop hard graduated neutral density filter (which I don’t use a lot since switching to Sony, but still nice to have)
- Other stuff: Several lens cloths, headlamp, insulated water bottle, extension tubes, Giotto Rocket Blower, and a couple of RX Bars (because photography always trumps meals).
Specialty Equipment (not pictured—stays behind unless I have a specific plan for it)
- Sony a7S III camera body: For Milky Way and other moonless night photography—it’s “only” 12 megapixels (remember when 12 megapixels was huge?), but this camera sees in the dark.
- Sony 24mm f/1.4 GM lens: For Milky Way and other moonless night photography—I can’t believe how compact this lens is.
- Sony 28mm f/1.8 G lens: For Milky Way and other moonless night photography—this one’s even more compact than the 24mm.
- Sony 90mm Macro: I use this lens a lot with extension tubes to get super close for my creative selective focus work (wildflowers, fall color).
- Sony 200-600 G lens: When I want to go big on a moonrise/moonset—sometimes I’ll pare it with the 2X teleconverter and really go crazy. I also use this lens with extension tubes for selective focus fall color.
Support
- Really Right Stuff 24L Tripod with a RRS BH-55 ball head: Sturdy enough for whatever I put on it, in pretty much whatever conditions I encounter. I also like that, fully extended with the head and camera, even without a centerpost it’s several inches taller than I am.
- Gitzo 1530 tripod with a RRS BH-40 ball head: My travel/hiking tripod. Without extending the centerpost it’s not quite as tall as I prefer, but it’s tall enough and I like the compactness for suitcases and long hikes.
Final camera bag thoughts
A camera bag is personal choice, based on many individual variables. So I’m not recommending against the Mindshift bag, which I found great in many ways. Because everyone’s body is different, I can only tell that the Shimoda was best for me.
If you’re in the market for a camera bag, make sure you try your candidate with weight before purchasing. And don’t just throw the bag on your back and call it good—actually walk around with it, bounce up and down, twist, bend over, take it off and put it on, and so on until you’re sure.
I know this kind of testing isn’t easy in this day of online shopping. If you don’t have a chance to try out your next camera bag before placing an order, find a nearby camera store do your research there. But if accept even a little of the camera store’s goodwill, don’t even think of ordering it online—support your local camera store.
About this image
For better or worse, February is Horsetail Fall month in Yosemite. For years I’ve thought about photographing the fall from the Four Mile Trail to Glacier Point, but never had the time or motivation to make it happen. Though this is my favorite trail out of Yosemite Valley, I hadn’t been on it in years and figured I’d need to scout it first. But this year a couple of people in my first February workshop shot Horsetail Fall from there on their own, and were able to give me enough info that I figured I could make it work without any advance recon.
I drove to Yosemite the afternoon before my February Yosemite Winter Moon photo workshop. With all the people, and Southside Drive closed to all parking, I had to walk nearly a mile to get to the Four Mile Trail trailhead. Even I’d been on level ground, my back and shoulders were already fatigued by the time I started ascending the switchbacks. I only had to walk another half mile or so, but by the time I reached my photo spot, I’d decided it was time for a new bag.


After scrambling up a short but steep hillside, I found a small gap in the trees with a good view of Horsetail Fall. Shedding my gear, it was time forget my aches and pains and to get to work. The first thing I noticed was how clearly visible the top of El Capitan was. It’s not visible at all from Northside Drive; it is visible from some of the vantage points on (now closed) on Southside Drive, but this was even better because I could clearly see the Horsetail Creek drainage.
For this shoot I loaded up both a7RIV bodies, one with my 24-105 and the other with the 100-400. Because I was shooting through a window in the surrounding foliage, I thought I’d be shooting mostly telephoto, but when I saw the setting sun slipping through the trees, I recognized a sunstar opportunity as well. This isn’t possible on the valley floor, so I took full advantage. With only one tripod on hand, I frequently switched between my 24-105 and 100-400 bodies, firing non-stop until the light finally faded about five minutes after sunset.
I was already on the verge admitting camera bag my mistake when the pandemic shut everything down, but by the time I made it back to the car that evening my mind was made up. Fingers crossed that I’m finally done.
February 2021
Click an image for a closer look, and to view a slide show.


