Eloquent Images by Gary Hart
Insight, information, and inspiration for the inquisitive nature photographer
Variations on a Tree
Posted on June 26, 2023

Winter Chill, Lake Wanaka, New Zealand
Sony a7R V
Sony 100 – 400 GM
ISO 100
f/18
30 seconds
I returned from New Zealand Saturday evening, a bit battered and bruised by jet lag and a brief but quite unpleasant battle with food poisoning (or norovirus), but nevertheless already missing this beautiful country that feels more like my home away from home each time I visit. I love everything about New Zealand—its unparalleled scenery, its friendly people, its tasty food, its pristine environment (the air, lakes, rivers, streets, and even the public restrooms), its meticulously maintained hiking trails, and even its (almost but not quite) ubiquitous sheep. Oh wait a minute—not the bacon. I definitely do not love New Zealand’s flaccid bacon (bacon should snap, not tear like soggy tissue).
Because I’m still in recovery mode, as I did last week, this week’s blog will be a new image attached to a revived and (significantly) updated prior post. I hope to forego the self-plagiarism and resume my regular schedule next week. In the meantime…
I’m incredibly blessed to make my living guiding enthusiastic photographers to many of our planet’s most beautiful locations: New Zealand, Iceland, Yosemite, and Grand Canyon, among many. While this makes my life far too rich for complaint, let me say (without complaining) that a particular challenge imposed by frequent return visits to the same locations is finding unique ways to photograph them.
My usual approach at these familiar locations is to identify appealing relationships and framing, then use my camera’s exposure variables to play with the scene’s “creative triad”: motion, light, and depth. Whether it’s blurring or freezing water, emphasizing shape by going dark for a silhouette or bright for a high-key effect, or depth-of-field from narrow to extreme to emphasize depth, I love playing with these variables to create something unique.
One particularly challenging subject is the solitary willow tree near the south shore of Lake Wanaka in New Zealand. This striking tree just stands by itself in a lake (most of the time), with little motion, silhouette, or depth of field opportunities. But each time I visit Wanaka, I challenge myself to find a version of the scene that’s different from anything I’ve captured, a challenge that grows harder with each visit. And just because I don’t have my full arsenal of creativity weapons doesn’t mean I’ve arrived completely disarmed.
With a compromised (but not quite eliminated) creative triad, my creative options at Lake Wanaka rely more heavily on some combination of weather and water conditions, juxtaposition of visual elements, focal length, and framing. And as you can see in the gallery at the bottom of this post, the conditions at the time of my visit play the largest role in the way I approach this scene. The weather conditions for sure, but also the color and light, the quality of the reflection, and whether it’s day or night.
Because a picture is worth a thousand words, I’ll spare you long explanations and share some examples with a few words of explanation
(Click the image for the blog post describing its capture)
First, a little bit about this beautiful tree. It grew from, of all things, a fence post placed near the lake around 1940, at a time when the water was lower than it is in most of these images. Spend much time in New Zealand and it’s not hard to recognize that New Zealanders are especially proud and protective of their indigenous flora and fauna. Which might explain why most New Zealanders view the attention this non-native willow tree receives with emotion that ranges from bewilderment to downright irritation. These feelings seem to intensify with proximity to Wanaka.
In March 2020 (clearly not a great month) the tree was vandalized by person/persons unknown (though I’ve been told that local authorities have a good idea who it is) who sawed off several branches, including the distinctive lowest branch that arced downward and nearly grazed the lake surface. And while this branchectomy (I made that word up) did cost the tree some of its aesthetic appeal, its beautiful spirit persists, and the Wanaka Willow remains a striking feature to view and photograph. (It won’t be difficult for anyone browsing the gallery images below to distinguish the before and after images.)

Wanaka Reflection, New Zealand
New Zealand’s winter clouds are a frequent source of delight. This image was captured late-morning (not usually great light), but the clouds and reflection were so nice that I couldn’t resist shooting. I chose a horizontal composition because it allowed me to include more clouds and reflection, while filling the frame top-to-bottom with the tree and its reflection, than a vertical composition would.

Red Sunset, Lake Wanaka, New Zealand
Juxtaposition is almost always a prime consideration. I especially love the snow-capped Southern Alps across the lake, so all things equal, I’ll usually position myself with the mountains in the background (the other options are trees and shoreline, or the town of Wanaka itself). In this scene the main event was the spectacular tangerine sunset, perhaps the most vivid color I’ve ever witnessed in New Zealand.
With the most intense color in the direction of the peaks, I set up facing that direction, taking care not to merge the tree with tiny Ruby Island. The reflection was slightly disturbed by gentle undulations on the lake’s surface, so I added a 6-stop neutral density filter to smooth the water. The resulting 30-second exposure glazed the lake surface and softened the distant fast-moving clouds just enough.

Gray Dawn, Lake Wanaka, New Zealand
But it’s not always about background juxtaposition. For example, on the morning following the sunset image above, the morning fog was so thick it rendered the background completely irrelevant. I chose a spot that best emphasized the tree’s shape, and that allowed me to fill my foreground with a mosaic of barely submerged stones. I played with my polarizer until I found an orientation that revealed the nearby stones while sparing the tree’s reflection. (Hold a gun to my head and ask me to name a favorite Wanaka Tree image and I might just choose this one.)

Starry Night, Lake Wanaka, New Zealand

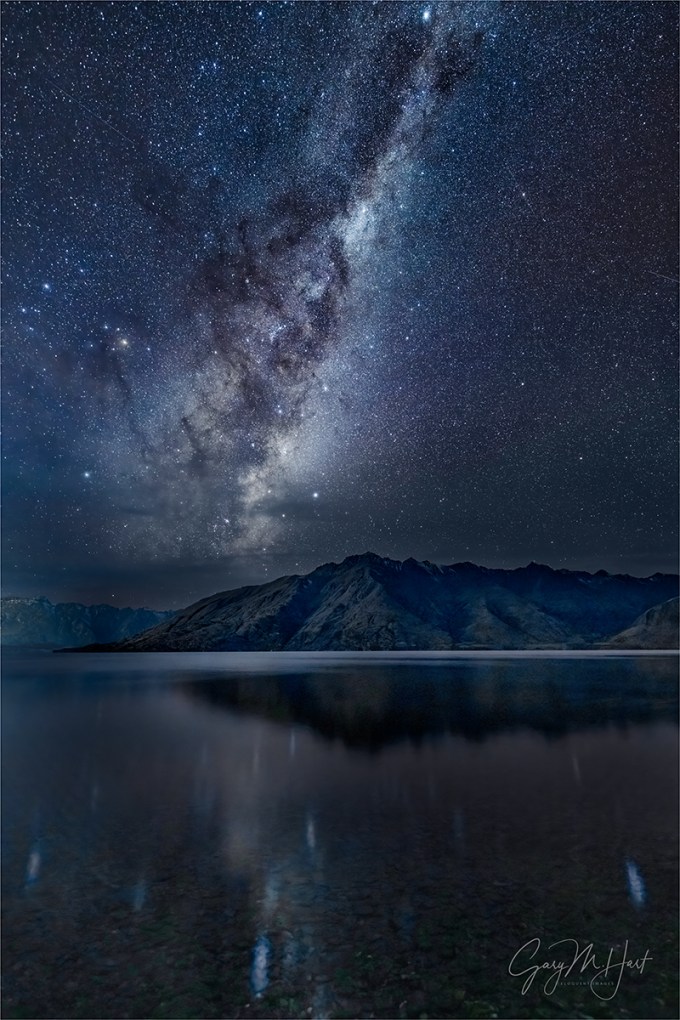
Sky Light,The Milky Way and City Lights, Lake Wanaka, New Zealand
One aspect of the conditions I have some control over is whether it’s day or night. By going out after dark on a clear night, I can include stars—depending on the timing and my position, I can also juxtapose the tree with the Milky Way and a background feature.
In June, when I’m usually in New Zealand, for the first half of the night including the tree with the Milky Way also means including the lights of Wanaka. While that’s not necessarily a bad thing, I generally prefer avoiding city lights. I made an exception on this chilly night when a low fog bank obscured most of the direct artificial light, absorbing and reflecting Wanaka’s glow to paint the lower half of the frame gold.

Milky Way and Reflection, Lake Wanaka, New Zealand
If I wait until the night hours closer to sunrise, the Milky Way has rotated westward, away from the city lights. On the morning I captured the image on the right, the Milky Way was well on its way to setting. Rather than staying up all night for this image, I simply rose a couple of hours before sunrise to make this image (the beauty of having a hotel within walking distance of the tree). Unfortunately, by the time I made it out to the tree, the sky was just starting to brighten and lose contrast, and the Milky Way had rotated so far west that including it with the tree meant also including nearby shoreline and trees too. I have visions of making it out there a couple of hours earlier, but so far haven’t had a clear enough night on any subsequent visit.
For the image at the top of this frame, captured the same night as the image that includes the city glow, I decide to forego the Milky Way entirely and just concentrate on the tree and its reflection. The result was another of my favorite, and most successful, images.

Lone Willow Reflection, Lake Wanaka, New Zealand
I wasn’t really crazy about the sky when I captured this image, but I liked the background peaks and low-hanging clouds. So I retreated down the lakeshore, away from the tree, and then climbed a gentle slope to distance myself even further, then used a telephoto to enlarge the tree and shrink the distance between it and the mountains and clouds. (If I had it to do over again, I’d have moved slightly right to avoid merging the tree with the island.)

Reflection on the Rocks, Wanaka Willow Tree, New Zealand
The beautiful clouds that had started the evening over the Southern Alps had move quickly across the scene were exiting southeast and out of my frame. It wasn’t long before my options were to hold my position and photograph the tree with the mountains and no clouds, or reposition myself to feature the best of the clouds against the town of Wanaka. I went with the clouds.
Because I saw the potential for a beautiful sunset, I went went wide to maximize the sky, choosing my 12 – 24 lens. Instead of filling most of the frame with colorful clouds, I positioned myself so the reflection mirrored the arc caused by the last of the retreating clouds, creating a frame for the tree. I was aware that I was picking up a few structures on the opposite lakeshore, but felt that was justifiable compromise to ensure the best clouds and sunset color potential combined with snowy peaks.
The light was beautiful when I started, but it just kept improving as the color ramped up. Every few minutes I repositioned myself to keep the tree framed beneath the shifting clouds. To feature the flat, multi-toned rocks visible beneath a thin veneer of reflective water, I dropped my tripod and moved it a foot or so into the water. And finally, I shifted just enough for the trunk to split the gap between two distant peaks. Going vertical allowed me to get the full arc of clouds and their reflection above the rocks, with less far lakeshore than a horizontal composition would have.

Winter Chill, Lake Wanaka, New Zealand
This year’s (2023) Wanaka visit featured persistent dense, high fog. Perhaps not the dazzling conditions we’d all hoped for, but the longer I spent with the scene, the more I started to appreciate the opportunities. With fairly bland clouds overhead, my goal this morning was to isolate the tree, its reflection, and distant Ruby Island. To do this, I used my my 100-400 lens, positioned myself as far back as I could, and aligned the tree and island so they were close but not merged.
The reflection this morning was visible but slightly disturbed by gentle waves rolling across the lake surface. With a focal length of 166mm, I was a little concerned about keeping both the tree and the background sharp, so I stopped down to f/18, temporarily removing my camera from the tripod to focus on trees behind me that were slightly farther away the the willow (read about hyperfocal focusing). To create a more ethereal effect in the reflection, I returned the pre-focused camera to the tripod and added my Breakthrough 6-stop Dark Polarizer for a 30-second exposure that gave the lake a beautiful gauzy sheen.
Workshop Schedule || Purchase Prints || Instagram
Variations on a Tree
Click any image to scroll through the gallery LARGE


Greetings from Down Under
Posted on June 19, 2023
Milky Way Reflection, Lake Wakatipu, New Zealand
Sony a7R V
Sony 14mm f/1.8 GM
ISO 6400
f/1.8
15 seconds
It’s hard enough sticking to my (self-imposed) weekly blog schedule when I’m home and just doing the daily stuff necessary to keep my business running. But for the last week Don Smith and I have been cavorting about the New Zealand countryside with a dozen awestruck photographers. So I’ve dusted off a still relevant blog post from 4 years ago, updated it, and added a brand new image (from this trip) and description.
What’s my problem?
I share a lot of Milky Way images (and when I say Milky Way, I’m referring to the brilliant core of our home galaxy). But then it seems does everyone else. And when I look at some of the other visually dazzling Milky Way images posted online, I realize I’m working at something of a disadvantage—not because of deficient equipment (not even close), a physical or mental handicap (though as the years spin by…), or even because I think the world is unfair (maybe it is, but it’s been pretty good to me). No, my disadvantage is solely the result of self-imposed “rules” that prevent me from photographing anything that can’t be captured with a single click.
Single-click shooting means no focus stacking, no HDR, no blending separately captured foreground and sky. In other words, if I can’t get what I want in one frame, I don’t get it. It’s not that I think there’s anything wrong with combining images—image blending is a tremendous tool that allows digital photographers to transcend the limitations of film photography. And it’s not because blending is “too technical” for me—having spent 20 years working in the tech industry, I know my way around a computer and have actually played a fair amount with blending images (it’s not rocket science). No, I don’t blend images simply because, as beautiful as they might be, I get no personal satisfaction from results that feel artificial to me. And if photography doesn’t make you happy, what’s the point?
Every time I bring this up, someone gets defensive, feeling like I’m saying that there’s something wrong with blending images. There isn’t!* I enjoy viewing the work of photographers who blend images to elevate their art. So if you blend and enjoy it, please go forth and blend to your heart’s content (and keep those defensive comments to yourself). This is about me, and what makes me happy.
*As long as it’s not used to deceive.
Milky Way capture
I’m frequently asked about my processing for Milky Way images, and I’ve always been a little reluctant to share a lot because I’m not an expert, I don’t blend, and my Milky Way workflow is always a work in process. Nevertheless, I’m asked enough that I’ve decided it might nevertheless help for me to share my overall processing mindset and approach. (Plus, it might help others to understand why my images aren’t as “stunning” as the images of those who blend.)
In many ways I still consider myself a film shooter, albeit with an upgrade to a digital camera. Processing, though not my favorite part of photography, is an essential digital windfall that enables me to extract results from the photons I capture, results that were never possible with film (especially for those of us who shot only color film/transparencies). Like most digital photographers, I couldn’t succeed without processing—the alternative is to let the camera or computer make processing decisions, and that’s control I don’t want to relinquish. And given the challenges of minimal light photography, processing is doubly important for Milky Way images.
Given that I don’t blend images (for Milky Way photography that’s usually one exposure for the foreground and another for the sky), I start with a raw file that needs help. A lot of help. I like foreground detail in my night images, which requires me to compromise with a less than ideal f-stop, shutter speed, and (especially) ISO to gather enough light. And even with these compromises, the image straight from the camera is still far darker and noisier than ideal.
The right gear
First, even with all the skill and processing software you can muster, if you’re going to photograph the Milky Way with one click, you need to have the camera and lens to do it. On a moonless night light capture is king, which means using a camera able to return relatively clean results at extreme ISOs (up to 12,800) with a very fast, wide lens—24mm and f/2.8 is okay, but wider and faster is better.
For years my Milky Way body has been some version of the Sony a7S series (a7S, a7S II, a7S III)—most recently the Sony a7S III (a truly remarkable low light camera), while my night lens has been one of the following: Sony 24mm f/1.4 GM, Sony 20mm f/1.8 G, or Sony 14mm f/1.8 GM. But an equipment change may be afoot—details below.
Exposure compromise
My processing choices depend a lot on my exposure choices, which as I said earlier, are all compromises. For example, with my 14mm at f/1.8 wide open, I can usually keep the ISO in the 3200 to 6400, and my shutter speed to 15 seconds—quality compromises for sure (high ISO means high noise, longer shutter speeds mean star motion), but the results are certainly acceptable. It might help to know that when I photograph the Milky Way, I usually give each composition a variety of exposure settings and choice the best one later, when I can see the images on my computer.
It starts with noise reduction
For all of my images, my standard noise processing is Topaz DeNoise AI Photoshop plugin. I used to run my Milky Way images through DxO PhotoLab 2, but later versions of DeNoise have been so good that I now skip the DXO step.
In Topaz I magnify the view to 100% (and sometimes 200%) and play with the Noise Reduction and Recover Detail sliders until I’m confident I’ve found the combination that maximizes noise reduction without muddying the detail. I’ve had the most success with the Low Light, Standard, and Severe Noise panels (in that order), but your results may vary so experiment with all the options to find the panels that work for you.
The method behind my madness
Processing is where things start to get more vague because my approach is less an explicit series of steps than it is searching for the best way to achieve the results I want, steps that can vary a lot from image to image. Sometimes I can achieve most of what I want in Lightroom, other times I lean more heavily on Photoshop—usually it’s a fairly even balance of the two.
Given my hit-and-miss approach, it’s probably most important to explain what makes a successful Milky Way image. Here’s what I’m going for:
- Minimal noise: Asked and answered (Topaz DeNoise AI)
- The right sky color: As far as I’m concerned, the color of the sky in a Milky Way image the photographer’s creative choice because at night the human eye doesn’t capture enough light to discern color. If you look at my recent Milky Way images, you’ll see that I tend to avoid a blue/cyan sky in favor of something more blue/purple. It just feels more night-like to me. But that’s just my opinion and I empower you to go with whatever color makes you happy (more on that below). And lately I’ve been skewing away from blue and toward black with just a hint of blue—and no cyan.
- Foreground detail: The amount varies with the foreground, and how much light I can give it without too much noise.
- Uniform sky tone and hue (as much as possible): I don’t like a huge difference between the sky near the horizon and up toward the top of the frame
- The stars should pop: I want the sky to be fairly dark, but the stars to stand out.
- No part of the Milky Way should be blown out: While I want the stars bright, I don’t want them too bright.
- And the final result still needs to look like night (even though it will be brighter than the human eye sees).
I make extensive use of Lightroom and Photoshop’s History panels. There’s no single best way to do anything in Lightroom and Photoshop, so I make a lot of what-if?, trial-and-error adjustments that I only keep if I’m satisfied. So you’re not going to get specific steps from me as much as you’ll get things to try and accept/reject. The other thing I want to emphasize is to magnify the image to 100% (1:1) when you’re trying to decide whether or not to accept an adjustment.
I always play with the Highlights/Whites/Shadows/Blacks sliders—lots of up/down trial-and-error adjustments to find the right balance (gotta love that History panel). The Lightroom Clarity and Texture sliders will make the stars pop (and sometimes the foreground), but be especially gentle with these to avoid exaggerating the noise and making the stars look crispy). And Dehaze will add contrast to the sky that really enhances the Milky Way, but it also might darken parts of the scene too much. As with Clarity and Texture, Dehaze moderation is key.
I use lots of techniques to get the color I want—often just one or two adjustments are enough, and sometimes it requires a lot of adjustments. In Lightroom, I play with Color Temperature and Tint. That usually means cooling the temperature to somewhere in the 3000-4000 range, and nudging the Tint slider slightly to the right—less cyan, more red (which creates a blue with hints of purple). When those things don’t do the job, I’ll play with Lightroom’s HSL sliders. And now that Lightroom’s masking capability makes separating sky and foreground a snap, I usually process each independently of the other.
To tweak the color in Photoshop, I usually select the area I want to adjust, Feather it fairly loosely (large Feather Radius), and create a Color Balance and/or Saturation layer, doing lots of trial-and-error moves with each. And when using Saturation, I almost always work on specific colors, adjusting some combination of Hue, Saturation, and Lightness until I’m satisfied. Also, I find that some of the other adjustments I make in Lightroom and Photoshop tend to pump up the color too much, so I usually desaturate the sky a fair amount in Photoshop.
To make the Milky Way more prominent, a few passes with the Dodge brush set to Highlights can do wonders by brightening the stars without affecting the sky. But don’t overdo it—I prefer multiple passes at low Opacity (less than 20).
Probably the trickiest thing to contend with is a different hue near the horizon than I get in the rest of the sky. I can usually mitigate this somewhat with a feather selection and a Color Balance or Saturation layer, described above. And sometimes, if I’m really brave, I’ll select the offending area, Feather it, use the Eyedropper tool to pick the color I want, and the Paint Bucket tool to apply the color to the selected area. I usually get better results with Tolerance set fairly high (>50) and Opacity fairly low (<30). If you do this, don’t expect it to work every time, and always examine the results at 100% because it can introduce some pretty nasty blotchiness that doesn’t jump right out at you on first glance at lower magnification.
With most of my images, the last thing I do before saving is sharpen. But since night images are rarely about fine detail, and sharpening exacerbates noise and creates crispy-looking stars, I usually don’t sharpen my Milky Way images.
These tips are not intended to be the final word on Milky Way processing—I just wanted to give you some insight into my approach, both my goals and the steps I take to achieve them. I’ve been using Photoshop for a long time, but don’t consider myself a Photoshop expert, not even close. There may be (probably are) better ways to do many of these things. But I’ve always been a simple-first photographer: Do things the simplest possible way until you find some way that’s better, or until you encounter something you just can’t do without upping the complexity. And if you take nothing else away from this, I hope you at least feel empowered to experiment until you achieve results that make you happy.
About this image

Milky Way Reflection, Lake Wakatipu, New Zealand
New Zealand is hands down my favorite place to photograph the Milky Way. Better even than my previous favorite, the ultra-dark Colorado River at the bottom of the Grand Canyon, because: 1) the skies in New Zealand are almost as dark as the bottom of the Grand Canyon 2) the New Zealand air is usually cleaner (less dust and pollution) 3) New Zealand’s winter matches the Milky Way core’s prime months, so in June (when we do our workshop) the galactic center is photographable from about 7 p.m. until 7 a.m. 4) the Milky Way is higher in the sky down here.
Milky Way photography is a priority in the New Zealand workshop—not just for the people who sign up, but for Don and me as well. But since it’s winter, we often battle clouds, so the Milky Way on any given night is never a sure thing. To maximize our chances, over the years we’ve been doing this workshop Don and I have identified a handful of prime Milky Way locations at various points along the workshop’s 10-day journey.
A Milky Way location needs a good view of the sky in the direction of the Milky Way (in the first hours after sunset, that would be southeast), a compelling foreground, and minimal light pollution. It took us a couple of years, but we finally found a nice Milky Way spot on beautiful (and large) Lake Wakatipu near Queenstown. Since the workshop begins and ends in Queenstown, this spot allows us to check off the Milky Way box at the start of the trip (fingers crossed), and also gives us one last resort shot at it at the end of the trip.
This year we lucked out with clear skies on our very first night. So after a nice sunset farther up the lake toward Glenorchy, we drove back toward town and pulled into “our” spot. After waiting about 30 minutes for the sky to darken, we went to work. At first Don and I concentrated on getting everyone up to speed with Milky Way photography, but eventually we were able to get to work on a few images of our own.
On this New Zealand trip I’d decided to try my Sony a7R V at night—but because I’ve never tried this camera at night, to hedge my bets I also packed the trusty a7S III. The lens I chose for this trip was my Sony 14mm f/1.8 GM—almost as fast as the 24mm f/1.4, the Milky Way’s elevation in the New Zealand sky makes opting for the extra width of the 14mm a no brainer.
I started with the a7S III, but after a half dozen or so images switched to the a7R V. I haven’t looked at the a7S III images yet, but I have to say that I’m blown away by the results I got with my a7R V. Blown away enough that my days of packing a body just for night photography might very well be over. To get an image as clean as this one with 61 megapixel everyday camera truly is a (cliché warning) game changer.
I’ve photographed here several times before, each in slightly different conditions. This year the fact that there wasn’t as much snow on the peaks as previous years was more than compensated by the still, reflective lake surface.
We still have three more workshop nights, and I have cautious hopes for our planned Milky Way shoot at Tasman Lake in Mt. Cook / Aoraki National Park in a couple of nights. But if the clouds take us down, there’s no stress because we already have a great Milky Way shoot in the bank. Add that to our very special day cruising on Doubtful Sound, yesterday’s excellent Wanaka Tree shoot, and today’s spectacular Fox Glacier helicopter ride and hike, not to mention lots of fun with a bunch of great people, and I’m already declaring this trip an unforgettable success.
A Milky Way Gallery
Click any image to scroll through the gallery LARGE


")


Expecting the Unexpected
Posted on June 11, 2023
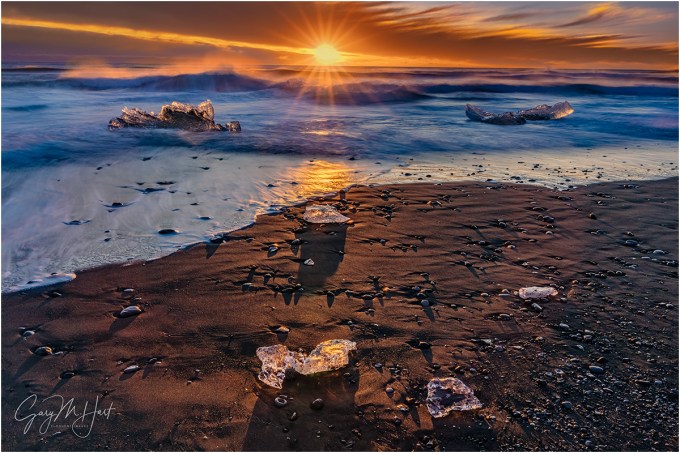
Bejewelled, Diamond Beach, Iceland
Sony a7R V
Sony 24-105 f/4 G
ISO 50
f/18
1.6 seconds
Usually when you arrive at a scene you have a pretty good idea of the landscape features in store. There’s El Capitan, or the Wanaka Willow tree, or Deer Creek Fall, or any number of stationary landscape icons photographers flock to—your job is simply to find the best way to render this permanent beauty. To further assist the process, you can probably even tap your memory, mentally recalling hundreds (thousands?) of prior images taken by others visiting this very spot. Photographing these locations isn’t necessarily easy, but it’s usually relatively straightforward.
On the other end of the spectrum are those scenes that surprise you every time, scenes so changeable they require eyes-on to figure out what’s going on this time before making your plan for photographing it.
That’s the way I feel every time I visit Diamond Beach in Iceland (Breiðamerkursandur for short). The first time I photographed here I was completely dazzled by the collection of jewel-like ice chunks embedded in jet black sand and continuously rearranged by churning surf. Some of these sparkling jewels were as large as cars, others were no bigger than small shards of glass.
Having previously viewed many Diamond Beach images, most with some version of motion-blurred waves sweeping around an ice chunk (or chunks), I immediately set out to attempt my own version of those tried-and-true standards. Easier said than done.
It turns out the moving water also moves the ices, so finding the shutter speed fast enough to anchor the ice yet long enough to blur the water, then timing the shutter click for the ideal water blur with the least ice blur is a real challenge. Worse still, you’re trying to do all this while keeping a vigilant eye on the frigid (and aggressive) North Atlantic surf. Between the shifting ice and constant assaults from waves, it’s nearly impossible to stay in one location long enough to really work a shot the way I like to.
Don Smith and I do at least one Iceland workshop each winter, so the following year, armed with this wealth of prior knowledge, I returned with a plan—only to be quickly reminded that Nature hates plans. And with each visit in subsequent years I’ve come to learn that no two Diamond Beach experiences are the same, varying tremendously with the tide, surf, and (a recent insight) amount of ice on the beach.
Last year the surf was so extreme that no one in our workshop group even ventured onto the beach, remaining content instead with more distant (longer focal length) captures from atop the rise just above the beach. So imagine the surprise when, despite our extreme caution, 3 people in the group were knocked down and drenched by a rogue wave that defied our most dire expectations, charging up the beach and onto our “safe” perch faster than they could retreat.
This year Don and I did two Iceland workshops and again encountered something new at Diamond Beach: (virtually) no ice. We learned that extreme cold had prevented calving from nearby Vatnajökull Glacier and rendered Glacier Lagoon unphotographable for our first group. Fortunately, at nearby Diamond Beach that group found a smattering of ice, just enough to photograph.
Our second group got more ice in Glacier Lagoon—not a lot, but enough to enjoy a couple of nice shoots there—but no ice actually on Diamond Beach. After first deciding Diamond Beach would be a complete swing and miss, Albert Dros (our group’s Iceland guide) and I explored and found a handful of microwave-size and smaller ice cubes high and dry on the platform above the beach (deposited I suspect by extreme surf at high tide).
While the group filed out of the bus and bundled up against a light rain, Albert and I picked up several of the larger (surprisingly heavy) ice chunks and relocated them into the surf so they could at least get their classic Diamond Beach blurred surf images. It actually worked out surprisingly well and we ended up shooting there for more than an hour, until the rain picked up and drove us back to the bus.
I guess the lesson here is the need for resourcefulness, and the importance of adjusting to the conditions you’re dealt rather than trying to force something that isn’t there, or simply throwing up your hands and moving on.
The image I share today came from the first workshop, when there was a little ice on the beach, but still less than I’d ever seen. We came for sunrise and arrived early enough to be the first on the beach. Everyone quickly spread out, some staying relatively close to the bus where there was a good assortment of surf-swept smaller ice. A few of us wandered more than a 1/3 mile down the beach where we saw a little less ice, but also a couple of larger chunks dancing in the surf.
I attempted find compositions that juxtaposed nearby smaller ice with the two larger chunks, but because this big ice was actually in the surf, all the relationships changed with each wave—not exactly the way I like to shoot.
After more than an hour of this the sun finally appeared, and I took the opportunity to work on sunstar images in the couple of minutes it took to rise between the lower and upper layer of clouds. Challenged by the constantly shifting ice and always moving surf, I still managed to get a dozen or so images before the sun rose out of view.
Workshop Schedule || Purchase Prints || Instagram
More Iceland
Click any image to scroll through the gallery LARGE


Connections (It’s Personal)
Posted on June 6, 2023
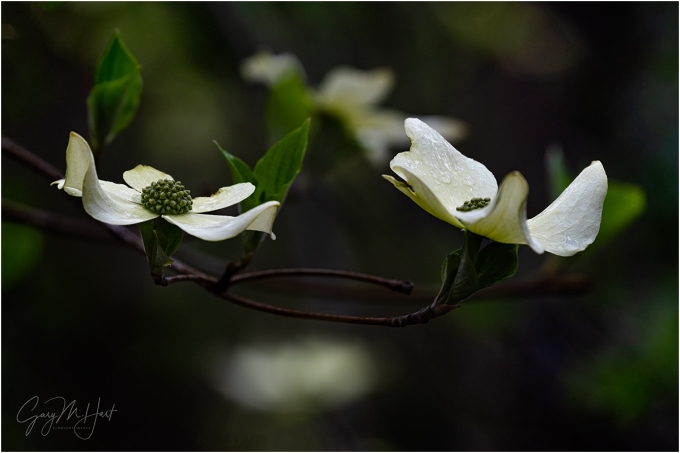
Afloat, Raindrops on Dogwood, Yosemite
Sony a7R V
Sony 100-400 GM
2 extension tubes (26mm total)
ISO 800
f/8
1/200 second
Once upon a time, whenever I heard a photographer say, “That’s exactly what I saw when I was there,” I’d cringe (because that’s impossible). Today, given the proliferation of AI generated and enhanced images, maybe I should rethink my perspective and just be glad that the photographer was there at all.
There’s a lot of buzz in the photography world about AI and its ability to manufacture images. I can’t deny AI’s benefits for many legitimate uses, but creating a landscape image from the comfort of your office chair with just a few words of description? Count me out.
Of course we’ve all seen landscape and nature images that were clearly faked, either through Photoshop manipulation (jumbo moon anyone?) or more recently with the help of AI. Somehow these images manage to fool enough people to generate a host of social media Likes, comments (“stunning!”), and shares, which tells me there’s a subset of photographers whose prime motivation is acclaim. Photography needs to make you happy, so if this makes them happy, I can’t begrudge these photographers the attention they need—my concern is the damage this inclination to solicit attention at any cost does to the credibility of the real photographers.
This is not a rant against image processing. In fact, in today’s world of digital capture, effective processing is an essential part of the creative process (as it has always been for B&W photography). But while the computer is important to digital capture, it’s there to serve the image, not generate it. Because I always want my creativity to happen in my camera, not my computer, I have to start thinking about processing long before I click the shutter. (The digital-capture equivalent of Ansel Adams’ “visualization” approach.)
Of course photography appeals to different people for different reasons. As much as I appreciate the processing power digital capture has brought to photography (especially to color photography—processing wasn’t a practical option for color film/transparency shooters), processing is probably my least favorite part of photography. And I know many excellent photographers who love processing and are far more masterful at it than I am.
Speaking only for myself as a creator and consumer, my photography is motivated by connection. When I create an image, I need to feel a personal connection with my subject before moving on the seeking to convey that connection in an image. This desire for connection also drives my need to write about my images—I pretty much never share a new image until I’ve written about its capture and what the image means to me (hence this blog).
When I view the photography of others, I want to feel like they’re conveying their own connection with the scene, not just trying to show me something pretty—and in so doing, they’re offering me a connection to their world. While every image from every photographer is processed (either by the photographer, by the camera, or both), the best processing is done in a way that allows me to ignore the processing so I can simply connect with the scene.
I realize that “connection” in this context is rather nebulous, but I do think connection helps explain why different images resonate more or less with different people. If you’re a photographer who hasn’t identified your own connections to the world, a good place to start would be to consider the things in your world that ignite that unsuppressible (reflexive?) urge to nudge a friend or loved one, point, and excitedly exclaim, “Look at that!”
“That” could be a dazzling city skyline, a happy dog stretching its head out the window of a passing car, a small child devouring an ice cream cone, a crisp mountain reflection, or an infinite number of other scenes you might encounter in your daily life. My own nudge-and-point (and raise my camera) triggers are almost always something in Nature—anyone spending time with my images (I hope) has a pretty good idea what they are. (Spoiler alert: rainbows, reflections, poppies, dogwood, anything celestial, and much more.) And speaking only for myself, writing about an image is as important as the capture and processing—not only does writing help me distill the feelings the scene provoked, it helps me understand my overall relationships with my subjects.
Even more important to me than the image I create is the in-Nature creation process where the connection actually starts. I’m not saying that I wander the woods with a camera consciously thinking about connections—it’s more a state I naturally fall into while in Nature that compels me to stop and make an image, or to patiently wait for the image to happen.
I know the subjects that resonate with me, and being as active on social media (as I have to be) gives me pretty good insight into the images that do and don’t resonate with others. So before posting a new image, I have a pretty good idea how many Likes, shares, and comments it will generate, but I never let that dictate the subjects I choose, or the images I share.
Just as I don’t share images that don’t thrill me, even when I know they’d be received enthusiastically, I also don’t hesitate to share personal favorites that will most likely generate crickets from the masses. But that’s okay—even though those personal favorites don’t elicit the volume of enthusiasm I’d like, the intensity of the enthusiasm I do receive from these images tells me connections were indeed made.
Today’s dogwood image is one of my potential “cricket” shares. It likely won’t thrill as many people as some of my more colorful, in-your-face-beauty landscapes do, but I also suspect there will be a few people with whom it connects intensely. It’s one of several I captured and processed on last month’s quick Yosemite overnighter with my brother (click the link for the full story).
Speaking of connection, few things in photography make me happier than exploring a forest like this, searching for intimate scenes that can only be revealed by a camera. When I get into a scene like this, with no one else requiring my attention and knowing I can be there as long as I need to be, time loses all meaning.
What I enjoy most about working these scenes is how different the world looks through my viewfinder than it looks to my eye. For example, the backgrounds in all of these forest dogwood images are almost always busier than what the image conveys. Through careful positioning, framing, depth management, and exposure, I’ve learned how to eliminate, simplify, complement, and disguise busy backgrounds.
My process starts with identifying a dogwood (or whatever the scene’s subject is) that I can isolate from its nearby surroundings, then moving around until I find a complementary background to be rendered as detail-less color and shape. This is almost always achieved by focusing close on a carefully chosen spot, usually using a telephoto zoomed to near the maximum focal length (or occasionally with my 90 macro), often with extension tubes to focus even closer (further limiting depth of field). I usually shoot these wide open (widest aperture for minimal DOF), but in this case I stopped down slightly to get a little more definition in the background dogwood.
Could I have stayed home and done something like this on my computer? Perhaps, but why rob myself of all that joy?
Workshop Schedule || Purchase Prints || Instagram
Personal Connections
Click any image to scroll through the gallery LARGE


, Yosemite")


