Eloquent Images by Gary Hart
Insight, information, and inspiration for the inquisitive nature photographer
Yosemite and the Joys of Spring
Posted on May 15, 2025
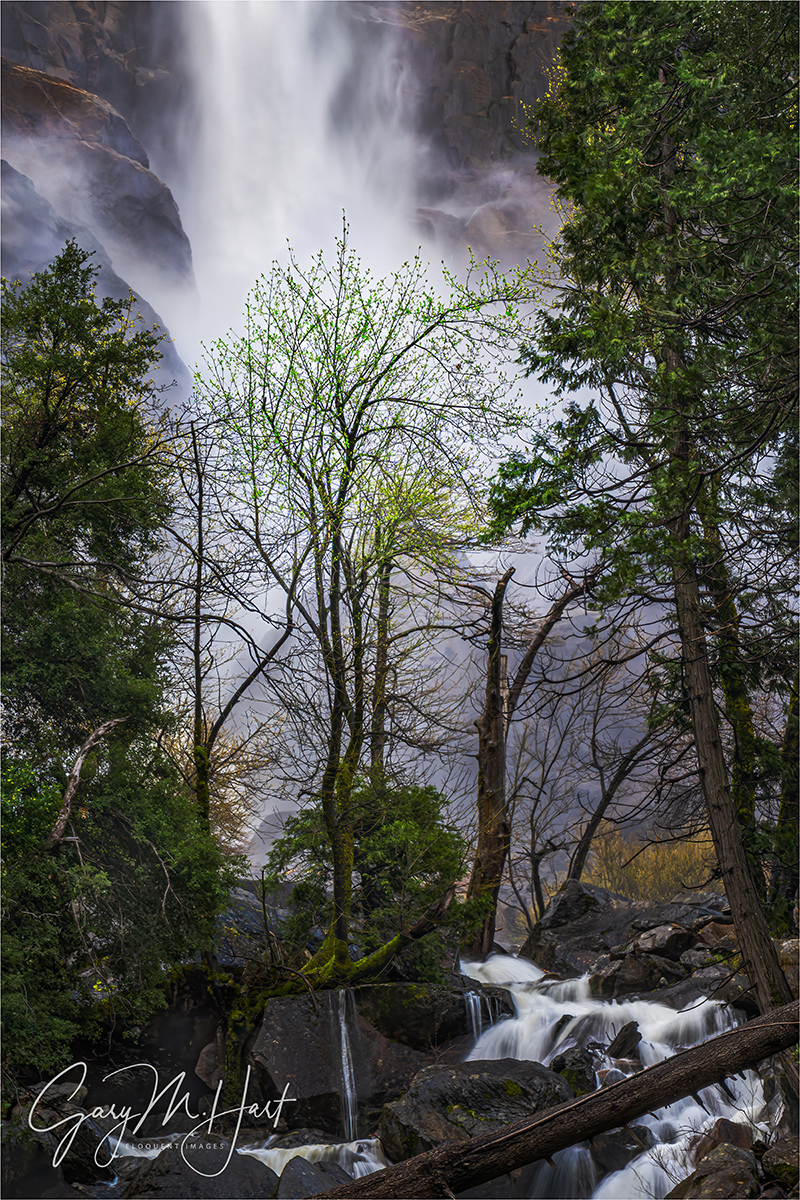
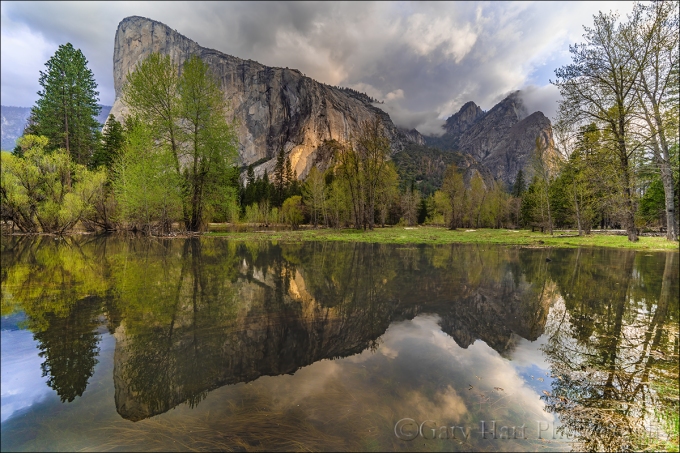
Tree and Bridalveil Fall, Bridalveil Creek, Yosemite
Sony a7R V
Sony 24-105 f/4 G
ISO 200
f/16
1/5 second
Probably the number one question I’m asked about Yosemite is, “What’s the best season for photography?” My response always sounds as if crafted by a waffling politician, but I swear I just don’t have the absolute answer everyone wants. And since I get to photograph Yosemite far more than the average photographer, and have for many years, my priorities are quite likely different than those of the average photographer.
I can say that my least favorite season is summer, because that’s when the waterfalls dry, the sky suffers from a chronic case of the blues (great for tourists, not so much for photography), and tourists swarm the park like ants to ice cream on pavement. But even summer offers beauty not possible any other season, mostly in the form of High Sierra splendor. Closed by snow most of the year, (usually) by late spring the high country roads to Glacier Point and Tuolumne Meadows have opened vehicular access to the exposed granite, wildflower-sprinkled meadows, gem-like lakes, and all the other pristine joys of Yosemite’s incomparable backcountry. And while Yosemite’s high country isn’t quite the respite from crowds it once was, its wide open spaces make solitude still much easier to find.
My own personal favorite season for creative photography is autumn. Though the waterfalls have dried completely or (at best) dwindled to a trickle, in autumn Yosemite Valley’s abundant assortment of deciduous trees throb with yellow and red. Adding to this varied color are mirror reflections in the Merced River, which has been slowed to a crawl along the length of the valley. As an added bonus, by the time the color arrives (mid/late October), dry waterfalls also mean most of the crowds have disappeared.
Winter is probably Yosemite’s most photographically variable season. Show up on a blue sky day in the midst of an (not uncommon) extended dry spell, and you’ll likely find brown meadows, trickling waterfalls, and dirt instead of snow. But arrive during or shortly after a snowstorm, and you’ll enjoy Yosemite Valley at its hands-down most beautiful—arguably one of the most beautiful sights anywhere on Earth. And since winter is the heart of California’s rainy season, the swirling clouds of a clearing storms are never more likely—even when the temperatures aren’t cold enough in Yosemite Valley to turn the rain to snow. Winter (specifically, mid/late February) is also when Horsetail Fall might turn molten red at sunset. Then there’s the rising full moon, which aligns most perfectly with Half Dome only in the winter months.
Yosemite in spring is all about the water—the season when the vertical granite can’t seem to shed the winter snowpack fast enough. Not only are the spring views dominated by well known Yosemite, Bridalveil, Vernal, and Nevada Falls, a seemingly infinite supply of ephemeral falls appear as well for a few weeks or months each spring. Rainbows on the waterfalls, dogwood everywhere, and reflective vernal pools decorating the meadows offer enough beauty to thrill tourists and photographers alike. All that water, paired with fresh green foliage, make spring the time I recommend for first-time visitors—it’s simply the season most likely to live up to expectations, and the least likely season to disappoint.
I stress about the conditions for my students before every workshop, but spring is the least stressful season for me because in Yosemite, there’s just no such thing as a bad spring day. Even though this is a relatively down year for the snowmelt that feeds the falls, last month’s Yosemite Waterfalls and Dogwood got a firsthand taste of all the joys of a Yosemite spring: plenty of water in all the falls, still pools dotting the meadows, and dogwood approaching peak bloom. And despite more clouds than usual, we had enough sunlight to photograph waterfall rainbows from four locations: three from different views of Bridalveil Fall, and one at the base of Lower Yosemite Fall.
One spot I never miss in spring is Bridalveil Creek, which offers an infinite number one-0f-a-kind scenes despite being in the heart of one of the most photographed locations in the world. Autumn is my favorite time to photograph Bridalveil Creek because I can add colorful leaves to the chain of cascades and pools beneath the fall, spring is a close second. While the creek in autumn seems to linger between each cascade, in spring it’s in far too much of a hurry to dally among the rocks.
Because of the intimate setting, its lack of a single obvious subject, and the sheer number of compositional elements begging to be composed into an image, I usually wait until the final day to bring my groups here. By then, everyone has refamiliarized themselves with their cameras, benefited from several days of training and image reviews, and had ample opportunity to get their creative juices flowing.
As usual, I started this group’s final morning at Bridalveil Creek, arriving just as the sky brightened ahead of the rising sun. Because this is an area to wander rather than stick together and photograph as a group, I began with a pretty thorough orientation, then set everyone free. I spent nearly an hour without my camera bag, just walking around trying to reach everyone to answer questions and make sure they were happy. Satisfied that all was well, I walked back to my car and grabbed my camera bag to see what I could find in the nearly one hour remaining.
I often head to the third bridge and work my way to some larger cascades (or small waterfalls) upstream; other times, especially when the group seems to require more help, I just shoot from one of the bridges. But this time I took advantage of a new gap in the trees that opened a new view of the fall just upstream from the third bridge. I’d been especially drawn to a young tree with brand new leaves, and envisioned juxtaposing it against the explosive white mist at the base of the fall. Three or four others in the group were working this scene, so I worked around them and finally ended up with the composition I’d visualized earlier.
With my 24-105 lens I started quite a bit wider, and gradually tightened my compositions as familiarity with the scene’s nuances enabled me to eliminate things. The patterns at the base of the wall changed continuously, so once I found a composition I liked, (true to form) I photographed it more than a dozen times, at several shutter speeds, to give myself a variety of water patterns and blur effects.
Join Me In Yosemite
The Joy of a Yosemite Spring
Click any image to scroll through the gallery LARGE


Ruminating on my Workflow—Both Digital and Analog
Posted on May 10, 2025

Spring Sunset, Half Dome, Yosemite
Sony a7R V
Sony 24-105 f/4 G
ISO 50
f/16
2 1/2 seconds
In one of the training sessions during last week’s Yosemite Spring Waterfalls and Dogwood photo workshop, someone asked about my digital workflow. During my (riveting) file management summary, I mentioned off-handedly that I never delete a raw file, regardless of its content. The amount of push-back I got surprised me, but it caused me to consider more closely my reasons for doing something I never imagined could be so controversial.
For starters, in addition to my primary reason for never deleting my raw files which I’ll get to shortly, I can cite several valid secondary reasons:
- Processing improvements might someday render a previously unusable image salvageable. For example, once considered a pipe dream, the ability to sharpen previously soft images has arrived, and capability continues improving. And today’s noise reduction software has allowed me to process images I once deemed so unprocessable that I would never have considered keeping them.
- I often use images from past shoots for information. Keeping each camera’s timestamp accurate (by adjusting it before each shoot) enables me to return virtually to prior locations and determine things like the time sunlight strikes a particular feature, or (by checking against past moon/sun rise/set image) the number of degrees a peak or mountain range rise above a hypothetical flat horizon.
- Applying my click-evaluate-refine-click… approach to arrive the final (“perfect”) image, it’s helpful to me to be able to reference the steps that got me to any given image.
- Knowing that I never delete anything saves me from the inevitable panic that would ensue when I can’t locate image where I expected to find it.
Each of these is a valid reason that, to me, by itself might be enough to justify a no-delete policy. But honestly, the biggest reason I don’t delete images is time. Going through each image one-by-one wastes minutes or hours that could have been spent on more productive endeavors; accelerating the image purge process by deleting large groups of images in one fell swoop, risks inadvertently expunging something important.
The most common arguments I hear in favor of culling images are organization and storage space. To which I say, locating any image isn’t a problem if you have an organized import procedure—mine is quite simple, involving a folder for each year, embedded with folders for each of that year’s shoots, then letting my Lightroom import rename each file to something descriptive. And storage space? Consider that on my desk is an 18 TB hard drive that cost me around $300. Not only does it contain every digital original (jpeg for a year or two, then raw ever since) I’ve captured since I transitioned to digital more than 20 years ago (2003), it’s still is only a half full. In other words, storage is cheap—really cheap.
I’m not advocating for my approach as much as I’m explaining it. As with pretty much everything else in photography, and despite what you might hear from self-proclaimed experts, there is no universal “best” way to do something: choose the workflow that’s best for you.
Awkward segue
“Workflow” has become something of a buzzword in the photography world, generally apply to image management. But really, it can describe the processes that guide any task from start to finish. Thinking about last week’s Yosemite dogwood workshop, it occurs to me that I also have an analog workflow for running my workshops, developed over the past 20 or so years (has it really been that long?).
A workflow is only as good as its ability to handle the unexpected or uncommon: flexibility. In my image management workflow, flexibility includes (among other things) multiple and redundant backups, including at least one offsite backup, to safeguard against any imaginable threat to my images. But that flexibility should also factor in the ability to quickly locate and access any image quickly, and in multiple ways, whether I’m at home or the road.
In my Yosemite workshops, flexibility starts with my lifetime of accumulated Yosemite knowledge that enables me to structure each workshop on the fly, based on the conditions. (FYI, I’m not trying to portray myself as the only photographer with this kind of intimate knowledge.) I start with a (mental) A-list of locations I want to get my group to no matter what, and a B-List of locations that I tap based on the conditions. And whether a photo spot is the A- or B-list, the when of each location visit is always determined by the conditions.
Last week’s workshop was a perfect example of why I never want to get too locked into a plan. We enjoyed conditions that were equal parts beautiful and challenging, requiring a lot of quick thinking and abrupt shifts to take full advantage. The fickle weather included low clouds (we didn’t even see all of Half Dome until the third day), high clouds, blue skies, light drizzle, torrential downpours, lightning and thunder, and a short-lived but generous dose of hail. Compounding the complications for me were especially unreliable weather reports that at some points felt downright random.
In a blue-sky Yosemite workshop, we may only get to Tunnel View once or twice, but when we enjoy actual weather, each visit to Tunnel View provides a completely different look. In this workshop, we made it to Tunnel View at least a half dozen times. And in a typical (more benign weather) dogwood workshop, I try to give my group time to get themselves in their creative zone by holding off on the serious dogwood shoots until day three (of four). But this time, the conditions on days one and two were so perfect for photographing dogwood (peak bloom, dense clouds, no wind), we started photographing dogwood on our first afternoon, saving the larger views for later in the workshop when the weather forecast promised that there would be fewer clouds obscuring Yosemite’s monoliths.
But photographing El Capitan and Half Dome requires El Capitan and Half Dome to actually be visible (not my first Yosemite rodeo)—since they usually disappear into the clouds when it rains, I grew increasingly concerned when the forecast for our final day started trending toward rain. One week before the workshop, our last day was “Mostly sunny, with a 10% chance of showers”; by the time the workshop started, the final day forecast was “Party sunny, with a 30% chance of showers.”
Forecasts are important because I plan locations based on conditions—not just conditions now, but my expectations of conditions later in the workshop (an inexact science at best). For my A-list locations especially, I don’t want to risk missing one entirely because I delayed until later in the workshop, only to find conditions deteriorated more than I’d expected.
For several reasons, I like finishing my Yosemite workshops with a sunset view of Half Dome from a peaceful bend in the Merced River on Yosemite Valley’s the east side. Though it’s a personal favorite that I visit a lot on my own, I also love sharing this spot with my groups. But when the workshop’s penultimate day presented a nice mix of clouds and blue sky, and the rain forecast for the final day had increased to 60%, I upended my preferred workshop workflow one more time and bumped my planned last-day Half Dome shoot to that evening.
I can’t say that my decisions always work out this well, but the personal validation is sure nice when they do. We arrived about an hour before sunset and found beautiful conditions from top to bottom. I love the fresh green of Yosemite’s brand new leaves each spring—I’d been to this spot with my moonbow group earlier in April, but the green was just starting then. This time the trees had completely leafed out and the difference was glorious. In autumn we can get mirror reflections here, but with peak spring flow swelling the Merced River, the reflection was a nice abstract of color and shape instead. And to top it all off, the clouds above Half Dome changed by the minute, making the sky much more interesting than the boring blue that’s so common in Yosemite.
Still, despite all this, my camera bag stayed on the ground nearby as I worked with my group, pointing out composition opportunities and encouraging them to find foregrounds and maybe try a neutral density filter to enable a long exposure that might reveal hidden (to the naked eye) patterns in the flowing water. As sunset approached and the light faded, some started packing up their gear. I told them not so fast: Half Dome can get light up to five minutes after sunset, and we have no way of knowing whether there’s an opening on the horizon for the sun to slip through. In other words, we’ll just sit tight for a few more minutes.
As if on queue, almost immediately I saw some of the highest clouds start to brighten and warm, so I opened my camera bag and extended my tripod, just in case. Within a minute or two the clouds above Half Dome started to pinken and I had my camera out and mounted within seconds.
There’s no time for creativity and experimentation when I’m with a group, but I’m extremely familiar with the many composition options here and went straight for my go-to good sky and reflection framing: vertical, Half Dome slightly right of center, just wide enough to include all of the best parts of the clouds (more specifically in this case, the color) and their reflection. You could call this compositional workflow (there’s that word again) that enabled me to get a nice image as quickly as possible.
Focus was easy since everything was at infinity. I wanted to emphasize the water’s motion with a long exposure, but didn’t have time to retrieve and screw on a neutral density filter. Fortunately, it was late enough that I was able to get a 2 1/2 second shutter speed using ISO 50 and f/16.
The pink only lasted a minute or two, and the direct light never reached Half Dome, but no one complained. As it turned out, our final sunset the next day was completely washed out by an electrical storm that swallowed Half Dome and El Capitan, and included some of the heaviest rain I’ve ever seen in California (and at one point chased me into the Wawona Tunnel to escape marble-sized hail).
One more thing
Going back to this compositional workflow I idea, in general I’m opposed to formulaic composition because it stifles creativity, but every image doesn’t need to break new ground, and like I said, nothing in photography is absolute…
More Yosemite Photo Workshops
Workshop Schedule || Purchase Prints || Instagram
Variations on a Scene: Images From This Location Through the Years
Click any image to scroll through the gallery LARGE


Natural Synergy: Building Relationships In Nature
Posted on July 24, 2023

Spring Bloom, Dogwood and Bridalveil Fall, Yosemite
Sony a7R V
Sony 100-400 GM
2 extension tubes (26mm total)
ISO 1600
f/8
1/60 second
After several weeks working through my New Zealand images, I’m giving myself (and you) a break from the land Down Under and returning to Yosemite. Because I absolutely refuse to visit Yosemite in summer, I returned to images from my trip in early May to photograph the dogwood, two subjects on my short-list of favorites.
Looking at these Yosemite images, combined with my still fresh New Zealand memories, reminds me of the extreme good fortune of my life. When I decided to make photography my career nearly 18 years ago, I promised myself I’d only photograph what I love. Not because I believed that’s where I thought I’d have the most success (I wasn’t that calculating), but simply because the only good reason I could come up with for leaving an excellent job with a great company was to do something that gave me joy. Lucky me—today most of my time behind a camera is spent pursuing subjects that touch a special place in my heart, subjects I’m naturally drawn to, camera or not. (And the bills are still getting paid.)
The first emotional magnets that come to mind are the fixed locations, like Yosemite, Grand Canyon, and New Zealand (to name just three) that draw and never cease to inspire me. More transient favorites include things like lightning, rainbows, and reflections, and seasonal subjects like fall color, winter snow, and spring flowers. And of course pretty much anything celestial excites me.
Relationships
As much as I enjoy these subjects individually, I especially love the natural synergy that happens when I can combine two or more in an image. While the Grand Canyon, an erupting volcano, or Yosemite Valley, are special by any standard, pairing the Grand Canyon with a lightning bolt, Kilauea Caldera with the Milky Way, or Yosemite with blooming dogwood always feels better to me than the sum of those individual parts.
This juxtaposition of subjects is so essential to photography that we often do it without thinking. For example, when we happen upon a scene and see El Capitan reflecting in the Merced River—click. Or look at that vivid sunset over the Sierra Crest—click. Nice pictures, but most successful photographers are more strategic and tactical about Nature’s juxtapositions. We find a subject we want to photograph, then figure out other natural elements that might pair well with it. Sometimes that’s simply a matter of walking around until we find an alignment that works; other times it means researching and returning months or years later to photograph the relationship we seek (with no guarantee it will happen).
When planning these shots, it helps me to think in terms of static and dynamic juxtapositions: static being relationships between permanent landscape features (mountains, waterfalls, etc.); dynamic juxtapositions always include at least one ephemeral phenomenon that we can never count on (a rainbow or lightning bolt). I know the places where I can put El Capitan and Bridalveil Fall in the same frame, or Mt. Whitney framed by Mobius Arch (static juxtapositions), timing dynamic elements like Yosemite’s annual dogwood bloom or the full moon setting behind Mt. Whitney require planning and execution.
Visual Motion
But just because an object is static, doesn’t mean an image of it should be; and a dynamic doesn’t automatically translate to motion in a still image. It’s my job to create motion in my still images by encouraging my viewers’ eyes to move through the frame, providing a path for their eyes to follow and/or a place for them to land. Accomplishing this isn’t necessarily difficult, but it does usually require some foresight and physical effort.
Once I’ve arrived at a location and identified my primary subject, I challenge myself to find at least one other element on a different visual plane. Sometimes that’s easy, other times…, not so much. Nevertheless, when my prime subject is in the distance, I look for something closer to balance it; likewise, if my subject is nearby, I want something in the background to complement it.
Foreground or background, sometimes my secondary subject has almost as much visual appeal as the primary subject; other times it’s there simply to balance my frame. Regardless of its aesthetic appeal, my secondary subject’s placement, both relative to the scene’s other visual elements and to the frame’s boundary, can make or break an image. And don’t forget that (lacking explosives) pretty much the only way to change the relative position of two static objects in a photographic frame is conscious positioning of the camera (and the photographer behind it!)—in other words, move!
Visual motion happens in a still image when elements in the frame create actual or virtual lines for the eye to (subconsciously) follow. Tangible lines might be a horizontal horizon, vertical waterfall, or diagonal river. But often it’s up to me to create virtual lines—an implicit, connect-the-dots path between visual elements. Objects in a scene have what I call “visual weight”: some quality like mass, brightness, or color that pulls the eye. After identifying these elements, we can move around until their relative positions in the frame (again subconsciously) move the viewers’ eyes.
The last important relationship consideration is depth. Photography is a futile attempt to render a 3-dimensional world in a 2-dimensional world. Lacking actual depth, we can create the illusion of depth by ensuring that objects with visual weight exist throughout the front-to-back plane. As a general rule I avoid merging these essential visual elements to avoid conflating them on the same plane and defeating the illusion of depth that’s so essential in a two-dimensional image.
Of course every situation is different, so to paraphrase Hector Barbossa (Geoffrey Rush) in The Pirates of the Caribbean, my suggestions here are more guidelines than rules. But they should never be buried so deep in your memory that they’re not available to access and apply as situations arise.
About this image
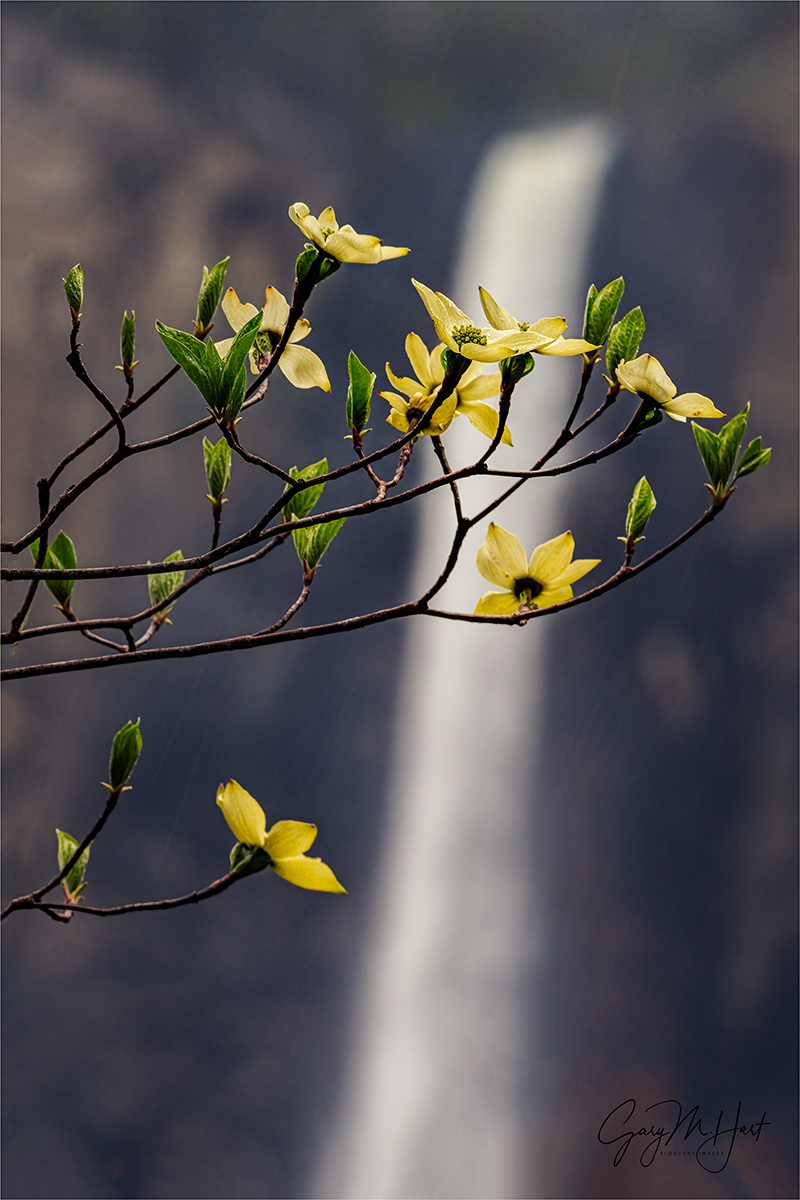
Spring Bloom, Dogwood and Bridalveil Fall, Yosemite
A week or so before capturing the dogwood image I’m sharing today, my brother Jay and I drove to Yosemite hoping to photograph the peaking dogwood bloom with Yosemite’s waterfalls at historic flows. There was indeed lots of water, but a cool spring had slowed the dogwood and they weren’t quite ready.
No problem—based on the dogwood’s premature state I observed in that first visit, I figured they needed another week or so to reach their full spring potential, so a week later Jay and I returned. Finding the dogwood in excellent shape, we spent pretty much the entire day photographing it.

Bridalveil Dogwood, Yosemite
With a light rain falling most of the day, one of the things in the back of my mind was attempting to reprise some version of a dogwood image I’d captured nearly 20 years earlier, one I consider a milestone in my aggressive relationship-seeking approach to photography. On the drive to Yosemite on that wet morning nearly 20 years ago, I decided I wanted to photograph a dogwood with a Yosemite icon in the background. That was the extent of my vision, but I pursued it relentlessly until I found a dogwood bloom I could pair with Bridalveil Fall. The rest, as they say, is history.
My goal on this year’s spring visit wasn’t to duplicate the old image, just my approach: blooming dogwood with Bridalveil Fall in the background. I returned to Valley View and found that original view of Bridalveil Fall blocked by other trees. So I traipsed about the forest looking for blooming dogwood with a clear sightline to Bridalveil Fall. That’s not as easy as you might think, but as you can see, I finally found a relationship that worked.
Instead of the close, wide angle shot I’d chosen all those years ago, this time I set up farther back, using a telephoto to enlarge Bridalveil and compress the distance between the two subjects. Because it was impossible for the dogwood and Bridalveil to be sharp (without focus-stacking, a personal no-no), I just embraced the softness in the fall, which helps the dogwood bracts stand out and makes it the primary subject.
It actually took about ten minutes before I was satisfied with the juxtaposition of dogwood and Bridalveil. Because there was a slight breeze, I bumped my ISO to 1600 for a faster shutter speed. I also played with different f-stops to find the right balance softness and clarity in Bridalveil. I think I like the old image better than the new one, but this one pleases me too, and it was a fun experience.
Natural Synergy
Click any image to scroll through the gallery LARGE


, Yosemite")


Connections (It’s Personal)
Posted on June 6, 2023
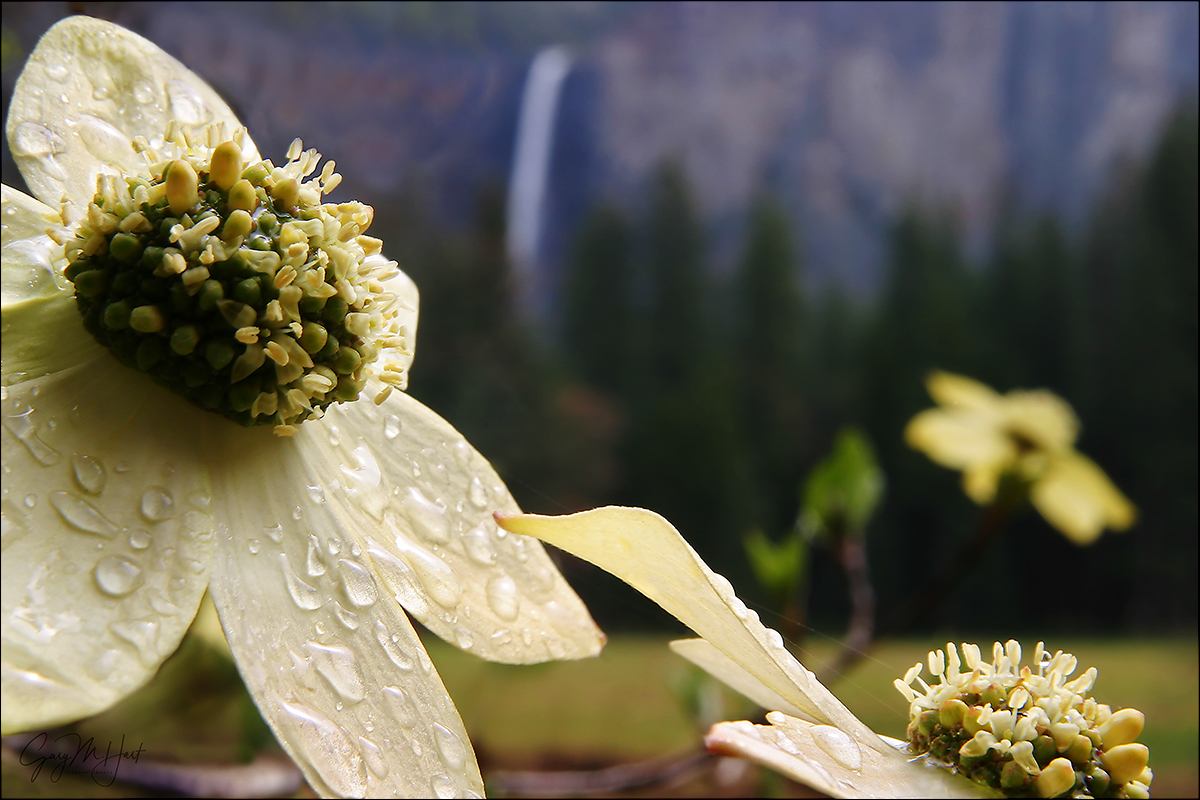
Afloat, Raindrops on Dogwood, Yosemite
Sony a7R V
Sony 100-400 GM
2 extension tubes (26mm total)
ISO 800
f/8
1/200 second
Once upon a time, whenever I heard a photographer say, “That’s exactly what I saw when I was there,” I’d cringe (because that’s impossible). Today, given the proliferation of AI generated and enhanced images, maybe I should rethink my perspective and just be glad that the photographer was there at all.
There’s a lot of buzz in the photography world about AI and its ability to manufacture images. I can’t deny AI’s benefits for many legitimate uses, but creating a landscape image from the comfort of your office chair with just a few words of description? Count me out.
Of course we’ve all seen landscape and nature images that were clearly faked, either through Photoshop manipulation (jumbo moon anyone?) or more recently with the help of AI. Somehow these images manage to fool enough people to generate a host of social media Likes, comments (“stunning!”), and shares, which tells me there’s a subset of photographers whose prime motivation is acclaim. Photography needs to make you happy, so if this makes them happy, I can’t begrudge these photographers the attention they need—my concern is the damage this inclination to solicit attention at any cost does to the credibility of the real photographers.
This is not a rant against image processing. In fact, in today’s world of digital capture, effective processing is an essential part of the creative process (as it has always been for B&W photography). But while the computer is important to digital capture, it’s there to serve the image, not generate it. Because I always want my creativity to happen in my camera, not my computer, I have to start thinking about processing long before I click the shutter. (The digital-capture equivalent of Ansel Adams’ “visualization” approach.)
Of course photography appeals to different people for different reasons. As much as I appreciate the processing power digital capture has brought to photography (especially to color photography—processing wasn’t a practical option for color film/transparency shooters), processing is probably my least favorite part of photography. And I know many excellent photographers who love processing and are far more masterful at it than I am.
Speaking only for myself as a creator and consumer, my photography is motivated by connection. When I create an image, I need to feel a personal connection with my subject before moving on the seeking to convey that connection in an image. This desire for connection also drives my need to write about my images—I pretty much never share a new image until I’ve written about its capture and what the image means to me (hence this blog).
When I view the photography of others, I want to feel like they’re conveying their own connection with the scene, not just trying to show me something pretty—and in so doing, they’re offering me a connection to their world. While every image from every photographer is processed (either by the photographer, by the camera, or both), the best processing is done in a way that allows me to ignore the processing so I can simply connect with the scene.
I realize that “connection” in this context is rather nebulous, but I do think connection helps explain why different images resonate more or less with different people. If you’re a photographer who hasn’t identified your own connections to the world, a good place to start would be to consider the things in your world that ignite that unsuppressible (reflexive?) urge to nudge a friend or loved one, point, and excitedly exclaim, “Look at that!”
“That” could be a dazzling city skyline, a happy dog stretching its head out the window of a passing car, a small child devouring an ice cream cone, a crisp mountain reflection, or an infinite number of other scenes you might encounter in your daily life. My own nudge-and-point (and raise my camera) triggers are almost always something in Nature—anyone spending time with my images (I hope) has a pretty good idea what they are. (Spoiler alert: rainbows, reflections, poppies, dogwood, anything celestial, and much more.) And speaking only for myself, writing about an image is as important as the capture and processing—not only does writing help me distill the feelings the scene provoked, it helps me understand my overall relationships with my subjects.
Even more important to me than the image I create is the in-Nature creation process where the connection actually starts. I’m not saying that I wander the woods with a camera consciously thinking about connections—it’s more a state I naturally fall into while in Nature that compels me to stop and make an image, or to patiently wait for the image to happen.
I know the subjects that resonate with me, and being as active on social media (as I have to be) gives me pretty good insight into the images that do and don’t resonate with others. So before posting a new image, I have a pretty good idea how many Likes, shares, and comments it will generate, but I never let that dictate the subjects I choose, or the images I share.
Just as I don’t share images that don’t thrill me, even when I know they’d be received enthusiastically, I also don’t hesitate to share personal favorites that will most likely generate crickets from the masses. But that’s okay—even though those personal favorites don’t elicit the volume of enthusiasm I’d like, the intensity of the enthusiasm I do receive from these images tells me connections were indeed made.
Today’s dogwood image is one of my potential “cricket” shares. It likely won’t thrill as many people as some of my more colorful, in-your-face-beauty landscapes do, but I also suspect there will be a few people with whom it connects intensely. It’s one of several I captured and processed on last month’s quick Yosemite overnighter with my brother (click the link for the full story).
Speaking of connection, few things in photography make me happier than exploring a forest like this, searching for intimate scenes that can only be revealed by a camera. When I get into a scene like this, with no one else requiring my attention and knowing I can be there as long as I need to be, time loses all meaning.
What I enjoy most about working these scenes is how different the world looks through my viewfinder than it looks to my eye. For example, the backgrounds in all of these forest dogwood images are almost always busier than what the image conveys. Through careful positioning, framing, depth management, and exposure, I’ve learned how to eliminate, simplify, complement, and disguise busy backgrounds.
My process starts with identifying a dogwood (or whatever the scene’s subject is) that I can isolate from its nearby surroundings, then moving around until I find a complementary background to be rendered as detail-less color and shape. This is almost always achieved by focusing close on a carefully chosen spot, usually using a telephoto zoomed to near the maximum focal length (or occasionally with my 90 macro), often with extension tubes to focus even closer (further limiting depth of field). I usually shoot these wide open (widest aperture for minimal DOF), but in this case I stopped down slightly to get a little more definition in the background dogwood.
Could I have stayed home and done something like this on my computer? Perhaps, but why rob myself of all that joy?
Workshop Schedule || Purchase Prints || Instagram
Personal Connections
Click any image to scroll through the gallery LARGE


, Yosemite")


The Dogwood Days of Spring
Posted on May 8, 2023

Dogwood Blooms, Yosemite
Sony a7R V
Sony 100-400 GM
2 extension tubes (26mm total)
ISO 800
f/5.6
1/250 second
In my first 14 years leading photo workshops, I never had to cancel a workshop. I have had to scramble a bit thanks to government shutdowns, hurricanes (really), closed roads, and power outages, but no cancellations. That record changed abruptly in spring 2020 when COVID-19 shut down the world, eventually costing me 14 workshops. Then, just as things started to reopen during the pandemic, extreme fire danger in the Eastern Sierra forced me to shut down another workshop.
By doubling up on workshops, and thanks to the patience and understanding of my affected customers, over the subsequent couple of years I was ultimately able to weather the cancellation storm with minimal (manageable) long term damage. In fact, this year’s second Iceland workshop in January was the final COVID make-up workshop—with clear sailing ahead, what could possibly go wrong?
Well…. First, a historically wet and cold winter delivered a historically deep Sierra snowpack. Then, after a cool spring, unseasonably warm temperatures last week goosed the dormant Sierra snowmelt, much of which had nowhere to go but Yosemite Valley, which forced closure of Yosemite Valley, flushing my May Yosemite Moonbow and Wildflowers photo workshop along with it. Not only was this bad news for my customers (not to mention my business), spring happens to be a personal favorite time to be in Yosemite. And this year I was particularly looking forward to all the water in Yosemite’s waterfalls and vernal pools.
For those keeping score at home, that’s 16 workshops lost in 3 years: 1 to fire, 1 to flood, and 14 to pestilence—clearly (as my wife pointed out), famine can’t be far behind. (Anyone who has endured a dinner at the Yosemite Valley Lodge cafeteria knows that’s not as much of a stretch as it sounds.) But seriously, unpredictability is a prime risk of pursuing profession so dependent on the fickle whims of Mother Nature. Still...
This month’s lost workshop was especially frustrating because the National Park Service, looking at the record Sierra snowpack and forecast hot temperatures, preemptively announced the closure of most of Yosemite Valley on the Wednesday before my workshop, which was scheduled to start the following Monday. The closure, they said, would begin at 10 p.m. Friday and continue until Wednesday at the earliest (their words), and possibly longer. Since my spring workshop is set entirely in Yosemite Valley (this year the high country will closed by snow until at least June), and was scheduled to span Monday through Thursday, I had no choice but to cancel. Immediately upon receiving the news, I scrambled to notify the workshop participants, cancel my lodging, and start the process of rescheduling everyone.
So imagine my surprise when, on Saturday, the NPS announced that Yosemite Valley would reopen Sunday, 3 days sooner than their promised “earliest.” Sigh. I instantly contacted my workshop hotel to see if it was too late to reinstate my group’s lodging (it wasn’t), then reached out to the cancelled group to find out who was still able to attend. I told them that even if only half were still available, I’d go ahead with the workshop as originally planned (but also that I’d still honor my cancellation policy for those who could no longer make it). Turns out all but 3 had already cancelled flights or made other plans, sadly confirming that my cancelled workshop count would officially hit 16.
As frustrating as this experience has been, I can’t really fault the NPS. The current Yosemite snowpack is truly unprecedented, and with no upstream dams on the Merced River or its tributaries, there’s absolutely no control over the runoff—the snowpack will send as much water as it wants to, whenever it wants to, and we downstream humans just need to deal with it. Which is exactly what the NPS did: In an abundance of (justifiable) caution, they decided to act proactively by clearing Yosemite Valley before the forecast extreme heat put them in react and evacuate mode. So while I appreciated the advance warning, since the snowmelt wasn’t as extreme as predicted, they soon reversed course—unfortunately too late to save my workshop.
All this got me thinking about how difficult it must be to manage Yosemite. With around 4 million visitors per year, Yosemite is one of the most visited national parks in the United States (the world?). Keeping all these people both safe and happy, while simultaneously protecting the wellbeing and beauty of this most special resource seems like an impossible task.
Yosemite’s total footprint is nearly 1200 square miles (slightly smaller than Rhode Island), but most of this area is remote backcountry that’s accessible only on foot. And instead delighting in the joys of High Sierra hiking and backpacking, virtually every one of Yosemite’s annual visitors tries to cram into the (slightly less than) 6 square miles of Yosemite Valley.
The result is, on a typical summer day, literally more cars in Yosemite Valley than parking places. Those lucky enough to score a parking spot are wise to leave their car there for the duration of their stay and navigate the park on foot, bicycle, or shuttle. In such a compact area teeming with pedestrians, cyclists, and vehicles, each with their own agenda—picture the occupants of Car 1 (including the driver) craning to admire the waterfalls and monoliths overhead, as the driver of Car 2 in front of them spies a pedestrian (or or cyclist, or deer) and slams on the brakes (SMASH!)—it’s a miracle there isn’t even more mayhem than there is.
Another problem the NPS constantly fights is the people who believe the rules only apply to everyone else and decide it’s okay to traipse through a clearly off-limits meadow, or climb over a protective guardrail: “I’m just one person and I’ll be quick”(photographers are especially frequent offenders). And then there are the people who treat Yosemite’s wildlife like personal pets who they need to feed and pose with for selfies.
Witnessing all this bedlam has caused me to realize that, despite my love for Yosemite and the care I take to follow the rules (and to ensure that my workshop students do as well), my mere presence in Yosemite risks making me part of the problem. As a result, I no longer schedule workshops for weekends, or during Yosemite’s most crowded months. In fact, I now refuse to visit Yosemite for any reason from mid-May through mid-October—even when someone offers to pay me for a private tour.
Though I generally resist doing anything in Yosemite in May, this month’s just-cancelled workshop was right on the cusp my self-imposed workshop curfew. But because the May full moon (necessary for a moonbow) fell in the first week the month, the dogwood bloom usually peaks the first week of May, and by starting May 1 I could completely avoid a weekend, I went ahead and scheduled it. I worried a little about the crowds, but never dreamed flooding would be my downfall.
On the other hand, the Yosemite Valley shutdown wasn’t without a small personal upside. Because I schedule my Yosemite workshops only for the times I’d most want to be there myself, I don’t get a lot of opportunity to photograph Yosemite on my own, during my favorite times to be there. But thanks to the cancellation, I was able to make two (!) personal trips to Yosemite—the first, when I’d normally have been doing last-minute workshop prep, was nice but turned out to be a complete photographic dud; the second, on what would have been the workshop’s final two days, was much more photographically successful.
Anxious to see Yosemite at peak water before Yosemite Valley closed, my brother Jay and I departed early on the Friday morning of the 10 p.m. closure day. Though the forecast called for nothing but blue skies, I hoped flooded meadows, blooming dogwood, and relatively few people would compensate. We struck out on all three fronts: while there was definitely a lot of water in the falls and meadows, the Merced wasn’t nearly as high as I’d seen it in prior wet springs; the dogwood were just starting, still quite tiny and mostly green; and the place was absolutely packed with people, to the point where parking was a real challenge. So we circled the valley a couple of times and drove home.
By the following week (the week my workshop had been scheduled for), the weather had cooled significantly and rain and snow had returned to the Sierra. Not only were these cloudy/stormy conditions better for photography, I figured (hoped) by then the dogwood would be really starting to pop. So on Wednesday afternoon Jay and I drove back to Yosemite, checked-in to our hotel, then made it into the park with about an hour to photograph before sunset.
With the dogwood blooming as hoped, we stopped for about 30 minutes to photograph the flowers (yes, I know they’re technically bracts, not flowers) in a light rain near the Pohono Bridge, then made it to the east side of the valley in time to catch a couple of reflections of Yosemite Falls before dark. We waited in the car for complete darkness, hoping the moon would pop out and give us a moonbow at the base of Upper Yosemite Fall, but the clouds seemed pretty committed, so we retreated to the hotel.
The next day was all about the dogwood, one of my absolute favorite things in the world to photograph. We stopped at most of my favorite dogwood spots, photographing a lot of close selective focus scenes like this one, but also some scenes with dogwood in the foreground and Bridalveil Fall or El Capitan in the background. A persistent light rain only made things better. In short, photography heaven.

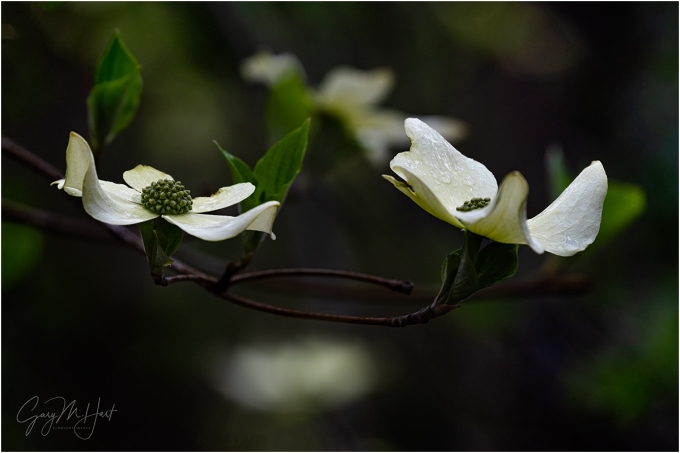
Dogwood Blooms, Yosemite
This beautiful specimen I found across the road from Valley View, where we ended up photographing for almost an hour-and-a-half. Jay started up the road, while I settled in across from the parking lot and slowly made my way up the road, working both sides as I went. Using my 100-400 exclusively, mostly with extension tubes as well, I started with dogwood that allowed me to include Bridalveil Fall in the background, then the Merced River, and finally simply concentrated on individual flowers, or groups of flowers.
As always, my objective in these close focus scenes is to find a flower or flowers with a complementary background: other flowers, parallel trunks, dark shade, water, and so on. After an hour or so I came across a large tree bursting with large, fresh dogwood blooms and went to work.
It wasn’t long before I found this flower with everything I wanted: it was in perfect shape, with a fully intact central flower cluster and none of the spots or taters that mar older blooms; it glistened with rain; in the background was a similarly flawless specimen; and everything was surrounded by splashes of bright green embedded in dark shade.
I composed as tightly as I could while still including all of both flowers and the arcing branch supporting the nearest one. Even though the breeze was minimal, given limited light I set my ISO to 800 to guard against subtle motion blur. I knew I couldn’t get the entire bloom sharp, so I took special care to focus on the center, then magnified my capture to doublecheck focus after each click.
It’s never a good thing to cancel a workshop, for many reasons, but sometimes good things can come from bad situations if you simply maintain an open mind and keep moving forward.
Workshop Schedule || Purchase Prints || Instagram
A Dogwood Gallery (including a few new ones from this trip)


Making a Scene
Posted on May 9, 2022
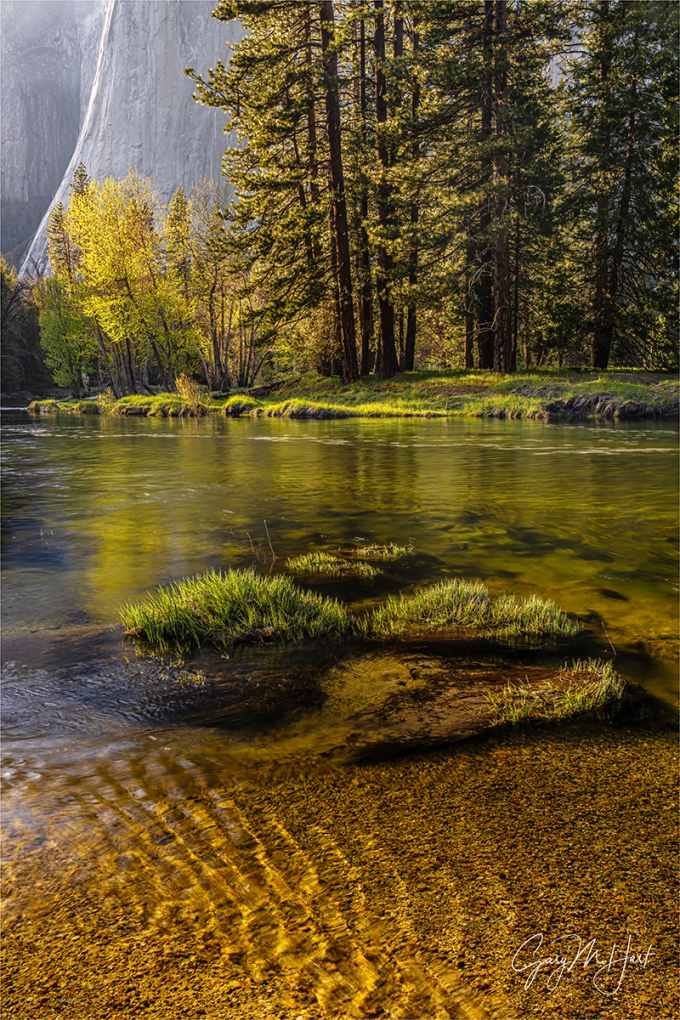
Spring Evening, Cathedral Beach, Yosemite
Sony 𝛂1
Sony 24-105 G
1/3 second
F/16
ISO 50
Think about what goes into making a landscape image. If the scenes and conditions are our raw materials, then it would be logical to say that our camera gear is our tools. But in addition to cameras, lenses, and other physical photography hardware, I’d say that our photography toolkit also includes the techniques we employ to deal with nature’s fickle whims.
And speaking of fickle whims, it’s impossible to deny that conditions make some scenes easier than others. But as much as I long for crimson sunsets, vivid rainbows, mirror reflections, and a host of other natural phenomena that can make virtually any shot feel like a slam dunk, these things are not always available when I want to make an image. For me, one of the greatest challenges is overcoming the boring (cloudless) skies that my California home is known (and loved) for. Not only do blank skies add rarely anything to a scene, they’re responsible for harsh light and the extreme dynamic range that even the best cameras struggle to handle. What’s a photographer to do?
For starters, we need to open our mind (and eyes). One of photography’s less heralded gifts is its ability, over time, to teach us to tune-in to nature’s subtleties, and how to leverage conditions that we once viewed as too difficult, into beautiful images. Fortunately, difficult doesn’t mean impossible—in fact, difficult can be downright fun. And the truth is, there are a lot of ways to overcome boring skies. Here are some suggestions:
- Shade: One of my favorite approaches to blank skies is photographing moving water, spring flowers, and fall color in full shade. While not spectacular, shade light is shadowless and easy to work with. It also makes it easy to blur water without a filter.
- Reflection: For the best reflections, look for sunlit subjects (the brighter the better) reflecting in still, shaded water.
- Sunstar: Any time the sun’s up, a sunstar is a readily available addition option for spicing up your scene. Position yourself so all but a small sliver of sun is blocked by an opaque object (such as a tree, rock, or the horizon), dial your f-stop to f/16 or smaller. Note that some lenses deliver sharper, more defined sunstars than others, and in general, wide lenses work best, especially primes and high quality zooms.
- Silhouette: Blank skies at sunrise and sunset are a great opportunity to create silhouettes that emphasize color and shape by eliminating everything in the scene except color and shape. Better still, incorporating a crescent moon (which always rises just before the sun, and sets just after the sun), can take silhouette scenes to the next level.
- Stars: Don’t forget the night sky. Often when I’m disappointed by a lack of clouds at a nice location, I just wait until dark and photograph the scene by moon- or starlight.
- Black and white and infrared: While I don’t photograph B&W and infrared, they are wonderful techniques for dealing with harsh midday light.
For example
Given their frequency, I’ve become pretty good at making the best of blue sky days in Yosemite. While last month’s Yosemite Waterfalls and Dogwood photo workshop did enjoy a few clouds, we also dealt with a fair amount of blank skies. For our first sunrise we photographed silhouettes and a rising crescent moon. And later in the workshop we spent a couple of hours photographing dogwood in the shade (mixed with a little sunlight) in the Fern Springs / Pohono Bridge area. But I think my favorite blue sky shoot came at Cathedral Beach on the workshop’s penultimate afternoon.
Cathedral Beach is an up-close view of El Capitan right on the Merced River. The low and slow flow of autumn makes a glassy reflection here, and in the months closer to the winter solstice, when the sun is farther south, all of El Capitan gets spectacular late afternoon light. But by mid-spring the river rushes and swirls with snowmelt, and the sun has moved so far north that only El Capitan’s west-facing wall gets late sunlight. But as you can see, all is not lost.
Viewing El Capitan from Cathedral Beach that afternoon, the first thing to catch my eye was the gorgeous light etching the otherwise shaded granite’s vertical plunge. No less spectacular was the brilliant backlight illuminating the cottonwood and grass across the river and reflecting color in the river.
I pulled out my (brand new!) Sony A1 and pondered my lens choice. Since capturing all of El Capitan from this location requires something wider than 24mm, I’d normally go with my Sony 16-35 GM or 12-24 GM lens here. But with no clouds and most of El Capitan in shade, I really wanted to eliminate the sky, most of the granite, and the less interesting surrounding foliage, so I reached for my Sony 24-105G lens.
This scene worked as a horizontal or vertical, but I finally zeroed in on the vertical composition because it was the best way to distill the scene down to its essentials: El Capitan’s edge light, the backlit foliage, the reflection, and the gold-flecked riverbed beneath parallel ripples. I moved along the riverbank until all this good stuff aligned with the set of grassy mounds catching light in the near foreground. I wanted front-to-back sharpness, so I stopped down to f/16 and focused on the most distant of the foreground mounds. And even though I didn’t have a mirror surface, I dialed the reflection up with my polarizer to add a little color to the river.
In Yosemite it’s hard to take a bad picture, but some are more rewarding than others. While I doubt it will be one of those images that goes viral, this image makes me especially happy because finding it and assembling all the components took a little creative effort.
Workshop Schedule || Purchase Prints || Instagram
The Cure for Blank Skies


, California")


Macro in Spirit
Posted on March 31, 2019
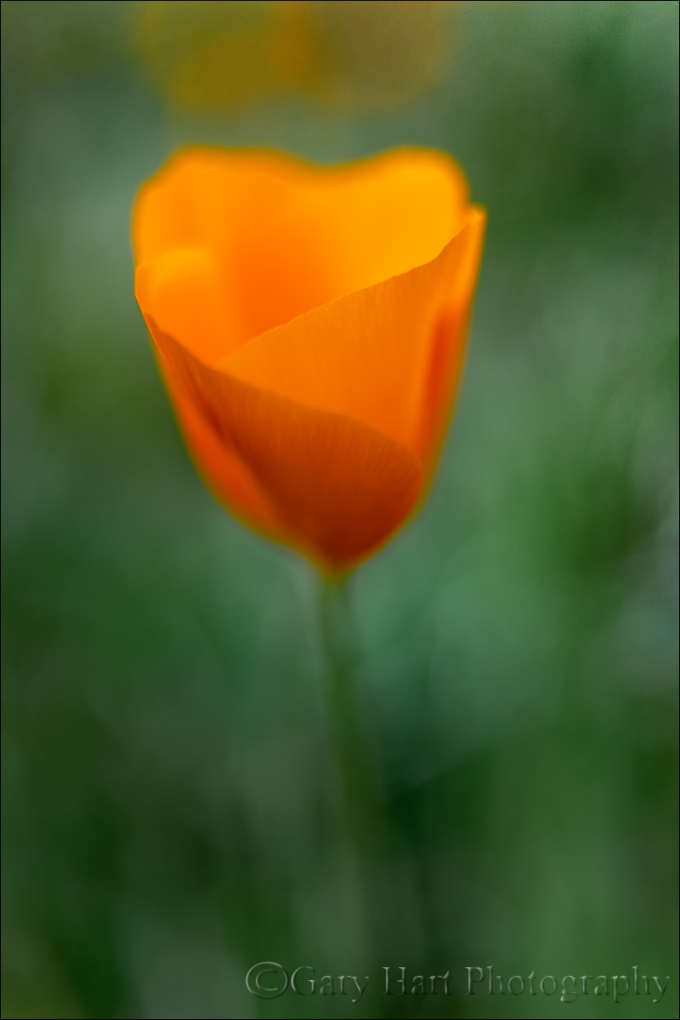
New Poppy, Merced River Canyon, California
It’s poppy season in California, and this is turning out to be a banner year. I’ve already enjoyed one nice poppy shoot, but things are just getting started in Northern California so I hope there are more to come.
When I photograph poppies, I don’t always use my macro lens. Even though my objective is similar to what I’d accomplish with a macro lens—a close view that excludes or blurs surrounding distractions—I often like to experiment with the creative flexibility other lenses provide. This also means that many of my so-called macro images technically aren’t macro at all.
What is macro photography?
The generally accepted definition of a macro image is an image in which the subject is at least as large on the sensor as it is in reality. When we photograph an expansive landscape with a full frame camera, we’re cramming the entire scene onto a 24mm x 36mm (864 mm2) rectangle (“cropped” sensors have even less real estate to work with, while medium format sensors have more). But imagine your landscape includes a single flower, and you want to get a closer look. As you zoom your lens tighter on the flower, or position yourself closer, the amount of the scene you capture shrinks, while everything remaining in the frame expands. Pretty soon the flower occupies most of the frame. Your image doesn’t achieve macro status until the still visible area of the flower spans 864 mm2 or larger.
It’s important to note that many camera manufactures will label a lens’s (or a point-and-shoot camera’s) closest focus point “macro” when all they really mean is just plain “close focus.” Getting closer will make the flower bigger, but unless you can focus close enough to reach that 1:1 threshold, it’s not a true macro.
So, by the generally accepted definition, this close image of a recently sprouted poppy doesn’t qualify as “macro.” But in my mind it’s macro in spirit because I use an intimate perspective with a single point of focus, in this case to emphasize the poppy’s translucent petals and graceful curves. My goal in these pseudo-macro images is make viewers look closer than they normally would, and (I hope) to help viewers see the poppy as more than a pretty gold flower.
To achieve that for this image, I tried something a little different. Shooting this afternoon with my Sony a7RIII, I started with my Sony 100-400 lens to allow a little working distance from the various poppies I targeted, then switched to my Sony 90mm macro to move closer to my subjects. When I wanted to get closer still, I brought out my extension tubes and switched back and forth between these two lenses. But the more time I spent out there, the closer I wanted to get.
Sprawling on the ground to work on this tiny new poppy, for something different I decided to try my 24-105 lens. At 24mm I was able to focus very close, but even wide open I had too much depth of field to properly blur the background, so I did what many say you’re not supposed to do: use extension tubes with a wide angle lens. With this arrangement the focus tolerance was microscopic, but when the poppy finally did snap into focus, my lens was so close they nearly touched.
I’m a tripod evangelist because in my approach to every scene, from macro to landscape, an image is not simply a click, it’s an incremental process: compose, expose, click, evaluate, refine, repeat until satisfied. Refining and repeating a standard landscape without a tripod is difficult enough; with macro and its minuscule tolerances, working without a tripod becomes nearly impossible.
For an image like this one, the tripod provides and another, less heralded advantage. This tiny flower was just a few inches above the ground, forcing me to sprawl in the weeds and awkwardly contort my body to avoid smashing the surrounding poppies. Holding this position as I refined my composition and waited for the breeze to pause was just plain uncomfortable, so every minute or two I had to stand to stretch and rest my cramped and fatigued muscles and joints. But each time I was ready to return to my subject, the composition I’d left was waiting patiently, right there in my viewfinder.
Because of the breeze, I bumped my ISO to 1600, which my a7RIII handles without even breathing hard. Freezing the poppy’s motion at 1/1000 of a second wasn’t hard, but because every time the wind moved the poppy, the focus point changed, I had to wait for the wind to die long enough for the poppy to return to the equilibrium position I’d focused on. The orange blobs you see in the background are more poppies, less than 8 inches away.
Read more about my approach to photographing wildflowers
Workshop Schedule || Purchase Prints
My Favorite Flower


Seeing the Entire Scene
Posted on January 27, 2019
Breaking Light, El Capitan and Three Brothers Reflection, Yosemite
Sony a7R III
Sony 12-24 f/4 G
1/25 second
F/10
ISO 100
As you might imagine, between my own images, my photo workshop participants’ images, browsing other photographers’ pages, and simply being connected to social media, I see a lot of images. A. Lot. Of. Images. And curse or blessing, I can’t help but have opinions—whether my own images or others’, some work wonderfully, others not so much.
There’s a lot that goes into creating a successful image, but if I could whisper in the ear of every photographer just before they click the shutter, it would be a reminder to, “See the entire scene.” It happens to all of us: We’re so drawn to a pretty scene or striking subject that we become blind to what’s happing in the rest of the frame. And it’s the what’s happening in the rest of the frame that separates a mere pretty snap of a beautiful scene from wall-worthy print that satisfies for years.
Dream world
Writer John Gardner talked about creating a “vivid and continuous dream” that so completely immerses readers in the imaginary world on the page, the physical world surrounding them temporarily disappears. Any distraction that jars the reader from the page and back into the present world is a failure.
The same applies to photography. As nature photographers, we invite the viewers of our images into a virtual world of our creation. To encourage these viewers to stay and explore our virtual world, we might offer them a fresh perspective, enable vicarious travel, or perhaps tap latent memories. Regardless of the reason, the longer they stay in our virtual world, the more successful our image. But when a jutting branch on the frame’s border reminds viewers of the world out the scene, or a bright rock tugs their eye and competes for attention with scene’s prime subject, our spell is broken.
Compromise
Sadly, nature rarely presents itself exactly as photographers want it. So many decisions we make are compromises: we bump the ISO to enable the small aperture and fast shutter speed the scene requires; we cut off a rock on the left because panning right would introduce garbage can; we can’t tighten a composition to eliminate a shrub because doing so would cut the top of a mountain; we don’t polarize the sky because the polarizer erases a rainbow; and on and on…. Given these realities, our goal doesn’t need to be perfection, it’s often just to slow down and see the entire scene to ensure the decisions that bring our image as close to perfection as possible.
For example
This flooded Yosemite meadow is a spring phenomenon caused by extreme runoff following a relatively wet winter. Some years it doesn’t happen at all, but last spring’s Yosemite workshop group was fortunate to be there during the few days the Merced River overflowed its banks here (I returned a couple of days later and found the river had receded). I could have plopped my tripod down (or simply raised my camera to my eye) anywhere in a 100 yard radius and been virtually assured of a beautiful picture.
But as beautiful as it was, and as much as I wanted to start clicking, my first stop to take it all in had some problems. From my original vantage point, the stand of trees on the right obscured the Three Brothers, so I moved left along the water’s edge. But given more trees on the left, it soon became clear that part of El Capitan would be obscured. My compromise was to find a spot that exposed both El Capitan’s nose and the Three Brothers.
I’d left the car with my Sony 16-35 f/2.8 GM Sony (on my Sony a7RIII) body because that lens had a polarizer for controlling the reflection—dial it up for the maximum reflection, dial it down to reveal the grassy texture just beneath the water, and maybe even a find midpoint with some reflection and some submerged grass. But 16mm wasn’t wide enough, so I sacrificed reflection control and switch to my Sony 12-24 f/4 G lens.
With my position and lens worked out, I was ready to frame my composition. I felt a little sense of urgency because I didn’t want to miss the rapidly moving splashes of light scooting across El Capitan, but I also didn’t want to rush so much that I missed a problem in my frame.
To dislodge my attention from a scene’s primary focus points, I often use a mnemonic device before clicking: “border patrol.” (Though perhaps in light of current events, I should come up with something different.) Border patrol is a gentle reminder to run my eyes around the border of my frame to check for problems. Potential problems here include cutting off part of a tree on the left or right, a distracting bright spot in the sky near the top of the frame, or inadvertently trimming El Capitan’s reflection on the bottom. (Incomplete reflections and distracting sky holes are some of the most frequently missed distractions.)
In this case I took care to ensure that I got all of El Capitan and its reflection while avoiding a few breaks in the clouds just above this view. I also used the evergreen on the left and the arcing trunks on the right to frame those borders. And by making sure my camera was perfectly level, I managed to keep my vertical lines straight.
Depth of field at 12mm wasn’t a concern; I chose f/10 and focused on the far bank knowing everything would be sharp. Motion wasn’t a concern, so I could just use ISO 100 and go with the shutter speed that gave me the best histogram in the viewfinder (I love mirrorless).
Careful Framing
Click an image for a closer look and slide show. Refresh the window to reorder the display.


Spring has sprung
Posted on May 15, 2017

Dogwood and Redbud, Merced River, Yosemite
Sony a7R II
Sony 70-200 f/4
1/40 second
F/4
ISO 200
I spent most of the last week in Yosemite and can confirm that spring has definitely sprung there. The Merced River, swollen by snowmelt, is overspilling its banks, flooding meadows and submerging riverside trails. Reflections are everywhere, and viewing the waterfalls without getting wet? Forget about it.
Another spring highlight is the moonbow that colors the mist beneath Yosemite Falls. A fortunate convergence of Yosemite Falls’ southeast exposure and the angle of the rising full moon when the snowmelt is at its peak make Yosemite one of the best locations in the world to witness a lunar rainbow. I was able to photograph it three times last week, twice with my workshop group and once with a private tour customer. Easily visible to the naked eye as a silvery arc in the billowing mist, a long exposure reveals the moonbow’s true colors.
But of all the spring treats Yosemite offers, for creative photography I think the dogwood might be my favorite. For just a few short weeks in April and May, these graceful blooms shower Yosemite Valley with splashes of white that remind me of the Fourth of July sparklers of my childhood. But unlike the ephemeral sparks of a sparkler, the dogwood progress in slow motion so I can appreciate them at a much more relaxing pace.
I found this branch at the Bridalveil Fall vista on Northside Drive, about a mile east of Valley View. The river was gold with late light, and the air was still as I went to work on the scene. Careful positioning allowed me to juxtapose three layers in my frame: in the foreground is the dogwood branch with varying degrees of detail; the middle-ground is a blend of heavily blurred redbud and more dogwood; all this spring beauty stands out against a backdrop of the sunlit Merced River. I experimented with different depths of field by varying my f-stop, focal length, and focus distance until I was satisfied.
Yosemite Spring
Click an image for a closer look and slide show. Refresh the window to reorder the display.


Returning to the scene of the crime
Posted on May 7, 2012
Bridalveil Dogwood, Yosemite
Canon EOS 10D
1/15 second
F22
ISO 100
48 mm
My Bridalveil Dogwood image is eight years old now. It remains one of my most popular images, and is still a personal favorite because it represents so many of my personal goals for each image:
- Use camera’s unique vision to reveal nature’s frequently overlooked details
- Manage the front-to-back plane to create the illusion of depth
- Guide the eye and create location context with selective focus
- Render the world in ways that allow others to imagine a world without human influence
My goal that morning, crystalized on the drive to Yosemite, was to juxtapose a sharply focused, foreground dogwood flower against a Yosemite icon softly focused in the background. I wandered Yosemite Valley in a light rain for a couple of hours before stumbling upon this blooming dogwood tree with Bridalveil Fall in the background. To frame Bridalveil with this pair of flowers I had to drag a log over to stand on, and extend my tripod’s center post much farther than I’m comfortable with (the center post is not terribly stable). An extension tube enabled a close focus that exaggerated the dogwood and softened Bridalveil Fall. Focused that close, getting Bridalveil sharp enough to be recognizable required me to stop down to f22. Fortunately there was no trace of wind.
Someone recently told me they overheard a couple of photographers stalking this tree, talking about my dogwood image, hoping they could duplicate it. While I was flattered, this need to replicate images makes me scratch my head. It’s what creates tripod traffic jams in Antelope Canyon on sunny days, at Mesa Arch every sunrise, and beneath Horsetail Fall each February, to name a few. I’m not saying I don’t have my share of derivative images, but they just don’t give me the satisfaction I get from creating something that I feel is uniquely my own. I tell my workshop students that images that move them to action are great, but they should be the starting point and never the goal. In other words, take an image that excites you and find put your own creative twist to it.
For example, while I have no desire to duplicate any image (my own or anyone else’s), I do return to “my” dogwood tree because I love the way it aligns so perfectly with Bridalveil Fall. A couple of years ago I was in Yosemite during an early snow storm. Many (shocked) colorful fall leaves remained on the trees, suddenly fringed with snow. Wanting to create something that showed the collision of fall and winter and still said Yosemite, I thought of this dogwood. Sure enough, I found a host of colorful leaves clinging like Christmas ornaments and composed something that achieved my goal.

Fall in to Winter, Yosemite
The dogwood were blooming beautifully during my Yosemite workshop that ended Saturday, so one morning I took my group to the Bridalveil dogwood tree. Of course the conditions were entirely different, but from what I saw on several LCDs and during the workshop image review, lots of new images were created. I even tried my own hand at something different, breaking out my 100-400 lens and isolating a sunlit branch wide open at extreme telephoto. I haven’t had a chance to see whether I captured anything worthwhile, but I’ll let you know….

