Eloquent Images by Gary Hart
Insight, information, and inspiration for the inquisitive nature photographer
Grand Canyon monsoon
Posted on August 12, 2013

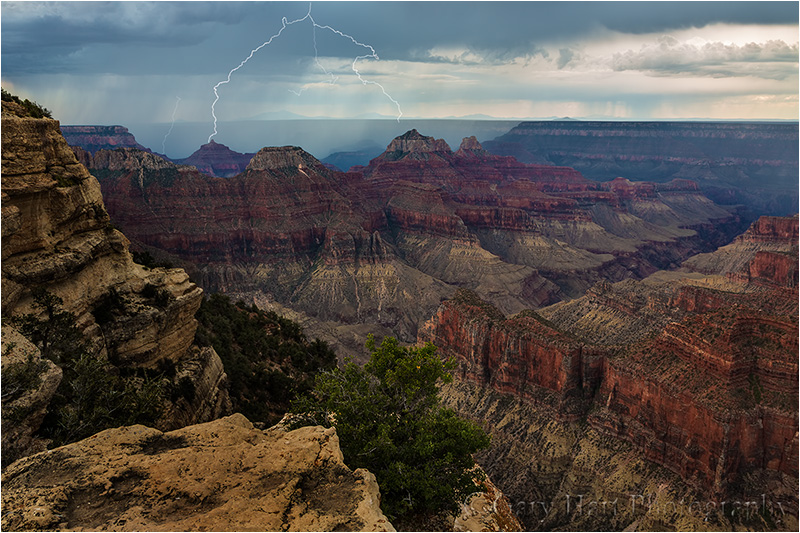
Twilight Lightning, Roosevelt Point, Grand Canyon North Rim
Canon EOS 5D Mark III
8.6 minutes
F/8.0
ISO 200
85 mm
After a marathon drive (that included four states and one unscheduled visit with a Utah Highway Patrol officer) from Northern California to St. George, Utah, Don Smith and I arrived at the North Rim of the Grand Canyon on Saturday afternoon. Our goal was advance scouting for our back-to-back Grand Canyon Monsoon workshops, which start this afternoon (Monday). Though we’re both pretty familiar with the North Rim, we wanted to check the conditions there (the wildflowers are gorgeous right now), and since these would be our first workshops at the North Rim, we also wanted to get a better handle on the drive times to our various locations.
Another motive was to scrape the rust on our lightning triggers, which hadn’t been used since last summer. Unfortunately, the Grand Canyon weather reports were less than promising, so when we headed out to shoot sunset Saturday night, lightning wasn’t on our mind. But shortly after arriving at our sunset destination, Walhalla Point, we saw a bolt strike across the canyon, above the Painted Desert. So out came the lightning triggers, and we spent the entire shoot bouncing between the (occasional) lightning in the east and truly gorgeous sunset color and sidelight along the rim to the south.
Don and I had much better luck with the sunset than we did with the lightning triggers (it turns out the rust was more on the photographers than the triggers). Our lightning attempts targeted one area in particular, but as the light faded, so did the lightning our target zone, and we became resigned to chalking this first night up to experience. But about the time we were ready to wrap up (ever notice how many stories of successful images start with those words?), we started seeing more lightning strikes farther north. Though it was getting cold up there at 9,000 feet, we thought we’d give it one more shot and move a few miles north to Roosevelt Point.
Twilight was in full bloom by the time we arrived at Roosevelt Point; fortunately, so was the lightning. I started with my lightning trigger, but soon switched it off in favor of long exposures. It seemed that one out of every two or three 30-second exposures seemed to capture a bolt, but with the light fading quickly, I needed to adjust my exposure after each frame. Soon I found myself in bulb mode, with exposures measured in minutes. The image here is my penultimate frame, a nearly nine-minute exposure captured forty-five minutes after sunset. The long exposure was able to wring out just enough light to reveal detail in the canyon. (The final frame, though exposed 2 1/3 stops brighter, was even darker than this one.)
This image perfectly illustrates the difference between the camera’s reality and ours. The scene my eyes saw was dark: not only was the Grand Canyon’s rich red completely lost to my eyes, its ridges and chasms were reduced to barely perceptible dark shapes. And the bolts you see here were not simultaneous—the one on the right fired early in the exposure, the two on the left came together toward the end. But through my camera’s unique vision, I was able to reveal the Grand Canyon in a way we human’s can only imagine.
More Grand Canyon lightning (no photographers were harmed in the making of this image)
Posted on August 20, 2012
Lightning Strikes Angel’s Gate, Bright Angel Point, Grand Canyon North Rim
* * * *
The bolt was so close that I saw its jagged collision in my rearview mirror, its deafening crack shaking the car less than a second later—three hundred yards, max. “Holy crap!” was our simultaneous (eloquent) response.
Don Smith and I had just negotiated fifteen minutes of natural pyrotechnics unprecedented in our benign, California-sky lifetimes. Obliterating our windshield, flooding the highway, firing warning shots on both sides of the car, Mother Nature was clearly angry at our trespass. This parting shot came just after the rain had eased from opaque sheets to large, individual pellets and we’d started to relax. To these two Californians, rain is a background phenomenon, faint static on the roof and hissing tires on wet blacktop. Earthquakes, which announce their arrival with a rumble and roll that builds slowly enough to allow quick retreat beneath a desk or door jam, are bland compared to the these random explosions that have done their damage and vanished before your brain can register what just happened.
We were in the final miles of a morning’s journey from the Grand Canyon’s popular South Rim to its more isolated North Rim. Safely stashed in the back of the car was the week’s bounty: memory cards, laptops, and backup drives brimming with the Grand Canyon monsoon images we’d come to photograph, including our holy grail, a dozen or so daylight lightning frames apiece. This four-hour detour to the North Rim was a last minute decision with no expectations—whatever we got here would be gravy.
A few minutes later we rolled into the North Rim parking area still buzzing with adrenaline. The thunderstorm we’d just survived had given way to blue skies, so we decided to leave the camera gear in the car and explore. While the lightning was gone, the storm’s rumbling vestiges reminded us not to get too comfortable.
After a quick peek into the Visitor Center to orient ourselves, we headed down to the Grand Canyon Lodge. The cornerstone feature of the lodge, which is perched precariously on the canyon’s north rim, is a large picture window overlooking an expansive deck with an IMAX view across the canyon to the South Rim, ten miles away.
Descending the stairs to the viewing area, we saw people lined up at the window, and stacked two-deep on the deck beyond, all gazing toward the South Rim. It didn’t take long to realize that what had everyone’s attention was a light show dancing across the rim’s entire length. While Don and I had spent the week photographing isolated lightning bolts separated by at least ten minutes, this storm was firing several times per minute. Time to get back to work.
In the short time since our arrival more clouds had organized overhead and Don and I found ourselves dodging juicy raindrops as we hustled back to the car. In less than ten minutes we were tiptoeing back out onto the rim, cameras and tripods in hand. Is this safe? Not only was the storm we were trying to photograph no more than eight miles distant, it was clearly advancing. And there seemed to be other strikes landing much closer somewhere behind us.
Atop a particularly exposed outcrop (with an awesome view!) just below the lodge, I tried to rationalize away all the lightning admonitions I’d read: “Avoid exposed, elevated areas”; “The next bolt can strike ten miles from its last strike”; “If you hear thunder, you’re too close”; “If you see it, flee it”; “If you hear it, clear it”; and so on. At first we set up our cameras as quickly as possible and rushed to (assumed) relative safety beneath a more sheltered ridge while our lightning triggers did the work. But soon, emboldened by the observation that other (presumably lightning-savvy) gawkers were unfazed by the storm’s proximity, we decided to remain with the cameras.
The show lasted about ninety minutes, though the lightning frequency dropped a bit after an hour or so. For variety we’d stay fifteen or twenty minutes at one spot, then move on to a different perspective, eventually making our way all the way out to Bright Angel Point, an elevated knife of limestone sediment protruding a hundred yards or so into the canyon. (In case Bright Angel Point’s elevation and isolation get didn’t get Mother Nature’s attention, the National Park Service has rimmed it with with an iron railing.) And there I stood, as happy as if I had a brain, until the show wrapped up and we went off in search of a sunset location before starting the long drive home.
The above image, taken from the trail to Bright Angel Point, came about twenty minutes into the shoot. The primary bolt is striking Angel’s Gate, about 7 1/2 miles from where I stood. That sounds like a pretty safe distance until you realize that the second fork of this bolt is striking the South Rim near Grandview, also about 7 1/2 miles from Angel’s Gate. The closest strike I recorded that afternoon was about 2 1/2 miles away. I’m sure those with more lightning experience than I will scoff at my hand wringing, and can no doubt share many harrowing tales of far closer encounters, but you gotta walk before you run (and I reserve the right to chuckle as I unpeel them from beneath their desk when that 5.0 tremor strikes.)
For those keeping score at home, here’s the final tally: Gary 51 (bolts), Lightning 0 (photographers).
The Grand Canyon, lightning, and lots (!) of people
Posted on August 17, 2012

Lightning Strike, Zoroaster Temple and Brahma Temple, Grand Canyon
Canon EOS 5D Mark III
1/15 second
Canon 24 – 105 f/4 L
ISO 50
F16
The thunderheads started blooming at around 11:00 a.m; by noon they were delivering rain and lightning at widely dispersed locations around the rim. It was Grand Canyon day two, the first full day of last week’s monsoon visit with Don Smith. Seeing black clouds to the east, we drove out to Lipan Point, but after an hour or so of nothing much, decided to shake things up and brave the crowds near Ground Zero for Grand Canyon tourist activity, Mather Point.
At Mather, Don and I split immediately—Don headed a little east toward an outcrop away from the crowds; having seen a couple of strikes already, I didn’t feel like exploring and headed to familiar territory right in the teeth of the tourists.
Sharing popular vistas with tourists can be trying, but it’s also lots of fun if I remember that my priorities are different from everyone else’s, and that my desire to get a good photograph in no way entitles me to special consideration. Additionally, because carrying a tripod labels me Photographer, I represent not just myself, but the entire community of photographers. In other words, in the minds of others, if I’m a jerk, it’s not just me who’s a jerk, it’s all photographers. If someone walks through (or stands in) my frame, I wait; if someone kicks my tripod, I simply smile and recheck my composition; if someone asks me questions (“Is that a real camera?”; “Are you a photographer?”; “What’s the best camera?”), I answer politely. And I’m always happy to snap pictures of the family, no matter how many cameras they hand me.
Because an extended tripod can occupy more space than I’m entitled to, and can be a real safety hazard for people gazing out rather than watching their step, I try to plant myself in as unobtrusive a location as possible. At the Grand Canyon, where everyone lines the rail, this isn’t always easy. In these situations I try to identify the ideal spot, then stand back and wait for the current occupant to move—fortunately, gawkers rarely stay long. Once at the rail, I put one or two tripod legs over or through the rail to minimize my footprint on the traffic side.
At the Grand Canyon in particular, where foot traffic seems to flow constantly, I avoid moving around much once I’m set up. This isn’t ideal for someone as concerned about foreground/background relationships as I am, but if I make the right choice to start, I can usually stay happy in one spot for twenty or thirty minutes by simply altering my focal length and orientation.
On this afternoon it wasn’t long before I was set up in a spot that made me happy. Having succeeded capturing lightning with a wide composition the prior day, I tried tighter compositions here at Mather. To maximize my odds for success with each composition, I stuck with a composition for two or three bolts (or until it was clear that nothing more was happening in that part of the sky), at least fifteen minutes in most cases. While waiting I’d just stand back, away from the rail, alternating my view between the target rain cell and the steady stream of tourists. With each bolt I’d quickly check the red light on the back of my camera to confirm that the shutter fired. After forty or fifty minutes in a spot, I’d shift to a different location.
Being fairly tight with the composition, I know I missed a few strikes just outside my frame. Of the four hits I got that day, the one at the top of this post was the best combination of position in the frame and brightness (I cropped it a little in Photoshop to tighten further). In a perfect world I’d have gotten a bolt striking either Brahma Temple (in the back), or Zoroaster Temple (the shorter tower just in front of Brahma), but I was pretty happy to get this one landing right behind Brahma, about six miles away.
In addition to all the quality time absorbing the Grand Canyon’s majesty and the novelty of an electrical storm to my California eyes, I had a blast meeting and talking with people. Lots and lots of people. Between flashes I answered many, many questions: “What are you waiting for?” (“Lightning.”); “What’s that thing on top of your camera?” (“It’s a lightning trigger.”); and, “How does it work?” (“It detects lightning and fires the shutter much faster than I can.”) These questions often led to great conversations with visitors from all over the world, many of whom stood and rooted for lightning right along with me. All in all, a really nice day.
(For a more technical discussion of lightning photography, click here.)
Workshop Schedule || Purchase Prints || Instagram
Lots of Lightning
Click any image to scroll through the gallery LARGE


Striking lightning (before it strikes you)
Posted on August 15, 2012

Lightning Strike Above the Colorado River, Lipan Point, Grand Canyon
Canon EOS-5D Mark III
32 mm
1/20 second
F/16
ISO 100
Let’s start with the given that lightning is dangerous, and the distinct possibility that photographers are stupid. Combining the two is a recipe for disaster. Add a shear, one-mile deep canyon with lots of exposed outcrops and…, well, you get the idea.
Okay, seriously, lightning is both dangerous and unpredictable. Before attempting anything that requires you to be outside during an electrical storm, it behooves you to do your homework: the more you understand lightning, and how to stay safe in its midst, the greater your odds of enjoying the fruits of any attempt to photograph it. Not only will understanding lightning improve your safety, it will also help you anticipate and capture lightning.
The shocking truth about lightning
Lightning is an electrostatic discharge that equalizes the negative/positive polarization between two objects. (When you get shocked touching a doorknob, you’ve been struck by lightning.) The cause of polarization during electrical storms isn’t completely understood, but it’s generally accepted that the key factor is the extreme vertical convective air motion within a thunderstorm (convection is up/down circular flow caused when less-dense warm air rises, becomes more dense as it cools, and falls; convection is also what causes the rising bubbles in boiling water). Convection carries positively charged molecules upward and negatively charged molecules downward. Because opposite charges attract each other, the extreme polarization (positive charge at the top of the cloud, negative charge near the ground) is quickly (and violently) equalized: lightning.
With lightning comes thunder, the sound of air expanding rapidly (exploding) when heated by a 50,000 degree by lightning bolt. The lightning that caused the thunder travels to you at the speed of light, over 186,000 miles per second (virtually instantaneous regardless of distance). But thunder, traveling at the speed of sound (a little more than 750 miles per hour—a million times slower than light), takes its time. Knowing that the thunder occurred with the lightning flash, and how fast it travels, we can compute the approximate distance of the lightning strike. At 750 miles per hour, thunder will travel a mile in about five seconds. Dividing the time between the lightning’s flash and the thunder’s crash by five gives you the lightning’s distance in miles; divide the interval by three for the distance in kilometers. If five seconds pass between the lightning and the thunder, the lightning struck about one mile away; fifteen seconds elapsed means it’s about three miles away.
Lightning safety
The 30 people killed by lightning in the United States each year had one thing in common: each didn’t believe he or she would be struck by lightning when they started whatever it was they were doing when they were struck. The only sure way to be safe in an electrical storm is to be in a fully enclosed structure or metal vehicle, away from open windows, plumbing, wiring, and electronic devices.
Unfortunately, photographing lightning requires being outside. While there’s no completely safe way to photograph lightning, it doesn’t hurt to improve your odds of surviving to enjoy the fruits of your labor. Most lightning strikes within a six mile radius of the previous strike. So, if less than thirty seconds elapses between the flash and bang, you’re too close. And since “most” doesn’t mean “all,” it’s even better to allow a little margin for error. Thunder isn’t usually audible beyond ten miles—if you can hear the thunder, it’s safe to assume that you’re in lightning range.
But if you absolutely, positively must be outside with the lightning crashing about you, or simply find yourself caught outside with no available shelter, there are few things you can do to reduce the chance you’ll be struck:
- Avoid water
- Avoid high ground
- Avoid exposed areas
- Avoid metal or electronic objects
- Avoid tall objects such as trees and open structures (and tripods)
- Stay at least fifteen feet from other people
- If you’re surrounded by trees, position yourself near shorter trees, as far from trunks as possible
- Crouch with your feet together and your hands covering your ears
- Do not lie down
- A lightning strike is often preceded by static electricity that makes your hair stand on end and an ozone smell (best described as the smell of electricity—I think of bumper cars at the amusement park or the smell of my electric slot cars when I was a kid)—if your hair starts to stand up and/or you notice a distinct odor that could be ozone, follow as many of the above steps as you can, as quickly as possible (often you’ll only have time to crouch)
Photographing daylight lightning with a lightning trigger
Photographing lightning at night is mostly a matter of pointing your camera in the right direction with a multi-second shutter speed and hoping the lightning fires while your shutter’s open—pretty straightforward. Photographing daylight lightning is a little more problematic. Without a lightning trigger to recognize lightning and click your shutter, success is largely dumb luck (few people are quick enough see it and click).
So just what is a lightning trigger? I thought you’d never ask. A lightning trigger is a device that attaches to your camera’s hot shoe and connects via a special cable to the camera’s remote release jack. When engaged, it fires the shutter immediately upon detecting lightning.
There are many lightning triggers from which to choose. I went with the one that was the consensus choice among photographers I know and trust: Lightning Trigger from Stepping Stone Products in Dolores, CO. At slightly less than $400, it’s far from the cheapest option, but from all I’ve read, heard, and now experienced, these aren’t generic products and the internal technology matters a lot. No regrets so far.
I won’t get into lots of specifics about how to set up the trigger because it’s quite simple and covered well in the included documentation. You should know that connecting it does disable the LCD replay, so you won’t be able to review your captures or histogram without disconnecting it (a simple but inconvenient task).
The Lightning Trigger documentation promises at least a 20 mile range, and I saw nothing that caused me to question that. It also says you can expect the trigger to fire at lightning that’s not necessarily in front of you—I can attest to that too. For every click with lightning in my camera’s field of view, I got at least five clicks with no visible lightning. For most of my Grand Canyon trip I was waiting for lightning that appeared in the direction my composition, perhaps 5 to 15 miles distant, about one bolt every 15 or 20 minutes. In other words, these weren’t particularly active storms with multiple flashes per minute. When lightning did fire in my composition, I estimate that the trigger clicked the shutter at least 95 percent of the time (that is, even though I got lots of false positives, the trigger missed very few actual strikes). Of these successful clicks, I actually captured lightning in about 2/3 of the frames. I suspect that the misses were more a function of the lightning itself that a problem with the trigger or camera—some flashes are single strokes that finish far too quickly for capture. In general, the more violent the storm, the greater the likelihood of bolts with long duration, multiple strokes that are easier to capture.
The Lightning Trigger documentation also recommends shutter speeds 1/20 second or longer—faster shutter speeds risk completing the exposure before some or all of the secondary strokes fire. To achieve daylight shutter speeds in the 1/20 to 1/4 second range, I shot in manual mode, using a polarizer, at ISO 50 and f16. The exposure will vary with the amount of light, so your settings will vary. You can also use a neutral density filter to slow the shutter speed.
Because shutter lag (the time elapsed between the click of the shutter button and the shutter opening) is death to lightning photography, you’ll need to turn off autofocus. Even though I use back-button focus, Canon says simply having autofocus on initiates a brief communication between the lens and camera that very slightly delays response (I can’t speak for Nikon). If you must autofocus, go ahead and do it each time you recompose, then turn autofocus off as soon as you’re focused. Similarly, despite what the Lightning Trigger documentation suggested, I used manual exposure mode to eliminate any camera-slowing metering when the shutter trips. And, also despite what the Lightning Trigger documentation suggests, I didn’t worry about my noise reduction settings. Canon assures (again, I can’t speak for Nikon) that noise reduction is a post-capture function that might slightly delay continuous frames, but it won’t increase shutter lag.
Other equipment
In addition to a lightning trigger, you’ll need a solid tripod and, ideally, a camera with a shutter lag faster than 60 milliseconds. Slower shutter lag won’t shut you out completely, but it will reduce your success rate. The Lightning Trigger website has a good, albeit somewhat dated, camera shutter-lag table.
I also recommend (in no particular order):
- Rain gear that will keep you dry from head-to-toe
- An umbrella for shielding your camera and lightning trigger (the trigger is not waterproof) while composing and shooting in the rain
- Lens hoods to reduce the raindrops that might mar the front element of your lenses
- Neutral density filter and/or polarizer to show shutter speed
- A garbage bag (my choice) or rainproof jacket for your camera
- Extra lightning trigger batteries
- An infrared remote to make sure the trigger is functioning (we borrowed the remote from our hotel)
- A towel (also borrowed from the hotel)
Getting the shot
I’m a Californian, which means lightning is a novelty for me. Nevertheless, a few months ago I purchased my Lightning Trigger, which has since been collecting dust. Because the lightning wouldn’t come to me, I decided to go to the lightning—in this case that meant a twelve hour drive to the Grand Canyon, in the heart of monsoon season, with my friend and fellow pro Don Smith.
Our plan was to find a location with an open view of the canyon and that allowed us to set up our cameras within sight of the car (so we could safely wait out the storms). Based on previous visits, we thought Lipan Point would be a good spot and started there, but we hadn’t anticipated the crowds we’d encounter. We also quickly realized that it’s pretty unrealistic to expect to photograph lightning in the midst of the storm—not only is it dangerous, the heavy rain risks damaging equipment, dots lens elements with raindrops, and pretty much obliterates any view. So in very short order we went to Plan B: Wait until the cell passes and photograph more distant storms.
The open views at the Grand Canyon are ideal for this and served us well. Don and I quickly learned that the lightning is most likely to strike within or near the gray curtains that are clearly recognizable as distant rain. The wider the composition, the greater your odds of capturing lightning, but the smaller it will appear in your image. My general approach was to identify the most likely lightning source (rain curtain) and find the best composition that included it. I tended to start wider to ensure success, then tighten my composition once I was fairly confident I had something. I also recommend that you don’t check your captures until you’re done (or better yet, until you upload your images to your computer). Since viewing the LCD requires disconnecting the trigger, doing so risks missing a shot; you’ll also find that many successful captures, especially wide compositions, just aren’t that visible on an LCD viewed in daylight.
Be aware that electrical storms can move quite quickly, so you need to monitor them closely. Sometimes this simply means adjusting your composition to account for shifting lightning; other times it means retreating to the car if the cell starts to threaten your location. Also be aware of the height from which the lightning originates and be sure to include enough cloud to get all of the stroke.
The above image of a single bolt striking the Painted Desert east and north of Desert View, as viewed from Lipan Point, was one of my first captures of the trip. I was composed quite wide to ensure capturing something (because I was so wide, I cropped it a little in Photoshop). Over a one hour period I actually got four strokes in some variation of this composition, but this was by far the brightest.
Helpful links


