Eloquent Images by Gary Hart
Insight, information, and inspiration for the inquisitive nature photographer
Mirrorless and my telephoto renaissance
Posted on February 7, 2015

Dawn Portrait, Mt. Whitney, Alabama Hills, California
Sony a6000
Tamron 150-600 @256 mm (384 mm full-frame equivalent)
Metabones Canon EF to Sony NEX Mark IV adapter
.4 seconds
f/11
ISO 200
Going smaller
Like most people, my original expectation for my nascent mirrorless world was a significantly lighter backpack, and indeed, I haven’t been disappointed. In my Canon days my primary pack was an F-Stop Tilopa with a medium ICU (F-Stop’s interchangeable internal module for storing and organizing gear), which held my 5D Mark III, Canon 16-35 f/2.8, 24-105 f/4, and 70-200 L lenses, plus a Zeiss 28 f/2 (for night photography). Unless I specifically planned a shoot that required it, my Canon 100-400L and 100 macro lenses traveled with my backup Canon body in a separate bag—not a big deal when I’m driving to a destination, but pretty much a non-starter when I have to fly (which I’m doing more and more).
After moving to the mirrorless Sony a7R, I immediately started using my smaller F-Stop Guru backpack, which easily handled the new body and the Sony equivalent of my primary Canon glass: Sony/Zeiss 16-35 F/4 and 24-70 f/4, Sony 70-200 f/4 G, plus the (Canon mount) Zeiss 28 f/2 and a Metabones adapter that allows me to use my Canon glass on a Sony EF mount body. This configuration gave me essentially the same focal range I had with Canon, in a significantly smaller, lighter package. Not only that, I can use a lighter tripod and head. Score.
But, since I hate shooting without a backup body and had heard fantastic things about the camera, I soon purchased a Sony a6000. This amazing little mirrorless camera’s 1.5 crop sensor makes it an ideal complement to my full-frame a7R, has (slightly) more resolution than the 5DIII, and (so far) appears to offer (at least) comparable image quality, with better dynamic range than the Canon. And with a little bit of rearranging, I found I could fit the a6000 into my Guru bag without jettisoning anything else.
The result of this downsizing is a camera pack that’s light enough for hiking without feeling like a backpacker, and and for cycling without feeling like I’m about to tip over.
Going bigger
For my ultra-telephoto needs, my plan all along had been to to use the Canon 100-400 with the Metabones adapter. But since the 100-400 had always been my least favorite lens—awkward to use, and not particularly sharp—I had no real plans to add it to my regular lens rotation. But my ears perked up when I started hearing my friend and similarly recent Sony convert (and fellow pro photographer) Don Smith raving about the Tamron 150-600 lens. Hmmmm….
The Tamron 150-600 arrived shortly before I departed for last week’s Death Valley / Mt. Whitney Winter Moon photo workshop. Because the Tamron lens isn’t available with a Sony FE mount, it would require an adapter as well. Don had been shooting the Sony A-mount version of the Tamron paired with Sony’s converter; I opted for the Canon mount version, reasoning that I could use it on my remaining Canon bodies should the need ever arise, and I already have the Metabones adapter. (Word on the street is that the Sony A-mount Tamron with the Sony adapter has much better autofocus than the Canon/Metabones combination, but I don’t need autofocus.)
First reaction? This is not a small or light lens. But as soon as I started using it, two things became clear: it’s much easier to use than my Canon 100-400, and it’s noticeably sharper. Suddenly, size notwithstanding, I had a lens that I could see myself using regularly.
If I’d still been lugging my Canon gear, I’d have had to sacrifice essential lenses each time I planned to use the 150-600. But with the mirrorless system and a little reconfiguring of the compartments in the Tilopa ICU (moving around the padded, Velcro-attached partitions), I can now carry in a single camera backpack (that fits in every overhead bin I’ve ever encountered, including the puddle-jumpers): three Sony bodies (a7R, my brand new a7S, and the a6000), plus lenses that give me a focal length range from 16 to 900 mm (the 150-600 lens is a full-frame equivalent of 225-900 mm on the 1.5-crop a6000). Life’s good.
In the field
So, what does a photographer do with all this new imaging power? Use it, of course. Visiting familiar locations as much as I do, I can’t tell you how refreshing it is to find a completely new way to see these landscapes.
The image at the top of this post was from my first time using the Sony a6000 and Tamron 150-600. To get a better handle on the conditions, I left home two days before the workshop, spending the first night in Lone Pine, near the Alabama Hills just beneath Mt. Whitney. After a moonlight shoot in the Alabama Hills, the next morning I rose before sunrise, strolled from my hotel room across the highway, and set up my tripod with the Tamron 150-600 mounted and a6000 attached.
The first time I aimed this combination at Mt. Whitney (the highest peak in the 48 contiguous United States), zoomed all the way out to 900mm (600mm x 1.5), and dialed in the focus, was an epiphany. Previously unseen rocks and trees snapped into view, and vortices of wind-swept snow spun on the summit. Amazing to my eye, but at 900 mm actually too close to find a composition I liked. So I pulled all the way back to a little less than 400 mm (256 x 1.5), framed up the mountain, and waited for the pink that always kicks off a Mt. Whitney clear-sky sunrise.
I captured this frame about ten minutes before sunrise. Being a little concerned about such a long focal length in low light, I hedged my bets slightly by using ISO 200 to halve my shutter speed. Since I notice little difference between ISO 100 and 200 on the a6000, I think 200 will be my standard ISO when I use the 150-600 on this body. But we’ll see.
The rest of the week was a rediscovery of ultra-telephoto photography. When I first switched to digital about twelve years ago, I started with a 1.6 crop Canon 10D, and my only telephoto lens was a 70-300, making images up to 480 mm a routine part of my capture paradigm. Isolating distant subjects, magnifying closer subjects, compressing foreground and background subjects—it was all a simple matter of reaching into my camera bag. But since switching to full-frame, and replacing the 70-300 with the (faster, optically better) 70-200, ultra-telephoto photography took backseat to more conventional landscapes, and I eventually forgot how much I enjoyed it when it was more convenient. Ultra-telephoto became something I had to plan, rather than a creative option available whenever the inspiration struck.

Moonset, Wildrose Peak, Death Valley
This is a 563 mm equivalent (375 mm X 1.5) sunrise moonset capture from Dante’s View
Don was assisting my Death Valley workshop (Don and I trade off assisting many of each other’s workshops), and I’m sure by the end of the week the group had grown weary of hearing Don and I gush about the fun we were having with our new toys. Sand dunes, moonrise, moonset, distant peaks—no natural feature was safe from our magnifying eye. A particular highlight came dark and early one morning at Dante’s View, when I turned the a6000 and 150-600 to Jupiter, low on the horizon near Telescope Peak, gathered the group around my LCD, zoomed to 600mm, and shared the glowing disk of our solar system’s largest planet surrounded by the four Galilean moons.
The bottom line
Mirrorless has definitely meant a significantly smaller, lighter bag to handle my “meat and potatoes” 16-200 mm focal length range (that I never leave home without) when mobility is paramount—hiking or biking, I hardly know there’s anything on my back.
But equally significant is the way compact mirrorless gear also allows me expand my creative options without hiring a Sherpa. Now, in the same backpack that once maxed out with a single Canon body (most recently a 5D Mark III) and Canon lenses covering 16-200 mm, I can travel with three mirrorless bodies, plus lenses covering an effective focal range from 16-900 mm (including my 28 mm f/2 Canon-mount Zeiss for night photography). Life’s good.
Visit my website to purchase prints and see my photo workshop schedule
An ultra-telephoto gallery (>200 mm)
Click an image for a closer look, and a slide show. Refresh your screen to reorder the display.


Links
Death Valley Winter Moon Photo Workshop

Moonrise Silhouette, Death Valley
The cure for blue skies
Posted on January 20, 2014

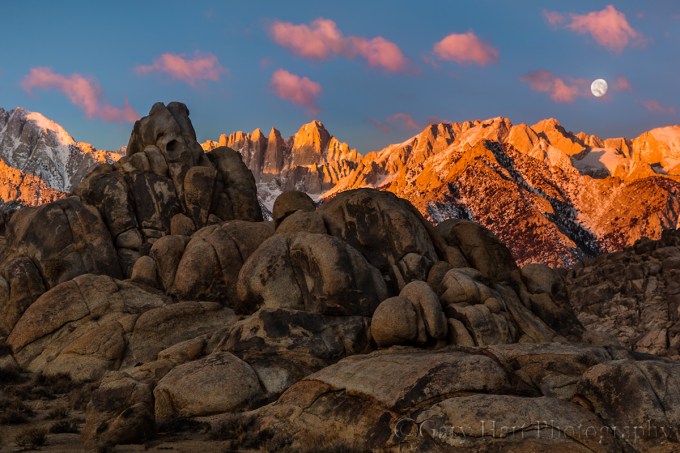
Sunrise Moonset, Sierra Crest, Alabama Hills, California
Canon EOS 5D Mark III
1/8 second
29 mm
ISO 200
F11
* * *
The prominent mountain on the left is 12,944 foot Lone Pine Peak. At 14,495 feet, Mt. Whitney is the highest point in the 48 contiguous United States; it’s the shark-tooth peak left of center. The slightly concave mountain on the far right is 14,380 foot Mt. Williamson.
A good landscape image usually involves, well…, a good landscape. But that’s only half the equation—photographers also need photogenic conditions—soft light, interesting skies, dramatic weather, or anything else that elevates the scene to something special. While we have absolute control over the time and location of our photo outings, the conditions have a significant random (luck) component.
Despite being less than a day’s drive from many of the most treasured photo destinations in the world, most of my photo trips are planned months in advance. Workshops in particular require at least a year of advance planning on my part, and many months of schedule adjustment and travel arrangements for the participants. I think I’ve pretty much established that positive thinking, finger crossing, divine pleas, and ritual incantation (no virgin sacrifice yet) are of zero value where photography is concerned—sometimes conditions work out wonderfully, sometimes not so much. And while I’ve photographed my workshop locations many times, I know most of my workshop participants haven’t, which is why I do my best to schedule my workshops when the odds are best for interesting skies.
My annual Death Valley / Mt. Whitney photo workshop is a perfect example: Among the driest places on Earth, Death Valley gets only about an inch of rain each year and suffers from chronic blue skies. Ever the optimist, I schedule my DV/Whitney workshop from mid-January through early February, when the odds, though still low, are at least best for clouds. And while I’ve actually been pretty lucky with the clouds in past workshops, to hedge my bets further, I always schedule this workshop to coincide with a full moon—if we don’t get clouds, the moon always seems to save the day (and night).
This year’s DV/Whitney workshop wrapped up Saturday morning. Unfortunately, it landed in the midst of what is on its way to becoming an unprecedented drought in California. After two dry winters, this winter is worse—a persistent high pressure system has set up camp above California, creating an impenetrable force field that deflects clouds and and bathes the state weather that is absolutely beautiful for everything but photography. In this year’s DV/Whitney workshop’s four+ days, we enjoyed highs in the glorious 80s, and I don’t recall seeing a single cloud (though there were unconfirmed rumors of a cloud sighting on the distant horizon late in the workshop).
But cloudless skies don’t need to mean lousy photography—they just shrink the window of opportunity. Places like Mosaic Canyon and Artist’s Palette are nice in the early morning or late afternoon shade. And in general, when clouds aren’t in the picture, the best photography skies are on the horizon opposite the sun before sunrise and after sunset. Last week I made a point of getting my group on location at least 45 minutes before sunrise, and kept them out well past sunset to photograph Death Valley’s one-of-a-kind topography beneath twilight’s shadowless pink and blue pastels. Among other things, in this light the dunes were fantastic (I was able to find a relatively footprint free area) all the way from shadowless twilight through high contrast early morning light, and the first light on Telescope Peak from Badwater was wonderful.
But the workshop’s real highlight, the element that elevated our week into something special, was the moon. The real moon show didn’t begin until it showed up above the primary views on our final two sunrises, but we got a nice preview on our first sunset when the waxing gibbous disk rose into the twilight wedge above the mountains east of Hell’s Gate. The next evening I took the group to panoramic Dante’s View; while the prime objective was photographing Death Valley’s last light and the sun setting from 5,000 vertical feet above Badwater, I instructed everyone to walk across the parking lot after sunset to catch the nearly full moon rising above the equally expansive (though significantly less spectacular) panorama of distant peaks to the east. The moon arrived early enough to allow at least ten minutes of quality photography, then we just kind of hung out to watch it for a little while longer. Very nice.
Friday morning’s sunrise we found the moon glowing as promised in the predawn indigo above Zabriskie Point. As the morning brightened, we watched the nearly round disk slide through twilight’s throbbing pink before disappearing directly behind Manly Beacon just a few minutes after sunrise.
But as nice as the Zabriskie shoot was, I think my personal favorite was the workshop’s final sunrise from the Alabama Hills. The group, now expert at managing the difficult contrast between foreground shadows and brilliant moon, immediately spread out to find their own foreground. One or two headed straight for the Whitney Arch (aka, Mobius Arch), while the rest of us were quite content with the variety of boulders west and south of our the arch.
The thing that makes the Alabama Hills such a special location for sunrise is its position between towering peaks to the west, and relatively flat horizon to the east. At sunrise here, the Sierra crest juts into the blue and rose of the Earth’s receding shadow, then transitions to amber when the first rays of sunlight kiss its serrated peaks. You anticipate watch the sun’s arrival by watch the shadow descent the vertical granite until it bathes the weathered boulders with warm, ephemeral sunlight. Then, just like that, the show’s over.
I’ve shot this scene at sunrise so many times that I usually remain a spectator unless something special moves me to pull out my camera. Last Saturday, despite the absence of clouds, I just couldn’t resist the pull of the moon, which hovered like a mylar balloon in the night/day transition. At first there wasn’t enough light to photograph detail in the rocks and moon in a single frame, but eventually, with the help of a two-stop graduated neutral density filter, I was able to capture the image at the top of the blog.
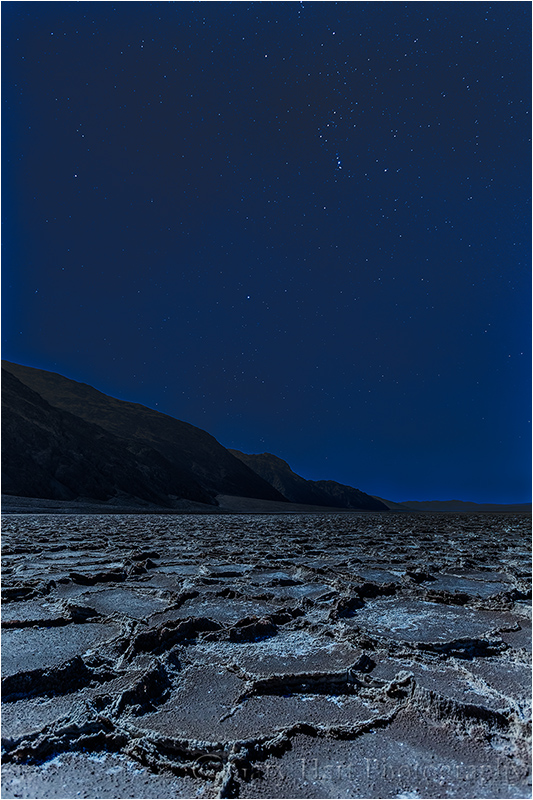
Orion, Badwater by Moonlight, Death Valley
Canon EOS 5D Mark III
15 seconds
17 mm
ISO 1600
F4
* * *
Another great thing about timing the Death Valley workshop to coincide with a full moon is our moonlight shoots. Of all the workshop moonlight shoots I do throughout the year, I think I look forward to the Death Valley Badwater shoot the most. This year’s didn’t disappoint—not only was the photography great, there’s just something about the playa’s warm temperatures and utter stillness that creates a genuinely festive atmosphere.

Moonset, Mt. Whitney and the Alabama Hills, California
* * *
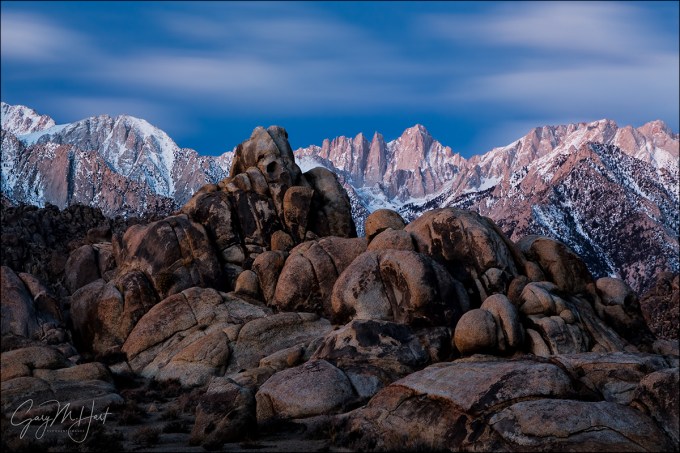
Last year I photographed the same scene in different conditions. While this year’s capture highlights the Sierra crest and uses the blank sky and dark foreground to create a twilight feel, last year’s image was captured shortly after the sun lit the peaks and colored the clouds. I used a tighter composition to emphasize Mt. Whitney, the moon, and the pink clouds.
Later that same morning…
Posted on March 1, 2013
Moonset, Mt. Whitney and the Alabama Hills, California
Canon EOS-5D Mark III
24-105L
1/2 second
F/11
ISO 100
It’s fun to browse the thumbnails from a shoot in chronological order to see the evolution of that day’s process. While can’t always remember specific choices, it’s always clear from the progression of my images that I was indeed quite conscious of what I was doing. I can look at one thumbnail and usually predict what the next will be.
This January morning in the Alabama Hills started for me about forty-five minutes before sunrise. When the sun finally warmed Mt. Whitney, a 95% waning gibbous moon was about to dip below the Sierra crest; comparing images, it’s clear I’d moved no more than twenty feet from the location of that morning’s earliest images. This is pretty typical of my approach—unlike many (but not all) photographers, who actively bounce around a location in search of something different, I tend to seek the scene until I find it, then work it to within an inch of its life. If I’m moving around, it usually means I haven’t found something that completely satisfies me.
Is mine the best approach? Of course not, but it is the best approach for me. There is no all encompassing rule for workflow in the field, except maybe to be true to your instincts. Because I happen to be very deliberate in my approach to many things, and can be incredibly (obsessively?) patient when I sense the potential for something I want, that’s the way I shoot. But, regardless of changing conditions and possible compositional variations, some photographers would go crazy locking into one scene. And just as my deliberate approach continually reveals details I’d have missed had I moved on sooner, it sometimes cheats me of even better opportunities waiting just around the corner. But I learned a long time ago not to stress about what I might be missing (because for me it’s even worse to chase what’s around the corner only to find what I end up with doesn’t match what I left).
Early on this chilly morning I found a relationship between a nearby stack of boulders and the distant Sierra peaks (Mt. Whitney in particular); the more time I spent with the scene, the more I saw and the better all the elements seemed to fit for me, so I just kept working. It didn’t hurt that conditions were changing almost as quickly as I could compose. Clouds ascended from behind Mt. Williamson as if churned out by a cloud making machine, sprinted south past Mt. Whitney, and disappeared behind Lone Pine Peak. On their way they took on whatever hue the rising sun was delivering, from white (before the sun) to vivid pink to amber.
Comparing today’s image to the image in my previous post, I see that my composition shifted to account for the moon. In the earlier image the most prominent boulder and Mt. Whitney serve as a set that anchors the center of the frame. In the later image I keep the set together but offset them to the left to balance the moon’s extreme visual weight. And while at first glance it appears both images were captured from the same spot with just slight focal length and direction adjustments, the height and position of the foreground boulder relative to Mt. Whitney’s summit shows that I’ve moved a little left and about twenty feet closer.

Before Sunrise, Mt. Whitney and the Alabama Hills, California
Relationships between elements in a frame are essential to an image’s success—controlling these relationships is a matter of moving up/down, left/right, forward/backward. Without remembering my decision to move that morning, I can still reconstruct my likely thought process: The more I worked the scene, the more clear I became on where the boulders’ left and right boundaries should be. Moving left and closer let me go wide enough to include the moon and clouds, fill the foreground with no more of the foreground boulders than I wanted, and balance the frame with the boulder/Whitney pair on the left and the moon on the right.
So while I do indeed stick with one scene for a long time, I’m far from static. Each frame is slightly different from the previous one. Like most of my favorite images, this Whitney sunrise moonset is an evolution; it started in the dark, evolving with the conditions and my growing familiarity with the scene’s elements.
There are no guarantees in nature, and I’ve had my share of “panic shoots” when something unexpected forced me to run around frantically searching for a scene to go with the moment. But when this morning’s dance of light, clouds, and moon blended into one of those magic moments photographers dream about, I was ready.
Photo Workshop Schedule
An Eastern Sierra Gallery
Click an image for a closer look and slide show. Refresh the screen to reorder the display.


The secret world before the sun
Posted on February 24, 2013
Before Sunrise, Mt. Whitney and the Alabama Hills, California
Canon EOS 5D Mark III
30 seconds
F/16
ISO 400
70 mm
Compared to the human eye, the camera’s vision has many shortcomings (as photographers are quick to lament). At the top of photographers’ list is the very narrow gap separating the brightest and darkest tones a camera can capture: dynamic range.
But while the camera taketh away, it also giveth. Experienced photographers understand that what we perceive as complete darkness is really just our eyes’ relatively limited ability to gather light, combined with the brain’s insistence on processing this limited input instantaneously. But a camera’s sensor (or a rectangle of unexposed film) can accumulate all the light striking it for whatever duration we prescribe, thereby stretching its “instant” of perception indefinitely. Advantage camera.
For example, the camera’s narrow dynamic range is (exquisitely) mitigated in the barely perceptible light preceding sunrise and following sunset. Unlike night photography, when the light in the sky is so faint that extremely long exposures are required to register any foreground detail, and daylight/moonlight photography, when unidirectional light casts high contrast shadows that exceed a camera’s dynamic range, pre-sunrise/post-sunset twilight light is spread so evenly overhead that most shadows disappear.
About this image
Horizon-to-horizon skylight made dynamic range a non-factor in the above Alabama Hills pre-sunrise scene, while my camera’s instant-stretching ability revealed beauty present in a landscape that was nearly invisible to my eyes.
I arrived at this scene about 45 minutes before sunrise, but knew from experience I wasn’t too early to get to work. White with snow and towering 10,000 vertical feet above my location in the Alabama Hills, Mt. Whitney jutted in dramatic contrast to the dark sky. As my eyes adjusted to the limited light, the jumbled rocks of the Alabama Hills became vague, colorless shapes. Anyone relying on their eyes on this January morning would likely conclude that there’s not yet enough light for photography. But I knew better.
I started by juxtaposing a nearby fortress of boulders against Whitney’s serrated outline. While the mountains were the dominant feature to my eyes, I knew a long exposure would make the nearby rocks equally prominent, making their sharpness essential. Limited light made autofocus out of the question, so I stopped down to f16 to increase my margin for error and focused manually.
As expected, a thirty-second exposure at ISO 400 uncovered volumes of invisible detail and color my eyes missed. (It took two or three exposures to get the focus, exposure, and composition right, as I felt like I was working blind, and my meter was of little value in the darkness.) Though I was photographing in a fairly stiff (and frigid!) breeze at 4,500 feet, it was nothing like the hurricane wind that smeared the clouds above Whitney into an ethereal glaze. Another revelation of the long exposure was the sky’s exquisite, natural (not processing-enhanced) blue-hour hue.
Workshop Schedule || Purchase Prints
A twilight gallery
Click and image for a closer look, and to enjoy the slide show


Alpenglow: Nature’s paintbrush
Posted on January 24, 2012
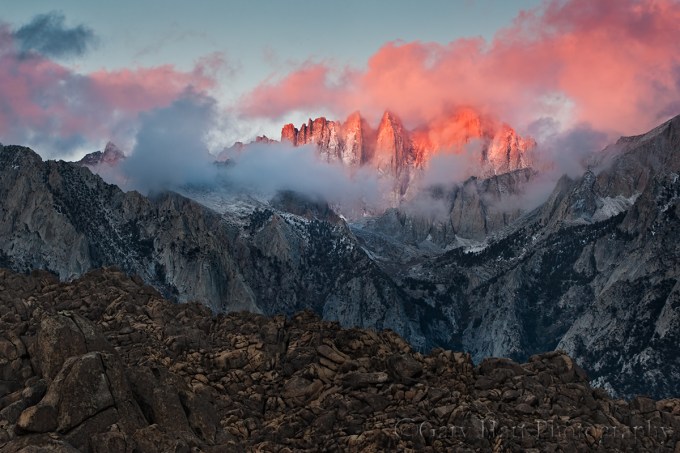
Red Dawn, Mt. Whitney and the Alabama Hills, Eastern Sierra
Canon EOS-1Ds Mark III
168 mm
.8 seconds
F/11
ISO 100
The foreground for Mt. Whitney is the rugged Alabama Hills, a disorganized jumble of rounded granite boulders, familiar to many as the setting for hundreds of movies, TV shows, and commercials. These weathered rocks make wonderful subjects without the looming east face of the southern Sierra. What makes this scene particularly special is the fortuitous convergence of topography and light that rewards early risers with a skyline dipped in pink–add a few clouds and it’s a photography trifecta.
We’ve all seen the pink band above the horizon opposite the sun shortly before sunrise or after sunset. Sometimes called “the belt of Venus,” this glow happens because sunlight that skims the Earth’s surface just before sunrise (or shortly after sunset) has to battle its way through the thickest part of the atmosphere, which scatters the shorter wavelengths (those toward the blue end of the visible spectrum), leaving just the longer, red wavelengths capping the horizon. When mountains jut high enough to reach into this region of pink light, we get “alpenglow.” Towering above the terrain to the east, the precipitous Sierra crest, anchored by 14,500 foot Mt. Whitney (the highest point in the contiguous 48 states) and 13,000 foot Lone Pine Peak, is ideally located to receive this sunrise treatment.
The image above was captured on a frigid January morning. While the best light on the Sierra crest usually starts a couple of minutes before the “official” (flat horizon) sunrise, this morning Mt. Whitney hid behind the clouds until the alpenglow was well underway. Like a piece of art waiting for its spotlight, the cloudy shroud was pulled back just as the sunlight struck Mt. Whitney, and for a couple of minutes it appeared as if a giant paintbrush had dabbed the swirling canvas with pink.
Workshop Schedule || Purchase Prints || Instagram
A Mt. Whitney Gallery
Click an image for a closer look, and to view a slide show.


