Eloquent Images by Gary Hart
Insight, information, and inspiration for the inquisitive nature photographer
In the Pink
Posted on February 14, 2026
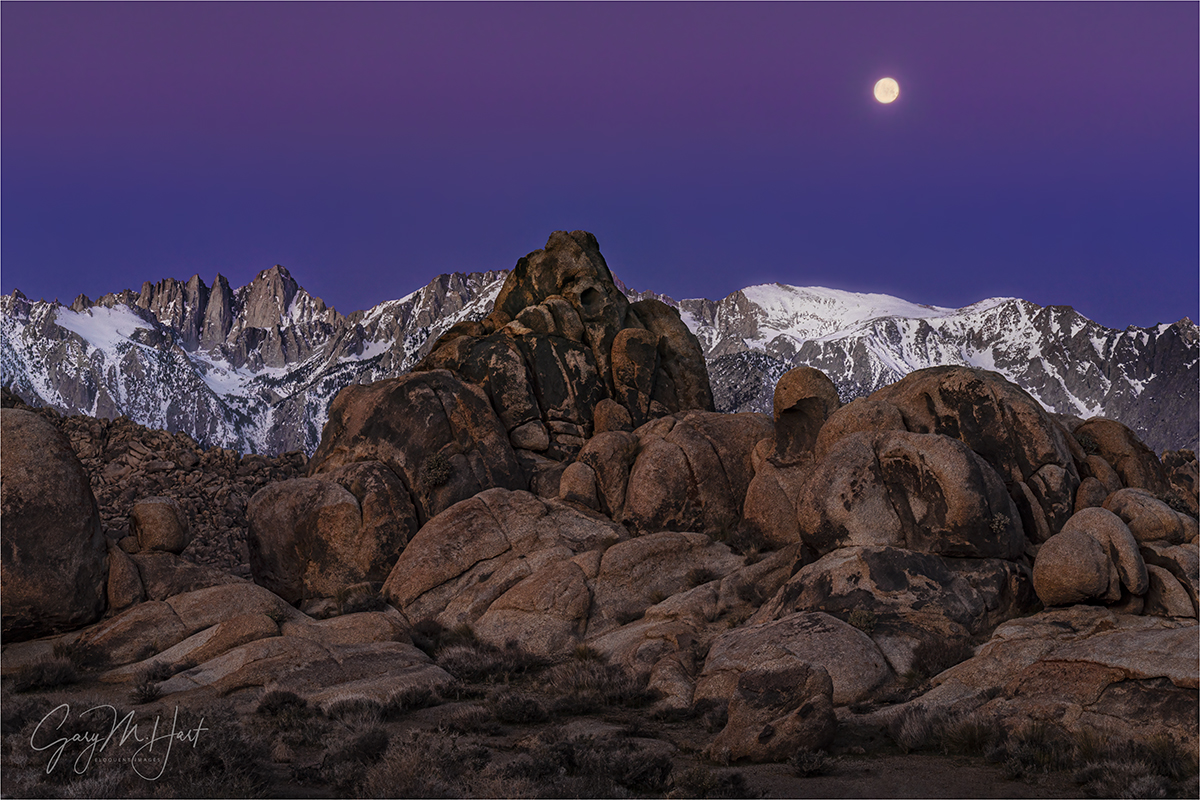
Twilight Wedge and Setting Moon, Mt. Whitney and the Alabama Hills, Eastern Sierra
Sony a7R V
Sony 24-105 G
1/5 second
F/16
ISO 100
The rewards of rising before the sun are many. For me, the opportunity to witness twilight’s soft, cool light slowly warmed by the approaching sun, to breathe in the cleanest air of the day, and to simply be alone with the purest sounds and smells of nature, are ample compensation for whatever chill and sleep deprivation I might experience. And on mornings when the sky is cloudless and the air especially pure, there might just be a bonus.
To collect that bonus, about 20 minutes before sunrise, look for parallel bands of vivid pink and steely blue hugging the horizon opposite the rising sun. Many photographers, myself included, call this early display the “twilight wedge,” but it has other similarly non-scientific names. Closer to the horizon, the dark blue band is actually Earth’s shadow—the final section of sky not receiving any direct light from the soon to appear sun; just above, the pink band is the the day’s first rays of direct sunlight. It’s pink because the sun is just far enough below the eastern horizon that the only its longest, red wavelengths manage to battle through the atmosphere all the way to the other side of the sky. The cleaner the air, the more vivid the twilight wedge’s color. (This color is also possible after sunset, but by day’s end there are usually more color-robbing particles in the air, and Nature’s quiet is often disturbed so much by human activity that some of the magic is lost.) And when towering peaks soar far enough above the viewer’s vantage point that they jut into this pink twilight wedge band, we call it alpenglow.
I love finding beautiful scenes to go with the gorgeous pre-sunrise sky opposite the sun. Near the top of my list is the Alabama Hills, in the shadow of the highest Sierra Nevada peaks. The Alabama Hills are a disorganized jumble of massive, weathered boulders covering many square miles, making an ideal foregrounds for the assortment of serrated peaks looming to the west. A more perfect arrangement for nature photographers couldn’t be assembled—and, as if that’s not enough, the Alabama Hills are also among the best places on Earth to photograph alpenglow.
Of course all this is no secret, and the Alabama Hills has become one of the most popular photography spots in California. To improve my chances of capturing unique images here, I love adding the moon to my Alabama Hills / Sierra Crest scenes. (And when I say “add,” I mean the honorable, old-fashioned way, not with AI or other digital shenanigans.) For years, I’ve timed my Death Valley winter workshop to allow me to take my group to the Alabama Hills, just a 90 minute drive from Death Valley, for the workshop’s final sunset, followed by the moon setting behind the Sierra Crest at sunrise the final morning.
Of course, because there’s only one “best” day in each lunar cycle to photograph a full (-ish) moon setting behind the Sierra Crest, I have no wiggle room when scheduling this workshop—a day early, and the moon is gone before the landscape is light enough to photograph; a day late, and the sky is much too bright by the time the moon drops close to the mountains.
But even nailing the day doesn’t ensure success. Clouds are of course a concern, especially in winter. And each year the timing and position of the moon’s disappearance behind the crest is a little different. In January and early February (when I always schedule this workshop), viewed from my preferred location, the moon sets somewhere between Mt. Whitney and Mt. Williamson (California’s two highest peaks), usually closer to Williamson.

Before Sunrise, Mt. Whitney and the Alabama Hills, California (30 minutes before sunrise)
I like to get my groups out to the Alabama Hills about 30 minutes before we can start photographing the moon. The foreground will still be quite dark to our eyes, and the moon will at least 10 degrees above the crest, but I tell my students to start shooting as soon as we arrive.
Using a long exposure in a frame that doesn’t include the moon (the top of the frame is below the moon), captures much more (mostly shadowless) foreground detail than our eyes see, while juxtaposing the mountains’ light gray granite against a sky that’s darker than the peaks—a magnificently striking sight indeed, especially when there’s snow on the peaks. We’ll keep shooting versions of this until it’s time to include the moon in the festivities.
For any moon photography, the darker the sky, the better the moon stands out. But too early and it’s impossible to capture foreground detail without completely blowing out the moon. For me, the time to photograph any setting full moon starts about 20 minutes before sunrise—basically, as soon as the landscape has brightened enough foreground and lunar detail with one click. And if we’re especially lucky, when that time arrives, we’ll find the moon in the midst of a vivid pink twilight wedge.
This opportunity only lasts a few minutes, because as the sky brightens and the foreground exposure gets easier, the color fades and the essential contrast between the sky and moon decreases. The twilight wedge lasts less than 10 minutes, and is followed by slowly warming sky. By maybe five minutes after sunrise, the good color is long gone and the moon/sky contrast has decreased enough for me to put my camera away.
This year’s Alabama Hills moonset was especially nice. One of my favorite things about my Death Valley / Alabama Hills workshop is that we get two “ideal” (moon setting as the color and light are at their best) sunrise moonsets for the price of one. On our last day in Death Valley, from Zabriskie Point we photograph the moon setting behind Manly Beacon, one of Death Valley’s most striking and recognizable features. Because the mountains behind which the moon sets from Zabriskie rise only about 3 degrees above a flat horizon, this moonset happens much closer to the “official” (flat horizon) sunrise that’s universally used for any celestial rise and set. The next morning we’re in the Alabama Hills—even though the moon sets about an hour later than it did the day before, because the Sierra Crest towers about 10 degrees above the horizon when viewed from the Alabama Hills, the actual moonset we see happens at just about the same time as the prior day’s moonset.
Which is exactly things unfolded for this year’s workshop group. We followed up a beautiful Death Valley Zabriskie Point sunrise moonset, with a similarly outstanding Alabama Hills sunrise moonset the next morning. The vivid hues of the twilight wedge had just peaked when I clicked this image. To my eyes, this entire scene (except the moon), and especially the foreground, was much darker than this image shows. But my camera’s ridiculous dynamic range, combined with Lightroom’s masking that allows me to process the sky and foreground independently from each other, enabled me to expose the scene dark enough to capture essential lunar detail, yet remain confident I had enough recoverable detail in the foreground.
Workshop Schedule || Purchase Prints || Instagram
Alabama Hills Gallery
Click any image to scroll through the gallery LARGE
")


")


Gifts From Heaven
Posted on November 3, 2024

Heaven Sent, Comet Tsuchinshan–ATLAS Above the Sierra Crest, Alabama Hills
Sony a7R V
Sony 24-105 f/4 G
ISO 3200
f/4
5 seconds
As much for its (apparently) random arrival as its ethereal beauty, the appearance of a comet has always felt to me like a gift from the heaven. Once a harbinger of great portent, scientific knowledge has eased those comet fears, allowing Earthlings to simply appreciate the breathtaking display.
Unfortunately, scientific knowledge does not equal perfect knowledge. So, while a great comet gives us weeks, months, or even years advance notice of its approach, we can never be certain of how the show will manifest until the comet actually arrives. For every Comet Hale-Bopp, that gave us nearly two years warning before becoming one of the most widely viewed comets in human history, we get many Comet ISONs, which ignited a media frenzy more than a year before its arrival, then completely fizzled just as the promised showtime arrived. ISON’s demise, as well as many highly anticipated comets before and after, taught me not to temper my comet hopes until I actually put eyes on the next proclaimed “comet of the century.” Nevertheless, great show or not, the things we do know about comets—their composition, journey, arrival, and (sometimes) demise—provide a fascinating backstory.
In the simplest possible terms, a comet is a ball of ice and dust that’s (more or less) a few miles across. After languishing for eons in the coldest, darkest reaches of the Solar System, perhaps since the Solar System’s formation, a gravitational nudge from a passing star sends the comet hurtling sunward, following an eccentric elliptical orbit—imagine a stretched rubber band. Looking down on the entire orbit, you’d see the sun tucked just inside one extreme end of the ellipse.
The farther a comet is from the sun, the slower it moves. Some comets take thousands, or even millions, of years to complete a single orbit, but as it approaches the sun, the comet’s frozen nucleus begins to melt. Initially, this just-released material expands only enough to create a mini-atmosphere that remains gravitationally bound to the nucleus, called a coma. At this point the tail-less comet looks like a fuzzy ball when viewed from Earth.
This fuzzy phase is usually the state a comet is in when it’s discovered. Comets are named after their discoverers—once upon a time this was always an astronomer, or astronomers (if discovered at the same time by different astronomers), but in recent years, most new comets are discovered by automated telescopes, or arrays of telescopes, that monitor the sky, like ISON, NEOWISE, PANSTARRS, and ATLAS. Because many comets can have the same common name, astronomers use a more specific code assembled from the year and order of discovery.
As the comet continues toward the sun, the heat increases further and more melting occurs, until some of the material set free is swept back by the rapidly moving charged particles of the solar wind, forming a tail. Pushed by the solar wind, not the comet’s forward motion, the tail always fans out on the side opposite the sun—behind the nucleus as the comet approaches the sun, in front of the comet as it recedes.
Despite accelerating throughout its entire inbound journey, a comet will never move so fast that we’re able to perceive its motion at any given moment. Rather, just like planets and our moon, a comet’s motion relative to the background stars will only be noticeable when viewed from one night to another. And like virtually every other object orbiting the sun, a comet doesn’t create its own light. Rather, the glow we see from the coma and tail is reflected sunlight. The brilliance of its display is determined by the volume and composition of the material freed and swept back by the sun, as well as the comet’s proximity to Earth. The color reflected by a comet’s tail varies somewhat depending on its molecular makeup, but usually appears as some shade of yellow-white.
In addition to the dust tail, some comets exhibit an ion tail that forms when molecules shed by the comet’s nucleus are stripped of electrons by the sun’s ultraviolet radiation. Being lighter than dust molecules, these ions are whisked straight back by the solar wind. Instead of fanning out like the dust tail, these gas ions form a narrow tail that points directly away from the sun. Also unlike the dust tail that shines by reflected light, the ion tail shines by fluorescence, taking on a blue color courtesy of the predominant CO (carbon monoxide) ion.
One significant unknown upon discovery of a new comet is whether it will survive its encounter with the sun at all. While comets that pass close to the sun are more likely to shed large volumes of ice and dust, many sun-grazing comets approach so close that they’re overwhelmed by the sun’s heat and completely disintegrate.
With millions of comets in our Solar System, it would be easy to wonder why they’re not a regular part of our night sky. Actually, Earth is visited by many comets each year, though most are so small, and/or have made so many trips around the sun that they no longer have enough material to put on much of a show. And many comets never get close enough to the sun to be profoundly affected by its heat, or close enough to Earth to shine brightly here.
Despite all the things that can go wrong, every once in a while, all the stars align (so to speak), and the heavens assuage the disappointment of prior underachievers with a brilliant comet. Early one morning in 1970, my dad woke me and we went out in our yard to see Comet Bennett. This was my first comet, a sight I’ll never forget. I was disappointed by the faint smudges of Comet Kohoutek in 1973 (a complete flop compared to its advance billing), and Halley’s Comet in 1986 (just bad orbital luck for Earthlings). Comet Hale-Bopp in 1996 and 1997 was wonderful, while Comet ISON in 2012 disintegrated before it could deliver on its hype.
In 2013 Comet PANSTARRS didn’t put on much of a naked-eye display, but on its day of perihelion, I had the extreme good fortune to be atop Haleakala on Maui, virtually in the shadow of the telescope that discovered it. Even though I couldn’t see the it, using a thin crescent moon I knew to be just 3 degrees from the comet to guide me, I was able to photograph PANSTARRS and the moon together. Then, in the dismal pandemic summer of 2020, Comet NEOWISE surprised us all to put on a beautiful show. I made two trips to Yosemite to photograph it, then was able to photograph it one last time at the Grand Canyon shortly before it faded from sight.
October 2024 promised the potential for two spectacular comets, Comet Tsuchinshan–ATLAS (C/2023 A3) in the first half of the month, and Comet ATLAS (C/2024 S1) at the end of the month. Alas, though this second comet had the potential to be much brighter, it pulled an Icarus and flew too close to the sun (RIP). But Comet Tsuchinshan–ATLAS was another story, brightening beyond expectations.
I shared the story of my trip to photograph Tsuchinshan–ATLAS in my October 16 I’m Not Crazy, I Swear… blog post, but have a couple of things to add about this image. First is how important it is to not get so locked into one great composition that you neglect capturing variety. I captured this wider composition before the image I shared a couple of weeks ago, and was pretty thrilled with it—thrilled enough to consider the night a great success. But I’m so glad that I changed lenses and got the tighter vertical composition shortly before the comet’s head dropped out of sight.
And second is the clearly visible anti-tail that was lost in thin haze near the peaks in my other image. An anti-tail is a faint, post-perihelion spike pointing toward the sun in some comets, caused when larger particles from the coma, too big to be pushed by the solar wind, are left behind. It’s only visible from Earth when we pass through the comet’s orbital plane. Pretty cool.
When will the next great comet arrive? No one knows, but whenever that is, I hope I’ve kindled enough interest that you make an effort to view it. But if you plan to chase comets, either to photograph or simply view, don’t forget the wisdom of astronomer and comet expert, David Levy: “Comets are like cats: they have tails, and do precisely what they want.”
Join me in my Eastern Sierra photo workshop
More Gifts From Heaven
Click any image to scroll through the gallery LARGE

")


")


")


I’m Not Crazy, I Swear…
Posted on October 16, 2024

Comet Tsuchinshan–ATLAS and Mt. Whitney, Alabama Hills, California
Sony α1
Sony 100-400 GM
5 seconds
f/5.6
ISO 3200
Crazy is as crazy does
In college, my best friend and I drove from San Francisco to San Diego so he could attend a dental appointment he’d scheduled before his recent move back to the Bay Area. We drove all night, 10 hours, arriving at 7:55 a.m. for his 8:00 a.m. appointment (more luck than impeccable timing). I dozed in the car while he went in; he was out in less than an hour, and we drove straight home. I remember very little of the trip, except that each of us got a speeding ticket for our troubles. Every time I’ve told that story, I’ve dismissed it with a chuckle as the foolishness of youth. Now I’m not so sure that youth had much to do with it at all.
I’m having second thoughts on the whole foolishness of youth thing because on Monday, my (non-photographer) wife and I drove nearly 8 hours to Lone Pine so I could photograph Comet Tsuchinshan–ATLAS setting behind Mt. Whitney. We arrived at my chosen location in the Alabama Hills about 15 minutes after the 6:20 sunset, then waited impatiently for the sky to darken enough for the comet to appear. I started photographing at around 7:00, and was done when the comet’s head dropped below Mt. Whitney at 7:30. After spending the night in Lone Pine, we left for home first thing the next morning, pulling into the garage just as the sun set. For those who don’t want to do the math, that’s 16 hours on the road for 30 minutes of photography.
In my defense, for this trip I had the good sense (and financial wherewithal) to get a room in Lone Pine Monday night, and didn’t get pulled over once. That this might have been a crazy idea never occurred to me until I was back at the hotel, and that was only in the context of how the story might sound to others—in my mind this trip was worth every mile, and I have the pictures to prove it.
I say that fully aware that my comet pictures will no doubt be lost in the flood of other Comet Tsuchinshan–ATLAS images we’ll see over the next few weeks, many no doubt far more spectacular than mine. My excitement with the fruits of this trip is entirely personal, and to say I’m thrilled to have witnessed and photographed another comet would be an understatement—especially in light of last month’s Image of the Month e-mail citing comets as one of the three most beautiful celestial subjects I’ve ever witnessed. And of those three, comets feel the most personal to me.
Let me explain
When I was ten, my best friend Rob and I spent most of our daylight hours preparing for our spy careers—crafting and trading coded messages, surreptitiously monitoring classmates, and identifying “secret passages” that would allow us to navigate our neighborhood without being observed. But after dark our attention turned skyward. That’s when we’d set up my telescope (a castoff generously gifted by an astronomer friend from my dad’s Kiwanis Club) on Rob’s front lawn (his house had a better view of the sky than mine) to scan the heavens hoping that we might discover something: a comet, quasar, supernova, black hole, UFO—it didn’t really matter. And repeated failures didn’t deter us.
Nevertheless, our celestial discoveries, while not Earth-changing, were personally significant. Through that telescope we saw Jupiter’s moons, Saturn’s rings, and the changing phases of Venus. We also learned to appreciate the vastness of the universe with the observation that, despite their immense size, stars never appeared larger than a pinpoint, no matter how much magnification we threw at them.
To better understand what we saw, Rob and I turned to illustrated astronomy books. Pictures of planets, galaxies, and nebula amazed us, but we were particularly drawn to the comets: Arend-Roland, Ikeya–Seki, and of course the patriarch of comets, Halley’s Comet (which we learned was scheduled to return in 1986, an impossible wait that might as well have been infinity). With their glowing comas and sweeping tails, it was difficult to imagine that anything that beautiful could be real. When it came time to choose a subject for the annual California Science Fair, comets were an easy choice. And while we didn’t set the world on fire with our project presentation, Rob and I were awarded a ribbon of some color (it wasn’t blue), good enough to land us a spot in the San Joaquin County Fair. (Edit: Uncovering the picture, I see now that our ribbon was yellow.)

Here I am with the fifth grade science project that started it all. (This is only half of the creative team—somewhere there’s a picture that includes Rob.)
The next milestone in my comet obsession occurred a few years later, after my family had moved to Berkeley and baseball had taken over my life. One chilly winter morning my dad woke me and urged me outside to view what I now know was Comet Bennett. Mesmerized, my smoldering comet interest flamed instantly, expanding to include all things astronomy. It stayed with me through high school (when I wasn’t playing baseball), to the point that I actually entered college with an astronomy major that I stuck with for several semesters, until the (unavoidable) quantification of the concepts I loved sapped the joy from me.
While I went on to pursue other things, my affinity for astronomy continued, and comets in particular remained special. Of course with affection comes disappointment: In 1973 Kohoutek fizzled spectacularly, a failure that somewhat prepared me for Halley’s anticlimax in 1986.
By the time Halley’s arrived, word had come down that it was poorly positioned for its typical display (“the worst viewing conditions in 2,000 years”), making it barely visible this time around, but I can’t wait until 2061! (No really—I can’t wait that long. Literally.) Nevertheless, venturing far from the city lights one moonless January night, I found great pleasure locating without aid (after much effort), Halley’s faint smudge in Aquarius.
After many years with no naked-eye comets of note, 1996 arrived with the promise of two great comets. While cautiously optimistic, Kohoutek’s scars prevented me from getting sucked in by the media frenzy. So imagine my excitement when, in early 1996, Comet Hyakutake briefly approached the brightness of Saturn, with a tail stretching more than twenty degrees (forty times the apparent width of a full moon).
But as beautiful as it was, Hyakutake proved to be a mere warm-up for Comet Hale-Bopp, which became visible to the naked eye in mid-1996 and remained visible until December 1997—an unprecedented eighteen months. By spring of 1997 Hale-Bopp had become brighter than Sirius (the brightest star in the sky), its tail approaching 50 degrees. I was in comet heaven. But alas, family and career had preempted my photography pursuits and I didn’t photograph Hale-Bopp.
Comet opportunities again quieted after Hale-Bopp. Then, in early 2007, Comet McNaught caught everyone off-guard, intensifying unexpectedly to briefly outshine Sirius, trailing a thirty-five degree, fan-shaped tail. McNaught put on a much better show in the Southern Hemisphere; in the Northern Hemisphere, because of its proximity in the sky to the sun, it provided a very small window of visibility, and was easily lost in the bright twilight. This, along with its sudden brightening, prevented McNaught from becoming the media event Hale-Bopp was. I only found out about it by accident, on the last day it would be easily visible in the Northern Hemisphere. By then digital capture had rekindled my photography interest (understatement), so despite virtually no time to prepare, I grabbed my camera and headed to the foothills east of Sacramento, where I managed to capture the McNaught image I share in the gallery below—my first successful comet capture.
Following McNaught, I vowed not to be caught off guard by a comet again. After enduring the frustration of promising (over-hyped?) comets disintegrated by the sun (you broke my heart, Comet ISON), and seeing others’ images of spectacular Southern Hemisphere-only comets (I’m looking at you, Comet Lovejoy), my heart jumped when I came across a website proclaiming the approach of Comet PANSTARRS (a.k.a, C/2011 L4 in less glamorous astro-nerd parlance), discovered not by an individual, but by the Pan-STARRS automated telescope array atop Haleakala on Maui.
Researching further, I learned that PANSTARRS could (fingers crossed) hang low in the western sky at magnitudes brighter than Saturn, for about a week right around its perihelion (closest approach to the Sun) in March 2013, remaining visible as it rises but dims over the following few weeks. Checking my calendar to see if I had any conflicts that week, I realized I’d be on Maui for my workshop during PANSTARRS’ perihelion! Turns out my first viewing of PANSTARRS was atop Haleakala, almost literally in the shadow of the telescope that discovered it. I also got to photograph a rapidly fading PANSTARRS above Grand Canyon on its way back to the farthest reaches of the Solar System.
Then, in 2020, came Comet NEOWISE to brighten our pandemic summer. I was able to make two trips to Yosemite and another to Grand Canyon to photograph NEOWISE (the Yosemite trips were for NEOWISE only).
One more time
Comet Tsuchinshan–ATLAS has been on my radar for at least a year, but not something I monitored closely until September, when it became clear that it was brightening as, or better than, expected. By the end of September I knew that the best Northern Hemisphere views of Tsuchinshan–ATLAS would be in mid-October, but since I was already in the Alabama Hills at the end of September, just a couple of days after the comet’s perihelion, I went out to look for it in the pre-sunrise eastern sky (opposite the gorgeous Sierra view to the west). No luck, but that morning only solidified my resolve to give it another shot when it brightened and returned to the post-sunset sky.
At that point I had no detailed plan, and hadn’t even plotted its location in the sky beyond knowing it would be a little above the western horizon shortly after sunset in mid-October. My criteria were a nice west-facing view, distant enough to permit me to use a moderate telephoto lens. After ruling out the California coast (no good telephoto subjects) and Yosemite Valley (no good west-facing views), I soon realized I’d be returning to the east side of the High Sierra.
At that point I started working on more precise coordinates and immediately eliminated my first (and closest) candidate, Olmsted Point, because the setting comet didn’t align with Half Dome. My next choice was Minaret Vista (near Mammoth), a spectacular view of the jagged Minaret range and nearby Mt. Ritter and Mt. Banner. This was a little more promising—the alignment wasn’t perfect, but it was workable. Then I looked at the Alabama Hills and Mt. Whitney and knew instantly I’d be reprising the long drive back down 395 to Lone Pine.
Though its intrinsic magnitude faded each day after its September 27 perihelion, Tsuchinshan–ATLAS’s apparent magnitude (visible brightness viewed from Earth) continued to increase until its closest approach to Earth on October 12. While its magnitude would never be greater than it was on October 12, the comet was still too close to the sun to stand out against sunset’s vestigial glow. But each night it climbed in the sky, a few degrees farther from the sun, toward darker sky.
Though Tsuchinshan–ATLAS would continue rising into increasingly dark skies through the rest of October, and each night would offer a longer viewing window than the prior night, I chose October 14 as the best combination of overall brightness and dark sky. An added bonus for my aspirations to photograph the comet with Mt. Whitney and the Sierra Crest would be the 90% waxing gibbous moon rising behind me, already high enough by sunset to nicely illuminate the peaks after dark, but still far enough away not to significantly wash out the sky surrounding the comet.
At my chosen spot, I set up two tripods and cameras, one armed with my Sony a7RV and 24-105 lens, the other with my Sony a1 and 100-400 lens. I selected that first location because it put the comet almost directly above Mt. Whitney, 16 degrees above the horizon, at 7 p.m. But since the Sierra crest rises about 10 degrees above the horizon when viewed from the Alabama Hills, I knew going in that the comet’s head would slip behind the mountains at 7:30, slamming shut my window of opportunity after only 30 minutes.
When it first appeared, Tsuchinshan–ATLAS was high enough that I mostly used my 24-105 lens. But as it dropped and moved slightly north (to the right), away from Whitney, we hopped in the car and raced about a mile south, to the location I’d chosen knowing that Tsuchinshan–ATLAS would align perfectly with Whitney as it dropped below the peaks. Most of my images from this location were captured with my 100-400 lens.
I manually focused on the comet’s head, or on a nearby relatively bright star, then checked my focus after each image. The scene continued darkening as I shot, and to avoid too much star motion I increased my ISO rather than extending my shutter speed.
As I photographed, I could barely contain my excitement at the image previews on my cameras’ LCD screens. Tsuchinshan–ATLAS and its long tail were clearly visible to my eyes, but the cameras’ ability to accumulate light made it much brighter than what we saw. The image I share today is one of my final images of the night. Even with a shutter speed of only 5 seconds, at a focal length of right around 200mm, if you look closely you’ll still see a little star motion.
My giddiness persisted on the drive back to Lone Pine and into our very nice (and hard earned) dinner. When our server expressed interest in the comet, I went out to the car and grabbed my camera to share my images with her. Whether or not the enthusiasm she showed was genuine, she received a generous tip for indulging me. And even though I usually wait until I’m home to process my images on my large monitor, I couldn’t help staying up well past lights-out to process this one image, just to reassure myself that I hadn’t messed something up (focus is always my biggest concern during a night shoot).
And finally…
FYI, neither Rob nor I became spies, but we have stayed in touch over the years. In fact, the original plan was for him to join me on this adventure, but circumstances interfered and he had to stay home. But we still have hopes for the next comet, which could be years away, or as soon as late this month….
Workshop Schedule || Purchase Prints || Instagram
My Comet History
Click any image to scroll through the gallery LARGE


Dawn’s Early Light
Posted on January 19, 2020

Dawn’s Early Light, Mt. Whitney, Alabama Hills, California
Sony a7RIV
Sony 100-400 GM
30 seconds
F/8
ISO 100
Imagine a world that’s so quiet you can hear nature’s every stirring, a place where each breath holds a pristine bouquet of subtle fragrances and the sky is a continuously shifting kaleidoscope of indigo, blue, yellow, orange, and pink. Maybe you’ve already figured out that I’m describing the very world we live in, before the sun’s light and warmth entice the dirty, noisy, oblivious masses.
The morning magic begins long before the human eye can register detail and color, while a few stars still burn overhead and nearby objects loom as vague shapes. Lacking enough light for the eyes to do their thing, the human experience pre-sunrise is biased toward the non-visual senses, as the sounds of a gentle breeze, flowing water, and stirring creatures mingle with the smells of dew and plants.
For the next 30 minutes, the eastern horizon seems to brighten faster than the rest of the scene. Pushed by the approaching sun, the earth’s shadow hovers in the west, swallowing stars with its steely blue. Following the earth’s shadow is the belt of Venus, as the sun’s longest wavelengths battle through the atmosphere to color the sky pink.
Photographing this pre-sunrise show can begin earlier than your eyes might tell you. Experienced photographers understand that what we perceive as darkness is just our eyes’ relatively limited ability to gather light, combined with the brain’s insistence on processing this limited input instantaneously. But a camera’s sensor accumulates all the light that strikes it for whatever duration we prescribe, thereby stretching the “instant” of perception indefinitely and allowing us to use every possible photon.
Another advantage a digital sensor has over the human eye is its ability to extract color from this apparent darkness. The human eye uses rods and cones to collect light, with the rods doing the heavy lifting in low light, pulling enough monochrome information to discern shapes, but providing little help with color and depth. The cones that complete the scene with color and depth information don’t kick in until there’s much more light. But a digital sensor, though blind to depth, captures photons without discrimination, allowing it to “see” color in very low light.
The ability to capture aspects of the natural world that differ from the human perspective might just be my favorite thing about photography, and these sunrise moments provide a great opportunity to engage the camera’s strength. When the scene is in the same direction as the rising sun, I look for shapes to isolate against the sky, then underexpose enough to turn the shapes into silhouettes, and to prevent the color from being washed out by the sun’s brilliance. When the sun is rising at my back, I take the opposite approach, giving the scene extra light to extract invisible detail from the virtually shadowless light and reveal hidden color in the sky and landscape.
About this image
On the penultimate day of each Death Valley Winter Moon workshop, my group makes the scenic, 90 minute drive from Death Valley to Lone Pine for the workshop’s final sunset and sunrise. The view in the Alabama Hills faces west, so at sunset we’re photographing shaded mountains beneath the brightest part of the sky—not ideal conditions for photography. If we’re lucky enough to get clouds, these Alabama Hills sunsets can still be special, but really it’s the sunrise that we’re here for. At sunrise in the Alabama Hills, we face the Sierra as the sun rises at our back, first coloring the sky with the blue hues of Earth’s shadow, followed by the magenta and pinks of twilight wedge.
Another special aspect of an Alabama Hills sunrise is the Sierra Crest. Towering 10,000 feet above the surrounding terrain, Mt. Whitney and its neighbors jut into the twilight wedge, and for a few sweet seconds take on its pink pastels that photographers call alpenglow.
This year’s sunset was nothing spectacular, but we walked out to the famous Mobius Arch, checked out a couple of other less noteworthy arches nearby, and I pointed out some of the area’s many movie-shoot spots. I was also able to show everyone where the morning sun would rise, and where the moon would set, and introduce them to the most prominent peaks on display: Lone Pine Peak on the left, Mt. Whitney in the middle, and Mt. Williamson on the right.
The forecast for the next morning was clear skies—maybe not dramatic, but good for the planned moonset and ideal for alpenglow on the crest. My general rule for any location is to arrive at least 30 minutes before the “official” (flat horizon) sunrise time, but in the Alabama Hills in winter, I like to get out there even earlier because the warm light from the eastern horizon light reflects off the snow and granite makes the peaks appear to glow in the dark.
The next morning, loading up in the dark at the hotel I glance toward Mt. Whitney and saw a bank of clouds fringing the crest. At first I was concerned that these clouds would obliterate Mt. Whitney, but arriving at our spot in the Alabama Hills, I realized the peak was indeed out, its tip just barely poking into the clouds. We’d arrived about 45 minutes before sunrise, but I barked (gently) at everyone not to delay, that despite what their eyes told them, this light (that still required headlamps to navigate) makes for great photography. Most beelined to the arch, but I saw a telephoto opportunity and quickly set up right next to the car.
White with snow, Mt. Whitney stood in dramatic contrast to the dark sky and foreground. Using the thin strip of clouds to frame the crest, I started by including some of the sky above the clouds, but quickly tightened my composition to simplify the composition. My 30-second exposure to brightened the image far beyond what my eyes saw, and smoothed all detail from the shifting clouds.
The eastern horizon was already gold from the approaching sun, and while I couldn’t really tell that by looking at Whitney, it was apparent with my very first frame. The sun was more than a half-hour from rising, so the light you see on the clouds and Whitney is reflected from the horizon glow, while the darker terrain below Whitney was too low for a direct view of the horizon light.
Workshop Schedule || Purchase Prints
Before the Sun
Click an image for a closer look and to view a slide show.


Go Big or Go Home
Posted on October 13, 2019

Setting Crescent, Sierra Crest, Alabama Hills (California)
Sony a7RIV
Sony 200-600 G
Sony 2x teleconverter
ISO 400
f/13
1/3 second
Like a teenager with his first car, I was itching to take my brand new Sony 200-600 for a spin. But since I don’t photograph wildlife, my ultra-telephoto lenses are used mostly for the moon, and occasionally close-focus stuff like fall color and wildflowers. And as much as I wanted to try it on the moon, I thought the fall color in my Eastern Sierra workshop would be my first opportunity.
Because I schedule the Eastern Sierra workshop to thread the needle between the best chance for peak fall color at North Lake, while avoiding the Lone Pine Film Festival and the Bishop Classic Car Rally, it’s one of the few workshops I do that isn’t timed for something happening in the sky (like the moon, the Milky Way, the northern lights, or lightning). So imagine my excitement when, before this year’s Eastern Sierra workshop, I checked the moon and realized a 6% crescent would be setting behind the Sierra Crest between Lone Pine Peak and Mt. Whitney on the workshop’s first night. Oh boy!
I got the group in position that evening and we all had a blast photographing the new moon slipping toward the serrated Sierra peaks. It started near Lone Pine Peak, and moved closer to Mt. Whitney as it dropped through the darkening sky. My first frames, while the moon was still pretty high, were fairly wide, but as it dropped closer to the mountains, my composition tightened.
When the crescent was just a few degrees above the crest, I grabbed my 200-600 and went to work. But, also like a teenager with his first car, I soon got the urge to soup it up and reached for my Sony 2X teleconverter. This gave me 1200mm at 61 megapixels. Wow.
I always joke that I don’t photograph anything that moves because I want to know my subject will still be there when I’m ready, so for someone as deliberate as I am, it really is startling to see how fast the moon moves through a 1200mm frame. Okay, maybe not as fast as a lion chasing dinner, or a leaping salmon becoming dinner, but instead of trying to track it, I still found it easier to anticipate the spot where the moon would disappear and let it slip into my frame.
It was 35 minutes after sunset when the moon finally reached the crest, making the trickiest part about this scene the exposure. This is the kind of exposure that begs to be handled in Manual mode because a meter would have no clue that I wanted to capture enough contrast between the sky and peaks to create a silhouette, as well as definition in the moonshadow, without completely blowing out the crescent. I also knew that the properly exposed image would look like crap on my LCD (it would require processing to moderate the extreme dynamic range between the dark mountains and bright moon).
To get the exposure right, I slowly pushed the scene brighter until the small blob of highlights in my histogram (the moon) hit the right side, then gave it one more stop of light (so the moon looked completely blown in the preview), knowing (fingers crossed) I could recover them later. I was slightly apprehensive because I still hadn’t processed any images from my new Sony a7RIV, but I was confident that it would have at least as much dynamic range as as my a7RIII, and just approached the exposure the same. All’s well that ends well—phew.
In a workshop my own photography isn’t a priority, so I didn’t get a lot of opportunity to play with my new toys on that trip. But my sense is that I’m going to love this new lens. Though its size means the 200-600 probably won’t replace my Sony 100-400 GM lens (which I love, BTW) as a full-time passenger in my camera bag, it will almost certainly be my default “big moon” lens. And my preliminary feelings are that the dynamic range of the a7RIV is indeed at least as good as the a7RIII (which is pretty incredible too).
Helping my workshop group with this crescent moon shoot got me thinking about metering, and how important it is to have it down cold. I’ve written a document on metering that I provide to all my groups to help them get up to speed before each workshop, but I’ve actually changed the way I meter in the few years since I wrote it. The old approach isn’t invalid (in fact, I think any serious photographer should be able to meter the old fashioned way), but I do think live-view histograms have made it a lot easier. So this week I rewrote my document and am sharing it below. (Please forgive any typos—it’s a work in progress.)
My Next Moon Shoot Opportunity
Exposure Basics
Cameras seem to be getting “smarter” every year. So smart, in fact, that for most scenes, duplicating a two-dimensional version of what your eyes see is a simple matter of pointing your camera and clicking the shutter button. That’s fine if all you care about is recording a memory, but not only is there more to photography than approximating “reality,” there are many creative reasons to override the camera’s choices.
For the creative control that elevates your images above the billions of clicks being cranked out every day, giving your camera the control of photography’s most important decisions ignores an undeniable truth…
Your camera is stupid
Sorry—mine is too. And while I can easily cite many examples, right now it’s just important to understand that your camera thinks the entire world is a middle tone. Regardless of what its meter “sees,” without intervention your camera will do everything in its power to make your picture a middle tone. Sunlit snowman? Lump of coal at the bottom of your Christmas stocking? It doesn’t matter—if you let your camera decide the exposure, your subject will turn out gray.
Modern technology offers faux-intelligence to help overcome this limitation. Usually called something like “matrix” or “evaluative” metering, this solution compares your scene to a large but finite internal database of choices, returning a metering decision based on the closest match. This works pretty well for conventional “tourist” snaps, but often struggles in the warm or dramatic light artistic photographers prefer—and it knows nothing of creativity. If you want to capture more than documentary “I was here” pictures, you really do need to take full control of your camera’s metering and exposure. Fortunately, this isn’t nearly as difficult as most people fear (or as it once was).
Laying the exposure foundation
The amount of light captured for any given scene varies with the camera’s shutter speed, f-stop, and ISO settings. Photographers measure captured light in “stops,” much as a cook uses a cup (of sugar or flour or chocolate chips or whatever) to measure ingredients in a recipe. Adding or subtracting “stops” of light by increasing or decreasing the shutter speed, f-stop, or ISO makes an image brighter or darker.
The simple beauty of metering is that a stop of light is a stop of light is a stop of light—it’s always the same amount of light, whether you change it with the:
- Aperture: The opening light passes through when the shutter opens, measured in f-stops (though aperture and f-stop are almost always used interchangeably, aperture is the actual opening, while f-stop is the ratio of the focal length to the aperture size we use to measure the amount of light that reaches the sensor). Since f-stop is a ratio, the higher the number, the smaller the aperture. Doubling the f-stop number decreases the light by two stops; halving the f-stop number increases the light by two stops. To memorize f-stops in one-stop increments, I keep track of two overlapping f-stop series, one starting at f/1, the other at f/1.4. Doubling then interleaving the results returns one-stop f-stop increments: f/1, f/1.4, f/2, f/2.8, f/4, f/5.6, f/8, f/11, f/16/, f/22, and so on.
- Shutter speed: The time the shutter is open, allowing light to pass through the aperture to reach the sensor. Doubling the shutter speed (open less time) reduces the light by one stop; halving the shutter speed adds one stop.
- ISO: The sensitivity of the sensor (or film) to light. Doubling the ISO adds one stop of light; halving the ISO subtracts one stop.
But while an aperture stop adds/subtracts the same amount of light as a shutter speed or ISO stop, the resulting picture can still vary significantly.
Your aperture choice determines the picture’s depth of field (DOF), while your shutter speed choice determines whether motion in the frame is stopped or blurred. And while an ISO stop also adds/subtracts the same amount of light as shutter speed and aperture without affecting motion and depth, image quality decreases as the ISO increases. So getting the light right is only part of the exposure objective—you also need to consider how you want to handle any motion in the scene, how much DOF to capture, and the ISO that generates the least noise.
Let’s say you’re photographing autumn leaves in a light breeze. You get the exposure right, but the leaves are slightly blurred at 1/15 second. To freeze that blur, you change your shutter speed to 1/30 second, which also reduces the light reaching the sensor by one stop. To replace that lost light (keep the exposure the same), you could open your aperture by a stop (change the f-stop), double the ISO, or make a combination of fractional f-stop and ISO adjustments that total one stop. Each choice will render a different result, but that’s a creative decision your camera isn’t capable of.
Metering modes
Today’s cameras have the ability to measure, or “meter” the light in a scene before the shutter clicks. In fact, most cameras have many different ways of evaluating a scene’s light. Your camera’s metering mode determines the amount of the frame the meter “sees.” The larger the area your meter measures, the greater the potential for a wide range of tones. Since most scenes have a range of tones from dark shadows to bright highlights, the meter will take an average of the tones it finds in its metering zone.
Metering mode options range from “spot” metering a very small part of the scene, to “matrix” (also known as “evaluative”), which looks at the entire scene and actually tries to guess at what it sees. Each camera manufacturer offers a variety of modes and there’s little consensus on name and function (different function for the same name, same function for different names) among manufacturers, so it’s best to read your camera’s manual to familiarize yourself with its metering modes.
Since I want as much control as possible, I prefer spot metering because it’s the most precise. The spot meter covers the smallest area of the frame possible, an imaginary circle in the center 3% (or so, depending on the camera) of the viewfinder. (Some cameras optionally allow you to spot meter on the current focus point instead of the center of the frame.) When spot metering, I can target the part of the frame I deem most important and base my exposure decision on the light reading there.
Spot metering isn’t available in all cameras (this was more true with older models). In some cameras, the most precise (smallest metering area) metering mode available is “partial,” which covers a little more of the scene, somewhere around 10%.
Regardless of the size of the metering zone, the camera will take an average of what it finds. In some modes that average is evenly extracted from the entire zone, in other modes, the average is biased toward the middle: “center-weighted.”
Exposure modes
Don’t confuse the metering mode with the exposure mode. While the metering mode determines what the meter sees, the exposure mode determines the way the camera handles that information. Most mirrorless and DSLR (digital single lens reflex) cameras offer manual, aperture priority, shutter priority, plus a variety of program or automatic exposure modes. Serious landscape photographers usually forego the full automatic/program modes in favor of the manual (my preference) or aperture/shutter priority modes that offer more control.
If you select aperture or shutter priority mode, you specify the aperture (f-stop) or shutter speed, and the camera sets the shutter speed or f-stop that delivers a middle tone based on what the meter sees. But you’re not done. Unless you really do want the middle-tone result the camera desires (possible but far from certain), you then need to adjust the exposure compensation (usually identified by a +/- symbol) to specify the amount you want your subject to be above or below a middle tone.
For example, if you point your camera’s spot-meter at a bright, sunlit cloud, the camera will only give your picture enough light make the cloud a middle tone—but if you’ve only given your scene enough light to make a white cloud gray, it stands to reason that the rest of your picture will be too dark. To avoid this, you would adjust exposure compensation (the +/- symbol) to instruct your camera to make the cloud brighter than a middle tone by adding two stops of light (or however much light you want to give the cloud to make it whatever tone you think it should be).
Rather than aperture priority, I prefer manual mode because I want control: my camera should not be making decisions for me. And once it’s mastered (it really isn’t hard), I think manual metering is easier. But if you can successfully handle each exposure situation with aperture or shutter priority, you’ll be fine—just stay away from the full automatic modes.
Exposure without (and with) compromise
I always try to use my camera’s best ISO, and the aperture that gives me the sharpest frame. Not just the desired DOF, but also the least diffraction (diffraction is a loss of detail caused when light passes through a small opening and spreads slightly—the smaller the opening, the greater the diffraction softening). But sometimes exposure-setting compromise is the only way to achieve the desired results.
For example, when DOF isn’t a consideration, I keep my f-stop in the f/8-f/11 range because it provides a reasonable amount of DOF, and that’s where lenses tend to be sharpest (least distortion), and diffraction is less of a concern (than it is at smaller apertures). But when I need a specific DOF, or want to capture a sunstar (small aperture), I have no problem compromising my f-stop setting to get there.
And I only compromise my ISO when there’s no other way to achieve a certain motion effect. So while ISO 100 is ideal (for my Sony a7RIV and the majority of other cameras), when the wind blows or I want to freeze moving water, I’ll increase my ISO to achieve the motion and DOF combination I need. And if I want a little more motion blur, I have no problem dropping down to ISO 50 to a allow a longer shutter speed.
The simplest way to minimize the need to compromise image quality is to use a tripod. A tripod removes camera shake from the exposure equation, meaning the only time shutter speed matters is when there’s motion in the scene. And when shutter speed doesn’t matter, you can always use the perfect ISO and aperture by going with whatever shutter speed you need, regardless of its length.
Some scenes are all about compromise, even with a tripod. For example, I’d love to photograph the Milky Way at ISO 100, f/8, 1/100 second, but that would give me a black frame. Since star motion increases with shutter speed, I push the ISO as far as I can without getting unfixable noise, open the aperture as wide as I can without obvious distortion—and I still have to live with a shutter speed that gives me a little star motion. All of these exposure choices are compromises that render less than perfect results, but without them, I’d have no Milky Way image at all.
The old fashioned way to meter
Armed with all this exposure understanding, it’s time to think about the best way to read and capture the light in a scene. For most of my photography life, in manual mode I’d set my camera to its native ISO (or to the ISO/ASA of the film I had loaded), determine my aperture (based on the DOF I want and/or the sharpest f-stop for my lens), point my camera’s spot-meter zone at the area on brightest part of the scene, and dial my shutter speed until it indicated the spot-meter zone is the tone I want. (I chose the brightest part of the scene because I know if I don’t blow it out, nothing in my frame will be lost.)
During my film days, and in my early digital life, that approach served me well. In fact, I think every serious photographer should understand metering well enough to do it this way. But….
With digital photography comes the histogram, which used to feel like cheating, but now has completely changed the way I meter.
Digital Metering
In the film days, we didn’t know if the exposure was right until the pictures were processed. To insure against missing the exposure, we’d bracket exposures by (usually) one stop on either side of what we believed to be the correct exposure. Today, thanks to the histogram, bracketing is no longer necessary.
Histogram explained
The histogram is a graph of the tones in an image, from absolute black to absolute white. Instead of clicking and hoping as we did in the film days, the addition of a histogram on every digital camera (that’s not a smartphone) provides photographers instant feedback on each image’s exposure. Better still, live-view histograms in mirrorless viewfinders, or on DLSR and mirrorless LCD screens, provide that essential exposure feedback before we click the shutter.
While any graph has the potential to evoke flashbacks of high school science trauma, a histogram is really quite simple—simple enough to be read and interpreted in the blink of an eye. And not only is your histogram easy to read, it really is your most reliable source of exposure feedback.
Simple Histogram: The shadows are on the left and the highlights are on the right; the far left (0) is absolute black, and the far right (255) absolute white.
When an image is captured on a digital sensor, your camera’s “brain” samples each photosite (the sensor’s individual pixels comprising the megapixel number used to measure sensor resolution), determining a brightness value that ranges from 0 (black) to 255 (white). Every brightness value from 1 to 254 is a shade of gray—the higher a photosite’s number, the brighter its tone.
Armed with the brightness values for each photosite in the image, the camera starts building the image’s histogram. The horizontal axis of the histogram has 256 discrete columns (0-255), one for each possible brightness value, with the 0/black column on the far left, and the 255/white column on the far right (they don’t display as individual columns because they’re crammed so close together).
Despite millions of photosites to sample, your camera builds a new histogram for each image virtually instantaneously, adding each photosite’s brightness value to its corresponding column on the histogram, like stacking poker chips—the more photosites of a particular brightness value, the higher its corresponding column will spike.
RGB histogram
The black-and-white histogram most of us are familiar with is the luminosity histogram. But each photosite on a conventional sensor actually measures the tone of one of three colors: red, green, and blue (RGB). The RGB histogram uses the same pixel sampling process to separate the luminosity histogram into three separate, more granular, graphs, one for each color.
The luminosity histogram shows the detail you captured, but it doesn’t tell you whether you lost color. In fact, the luminosity histogram could look fine even when two of the three RGB channels are clipped (cut off, indicating color is lost). So in high dynamic range scene (extreme highlights and shadows), or scenes with an extreme amount of one color (such a brilliant sunset or a backlit poppy), checking the RGB histogram to ensure that none of the image’s color channels is clipped is especially important. The solution for a clipped RGB channel (or two) is to reduce the exposure.
Reading your histogram
There’s no such thing as a “perfect” histogram shape. Rather, the histogram’s shape is determined by the distribution of light in the scene, while its left/right distribution (whether the graph is skewed to the left or right) is a function of the amount of exposure you’ve chosen to give your image. The histogram graph’s height is irrelevant—information that appears cut off at the top of the histogram just means the graph isn’t tall enough to display all the photosites possessing that tone (or range of tones).
When checking an image’s histogram for exposure, your primary concern should be to ensure that the none of the tone data is cut off on the left (lost shadows) or right (lost highlights). If your histogram appears cut-off on the left side, shadow detail is so dark that it registers as black. Conversely, if your histogram appears cut off on the right side, highlight detail is so bright that it registers as white.
Trusting your histogram
Basing the image’s exposure on the way the picture looks on the LCD is the single biggest exposure mistake I see photographers make. The post-capture review image that displays on your camera’s LCD is great for checking composition, but the range of tones you can see in your review image varies with many factors, such as the review screen’s brightness setting and the amount of ambient light striking the LCD. Even more important, because there’s more information captured than the LCD preview can show, even in the best conditions, you’ll never know how much recoverable data exists in the extreme shadows and highlights by relying on the LCD preview.
It’s human nature to try to expose a scene so the picture on the LCD looks good, but an extreme dynamic range image that looks good on the LCD will likely have unusable highlights or shadows. As counterintuitive as it feels, exposing a high dynamic range scene enough to reveal detail in the darkest shadows brightens the entire scene (not just the shadows), likely pushing the image’s highlights to unrecoverable levels. And making an image dark enough on the LCD to salvage bright highlights darkens the entire scene, all but ensuring that the darkest shadows will be too black.
In fact, a properly exposed, a scene with both bright highlights and dark shadows, such as a sunrise or sunset, will look awful on the LCD (dark shadows and bright highlights) because there’s information there you can’t see (yet). The histogram provides the only reliable representation of the tones you captured (or, in your live-view LCD display or mirrorless electronic viewfinder, of the tones you’re about to capture).
Live-View Metering
Starting with the live-view screen, and now in mirrorless viewfinders, we can view our histogram before clicking the shutter. So instead of guessing the exposure settings that return the tones we want, we have an actual pre-capture picture of the tones to monitor and adjust.
It really is this simple
Using the pre-capture histogram—almost always in my Sony mirrorless viewfinder, but the histogram on a mirrorless or DSLR LCD screen will work too—I start the exposure process as I always have. In manual exposure mode, I default to my camera’s best ISO (100 for most cameras, but definitely not all, so check your camera’s native ISO), and the best f-stop for my composition. I don’t touch these settings unless motion in my scene, such as wind or star movement, forces an ISO and/or f-stop compromise. With ISO and f-stop set, I slowly adjust my shutter speed with my eye on the histogram until it looks right. Click.
Spare the highlights
In a low or moderate contrast scene, I’ll have a little room on both sides of the histogram (the graph doesn’t bump up against either side)—a very easy scene to expose. But in a high dynamic range scene, the difference between the darkest shadows and brightest highlights might stretch beyond one or both sides of the histogram. When a high dynamic range scene forces me to choose between saving the highlights or the shadows, I almost always bias my exposure choice toward sparing the highlights, carefully dialing the shutter speed until the histogram bumps against the right side.
When forced to decide between the highlights or shadows, I almost always try to spare the highlights, for a couple of reasons: First, shadows are usually easy to recover than highlights; second, highlights are almost always more important than shadows. In fact, because the human eye is reflexively drawn to the brightest areas of the frame, I rarely have anything important in the shadows of a high dynamic range scene.
The post-capture histogram is usually more reliable than the pre-capture histogram. Sometimes this doesn’t matter, but in a high dynamic range scene, or any time I push my histogram close to the right side, I verify my exposure by checking the post-capture histogram. Another situation that can sometimes fool the pre-capture histogram is blurred (long exposure) whitewater.
The zebras
Most mirrorless cameras, and many newer DSLRs, offer “zebra” highlight warnings in their pre-capture view. The first time I meter a scene, my camera’s current exposure settings (based on my previous scene) might be far from what the new scene requires. When that’s the case, I push my shutter speed fast until the zebras appear (if my prior exposure was too dark) or disappear (if my prior exposure was too bright), then refine the exposure more slowly while watching the histogram. While these alerts aren’t nearly as reliable as the histogram and should never be relied on for final exposure decisions, I use their appearance as a signal that it’s time to monitor my histogram.
Know your camera
Photographers who shoot raw make exposure decisions with the understanding that the capture exposure is simply the start, and the final exposure is determined by the processing. But the more photons you capture, the greater your latitude for adjustment later.
Trusting the histogram is a great start, but every camera model interprets and displays its exposure information differently. Added to that, the histogram is based on the jpeg the camera displays, so raw shooters always have more image information than their histogram shows—it’s important to know how much more.
With my Sony a7R bodies, I know I’m pretty safe pushing my histogram at least a full stop beyond the left or right (shadows and highlights) histogram boundary. This knowledge enables me to get the most out of even the most challenging high dynamic range scenes.
Practice makes perfect
Like most things in photography, the more you do it, the easier it becomes. For many people reading this, my approach is nothing revolutionary. But if it’s all new to you, or if you feel a little rusty, I suggest that you go out and try it in a low stress situation. Keep working on it whenever you find yourself in a situation where getting the shot doesn’t feel life or death.
When you do get into one of those “Oh my God, look at that!” moments, go back to whatever feels most comfortable to you. I think you’ll find that it won’t take too much practice before the right way is also the most comfortable way.
Workshop Schedule || Purchase Prints
Big (and Big-ish) Moons
Click an image for a closer look and to view a slide show.


")


Photograph the Eastern Sierra
Posted on October 10, 2017
First Light, Lone Pine Peak and Mt. Whitney, Alabama Hills, Eastern Sierra (2006)
Canon EOS-1Ds Mark II
Canon 70-200 f/4L
1/20 second
F/8
ISO 200
This is an edited and updated version of my Eastern Sierra article that appeared in the September 2016 edition of “Outdoor Photographer” magazine
Eastern Sierra
Skirting the east side of the Sierra Nevada, US 395 enchants travelers with ever-changing views of California’s granite backbone. Unlike anything on the Sierra’s gently sloped west side, Highway 395 parallels the range’s precipitous east flank in the shadow of jagged peaks that soar up to 2 miles above the blacktop. More than just beautiful, these massive mountains form a natural barrier against incursion from the Golden State’s major metropolitan areas, keeping the Eastern Sierra region cleaner and quieter than its scenery might lead you to expect.
It would be difficult to find any place in the world with a more diverse selection of natural beauty than the 120-mile stretch of 395 between Lone Pine and Lee Vining: Mt. Whitney and the Alabama Hills, the ancient bristlecones of the White Mountains (across the Owens Valley, east of the Sierra), the granite columns of Devil’s Postpile, Mono Lake and its tufa towers, and too many lake-dotted, aspen-lined canyons to count. Long a favored escape for hikers, hunters, and fishermen, in recent years photographers have come to appreciate the rugged, solitary beauty possible only on the Sierra’s sunrise side.
I prefer photographing most Eastern Sierra locations at sunrise, when the day’s first rays paint the mountains with warm light, and the highest peaks are colored rose by alpenglow. (Without clouds, Eastern Sierra sunset light can be tricky, as you’ll be photographing the shady side of the mountains against the brightest part of the sky.) Devoid of large metropolitan areas, low light pollution also makes the Eastern Sierra one California’s finest night photography destinations. But regardless of the time of day, the key to photographing the Eastern Sierra is flexibility—if you don’t like the light in one direction, you usually don’t need to travel far to find something nice in another direction.
Lone Pine area
The southern stretch US 395 bisects the Owens Valley, a flat, arid plane separating the Sierra Nevada to the west from the Inyo ranges to the east. Just west of Lone Pine lies the Alabama Hills. Named for a Confederate Civil War warship, the Alabama Hills’ jumble of weathered granite boulders and proliferation of natural arches would be photogenic in any setting. Putting Mt. Whitney (the highest point in the 48 contiguous states), Lone Pine Peak (the subject of Mac OS X Sierra’s desktop image), and the rest of the serrated southern Sierra crest seems almost unfair.
The Alabama Hills are traversed by a network of unpaved but generally quite navigable roads. To get there, drive west on Whitney Portal Road (the only traffic signal in Lone Pine). After 3 miles, turn right onto Movie Road and start exploring. If you’re struck by a vague sense of familiarity here, it’s probably because for nearly a century the Alabama Hills has attracted thousands of movie, TV show, and commercial film crews.
Mobius Arch (also called Whitney Arch and Alabama Hills Arch) is the most popular photo spot in the Alabama Hills. It’s a good place to start, but settling for this frequently photographed subject risks missing numerous opportunities for truly unique images here. To get to Mobius Arch, drive about a mile-and-half on Movie Road to the dirt parking area at the trailhead. Following the marked trail down and back up the nearby ravine, the arch is an easy ¼ mile walk. There’s not a lot of room here, but if the photographers work together it’s possible to arrange four or five photographers on tripods with Mt. Whitney framed by the arch. And don’t make the mistake many make: the prominent peak on the left is Lone Pine Peak; Mt. Whitney is serrated peak at the back of the canyon.
Sunrise is primetime for Alabama Hills photography, but good stuff can be found here long before the sun arrives. I try to be set up 45 minutes before the sun (earlier if I want to ensure the best position for Whitney Arch) to avoid missing a second of the Sierra’s striking transition from night to day.
The grand finale from anywhere in the Alabama Hills is the rose alpenglow that colors the Sierra crest just before sunrise. Soon after the alpenglow appears, the light will turn amber and slowly slide down the peaks until it reaches your location, warming the nearby boulders and casting dramatic, long shadows. But unless there are clouds to soften the light, you’ll find that the harsh morning light will end your shoot pretty quickly once the sunlight arrives on the Alabama Hills.
Whitney Portal Road (closed in winter) ends about 11 miles beyond Movie Road, at Whitney Portal, the trailhead for the hike to Mt. Whitney and the John Muir Trail. On this paved but steep road, anyone not afraid of heights will enjoy great views looking east over the Alabama Hills and Owens Valley far below, and up-close views of Mt. Whitney looming in the west. At the back of the Whitney Portal parking lot is a nice waterfall that tumbles several hundred feet in multiple steps.
The Alabama Hills are one of my favorite moonlight locations. Because the full moon rises in the east right around sunset, on full moon nights the Alabama Hills and Sierra crest are bathed in moonlight as soon as darkness falls. Lit by the moon, the hills’ rounded boulders mingle with long, eerie shadows, and the snow-capped Sierra granite radiates as if lit from within.
If you find yourself with extra time, drive about 30 miles east of Lone Pine on Highway 136 until you ascend to a plain dotted with photogenic Joshua trees—after you’ve finished photographing the Joshua trees, turn around and retrace the drive back to Lone Pine on 136 to enjoy spectacular panoramic views of the Sierra crest. And just north of Lone Pine on 395 is Manzanar National Historic site, a restored WWII Japanese relocation camp. Camera or not, this historic location is definitely worth taking an hour or two to explore.
Bristlecone pine forest
Continuing north from Lone Pine on 395, on your left the Sierra stretch north as far as the eye can see, while the Inyo mountains on the right transition seamlessly to the White Mountains. Though geologically different from the Sierra, the White Mountains’ proximity and Sierra views make it an essential part of the Eastern Sierra experience.
Clinging to rocky slopes in the thin air above 10,000 feet, the bristlecone pines of the White Mountains are among the oldest living things on earth—many show no signs of giving up after 4,000 years; at least one bristlecone is estimated to be 5,000 years old.
Abused by centuries of frigid temperatures, relentless wind, oxygen deprivation, and persistent drought, the bristlecones display every year of their age. Their stunted, twisted, gnarled, polished wood makes the bristlecones suited for intimate macros and mid-range portraits, or as a striking foreground for a distant panorama.
The two primary destinations in the bristlecone pine forest are the Schulman and Patriarch Groves. Get to the bristlecone pine forest by driving east from Big Pine on Highway 168 and climbing about 13 car-sickness inducing miles. Turn left on White Mountain Road and continue climbing another 10 twisting miles to reach the Schulman Grove. Despite the incline and curves, the road is paved all the way to this point. Stop at the Sierra panorama after about 8 miles for a spectacular view that also makes a great excuse to pause and collect yourself.
Stop at the small visitor center in the Schulman Grove to pay the modest use fee, then choose between the 1-mile Discovery loop trail, and the 4 1/2 mile Methuselah loop trail. Both trails are in good shape, but the extreme up and down in very thin air will test your fitness. Most of the trees on the Methuselah Trail get more morning light, while the majority of the Discovery Trail trees get their light in the afternoon.
If you’re unsure of your fitness, or have limited time, the Discovery Trail is definitely the choice for you. Because the photogenic trees start with the very first steps, on this trail you can turn around at any point without feeling cheated of opportunities to photograph nice bristlecones. And along the way you’ll appreciate the handful of benches for enjoying the view and catching your breath. Hikers who can make it to the top of the switchbacks are rewarded great views of the snow-capped Sierra across the Owens Valley.
The Discovery Trail climbs for a couple hundred more yards beyond the switchbacks, but just as you’re beginning to wonder whether all the effort is worth it, the trail levels, turns, and drops. Soon you’ll round a 90-degree bend and be rewarded for your hard work with two of the most spectacular bristlecones in the entire forest. Spend as much time here as you have, because the rest of the loop back to the parking lot has nothing to compete with these two trees.
The pavement ends at the Schulman Grove, but the unpaved 12-mile drive to the Patriarch Grove is navigable by all vehicles in dry conditions. Home to the Patriarch Tree, the world’s largest bristlecone pine, the Patriarch Grove is more primitive and much less visited than the Schulman Grove. Unlike the Schulman Grove, where I rarely stray far from the trail, I often find the most photogenic bristlecones here by venturing cross-country, over several small ridges east of the Patriarch Tree. Even without a trail, the sparse vegetation and hilly terrain provides enough vantage points that make getting lost difficult.
Clean air, few clouds, and very little light pollution make the bristlecone groves a premier night photography location. On moonless summer and early autumn nights, the bright center of the Milky Way is clearly visible from the slopes of the bristlecone forest. For the best Milky Way images, look for trees that can be photographed against the southern sky. And no matter how warm it is on 395 below, pack a jacket.
The bristlecone forest closes in winter.
Bishop area
An hour north of Lone Pine on 395 is Bishop. Its central location, combined with ample lodging, restaurant, and shopping options make Bishop an excellent hub for an Eastern Sierra trip—if you want to anchor in one spot and venture out to the other Eastern Sierra locations, Bishop is probably your best bet.
West of Bishop are many small but scenic lakes nestled in steep, creek-carved canyons that are lined with aspen (and some cottonwood) that turn brilliant yellow each fall. Many of these canyons can be accessed on paved roads, others via unpaved roads of varying navigability, and a few solely by foot.
Of these canyons, Bishop Creek Canyon is the best combination of accessible and scenic. To get there, drive west on Highway 168 (Line Street in Bishop). After about 15 miles you can decide whether to turn left on the road to South Lake, or continue straight to reach North Lake and Lake Sabrina (pronounced with a long “i”).
One of the area’s most popular sunrise spots, North Lake is a 1-mile signed detour on a narrow, steep, unpaved road—easily navigated in good conditions by all vehicles, but the un-railed, near vertical drop is not for the faint of heart. A mile or so beyond the turn to North Lake the road ends at Lake Sabrina, a fairly large reservoir in the shadow of rugged peaks and surrounded by beautiful aspen (but its bathtub ring when less than full is not for me).
South Lake is another aspen-lined reservoir that shrinks in late summer and autumn. Highlights on South Lake Road are a manmade but photogenic waterfall leaping from the mountainside, clearly visible on the left as you ascend, and Weir Lake, just before South Lake.
Both Bishop Canyon roads are worth exploring, especially in autumn, when the fall color can be spectacular. Each features scenic tarns and dense aspen stands accented by views of nearby Sierra peaks. Rather than beeline to a fall color spot, in autumn I drive the Sabrina and South Lake roads and pick the best color.
Highway 395 north of Bishop features a few of my favorite fall color destinations, including Rock Creek Canyon and McGee Creek. About a half hour north of Bishop, detour west off the highway to postcard-perfect Convict Lake. And just beyond the road to Convict Lake is the upscale resort town of Mammoth Lakes, just a few miles west of 395. The drive on 203 through Mammoth Lakes takes you past the Mammoth Mountain Ski slopes to Minaret Vista. This panoramic view of the sawtooth Minaret Range, Mt. Ritter, and Mt. Banner captures the essence of high Sierra beauty. From here, follow the road down the other side to see the basalt columns of Devil’s Postpile, and to take the short hike to Rainbow Fall.
Lee Vining area
Leaving Bishop, Highway 395 climbs steeply, crests near Crowley Lake, skirts the communities of Mammoth Lakes and June Lake, finally dropping down into the Mono Basin and Lee Vining. Though this is an easy, one-hour drive, you’ll feel like you’ve landed on a different planet. In October, detour onto the June Lake Loop, another popular fall color drive.
By far the most popular Mono Lake location is South Tufa, a garden of limestone tufa towers that line the shore and rise from the lake. Tufa are calcium carbonate protrusions formed by submerged springs and revealed when the lake drops. In addition to the striking tufa towers, South Tufa is on a point that protrudes into the lake, allowing photographers to compose with both tufa and lake in the frame while facing west, north, or east.
To visit South Tufa, turn east on Highway 120 about 5 miles south of Lee Vining. Follow this road for another 5 miles and turn left at the sign for South Tufa. Drive about a mile on an unpaved, dusty but easily navigated road to the large dirt parking lot. From here it’s an easy ¼ mile walk to the lake, but wear your mud shoes if you want to get close to the water. And don’t climb on the tufa.
While South Tufa can be really nice at sunset, mirror reflections on the frequently calm lake surface, and warm light skimming over the low eastern horizon, make this one of California’s premier sunrise locations. To get the most out of a sunrise shoot here, it’s a good idea to photograph South Tufa at sunset to familiarize yourself with the many possibilities here (and who knows, maybe you’ll get lucky and catch one of the Eastern Sierra’s spectacular sunsets).
In the morning, arrive at the lake at least 45 minutes before sunrise to ensure a good spot at this popular location—you can start shooting as soon as you arriving, using long exposures to brighten the scene and smooth the water. I usually start with scenes to the east, capturing tufa silhouettes against indigo sky and water. As the dawn brightens, keep your head on a swivel and be prepared to shift positions with the changing light.
As the sun approaches and the dynamic range increases in the east, I often turn to face west. Soon the highest Sierra peaks are colored with pink alpenglow, followed quickly by the day’s first direct sunlight. With the sun rising beneath the horizon behind me, its light slowly descends the Sierra peaks stretching before me. When the sunlight finally reaches lake level, for a few minutes the tufa towers are awash with warm sidelight, creating wonderful opportunities facing north. As with the Alabama Hills, without clouds to soften the sunlight and make the sky more interesting, the sunrise show is terminated quickly by contrasty light.
Other options in and near Lee Vining are the excellent Mono Lake visitor center on the north side of town, the small but very informative Mono Committee headquarters in the middle of town, any meal at the Whoa Nellie Deli in the Mobil Station (trust me on this), and Bodie, an extremely photogenic ghost town maintained in a state of arrested decay, less than an hour’s drive north. And a sinuous 20-minute drive west, up 120 (closed in winter) lands you at Tioga Pass, Yosemite’s east entrance and the gateway to Tuolumne Meadows.
Fall color in the Eastern Sierra
Each fall the Eastern Sierra becomes a Mecca for photographers chasing the vivid gold coloring the area’s ubiquitous aspen groves. The show starts in late September at the highest elevations, and continues well into October in some of the lower elevations. Fall color timing and locations vary from year-to-year, but the general fall color rule to follow here is: If the trees are still green, just keep climbing.
The best way to photograph the Eastern Sierra’s fall color is to explore: Pick a road that heads west and start climbing until something stops you. To give you a head start, here are a few of my favorite spots, from south to north. (Rather than beeline to specific locations in these ever-changing canyons, I’ve found it’s best to drive slowly and stay alert for opportunities along the way.)
Bishop Creek Canyon: Nice any season it’s open, Bishop Creek Canyon (detailed earlier) comes alive with gold each autumn. Aspen surrounding the canyon’s many lakes make for spectacular reflections. Of these, North Lake is probably the most popular, but autumn mornings can be extremely crowded here. The color in Bishop Creek Canyon usually peaks in late September at the highest elevations (near North Lake, Lake Sabrina, and South Lake), but lasts until mid-October farther down the canyon.
Rock Creek Canyon: Near the crest of the climb out of Bishop on 395, turn left at the sign for Rock Creek Lake. Climb this road along Rock Creek all the way up to its terminus at Mosquito Flat trailhead. Over 10,000 feet, this is the highest paved road in the Sierra. As with Bishop Creek Canyon, the best photography in Rock Creek Canyon is usually found at random points along the road—drive slowly and keep your eyes peeled.
McGee Creek: When you see Crowley Lake on the right, look for the road to McGee Creek on the left. This 2-mile unpaved road is navigable by all vehicles, but take it slow. It ends at a paved parking lot that’s the launching point for a hike up McGee Creek, into the canyon, and the mountains beyond. Unlike most other Eastern Sierra canyons, the dominant tree here is cottonwood. While I’ve had good success photographing along the creek right beside the parking lot, you can find nice color as far up the canyon as your schedule (and fitness) permits.
Convict Lake: The road to Convict Lake is just south of Mammoth Lakes. It’s a 2-mile paved drive to a beautiful lake nestled at the base of towering mountains—definitely worth the short detour off of 395.
June Lake Loop: Between Mammoth Lakes and Lee Vining is a 15 mile loop that exits 395 near the small town of June Lake (look for a gas station on the left) and returns to 395 a few miles down. Along the route you’ll find several lakes, and a waterfall at the very back of the loop (visible from the road).
Lundy Canyon: About 5 miles north of Lee Vining, turn left onto the Lundy Canyon road to enjoy one of my favorite Eastern Sierra fall color spots. The lower half of this road, below Lundy Lake, is often a good place to find late season color, but my favorite photo spots aren’t until road turns bad, just beyond the lake.
Driving slowly and with great care, most vehicles can make the 2 unpaved miles along Mill Creek to the end of the road. In addition to beautiful creek scenes, you’ll find several small, reflective beaver ponds along the way. If you make it to the end of the road, park and follow the trail up the canyon, through an aspen grove, for about ¼ mile to reach a small, waterfall-fed lake. The overgrown lakeshore makes photography here difficult, but a short walk along the shoreline to the left, toward the lake outlet, will take you to a massive beaver dam. Roll up your pants and get your feet (and more) wet for the best views of the lake.
Dunderberg Peak and Virginia Lakes: Shortly after the turn to Lundy Canyon, 395 climbs steeply to Conway Summit, at 8143 feet, the highest point on the entire route. On the left, just past a spectacular view of the entire Mono basin (worth the stop), is the road to Virginia Lakes. Here you’ll find some of the area’s earliest aspen to turn. Just beyond the Virginia Lakes road are colorful views of Dunderberg Peak and its aspen-blanketed slopes.
There’s far too much to photograph in the Eastern Sierra to describe here. Join me in an Eastern Sierra photo workshop to explore all these locations, plus many more less known spots: Eastern Sierra Photo Workshops
Workshop Schedule || Purchase Prints
An Eastern Sierra Gallery


Beware the “expert”
Posted on March 4, 2016
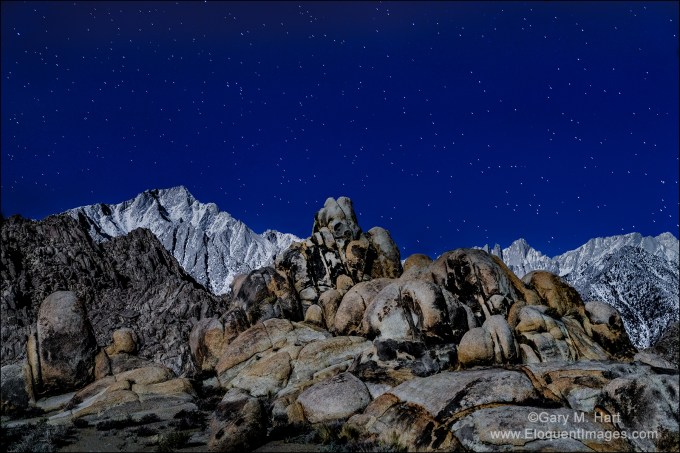
Sierra Moonlight, Mt. Whitney and Lone Pine Peak, Alabama Hills, California
Sony a7R II
Sony/Zeiss 24-70 f4
15 seconds
F/5.6
ISO 3200
Rules are important. The glue of civilization. And after a childhood constrained by bedtimes, homework, and curfews, it’s no wonder that as adults we honor rules simply because, well, simply because. (I mean, who doesn’t wait for however long it takes and with no car or cop in sight, for a light to change?)
As much as civil society relies on universal obedience, not all “rules” are created equal. And our reluctance to question authority inhibits growth. One example would be blind adherence to the (usually) well-intended photography “experts” proliferating in print, online, and (especially) in your local camera club. These self-proclaimed authorities have figured out that people who are just learning are less confident, and tend to respond more to authority than substance.
The camera club paradox
I think camera clubs are great for many reasons: they connect people with a common interest, facilitate the exchange of information and ideas, and provide a forum for sharing our photographic creations. Camera clubs spur us to get out and shoot when we otherwise might stay home, and offer the beginner rules that provide a stable foundation upon which to build her craft.
But camera clubs can also be a breeding ground for self-proclaimed experts, a status often not conferred to the person most qualified, but to the person who spews photographic dogma with the most authority. The result is well-intended but misinformed knowledge that infects a camera club like a mutated virus.
I’m especially troubled when I hear of images shared in a camera club photo competition that were dismissed without consideration because they violated the local “expert’s” idea of an unbreakable photographic rule. Some camera club capital “violations” I’ve seen firsthand or heard about (by no means a comprehensive list):
- Centered subject
- Centered horizon
- Blown highlights
- No detail in the shadows
- Not sharp from front to back (this one really bothers me)
Each of these things can be a problem, but they can be a refreshing expression of creativity as well. And even if they are a problem, refusing to consider an image because it violates someone’s definition of “perfect” discounts all that’s potentially good about it.
If you’re an aspiring photographer and someone dismisses an image for a technical violation, take a step back, inhale, and remind yourself that there are very, very few absolutes in photography. In general, it’s helpful to remember that no matter how strongly it’s stated, advice that doesn’t feel right (even if you can’t articulate why) doesn’t need to be heeded. In fact, the next time someone starts feeding you photography advice in absolutes, run (don’t walk) to the nearest exit.
About this image
I jumped on my anti-expert soapbox after observing several recent workshop participants who were clearly constrained by “rules” enforced by their local camera club. And looking at this image, I realized that there are camera clubs that probably wouldn’t even consider it because I centered the horizon and the teddy-bear shaped rock in the foreground. I also captured a little more star motion than is ideal. But deal breakers? Not to me.
I’d taken my January Death Valley workshop group out to the Alabama Hills for a moonlight shoot on the workshop’s last night. A few in the group walked out to the arch, but most gravitated to this group of boulders a little south of the parking area. As I worked to get the group up to speed with moonlight photography, I tried a few frames of my own.
Most of my moonlight images are fairly wide, and even the closest focus point is far enough away to be at infinity, even wide open. But the rocks here were close enough, and my focal length was long enough (57mm), that I stopped down from f4 to f5.6 to increase my margin for error. And rather than autofocusing on the moon as I normally do, I focused toward the back of the foreground rocks. As I hope you can see in this low-res web version, I made the right focus choices.
The other problem I had to contend with was motion blur in the stars. At the 16mm to 24mm I typically use for night photography (to maximize the number of stars), motion blur isn’t much of a problem, even at 30 seconds. But at nearly 60mm, I didn’t think I could get away with 30 seconds. This is the first time I’d tried my Sony a7RII at night—I usually use my a7S, but I’d heard such good things about the a7RII’s high ISO capability that I thought I’d try it.
Bumping the ISO to 3200 (from my moonlight standard of 800), I was able to drop my shutter speed to 15 seconds. This image is so clean at 3200, and the star motion is visible enough, that I regret now that I didn’t go to ISO 6400 and cut my shutter speed to 8 seconds. Next time….
Workshop schedule
A gallery of potential rejects
(Images that might not make the cut at a camera club competition)
Click an image for a closer look, and a slide show. Refresh the screen to reorder the display.


Don’t settle for the trophy shot
Posted on February 14, 2016
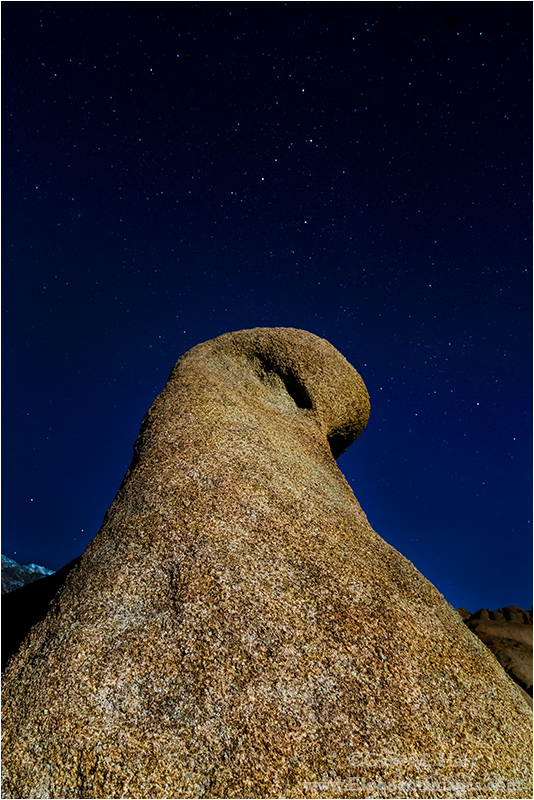
Cassiopeia Above Mobius Arch, Alabama Hills, California
Sony a7R II
Sony/Zeiss 24-70 f4
20 seconds
F/8
ISO 3200
Trophy shot: A beautifully executed capture of a frequently photographed scene.
In Monday’s post I wrote about relationships in nature. They really are everywhere, these juxtapositions of landscape, light, and sky that we photograph by virtue of our timing, position, and creative vision. In their pursuit, photographers label photo spots a “sunrise location” or “sunset location,” research the best time to photograph pretty much every popular landmark, plot the when and where of the moonrise, and…, well, you get the idea.
Unfortunately, in this age of ubiquitous cameras and limitless information, these easy relationship images have become cliché, a “trophy” to display in what seems to be a never-ending “top-this” cycle. While putting a beautiful scene with good light or a vivid sky makes a great foundation for a nice image, elevating an image above trophy status requires a serious infusion of creativity. In other words, rather than settle for an image that’s merely a flawlessly executed version of the same scene we’ve all seen hundreds of times, photographers should be seeking unique relationships between the scene’s varied elements, relationships that look deeper than the conventional treatment.
For example
(Like many other photographers) I’ve photographed California’s Alabama Hills a lot. Here stacked, weathered granite boulders provide a dramatic foreground for Mt. Whitney and the precipitous eastern escarpment of the Sierra Nevada range.
Despite an almost infinite variety of potential foreground subjects, the Alabama Hills trophy shot is Mobius Arch (aka, Whitney Arch), which makes a striking frame for Mt. Whitney. Some version of this composition has been a prime goal for many photographers, but like most easy captures these days, there’s rarely anything special about Mobius Arch images.
As with any location, it helps to start with a nice sky and good light. The natural relationships I try to add to the Alabama Hills’ beauty include sunrise alpenglow on Mt. Whitney, warm light on the granite boulders, and the moon’s disappearance behind the serrated, snow-capped peaks. But as beautiful as these phenomena are, they’re still not enough to set one Mobius Arch image apart from the other.

Moonset, Mt. Whitney and Mobius Arch, Alabama Hills, California
As a workshop leader I have to take my groups to the arch because if they’ve never been here before, it’s probably what they came to see. But my job doesn’t end there—it’s also incumbent on me to help my students find alternate compositions that use the arch in a unique way, or don’t use the arch at all.
I encourage Alabama Hills first-timers to seek relationships that combine the foreground rocks, distant peaks, and whatever is happening in the sky in ways they haven’t seen before. It can take a while, but the longer they work on a scene, the more the hidden relationships start to appear. Eventually most tire of the arch and start wandering off to explore the countless other opportunities nearby.
About this image
Arch or not, a particular Alabama Hills favorite of mine is moonlight, especially in winter, when the snowy crest glows with reflected moonlight. Last month, after three wonderfully cloudy days in Death Valley, my Death Valley workshop group traveled to Lone Pine to wrap up the workshop with a sunset and sunrise in the Alabama Hills. Since our Death Valley moonlight shoot had been preempted, after dinner in Lone Pine I took everyone up to the Mobius Arch area to give moonlight one more try.
The sky that night cooperated wonderfully. I started by bouncing between photographers making sure they’d mastered the exposure and focus challenges of moonlight photography. It wasn’t long before everyone was up to speed (it’s not hard) and scattering in search of their own moonlight boulder, mountain, and sky relationships.
Leading a group doesn’t allow me to do creative photography and natural relationship hunting, but that night I did find a couple of minutes to photograph some favorite compositions in the moonlight. It’s amazing how easily the eyes adjust to moonlight, and soon found myself composing as if we were shooting in daylight. It was also quite cold on this January night, but it’s amazing how easily the cold is ignored when the photography’s good.
When the cold started to trump the photography, I walked out to the arch to round up the people who had ended up there. As I said, I don’t get to hunt for the creative relationships when I’m with a group, but as I was exiting the arch I glanced skyward and saw Cassiopeia hanging in the northern sky. What stopped me was the way the arch’s angled profile seemed to lead directly to the constellation. Since I’ve always found this side of the arch interesting without ever finding something to put with it, I quickly extended my tripod and attached my camera and 24-70 lens.
Lowering the camera to about three feet above the ground emphasized the steep slope and compressed a large chunk of mostly empty sky separating Cassiopeia and the arch’s top. In most of my moonlight compositions, even wide open the focus point for the entire scene is infinity, so I simply autofocus on the moon. But with the arch’s textured granite starting just a couple of feet from my lens, I knew I needed to be careful with my depth of field and focus point.
To increase my depth of field I stopped down to f8, compensating for the lost light by cranking my ISO to 3200 (love the high ISO of the a7RII). I tried a couple frames using nothing but moonlight to manually focus, but after magnifying the images in my LCD, it was clear that I’d need focus help. I asked one of the guys in my group to shine his flashlight about a third of the way up the arch, focused, and clicked. After a quick check of the LCD confirmed that I’d nailed the focus, I packed up my gear and headed back to the cars. This was my only sharp frame.
Photo workshop schedule
The View from the Alabama Hills
Click an image for a closer look, and a slide show. Refresh the screen to reorder the display.


Mirrorless and my telephoto renaissance
Posted on February 7, 2015

Dawn Portrait, Mt. Whitney, Alabama Hills, California
Sony a6000
Tamron 150-600 @256 mm (384 mm full-frame equivalent)
Metabones Canon EF to Sony NEX Mark IV adapter
.4 seconds
f/11
ISO 200
Going smaller
Like most people, my original expectation for my nascent mirrorless world was a significantly lighter backpack, and indeed, I haven’t been disappointed. In my Canon days my primary pack was an F-Stop Tilopa with a medium ICU (F-Stop’s interchangeable internal module for storing and organizing gear), which held my 5D Mark III, Canon 16-35 f/2.8, 24-105 f/4, and 70-200 L lenses, plus a Zeiss 28 f/2 (for night photography). Unless I specifically planned a shoot that required it, my Canon 100-400L and 100 macro lenses traveled with my backup Canon body in a separate bag—not a big deal when I’m driving to a destination, but pretty much a non-starter when I have to fly (which I’m doing more and more).
After moving to the mirrorless Sony a7R, I immediately started using my smaller F-Stop Guru backpack, which easily handled the new body and the Sony equivalent of my primary Canon glass: Sony/Zeiss 16-35 F/4 and 24-70 f/4, Sony 70-200 f/4 G, plus the (Canon mount) Zeiss 28 f/2 and a Metabones adapter that allows me to use my Canon glass on a Sony EF mount body. This configuration gave me essentially the same focal range I had with Canon, in a significantly smaller, lighter package. Not only that, I can use a lighter tripod and head. Score.
But, since I hate shooting without a backup body and had heard fantastic things about the camera, I soon purchased a Sony a6000. This amazing little mirrorless camera’s 1.5 crop sensor makes it an ideal complement to my full-frame a7R, has (slightly) more resolution than the 5DIII, and (so far) appears to offer (at least) comparable image quality, with better dynamic range than the Canon. And with a little bit of rearranging, I found I could fit the a6000 into my Guru bag without jettisoning anything else.
The result of this downsizing is a camera pack that’s light enough for hiking without feeling like a backpacker, and and for cycling without feeling like I’m about to tip over.
Going bigger
For my ultra-telephoto needs, my plan all along had been to to use the Canon 100-400 with the Metabones adapter. But since the 100-400 had always been my least favorite lens—awkward to use, and not particularly sharp—I had no real plans to add it to my regular lens rotation. But my ears perked up when I started hearing my friend and similarly recent Sony convert (and fellow pro photographer) Don Smith raving about the Tamron 150-600 lens. Hmmmm….
The Tamron 150-600 arrived shortly before I departed for last week’s Death Valley / Mt. Whitney Winter Moon photo workshop. Because the Tamron lens isn’t available with a Sony FE mount, it would require an adapter as well. Don had been shooting the Sony A-mount version of the Tamron paired with Sony’s converter; I opted for the Canon mount version, reasoning that I could use it on my remaining Canon bodies should the need ever arise, and I already have the Metabones adapter. (Word on the street is that the Sony A-mount Tamron with the Sony adapter has much better autofocus than the Canon/Metabones combination, but I don’t need autofocus.)
First reaction? This is not a small or light lens. But as soon as I started using it, two things became clear: it’s much easier to use than my Canon 100-400, and it’s noticeably sharper. Suddenly, size notwithstanding, I had a lens that I could see myself using regularly.
If I’d still been lugging my Canon gear, I’d have had to sacrifice essential lenses each time I planned to use the 150-600. But with the mirrorless system and a little reconfiguring of the compartments in the Tilopa ICU (moving around the padded, Velcro-attached partitions), I can now carry in a single camera backpack (that fits in every overhead bin I’ve ever encountered, including the puddle-jumpers): three Sony bodies (a7R, my brand new a7S, and the a6000), plus lenses that give me a focal length range from 16 to 900 mm (the 150-600 lens is a full-frame equivalent of 225-900 mm on the 1.5-crop a6000). Life’s good.
In the field
So, what does a photographer do with all this new imaging power? Use it, of course. Visiting familiar locations as much as I do, I can’t tell you how refreshing it is to find a completely new way to see these landscapes.
The image at the top of this post was from my first time using the Sony a6000 and Tamron 150-600. To get a better handle on the conditions, I left home two days before the workshop, spending the first night in Lone Pine, near the Alabama Hills just beneath Mt. Whitney. After a moonlight shoot in the Alabama Hills, the next morning I rose before sunrise, strolled from my hotel room across the highway, and set up my tripod with the Tamron 150-600 mounted and a6000 attached.
The first time I aimed this combination at Mt. Whitney (the highest peak in the 48 contiguous United States), zoomed all the way out to 900mm (600mm x 1.5), and dialed in the focus, was an epiphany. Previously unseen rocks and trees snapped into view, and vortices of wind-swept snow spun on the summit. Amazing to my eye, but at 900 mm actually too close to find a composition I liked. So I pulled all the way back to a little less than 400 mm (256 x 1.5), framed up the mountain, and waited for the pink that always kicks off a Mt. Whitney clear-sky sunrise.
I captured this frame about ten minutes before sunrise. Being a little concerned about such a long focal length in low light, I hedged my bets slightly by using ISO 200 to halve my shutter speed. Since I notice little difference between ISO 100 and 200 on the a6000, I think 200 will be my standard ISO when I use the 150-600 on this body. But we’ll see.
The rest of the week was a rediscovery of ultra-telephoto photography. When I first switched to digital about twelve years ago, I started with a 1.6 crop Canon 10D, and my only telephoto lens was a 70-300, making images up to 480 mm a routine part of my capture paradigm. Isolating distant subjects, magnifying closer subjects, compressing foreground and background subjects—it was all a simple matter of reaching into my camera bag. But since switching to full-frame, and replacing the 70-300 with the (faster, optically better) 70-200, ultra-telephoto photography took backseat to more conventional landscapes, and I eventually forgot how much I enjoyed it when it was more convenient. Ultra-telephoto became something I had to plan, rather than a creative option available whenever the inspiration struck.

Moonset, Wildrose Peak, Death Valley
This is a 563 mm equivalent (375 mm X 1.5) sunrise moonset capture from Dante’s View
Don was assisting my Death Valley workshop (Don and I trade off assisting many of each other’s workshops), and I’m sure by the end of the week the group had grown weary of hearing Don and I gush about the fun we were having with our new toys. Sand dunes, moonrise, moonset, distant peaks—no natural feature was safe from our magnifying eye. A particular highlight came dark and early one morning at Dante’s View, when I turned the a6000 and 150-600 to Jupiter, low on the horizon near Telescope Peak, gathered the group around my LCD, zoomed to 600mm, and shared the glowing disk of our solar system’s largest planet surrounded by the four Galilean moons.
The bottom line
Mirrorless has definitely meant a significantly smaller, lighter bag to handle my “meat and potatoes” 16-200 mm focal length range (that I never leave home without) when mobility is paramount—hiking or biking, I hardly know there’s anything on my back.
But equally significant is the way compact mirrorless gear also allows me expand my creative options without hiring a Sherpa. Now, in the same backpack that once maxed out with a single Canon body (most recently a 5D Mark III) and Canon lenses covering 16-200 mm, I can travel with three mirrorless bodies, plus lenses covering an effective focal range from 16-900 mm (including my 28 mm f/2 Canon-mount Zeiss for night photography). Life’s good.
Visit my website to purchase prints and see my photo workshop schedule
An ultra-telephoto gallery (>200 mm)
Click an image for a closer look, and a slide show. Refresh your screen to reorder the display.


Links
Death Valley Winter Moon Photo Workshop

Moonrise Silhouette, Death Valley
The cure for blue skies
Posted on January 20, 2014

Sunrise Moonset, Sierra Crest, Alabama Hills, California
Canon EOS 5D Mark III
1/8 second
29 mm
ISO 200
F11
* * *
The prominent mountain on the left is 12,944 foot Lone Pine Peak. At 14,495 feet, Mt. Whitney is the highest point in the 48 contiguous United States; it’s the shark-tooth peak left of center. The slightly concave mountain on the far right is 14,380 foot Mt. Williamson.
A good landscape image usually involves, well…, a good landscape. But that’s only half the equation—photographers also need photogenic conditions—soft light, interesting skies, dramatic weather, or anything else that elevates the scene to something special. While we have absolute control over the time and location of our photo outings, the conditions have a significant random (luck) component.
Despite being less than a day’s drive from many of the most treasured photo destinations in the world, most of my photo trips are planned months in advance. Workshops in particular require at least a year of advance planning on my part, and many months of schedule adjustment and travel arrangements for the participants. I think I’ve pretty much established that positive thinking, finger crossing, divine pleas, and ritual incantation (no virgin sacrifice yet) are of zero value where photography is concerned—sometimes conditions work out wonderfully, sometimes not so much. And while I’ve photographed my workshop locations many times, I know most of my workshop participants haven’t, which is why I do my best to schedule my workshops when the odds are best for interesting skies.
My annual Death Valley / Mt. Whitney photo workshop is a perfect example: Among the driest places on Earth, Death Valley gets only about an inch of rain each year and suffers from chronic blue skies. Ever the optimist, I schedule my DV/Whitney workshop from mid-January through early February, when the odds, though still low, are at least best for clouds. And while I’ve actually been pretty lucky with the clouds in past workshops, to hedge my bets further, I always schedule this workshop to coincide with a full moon—if we don’t get clouds, the moon always seems to save the day (and night).
This year’s DV/Whitney workshop wrapped up Saturday morning. Unfortunately, it landed in the midst of what is on its way to becoming an unprecedented drought in California. After two dry winters, this winter is worse—a persistent high pressure system has set up camp above California, creating an impenetrable force field that deflects clouds and and bathes the state weather that is absolutely beautiful for everything but photography. In this year’s DV/Whitney workshop’s four+ days, we enjoyed highs in the glorious 80s, and I don’t recall seeing a single cloud (though there were unconfirmed rumors of a cloud sighting on the distant horizon late in the workshop).
But cloudless skies don’t need to mean lousy photography—they just shrink the window of opportunity. Places like Mosaic Canyon and Artist’s Palette are nice in the early morning or late afternoon shade. And in general, when clouds aren’t in the picture, the best photography skies are on the horizon opposite the sun before sunrise and after sunset. Last week I made a point of getting my group on location at least 45 minutes before sunrise, and kept them out well past sunset to photograph Death Valley’s one-of-a-kind topography beneath twilight’s shadowless pink and blue pastels. Among other things, in this light the dunes were fantastic (I was able to find a relatively footprint free area) all the way from shadowless twilight through high contrast early morning light, and the first light on Telescope Peak from Badwater was wonderful.
But the workshop’s real highlight, the element that elevated our week into something special, was the moon. The real moon show didn’t begin until it showed up above the primary views on our final two sunrises, but we got a nice preview on our first sunset when the waxing gibbous disk rose into the twilight wedge above the mountains east of Hell’s Gate. The next evening I took the group to panoramic Dante’s View; while the prime objective was photographing Death Valley’s last light and the sun setting from 5,000 vertical feet above Badwater, I instructed everyone to walk across the parking lot after sunset to catch the nearly full moon rising above the equally expansive (though significantly less spectacular) panorama of distant peaks to the east. The moon arrived early enough to allow at least ten minutes of quality photography, then we just kind of hung out to watch it for a little while longer. Very nice.
Friday morning’s sunrise we found the moon glowing as promised in the predawn indigo above Zabriskie Point. As the morning brightened, we watched the nearly round disk slide through twilight’s throbbing pink before disappearing directly behind Manly Beacon just a few minutes after sunrise.
But as nice as the Zabriskie shoot was, I think my personal favorite was the workshop’s final sunrise from the Alabama Hills. The group, now expert at managing the difficult contrast between foreground shadows and brilliant moon, immediately spread out to find their own foreground. One or two headed straight for the Whitney Arch (aka, Mobius Arch), while the rest of us were quite content with the variety of boulders west and south of our the arch.
The thing that makes the Alabama Hills such a special location for sunrise is its position between towering peaks to the west, and relatively flat horizon to the east. At sunrise here, the Sierra crest juts into the blue and rose of the Earth’s receding shadow, then transitions to amber when the first rays of sunlight kiss its serrated peaks. You anticipate watch the sun’s arrival by watch the shadow descent the vertical granite until it bathes the weathered boulders with warm, ephemeral sunlight. Then, just like that, the show’s over.
I’ve shot this scene at sunrise so many times that I usually remain a spectator unless something special moves me to pull out my camera. Last Saturday, despite the absence of clouds, I just couldn’t resist the pull of the moon, which hovered like a mylar balloon in the night/day transition. At first there wasn’t enough light to photograph detail in the rocks and moon in a single frame, but eventually, with the help of a two-stop graduated neutral density filter, I was able to capture the image at the top of the blog.
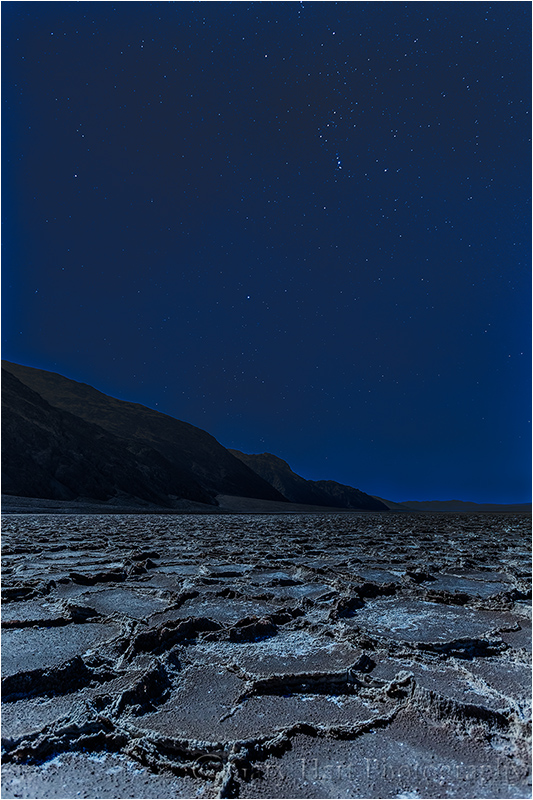
Orion, Badwater by Moonlight, Death Valley
Canon EOS 5D Mark III
15 seconds
17 mm
ISO 1600
F4
* * *
Another great thing about timing the Death Valley workshop to coincide with a full moon is our moonlight shoots. Of all the workshop moonlight shoots I do throughout the year, I think I look forward to the Death Valley Badwater shoot the most. This year’s didn’t disappoint—not only was the photography great, there’s just something about the playa’s warm temperatures and utter stillness that creates a genuinely festive atmosphere.

Moonset, Mt. Whitney and the Alabama Hills, California
* * *
Last year I photographed the same scene in different conditions. While this year’s capture highlights the Sierra crest and uses the blank sky and dark foreground to create a twilight feel, last year’s image was captured shortly after the sun lit the peaks and colored the clouds. I used a tighter composition to emphasize Mt. Whitney, the moon, and the pink clouds.

