Eloquent Images by Gary Hart
Insight, information, and inspiration for the inquisitive nature photographer
The cat’s out of the bag…
Posted on May 19, 2017
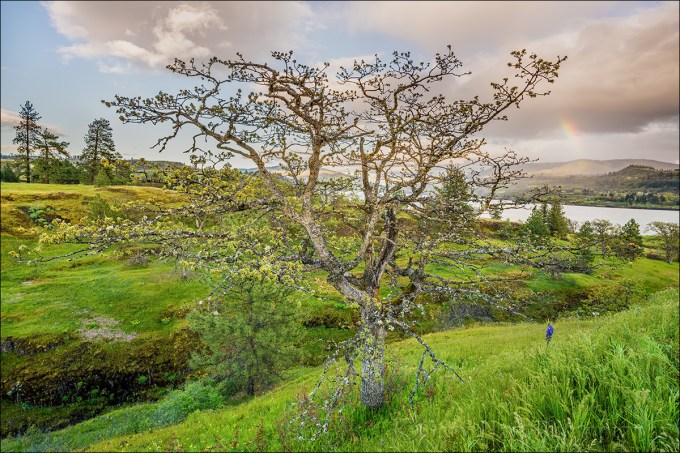
Spring Rainbow, Catherine Creek Trail, Columbia River Gorge
Sony a7R II
Sony 16-35 f2.8 GM
18mm
1/125 second
F/11
ISO 400
For about three weeks I’ve had to bite my tongue about two new Sony lenses I got to try out a few weeks ago. But yesterday Sony announced their brand new 16-35 f2.8 GM and 12-24 f4 G lenses and I’m free to share.
I spent most of this week just outside of Santa Barbara, California with a hundred or so Sony Artisan and Creative Collective photographers at Sony’s Kando Summit. This event was revelatory in many ways: Not only did I get to commune with fellow Sony Artisan’s who had previously been just names on e-mails and pictures on Facebook, I also learned that the future of photography is in the very capable hands of the Collective members—such an impressive group of creative, intelligent young adults.
For most of the Summit the hardware show-stealer was the brand new Sony a9—each of us got our own a9 to play with (but not to keep) for the duration of the event, along with many great photo opportunities (models, sets, and demonstrations) provided to us by Sony. Without going into a lot of detail, I predict that time will prove that the Sony a9 is an actual photography game changer and not just another “next great camera” cliché.
But the availability of the a9 wasn’t a surprise; the surprise (to almost everyone else) was the announcement of the new 16-35 and 12-24 lenses, and their instant availability (again only to borrow). Since I’d already had nearly a week of quality time with them, I passed on this opportunity, but had to jump aside to avoid being trampled by a stampede of photographers intent on getting their hands on these two new lenses.
Don Smith and I were just wrapping up our back-to-back Columbia River Gorge workshops when Sony asked us if we could stay a couple of extra days to try out their two new (super-secret) lenses. They overnighted them to us, and since we had them for a week, Don and I decided we had time to try them for a couple of extra days at our favorite locations closer to home. For me that was Yosemite (Don went to Big Sur). Since I knew I wanted the 12-24 in Yosemite, I took the 16-35 for our two extra days in the CRG.
First Impressions: 16-35 f2.8 GM
The first thing that struck me about this lens was its compactness. As a landscape shooter always on a tripod, I value compactness over speed in a lens, but this one gives me both. Of course it’s not as compact as my Sony/Zeiss 16-35 f4, but it’s noticeably more compact than my Canon 16-35 f2.8 was. I was also pleased with its smoothness of operation and speed of focus—this lens is definitely a joy to use.
Of course compactness and ease of use mean nothing if a lens isn’t sharp, and I can tell you with certainty that this lens is as sharp as we’ve come to expect Sony’s GM lenses to be—that is, ridiculously sharp from corner to corner and throughout the aperture range. I haven’t really taken the time to do a/b tests against any other lenses (I leave the pixel-peeping to others), but I did magnify many images to 100% (on my 27-inch iMac Retina 5K monitor) and can’t imagine that I have any lenses sharper than this one (including primes).
First Impressions: 12-24 f4 G
Even more than with the 16-35, the 12-24 blew me away with its compactness. I’ve handled the Nikon 14-24 f2.8 many times, and actually used Canon’s 11-24 f4, and as sharp as those lenses are, the first thing I remember about those lenses is their heft—they’re beasts, and just too heavy to carry in my bag for regular use. Not so with the Sony 12-24: This lens is 1/3 the weight of Canon’s 11-24—in fact it’s noticeably lighter than the Canon 24-105, and not much heavier than the Canon 17-40. Wow.
Like the 16-35, this lens just felt good on my camera and in my hand. The operation was smooth, and focus was fast and easy. Having rarely shot with a lens this wide, I found myself frequently surprised by how much more I could get in my frame at 12mm than I can at 16mm—suddenly things not possible with a single click before were very doable. With so many views of very large and close subjects (such as El Capitan and Half Dome), this lens was made for Yosemite. And I did an actual double-take at the top of the trail to lower Yosemite Fall when I realized I could get the entire fall and a sunstar (with the sun behind my right shoulder) in one frame (see the gallery below).
Sharpness? Again, I didn’t do any pixel peeping beyond magnifying my images to 100%, but they looked every bit as sharp as the Canon 11-24 images that blew me away when I used it a year ago. I will own this lens the first day it’s available.
About this image
On the first evening with our new toys, Don and I went to Catherine Creek on the Washington side of the Columbia River Gorge. At the trailhead Don headed off in one direction and I went in the other, eventually ending up at this tree that I remembered from previous visits.
With the wind blowing like crazy, probably 25-35 MPH, this lens was perfect for the wide scenes that deemphasize motion. To further ensure against any motion blur I bumped my ISO to 400 and went to work. I started by balancing the tree with a small waterfall that was down the hillside to my left, but when a surprise rainbow fragment popped out above the Columbia River I quickly shifted position. My exposure variables were already set, so all I had to do was compose, focus, and shoot. Good thing, because the rainbow faded quickly and I only had time for a handful of images before it was gone completely.
Listen to Don and I discuss the new lenses on the Alpha Universe Podcast
Sony 16-35 f2.8 GM and Sony 12-24 f4 G Sample Images
Click an image for a closer look and slide show. Refresh the window to reorder the display.


, Catherine Creek Trail, Columbia River Gorge")
Mirrorless and my telephoto renaissance
Posted on February 7, 2015

Dawn Portrait, Mt. Whitney, Alabama Hills, California
Sony a6000
Tamron 150-600 @256 mm (384 mm full-frame equivalent)
Metabones Canon EF to Sony NEX Mark IV adapter
.4 seconds
f/11
ISO 200
Going smaller
Like most people, my original expectation for my nascent mirrorless world was a significantly lighter backpack, and indeed, I haven’t been disappointed. In my Canon days my primary pack was an F-Stop Tilopa with a medium ICU (F-Stop’s interchangeable internal module for storing and organizing gear), which held my 5D Mark III, Canon 16-35 f/2.8, 24-105 f/4, and 70-200 L lenses, plus a Zeiss 28 f/2 (for night photography). Unless I specifically planned a shoot that required it, my Canon 100-400L and 100 macro lenses traveled with my backup Canon body in a separate bag—not a big deal when I’m driving to a destination, but pretty much a non-starter when I have to fly (which I’m doing more and more).
After moving to the mirrorless Sony a7R, I immediately started using my smaller F-Stop Guru backpack, which easily handled the new body and the Sony equivalent of my primary Canon glass: Sony/Zeiss 16-35 F/4 and 24-70 f/4, Sony 70-200 f/4 G, plus the (Canon mount) Zeiss 28 f/2 and a Metabones adapter that allows me to use my Canon glass on a Sony EF mount body. This configuration gave me essentially the same focal range I had with Canon, in a significantly smaller, lighter package. Not only that, I can use a lighter tripod and head. Score.
But, since I hate shooting without a backup body and had heard fantastic things about the camera, I soon purchased a Sony a6000. This amazing little mirrorless camera’s 1.5 crop sensor makes it an ideal complement to my full-frame a7R, has (slightly) more resolution than the 5DIII, and (so far) appears to offer (at least) comparable image quality, with better dynamic range than the Canon. And with a little bit of rearranging, I found I could fit the a6000 into my Guru bag without jettisoning anything else.
The result of this downsizing is a camera pack that’s light enough for hiking without feeling like a backpacker, and and for cycling without feeling like I’m about to tip over.
Going bigger
For my ultra-telephoto needs, my plan all along had been to to use the Canon 100-400 with the Metabones adapter. But since the 100-400 had always been my least favorite lens—awkward to use, and not particularly sharp—I had no real plans to add it to my regular lens rotation. But my ears perked up when I started hearing my friend and similarly recent Sony convert (and fellow pro photographer) Don Smith raving about the Tamron 150-600 lens. Hmmmm….
The Tamron 150-600 arrived shortly before I departed for last week’s Death Valley / Mt. Whitney Winter Moon photo workshop. Because the Tamron lens isn’t available with a Sony FE mount, it would require an adapter as well. Don had been shooting the Sony A-mount version of the Tamron paired with Sony’s converter; I opted for the Canon mount version, reasoning that I could use it on my remaining Canon bodies should the need ever arise, and I already have the Metabones adapter. (Word on the street is that the Sony A-mount Tamron with the Sony adapter has much better autofocus than the Canon/Metabones combination, but I don’t need autofocus.)
First reaction? This is not a small or light lens. But as soon as I started using it, two things became clear: it’s much easier to use than my Canon 100-400, and it’s noticeably sharper. Suddenly, size notwithstanding, I had a lens that I could see myself using regularly.
If I’d still been lugging my Canon gear, I’d have had to sacrifice essential lenses each time I planned to use the 150-600. But with the mirrorless system and a little reconfiguring of the compartments in the Tilopa ICU (moving around the padded, Velcro-attached partitions), I can now carry in a single camera backpack (that fits in every overhead bin I’ve ever encountered, including the puddle-jumpers): three Sony bodies (a7R, my brand new a7S, and the a6000), plus lenses that give me a focal length range from 16 to 900 mm (the 150-600 lens is a full-frame equivalent of 225-900 mm on the 1.5-crop a6000). Life’s good.
In the field
So, what does a photographer do with all this new imaging power? Use it, of course. Visiting familiar locations as much as I do, I can’t tell you how refreshing it is to find a completely new way to see these landscapes.
The image at the top of this post was from my first time using the Sony a6000 and Tamron 150-600. To get a better handle on the conditions, I left home two days before the workshop, spending the first night in Lone Pine, near the Alabama Hills just beneath Mt. Whitney. After a moonlight shoot in the Alabama Hills, the next morning I rose before sunrise, strolled from my hotel room across the highway, and set up my tripod with the Tamron 150-600 mounted and a6000 attached.
The first time I aimed this combination at Mt. Whitney (the highest peak in the 48 contiguous United States), zoomed all the way out to 900mm (600mm x 1.5), and dialed in the focus, was an epiphany. Previously unseen rocks and trees snapped into view, and vortices of wind-swept snow spun on the summit. Amazing to my eye, but at 900 mm actually too close to find a composition I liked. So I pulled all the way back to a little less than 400 mm (256 x 1.5), framed up the mountain, and waited for the pink that always kicks off a Mt. Whitney clear-sky sunrise.
I captured this frame about ten minutes before sunrise. Being a little concerned about such a long focal length in low light, I hedged my bets slightly by using ISO 200 to halve my shutter speed. Since I notice little difference between ISO 100 and 200 on the a6000, I think 200 will be my standard ISO when I use the 150-600 on this body. But we’ll see.
The rest of the week was a rediscovery of ultra-telephoto photography. When I first switched to digital about twelve years ago, I started with a 1.6 crop Canon 10D, and my only telephoto lens was a 70-300, making images up to 480 mm a routine part of my capture paradigm. Isolating distant subjects, magnifying closer subjects, compressing foreground and background subjects—it was all a simple matter of reaching into my camera bag. But since switching to full-frame, and replacing the 70-300 with the (faster, optically better) 70-200, ultra-telephoto photography took backseat to more conventional landscapes, and I eventually forgot how much I enjoyed it when it was more convenient. Ultra-telephoto became something I had to plan, rather than a creative option available whenever the inspiration struck.

Moonset, Wildrose Peak, Death Valley
This is a 563 mm equivalent (375 mm X 1.5) sunrise moonset capture from Dante’s View
Don was assisting my Death Valley workshop (Don and I trade off assisting many of each other’s workshops), and I’m sure by the end of the week the group had grown weary of hearing Don and I gush about the fun we were having with our new toys. Sand dunes, moonrise, moonset, distant peaks—no natural feature was safe from our magnifying eye. A particular highlight came dark and early one morning at Dante’s View, when I turned the a6000 and 150-600 to Jupiter, low on the horizon near Telescope Peak, gathered the group around my LCD, zoomed to 600mm, and shared the glowing disk of our solar system’s largest planet surrounded by the four Galilean moons.
The bottom line
Mirrorless has definitely meant a significantly smaller, lighter bag to handle my “meat and potatoes” 16-200 mm focal length range (that I never leave home without) when mobility is paramount—hiking or biking, I hardly know there’s anything on my back.
But equally significant is the way compact mirrorless gear also allows me expand my creative options without hiring a Sherpa. Now, in the same backpack that once maxed out with a single Canon body (most recently a 5D Mark III) and Canon lenses covering 16-200 mm, I can travel with three mirrorless bodies, plus lenses covering an effective focal range from 16-900 mm (including my 28 mm f/2 Canon-mount Zeiss for night photography). Life’s good.
Visit my website to purchase prints and see my photo workshop schedule
An ultra-telephoto gallery (>200 mm)
Click an image for a closer look, and a slide show. Refresh your screen to reorder the display.


Links
Death Valley Winter Moon Photo Workshop

Moonrise Silhouette, Death Valley
More thoughts on the Sony a7R
Posted on January 20, 2015

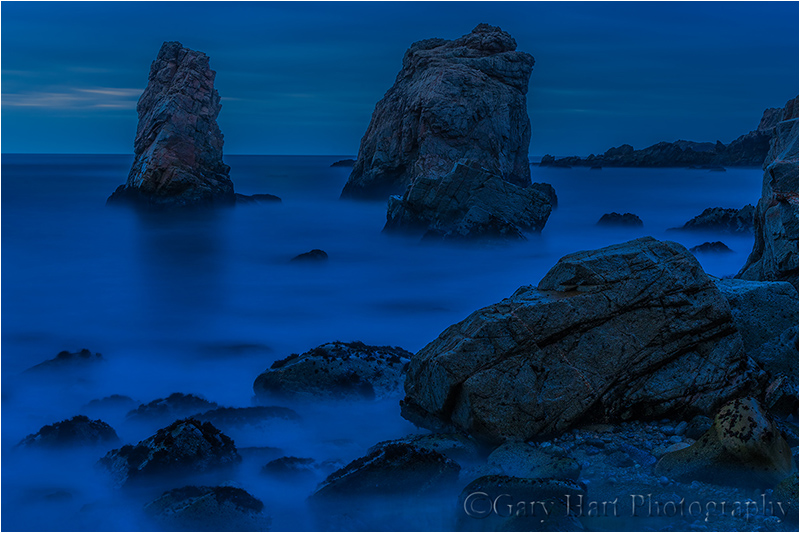
Rocks at Sunset, Garrapata Beach, Big Sur
Sony a7R
Sony/Zeiss 16-35
1/15 seconds
F/20
ISO 100
Read my original thoughts on the Sony a7R in my November 25 post, “New trick, old dog.“
It’s been about two months since I switched my primary camera from a Canon 5D Mark III to a Sony a7R. After a lifetime of seeing the “actual” world through my viewfinder, (for me at least) there has been some adjustment to trusting a digital facsimile of the world. I’m actually surprised by how long the adjustment is taking, but I’m getting there (and your results may vary). And this is really more my problem than the camera’s—I have no significant complaints with the camera’s interface or handling.
Another thing to prepare for is a lot more sensor dust. Unlike and SLR, which has a mirror and shutter to protect the sensor, a mirrorless sensor is pretty much exposed to the elements when the lens is removed. At the very least you’ll want to blow the sensor after each use, and do more aggressive cleaning very regularly.
On the positive side of the ledger, I appreciate the a7R’s extreme customizability. And I’m finding focus-peaking and (especially) the focus magnifier to be a godsend for my shooting style—I obsessively seek subjects from near to far in my frame, and am more than happy to forego the speed of autofocus for the precision of manual focus. As my trust in the a7R’s electronic focus aids grows, I find manual focusing so effortless that I never even attempt autofocus (nor do I miss using it).
But more important than interface and usability pluses and minuses, I continue to be blown away by the quality of the images I get from this camera. The a7R’s dynamic range is the stuff of dreams, and the sharpness and resolution continue to thrill me. I’m admittedly not a pixel-peeper, but I’ve not encountered any of the lens concerns some have reported online—my Sony/Zeiss 16-35, 24-70, and Sony 70-200 lenses are sharper than my Canon L glass. Period. I purchased the Metabones Canon-to-Sony adapter fully expecting to use my Canon lenses a lot, but so far have only used the Metabones once (it works fine).
I do have a concern about the sturdiness of the the a7R lens mount—all my lenses wobble too much where they connect to the body, and with minimal pressure can be removed without pressing the unlock button (some more easily than others). Conducting workshops gives me unique exposure to other cameras, and I can say that I’ve seen several a7Rs and they all exhibit this problem. But in a refreshing change of pace from my Canon experience, it appears that Sony has quickly (albeit tacitly) recognized the problem and improved the mount in its newer a7S and a7II bodies. While I’ve heard nothing about a lens mount recall of the first generation Sony a7 bodies (a recall that I feel would be justified), I won’t stress it too much because I found a simple and inexpensive solution: The Fotodiox TOUGH E-Mount completely fixed the problem on my a7R. I consider the Fotodiox mount a must for any Sony E-mount body the preceded the a7S. Installation is quite simple, but here’s a word to the wise: Before attempt the replacement, watch the video on the Fotodiox page; also note that you’ll need a Phillips #000 screwdriver (despite the picture on the website, one isn’t included with the mount).
And since we’re talking about things you might want to purchase, the a7R does not come with a battery charger. Instead, Sony gives you a USB cable that plugs into your camera and connects to the provided adapter (or any other USB adapter—I can plug their cable with my iPhone, Kindle charger, or computer). The problem with this is that the battery needs to be in the camera while you charge, making it impossible to charge a battery while you use the camera, not a great scenario for such a power-thirsty camera. You could spend another $50 or on Sony’s charger, or you could do what I did and buy a third-party charger. For about $27 on Amazon I got a Wasabi charger that includes two batteries (haven’t tested them, but at the very least they can be backups that hold me until I can get a primary battery charged), a car charger, and European adapter. I also ordered one more Sony battery as my primary backup (but I’m kind of obsessive about having backups).
And speaking of backups, perhaps the best indication of my level of commitment to the new Sony is that I just ordered a Sony a6000 (and the Fotodiox TOUGH E-mount). I can’t afford not to have a backup body, and the a6000 is a perfect complement to the a7R—in addition to its rave reviews, the a6000 is quite compact, is only around $700 (even cheaper if you shop around), takes all my EF mount lens, and with a 1.5 crop sensor, gives me extra focal length when I need it (in other words, it’s more than a backup). So it looks like I’m all-in with Sony. Stay tuned….
A few words about this image
The image at the top of today’s post is from my Big Sur visit early this month. I share it here because it’s a great example of why I’m so excited about the dynamic range of the a7R. Since I don’t blend images (just my personal style), I needed to capture this scene with one click. Even with the great dynamic range, I used a Singh-Ray 3-stop graduated neutral density filter to hold back the sky, had to pull the highlights down and shadows up the shadows a little in Lightroom, and do a little dodging and burning in Photoshop. But all things considered, this was a remarkably straightforward capture with the a7R (not much work to expose and process).
If you’re thinking about purchasing filters (like the graduated neutral density filter I used here), you can’t to better than Singh-Ray. For a 10 percent discount on the Singh-Ray site, use the discount code gary10.
A (growing) gallery of Sony a7R captures
Click an image for a closer look, and a slide show. Refresh your screen to reorder the display.


New trick, old dog
Posted on November 25, 2014
Nightfall, Big Sur Coast, California
Sony a7R
43 mm
4 minutes
F/16
ISO 200
Way back in 2008 when I got my first live-view camera, a Canon 1DS Mark III, I couldn’t understand what all the hubbub was about. I’d been looking through a viewfinder for thirty years and saw no reason to do things any differently. But when a 5D Mark III entered my life in early 2012, its improved live-view interface caused me to waver a bit—in particular the live-view focus capability, an on-screen level, a histogram that appeared before capture, and the ability to compose at odd angles without being tethered to the viewfinder. While I incorporated these capabilities into my workflow in the field when conditions dictated, for the most part I remained the same viewfinder shooter I’d always been.
Enter mirrorless
A few years ago, camera manufacturers, looking to replace point-and-shoot business rapidly succumbing to ubiquitous smartphones, realized that removing the mirror box from an SLR (single lens reflex: a mirror deflects the lens’s view up through the viewfinder, then flips the mirror up and out of the way of the sensor when the shutter fires) camera would allow them to put an SLR-size sensor in a much smaller body. These first mirrorless systems picked off many enthusiastic amateurs looking for better image quality than a smartphone or point-and-shoot without having to lug bulky gear. But the pros still considered mirrorless cameras fancy toys, or at best, a viable second camera.
Then, in late 2013, Sony released its full-frame, a7 mirrorless cameras and partnered with Zeiss for compatible lenses. Sony was the maker of the esteemed 36 MP Nikon D800 sensor (which they put in their mirrorless a7R body), and Zeiss has long been regarded one of the world’s finest lens makers. Suddenly, they had our attention.
Waffling….
While I was mildly intrigued by what Sony was doing, I remained committed to my Canon 5DIII. Given my significant investment in Canon glass, and confidence that Canon would be coming out with something better soon, I gave little serious thought to switching.
But, despite the consensus that Nikon and Sony cameras have surpassed Canon in image quality, we’ve reached the end of 2014 with nothing but cricket sounds coming from Canon’s corner of Tokyo. Contrasting those cricket sounds is the celebratory din from pros I respect who abandoned the Canon ship in favor of Sony, and are thrilled with Sony’s improved dynamic range, high ISO performance, and significantly higher resolution. Hmmm.
Budding relationship
Then my good friend Don Smith (and fellow long-time Canon shooter) made the Sony plunge, and I got to see the camera and its results up close on our trips to the Grand Tetons and Columbia River Gorge. Don couldn’t stop raving about the quality of the Sony image files, and I couldn’t get over the compactness of his camera bag.
So this month I did it. I pulled the trigger and went all-in on a Sony a7R and three lenses: a Sony 70-200 f4, and Sony/Zeiss 16-35 f4 and 24-70 f4 lenses. Hedging my bets, I also purchased the Metabones Mark IV adapter that enables me to use my Canon lenses on the a7R.
Was it love at first sight? Hardly. Like any new relationship, there are growing pains—in this case, it’s adjusting to a completely new way of shooting. I’ve always been a keep-it-simple, full control, totally manual (metering, focus) shooter—I just don’t want my camera making any decisions for me. Relying exclusively on an electronic viewfinder for composition, exposure, and focus is a paradigm shift that caught me off guard.
So the Sony and I are still negotiating certain aspects of our relationship. I will acknowledge that things like pre-capture focus-peaking (dots that highlight in-focus areas before I shoot) and exposure zebras (diagonal lines that appear where my image is over or under exposed) are potentially quite useful, but I still have trust issues—just because you tell me you’re sharp, doesn’t mean I have to believe you.
And I’ve always felt that spot metering was the way to go in manual exposure mode (it’s all I’ve ever used), but I’m coming to the conclusion that the way to go with the Sony is to let the meter see the entire scene and base my exposure settings on the pre-shot histogram. I wish it gave me the RGB histogram before the shot, but I’m willing to compromise for the sake of photographic harmony.
But there’s no denying the image quality, and for that alone, I’m quite confident that this relationship will last. Without doing a lot of pixel-peeping tests (I leave that stuff to other photographers while I’m out taking pictures), the dynamic range if the a7R just blows me away. I’m guessing that I get at least two more stops of dynamic range than I got with any of my Canon bodies, a game-changer for a landscape shooter.
This being such a new relationship, we haven’t spent a night together yet. And until we do, I’m not about to discard my Canon (does that make me a bad person?). I’m less concerned about the a7R’s night image quality than I am about my ability to compose and focus in low light using the electronic viewfinder. So stay tuned….
An evening out
While I haven’t done a full-on night shoot yet, I did stay out quite a bit past sunset on my first shoot. The image here is from that first date, a triple-date actually, to Soberanes Point in Big Sur with friends Don Smith and Mike Hall. While Don’s experience with his new a7R was the tipping point in my decision to switch, he was just a few weeks ahead of me, and we were both still trying to figure things out (and laughing about feeling like beginners).
When the sky darkened, the low-light shortcomings of the a7R’s electronic viewfinder became apparent, as feared. About 25 minutes after sunset (when I clicked this), I could still see enough with my 24-70 f4 to compose and focus, but just barely. Shortly thereafter I switched to my Canon-mount Zeiss f2 (with the Metabones adapter) and found the light gathering capability of the faster lens helped a lot. I’m guessing that until I get some fast Sony/Zeiss glass, I’ll be shooting night with my f2 and 2.8 Canon lenses and the Metabones adapter, but I’m less concerned than I was originally. Again, stay tuned….
Final thoughts
I’m slowly coming to terms with the electronic viewfinder and am pretty sure I’ll grow to like using it most of the time. Some of the a7R’s shortcomings—for example, the shutter is noisy, most things seem slightly more sluggish than I’m used to, and the autofocus doesn’t compare to my 5DIII (though some of the other Sony’s are much better, and I’m not a big autofocus person anyway)—are of little concern to me as a landscape shooter. And because it’s a battery hog, I carry four batteries (they’re small and light), though two is probably enough for a full day of heavy shooting, unless I’m adding a night shoot. And the user-manual feels more like an afterthought (I’m afraid this doesn’t make Sony unique), but there are plenty of resources available online, with more appearing every day.
In addition to the a7R’s improved dynamic range, which by itself is enough in my book to justify switching, I love the new weight of my camera bag. The body is much smaller than my 5DIII, the lenses are somewhat smaller (which also saves money on filters), the combination of which means I can use my smaller bag (F-Stop Guru) and lighter tripod (Gitzo 1531—if I had to do it now, I’d be buying the RRS TQC-14) and head (RRS BH-30) most of the time.
Having a smaller camera bag and tripod has air travel benefits as well—I won’t stress the airport check-in weigh-in as much (I pack my tripod and head in the suitcase), and won’t need to debate flight attendants who refuse to believe my larger camera bag (F-Stop Tilopa) will fit in the overhead compartment (it will, but there can be flight-long ramifications to proving a flight attendant wrong in front of a plane full of cranky travelers).
I think the a7R is best for a landscape shooter—I don’t think I’d make the a7R my primary camera if I had to photograph anything that moves. All pros and cons factored in, it may just be the best landscape camera. The strongest recommendation I can make to anyone making a change is to allow ample time to get up to speed with the new camera. This is more than just learning a new control interface and menu system—unless you’re already a fulltime live-view shooter, it’s an entirely new way of shooting. In other words, take it on a few dry runs before going out when every click counts.
As with any new relationship, there will be growing pains. But I think this one’s going to last.
Epilogue (January, 2015)
It’s been month and a half since I switched to the Sony a7R. And while I’m still getting comfortable with the full-time mirrorless paradigm, I have no significant complaints with the camera’s interface or handling (“It’s not you, it’s me”). The focus peaking is a godsend for a photographer like me, who obsessively seeks subjects from near to far in the frame. And I’m growing to appreciate the extreme customizability of the a7R’s buttons.
I do have a concern about the sturdiness of the the mount—all my lenses wobble a bit where they connect to the body, and with minimal pressure can be removed without pressing the unlock button (some more easily than others). I hope Sony makes fixing this a high priority, because while the body lenses are quite solid, this single flaw makes everything feel a little fragile.
But most important, I continue to be blown away by the quality of the images I get from this camera. The dynamic range is the stuff of dreams, and the sharpness and resolution continue to thrill me. I’ve grown to trust focus peaking, and find manual focusing so effortless that I never even attempt autofocus (nor do I miss using it). Perhaps the best indication of my level of commitment is that I just ordered a Sony a6000, giving my daughter my old Canon 5DIII. It looks like I’m all-in.
A (growing) Sony a7R gallery
Click an image for a closer look, and a slide show. Refresh your screen to reorder the display.


