Eloquent Images by Gary Hart
Insight, information, and inspiration for the inquisitive nature photographer
Feeding My Muse
Posted on May 22, 2024
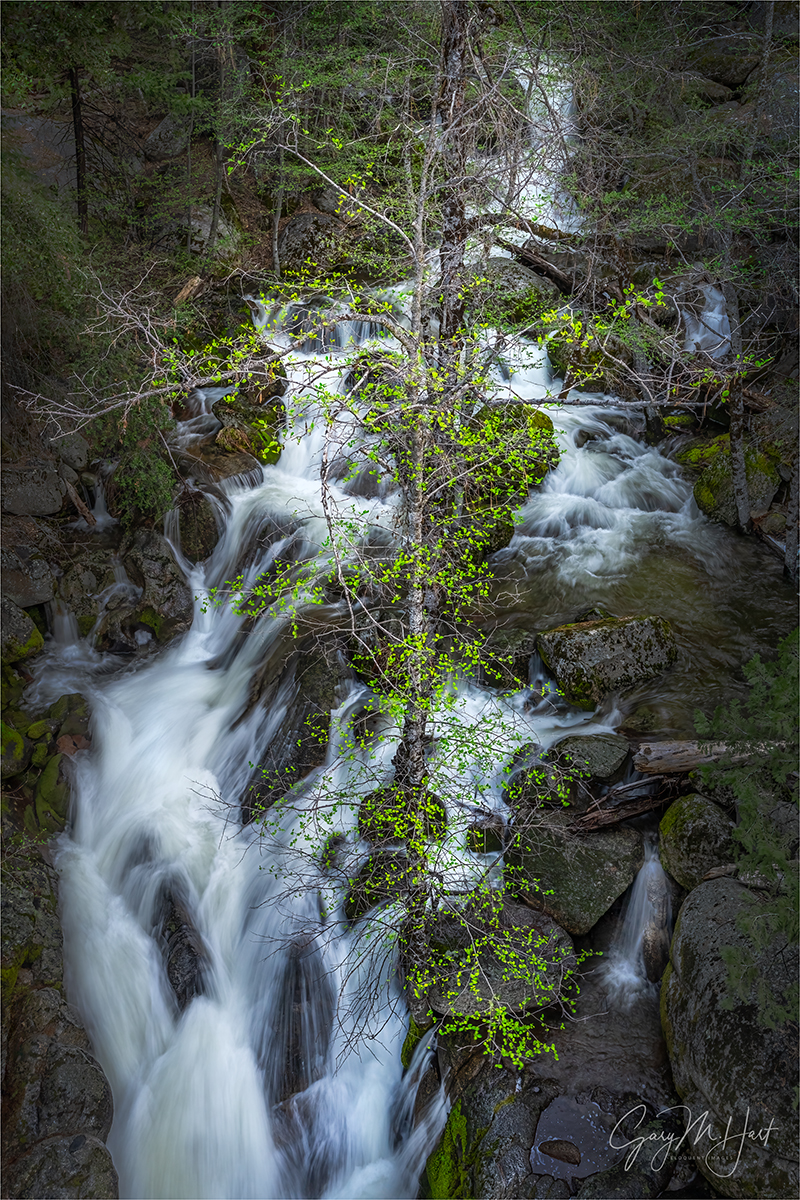
Spring Cascade, Tamarack Creek, Yosemite
Sony α1
Sony 16-35 f/2.8 GM
ISO 800
f/11
1/4 second
Ode to the Coffee Table Book
I grew up in an era when coffee table books were a thing. For decades, these dense rectangular blocks, packed with thick, glossy pages containing far more picture than text, dominated living rooms across America. Whether acquired by purchase or gift, once installed on a coffee table, most coffee table books would rest unopened for years, virtually untouched except by an occasional dust cloth, and maybe a micro-adjustment on the way to answer the door for company. It seems the CTB’s prime function was to generate the illusion of sophistication by enabling its owner to feign interest in a variety of esoteric subjects: the churches Europe, windmills, Iceland’s waterfalls, and so on.
But here’s a little secret. Turns out, many of these books were actually quite enjoyable. Who knew? As a child naive to the hands-off rules, to occupy myself while the adults were busy chatting about boring stuff, I’d sometime heft one of these beefy tomes onto my lap and page through it.
I found myself most drawn to books dedicated to nature and landscapes—pretty much anything with pictures of mountains, forest, desert, or coastline. For many years my attention was solely on the pictures and I paid no attention to the photographer responsible for them. But eventually I became aware that the images I lingered on longest came courtesy of David Muench. While some were in theme-based CTB photo anthologies filled with images from many photographers, I got to where I could instantly identify Muench’s beautiful captures before checking the photo credit. And I was especially excited whenever I found a book filled exclusively with Muench’s beautiful images of the American outdoors: the Southwest, National Parks, the Rockies—it didn’t really matter.
As a child, my analytical skills and photography aspirations were still many years in the future—I just knew I could spend several minutes on each page, visually caressing each mountain, lake, rock, tree, leaf, and flower. In hindsight, I know that my own photography today, both the scenes I’m drawn to as well as the way I approach them, were organically and profoundly influenced by this exposure to David Muench’s images.
Revelation
I’m writing about this because last month I had the good fortune to get my hands (and eyes) on William Neill’s latest book, “Yosemite: Sanctuary in Stone.” The instant I cracked it open, those childhood feelings of profound awe came flooding back, and instantly I was reminded how much, in this age of ubiquitous screens, I miss the tactile relationship with beautiful photography that can only be provided by a large, well-printed book.
Though it would be undeniably true, labeling “Yosemite: Sanctuary in Stone” a book full of pretty pictures would be a gross understatement. The opposite of derivative, Neill’s images are revelatory in their vision, a reminder that, in any scene, there’s so much more to photograph than we see at first glance.
Most of the images Neill shares in this book are intimate portraits featuring interactions of Earth’s more permanent features with its ephemeral elements, such as light, shadow, water, clouds, rain, fog, and snow. Though few depict the recognizable icons we associate with Yosemite (monoliths and waterfalls), each reveals the natural patterns, color, and contrast that makes Yosemite unique, somehow blending all this into coherent scenes that are so simple, it’s hard to believe no one saw them sooner. The product is a celebration of Nature’s most subtle beauty, rendered all the more beautiful because it’s been pulled from obscurity by a photography master. These images inspire me to continue cultivating my own personal vision, and to bolster my creative foundation by spending more time with profound photography like this.
Feeding My Muse
When I set out to write this, my intent was a straightforward piece honoring William Neill’s beautiful book, and acknowledging the role of the muse in its more conventional sense: an external influence that stimulates an artist’s creative instincts. But the more I wrote, the more I found myself leaning toward my own muse as an internal collaboration between a lifetime of external inputs.
Huh? What I mean is, we’re all influenced by the creations of others, and by our general interactions with the world. That influence can be conscious, like my experience paging through “Yosemite: Sanctuary in Stone,” or unconscious, like my childhood exposure to David Muench’s photography, or simply by spending a night on my back beneath a dark sky generously sprinkled with stars. Regardless, all that input is processed by my internal muse and organically output as inspiration: my internal muse.
A successful image happens at the intersection of vision and craft. Craft taps the analytical part of the brain, enabling us to master a scene’s motion, light, and depth through the control of the camera’s exposure variables, as well as command of hyperfocal technique for managing focus. Vision, more than the mere “eye for composition” many photographers talk about, is the ability to conjure unseen possibilities, and to channel the camera’s unique vision to uncover hidden patterns and relationships. Craft can be refined and honed by study and repetition, while vision is more elusive.
This is where I call on my internal muse to blend vision and craft to create (I hope) photographic synergy. But like any creative instinct, the internal muse must be nurtured and fed. I fear that the decline of big photography books like Neill’s has robbed many photographers’ internal muse of a prime source of sustenance. For proof, look no further than the proliferation of derivative photography online, a feedback loop of sameness where Photoshop amplification and AI manufacturing substitutes for inspiration and vision.
Of course taking my muse out into the field is easier said than done. I love sharing beautiful locations with my workshop students, but when I’m leading a photo workshop, my own priorities take backseat to theirs. I can’t explore and experiment the way I do when I’m on my own. But that doesn’t keep me from trying.
Putting My Muse to Work
In April I did two Yosemite workshops that focused on Yosemite at its saturated spring best. Both groups chased rainbows in Yosemite’s booming waterfalls, mirror reflections in the valley’s many ephemeral pools, and pristine dogwood blooms decorating the swollen Merced River. A particular highlight this year was the opportunity to share the Upper Cascades in full flow.
The Upper Cascades vantage point I like is the Cascade Creek Bridge on Big Oak Flat Road, just upstream from the Cascade Creek and Tamarack Creek confluence (which is visible from the bridge). Like most waterfalls, Upper Cascades is best in overcast or full shade. So the open southern exposure, and the fact that overcast is relatively rare in California, makes it difficult to find Upper Cascades in ideal light. And since Upper Cascades is fed entirely by snowmelt, its window of opportunity is very small. So I’m thrilled any time I can make it here when the water’s flowing and the light is soft.
On the visit with my first group, after a brief orientation and getting everyone set up, almost as an afterthought I pointed to the bridge over Tamarack Creek just 50 yards or so up the road, telling them it’s a beautiful little creek, but so overgrown that it’s pretty difficult to photograph. But when I noticed a couple heading that way a little later, I couldn’t help wander up there myself to see what they’d found.
This might be a good time to mention that one exercise I use to stimulate my muse when I’m in the field is to think of specific favorite images that were almost certainly not the obvious shot, then challenge myself to find my own less obvious shot. One of those favorite images is William Neill’s Dawn, Lake Louise, Banff National Park, Canada; another is Charles Cramer’s (wait for it…) Cascade Creek, Spring, Yosemite, captured just yards from where I stood that morning. (William Neill also has his own version of the Cascade Creek tree—not a duplicate and equally beautiful—and I honestly don’t know which came first. I default to Charles Cramer’s because it’s the first one I saw, but I love them both.)
So anyway, scanning my the scene, I was first bothered by a single alder tree, just starting to sport its spring green, right smack in the middle of the scene. Then it occurred to me that I could actually use that tree to anchor my scene. My idea was a wide, vertical composition that placed the tree front and center, with the creek racing down the steep slope directly behind it. After working with it for a while, I decided that, while I really liked the composition, the tree needed more leaves. So I made a mental note to try again in a week, on my second group’s Upper Cascades visit, when the leaves might have filled in more.
And that’s exactly what I did. While not as full as I’d hoped, on that second visit the leaves were definitely more visible than the first time and I went straight to work. Though it’s difficult to tell in a two-dimensional image, Tamarack Creek approaches waterfall steep right here. Since there wasn’t enough light to freeze the water at any reasonable ISO, so I just went all-in on motion blur.
Having already worked out the composition on my first visit, I just ran a range of shutter speeds from 1/10 to 5 seconds. Examining my results as I worked, it quickly became clear that the speeds from 1/5 to 1/2 would be best: faster than 1/5 looked scratchy (still blurred, but not smooth); longer than 1/2, the water started to lose definition. This image used 1/4 second—I chose it because it smoothed the water nicely, while still retaining all the definition that conveys its extreme speed.
Opportunities like this during a workshop are fairly rare because I usually need to put my muse on hiatus to focus on my group. When that happens, my best images are usually the more obvious beauty, such a vivid sunrise/sunset, arcing rainbow, rising/setting moon, or any of the many other natural phenomena nature photographers covet and chase relentlessly. But as beautiful as those special moments are, my muse and I are never happier than the quiet times I get to spend working in subtle light, using my creative instincts to extract a scene’s essence.
Workshop Schedule || Purchase Prints || Instagram
My Muse and I
Click any image to scroll through the gallery LARGE


, California")

A Dose of Perspective
Posted on December 6, 2023

Celestial Reflection, Milky Way Over the Colorado River, Grand Canyon
Sony a7SIII
Sony 20mm f/1.8 G
ISO 12800
f/1.8
30 seconds
Nothing in my life delivers a more potent dose of perspective than viewing the world from the bottom of the Grand Canyon. Days are spent at the mercy of the Colorado River, alternately drifting and hurtling beneath mile-high rock layers that reveal more than a billion years of Earth story. And when the sun goes down, the ceiling transforms into a cosmological light show, each stellar pinpoint representing a different instant in our galaxy’s past.
I’ve done this raft trip eight times now—long enough to know that when I stop doing it, the night sky is what I’ll miss most. To ensure the darkest skies (and the most stars), each trip is timed around the lunar minimum when the moon’s only appearance is a thin crescent is shortly before sunrise or after sunset. For most of my rafters, these are the darkest skies they’ll ever see—so dark that the Milky Way actually casts a faint shadow.
While cloudless nights down here always deliver a seemingly impossible display of stars, viewing the glowing core of our Milky Way galaxy is never assured. In the Northern Hemisphere, even when the galactic core reaches its highest point, it’s still relatively low in the southern sky. So, given the Grand Canyon’s general east/west orientation (high walls north and south), the best Milky Way views are usually blocked by the canyon’s towering walls. But these trips spend the first two nights in the north/south-trending Marble Canyon stretch of Grand Canyon, where we can enjoy open views of the north and south sky. And even after the canyon’s westward bend just downstream from the Little Colorado River confluence, a few fortuitous twists in the river open more nice southern views.
Campsites along the Colorado River are all first-come, first-served—if you set your sights on a Milky Way spot and arrive to find it occupied, there’s no option but to continue downstream. Over the years my (incomparable) guides and I have become pretty adept at identifying and (equally important) securing the best sites for Milky Way views—if the weather cooperates, we always score one or (usually) more quality Milky Way shoots.
One more Grand Canyon Milky Way obstacle I should mention is that even in the most favorable locations, the galactic core doesn’t rotate into the slot between the canyon walls until around 1:00 or 2:00 in the morning. Often rafters go to bed with every intention of rising to photograph it, but when the time comes to rise and shoot, their resolve has burrowed somewhere deep in the cozy folds of their sleeping bags. The best antidote for this is willpower, bolstered by bedtime preparation. To assist my rafters, I prescribe at the very least:
- Pick your campsite strategically, with the Milky Way in mind. (The first thing I do when we land is let everyone know where the Milky Way will appear.) That means either setting up your cot or tent with a good view of the southern sky, or at a place with easy access (in pitch darkness) to your desired shooting spot.
- Before going to bed, identify your composition, set up your camera, lens, and tripod, set your exposure (a relative constant that I’m able to help with), and focus at infinity.
- Have your camera ready atop the tripod and beside your cot (or outside your tent) when you go to bed. Some people just wake and shoot from their campsite (sometimes not even leaving their cot), but I usually prefer walking down to the river for the best possible foreground.
- Better still, if it can be done without risk of someone stumbling over it in the dark, leave the camera composed and focused at your predetermined shooting spot. But if this spot happens to be beside the river, check with the guides because the river level fluctuates on a known schedule (based on releases from Glen Canyon Dam timed for peak flow during peak electricity demand, and distance downstream).
I’ve learned that it isn’t practical to plan a group shoot for the wee hours of the morning, so I let people know when I plan to be up and where I’ll be, then let them decide whether to join me, choose their own time or place, or just stay in bed.
Regardless of the night’s Milky Way plan, I always forego the available but optional tent in favor of the unrivaled celestial ceiling. At home I’m a read-until-the-book-drops-to-my-chest guy, but down here I just lie flat on my back with my eyes locked heavenward, scanning for meteors, constellations, and satellites until my eyelids fail me. Here’s a sample of the mind-boggling thoughts that crowd my mind as I gaze:
- The light from every single pinpoint up there was created at a different time, and took many, sometimes thousands of, years to reach us—I really am peering back into the past.
- That streaking meteor was no larger than a pea and had probably been drifting around the solar system for millions, or billions, of years.
- Many of these stars host planets capable of hosting life.
- Our Milky Way galaxy is home to 10 times as many stars as there are people on Earth.
- For each star in the Milky Way, there are at least 20, and possibly as many as 200, galaxies in the Universe—many with trillions of stars.
Mind sufficiently boggled, I’ll eventually drift off to sleep (resistance is futile), but am fortunate that I don’t usually need to set an alarm to wake up—at bedtime I just tell myself what time I want to be up and trust my body’s clock. Then I psych myself into getting up by thinking I’m just going to fire off a dozen or so frames and then go back to bed. Of course I usually end up staying out much longer—always when there are others up and needing help, but often just because once I’m awake, the sky is just too beautiful to go back to sleep.
Rising for the galactic core’s arrival gives a good two or three hours of quality Milky Way time before the sky starts to brighten noticeably in the camera, sometime around 4:00 a.m. (the eyes don’t see the brightening for another half hour or so). I use all that dark time to work on a variety of compositions and exposure settings, sometimes moving around, but often staying put and just letting the Milky Way do the moving across the scene, from one side of the canyon to the other.
Since the “star” of the Grand Canyon night images is the sky, and vertical orientation gives me more of the vertically oriented Milky Way framed by the canyon’s vertical walls, my initial compositions are usually vertical. But the longer I do this, the more I’ve tried to lean into horizontal compositions as well, giving the canyon walls billing equal to the Milky Way.
Today I’m sharing a newly processed image from my 2021 raft trip—you can read the story of this night, and see a vertical version of the scene, here. This spot has become one of my favorite campsites because of the way, when the flow is just right, the water here spreads and pools at an extreme bend in the river. The reflection this night was spectacular, probably the best I’ve ever seen here, and (needless to say) I got very little sleep.
FYI
This image (like all of my images) is a single click (no compositing of multiple frames) with no artificial light added (no light painting or any other light besides stars and skylight). I was using my 20mm f/1.8 lens, which was wide enough, but I sure wish I’d have had the 14mm f/1.8 that was on order but didn’t arrive on time.
I had to skip the 2023 Grand Canyon raft trip, but am excited to be returning in May of 2024—and I just scheduled my 2025 trip.
Milky Way Favorites (one click—no blending)
Click any image to scroll through the gallery LARGE


Shoot for the Star
Posted on June 6, 2021

Sunstar, Little Colorado River, Grand Canyon
Sony a7RIV
Sony 12-24 f/2.8 GM
1/160 second
F/16
ISO 100
Cool as they can be, sunstars (AKA, diffraction spikes, sunbursts, or starbursts) border on gimmicky and cliché. So why do I shoot them? Because sometimes it’s the best solution when the sun intrudes on the scene you came to photograph. In other words, as much as I like dramatic clouds, vivid color, of soft light, I’d rather have a sunstar than a blank blue sky—kind of a lemonade-from-lemons approach.
Sunstars do look kind of cool, but maybe another reason they work is the universal resonance that comes with witnessing the sun kiss the horizon—I mean, who doesn’t have a comforting memory of watching from a special location as the sun begins or ends its daily journey?
Unfortunately, doing justice to these moments in a photograph is difficult: Including the sun in your frame introduces lens flare and extreme (often unmanageable) contrast, and creates an unattractive eye magnet that can overpower the rest of the scene. But while a sunstar doesn’t capture the literal experience of watching the sun’s arrival or departure, it can do a pretty good job of conveying the power of the moment.
A sunstar is created when sunlight diffracts (spreads) as it passes the intersection points of a lens diaphragm’s overlapping aperture blades. The smaller the opening, the steeper the angle between the blades, the more the light bends, and the more pronounced the sunstar spikes. The more diaphragm blades, the more spikes in the sunstar (this is a simplification of what actually happens, but you get the idea).
The good news is, despite the physical drawbacks mentioned earlier, creating a sunstar is relatively straightforward. Here’s a quick recipe:
- Start with a brilliant point of light: You can create a sunstar with any bright light source—the moon, stars, or even an artificial light such as a lighthouse, or car headlights—but I’m going to talk about the brightest, most ubiquitous, and easiest light source: the sun. Rather than using the entire sun, it’s usually best (but not always—you decide what looks best) to block most of it with the horizon, a cloud, or some terrestrial feature, such as a rock or tree. And clouds and atmospheric haze will significantly limit your sunstar—sometimes I’m not even aware of clouds or haze until the sunstar I expect is faint or non-existent.
- Size matters: The larger the visible portion of the sun, the bigger the sunstar, but also the more lens flare and blown highlights. Conversely, if most of the sun is blocked, you’ll get a smaller sunstar, but it will also be more precise and delicate. There’s not absolute ideal size, it’s more of a balancing act to find the right mix for your taste and situation.
- The smaller your aperture, the better your sunstar: A wide-open aperture is a nearly perfect circle (not good for sunstars), but the angle between the diaphragm blades increases as the diaphragm closes down, improving the sunstar as the angles increase. For my sunstars, I generally stop down to f/16 or smaller (larger f-number).
- Manage the highlights: When the sun is entering your frame, you’re invariably dealing with a sky that’s much brighter than your foreground and will need to take steps to avoid the foreground of murky shadows. If you have a foreground shape or shapes against the sky, you could turn the foreground into a silhouette. When I’m exposing for a sunstar, I watch the histogram (a benefit of mirrorless photography is the histogram in the viewfinder) and try to find a balance between the extreme highlights in and surrounding the sun and the dark shadows of the surrounding scene. I usually bracket over a 4-stop range in 2/3-stop increments, doing this as rapidly as possible to give me a good number of different exposures to choose between.
- Different lenses will yield different results: Experiment with your lenses to see which one gives the most pleasing sunstar effect. As a general rule, the better the quality of the lens, the better its sunstar effect. Prime lenses tend to do a better job, but a today’s best zooms create beautiful sunstars too. And the number a sunstar spikes will increase with the number of diaphragm blades.
- Remove filters: The more glass between the sun and your sensor, the more reflections and lens flare you’ll get, so remove your polarizer (which has no benefit anyway when you’re pointing at the sun) and UV filter.
- Practice: You can practice sunstars any time the sun’s out. Just go outside with your camera, dial in a small aperture, and hide the sun behind whatever object is convenient (a tree, your house, etc.).
About this image

Sunstar, Little Colorado River, Grand Canyon
This scene from last month’s Grand Canyon raft trip is a perfect example of why I sometimes resort to creating a sunstar—and I nearly missed it because I wasn’t ready. On a raft trip like this, no matter how much we try to time our stops with the best light, other factors often dictate the schedule.
We were fortunate to score a campsite directly across the Colorado River from the confluence with the Little Colorado River. We set up camp in the early afternoon and motored across the river as soon as we saw the other trips clear out. So we had the Little Colorado to ourselves, but with the sun still high in the cloudless sky, I resigned myself to having to wait for the sun to disappear behind the canyon walls before breaking out the camera gear. In the meantime we had a blast navigating a natural waterslide and cooling off in pools just warm enough to be refreshing.
When the non-photographers shuttled back to camp, the photographers remained at the Little Colorado to wait for the shade. While waiting I pulled out my Sony a7RIV put a 6-stop neutral density filter on my Sony 24-105 G, and wandered up and down the river looking for whitewater to play with. This was mostly just an exercise to kill time and familiarize myself with compositions for later, but was having fun I kind of lost track of time.
Not having really thought about the path the sun would take, and whether a sunstar would be an option, I looked up and saw that the sun was about to disappear behind a peak directly downstream and suddenly recognized a perfect sunstar opportunity. But my camera bag, with the Sony 12-24 GM lens I needed to get everything in (and also with the best sunstar), was about 200 yards downstream.
Not sure I had enough time, I sprinted as fast as my flip-flops would carry me, grabbed my bag (which was already in full shade), and sprinted back upstream toward the retreating sunlight. The sunstar happens right at the intersection of sunlight and shadow, but when raced into the sunlight I continued a little farther to give myself enough time before the sun set.
I really couldn’t afford to be picky about a composition but was lucky to find something with a foreground (rock) and middle ground (the blue of the Little Colorado) to go with my background (red-rock peak and sunstar). With the sunstar already in full swing in my viewfinder, I quickly (frantically) framed up a composition (no time for my customary obsessive tweaks, reviews, and refinements), dialed to f/16, metered (have I mentioned lately how much I love having a histogram in my viewfinder?), and clicked.
I only got four decent sunstar frames before the sun was gone. I had no idea if I had anything usable because I don’t usually perform too well when I rush, but was pretty happy to find something that works.
Workshop Schedule || Purchase Prints || Instagram
A Sunstar Gallery


Color My World
Posted on May 23, 2021
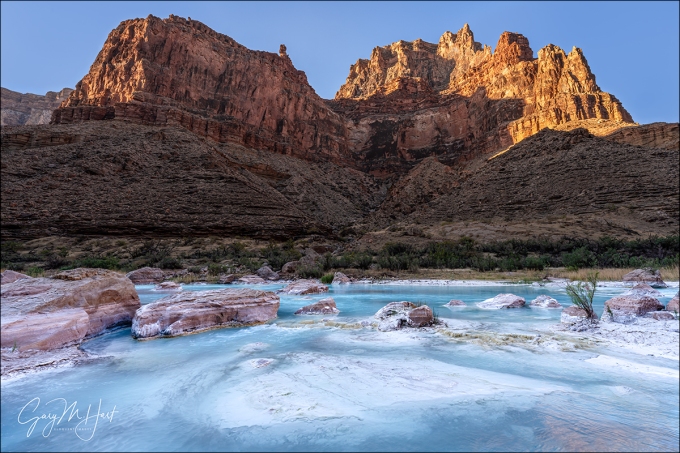
Red, White, and Blue
Little Colorado River, Grand Canyon
Sony a7RIV
Sony 12-24 f/2.8 GM
1/6 second
F/16
ISO 50
Before rafting the Grand Canyon my relationship with the Little Colorado River was limited to the view from the Cameron Suspension Bridge on US 89, a route I’d traveled at least twice a year for many years. Rarely more than puddles connected by a muddy trickle, to me the Little Colorado seemed better suited to be an indicator of recent precipitation than an actual photo destination. So on my first Grand Canyon raft trip way back in 2014, when Wiley (the lead guide for all but one of my now seven(!) trips) said we’d be stopping at the Colorado River’s confluence with the Little Colorado River, I shrugged.
That day had been a mix of clouds and sun, great for photography—all we needed was to pull over and tie up at a worthy subject. When we reached the confluence in early afternoon, Wiley suggested that we be back on the raft in 45 minutes, and I remember thinking, Really? Surely we can find a better spot to take advantage of this great light. I wasn’t even sure whether to grab my camera bag, but since I was the photography leader, I decided I better set a good example. Still skeptical, I followed one of the along a short trail through the shrubs, the rest of the group trailing. Rounding a corner I emerged from the brush and stopped like I’d slammed into a brick wall. Unable at first to process what I was seeing, I finally turned and managed to call back to Wiley, “Uh, we’re going to need more time here.”
Defying expectations
There is nothing subtle about color in nature. In fact, the vivid natural hues that surround us may just be my favorite thing to photograph. But we live our lives taking for granted a certain range of natural color constants: the sky will feature a reliable blue throughout the day, bracketed by certain shades of red or orange at sunrise and sunset, and darken to something close to black at night. Water we expect to be particular shades of green or blue depending on light and clarity. Even when nature’s color intensifies to a hue and intensity that moves us to pause and take note (or photograph), it’s reliably within our range of expectations—a vivid sunset, or the rich blues of Lake Tahoe and Crater Lake.
But sometimes nature throws us a curve. Death Valley’s aptly named Artist’s Palette features and array purple, green, and pink rocks; last summer’s fires turned California’s midday sky an otherworldly orange; it’s impossible not to be gobsmacked the greens and reds of an aurora. And I’ll never forget the first time I laid eyes on the green and blue glacial lakes of the Canadian Rockies and New Zealand. But for me, none of these sights were as disorienting as my first view of the Little Colorado River’s azure hues.
So what’s going on?
What happened to the familiar greenish-brown puddles upstream? Clearly, somewhere in the 55 or so river miles between Cameron and Grand Canyon, the Little Colorado has gotten an upgrade. Not only is there a lot more water, the blue water that’s been added is not a color I’ve seen in nature.
It turns out that, after leaving Cameron the Little Colorado twists along a scenic canyon of its own creation, a canyon deep enough to cut into a travertine-laced aquifer that recharges and colors its flow. The travertine (limestone formed by mineral springs) is infused with magnesium and calcium that adds the blue hue to the water, and leaves deposits that paint the rocks and river’s bed a reflective white, further enhancing the azure hue. Adding to all this magnificence is the rich red of the surrounding Grand Canyon walls.
Of course like most things in nature, the Little Colorado’s color is not guaranteed. When the summer monsoon rains arrive, the Little Colorado’s blue is overpowered by reddish brown sediment washed downstream by frequent torrential downpours. But by scheduling my raft trips for May, I’m usually able to beat this change (in May we also get to enjoy the Colorado River at its translucent green best). Only once have we found the Little Colorado River running brown, and we just kept right on floating downstream.
About this image
My Grand Canyon raft trip has many photographic highlights, but the most memorable (in no particular order) are the Milky Way (in the darkest sky you can imagine), Havasu Canyon, Elves Chasm, Deer Creek Fall, and the Little Colorado River. For the Milky Way we want a campsite that has a good view of the southern horizon, with the river in the foreground (and of course no clouds); for the others we like clouds or shade, and even tougher, few to no other people.
Over the years Wiley and I have gotten pretty good at strategizing our schedule to maximize the photo opportunities at the trip’s photo highlights. We came into this year’s trip knowing we were facing nothing but clear skies—great for the Milky Way, but not so much for the key locations. So before putting in on our first morning, we made our plan.
The first highlight location is the Little Colorado River, about 60 miles downstream from the starting point at Lee’s Ferry. By scoring the campsite directly across the Colorado River from the Little Colorado confluence, we could monitor the comings and goings at the confluence and shuttle the group across when when other rafters cleared out.
The afternoon was hot, with a couple of hours of harsh sunlight remaining—lousy for photography, but spectacular for swimming in the cool, but not cold, Little Colorado. Our guides led us about a half mile upstream to a perfect little swimming hole fed by a natural water slide where we splashed and lounged for a couple of hours.
When the sun started to dip behind the surrounding canyon walls, the non-photographers shuttled back to camp, while the photographers stayed and spread out to enjoy the softly shaded river beneath towering red sandstone kissed by late light. When we returned to camp that evening, everyone seemed quite satisfied with their results, but I couldn’t stop thinking about what the scene might be like in the morning. While I loved the way the sun lit the sandstone across the Colorado River, I realized that the most prominent peak above the confluence, in full shade for all of our afternoon shoot, should get really nice morning light.
At camp that night I talked to Wiley about giving anyone interested another shot at the Little Colorado in the morning, and we came up with a plan that would permit that without jeopardizing our schedule for what would be the trip’s longest, most intense day of rafting.
The guides had coffee ready at 5:15 the next morning, and by 5:30 five of us were motoring back across the river to the confluence. (This may sound early, but with nothing but natural light, we’re usually in bed by 8:30 each evening, and stirring shortly after 5:00 in the morning.
While we had less than an hour to photograph, that turned out to be enough. I only had to walk a short distance upstream before I was stopped by the view I’d visualized the night before. I tried it a little tighter to eliminate the boring sky, but discovered that I couldn’t get much sunlit sandstone into my frame without including sky. And as soon as I did that, I realized that including some regular old blue sky would actually provide context (and credibility) for the river’s otherworldly blue.
Pulling out my Sony a7RIV and Sony 12-24 f/2.8 GM lens, I was able to include the entire sunlit peak (does anyone know what it’s called?). With a general idea of my composition, I moved around a bit until I found a foreground that worked. To get all of the foreground limestone island in my frame, I scaled a small ledge behind me and framed up this scene.
I used ISO 50 and f/16 to stretch my shutter speed a little (but probably not enough to make much difference). Extreme dynamic range made the exposure a little tricky, but I simply monitored the histogram in my viewfinder (have I mentioned lately how much I love shooting mirrorless?) and dialed my shutter speed until the histogram looked right. Click.
Color My World
Click an image for a closer look, and to view a slide show.


My Lifelong Relationship With Yosemite
Posted on May 9, 2021
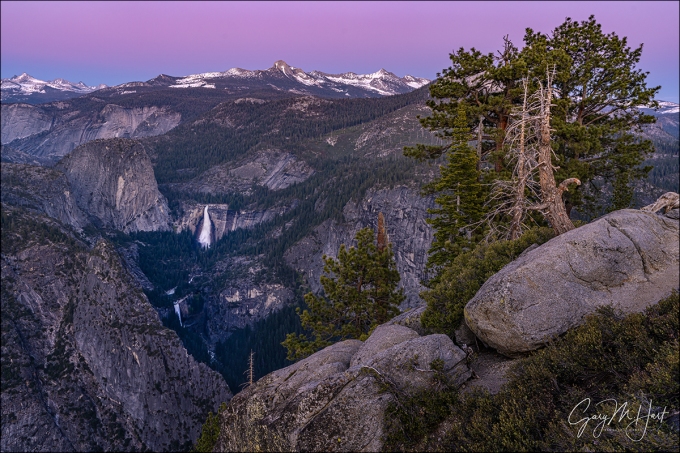
Alpenglow, Nevada and Vernal Falls from Glacier Point, Yosemite
Sony a7RIV
Sony 16-35 f/2.8 GM
1 second
F/10
ISO 100
My relationship with Yosemite doesn’t have a beginning or end. Rather, it’s a collection of asynchronous memories that I’m still forming. In fact, some of my Yosemite experience actually predates my memory (and I have the pictures to prove it—see below). The earliest memories, like following bobbing flashlights to Camp Curry to watch the Firefall spring from Glacier Point, or warm evenings in lawn chairs at the garbage dump, waiting for the bears to come to dinner, are part of the glue that bonds my family.
While my relationship with Yosemite may not have a beginning or end, it does have a few hiccoughs. The most recent, and by far most significant, was the abrupt halt to my regular, and often unscheduled, visits to Yosemite. BC (before COVID) I’d make 20 or 30 trips per year to my home-away-from-home, some planned far in advance (both workshops and personal trips), but many only after dropping everything with just a few hours notice, when it looked like something special might taje place. But COVID closures, and further restrictions that required me to apply for approval to visit, saw my 2020 visits plummet. Let’s see, from March 2020 through January 2021 there were only three: two last July for Comet NEOWISE (8 hours of driving for 1 hour of photography each time), and one for my late October fall color workshop (my only 2020 workshop since February, anywhere).
Glacier Point plays a role in many of my Yosemite memories, but none are more permanently embedded than a visit when I was probably 8 or 9. My father was a serious amateur photographer whose his own relationship with Yosemite influenced me. One of my most vivid Yosemite memories is (foolishly) standing atop Sentinel Dome in an electrical storm, extending an umbrella to shield his camera while he tried to photograph lightning firing across the valley.
Being Californians with little lightning experience, we had no idea how foolish this was—the lightning was a couple of miles away, which seemed a safe distance. But later that afternoon we attended a ranger talk at Glacier Point, we learned that lightning can travel more than 10 miles and that elevated and fully exposed Sentinel Dome is probably the last place you’d want to be in an electrical storm. He said this with a chuckle, as if to imply that he knew no one present would be foolish enough to attempt this. The kicker to this story came at Glacier Point later that afternoon, when seemingly out of nowhere a rainbow arced across the face of Half Dome. I’ll never forget my father’s excitement—the resulting image was the source of his greatest photographic pride, and the print he made still graces my mom’s wall.

Lecturing my first workshop group on the virtues of tripod use
As I grew older, I started creating my own Yosemite memories. On countless trips into its vast backcountry, I relished reclining beside gem-like lakes cradled in granite basins, sipping from streams that started the day as snow, and nights beneath an infinite canopy of stars—all to a continuous soundtrack of wind and water.
Given this history, it’s no surprise that I became a nature photographer, using my camera to try to convey the essence of this magic world. A big part of my “new” (it’s now more than 15 years) career is the opportunity to share Yosemite with other photographers. But despite the fact photography is now my livelihood, visiting Yosemite is never work. Now I get to live vicariously through their excitement, watching them experience firsthand the beauty they’ve previously seen only in pictures, or opening their eyes to new perspectives of familiar Yosemite scenes. I’m humbled that I might be a catalyst for others’ nascent or expanded relationships with this special place, and that they might spread their love to others.
Of course I’ve seen lots of change while accumulating my Yosemite memories. Gridlock is a summer staple, the bears have been separated (with moderate success), the Firefall has been extinguished (no, Horsetail Fall is not the Firefall), and backpacking requires difficult-to-obtain permits, water purifiers, and bear canisters. In recent years, the new park vendor has spoiled many of Yosemite’s institutions with what I can only label as corporate greed that places their bottom line above the visitor’s experience.
But I’m thrilled to return to something resembling the old normal. Each time I return I’m reminded that despite human interference, Yosemite’s soaring granite and plummeting waterfalls are magnificent constants, a vertical canvas for Nature’s infinite cycle of season, weather, and light.
About this image
An extremely dry winter allowed for the early opening of Glacier Point, just three days before the start of my Yosemite Waterfalls and Dogwood photo workshop. It’s a always nice to share this spectacular view with others, and this year’s group had a large number of Yosemite first-timers, a particular treat.
When we arrived I was pleased to see that it wasn’t too crowded, but I still had to spend a little time negotiating space along the rail facing Half Dome and Tenaya Canyon for a few people in my group. One potential spot, where the railing protruded from a steeply sloping granite boulder, was especially precarious (not dangerous, though you definitely didn’t want to drop anything), with tricky footing that required grippy shoes, creative tripod arrangement, and a firm grasp of the bar to stay upright. A couple of people tried it and decided it wouldn’t work for them, so after finding no more takers, I ended up settling there.
Though we did have some nice clouds behind Half Dome and distant Mt. Conness, there was no sign of clouds further south. I focused most of my attention on Half Dome and the clouds, but once the sun set I pointed my camera toward the lovely alpenglow deepening on the eastern horizon above Nevada and Vernal Falls. I thought the nearby trees and vertical granite face made a nice foreground, but couldn’t quite get them all in without also including the wall and railing I was braced against. After even more tripod machinations, I managed to elevate my tripod to the maximum height possible—high enough. Using the trees and cliff face on the right of my frame to balance the visual weight of the waterfalls on left, I focused on the dead tree and clicked.
My Yosemite
Click an image for a closer look, and to view a slide show.


