Eloquent Images by Gary Hart
Insight, information, and inspiration for the inquisitive nature photographer
Tapping the Essence
Posted on June 5, 2022
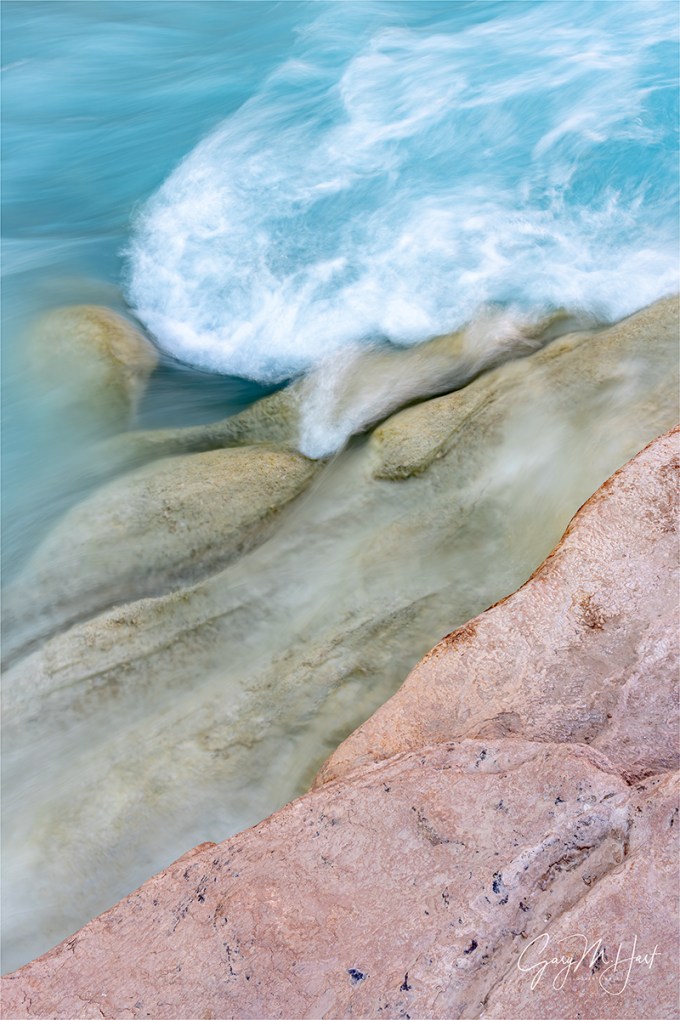
Churn, Little Colorado River, Grand Canyon
Sony α1
Sony 24-105 f/4 G
1/3 seconds
F/16
ISO 100
Spend enough time viewing landscape images on Facebook and Instagram and it soon becomes clear that dramatic spectacle and saturated color generates the most fan attention. Fueled by this knowledge, photographers seeking online praise try to outdo the drama and color of prior images, both their own and others’, with every shoot. The unfortunate consequence is a photographic feedback loop where one ostentatious image spawns increasingly ostentatious images, which then encourage even more ostentatious images, and on, and on….
This accelerating cycle reminds me of Top 40 music, where one breakthrough success generates a flood of uninspired clones. Catchy tunes are fine for a few listens, but few possess staying power and are soon forgotten. Contrast that to artists like the Beatles (am I dating myself?), who aggressively resisted repetition of prior success in favor of new sounds—sounds that the world has been listing to pretty much nonstop for nearly 60 years.
Admittedly, few artists are blessed with the Beatles’ creative genius, but that’s no excuse to shortcut your own creativity. As with music, images that elicit a reflexive Like and Share from digital passersby, and (if you’re lucky) maybe even a “Stunning!” in the comments box, are usually forgotten with the next click. But images that resonate on a personal level by revealing something unseen, or by touching a hidden place inside the viewer, have the power to grab people in their tracks and not let go.
Of course this sounds great in theory, but how is it accomplished? If the answer were easy, we’d all be doing it. But, like Dorothy and the Ruby Slippers, perhaps we’ve had the power all along.
Because most people long for a connection to the world around them—not simply a connection with nature, but also a connection with kindred souls—a good place to start would be to give viewers of your images something of yourself to latch on to, by concentrating on subjects that resonate with you.
Which might be why my own photography took a significant leap forward when I started photographing simply to please myself. In other words, the more I pursue moments in nature that touch me personally, (as if by magic) the more unique, gratifying, and successful my images became. While my most personal images don’t please everyone, the people they do reach seem to feel a deeper connection than they do to my images intended to impress. And best of all, they make me happy.
About this image
I’ve spent many hours at the bottom of the Grand Canyon, roaming the banks of the incomparable Little Colorado River near its confluence with the Colorado River. I’ll never forget my reaction the first time I saw the Little Colorado’s impossible blue. I had no inkling of what was in store when I hopped from the raft and rounded the corner, but when that blue hit my eyes I stopped short and stared for a few seconds trying to process it, then spun around and strode back to the raft to tell my lead guide, “We’re going to need more time here.”
Despite all the time spent here (and admittedly, it hasn’t all been photography—on warmer days my group enjoys cooling off by floating down a natural water chute about 1/2 mile upstream), I’ve struggled to make images that I feel really does the scene justice. But last year something clicked when I started looking closer, emphasizing the intimate beauty at my feet: the juxtaposition of red, white, and blue water and rock; the rock’s rich texture; the curves, angles, and levels of the limestone layers; and the play of the river among all these elements.


This year I took my look-closer approach a step further. After spending a hot afternoon at the Little Colorado doing more swimming than photography, I rose at 5:00 the following morning to return along with a half-dozen hardcore photographers in my raft trip group for a solid hour of just-plain-photography (taking advantage of our campsite directly across the river that allowed us to shuttle back and forth). While I landed that morning with no real plan, after a handful of uninspired clicks I came across this little rapid that stopped me in my tracks. Exactly 101 images later it was time to hustle back to the raft.
That’s right, 101 images of this one little rapid—and it was probably the most photography fun I’ve had all year. Every single frame was different from the others, and know I’d have found 101 more unique captures if I’d have had time.
Using my Sony 24-105 G lens on my Sony α1, I started with a tighter, horizontal composition, refining until the framing felt balanced, then ran a series of shutter speeds (by varying my ISO) ranging from 1 second to 1/100 second in (more or less) 1-stop increments. Then I’d find a new composition by going slightly wider, and occasionally changing my position and orientation. For each composition I’d use a similar series of shutter speeds, though it wasn’t long before I decided that the range I liked best was between 1/2 second and 1/30 second. (I like shooting motion with a range of shutter speeds so I can defer my final choice until I can view everything on my large monitor at home.)
Not until the last 10 minutes or so did I expand my composition enough to include the red rock platform on which I stood. Sometimes it takes working a scene for a while to distill it to its truest form, and it turns out really I love the strong diagonal this originally overlooked addition adds, not to mention the extra color and texture.
Like many of my favorite images, I know this one won’t accumulate the abundance of Likes that a landscape icon beneath a vivid sunset might, but it’s these intimate frames that capture the essence of the scene that make me happiest.
Join me as I do it all over again next year
Tapping the Essence
Click an image for a closer look, and to view a slide show.


, California")


Everyone’s a Photographer Until…
Posted on July 25, 2021
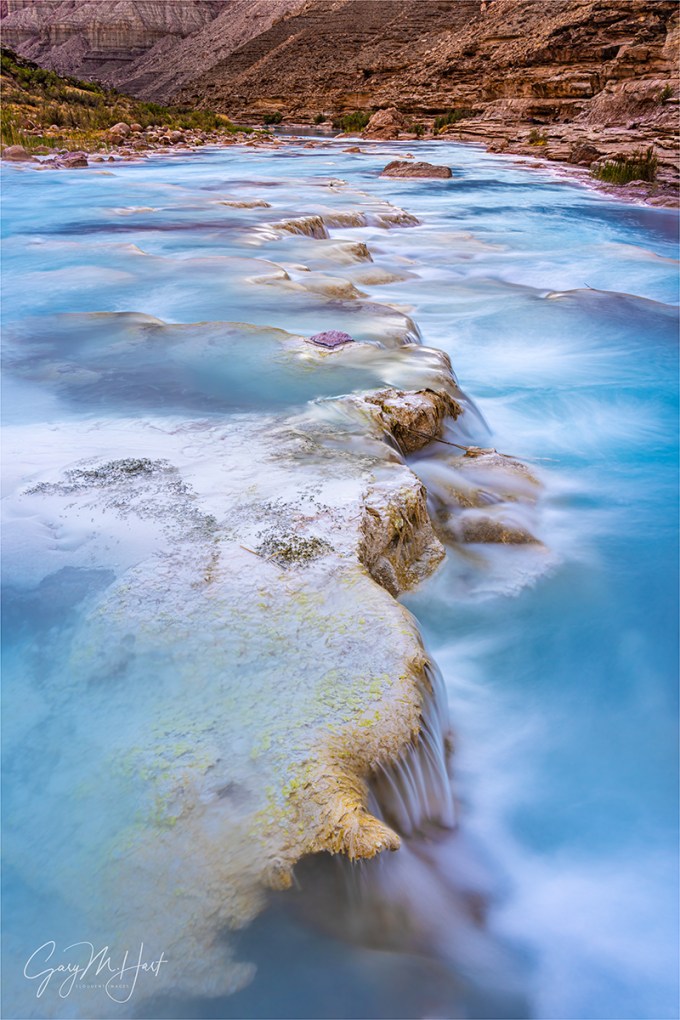
Limestone Cascades, Little Colorado River, Grand Canyon
Sony a7RIV
Sony 24-105 G
4 seconds
F/16
ISO 100
I have a T-shirt that says, “Everyone’s a photographer until…,” above a picture of a camera exposure-mode dial set to Manual. In my mind, this is one of those declarations that’s as true as it is funny (if you don’t see the humor, you’re probably not a photographer anyway).
 I write this with no very little judgement or condescension. Photography needs to make you happy, and if having to think about shutter speeds, f-stops, and ISO saps your joy, then set your camera’s dial to Auto and have a blast. And my goal isn’t to shame auto-shooters, it’s just to point out (again) that photography’s greatest opportunity for creativity comes with mastery of your scene’s “creative triad”: motion, light, and depth. And you can’t master the creative triad without mastering the exposure variables: shutter speed, ISO, and f/stop. Period.
Though it’s quite possible to get fantastic pictures in full automatic exposure mode by simply framing up a composition and clicking, composition is only one of the variables that combine to make a successful image (see “creative triad” above). And composition happens to be the variable that’s easiest to master competently. So I’m afraid if you want to distinguish yourself as a photographer, you really need to bite the bullet and master exposure.
What IS exposure mastery?
It’s important to understand that the correct exposure for most images requires some level of compromise—a shutter speed, f-stop, or ISO that’s less than ideal. (Especially true if you’re not using a tripod—fortunately landscape photography is particularly suited to tripod use.) For example, achieving a shutter speed fast enough to freeze flowing water might require a less than ideal f-stop or ISO.
Exposure mastery means being able to achieve your desired motion, light, and depth with the absolute minimum exposure compromise. It also means knowing when your creative goal isn’t possible—for example, when there’s no usable exposure combination that will get both a foreground and background subject sharp, or blur a water feature (while still getting the light right).
(For the record, even though I’m a fulltime Manual shooter, Aperture/Shutter Priority shooters who do it the right way qualify as Manual shooters in my book because they are making decisions about all of their exposure variables. What’s the “right way”? Setting the shutter speed or f-stop based on what their creative vision calls for, and knowing how to manage exposure compensation to get the exposure right.)
The good news is, you don’t need to use Manual metering (or Aperture/Shutter Priority) all the time. But you really should know how to use it, and be able to identify when it does and doesn’t matter. Fortunately, it isn’t as difficult as most people fear.
Rather than reinvent the wheel, here’s my Photo Tips article on Digital Metering.
About this image
Exploring the bank of the Little Colorado River during this year’s Grand Canyon raft trip, I hunted compositions and waited for the late afternoon shade to arrive. One feature I especially wanted to highlight was the linear limestone shelves that formed long, stair-step ledges. After a little searching, I found the cascade in this image just upstream from where most in the group had gathered to swim and photograph.
Lacking an obvious foreground anchor, I settled for a small, c-shaped cascade, and lowered my tripod to within a couple of feet to exaggerate the feature’s prominence. When the shade finally arrived, the dynamic range instantly became a non-factor for my Sony a7RIV, making the light part of my exposure decision pretty straightforward.
The motion and depth part of the equation, however, were a different story. The churning cascades created random splashes that I knew would distracting in a still image, so I chose to eliminate them with a long shutter speed to smooth the water. Even though I was now in full shade, there was too much light to achieve enough motion blur without the help of a neutral density filter, so I added my Breakthrough 6-stop dark polarizer to my Sony 24-105 f/4 G lens. This also allowed me to polarize distracting sheen on the rocks and water’s surface.
I also really wanted front-to-back sharpness, far from a sure thing with a foreground so close and background so distant (an f-stop decision I’d never trust to one of the auto exposure modes). After consulting my hyperfocal app, I stopped down to f/16, focused on the cascade just behind the nearby rock protrusion, pushed my shutter speed until my pre-capture histogram looked right (4 seconds), and clicked.
Managing Motion, Light, and Depth


, California")


")


Shoot for the Star
Posted on June 6, 2021

Sunstar, Little Colorado River, Grand Canyon
Sony a7RIV
Sony 12-24 f/2.8 GM
1/160 second
F/16
ISO 100
Cool as they can be, sunstars (AKA, diffraction spikes, sunbursts, or starbursts) border on gimmicky and cliché. So why do I shoot them? Because sometimes it’s the best solution when the sun intrudes on the scene you came to photograph. In other words, as much as I like dramatic clouds, vivid color, of soft light, I’d rather have a sunstar than a blank blue sky—kind of a lemonade-from-lemons approach.
Sunstars do look kind of cool, but maybe another reason they work is the universal resonance that comes with witnessing the sun kiss the horizon—I mean, who doesn’t have a comforting memory of watching from a special location as the sun begins or ends its daily journey?
Unfortunately, doing justice to these moments in a photograph is difficult: Including the sun in your frame introduces lens flare and extreme (often unmanageable) contrast, and creates an unattractive eye magnet that can overpower the rest of the scene. But while a sunstar doesn’t capture the literal experience of watching the sun’s arrival or departure, it can do a pretty good job of conveying the power of the moment.
A sunstar is created when sunlight diffracts (spreads) as it passes the intersection points of a lens diaphragm’s overlapping aperture blades. The smaller the opening, the steeper the angle between the blades, the more the light bends, and the more pronounced the sunstar spikes. The more diaphragm blades, the more spikes in the sunstar (this is a simplification of what actually happens, but you get the idea).
The good news is, despite the physical drawbacks mentioned earlier, creating a sunstar is relatively straightforward. Here’s a quick recipe:
- Start with a brilliant point of light: You can create a sunstar with any bright light source—the moon, stars, or even an artificial light such as a lighthouse, or car headlights—but I’m going to talk about the brightest, most ubiquitous, and easiest light source: the sun. Rather than using the entire sun, it’s usually best (but not always—you decide what looks best) to block most of it with the horizon, a cloud, or some terrestrial feature, such as a rock or tree. And clouds and atmospheric haze will significantly limit your sunstar—sometimes I’m not even aware of clouds or haze until the sunstar I expect is faint or non-existent.
- Size matters: The larger the visible portion of the sun, the bigger the sunstar, but also the more lens flare and blown highlights. Conversely, if most of the sun is blocked, you’ll get a smaller sunstar, but it will also be more precise and delicate. There’s not absolute ideal size, it’s more of a balancing act to find the right mix for your taste and situation.
- The smaller your aperture, the better your sunstar: A wide-open aperture is a nearly perfect circle (not good for sunstars), but the angle between the diaphragm blades increases as the diaphragm closes down, improving the sunstar as the angles increase. For my sunstars, I generally stop down to f/16 or smaller (larger f-number).
- Manage the highlights: When the sun is entering your frame, you’re invariably dealing with a sky that’s much brighter than your foreground and will need to take steps to avoid the foreground of murky shadows. If you have a foreground shape or shapes against the sky, you could turn the foreground into a silhouette. When I’m exposing for a sunstar, I watch the histogram (a benefit of mirrorless photography is the histogram in the viewfinder) and try to find a balance between the extreme highlights in and surrounding the sun and the dark shadows of the surrounding scene. I usually bracket over a 4-stop range in 2/3-stop increments, doing this as rapidly as possible to give me a good number of different exposures to choose between.
- Different lenses will yield different results: Experiment with your lenses to see which one gives the most pleasing sunstar effect. As a general rule, the better the quality of the lens, the better its sunstar effect. Prime lenses tend to do a better job, but a today’s best zooms create beautiful sunstars too. And the number a sunstar spikes will increase with the number of diaphragm blades.
- Remove filters: The more glass between the sun and your sensor, the more reflections and lens flare you’ll get, so remove your polarizer (which has no benefit anyway when you’re pointing at the sun) and UV filter.
- Practice: You can practice sunstars any time the sun’s out. Just go outside with your camera, dial in a small aperture, and hide the sun behind whatever object is convenient (a tree, your house, etc.).
About this image

Sunstar, Little Colorado River, Grand Canyon
This scene from last month’s Grand Canyon raft trip is a perfect example of why I sometimes resort to creating a sunstar—and I nearly missed it because I wasn’t ready. On a raft trip like this, no matter how much we try to time our stops with the best light, other factors often dictate the schedule.
We were fortunate to score a campsite directly across the Colorado River from the confluence with the Little Colorado River. We set up camp in the early afternoon and motored across the river as soon as we saw the other trips clear out. So we had the Little Colorado to ourselves, but with the sun still high in the cloudless sky, I resigned myself to having to wait for the sun to disappear behind the canyon walls before breaking out the camera gear. In the meantime we had a blast navigating a natural waterslide and cooling off in pools just warm enough to be refreshing.
When the non-photographers shuttled back to camp, the photographers remained at the Little Colorado to wait for the shade. While waiting I pulled out my Sony a7RIV put a 6-stop neutral density filter on my Sony 24-105 G, and wandered up and down the river looking for whitewater to play with. This was mostly just an exercise to kill time and familiarize myself with compositions for later, but was having fun I kind of lost track of time.
Not having really thought about the path the sun would take, and whether a sunstar would be an option, I looked up and saw that the sun was about to disappear behind a peak directly downstream and suddenly recognized a perfect sunstar opportunity. But my camera bag, with the Sony 12-24 GM lens I needed to get everything in (and also with the best sunstar), was about 200 yards downstream.
Not sure I had enough time, I sprinted as fast as my flip-flops would carry me, grabbed my bag (which was already in full shade), and sprinted back upstream toward the retreating sunlight. The sunstar happens right at the intersection of sunlight and shadow, but when raced into the sunlight I continued a little farther to give myself enough time before the sun set.
I really couldn’t afford to be picky about a composition but was lucky to find something with a foreground (rock) and middle ground (the blue of the Little Colorado) to go with my background (red-rock peak and sunstar). With the sunstar already in full swing in my viewfinder, I quickly (frantically) framed up a composition (no time for my customary obsessive tweaks, reviews, and refinements), dialed to f/16, metered (have I mentioned lately how much I love having a histogram in my viewfinder?), and clicked.
I only got four decent sunstar frames before the sun was gone. I had no idea if I had anything usable because I don’t usually perform too well when I rush, but was pretty happy to find something that works.
Workshop Schedule || Purchase Prints || Instagram
A Sunstar Gallery


Color My World
Posted on May 23, 2021
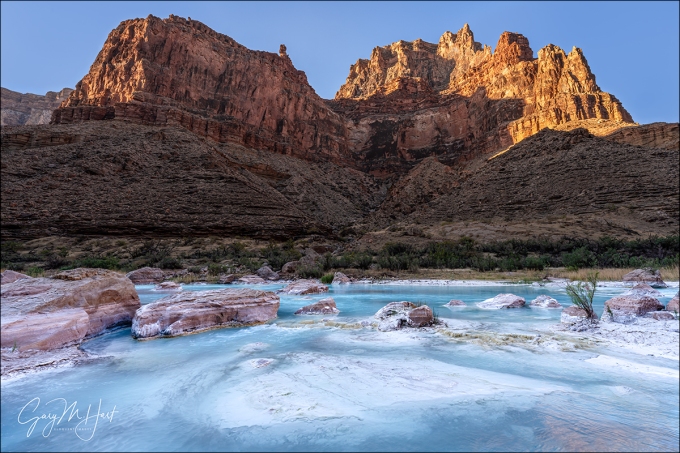
Red, White, and Blue
Little Colorado River, Grand Canyon
Sony a7RIV
Sony 12-24 f/2.8 GM
1/6 second
F/16
ISO 50
Before rafting the Grand Canyon my relationship with the Little Colorado River was limited to the view from the Cameron Suspension Bridge on US 89, a route I’d traveled at least twice a year for many years. Rarely more than puddles connected by a muddy trickle, to me the Little Colorado seemed better suited to be an indicator of recent precipitation than an actual photo destination. So on my first Grand Canyon raft trip way back in 2014, when Wiley (the lead guide for all but one of my now seven(!) trips) said we’d be stopping at the Colorado River’s confluence with the Little Colorado River, I shrugged.
That day had been a mix of clouds and sun, great for photography—all we needed was to pull over and tie up at a worthy subject. When we reached the confluence in early afternoon, Wiley suggested that we be back on the raft in 45 minutes, and I remember thinking, Really? Surely we can find a better spot to take advantage of this great light. I wasn’t even sure whether to grab my camera bag, but since I was the photography leader, I decided I better set a good example. Still skeptical, I followed one of the along a short trail through the shrubs, the rest of the group trailing. Rounding a corner I emerged from the brush and stopped like I’d slammed into a brick wall. Unable at first to process what I was seeing, I finally turned and managed to call back to Wiley, “Uh, we’re going to need more time here.”
Defying expectations
There is nothing subtle about color in nature. In fact, the vivid natural hues that surround us may just be my favorite thing to photograph. But we live our lives taking for granted a certain range of natural color constants: the sky will feature a reliable blue throughout the day, bracketed by certain shades of red or orange at sunrise and sunset, and darken to something close to black at night. Water we expect to be particular shades of green or blue depending on light and clarity. Even when nature’s color intensifies to a hue and intensity that moves us to pause and take note (or photograph), it’s reliably within our range of expectations—a vivid sunset, or the rich blues of Lake Tahoe and Crater Lake.
But sometimes nature throws us a curve. Death Valley’s aptly named Artist’s Palette features and array purple, green, and pink rocks; last summer’s fires turned California’s midday sky an otherworldly orange; it’s impossible not to be gobsmacked the greens and reds of an aurora. And I’ll never forget the first time I laid eyes on the green and blue glacial lakes of the Canadian Rockies and New Zealand. But for me, none of these sights were as disorienting as my first view of the Little Colorado River’s azure hues.
So what’s going on?
What happened to the familiar greenish-brown puddles upstream? Clearly, somewhere in the 55 or so river miles between Cameron and Grand Canyon, the Little Colorado has gotten an upgrade. Not only is there a lot more water, the blue water that’s been added is not a color I’ve seen in nature.
It turns out that, after leaving Cameron the Little Colorado twists along a scenic canyon of its own creation, a canyon deep enough to cut into a travertine-laced aquifer that recharges and colors its flow. The travertine (limestone formed by mineral springs) is infused with magnesium and calcium that adds the blue hue to the water, and leaves deposits that paint the rocks and river’s bed a reflective white, further enhancing the azure hue. Adding to all this magnificence is the rich red of the surrounding Grand Canyon walls.
Of course like most things in nature, the Little Colorado’s color is not guaranteed. When the summer monsoon rains arrive, the Little Colorado’s blue is overpowered by reddish brown sediment washed downstream by frequent torrential downpours. But by scheduling my raft trips for May, I’m usually able to beat this change (in May we also get to enjoy the Colorado River at its translucent green best). Only once have we found the Little Colorado River running brown, and we just kept right on floating downstream.
About this image
My Grand Canyon raft trip has many photographic highlights, but the most memorable (in no particular order) are the Milky Way (in the darkest sky you can imagine), Havasu Canyon, Elves Chasm, Deer Creek Fall, and the Little Colorado River. For the Milky Way we want a campsite that has a good view of the southern horizon, with the river in the foreground (and of course no clouds); for the others we like clouds or shade, and even tougher, few to no other people.
Over the years Wiley and I have gotten pretty good at strategizing our schedule to maximize the photo opportunities at the trip’s photo highlights. We came into this year’s trip knowing we were facing nothing but clear skies—great for the Milky Way, but not so much for the key locations. So before putting in on our first morning, we made our plan.
The first highlight location is the Little Colorado River, about 60 miles downstream from the starting point at Lee’s Ferry. By scoring the campsite directly across the Colorado River from the Little Colorado confluence, we could monitor the comings and goings at the confluence and shuttle the group across when when other rafters cleared out.
The afternoon was hot, with a couple of hours of harsh sunlight remaining—lousy for photography, but spectacular for swimming in the cool, but not cold, Little Colorado. Our guides led us about a half mile upstream to a perfect little swimming hole fed by a natural water slide where we splashed and lounged for a couple of hours.
When the sun started to dip behind the surrounding canyon walls, the non-photographers shuttled back to camp, while the photographers stayed and spread out to enjoy the softly shaded river beneath towering red sandstone kissed by late light. When we returned to camp that evening, everyone seemed quite satisfied with their results, but I couldn’t stop thinking about what the scene might be like in the morning. While I loved the way the sun lit the sandstone across the Colorado River, I realized that the most prominent peak above the confluence, in full shade for all of our afternoon shoot, should get really nice morning light.
At camp that night I talked to Wiley about giving anyone interested another shot at the Little Colorado in the morning, and we came up with a plan that would permit that without jeopardizing our schedule for what would be the trip’s longest, most intense day of rafting.
The guides had coffee ready at 5:15 the next morning, and by 5:30 five of us were motoring back across the river to the confluence. (This may sound early, but with nothing but natural light, we’re usually in bed by 8:30 each evening, and stirring shortly after 5:00 in the morning.
While we had less than an hour to photograph, that turned out to be enough. I only had to walk a short distance upstream before I was stopped by the view I’d visualized the night before. I tried it a little tighter to eliminate the boring sky, but discovered that I couldn’t get much sunlit sandstone into my frame without including sky. And as soon as I did that, I realized that including some regular old blue sky would actually provide context (and credibility) for the river’s otherworldly blue.
Pulling out my Sony a7RIV and Sony 12-24 f/2.8 GM lens, I was able to include the entire sunlit peak (does anyone know what it’s called?). With a general idea of my composition, I moved around a bit until I found a foreground that worked. To get all of the foreground limestone island in my frame, I scaled a small ledge behind me and framed up this scene.
I used ISO 50 and f/16 to stretch my shutter speed a little (but probably not enough to make much difference). Extreme dynamic range made the exposure a little tricky, but I simply monitored the histogram in my viewfinder (have I mentioned lately how much I love shooting mirrorless?) and dialed my shutter speed until the histogram looked right. Click.
Color My World
Click an image for a closer look, and to view a slide show.


2015 Grand Canyon Raft Trip: The Little Colorado
Posted on June 8, 2015

Red, White, and Blue | Little Colorado River | Grand Canyon
Sony a7R
Sony/Zeiss 16-35
1/50 second
F/11
ISO 100
“Uh, we’re going to need more time here”
Before last year’s raft trip, my relationship with the Little Colorado River was limited to the view from the Cameron Suspension Bridge on US 89: Rarely more than a muddy trickle, the Little Colorado seemed better suited as an indicator of recent precipitation than a photo destination. So last year, when Wiley (my raft trip’s lead guide) said we’d be stopping at the Little Colorado River confluence, I shrugged.
The day had been a mix of clouds and sun, great for photography. The sun was behind the clouds when we tied up on the rocks at the confluence; as I hopped off the raft, camera bags in tow, Wiley told us to be back on the raft in 45 minutes. I remember thinking, Really? Surely we can find a better spot to take advantage of this great light, but I kept my mouth shut. Expectations low, I rounded the corner and stopped like I’d slammed into a brick wall. Unable at first to process what I was seeing, I finally turned and called back to Wiley, “Uh, we’re going to need more time here.” And it was so.
So what happened?
Clearly, somewhere between Cameron and the canyon, the Little Colorado had gotten an infusion. And not just an infusion of regular old greenish-brown river water, but an infusion of mineral-laced, other-worldly turquoise water. It turns out that, after leaving Cameron, the Little Colorado carves a deep (and quite scenic) canyon, a canyon so deep that it cuts into a travertine- and limestone-laced aquifer that recharges and colors its flow. The limestone also paints the river’s bed a reflective white, further enhancing the turquoise hue. (It’s the same color, for the same reason, as the more heralded Havasu Creek.)
Do-over
Unfortunately, on that first visit, the photogenic clouds and light that had been with us all day took our arrival as its cue to move on, forcing us photograph this beautiful scene in ordinary, harsh, mid-afternoon light. On that visit, despite the extra time, I wasn’t able to capture anything that would do this magnificent spot justice. But I made plans to return, and strategized with Wiley the best way to maximize our chances for good light the next time.
Our original plan for the Little Colorado this year was a late afternoon stop on day 2, but after a windy morning, Wiley suggested stopping early at a more sheltered campsite. Though that meant not getting to the Little Colorado until the morning of day 3, the weather forecast before we departed (to the land of no weather forecasts) had called for lots of clouds and a slight chance of showers for most of the week; the clouds had been with us so far, so I crossed my fingers that they’d hang in there for us.
And hang in they did. For the hour-and-half we had there, the sun made cameo appearances but largely remained offstage. In place of the typical horizon-to-horizon blue sky, we got patches of blue mixing with rapid changing cumulus. When the sun did appear, it spotlighted individual features rather than illuminate the entire scene.
The biggest problem I had was deciding where to point my camera. Usually I identify where the best shot is and concentrate my attention there. In this case, because I couldn’t decide, I shot both upstream and down, hedging my bets with wide and tight, horizontal and vertical compositions. I know I left a lot of shots farther upstream, so I guess I’ll just need to go back next year.
Inside out at Grand Canyon
Click an image for a closer look, and a slide show. Refresh the screen to reorder the display.


