Eloquent Images by Gary Hart
Insight, information, and inspiration for the inquisitive nature photographer
From one extreme to another
Posted on August 1, 2012

Bristlecone at Sunset, Schulman Grove, White Mountains, California
* * * *
In my previous post I wrote about California’s extremes. I used Badwater in Death Valley to illustrate, but of course there are many more examples. Case in point: the bristlecone pines of the White Mountains, just east of Bishop, across the Owens Valley from the Sierra Nevada.
The more heralded, heavily traveled Sierra gets most of the rain and snow from the Pacific, rendering the White Mountains a high elevation desert. With very little water to sustain foliage, fierce winds scour the White’s rocky surface unchecked. Water (and foliage) also moderates temperatures (lower highs, higher lows)–without water’s moderating effect, high temperatures in the White Mountains are higher and low temperatures are lower than corresponding elevations in the nearby Sierra.
Enter the bristlecone pine, a hardy conifer that has evolved to not only survive in these extremes, it thrives. Thrives to the point that it is generally acknowledged as the oldest living thing on earth (older, even, than Larry King). Some bristlecones approach 5,000 years old; the tree in this image is around 4,000 years old, give or take a millennium (due to, believe it or not, concerns about vandalism, individual bristlecone ages aren’t revealed).
The Schulman Grove Discovery Trail is a one mile loop with great access to some magnificent trees. It’s a very well-marked, heavily used trail, but it’s quite steep. And at over 10,000 feet elevation, it will definitely test your lung capacity. At just about the halfway point of the trail, you’ll find a magnificent bristlecone pair, well worth the effort to get out there. The trail here loops around these trees, providing 270 degrees of perspective.
The most popular view here, the view that seems to attract the most photographers, is close and looking up at the trees against the sky. But this evening I liked that the (often obscurred by haze) Sierra crest was clearly visible, and saw that the sky had potential for color, so I picked a more distant vantage point up the trail a bit. From there I could isolate the tree against the mountains and compress the distance somewhat with a moderate telephoto.
Using some scruffy yellow shrubs to anchor my foreground, I decided a vertical composition allowed me to compose the tree a little tighter. It was about 75 feet away, which meant at f16 and 75mm, focusing just a little in front of the tree gave me sharpness from 25 feet to infinity (as reported by the hyperfocal app in my iPhone). The color came late, after many photographers had packed up and headed back to the visitor center. While the sunset didn’t paint the entire sky, it very conveniently peaked in direct line with my composition. I love it when everything comes together.
Sunsets are red because the sky is blue
Posted on July 17, 2012

Sunset, Mono Lake
A sunset myth
If your goal is a colorful sunset/sunrise and you have to choose between pristine or polluted air, which would you choose? If you said clean air, you’re in the minority. You’re also right. But despite some pretty obvious evidence to the contrary, it seems that the myth that a colorful sunset requires lots of particles in the air persists. If particles in the air were necessary for sunset color, Los Angeles would be known for its incredible sunsets and Hawaii would only be known for its beaches.
But what is the secret to a great sunset? Granted, a cool breeze, warm surf, and a Mai Tai are a great start, but I’m thinking more photographically than recreationally (sorry). I look for a mix of clouds (to catch the color) and sky (to pass the sunlight), with a particular emphasis on a clear western horizon (or eastern for sunrise). But even with a nice mix of clouds and sky, sometimes the color fizzles. Often the missing ingredient, contrary to common belief, is clean air, the cleaner the better. And like most things, it all makes sense when you understand what’s going on.
Light and color
Understanding sunset color starts with understanding how sunlight and the atmosphere interact to make the sky blue. As you probably know, visible light reaches our eyes in waves of varying length, with each wavelength perceived as a different color. Starting with the shortest wavelengths and moving toward the longest, visible light goes from violet, indigo, blue, green, yellow, orange, and red. (These color names are arbitrary labels we’ve assigned to the colors we perceive at various points along the visible portion of the electromagnetic spectrum—there are an infinite number of colors in between each of these colors.) When a beam of light passes through a vacuum (such as space), it moves in a straight line, without interference, so all its wavelengths reach our eyes simultaneously and we perceive the light as white.
Why is the sky blue?
When light interacts with a foreign object—for example, when a beam of sunlight enters our atmosphere—different wavelengths respond differently depending on the size of the molecules they encounter. If sunlight encounters molecules that are larger than its wavelengths, such as atmospheric impurities like dust or smoke, all its wavelengths bounce off (reflect). Because these large molecules are of varying sizes, a variety of wavelengths (colors) get blended into a hazy sky with a gray or brown cast. If all the wavelengths get bounced equally, the sky will appear white(ish).
When a beam of sunlight hits the much smaller molecules that comprise our atmosphere, such as nitrogen and oxygen, rather than reflecting, some of its wavelengths are absorbed, then scattered in all directions. Because the shorter wavelengths (violet and blue) absorb and scatter most easily, they’re the first to scatter, while the longer wavelengths (orange and red) pass through to color the sky of someone farther away. The more direct the sunlight’s path to our eyes (the less atmosphere it passes through), the more we see the first (blue) wavelengths to scatter. When the sun is high in our sky, its light takes the most direct path through the atmosphere and our sky is blue. In the mountains sunlight has passed through even less atmosphere and the sky appears even more blue than it does at sea level.
Sunrise/sunset color
When the sun is on the horizon, the light that reaches us has traveled through so much atmosphere that it has been stripped of its blueness (those wavelengths are coloring the sky of someone whose sun is high overhead), leaving only the long wavelengths. This paints our sunrise/sunset sky shades of orange and red.
Clean air for color
One problem with pollutants is that large airborne particles absorb light, which subdues the intensity of the sunrise/sunset. But more than subdued intensity, airborne junk just plain muddles color.
Anyone who has blended a smoothie consisting of a variety of brightly colored ingredients (such as strawberries, blueberries, and spinach—yum) knows the smoothie’s color won’t be nearly as vivid as any of its ingredients, not even close. Instead you’ll end up with a brownish or grayish muck that might at best be slightly tinted with the color of the predominant ingredient. That’s what happens to the color when the light has to interact with large airborne particles like dust, smoke, and smog. Because these particles aren’t of uniform size, they each reflect a slightly different color rather than allowing one vivid color to dominate. In the middle of the day pollution means less blue; at sunrise/sunset, it’s less pink, red, and orange.
For example
One of my favorite sunrise/sunset locations is the Eastern Sierra. Its location on the lee side of the Sierra keeps the air relatively pristine, and the clouds formed by the interaction of the prevailing westerly wind’s with the precipitous Sierra crest are both unique and dramatic.
Mono Lake makes a particularly nice subject for the Eastern Sierra’s brilliant shows. Not only does it benefit from the Eastern Sierra’s clean air and photogenic clouds, Mono Lake’s tufa formations and (frequently) reflective surface make a wonderful foreground subject. And the openness of the terrain allows you to watch the entire sunrise or sunset unfold. Many times over the course of a sunrise or sunset I’ve photographed in every direction.
The above image was at the tail end of a particularly vivid Mono Lake sunset. The air was clean and I was very fortunate to get not only clouds and color, but also perfectly calm wind that turned the lake’s surface to glass. As you may have noticed by the 15 second exposure, the color lasted quite long that night, and this was toward the end of the show.
I wanted sharpness throughout the frame, so I stopped down to f16—being on a tripod, the long shutter speed wasn’t a factor. I paid careful attention to orienting my polarizer to pick up the color reflecting on the water in the left side of the frame, while removing enough reflection on the right to reveal the submerged rocks. This resulted in differential polarization in the sky as well, but that was a relatively easy fix with my Dodge/Burn action in Photoshop. The rest of the processing for this image was pretty straightforward, with some noise reduction, a slight crop for framing, selective contrast adjustment, and a little desaturation of the blue channel.
I find that the more I can anticipate skies like this, the better prepared I am when something spectacular happens. I was at the lake well before the color started, but because it looked like all the sunset stars were aligning, I was able to plan my shots well before they arrived. I’m far from perfect at predicting conditions, but the more I learn (and experience), the better I get.
Photographic reality: The missing dimension
Posted on June 4, 2012

Nature’s Palette, Half Dome from Sentinel Dome, Yosemite
![]()
“Photography’s gift isn’t the ability to reproduce reality, it’s the ability to expand it.”
(The sixth and final installment of my series on photographic reality.)
So far I’ve written about focus, dynamic range, confining borders, motion, and time, but I think most obvious (and also I’m afraid most overlooked) difference separating the camera’s vision from our own is the missing dimension: depth.
Photography attempts to render a three dimensional world in a two dimensional medium—the most photographers can hope for is the illusion of depth. While anyone can put a camera to their eye and compose the lateral, left-to-right aspect of a scene, translating their own three-dimensional experience to their camera’s two-dimensional reality is a leap that many miss. This may explain why a sense of depth is often the most significant quality separating a merely good image from an outstanding image.
Achieving the illusion of depth starts with looking beyond your primary subject and finding a complementary foreground or background: If your primary subject is nearby, find a background object, shape, or color that frames, balances, and/or helps your subject stand out; conversely, if your primary subject is in the distance, look for foreground elements that can lead your viewers’ eyes through the frame without distracting or competing for attention.
Once you have your foreground/background elements worked out, your composition isn’t complete. In your three-dimensional view, size and distance are easily interpreted, something we stereographic humans take for granted. But your scene’s depth is lost to your camera. In a two-dimensional world aligned objects at varying distances loose the separation that makes them stand out—you need to visually separate these merged objects—put them on different lines of sight—to allow your viewer to imagine the depth you see at capture. I can’t emphasize how important this is.
In my many years of observing and assisting other photographers working to improve their images, I’ve decided that the single most significant factor holding them back is their ignorance of, or unwillingness to wield, their control over their images’ depth relationships. There seems to be an invisible force that binds tripods to their first landing place. Overcoming this force (to which I’m not immune) requires vigilant attention to each visual element in your frame and taking whatever steps necessary to ensure that each stands alone. If you can’t achieve separation from your current position, move! Simply repositioning a little left/right, up/down, forward/backward really can make a huge difference. In other words, in a static landscape, it’s your job to be dynamic.
For example
With the benefit of a 360 degree view, it was clear that all the elements were in place for a spectacular sunset atop Yosemite’s Sentinel Dome. An afternoon rain had scoured the air of color-robbing particles, and an opening on the west western horizon left a clear path for the setting sun to illuminate the clouds above Half Dome to the east. But as spectacular as I expected the color above Half Dome to be, I wasn’t going to be satisfied with just another pretty picture of Half Dome at sunset.
One of the things I like most about photographing from Sentinel Dome is the variety of foreground subjects: rocks, cracks, and of course the solitary jeffrey pine made famous by Ansel Adams and others, now dead and on its side. On this evening, guessing (hoping) that the earlier downpour had filled indentations I remembered on Sentinel’s southeast flank, I headed over there.
One thing I pride myself in is arriving at a location early, well before the best conditions, to allow time to anticipate the light and assemble the elements of my composition. Being such a deliberate shooter, this is really a necessity for me. So when I found these pools right where I’d hoped, I was able to take the time to figure out how to use them. I started by moving around quite a bit, first to find the angle that would best frame Half Dome with the pools, then forward and backward to get an idea of the best distance and focal length that would give Half Dome enough size while giving the pools enough room. A factor in these distance/focal-length considerations was finding the angle that would allow me to include a reflection of the clouds, which meant moving up and down as well. In this case I dropped quite low, probably no more than a foot off the ground, taking care not to get so low that the bottom of Half Dome merged with the edge of Sentinel Dome. With the composition worked out, I did some depth of field figuring and decided that I’d better stop all the way down to f20 to ensure a perfectly sharp foreground and acceptably sharp Half Dome.I focused on the granite about eight feet away and think I did a pretty good job achieving front-to-back sharpness. (Today I’d use the DOF app on my iPhone, but checking it now confirms that I did okay.)
Being on a tripod with no motion in the scene meant I was able to go with whatever shutter speed gave me the exposure I wanted, at my camera’s native ISO 100. I metered on the foreground and used a graduated neutral density filter to darken the bright sky, starting my exposures before the best color started (you never know when the color will peak—it’s best to have a few too many images than to realize after the fact that the color you’re waiting for isn’t coming), monitoring my histogram and adjusting down in 1/3 stop increments as the light dropped.
On this evening the color just kept getting better and better, until the air seemed to buzz with color and the entire landscape glowed red. Believe it or not, the red was even more vivid than what you see here, but I decided to tone down the saturation a bit because there comes a point where Mother Nature seems to defy credibility. This remains one of my favorite images.
Making lemonade at the Grand Canyon
Posted on April 30, 2012

Last Light, Desert View, Grand Canyon
We’ve all heard Dale Carnegie’s trite maxim, “When life gives you lemons, make lemonade.” Of course these pithy statements become popular because they resonate with so many people, photographers included. And it seems that not only are the photographers who adopt this attitude more productive, they’re just plain happier. For example….
Few pursuits are more frustrating than trying to predict Mother Nature’s fickle whims. Last week I was in Northern Arizona co-leading Don Smith’s Northern Arizona workshop. On our first night we pulled in to Desert View to find everything in place for a vivid, colorful, cliché Grand Canyon sunset: billowing cumulus clouds, patches of blue sky, and a gaping hole for the setting sun on the western horizon.
The only problem was, for some inexplicable reason, the color never materialized–the sun dropped, the light faded, and we were teased with no more than a few whispers of pink. For anyone who had put all their eggs in the brilliant sunset basket, this would have been a major disappointment. But (in my opinion) what we did get was even better.
Anticipating a colorful sunset, I had set up my composition accordingly. I was patiently waiting when, just before reaching the horizon, the sun slipped beneath a cloud and for about 90 seconds painted the canyon’s rim with the brightest, warmest light imaginable. When the light popped I quickly jettisoned my colorful sky composition and scanned the rim for a subject painted by the sunlight. When my eyes fell on this tree I quickly evaluated the scene for the best way to emphasize the tree and foreground light.
While the tree and light were front and center, the storm clouds overhead and Colorado River below made excellent background complements I knew I needed to include. I started by aligning myself with the tree’s branches framing the Colorado. Moving as far back as the terrain permitted, I zoomed to fill the frame and compress the foreground/background distance. With a 67mm focal length, depth of field was tricky. My hyperfocal app told me that the hyperfocal distance at f16 was around 30 feet, meaning if I focus 30 feet away, I could be sharp from 15 feet to infinity. I refined my composition, removed my camera from the tripod, focused on a tree about 30 feet away, returned the camera to the tripod, and clicked.
I’m a big advocate of surveying a scene, anticipating the light and conditions, and finding compositions before the conditions occur. But the moral here is to not become so locked in to a plan that you fail to seize unexpected opportunities. In hindsight I realize I should have anticipated this light too–I had a clear view of the sun’s path to western horizon, but I was so giddy with excitement about the color that was “sure” to materialize that I almost missed this other opportunity.
As it turned out, at Hopi Point the next evening we had the opposite experience–clouds on the western horizon promised to block the color-generating sunlight, but those of us who waited 15 minutes after sunset were (somehow) treated to a neon sunset that had the whole shuttle bus buzzing all the way back to the village (more on this in a future post). Maybe if I were as familiar with the Grand Canyon as I am with Yosemite, I’d be better at predicting its conditions, but until that happens, I’ll just keep guzzling the lemonade.
The best laid plans…
Posted on April 13, 2012
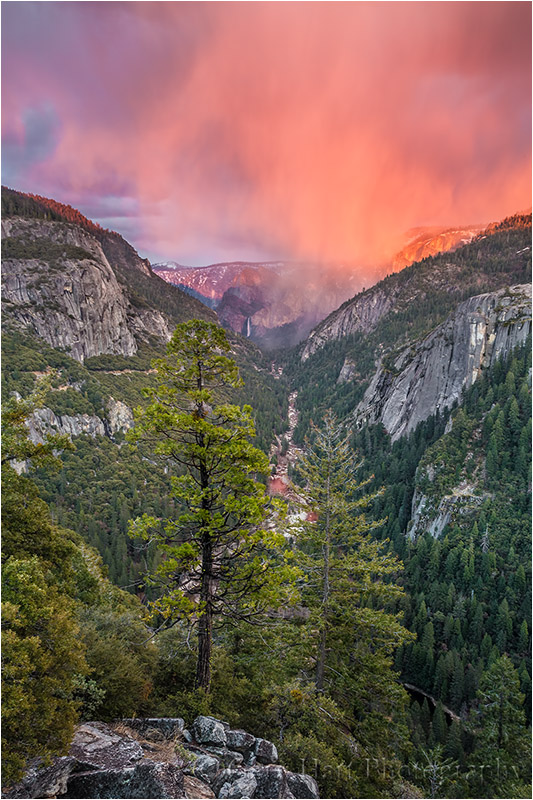
Red Veil, Bridalveil Fall and the Merced River Canyon, Yosemite
The plan was to photograph a full moon rising at the end of the Merced River Canyon, just to the right of Bridalveil Fall, at sunset. It was the final night of last week’s Yosemite Spring: Moonbow and Wildflowers photo workshop, and the moonrise was to be the grand finale. But after a day photographing poppies and waterfalls beneath a sky mixed with sun and clouds, the clouds took over and threatened to obscure everything. Nevertheless, most of the group hung in there to the bitter end, which is how we found ourselves at this vista point on Big Oak Flat Road about 45 minutes before sunset.
We could see Bridalveil but no hint of sky anywhere. Along with the clouds had come a biting cold (for April) wind that included a few snowflakes–most of the week and been quite comfortable, so we were a little unprepared for (and resentful of) the change. But there we stood, cameras poised atop tripods, shivering (us, not the cameras), chatting, and monitoring the horizon for any sign of an opening. I gave my standard “It’s impossible to predict Yosemite’s conditions in five minutes based on the conditions now” speech (it’s true), but the clouds were clearly lowering and even I was secretly pessimistic.
About the time people started eyeing the warmth of the cars, a small patch of light appeared in front of Bridalveil. Given the absolute grayness of the sky, we were a little perplexed, but that didn’t keep anyone from engaging their camera and firing off a few quick frames before the light disappeared. And disappear it did, but only for a minute or so, before returning. After another minute or two it was clear that the light wasn’t shrinking, it was expanding and soon we all started rooting for it to spotlight Bridalveil (photographers are greedy).
Which is exactly what it did. For the next thirty minutes we were treated to a light show that defied explanation. From our perspective there was no break in the clouds, but clearly the sun must have slipped beneath an opening on the western horizon, out of site behind a granite ridge, because soon the shaft expanded to a focused beam that traversed the entire canyon. We’d been so focused on the light that we didn’t at first notice a translucent cloud that had broken away from the flat gray ceiling. As the invisible sun dropped toward the horizon, its light warmed to gold, the shaft ascending the canyon walls, eventually illuminating the sky above Bridalveil. For the next ten minutes we watched the rogue cloud go from a brilliant amber to deep crimson veil draping the canyon.
About the time the color started reflecting in the Merced River far below, I noticed that we were all just standing shoulder-to-shoulder capturing pretty much the same thing, so I quickly moved about 20 feet down in search of a foreground. With the color peaking I managed a few wide frames, framing the Merced River and Bridalveil Fall with two nearby evergreens. After that the color faded quickly and we were all left wondering whether we’d imagined what we’d just seen. I’ve been photographing in Yosemite for my entire adult life and have never seen anything quite like this. I didn’t even think about the moon until it popped over a ridge about two hours later, on my drive home.
Finding your camera’s “truth”
Posted on December 17, 2011

Gossamer Twilight, Pfeiffer Beach, Big Sur
Something I teach, write, and lecture on frequently (ad naseum?) is the photographer’s obligation to understand, not fight, the camera’s vision. Some people seem to get this; others, not so much. So I’ve decided to try a slightly different tack.
Visual “Truth” is relative
Without getting too philosophical, it’s important to understand that, like your camera, your view of the universe is limited and interpreted. In other words, there is no absolute visual truth. Instead, we (you, me, and our cameras) each have our own view of the world that’s based on many factors–some we can control, others we can’t. When you look through a viewfinder, the more you turn off your visual biases and understand your camera’s, the more successful your photography will be.
Limited vision
Before lamenting your camera’s limitations, pause to consider that what you and I see is incredibly limited as well. The visible (to the human eye) portion of the electromagnetic spectrum is a minuscule part of the infinite continuum of electromagnetic radiation bombarding each of us, every instant of every day. For example, X-ray machines “see” waves in the one nanometer (one billionth of a meter) range; TVs and radios “see” waves that are measured in centimeters; humans, on the other hand, only see waves between (about) 400 and 750 nanometers.
Using this knowledge, astronomers peer into space with tools designed to see objects at wave lengths invisible to us. X-rays allow doctors to view bones hidden beneath opaque skin, and night vision technology uses “invisible” (to us) infrared radiation (heat) to see objects complete darkness. In other words, in the grand scheme of things, there’s no single absolute visual standard–it’s all relative to your frame of reference.
The camera has its own frame of reference. While it records more or less the same visible spectrum our eyes do, the camera is missing an entire dimension: depth. Not only that (since we’re not talking about movies here), a camera only returns a snap of a single instant. And we all know about limited dynamic range and depth of field.
Despite these differences, photographers often go to great lengths to force their camera to record what their eyes see. Not only is this impossible, it doesn’t take advantage of the camera’s ability to see things in ways we don’t.
Interpreted vision
Our visual input is interpreted before we perceive it, in much the same way a camera’s input is processed before it’s output (to a monitor, printer, or whatever). Visual processing happens in our brain, which makes adjustments for things like color temperature, perspective, motion, and so on.
Likewise, every photograph must be processed (interpreted) in some way before it can be viewed, either by the camera (if camera gives you a jpeg or tiff), or by the photographer, using Photoshop or some other processing software.
Visual synergy
In most ways, the eye’s ability to capture light exceeds that of even the best cameras. On the other hand, the camera does do a few things our eyes can’t do: In the image above, captured a year ago at Pfeiffer Beach on the Big Sur coast, I used my camera’s ability to accumulate light to reveal things that, while invisible to my eye, were still quite real.
According to the EXIF data (try getting your eye/brain to record that), the sun had set twenty minutes prior, but my camera was still able to see in the limited light. This twenty second exposure revealed more detail than my eye registered. In doing so it smoothed the surf into a gauzy mist, and captured reflected color lost in my visual darkness.
Another thing I really like about my camera’s take on this scene is the way it reveals the transition of light and color as the view moves away from the sun. Though the eye does register it, our brains, influenced by the subconscious misperception that a cloudless sky is a uniform sky, often overlook subtle differences like this. But capture it in an image and the transition is both striking and beautiful.
So what about the blurred water?
People who criticize blurred water images for being “false” because that’s not the way water is, completely miss the point (I won’t get into the whole cliché argument here, which has more validity). My question to them is, how would you choose to capture water? (It’s a trick question.) When they answer frozen sharp, I ask them how many times they’ve actually seen a wave or water droplet suspended in midair. (Checkmate.)
The point is, a still camera simply “sees” motion differently than we do. Rather than holding our images to an unattainable human standard, we should feel free to appreciate and convey our cameras’ unique perspective. In this Pfeiffer Beach scene, I like the way smoothing the water to an ethereal gauze more accurately conveys the inviting mystery of the sea.
What is real?
Is this image real? While it’s nothing like what I saw, it’s still a very accurate rendering of my camera’s reality. Understanding my camera’s vision enabled me to share a perspective that expands my limited vision and transcends human reality. Pretty cool.
Magenta moonrise, Half Dome, Yosemite
Posted on November 21, 2011

Magenta Moonrise, Half Dome, Yosemite
With my camera I’m able to create my own version of any view, adjusting focal length (the amount of magnification) and composition to emphasize whatever elements and relationships I find most compelling. Today’s image was captured on the final shoot ofmy most recent fall workshop, three sunsets after my previous image, from virtually the same location.
On Sunday evening (the first sunset), with Yosemite Valley emerging from swirling clouds and the moon high above Leaning Tower, I chose a wide composition that encompassed the entire scene. Wednesday evening the eastern horizon was partially obscured by a uniform layer of translucent clouds. As the sunset progressed, we watched the moon’s glow rise through the throbbing pink clouds. When it slipped into a small opening I quickly tightened my composition to create a frame that was all about Half Dome and the moon. I made the Sunday moon a delicate accent, the Wednesday moon a bold exclamation point. These decisions remind me that photography is more than simply documenting a moment; it’s taking that moment and using the camera’s unique vision to convey its essence.
One more thing: By the last day of a workshop, relationships have been forged and inside jokes have blossomed. The group interaction feels more like a family gathering (minus the disfunction) than the assembly of diverse strangers we were three-and-a-half days earlier. On this evening in particular we had a great time laughing about things that anyone who hadn’t been in the workshop couldn’t appreciate. It was lots of fun, and a wonderful way for me to wrap up this year’s fall workshop season.
Photographing the Grand Canyon: It’s not as easy as it looks
Posted on March 29, 2011

Sunset, Hopi Point, Grand Canyon
Canon EOS-1Ds Mark III
1 second
F/18.0
ISO 100
28 mm
As a photographer weaned on the no less breathtaking but far more finite confines of Yosemite, transitioning to photographing the Grand Canyon shattered a long-established template for success. In Yosemite Valley I’m surrounded by looming walls as familiar as they are spectacular. Attempts to capture Yosemite’s grandeur generally involve isolating or combining specific subjects: El Capitan, Half Dome, Yosemite Falls, and so on.
But when photographing from the rim of the Grand Canyon, no single subject stands out. Rather, I’m instantly overwhelmed by both the vast expanse of the vista and the enormity of its scale. The problem is, as far as the camera is concerned, breadth and size are mutually exclusive: The wider I compose to include the vista, the more everything in the frame shrinks; the tighter I compose to convey the size of the canyon’s features, the more the vista shrinks. But perhaps the greatest hurdle is the Grand Canyon’s great distance, with dramatic red ridge after red dramatic ridge seeming to continue into infinity. This visual depth is completely lost in the camera’s two-dimensional vision.
While I’m not sure I’ve completely mastered the Grand Canyon, I feel like I’m finally getting the hang of it. The above sunset photographed from Hopi Point demonstrates the approach that seems to work best for me, which is to find something for the foreground that complements the background I’m trying to highlight. The Grand Canyon’s rim is rife with interesting trees and shrubs, but in this case I wanted to photograph the sun on the horizon, using the river to lead the eye through the frame. But I couldn’t find an appealing foreground subject. Since experience has shown me that something in the foreground anchors the viewer and is essential to the depth I want to convey, rather than forego any foreground subject at all, I settled for two pretty ordinary shrubs on the canyon’s rim. Because they’re not particularly compelling, I positioned the shrubs at the edge of the frame, allowing ample room for the eye to move easily along the more interesting rim and through the rest of the frame.
Another difficulty photographing the Grand Canyon is the extreme contrast between the bright sky and deeply shaded canyon at sunrise and sunset, a contrast the eye handles far more easily than a camera. The best light in Yosemite Valley comes at sunset, when the sun is at your back for most compositions that include El Capitan or Half Dome. But the Grand Canyon offers an unobstructed view of the horizon in all directions–as difficult as it is to photograph, it’s pretty hard to ignore the rising and setting sun. And the canyon’s precipitous sides put much of it in deep shadow when the sun is on the horizon.
For this sunset I’d arrived at Hopi Point about an hour early, allowing time to plan and set up my composition. When the sun reached the horizon I combined two- and three-stop graduated neutral density filters, which enabled a long enough exposure to bring out the canyon’s shadow detail while holding back color-robbing brightness in the sky. (The Grand Canyon is a great place for hard-transition or reverse GNDs because the linear horizon is a great place to hide the dark-to-light transition.) The sunburst was achieved by using a small aperture (f18) and timing my exposure just as a thin sliver of sun peaked beneath a cloud.
While I’m still not as productive at the Grand Canyon as I am in Yosemite (and other more familiar locations), I really do enjoy the challenge and am encouraged by the growing satisfaction I feel following each trip. My fingers are crossed that I was able continue this trend with the images from my latest visit. Stay tuned….

