Eloquent Images by Gary Hart
Insight, information, and inspiration for the inquisitive nature photographer
Going long
Posted on August 24, 2015
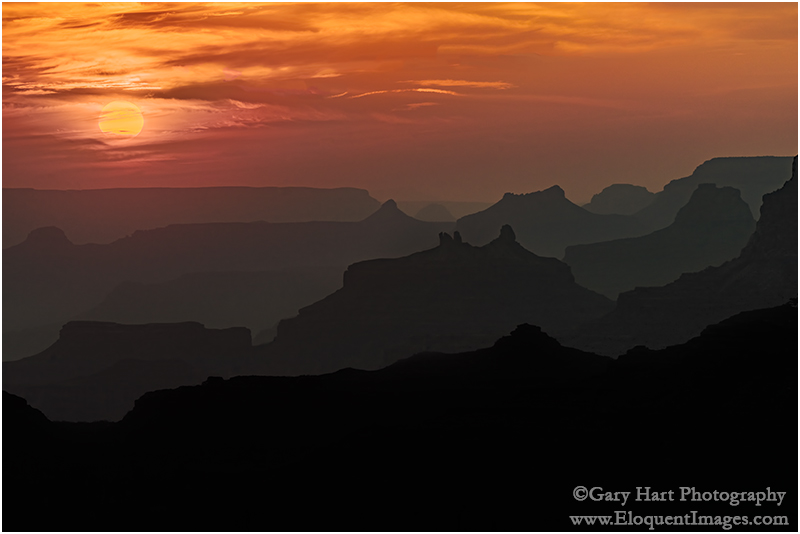
Sunset Silhouettes, Desert View, Grand Canyon
Sony a7R II
Tamron 150-600 (Canon-mount with Metabones IV adapter)
1/125 second
F/11
ISO 200
It’s no secret that a prime benefit of mirrorless photography is the smaller form-factor of the bodies and lenses. And while I was looking forward to lightening my bag when I made the switch, it turns out that my first mirrorless thought wasn’t, “Oh gee, this bag is so light!” (it was). My first thought was actually, “Oh gee, look at all that extra room!”
While everyone knows that nature abhors a vacuum, it appears that nature photographers do too. Rather than leave that space empty and revel in my eased burden, I opted to fill every cubic inch with more gear. So, in a bag that was formerly maxed out with one Canon SLR body and four lenses covering 16mm to 200mm, I now carry three mirrorless bodies and four lenses that go from 16mm to 600mm. It’s the heaviest bag I’ve ever carried—and I love every ounce of it.
Occupying the most bag real estate (and weight!) is a Tamron 150-600mm lens (and Metabones adapter). My original thought when I purchased the Tamron was that I’d leave this beast in the car and only lug it out for very specific uses (much the way I used my Canon 100-400). But I’ve been having so much fun doing long telephotos with the 150-600 that I suck it up and pack it out pretty much everywhere I go.
I had particular fun with the big Tamron on my recent Grand Canyon trip. With distant vistas at virtually every stop, Grand Canyon provides infinite opportunities for the isolation and compression shots an extreme telephoto lens does so well. Suddenly I was enjoying familiar vistas in brand new ways—far off rock spires and buttes suddenly filled my entire frame, the distance separating receding ridges compressed until they lined up like a column of dominos, and the sun’s throbbing disk expanded on the horizon like a hot air balloon.
On the final sunset of our second workshop, Don Smith and I guided the group to Desert View, where we all spread along the rim west of the Watchtower. The canyon was extremely hazy, but I told everyone in the group within earshot that the haze would subdue the sun enough that we’d probably get that red rubber ball sun as it dropped from view.
I wasn’t planning to shoot, but as I stood on the rim working with the students (who were by now pretty independent anyway), I couldn’t resist setting up my tripod and breaking out the 150-600. Anticipating where the sun would reach the horizon, I moved a little east to balance it better with the most striking features in the view. Then I framed up my composition and waited for the sun to slip into the haze. With the help of my 3-stop Singh-Ray reverse graduated neutral density filter, I was indeed able to retain some yellow in the sun while still capturing silhouettes of the ridges stacked all the way to the horizon.
When I got the image home and opened it in Lightroom, the canyon was completely black, and the sun was a white disk. But tugging the Shadows slider to the right pulled out the silhouettes you see here (with remarkably little noise), and dragging the Highlights slider all the way to the left filled almost the entire sun with yellow (a thin band of white remained along the top edge, which I touched up in Photoshop). While the sun appeared more red to my eye, I was thrilled to get any color at all.
Schedule of Photo Workshops
A long shot gallery
Click an image for a closer look, and a slide show. Refresh the screen to reorder the display.


The dark night
Posted on August 20, 2015

Angel’s View, Milky Way from Angel’s Window, Grand Canyon
Sony a7S
Rokinon 24 f1.4
20 seconds
F/1.4
ISO 6400
How to offend a photographer
Gallery browser: “Did you take that picture?”
Photographer: “Yes.”
Gallery browser: “Wow, you must have a good camera.”
Few things irritate a photographer more than the implication that it’s the equipment that makes the image, not the photographer. We work very hard honing our craft, have spent years refining our vision, and endure extreme discomfort to get the shot. So while the observer usually means no offense, comments discounting a photographer’s skill and effort are seldom appreciated.
But…
As much as we’d like to believe that our great images are 100 percent photographic skill, artistic vision, and hard work, a good camera sure does allow us to squeeze the most out of our skill, vision, and effort.
As a one-click shooter (no HDR or image blending of any kind), I’m constantly longing for more dynamic range and high ISO capability. So, after hearing raves about Sony sensors for several years, late last year (October 2014) I switched to Sony. My plan was a gradual transition, shooting Sony for some uses and Canon for others, but given the dynamic range and overall image quality I saw from my Sony a7R starting day one, I haven’t touched my Canon bodies since picking up the Sony.
While I don’t think my Sony cameras have made me a better photographer, I do think ten months is long enough to appreciate that I’ve captured images that would have been impossible in my Canon days. I instantly fell in love with the resolution and 2- to 3-stop dynamic range improvement of my Sony a7R (and now the a7R II) over the Canon 5D III, the compactness and extra reach of my 1.5-crop a6000 (with little loss of image quality), and my a7S’s ability to pretty much see in the dark.
But what will Sony do for my night photography?
I need more light
I visit Grand Canyon two or three times each year, and it’s a rare trip that I don’t attempt to photograph its inky dark skies. But when the sun goes down and the stars come out, Grand Canyon’s breathtaking beauty disappears into a deep, black hole. Simply put, I needed more light.
Moonlight was my first Grand Canyon night solution—I’ve enjoyed many nice moonlight shoots here, and will surely enjoy many more. But photographing Grand Canyon by the light of a full moon is a compromise that sacrifices all but the brightest stars to achieve a night scene with enough light to reveal the canyon’s towering spires, receding ridges, and layered red walls.
What about the truly dark skies? For years (with my Canon bodies) the only way to satisfactorily reveal Grand Canyon’s dark depths with one click was to leave my shutter open for 30 minutes or longer. But the cost of a long exposure is the way Earth’s rotation stretches those sparkling pinpoints into parallel arcs.
As with moonlight, I’m sure I’ll continue to enjoy star trail photography. But my ultimate goal was to cut through the opaque stillness of a clear, moonless Grand Canyon night to reveal the contents of the black abyss at my feet, the multitude of stars overhead, and the glowing heart the Milky Way.
So, ever the optimist, on each moonless visit to Grand Canyon, I’d shiver in the dark on the canyon’s rim trying to extract detail from the obscure depths without excessive digital noise or streaking stars. And each time I’d come away disappointed, thinking, I need more light.
The dynamic duo
Early this year, with night photography in mind, I added a 12 megapixel Sony a7S to my bag. Twelve megapixels is downright pedestrian in this day of 50+ megapixel sensors, but despite popular belief to the contrary, image quality has very little to do with megapixel count (in fact, for any given technology, the lower the megapixel count, the better the image quality). By subtracting photosites, Sony was able to enlarge the remaining a7S photosites into light-capturing monsters, and to give each photosite enough space that it’s not warmed by the (noise-generating) heat of its neighbors.
With the a7S, I was suddenly able to shoot at ridiculously high ISOs, extracting light from the darkest shadows with very manageable noise. Stars popped, the Milky Way throbbed, and the landscape glowed with exquisite detail. I couldn’t wait to try it at Grand Canyon.
My first attempt was from river level during this year’s Grand Canyon raft trip in May. Using my a7S and Canon-mount Zeiss 28mm f2 (after switching to Sony, I was able to continue using my Zeiss lens with the help of a Metabones IV adapter), I was immediately blown away by what I saw on my LCD, and just as excited when I viewed my captures on my monitor at home.
But I wasn’t done. Though I’d been quite pleased with my go-to dark night Zeiss lens, I wanted more. So, in my never-ending quest for more light, just before departing for the August Grand Canyon monsoon workshop, I purchased a Rokinon 24mm f1.4 to suck one more stop’s worth of photons from the opaque sky. The new lens debuted last Friday night, and I share the results here.
About this image
Don Smith and I were at Grand Canyon for our annual back-to-back monsoon workshops. On the night between workshops, Don and I photographed sunset at Cape Royal, then walked over to Angel’s Window where we ate sandwiches and waited for the Milky Way to emerge. The sky was about 80 percent clouds when the sun went down and we debated packing it in, but knowing these monsoon clouds often wane when the sun drops, we decided to stick it out.
Trying to familiarize myself with the capabilities of my new dark night lens, I photographed a handful of compositions at varying settings. To maximize the amount of Milky Way in my frame, everything oriented vertically. As with all my images, the image I share here is a single click.
Despite the moonless darkness, exposing the a7S at ISO 6400 for 20 seconds at f1.4 enabled me to fill my entire histogram from left to right (shadows through highlights) without clipping. Bringing the shadows up a little more in Lightroom revealed lots of detail with just a moderate amount of very manageable noise.
This is an exciting time indeed for photographers, as technology advances continue to push the boundaries of possibilities. Just a few years ago an image like this would have been unthinkable in a single click—I can’t wait to see what Sony comes up with yet.
Some comments on processing night images
Processing these dark sky images underscores the quandary of photography beyond the threshold of human vision—no one is really sure how it’s supposed to look. We’re starting to see lots of night sky images from other photographers, including many featuring the Milky Way, and the color is all over the map. Our eyes simply can’t see color with such little light, but a long exposure and/or fast lens and high ISO shows that it’s still there—it’s up to the photographer to infer a hue.
So what color should a night scene be? It’s important to understand that an object’s color is more than just a fixed function of an inherent characteristic of that object, it varies with the light illuminating it. I can’t speak for other photographers, but I try to imagine how the scene would look if my eyes could capture as much light as my camera does.
To me a scene with blue cast is more night-like than the warmer tones I see in many night images (they look like daylight with stars), so I start by cooling the color temperature below 4,000 degrees in Lightroom. The purplish canyon and blue sky in this image is simply the result of the amount of light I captured, Grand Canyon’s naturally red walls, and me cooling the image’s overall color temperature in Lightroom. For credibility, I actually decided to desaturate the result slightly. (The yellow glow on the horizon is the lights of Flagstaff and Williams, burned and desaturated in Photoshop.)
Learn more about starlight photography
A dark night gallery
Click an image for a closer look, and a slide show. Refresh the screen to reorder the display.


Hurry up and wait
Posted on August 14, 2015

Diagonal Lightning Strike, Lipan Point, Grand Canyon
Sony a7R II
Sony/Zeiss 24-70
1/13 second
F/11
ISO 50
Photographing lightning is about 5 percent pandemonium, and 95 percent arms folded, toe-tapping, just plain standing around. A typical lightning shoot starts with a lot of waiting for the storm to develop and trying to anticipate the best (and safest) vantage point. But with the first bolt often comes the insight that you anticipated wrong and: 1) The lightning is way over there; or 2) The lightning is right here (!). What generally ensues is a Keystone Cops frenzy of camera bag flinging, tire screeching, gear tossing, tripod expanding, camera cursing, Lightning Trigger fumbling bedlam. Then it’s more waiting. And waiting. And waiting….
In many ways the waiting part is a lot like fishing—except these fish have the ability to strike you dead without warning. And a strike is no guarantee that you’ve landed something—that assurance won’t come until you review your images. Unfortunately, when a Lightning Trigger is attached, LCD reviews are disabled. But to avoid missing the next one, I’ve learned to resist the temptation to turn off my Lightning Trigger and check after every bolt (like pulling the line from the water every few minutes to see if the worm’s still there).
About this image
With clear skies in the forecast, Don Smith and I started last Sunday with plans to recover from the preceding day’s 12 hour drive to the Grand Canyon, and to recharge for our Grand Canyon Monsoon workshop that started Monday. But walking outside after lunch, dark clouds building overhead sent us racing up to the rim (a 15 minute drive) to see what was going on (see Keystone Cops frenzy reference above).
Starting at Grand View, we quickly set up our tripods, cameras, and Lightning Triggers and aimed toward promising clouds up the canyon. But within 10 minutes the clouds overhead darkened; when they started pelting us with hail, we retreated to the car. Since the storm appeared to be moving east-to-west, we drove east to get on the back side of it, eventually ending up at Lipan Point (one of our favorite spots).
We set up west of the Lipan vista, enjoying relative peace and quiet away from the summer swarm. The cell that had chased us from Grand View was diminishing, so much so that we needed sunscreen when we started, but we could see an even more impressive cell was moving up from the south. Meanwhile, the clouds in the canyon were spectacular, but all the lightning was firing above the flat, scrub pine plain to the south. Our hope was that it would reach the canyon in our viewfinders before reaching us.
Of course I wanted lightning firing into the canyon, but at first I hedged my bets and composed wide enough to include the less aesthetically pleasing evergreen forest. As the rain moved across the canyon to our west, our blue sky had started to give way to darkening clouds, and distant thunder rolled through the afternoon stillness.
This was my first lighting shoot (and just my second overall) with my brand new Sony a7R II, so I was quite anxious to test its lightning capture capability. Speed is of the essence with lightning, and the faster the shutter responds to a click command, the better the chances of capturing it. My Canon 5D III had done the job in the past, but I knew I missed a number of strikes due to its only mediocre shutter lag.
The a7R II, like the a7S and a6000 (but not the a7R), has an electronic front curtain shutter that drastically shrinks shutter lag, so in theory its performance would rival the a7S and a6000, both of which I’d already succeeded with. That morning I’d tested the a7R II against the a7S and found its response identical, but you never know for sure until you try. (The other part of this equation is a good lightning sensor, and the only one I’ve seen work to my satisfaction is the Lightning Trigger from Stepping Stone Products.)
That afternoon we enjoyed about a half hour of quality shooting before the storm moved too close for comfort. In that span I saw at least a half dozen canyon strikes; the new camera captured most (all?) of them. The one you see here was from early in the show—subsequent strikes were further north (right) before petering out.
Read more about lightning photography, and see a gallery of lightning captures, on my Lightning Photography photo tips page.
Our first date: First impressions of my Sony a7R II
Posted on August 10, 2015

Flaming Oaks, Sierra Foothills, California
Sony a7R II
Tamron 150-600 (Canon-mount with Metabones IV adapter)
1 second
F/8
ISO 100
Love at first sight
My Sony a7R II arrived Wednesday, but my schedule limited my use to staying home and familiarizing myself with menus and overall handling. If you’re familiar with Sony’s e-mount mirrorless bodies, you’ll be able to hit the ground running with the a7R II. The menu system is the same, though of course there are few new features.
The buttons and controls have moved a bit from their placement on the original a7 bodies (a7, a7R, a7S), but it’s essentially the same body as the a7 II (released late last year). Blindfolded, it would be difficult to distinguish the a7R II from the a7 II, and in fact, my Really Right Stuff L-plate (which I ordered several weeks ago), is the a7 II L-plate. I didn’t order the battery grip, but I know the a7 II battery grip fits the a7R II as well.
On the other hand, the a7R II has more heft than the a7R—the body, while still far more compact than my Canon bodies, is definitely larger and heavier than the original a7R body. The grip noticeably larger too. The result is a camera that feels more solid without sacrificing its mirrorless compactness—a definite upgrade.
I find mirrorless so perfectly suited to manual focus (for stationary landscape subjects), and the a7R autofocus so sluggish, that I just stopped using autofocus. I think that will change with the a7R II, as just a few test frames made it clear that the autofocus is vastly improved, both in speed and accuracy—not just for my Sony glass, but for my Canon lenses paired with a Metabones IV adapter (just make sure you’re using the latest Metabones firmware). Manual will remain my primary focus paradigm, but it’s nice to know that autofocus is now a viable option.
Shutter lag
One prime consideration for me is shutter-lag (the time it takes the shutter to engage once the button it pressed). Measure in milliseconds, it’s not a big factor for virtually all uses, but when photographing lightning, every millisecond matters. My Canon 5D Mark III’s shutter lag was decent but not great; the a7R is too slow to even consider for lightning; the a6000 is quite fast; and the a7S is (dare I say) lightning fast. So on the eve of my annual Grand Canyon monsoon trip (for the workshop Don Smith and I do each year), I was quite anxious to know how the a7R II would perform in the shutter lag department.
I don’t have the means to measure the actual shutter lag of a camera, but since I have the shutter lag numbers for the a7S, and have had great success photographing lightning with it already, I just wanted to know know how the a7R II compares the a7S. And I was able to devise a way to test their relative speed. Without going into too much detail, my test involved both cameras set up on a tripod with a Lightning Trigger (the only lightning sensor I’d even consider using—I own two) attached.
With both cameras focused on a timer that recorded milliseconds, I simultaneously triggered each using its Lightning Trigger, then compared the times captured in the images of each camera. They were identical. Just to be sure I ran a second test and again they were identical.
As I write this I’m one day into my Grand Canyon trip and can tell you that I now have empirical data confirming that the a7R II is a great lightning camera, maybe even the best lightning camera. But that’s a story for another day….
Kiss and tell
Thursday night I took my new camera out to one of my favorite sunset spots in the foothills. Sporting her brand new L-plate and 128 GB media card, she was clearly primed for action. This being our first date, I didn’t want to push her too hard, but I could tell she was definitely ready for whatever I asked.
As luck would have it, this turned out to be more than a dry run shoot to test a new camera. The sunset that night was off the charts, so much so that I ended up breaking out a second camera (she didn’t seem to mind that either). I haven’t had a lot of time to play with the images from that night, but am sharing this one here from the very end of the shoot. Despite its appearance, and the rash of fires burning throughout California, no trees were injured in the making of this image. This is just silhouette of a trio of oaks against the sunset, underexposed to enhance the trees’ shape and hold the color in the sky.
My first impressions of the a7R II? I think it’s a relationship that’s going to last (at least until the next version comes out). In addition to the improved focus and increased resolution, in the very brief time we’ve been together, it’s clear that the dynamic range is even better than the phenomenal dynamic range I get from my a7R.
All this, and a great body.
My Sony Gallery (a history of my ten months as a Sony shooter)
Click an image for a closer look, and a slide show. Refresh the screen to reorder the display.


The camera’s vision: Light
Posted on August 2, 2015
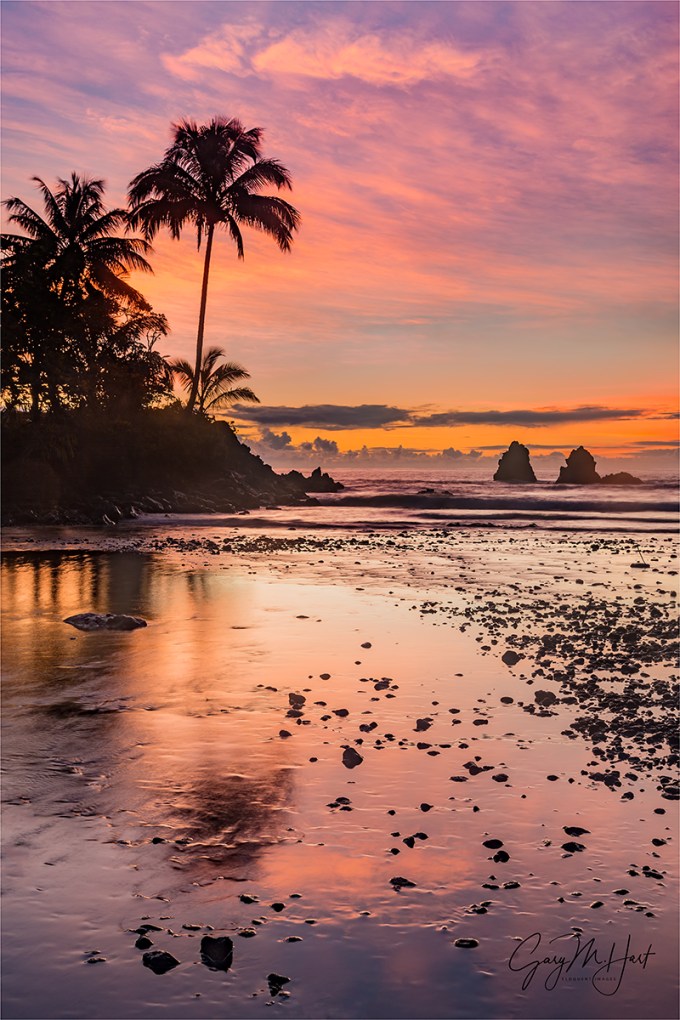
Tropical Sunrise, Hawaii Big Island
Canon EOS-5D Mark III
32 mm
1 second
F/11
ISO 200
Something I teach, write, and lecture on frequently (ad naseum?) is the photographer’s obligation to understand, not fight, the camera’s vision. Some people get this; others, not so much.
So here I go again…
Visual “Truth” is relative
Without getting too philosophical, it’s important to understand that, like your camera, your view of the universe is both limited and interpreted. In other words, there is no absolute visual truth. Instead, we (you, me, our cameras) each have a unique vision of the world that’s based on the way we receive it. Our definition of “real” is biased toward the three-dimensional, 360 degree, continuous-motion way our eye/brain system processes our universe, but it’s wrong to contend that the camera’s perspective is any less real than yours or mine.
The visible spectrum
Before lamenting your camera’s limitations, pause to consider that, in the grand scheme of perpetual electromagnetic energy surrounding us, what you and I see is incredibly limited as well. The visible (to the human eye) portion of the electromagnetic spectrum is an insignificant fraction of the infinite continuum of electromagnetic wavelengths permeating the Universe. For example, X-ray machines peer into the world of electromagnetic waves in the one nanometer (one billionth of a meter); TVs and radios “see” waves that are measured in centimeters; humans, on the other hand, see only waves in the very narrow band between (about) 400 and 750 nanometers.
With tools that target specific wavelengths, doctors reveal subcutaneous secrets, astronomers explore our galaxy and beyond, law enforcement and the military use “invisible” (to us) infrared radiation (heat) to see people and objects in complete darkness. In other words, in the grand scheme of things, there’s no single absolute visual standard—it’s all relative to your frame of reference.
The camera has its own frame of reference. While it’s sensitive to more or less the same visible spectrum our eyes see, the camera is oblivious to an entire dimension (depth). Not only that (since we’re not talking about movies here), a camera only returns a snap of a single instant. But a camera has advantages—its narrow perspective (compared to the human experience) allows photographers to hide distractions outside the frame, and that “instant” reflected in a photo can actually be an accumulation of infinite number of instants.
Despite these differences, photographers often go to great lengths attempting to force their cameras to record the world the way their eyes see it—not necessarily bad, but extremely limiting. Not only is duplicating human vision with a camera impossible, doing so sacrifices the camera’s ability to reveal things the eye/brain misses.
Interpreted vision
Every photograph must be processed (interpreted) in some way before it can be viewed. The processing can happen in a lab (remember those days?), the camera, and/or in a computer. But human visual input is also interpreted before we perceive it. Visual processing happens in the brain, which adjusts for things like color temperature, perspective, motion, and so on.
Of course human vision is a lot more complex than that, and while the eye/brain relationship might not be a perfect analog for the camera/computer paradigm, suffice to say, whether you’re looking at Yosemite in a digital print, on a computer screen, or through your own two eyes, the scene has been interpreted. And with interpretation comes bias.
Leveraging limitations
In many ways, the eye’s ability to capture light exceeds that of even the best cameras, effortlessly pulling detail out of deep shadows and bright highlights. But savvy photographers know how to use their cameras’ limited dynamic range to hide distractions, emphasize the scene’s most important elements, and reveal washed out color.
In the image above, captured on the Big Island of Hawaii last September, I used my camera’s (relatively) narrow dynamic range to simplify a sunrise to its essential color and shape. I could have blended multiple exposures to bring the detail in this scene closer to what my eyes saw, but it wasn’t the scene’s detail that moved me. Instead, underexposing the shadows minimized detail in the trees and rocks and allowed me to reveal color that had been washed out by the rising sun. I was able to simplify an originally complex scene to the elements that I found most compelling: the very tropical outline of swaying palms, the

Brilliant Poppy, American River Parkway, Sacramento
tenacious strength of rugged sea stacks, and the vivid color of a Hawaii sunrise, all mirrored in an abstract foreground reflection.
Instead, using my camera’s “limited” dynamic range, I blackened the superfluous detail that would have distracted from the qualities of the scene that I most wanted to convey.
In the poppy image on the right, the scene’s dynamic range was again impossible to capture with a camera—everything you see as white was blue sky or brilliant sunlight to my eyes. I chose to properly expose the poppy and let the sky blow out. The result was this beautifully backlit poppy isolated against a white background that was nothing like my view of the scene—but it was exactly what my camera saw.
Open your mind
So the next time you feel like labeling “real” or “not real,” or insisting that your camera do things it’s not very good at (just to satisfy your own perception of reality), remember that real is relative and far broader than your narrow perspective.
A few words about this image
I get to Onomea Bay each time I’m on the Big Island, and each time this scene is a little different. In recent years the stream feeding the bay has been low, and the tide has been out, so I haven’t been able to capture reflections like this. But on this visit in 2014 I got the reflection I wanted and a colorful sky to boot. Because this scene is more about the shapes of the palm tree and nearby rocks, I was able to save the sunrise color by turning them into silhouettes.
Workshop Schedule || Purchase Prints
Stuff my camera saw that I didn’t
(Or saw far differently)
Click an image for a closer look, and a slide show. Refresh the screen to reorder the display.


