Sometimes It’s Better To Be Lucky Than Good
Posted on September 30, 2023
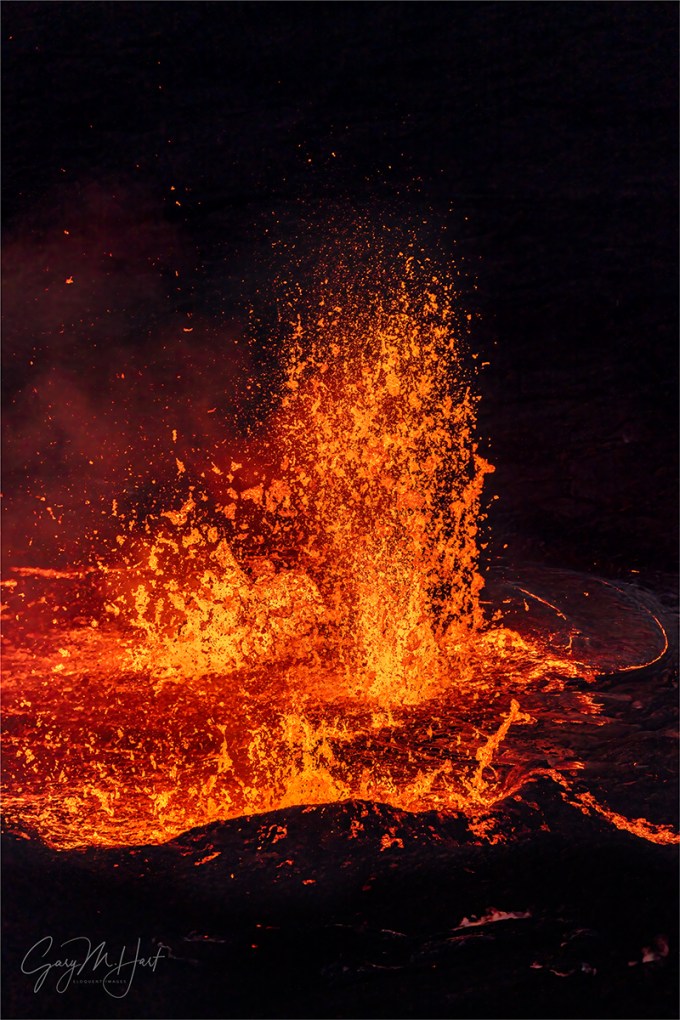
 Making Mountains, Kilauea, Hawaii
Sony a7R V
Sony 100-400 GM
ISO 1600
f/5.6
1/500 second
As a rule, landscape photographers resent being told “you’re so lucky to have seen that.” We work very hard to get to our scenes in just the right conditions, and to create the compositions with the exposure settings that portray them at their best. But I have to admit that luck is a factor as well—sometimes more than others.
For example…

Sunrise Mirror, Mono Lake
One time my brother Jay and I spent an afternoon exploring the north shore of Mono Lake, searching for alternatives to the mayhem of heavily-photographed South Tufa. Navigating a maze of barely passable unpaved roads, we found a remote spot that required a half mile walk through sand and shoe-sucking mud to reach, but it looked like it would be worth returning to for sunrise.
Rising a couple of hours before the next morning’s sun, we made our way in that general direction, but in the darkness couldn’t find the exact spot (or even the exact road). Nevertheless we did find a place to park, so we blazed a new trail to the lake, where we waited for sunrise.
Though luck isn’t what got us out of bed that morning, it had everything to do with all that followed. For starters, we were quite fortunate to randomly wind up at the spot we did. But the real luck was the clouds the sky delivered this morning, and the perfectly calm lake surface that mirrored them perfectly.

Rainbow Bridge, Colorado River, Grand Canyon
For good reason, rainbows usually feel like gifts from heaven. Knowing the science behind rainbows can certainly make finding them easier, but that knowledge can’t actually create the conditions necessary to form a rainbow.
Each year I schedule my Grand Canyon Raft Trip for Photographers to maximize the opportunity for dark sky (moonless) Milky Way opportunities, clear (pre-monsoon) water in the Colorado River, and blue in the Little Colorado River. Rainbows are never a consideration when I make these plans.
I’ll take a little bit of credit for seeing the conditions and anticipating the possibility of a rainbow on this rainy May afternoon in 2016, but of course had absolutely nothing to do with the actual manifestation of those conditions. Yet there it was, a vivid double rainbow spanning the Grand Canyon walls, exactly as I’d fantasized for many years. Do you believe in miracles?

Aurora Reflection, Glacier Lagoon, Iceland
If you know anything about the northern (and southern) lights, you know that they’re caused when Earth’s magnetosphere is overwhelmed by electromagnetic radiation from the Sun. You might also know that this solar activity follows an 11 year cycle from one “solar maximum” to the next. And it stands to reason that midway between these electromagnetic peaks is the solar minimum, when the Sun is relatively quiet and auroral activity reaches its nadir.
It just so happened that in 2019 Don Smith and I chose the most recent solar minimum to make our first visit to Iceland, scouting for our Iceland photo workshop scheduled to debut the following year. We chose winter to increase our aurora odds, but given the Sun’s quiescent status really had no right to expect a northern lights show. Of course that didn’t prevent us from spending each night shivering in the cold dark, peering into a frustratingly black sky.
So imagine our surprise when, just as our trip was wrapping up, a confluence of magic conditions graced us. First, on the trip’s final night we just happened to be at Glacier Lagoon, where floating icebergs bob atop a mirror-like lake just downstream from Jökulsárlón Glacier—a made-to-order aurora landscape. Coinciding with this visit was a reprieve from the clouds that so frequently obscure Iceland’s night sky. And even more fortunate, of all possible nights the Sun chose this one to deliver the most breathtaking solar display of that winter.
A Kilauea Eruption


My latest lucky break, so lucky that I actually shake my head and chuckle whenever I think about it, came in my Hawaii Big Island workshop earlier this month. Kilauea hadn’t erupted since June, and since its historic eruption in 2018 had actually spent much more time asleep than awake. The volcano was still sound asleep the Friday Jay and I departed for Hawaii, just three days before the workshop, and remained that way as we went about my annual pre-workshop scouting routine on Saturday and Sunday. (You can read about what happened next in my I Was There blog post.)
On Sunday afternoon we headed down the Puna Coast, a beautiful volcanic coastline that also happens to be off the cellular grid. But in the several hours we were down there, Kilauea came back to life and we instantly jettisoned all plans for the evening and beelined to the caldera. I felt especially lucky to photograph the eruption at its peak, on the night it started, from the closest possible vantage point—that was shut down permanently about 30 minutes after we started.
When I took my group back up to Kilauea a couple of days later, I had no idea where we’d go or even if there would be another spot with a direct view of the eruption. Guiding them into Volcanoes National Park, I just followed the crowds until I encountered a detour that terminated in a parking lot near the rim. There we learned that a one-mile walk would indeed enable us to view the eruption.
So we set out on foot, still not really sure what to expect, finally encountering our first view of churning magma about 1/2 mile down the trail. Everyone was so thrilled by the sight that I had to herd them forward with promises (hopes) of even better views ahead. To my relief, the view soon opened up to provide a full view of the entire caldera floor, complete with fountaining cinder cones and flowing lava—everything a volcano watcher can hope for. More than one person told me that evening had checked a long coveted bucket-list item for them.
We returned a couple of nights later for one more shot at the eruption, and to apply lessons learned from our first visit. On this second visit a dense mist had settled in the caldera, making focus sometimes difficult, but also painting a towering rainbow as the sun set behind Mauna Loa. By the end of the workshop, every single one of us had once in a lifetime memories and the images to savor them by.
When the eruption started, I marveled at my good luck that it happened the day before my workshop started. Little did I know that the eruption would end the day after the workshop wrapped up, and my workshop group couldn’t have thread the eruption needle more perfectly if I’d have planned it that way. Like I said, sometimes it’s better to be lucky than good.
Workshop Schedule || Purchase Prints || Instagram
Fortunate Photography
Click any image to scroll through the gallery LARGE


, Yosemite")


Storm Chasing Grand Canyon Style
Posted on September 19, 2023

Electric Sunset, Desert View Lightning, Grand Canyon
Sony a7R V
Sony 24-105 f/4 G
ISO 200
f/8
10 seconds
Before returning to the Hawaii trip, I want to wrap up my Grand Canyon trip with another image from the wonderful lightning show on the last night of the second workshop. I wrote about this evening, and the frustrations that preceded it, in my August 29 “Feast or Famine” post. I’ve actually processed three of my favorite lightning strikes from that evening, and it occurs to me that viewing them in sequence adds a little context to the experience—not just for this storm, but for most of the best storms I’ve photographed over my many years storm chasing here.
My approach to photographing Grand Canyon lightning is to take advantage of the broad, distant views along the canyon’s rim to keep a safe(-ish) distance from the storms we photograph. These wide views are a prime reason I use (and strongly recommend to all of the photographers in my workshops) a Lightning Trigger LT IV from Stepping Stone Products in Colorado (I get no kickback or other perks from Stepping Stone—they’ve even discontinued the 10% discount my workshop participants used to get). Not only does the Lightning Trigger miss fewer lightning bolts than any lightning sensor I’ve seen, my groups and I have captured lightning up to 60 miles away—a huge advantage for the kind of lightning photography I do at Grand Canyon.
Since at least 80% of the storms my groups photograph are too distant for the thunder to reach us, the lens I recommend (and use more than 90% of the time) is a 24-105 (for anyone who doesn’t have a 24-105, a 24-70 is a good second choice). Since we can only guess where the next lightning bolt will strike, this focal range is wide enough for the loose compositions that ensure lightning somewhere in the frame, and long enough to pull in even the most distant lightning the LT captures. And we make our composition decisions with the full understanding that we’ll almost certainly be cropping any resulting lightning image—one of the few times I’m grateful for every single one of the 61 megapixels on my Sony a7R V’s sensor.
Having a distant vantage point has the added benefit of providing a ringside seat for the storms’ evolution and motion. I’ve watched storms develop in place, going from puffy white clouds to towering thunderheads in a matter of minutes. Often the storms will drift up from the south—some traveling great distances and lasting an hour or more, others building and dissipating quickly, only to be replaced by another new storm just a little farther north, until the activity reaches the canyon.
The North Rim is the best place to view these northward-trending storms. Since our North Rim lodging is right on the rim, we’ll often just hang out on one of the (lightning rod shielded) view decks at the lodge and wait for the lightning to come to us. Usually the storms don’t make it all the way across the canyon, but we have been chased inside a few times.
The South Rim is a little trickier for lightning photography for several reasons: more people; our hotel is 15 minutes from the rim; and many storms sneak up behind us. But when we do get in position to photograph a storm on the South Rim, it’s a real treat because this is where we find Grand Canyon’s most expansive views.
The Grand Canyon south-to-north storm path I describe is simply a tendency—far from a rule. We’ve also photographed many storms that have moved down from north of the canyon, as well as many that have moved toward us from up- or down-canyon. The storms can move east-to-west, west-to-east, or curve from a north/south to an east/west path (or vice versa). And then there are the storms that just stay put, dumping rain and stabbing the rim with lightning in one spot for more than an hour.
Because of the storms’ unpredictability, it’s very important to keep a constant eye on them, monitoring the general direction of movement. For safety reasons of course, but also to make the most informed composition decisions. Unlike pretty much every other kind of photography, in lightning photography you really don’t know where the scene’s most important feature will be. The difficulty is balancing the best composition for the scene, with where the lightning is most likely to strike.
I got my latest reminder of this for the Desert View lightning shoot on the the workshop’s final night. After starting the day with lots of optimism, we’d pretty much given up hope for a lightning experience. Sunset that evening was Desert View, one of my favorite Grand Canyon locations. The sunset was a treat, but as the sun dropped, I noticed the rain increasing about 15 miles down-canyon (west), to the point where I thought in might be worth breaking out the Lightning Triggers and crossing our fingers.
Fortunately, this was in the direction of one of Desert View’s best compositions, so we weren’t really losing much pointing this way. Meanwhile, I noticed some clouds with potential moving up from the south, just east of the canyon. Though the clouds to the west looked a little more promising for lightning, I liked a northeast-facing composition (wide enough to capture any lightning out there) even better and soon pointed my camera in that direction—a luxury I had (to choose the best composition over the best chance for lightning) because I have more than enough lightning images already.
To make a long story just a little shorter, I got nothing with my northeast composition, but the people facing west weren’t having any luck either. The (still unproductive) cell to the west seemed to be in a great hurry to move north, across the canyon, and I encouraged everyone pointing in that direction to adjust their compositions accordingly (and to keep their fingers crossed)—while I stubbornly stuck with my composition in the opposite direction.
As soon as the western cell made it across the rim, it made a 90 degree turn and started scooting across the North Rim, directly in front of us. It took a couple of excited exclamations (that could only mean lightning across the canyon) to change my mind, and I turned my camera in that direction (now northwest).
I like the Desert View compositions due west (where the rain had been), and northeast (where I’d been pointing). But the lightning was firing directly across the canyon—my least favorite canyon view at Desert View. So I widened up enough to include some of the really nice view to the west—if I’d guessed right, I’d get that view on the left of my scene, with lightning on the right.
I ended up with three really nice lightning images this evening, each well after sunset. The first one (shared above) came the earliest, when I still had most of the down-canyon view I like so much. The second came nine minutes later, after it had become clear that the lightning was moving east and I needed to adjust accordingly. The final strike was six minutes later, after the darkness had really started to take hold, but the activity had moved far enough east that I could completely change my composition to include the up-canyon northeast view I like so much.


I think from this series of images you can really get a sense for the storm’s movement, and my attempts to balance the best composition with the potential for the best lightning. I’m not always as successful as I was this evening, but I guess that’s part of the thrill of lightning photography.
Join me at the Grand Canyon
Lightning Sequences
Here’s a collection of groups of 2 or 3 images captured together (same shoot); I’ve placed each sequence together, in the order they were captured (it’s probably easier to see the sequences if you click through the gallery)
Click any image to scroll through the gallery LARGE


I Was There
Posted on September 13, 2023
Fountain of Fire, Kilauea, Hawaii
Sony a7R V
Sony 100-400 GM
ISO 800
f/5.6
1/1250 second
I have several childhood memories of the natural world that are forever etched in my brain. The oldest is probably the time in Yosemite when I helped my dad with an ill-advised lightning shoot atop Sentinel Dome, then later that evening, just down the road at Glacier Point, enjoyed rainbow across the face of Half Dome. Another was waking in the predawn darkness to view my first comet, 0 magnitude (very bright) Comet Bennett. Then there was the first time I laid eyes on the impossible blue of Moraine Lake in Banff National Park, Alberta.
All of these experiences laid the groundwork for my life as a photographer, fostering an unconscious desire to save and share them before the memory faded. Of course no picture can accurately convey the experience of “being there,” but I somehow found comfort in the knowledge that, because I’d preserved a small piece of the event, a part of me could revisit it any time I wanted to.
With my camera to prod me, the frequency of these indelible “I was there” moments with Nature has increased: a rainbow over Yosemite Valley; lightning strikes, accented by a small rainbow, on the rim of Grand Canyon; the Milky Way above erupting Kilauea (many times); a total solar eclipse; a rim-to-rim rainbow from the bottom of Grand Canyon; the northern lights dancing in the Iceland dark.
On Sunday of this week I was gifted another. With my annual Hawaii Big Island workshop starting Monday, my brother Jay and I arrived Friday so I could check on all my workshop locations. For the first seven years I did this workshop, I never had to worry about Kilauea because it had been erupting continuously since 1983. Then Pele sent a “don’t ever take me for granted” message in 2018 with a dazzling pyrotechnic display, before promptly rolling over and going to sleep.
Since then Kilauea has stirred periodically, but scheduling workshops more than a year in advance means relying on luck to catch Pele awake. I missed in 2018, 2019, lost 2020 to COVID (no eruption anyway), and just missed it in 2021. I completely lucked out in 2022 with one of the best displays I’d ever seen. But this year things appeared to be back to business as (recent) usual. The volcano had been quiet since June, and though Pele had been showing signs of stirring for a couple of months, by the day before my workshop I’d resigned myself to another year without a Kilauea eruption. Not the end of the world—there is more than enough to photograph here without an active volcano—but a disappointment for all of us who had been crossing our fingers.
Jay and I spent Sunday afternoon out of cell phone range, scouting along the Puna Coast. So imagine my surprise when we emerged from cellular darkness to see two notifications from the USGS in my inbox. When I saw Kilauea in the subject line, my heart jumped. But when I opened the first e-mail and saw that it started with, “Kilauea is not erupting,” I quickly skipped to the second one, which had a timestamp just 26 minutes later.
The first sentence jumped out at me: “Kilauea is erupting.” I didn’t bother to read further before punching the gas and detouring straight toward the volcano. The eruption had started at 3:15 p.m., and at exactly 5:00 p.m. we were rolling up to the Visitor Center. There we learned that we could view the eruption right across the street, from Volcano House.
We raced over there and could clearly see the smoke and orange glow above the caldera rim, but only occasional bursts of lava that jumped high enough to crest the steep crater wall. Rather than photograph there, I decided to see if there might be a better view. At the steam vents we found more of the same. But while there we ran into a couple who told us the best view was at Keanakakoi, on the other side of caldera. So off we went.
At Keanakakoi we snagged one of the last parking spots, grabbed our camera bags, and bolted down the trail (a paved road now closed to non-official vehicles). After a brisk one mile walk, we made it to the vista about 10 minutes before sunset.
I’ll never forget sight greeting us directly below: the caldera floor churned with at least a two-dozen lava fountains of varying size, surrounded a honeycomb of just-cooled black lava separated by thin, glowing cracks. Splitting this fiery orgy was a large lava river and several smaller ones. We instantly joined the throngs who had jumped the improvised rope placed no doubt to prevent us from plunging to our deaths (safety-schmafety).
What followed was a clicking frenzy. I started with my 24-105 lens, eventually switching to my 100-400. (I also snuck in a couple of quick iPhone photos—the lava field was close enough to fill the frame without cropping). Monitoring my RGB histogram, I quickly determined that an exposure that completely spared the red channel skewed the rest of the histogram far to the left, which of course made perfect sense and was no problem because pretty much the only thing that mattered in this scene was the orange lava.
So focused was I on scene below me that it was a couple of minutes before I registered that I was working in what might be the windiest conditions I’ve ever photographed in. I’ve probably experienced stronger gusts (I’m looking at you, Iceland), but this wind was steady, brutal, and relentless. So strong in fact that it nearly ripped the glasses of my face, and forced me to actually keep one hand on them most of the time.
Given the rapidly approaching darkness, with most subjects this wind could have been a significant problem. But because my primary (only?) subject was imbued with its own built-in light source, and was in constant, frenetic motion that required an extremely fast shutter speed anyway, I found it all quite manageable—I was actually more concerned about getting blown into the maelstrom than I was about camera shake.
Throughout the evening I varied my exposure settings, shooting wide open with shutter speeds varying between 1/500 and 1/1500 second, and ISOs ranging from 800 to 3200. Focal lengths ranged from fairly wide (wider than 50mm at the start) to 400. In fact, many of my 100-400 frames were closer to the 100 range so I could include groups of fountains. I tried to time each shot for peak explosiveness in whatever fountain or fountains I’d targeted, but honestly, since these peaks came every second or two, that wasn’t much of a challenge.
Every once in a while I got a strong whiff of sulfur, a reminder of the risks of being so close to a volcanic eruption. It seemed like we’d been out there at least an hour when I was aware of shouting behind me. I turned to see rangers running around shoeing us from the edge and at first thought all of us on the other side of the rope were in trouble, but it turns out we were being evacuated, and they meant business. A review of the timestamps on my images showed that what seemed like more than an hour was in fact only 33 minutes.
How close were we to the eruption? The image I share today, a simple isolation of one of the eruption’s many lava fountains, is 400mm uncropped. (I learned later that we’d been only 1/2 mile away.) Unfortunately, this very-close view has been closed since our evacuation that evening, with no guarantee it will open again until the eruption abates. With this closure in place I was concerned that I wouldn’t be able to get my group a good look at the eruption—a concern that was erased in spectacular fashion Tuesday night. But that’s a story for another day….
Join me in Hawaii
I Was There
Click any image to scroll through the gallery LARGE


, Yosemite")


Here Comes the Sunstar
Posted on September 4, 2023

Day’s End on the Rim, Desert View, Grand Canyon
Sony α1
Sony 16-35 f/2.8 GM
ISO 100
f/20
1/8 second
As striking as they might be, some people find sunstars (AKA, diffraction spikes, sunbursts, or starbursts) gimmicky and cliché. When I (and pretty much any other landscape photographer) arrive at a location, of course I hope for some combination of dramatic clouds, vivid color, and soft light. But when the sun dominates the scene, it turns out that including a sunstar is usually the best way to get the most out of the moment.
Adding a sunstar to a photograph does have its challenges: Including any part of the sun in your frame introduces lens flare, not to mention extreme (often unmanageable) contrast. And poorly executed, a sunstar creates an unappealing eye magnet that overpowers the rest of the scene. And while a sunstar doesn’t capture the literal experience of watching the sun’s arrival or departure, it’s almost always better than a washed-out blue sky.
For a long time I considered sunstars merely a lemonade-from-lemons solution—the best way to play a poor hand. But over time I’ve come to appreciate a sunstar’s ability to represent the brilliance of gazing directly into the sun—minus the corneal damage. Like blurring whitewater and waves or freezing airborne droplets to convey motion, a sunstar can serve as a proxy for a natural phenomenon that’s impossible to duplicate in a still photo.
The truth is, the sun is a powerful conveyer of emotion. We all have fond memories of watching the day’s first or last rays as the sun peeks above, or slips below, the horizon. And who doesn’t feel relief when moving from sunlight to shade on a blistering summer afternoon, or from shade to sunlight on a chilly winter day? A sunstar can freeze these natural transitions in a still image, subconsciously stirring their associated emotions.
So what’s going on?
A sunstar forms when brilliant, direct sunlight (or any other bright light) diffracts (spreads) as it passes through the overlapping blades of a lens iris (its aperture). These are the blades that open to admit more light (small f-number), and close to limit light (large f-number).
It’s true that the more circular the aperture opening, the more pleasing a lens’s bokeh. But it’s impossible to get past the fact that you can’t make a perfect circle by connecting a series of straight lines (which is what each aperture blade is). Adding blades helps keep the aperture iris more circular, but as the lens stops down (smaller aperture) to allow less light to pass, the angle between adjacent blades steepens and the more the emulated circular shape (remember, it’s never a true circle) becomes a more obvious polygon—connected straight edges, one for each blade, with each blade intersecting its adjacent blades at identical angles totaling 360 degrees.
As sunlight crosses the straight line made by each iris blade, diffraction spreads spikes of light in both directions perpendicular to the blade. If the lens has an odd number of iris blades, each spike will appear in your sunstar—2 spikes for each iris blade. Lenses with an even number of blades consist of pairs of exactly parallel blades opposite each other around the opening; the diffraction spikes of each matching pair overlap, so you’ll see just one spike for each blade. In other words, the amount of spikes in your sunstar is a function of the number of iris blades in your lens: with an even number of blades you’ll see one spike per blade; with an odd number of blades, it will be 2x the number of blades.
Light diffracts (spreads) as it passes through a small opening—the smaller the opening, the greater the diffraction. Since diffraction reduces resolution, we usually we try to choose apertures that minimize diffraction. But when a sunstar is the goal, a small aperture makes the sunstar more distinct.
Sunstar how-to
If you’re still with me, you’ll be happy to know that creating a sunstar is much more straightforward than understanding its optics. Here’s a quick recipe:
- Start with a brilliant point of light: You can create a sunstar with any bright light source—the moon, stars, or even an artificial light such as a lighthouse, or car headlights—but I’m going to talk about the brightest, most ubiquitous, and easiest light source: the sun. Rather than using the entire sun, it’s usually best (but not always—you decide the look you prefer) to block most of the light with the horizon, a cloud, or some terrestrial feature, such as a rock or tree. And clouds and atmospheric haze can reduce the brilliance enough to significantly limit your sunstar. Sometimes I’m not even aware of clouds or haze until I see the sunstar spikes are faint, spread out, or non-existent.
- Different lenses will yield different results: Experiment with your lenses to see which one gives the most pleasing sunstar effect. As a general rule, wide lenses are better, and the better the quality of the lens, the better its sunstar effect. Prime lenses tend to do a better job, but today’s best zooms create beautiful sunstars too, especially at their widest focal lengths. Remember, the number a sunstar spikes is determined by the number of diaphragm blades.
- Remove filters: The more glass between the sun and your sensor, the more reflections and lens flare you’ll get, so remove your polarizer (which has no benefit anyway when you’re pointing at the sun) and UV filter. If you must use a graduated neutral density filter to hold down the dynamic range, go ahead.
- The smaller your aperture, the better your sunstar: A wide-open aperture is a nearly perfect circle (not good for sunstars), but the angle between the diaphragm blades increases as the diaphragm closes down, improving the sunstar as the angles increase. For my sunstars, I generally stop down to f/16 or smaller (larger f-number)—usually f/18 or f/20.
- Size matters: The larger the visible portion of the sun, the bigger the sunstar, but also the more lens flare and blown highlights. Conversely, if most of the sun is blocked, you’ll get a smaller sunstar, but it will also be more precise and delicate. There’s not absolute ideal size, it’s more of a balancing act to find the right mix for your taste and situation.
- Composition: The extreme dynamic range of a sunstar image makes it essential to photograph the scene the way your camera sees it, not the way your eyes see it. I generally set up my composition before I meter, brightening the foreground enough to make it plainly visible in my mirrorless LCD (ideally I do this before the sunstar appears). If you’re new to sunstar photography, or don’t have a camera with lots of dynamic range, a silhouette or high key image are good options. Start with a foreground shape, or shapes, that standout against the sky—for silhouettes, meter on the sky and underexpose; for high key, meter on your foreground subject and overexpose slightly (to turn the sky white or nearly white—see poppy example in the gallery below).
- Manage the highlights: With the sun actually in your frame, you’re invariably dealing with a sky that’s much brighter than your foreground—overexposed highlights and underexposed shadows are virtually unavoidable. To maximize the usable data you capture, start with a raw—a jpeg file just doesn’t have enough dynamic range to handle the extreme highlights and shadows of a sunstar image. Nevertheless, it’s likely the image will look like crap on your LCD—even in a properly exposed sunstar image, the highlights will probably look too bright and the shadows will look too dark. On the other hand, if the sky looks great, the shadows are probably hopelessly dark (unrecoverable); if the highlights look great, the sky is probably hopelessly bright. When I’m exposing for a sunstar, I watch the histogram (a benefit of mirrorless photography is the pre-capture histogram in my viewfinder) and try to find a balance between the extreme highlights near the sun, and the dark shadows of the surrounding scene. In most of my photography don’t bracket for exposure, but sunstars are one significant exception. Since the dynamic range is so extreme that the histogram shows both shadows and highlights completely clipped (blown), I try to start with an exposure where their both more-or-less equally clipped, then bracket over at least a 6-stop range (3 stops up and down from my midway starting point) in 2/3-stop increments, changing exposures as rapidly as possible to give me a good number of different exposures to choose between.
- Processing: I promise that you’ll need to do some processing to get the most out of the highlights and shadows, but take a look at my gallery below—each image was captured with one click (no HDR or any other multi-image blending), and most (all?) were captured without a GND filter. My usual processing approach is to start with one of the frames near the middle of the exposure range that I used, pull the Highlights slider all the way to the left (-100) and pull the Shadows slider all the way to the right (+100). Then I pull the exposure slider to the right until satisfactory detail appears in the shadows. If this brightens my highlights too much, I discard these changes and move to a darker image. Following this approach, I can usually find at least one frame with usable shadow/highlight balance.
- Practice: You can practice sunstars any time the sun’s out. Just go outside with your camera, dial in a small aperture, and hide the sun behind whatever object is convenient (a tree, your house, etc.).
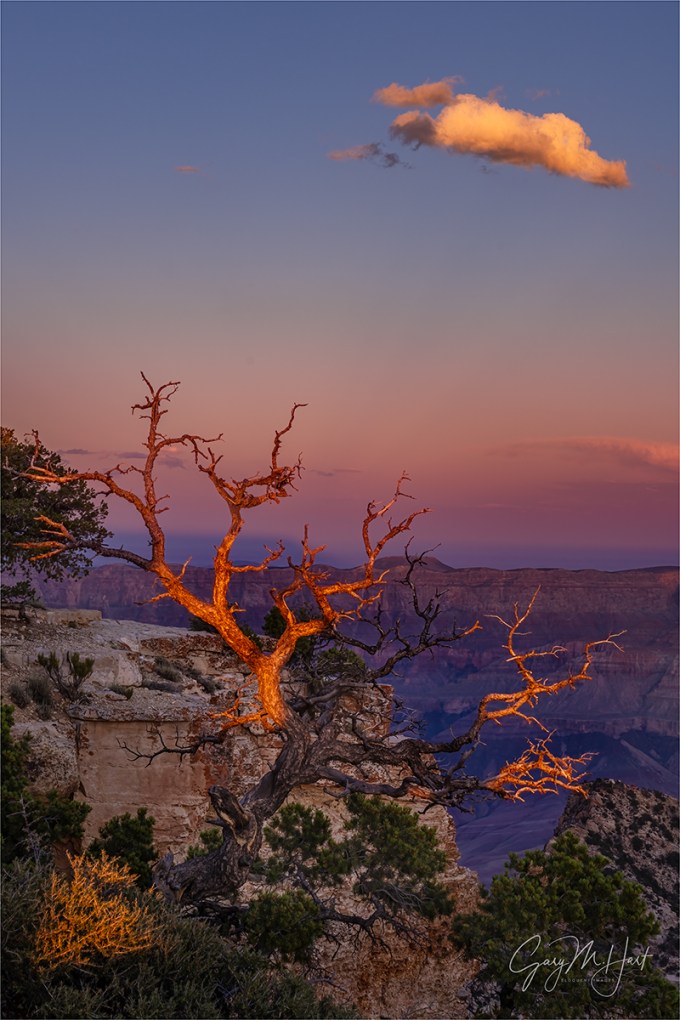
About this image


I captured today’s image on the first sunset shoot of last month’s first Grand Canyon Monsoon photo workshop. You can read all the details of that shoot in an earlier blog post: Where to Draw the Line. Because I was with my group that evening, and especially because this was our first evening, I stayed in one place so I could continue working with anyone who needed help. That kind of limited my composition options, but I was very happy to have this striking tree directly in front of me, so I just tried to find as many ways as possible to feature it.
The Grand Canyon’s expansive views make it especially easy to lock into horizontal compositions, a mistake I almost made. Fortunately, since we were using clouds rather than the horizon to block most of the sun, we had multiple sunstar opportunities as the sun and clouds shifted. And though I was set up for a sunstar, when the sun first appeared, it was the shafts of light that stood out most. For those I’m glad my camera was oriented horizontally. (And I still got a little sunstar.)
But when the shafts faded and the sunstar became more prominent, I’m pleased to have given myself some vertical options. I’m actually surprised how much I prefer the vertical version of this later scene (after the shafts) to the horizontal orientation I was stuck in. In the horizontal version (it’s in the gallery below), I don’t the think the tree stands out nearly as well. This vertical version really becomes all about the tree and the sunstar, connected by the canyon’s receding red ridges.
Join Me at the Grand Canyon
A Star is Born
Click any image to scroll through the gallery LARGE


Feast or Famine at the Grand Canyon
Posted on August 29, 2023

Sunset Lightning, Desert View, Grand Canyon
Sony a7R V
Sony 24-105 f/4 G
ISO 800
f/5.6
20 seconds
We had reached the final night of this year’s second and final Grand Canyon monsoon photo workshop. To say that I’d spent the weeks leading up to this year’s workshops monitoring the Grand Canyon weather forecast, praying for the monsoon storms that bring lightning, would be a gross understatement—but despite all this vigilance and no small amount of strategic scrambling during the workshop, we’d come down to the wire with little to show for our effort.
The sad fact is, this year’s monsoon rains came late—very, very late. So when the storms finally arrived about a week before the start of the first workshop, I was relieved. And when the National Weather Service actually started including a chance of thunderstorm in the forecasts for the first workshop’s earliest days, I became downright optimistic. Too optimistic, it turns out.
Such is the dilemma of storm chasing at Grand Canyon. The primary goal in these monsoon workshops, more important even than photographing lightning, has to be safety (believe it or not, some in my groups try to argue with me on this). Fortunately, Grand Canyon’s expansive views are tailor made for photographing lightning from a (relatively) safe distance—usually we’re targeting cells either far up- or down-canyon, or across the canyon. Our lightning is distant enough that more often than not we don’t even hear its thunder. But since we never want to be in the storm we’re photographing, it’s actually possible to have too much lightning.
One thing I’ve observed in the dozen or so years I’ve been chasing lightning at Grand Canyon is how to translate the weather forecast into our actual odds for photographing lightning. Believe it or not, my best lightning success happens when the forecast calls for a 20 to 50 percent chance of thunderstorms, with 40 percent the sweet spot; the odds start to shrink significantly once the forecast chance of thunderstorms exceeds 50 percent. In other words, while 0 percent sucks. so does 100 percent.
This year’s two Grand Canyon monsoon workshops delivered a double dose of lightning’s feast or famine fickleness. Both groups got a heaping helping of too much lightning on one end of the workshop, balanced by a starvation diet on the other.
The first workshop saw clouds with modest lightning potential on the first night, but had to settle instead for a spectacular sunset. No problem, the sunset was a great consolation prize and we were excited by the 50 percent thunderstorm chance forecast for day two. But when I woke the next morning to see that the chances had bumped to 70 percent, I was less than thrilled. I knew it could be great, but I also knew that it could turn out to be a very long, frustrating day.
After sunrise that second morning we returned to the hotel for a break followed by an image review. At about 11:30 my lightning app showed storms approaching the canyon, so we aborted the image review and bolted (pun unavoidable) for the rim. We parked near Mather Point and set up at a spot down the rim a short distance, setting our sights on a promising cell approaching from the west (down canyon). Unfortunately, we also heard thunder in the south and I knew there was another cell bearing down from behind that bore watching.
The rain hadn’t started and the conditions looked extremely promising for lightning over the canyon, so we stayed put until we became aware of the lightning sneaking up behind us—counting out 15-20 seconds between the lightning and its thunder, I knew it was about 4 miles away, maybe a little closer. When the wind picked up and the first large raindrops started splatting the pavement, I told the group it’s time to bolt (there’s that word again). But the parking lot was several hundred yards from our position, so most of that sprint happened in an intense downpour.
By the time we made it to the cars, the lightning was landing within 2 miles and everyone was thoroughly drenched. We were also quite invigorated because lightning will do that. For more than an hour we waited out the storm in the cars, taking in the action through fogged glass. When the rain finally slowed and it felt safe enough to return to the rim, the depleted storm had moved east—it was out of sight and we were out of luck.
We spent the rest of that afternoon chasing lightning up and down the South Rim. We saw lots of lightning in our travels, some frighteningly (thrillingly) close to the road, but never found a vantage point far enough from the action to safely set up for more than a few minutes at a time. By the time we migrated to the North Rim for the workshop’s final two days, we were in lightning famine mode. Long story short, despite all that early activity, only a few people in that first group finished the workshop with a lightning image, and most were completely shut out. Thanks to the rain-scoured air, the first group did enjoy a spectacular Milky Way shoot our final night on the North Rim. And between the opening sunset and the Milky Way shoot, plus several other nice opportunities, I know everyone got some fantastic images, but not the lightning they’d hoped for. But it wasn’t for lack of trying.
In more than 2/3 of my Grand Canyon workshops, everyone in the group gets at least one nice lightning image. But the forecast entering the second workshop promised nothing but clear skies from beginning to end—full-on lightning famine mode. It was starting to look more and more like my recent streak of many (5? 6?) years of at least one group (and usually both) getting good lightning was about to come to a crashing end.
At this point I started to wax philosophical, reminding myself (and all who would listen) how beholden we nature photographers are to the capricious whims of Mother Nature. This isn’t a complaint so much as it is an observation, because Nature’s mercurial behavior, that seems to relish thwarting even the best conceived plans, can also turn on a dime to deliver absolute euphoria when we least expect it.
Though the second group did enjoy a nice Milky Way shoot, augmented by a surprise cameo by a most unnatural visitor, our two days on the North Rim turned into a complete lightning starvation diet. For a couple of reasons I won’t take the time to detail here, the North Rim is typically better than the South Rim for lightning success. But following our North Rim failure, and with the workshop scheduled to end Thursday morning on the South Rim, my hopes were dimming fast.
Group 2 started Sunday afternoon and I tried my best to give them realistic lightning expectations. But after waking to my alarm at 4:15 Monday morning, before getting out of bed I checked the NWS forecast and saw that they’d bumped Wednesday from a 0 percent to a 20 percent chance of thunderstorms. Of course Nature and its henchmen (the NWS) love messing with me because I’ve seen these forecasts disappear as suddenly as they appeared, but still… I held my breath checking the forecast again later that morning, but saw that Wednesday’s thunderstorm percentage was now 40—I was suddenly (cautiously) ecstatic. By bedtime it was up to 60%—hmmm… Going from zero-to-sixty in 12 hours might not be so great for my Subaru Outback, but for a thunderstorm forecast that’s a pretty significant change. It didn’t take long to figure out what was going on: Nature had enjoyed torturing my first group so much, it going for a reprise of that experience for the second group.
And that’s pretty much what happened. We spent Wednesday, the workshop’s last full day, truncating the image review to chase lightning all around the South Rim, waiting in the cars for the rain to stop while lightning danced all around us without ever getting a good shot at it (sound familiar?). As sunset approached, when it appeared that most of the weather had wrapped up, we stopped chasing and settled in for a nice (fingers crossed) Desert View sunset.
In the parking lot before walking out the rim I told everyone to stick their Lightning Triggers in their camera bags just in case, reminding them (with as much conviction as I could muster) that you never know what’s going to happen and that I’ve been surprised by an unexpected thunderstorm before. “You never know,” I said, with so much sincerity that I almost believed it myself. Almost.
Sunset was indeed nice (understatement)—different than the first group’s opening sunset, but every bit as good. And then something strange happened—we noticed a few marginally promising clouds depositing rain across the canyon. Just in case, we all pulled out our triggers and set up. Unlike the rest of the group, I pointed up Marble Canyon where the clouds looked decent, though slightly less promising, because I liked that composition better (a luxury I can afford because I already have 12 years worth of lightning images). But with my attention directed toward my chosen scene, I soon started hearing the others exclaim about actual lightning across the canyon—the first photographable lightning of the workshop.
I (stubbornly) stayed the course for a couple of minutes, but the excitement I heard from the group was impossible to ignore—when I actually saw a truly spectacular strike across the canyon, I quickly recomposed. We stayed out on the rim until it became too dark to capture canyon detail without blowing out the lightning—maybe until about 20 minutes after sunset. By then I was completely surrounded by ecstatic photographers. This was more of a quality over quantity lightning experience, with maybe a dozen or so truly beautiful strikes (far from a record haul)—each quite brilliant, with many tendrils, and many with multiple strokes—about as good as the quality gets.
Just when I think I have this nature photography thing figured out…
One more thing
The workshop wrapped up after an absolutely epic sunrise the next morning. The lightning forecast for that day was good enough that many of us hung around long enough to photograph more lightning. For Curt (the photographer assisting me) and I, this lightning was skewed more toward quantity than quality— before hitting the road we’d feasted at least 30 more lightning strikes, some quite nice (though not as nice as the prior night). So sated were we by the lightning of last two days, we didn’t even mind that our delayed departure meant spending the night in Barstow (look it up).
Join me for next year’s Grand Canyon adventures
Workshop Schedule || Purchase Prints || Instagram
Twelve Years of Grand Canyon Lightning
Click any image to scroll through the gallery LARGE


Watch Your Back
Posted on August 21, 2023
Day’s End, Cape Royal, Grand Canyon
Sony a7R V
Sony 24-105 f/4 G
ISO 100
f/13
1/13 seconds
Landscape images can be divided into two categories: the right place at the right time images, and the “Hey, look at this!” images (that creatively reveal something easily overlooked). While I do everything I can to get myself and my workshop groups in the right place at the right time for something special, it’s the HLAT! images that I find most satisfying.
Right-place/right-time can be an anticipated event that we mark on a calendar and make an effort to be present for (or schedule a photo workshop for)—things like a Yosemite moonrise, Iceland’s northern lights in January, or the lightning of the summer monsoon at Grand Canyon. Or they can be one of those surprises that sometimes just seem to fall into our laps—for example, a SpaceX rocket launch photobombing a workshop Milky Way shoot. As thrilling as these moments can be, photographing them is mostly just a matter of combining a decent eye for composition with an understanding of your camera and mastery of photographic craft (like exposure and depth of field).
The HLAT! images start with those basic skills, but also require creative vision and an uncommon attention to detail. It’s a mindset that knows there’s something better here, and a determination to find it.
Rather than settling for the obvious, I strive for that mindset and approach. And while I think I have decent success with it, in pretty much every workshop image review I’m reminded by my students’ images that I still miss things. My students’ images are a great reminder to everyone present, myself included, of the creative possibilities at every location.
I do find it ironic that those spectacular right-place/right-time moments we covet so much can so easily blind us to all the subtle, but no less beautiful, opportunities nearby. And while a few fortunate photographers seem naturally predisposed to recognize Nature’s subtleties and convey them in unique ways, most of us need to actively cultivate that vision. For me that means having the discipline to regularly check my surroundings—look behind me, look closer, and just plain slow down—no matter what else is going on.
Most times I start by identifying the best light and finding a composition that uses it, regardless of the scene’s primary subject. Something else that helps is switching to a different lens—for example, using an ultra-wide when the more obvious composition calls for something longer, then getting right up in a close foreground subject. Or I’ll add telephoto lens when my first inclination is to shoot wide, then remove my camera from the tripod and slowly scan the scene to see what stops me.
I had a good opportunity to apply all this at Grand Canyon earlier this month. Anyone who has photographed sunset at Cape Royal on the North Rim of the Grand Canyon knows that “the shot” there is facing west and southwest. Not only is west the direction of the setting sun, it’s also where you’ll find the North Rim’s most impressive canyon view. And starting with that view, going wider and angling your camera just a little to the left (southwest) allows you to include all of massive Wotan’s Throne, arguably the Grand Canyon rim’s most iconic feature, jutting front-and-center.

Last Light, Wotan’s Throne, Cape Royal, Grand Canyon
Though Wotan’s Throne is a prominent feature at most of the South Rim vistas, Cape Royal on the North Rim is the closest vantage point, and the absolutely best place to catch it throbbing with the warm light of the sun’s last rays. Less heralded Cape Royal views to south and east include Vishnu Temple and more canyon, but they’re not nearly as expansive as the view west and southwest.
My workshop groups always do a sunset shoot here, and when conditions permit, we top it off with a Milky Way shoot. As you might imagine, no matter which way their cameras were pointed, no one leaves Cape Royal disappointed.
First time photographers here can be forgiven for giving all of their sunset attention to these west/southwest views. This evening it seemed everyone in my group had found some version of the obvious sunset- and Wotans-facing view. Some had visions of capturing a sunstar or red rubber ball sun, while others set up to include Wotan’s Throne’s last light (a wide shot will get both). But as you’ll hear from any quarterback who has fixed his gaze on the primary receiver while the (unguarded) tight end frantically waves his arms in the end zone, the first choice isn’t always the best choice.
In a workshop I generally don’t shoot unless I think I can get something new, but no matter how “ordinary” I think the sunset might be, I’ve learned never to walk out to Cape Royal without my camera bag. This time, as expected, my gear had spent the entire evening resting on a rock, undisturbed.
One of my roles during a shoot with a group is to be the eyes in the back of everyone’s head—not only does this benefit them, foregoing my camera keeps me from being so locked in on what’s in my viewfinder that I miss other good stuff. So while the group concentrated on the primary scene, I kept my head on a swivel, scanning for less obvious opportunities.
Long aware of the aesthetic appeal of the dead tree clinging to the cliff at Cape Royal, I’ve attempted to photograph it (with varying degrees of success) on previous visits. Usually it’s been as an accent to the primary subject (as in the Wotan’s Throne image above), and I’ve never really emphasized it. But this time, after seeing its gnarled branches bathed in golden sunset light and accented by a single lit cloud, I sounded the alarm.
Of course this was also the moment when the sun had just balanced in the horizon, so most of the Wotan’s light, sunstar, red ball crowd were otherwise engaged. But a couple in the group saw what I saw and pulled themselves away, and when I raced to my bag to pull out my own camera and tripod and set up facing the opposite direction of everyone else (Tip: when you see a pro photographer point his or her camera in the opposite direction, take a second to figure out what the attraction is), one or two more joined the fun.
With only a couple of minutes before the sun disappeared, I worked fast, starting with vertical compositions, but making sure to include horizontal options as well. The cloud was a fortuitous addition, just enough to carry the sky. And while I try to avoid cutting subjects with the horizon line, I didn’t have much choice and was grateful that the lit part of the tree was almost entirely below the horizon.
As the sun dropped, the light on the tree just kept getting warmer, but also the amount of the tree actually receiving light shrunk. At some point I realized that the tree was actually catching some of my shadow (duh), so every time I clicked my shutter (using a 2-second timer because I hate the Sony remote), I ducked to hide my shadow.
Turns out, this is one of those images that’s equal parts right place, right time, and “Hey, look at this.” I happened to be at the right place at the right time for this light and cloud, but I’d have completely missed it if I’d been too focused on the more obvious scene. In this case I was especially pleased because not only did I get an image that’s a little different than the conventional scene, I was actually able to encourage a few others in the group into photographing something they otherwise would have missed—and in the process remind them to always watch their back.
Epilogue
Less than 2 hours after this we were photographing Wotan’s Throne beneath the Milky Way, when Elon Musk’s SpaceX Falcon 9 rocket crashed the party. And at this point in the workshop it still looked like we’d be lucky to get lightning, but that changed quite suddenly two nights later. Stay tuned…
Join me at the Grand Canyon
Workshop Schedule || Purchase Prints || Instagram
The Less Obvious Shot
Click any image to scroll through the gallery LARGE


That Time Elon Musk Photobombed My Workshop…
Posted on August 15, 2023
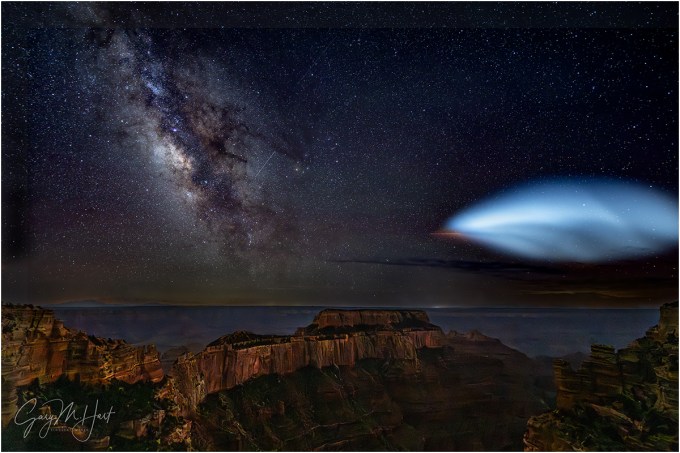
Milky Way and SpaceX Falcon 9, Wotan’s Throne, Grand Canyon
Sony a7R V
Sony 14mm f/1.8 GM
ISO 4000
f/1.8
25 seconds
Last week’s Grand Canyon Milky Way shoot almost didn’t happen, but by the time all was said and done, we ended up with far more than we’d bargained for.
My Grand Canyon monsoon workshops are ostensibly about photographing all of Grand Canyon’s unrivaled beauty, but ask anyone who signs up and they’ll tell you their number one goal is lightning. About 70 percent of my monsoon groups have what I consider lightning success: everyone in the group gets at least one nice lightning image. Of course that also means in 30 percent of my groups, not everyone gets lightning—I can prepare them, monitor the activity, and put us in the locations that maximizes our chances, if the lightning isn’t happening, there’s not much I can do. On the other hand, the clouds that bring lightning often wipe out the night sky, so the (generous) consolation prize for the clear-sky groups is the opportunity to photograph the Milky Way in the dark Grand Canyon sky.
After spending the first two days of this year’s second Grand Canyon workshop beneath wall-to-wall blue skies, all of us were excited about photographing the Milky Way on that second night. Though I was a little concerned about the wind during the Cape Royal sunset shoot, it wasn’t until walking over to my nearby Milky Way location in the darkening twilight (for a less obstructed view and better angle to our foreground subject, Wotan’s Throne), that I really started to fear our Milky Way shoot might not happen. I’d hoped that the more sheltered location would help, but the wind there was just as intense, blowing so hard that I wasn’t sure we’d be able to keep our cameras stable throughout the long exposures a Milky Way shoot requires.
Not only that, the views this spot offers are very exposed, with no railings above a precipitous vertical drop (there’s also room back from the edge for all who aren’t comfortable with heights, so no one is forced to stand on the edge). That meant, given the wind gusting to 40 MPH, in addition to camera stability concerns, I was more than a little concerned about someone straying too close to the edge and getting knocked off balance by a sudden gust. Yikes.
After pondering all this, I decided that we’d hang out a safe distance from the edge at least long enough for the darkening sky to reveal the Milky Way. Best case, the wind would die enough for us to photograph; worst case, we’d at least get to see the Milky Way, always a treat. (Okay, the real worst case would be someone stumbling over the cliff in the dark, but there was really no need for anyone to vacate their safe vantage point once we were established.)
As we waited, I realized that the gusty wind often slowed long enough that we might be able to time our captures between gusts and decided we may as well give the Milky Way a shot—when darkness was complete, we were open for business. With each person’s camera safely affixed to their tripod, Curt (the photographer assisting me) and I moved around to ensure that all had achieved reasonable focus, the right exposure settings, and a good composition. Thanks to our optional practice shoot at Grand Canyon Lodge (where the South Rim lights make for less than ideal Milky Way conditions) the prior night, the group got up to speed quickly.
With exposures in the 10 to 30 second range (double that if long exposure noise reduction is turned on), we had lots of time while waiting for each exposure to complete to simply appreciate skies darker than any of us get at home—for some, darker than they’d ever seen.
It truly is a joy to watch the stars pop out in a darkening sky. There’s Spica in Virgo, Arcturus in Bootes, Antares in Scorpius, plus a host of less prominent stars. Splitting the dark like sugar spilled in ink was our Milky Way galaxy’s luminous core. Two or three times a meteor flashed through the scene, perhaps a stray Perseid streaking from behind us, but most likely just a random piece of space dust.
But wait a minute… What’s that? As I mentally checked through all the familiar skymarks (I just made-up that word), something new caught my eye. Expanding in the southwest sky was a large diaphanous disk. We all saw it at about the same time, which told me that it had just appeared. My first thought, which I uttered out loud only half joking, was, “I hope it’s one of ours.”
Living in California my entire life means I’ve seen a few rocket launches—none that looked exactly like this, but similar enough that I was pretty confident that’s what we were seeing. I did a quick Google search and the first thing that popped up was a SpaceX Falcon 9 Starlink mission launching from Vandenberg Air Force Base on California’s Central Coast, nearly 500 miles away, at 8:57 that night. I checked my watch: 9:04 p.m.—mystery solved.
SpaceX was founded in 2002 by Elon Musk to further his dreams of space dominance. Propelled by reusable Falcon and (soon) Starship rockets, SpaceX crafts deliver both human and electronic payloads to space. Today the human payloads are primarily mega-rich tourists, but the eventual goal is to put humans on the Moon, Mars, and perhaps beyond.
A more practical current SpaceX implementation is the Starlink satellite system that blankets Earth and is capable of providing Internet service anywhere on the planet. I’ve used Starlink at a location where I’d previously had no Internet (the Grand Canyon North Rim, actually) and was absolutely blown away by the speed and reliability—not as fast as home, but certainly fast enough for reasonable use (I didn’t stream any movies, but I did stream shorter videos without problem). On the other hand, this year we tried Starlink on the North Rim and didn’t have a clear enough view through the trees to get a reliable signal—sometimes it worked, but mostly it didn’t.
Which is why SpaceX is still adding satellites. As of August 2023 4,500 Starlink satellites orbit roughly 200 – 350 miles above Earth’s surface. The launch we witnessed last Monday added another 15, with the ultimate goal being as many as 42,000!
I found a video of the launch and learned that 7 1/2 minutes after liftoff, a few seconds before I captured this image, the rocket propelling the satellites toward orbit was 175 miles above Earth’s surface, traveling over 10,000 MPH. But the the Falcon 9 rocket achieves this altitude and speed by using two stages—when the first one has exhausted its fuel, it steps aside and defers to stage two. After doing a little research I’m pretty sure what we witnessed was the beginning of the stage-1 rocket’s return to Earth—the second stage and its satellite payload were out of sight.
Five minutes earlier (2 1/2 minutes into the flight), it’s job done, stage 1 had shut down and separated from the moneymaking section of the rocket, turning control of the payload delivery to stage 2. At that point the rocket was about 50 miles above Earth, traveling about 4,700 MPH. As stage 2 took over, accelerating its payload of satellites even further heavenward, it rapidly outpaced the jettisoned first stage.
With nothing propelling stage 1 forward, Earth’s gravity became the only force acting on it, causing immediate deceleration. But with so much momentum and virtually no atmosphere to slow it further, the depleted stage 1 continued climbing for about 2 1/2 more minutes.
Without further intervention, stage 1 would have plummeted far out in the Pacific. But SpaceX wants to reuse it, so about 7 1/2 minutes into the flight, when it was about 42 miles above the ocean and traveling more than 4,800 MPH, stage one threw on the brakes with a 20-second entry burn timed to deliver it into the waiting “arms” (landing pad) of a SpaceX ship positioned in the east Pacific, west of Baja California. Bullseye (watch the video and be amazed).
I believe the glowing cloud my group and I witnessed was the exhaust from this entry burn, illuminated by the sun. The red streak is the rocket burn itself.
The opportunity to view this phenomenon is relatively rare. Because the exhaust cloud has no inherent luminance, it’s visible only when illuminated by sunlight. That means Earth-bound viewers must be beneath dark skies, and the exhaust plume must be high enough to still have a direct line of sight to the sun—in other words, night below, daylight above. Too far east and the plume would get no sunlight; too far west and it wouldn’t have been visible to anyone beneath a night sky. This convergence requires a twilight launch, cloudless skies, and a viewing position within a relatively small terrestrial zone just into the dark side of night’s advancing shadow.
I virtually never photograph anything manmade, but this was too cool to lose to silly personal rules. At this point, still completely ignorant of all I detailed above, I quickly adjusted my composition to include more of the glowing exhaust plume without losing the Milky Way and Wotan’s Throne. I just stuck with the exposure values I’d already been using. I got exactly one frame before the rocket and its cloud faded noticeably—I just hoped the image was sharp.
I come from the generation where space flight was celebrated, a time when the world stopped to watch every launch, splashdown, and space milestone. Teachers would wheel televisions into classrooms so we could all view together, and I still have vivid memories of watching Neil Armstrong’s first steps on the moon. But as amazing as this SpaceX launch was to view and photograph, and no matter how beneficial this technology is, I can’t help being more than a little concerned about what all this hardware in space is doing to our once pristine night sky.
When I was a kid gazing up at the night sky, spotting a satellite was a rare and thrilling event. But in this 25-second exposure I count at least 9 satellites of varying degrees of brightness—what’s our night sky experience going to be like when Starlink’s count reaches its 42,000 goal, and SpaceX’s inevitable competitors try to match them?
And if scientific exploration is important to you, consider that satellites have become the bane of optical astronomers’ existence. SpaceX has started applying a less reflective surface to its Starlink satellites, reducing their visibility by about 50% (better than nothing but still not great), but also increasing their surface temperatures, making them more problematic for infrared astronomy.
I don’t really have a solution for this conundrum, I just hope that moderation is applied to these technological advances, and that factors beyond the bottom line are considered as we dig deeper into space.
(And I still love this image.)
Join me at the Grand Canyon
To Infinity and Beyond
Click any image to scroll through the gallery LARGE


Where to Draw the Line
Posted on August 7, 2023

Beams of Gold, Desert View, Grand Canyon
Sony α1
Sony 16-35 f/2.8 GM
ISO 100
f/16
1/25 second
I’m in the midst of 11 days and two workshops chasing lightning at Grand Canyon. Despite daily 4:15 a.m. wake-ups, very late dinners, and lots of waiting for something to happen punctuated by bursts of extremely intense activity, I am in fact (to quote Cosmo Kramer) lovin’ every minute of it.
The first workshop group photographed an assortment of monsoon thrills that included lightning, dramatic clouds, and vivid sunrises and sunsets. We also enjoyed skies as clean (haze-free) as I’ve ever seen at the Grand Canyon, which made for a spectacular Milky Way shoot on the North Rim. The second group started yesterday afternoon, and while the lightning spigot has briefly turned, starting this afternoon it’s forecast to return for the rest of the workshop. (Fingers crossed.)
One mantra I find myself frequently repeating to all Grand Canyon workshop groups is, “Less sky, more canyon.” That’s because, even though a landscape photographer’s objective is to maximize beauty (right?), and it’s a rare sky that rivals with the beauty of Grand Canyon, I frequently see photographers here giving too much of their frame to a sky that simply can’t compete with the canyon below.
This doesn’t mean Grand Canyon images should never include lots of sky, but it does mean that the sky you give your Grand Canyon (and other scenic locations) image should be earned. A towering rainbow? Shimmering Milky Way? Horizon-to-horizon sunrise or sunset color? By all means, widen your lens and tilt the camera skyward. But don’t forget that even when the sky is spectacular, it’s the canyon below that makes your image special.
For example, below are a couple of images captured from Hopi Point at different sunsets. The first one was a blank sky day, so I used the absolute least amount of sky possible, and augmented it with a sunstar. The second one was an electric sunset that filled the sky with red. To include even more sky without sacrificing the best part of the canyon, I even went with a vertical composition.


I suspect people’s too much sky choice happens for a few reasons. Many photographers, so focused on their prime subject, tend to forget about the rest of their frame. Less experienced photographers often reflexively split their frame with the horizon, while other photographers, victims of bad advice, have become slaves to rigid rules. These photographers avoid putting the the horizon in the middle with biblical fervor, instead putting it 1/3 of the way down from the top, or 1/3 up from the bottom. But despite what you might have heard from the “expert” judging images at your neighborhood camera club, or viewed from that YouTube photography pro your brother-in-law swears by, there is no rule for where to place the horizon line.
In other words, I’ll put my horizon wherever I want to, thankyouverymuch. If I think the horizon belongs 1/3 of the way down from the top, 1/5 of the way up from the bottom, or straight across the middle of the frame, that’s exactly where it will go.
How do I determine where the horizon belongs? Put simply, that’s entirely dependent on the relative merits of the sky versus the landscape in the scene I’m photographing.
Without doing actual math (heaven forbid), I mentally weigh the landscape versus the sky and arrive at some kind of virtual score: if I like the landscape 4-times more than the sky, the landscape gets 4-times more frame than the sky; if I like the sky twice as much as the landscape, the sky gets twice as much frame as the landscape.
As I said, I don’t actually do this math in my head, I just end up here by feel. You can too, by trusting your instincts. And if you don’t trust your initial instincts, try popping the camera off the tripod (you are using a tripod, right?), pointing it in the direction of your scene, then slowly moving horizon line up and down the scene until a position feels right. Over time you’ll grow to recognize and trust the subtle signals your instincts send.
The image I’m sharing today was captured last Tuesday, on the first sunset of the first workshop. Because I’d started the shoot with my 100-400 lens, the foreground wasn’t a factor in my decision where to set up—I just chose an opening amidst the rest of my group. But as sunset approached, it started to look like something special was possible. Not only had a narrow gap appeared in the clouds near the horizon, the clouds were riddled with small openings with potential to allow sunlight to stream through as the sun dropped.
Because I was with my group and this was our first day, I didn’t do my usual anticipatory exploration for the best foreground, I just worked with the scene right there among my group. After replacing the 100-400 with my 16-35 f/2.8 lens, I started by trying to figure out the best way to handle the dead tree jutting up from below the canyon wall.
By shifting a couple of feet to my left to stand atop a light-color rock platform, I was able to block the less appealing middle foreground hill with the dense green shrub on the right, and to frame the dead tree (which had now become an important foreground element) between the two nearby shrubs. After determining that I wanted as little of the rocky dirt on the left as possible, I went to work on establishing the top of my frame.
The sky above the contiguous cloud bank blocking the sun was a lot of blue with a scattering of individual clouds. It was pretty in an ordinary way, but nowhere near as beautiful as the sunlit clouds and canyon below. That left me with two options for the top of my frame: directly above the clouds to include no more than a thin stripe of blue sky, or somewhere in the clouds with no blue sky.
I photographed it both ways for multiple options to choose between when I review my images on my computer. As you can see, I chose the former because I couldn’t find a good place to cut the clouds without putting a bright spot at the top of the frame and/or cutting off part of the sunstar.
This sunset display continued for about 15 minutes, continually changing as the sun dropped. I’ve actually processed another, very similar, image captured a few minutes later, without beams but with a better sunstar and have added it to the gallery below.
Of course all this advice applies pretty universally to whatever location you’re photographing, but few places provide examples as dramatic as Grand Canyon. Check out the gallery below for proof.
Join me at Grand Canyon
More Grand Canyon Skies
Click any image to scroll through the gallery LARGE


Smart Luck
Posted on July 30, 2023

Milky Way and the Southern Alps, Mt. Cook / Aoraki National Park, New Zealand
Sony a7R V
Sony 14mm f/1.8 GM
ISO 12800
f/1.8
10 seconds
Once upon a time I posted a rainbow image on Facebook and someone commented that getting a shot like that is simply dumb luck. After having a good chuckle, I actually felt a little sad for the commenter. Since we all tend to make choices that validate our version of reality, imagine going through life with that philosophy.
No one can deny that photography has a significant luck component, but each of us chooses our relationship with the fickle whims of chance—I prefer to look for smart luck. Smart luck embraces Louis Pasteur’s conviction that chance favors the prepared mind. Ansel Adams was quite fond of repeating Pasteur’s quote, and later Galen Rowell as well as many other photographers have jumped on board. So while many may indeed feel lucky to have witnessed special moments in Nature, let’s not lose sight of our opportunities to create our own “luck.” Smart luck.
Some examples

Double Rainbow, Tunnel View, Yosemite
As nature photographers, we must acknowledge the tremendous role chance plays in the conditions that rule the scenes we photograph, then do our best to maximize our odds for witnessing whatever special something Mother Nature might toss in our direction. A rainbow over the Safeway parking lot or the sewage treatment plant is still beautiful, but a rainbow above Yosemite Valley can ascend to a lifelong memory (not to mention a beautiful photograph).
I’ll never forget the time, while driving to Yosemite to meet new clients to plan the next day’s tour over dinner, I saw conditions that told me a rainbow was possible. When I met the clients at the cafeteria, I “suggested” (pleaded?) that we forget dinner and take a shot at a rainbow instead. Despite no guarantee of success, we raced our empty stomachs across Yosemite Valley, scaled some rocks behind Tunnel View, and sat in a downpour for about twenty minutes. Our reward? A double rainbow arcing across Yosemite Valley. Were we lucky? Absolutely. But it was no fluke that my clients and I were the only “lucky” ones out there that evening.

Captive Crescent, El Capitan and Half Dome, Yosemite
Before sunrise on a chilly May morning in 2011, my workshop group and I had the good fortune photograph a crescent moon splitting El Capitan and Half Dome before sunrise. Was this luck? I’ll give you one guess.
I suppose we were lucky that our alarms went off, and that the clouds stayed away that morning. But I knew at least a year in advance that a crescent moon would be rising at this less heralded Yosemite vista on this very morning, scheduled my spring workshop to include the date, then spent hours obsessively making sure I hadn’t made any mistakes.

Rainbow Bridge, Colorado River, Grand Canyon
I’d love to say that I sensed the potential for a rainbow over the Grand Canyon when I scheduled my 2016 Grand Canyon raft trip, then hustled my group down the river for three days to be in this very position to witness the moment. Sadly, I’m not quite that prescient. On the other hand, I did anticipate the potential for a rainbow at least an hour earlier, scouted our campsite to determine the best locations to photograph it, then called the rainbow’s arrival far enough in advance that everyone was able to grab their gear and be set up before its arrival.
Anticipating these special moments in nature doesn’t require any real gifts—just a basic understanding of the natural phenomena you’d like to photograph, and a little effort to match your anticipated natural event (a rainbow, a moonrise, the Milky Way, or whatever) with your location of choice.
But to decide that photographing nature’s most special moments is mostly about luck is to pretty much limit your rainbows to the Safeways and sewage treatment plants of your everyday world. I’ve lost track of the number of times I’ve prepared for a special moment in nature, changed plans, lost sleep, driven many miles, skipped meals, and suffered in miserable conditions, all with nothing to show for my sacrifice. But just one success like a rainbow above Yosemite Valley or the Grand Canyon is more than enough compensation for a thousand miserable failures. And here’s another secret: no matter how miserable I am getting to and waiting for my goal event, whether it happens or not, I absolutely love the anticipation, the just sitting out there marinating in the thought that it might happen.
About this image

Milky Way and the Southern Alps, Mt. Cook / Aoraki National Park, New Zealand
Don Smith and I didn’t choose New Zealand in June by accident. And it was no fluke that we were at this spot beneath the Southern Alps on a moonless night. June is when the Milky Way’s core rises highest in the night sky, and we knew exactly where to be when it came out this night. Well, we thought we knew exactly where to be…
Our New Zealand workshop group had had such a great Milky Way experience on the workshop’s first night, everyone wanted to do it again. But this year’s trip encounter more fog than we ever have, which brought us some nice daytime conditions but wasn’t particularly conducive to night photography. We finally got another chance on the workshop’s penultimate night, when the sky cleared at one of my favorite places for night photography. After a nice sunset shoot, we went to dinner (at a spectacular buffet) while waiting for the sky to darken, then headed back out.
But when we arrived at our predetermined location, a bridge over the Hooker River, we discovered that workers doing grading (I assume) on the riverbank just upstream had left a spotlight on outside their little shed, perhaps by mistake, or maybe to discourage thieves. Whatever the reason, it was so bright that it washed out the bottom half of everyone’s frame. No problem—we were familiar enough with the location that we were able to drive up the road a mile or so until we found a nice view where the light wasn’t a factor.
This far into the workshop everyone was fairly comfortable with their cameras, but the utter darkness out there added another layer of complication. Spreading out along the shoulder, we had to take care not to bump into tripods and each other, but once everyone established their positions and started finding compositions that worked, there wasn’t really any need to move around. At that point the job for Don and I is mostly to be a resource—help people with their compositions and focus (mostly just checking to ensure that it’s okay)—and just stay out of the way.
Since most of my compositions at the prior Milky Way shoot had been vertical, this night I opted for horizontal frames that included more mountains. With nothing special in the immediate foreground, I minimized it in my frame. I further deemphasized (darkened) the foreground with a faster shutter speed that had the added benefit of reducing star motion.
After we’d been out their for a while and I was pretty sure everyone had been successful, I pointed out the Large and Small Magellanic Clouds, satellite galaxies of our Milky Way that aren’t visible in the Northern Hemisphere. They’re not in this frame—they’d be quite a bit to the right of the Milky Way with a very wide lens—but I’ve seen several images from others in the group that included them. Altogether a very special evening.
Join Don and Me in New Zealand Next June
More Smart Luck


, Yosemite")


Natural Synergy: Building Relationships In Nature
Posted on July 24, 2023

Spring Bloom, Dogwood and Bridalveil Fall, Yosemite
Sony a7R V
Sony 100-400 GM
2 extension tubes (26mm total)
ISO 1600
f/8
1/60 second
After several weeks working through my New Zealand images, I’m giving myself (and you) a break from the land Down Under and returning to Yosemite. Because I absolutely refuse to visit Yosemite in summer, I returned to images from my trip in early May to photograph the dogwood, two subjects on my short-list of favorites.
Looking at these Yosemite images, combined with my still fresh New Zealand memories, reminds me of the extreme good fortune of my life. When I decided to make photography my career nearly 18 years ago, I promised myself I’d only photograph what I love. Not because I believed that’s where I thought I’d have the most success (I wasn’t that calculating), but simply because the only good reason I could come up with for leaving an excellent job with a great company was to do something that gave me joy. Lucky me—today most of my time behind a camera is spent pursuing subjects that touch a special place in my heart, subjects I’m naturally drawn to, camera or not. (And the bills are still getting paid.)
The first emotional magnets that come to mind are the fixed locations, like Yosemite, Grand Canyon, and New Zealand (to name just three) that draw and never cease to inspire me. More transient favorites include things like lightning, rainbows, and reflections, and seasonal subjects like fall color, winter snow, and spring flowers. And of course pretty much anything celestial excites me.
Relationships
As much as I enjoy these subjects individually, I especially love the natural synergy that happens when I can combine two or more in an image. While the Grand Canyon, an erupting volcano, or Yosemite Valley, are special by any standard, pairing the Grand Canyon with a lightning bolt, Kilauea Caldera with the Milky Way, or Yosemite with blooming dogwood always feels better to me than the sum of those individual parts.
This juxtaposition of subjects is so essential to photography that we often do it without thinking. For example, when we happen upon a scene and see El Capitan reflecting in the Merced River—click. Or look at that vivid sunset over the Sierra Crest—click. Nice pictures, but most successful photographers are more strategic and tactical about Nature’s juxtapositions. We find a subject we want to photograph, then figure out other natural elements that might pair well with it. Sometimes that’s simply a matter of walking around until we find an alignment that works; other times it means researching and returning months or years later to photograph the relationship we seek (with no guarantee it will happen).
When planning these shots, it helps me to think in terms of static and dynamic juxtapositions: static being relationships between permanent landscape features (mountains, waterfalls, etc.); dynamic juxtapositions always include at least one ephemeral phenomenon that we can never count on (a rainbow or lightning bolt). I know the places where I can put El Capitan and Bridalveil Fall in the same frame, or Mt. Whitney framed by Mobius Arch (static juxtapositions), timing dynamic elements like Yosemite’s annual dogwood bloom or the full moon setting behind Mt. Whitney require planning and execution.
Visual Motion
But just because an object is static, doesn’t mean an image of it should be; and a dynamic doesn’t automatically translate to motion in a still image. It’s my job to create motion in my still images by encouraging my viewers’ eyes to move through the frame, providing a path for their eyes to follow and/or a place for them to land. Accomplishing this isn’t necessarily difficult, but it does usually require some foresight and physical effort.
Once I’ve arrived at a location and identified my primary subject, I challenge myself to find at least one other element on a different visual plane. Sometimes that’s easy, other times…, not so much. Nevertheless, when my prime subject is in the distance, I look for something closer to balance it; likewise, if my subject is nearby, I want something in the background to complement it.
Foreground or background, sometimes my secondary subject has almost as much visual appeal as the primary subject; other times it’s there simply to balance my frame. Regardless of its aesthetic appeal, my secondary subject’s placement, both relative to the scene’s other visual elements and to the frame’s boundary, can make or break an image. And don’t forget that (lacking explosives) pretty much the only way to change the relative position of two static objects in a photographic frame is conscious positioning of the camera (and the photographer behind it!)—in other words, move!
Visual motion happens in a still image when elements in the frame create actual or virtual lines for the eye to (subconsciously) follow. Tangible lines might be a horizontal horizon, vertical waterfall, or diagonal river. But often it’s up to me to create virtual lines—an implicit, connect-the-dots path between visual elements. Objects in a scene have what I call “visual weight”: some quality like mass, brightness, or color that pulls the eye. After identifying these elements, we can move around until their relative positions in the frame (again subconsciously) move the viewers’ eyes.
The last important relationship consideration is depth. Photography is a futile attempt to render a 3-dimensional world in a 2-dimensional world. Lacking actual depth, we can create the illusion of depth by ensuring that objects with visual weight exist throughout the front-to-back plane. As a general rule I avoid merging these essential visual elements to avoid conflating them on the same plane and defeating the illusion of depth that’s so essential in a two-dimensional image.
Of course every situation is different, so to paraphrase Hector Barbossa (Geoffrey Rush) in The Pirates of the Caribbean, my suggestions here are more guidelines than rules. But they should never be buried so deep in your memory that they’re not available to access and apply as situations arise.
About this image
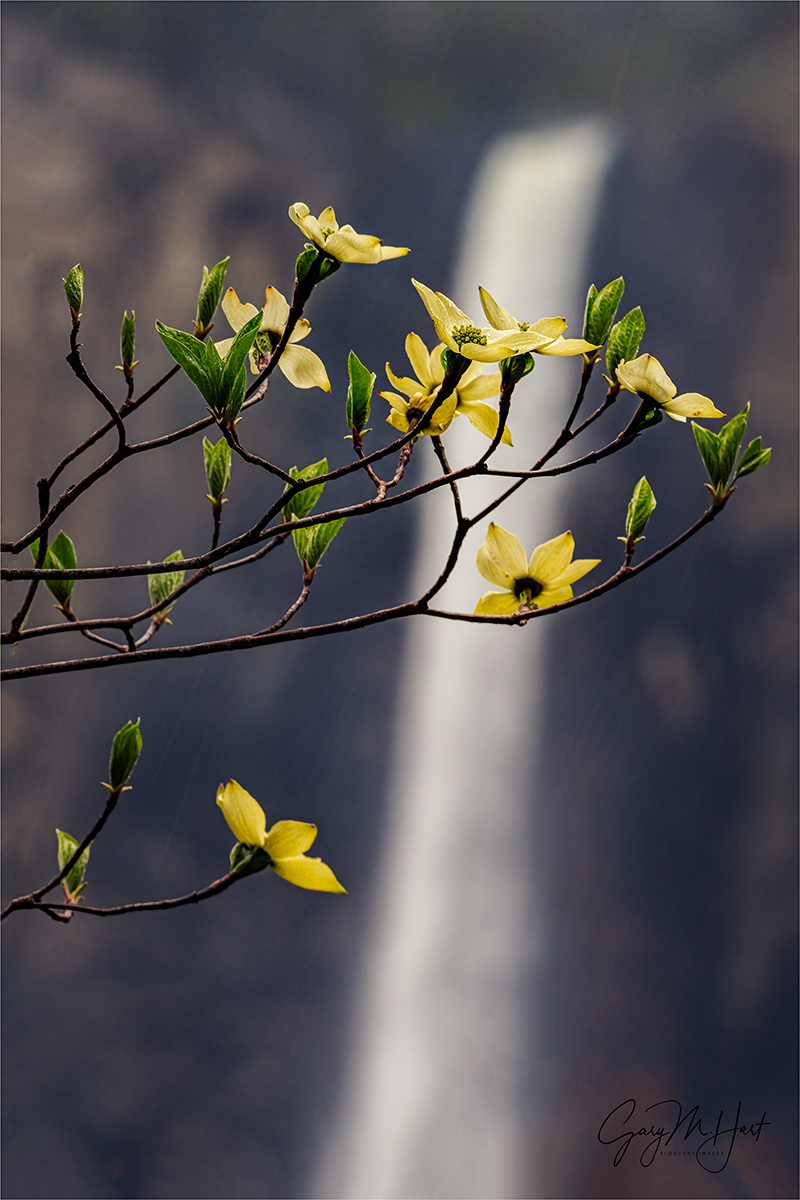
Spring Bloom, Dogwood and Bridalveil Fall, Yosemite
A week or so before capturing the dogwood image I’m sharing today, my brother Jay and I drove to Yosemite hoping to photograph the peaking dogwood bloom with Yosemite’s waterfalls at historic flows. There was indeed lots of water, but a cool spring had slowed the dogwood and they weren’t quite ready.
No problem—based on the dogwood’s premature state I observed in that first visit, I figured they needed another week or so to reach their full spring potential, so a week later Jay and I returned. Finding the dogwood in excellent shape, we spent pretty much the entire day photographing it.

Bridalveil Dogwood, Yosemite
With a light rain falling most of the day, one of the things in the back of my mind was attempting to reprise some version of a dogwood image I’d captured nearly 20 years earlier, one I consider a milestone in my aggressive relationship-seeking approach to photography. On the drive to Yosemite on that wet morning nearly 20 years ago, I decided I wanted to photograph a dogwood with a Yosemite icon in the background. That was the extent of my vision, but I pursued it relentlessly until I found a dogwood bloom I could pair with Bridalveil Fall. The rest, as they say, is history.
My goal on this year’s spring visit wasn’t to duplicate the old image, just my approach: blooming dogwood with Bridalveil Fall in the background. I returned to Valley View and found that original view of Bridalveil Fall blocked by other trees. So I traipsed about the forest looking for blooming dogwood with a clear sightline to Bridalveil Fall. That’s not as easy as you might think, but as you can see, I finally found a relationship that worked.
Instead of the close, wide angle shot I’d chosen all those years ago, this time I set up farther back, using a telephoto to enlarge Bridalveil and compress the distance between the two subjects. Because it was impossible for the dogwood and Bridalveil to be sharp (without focus-stacking, a personal no-no), I just embraced the softness in the fall, which helps the dogwood bracts stand out and makes it the primary subject.
It actually took about ten minutes before I was satisfied with the juxtaposition of dogwood and Bridalveil. Because there was a slight breeze, I bumped my ISO to 1600 for a faster shutter speed. I also played with different f-stops to find the right balance softness and clarity in Bridalveil. I think I like the old image better than the new one, but this one pleases me too, and it was a fun experience.
Natural Synergy
Click any image to scroll through the gallery LARGE


, Yosemite")


