Later that same morning…
Posted on March 1, 2013
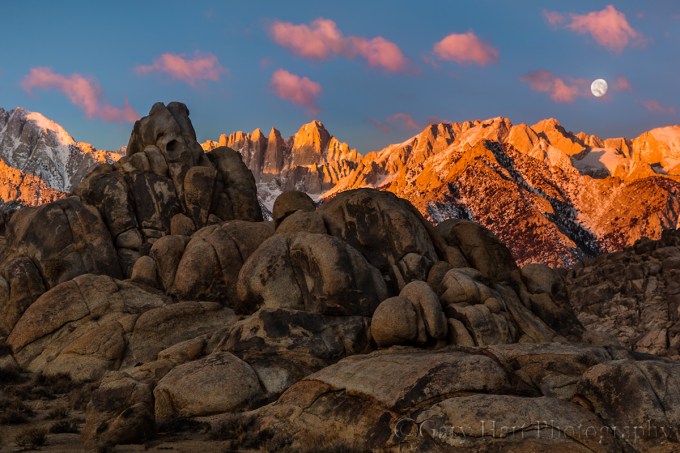
Moonset, Mt. Whitney and the Alabama Hills, California
Canon EOS-5D Mark III
24-105L
1/2 second
F/11
ISO 100
It’s fun to browse the thumbnails from a shoot in chronological order to see the evolution of that day’s process. While can’t always remember specific choices, it’s always clear from the progression of my images that I was indeed quite conscious of what I was doing. I can look at one thumbnail and usually predict what the next will be.
This January morning in the Alabama Hills started for me about forty-five minutes before sunrise. When the sun finally warmed Mt. Whitney, a 95% waning gibbous moon was about to dip below the Sierra crest; comparing images, it’s clear I’d moved no more than twenty feet from the location of that morning’s earliest images. This is pretty typical of my approach—unlike many (but not all) photographers, who actively bounce around a location in search of something different, I tend to seek the scene until I find it, then work it to within an inch of its life. If I’m moving around, it usually means I haven’t found something that completely satisfies me.
Is mine the best approach? Of course not, but it is the best approach for me. There is no all encompassing rule for workflow in the field, except maybe to be true to your instincts. Because I happen to be very deliberate in my approach to many things, and can be incredibly (obsessively?) patient when I sense the potential for something I want, that’s the way I shoot. But, regardless of changing conditions and possible compositional variations, some photographers would go crazy locking into one scene. And just as my deliberate approach continually reveals details I’d have missed had I moved on sooner, it sometimes cheats me of even better opportunities waiting just around the corner. But I learned a long time ago not to stress about what I might be missing (because for me it’s even worse to chase what’s around the corner only to find what I end up with doesn’t match what I left).
Early on this chilly morning I found a relationship between a nearby stack of boulders and the distant Sierra peaks (Mt. Whitney in particular); the more time I spent with the scene, the more I saw and the better all the elements seemed to fit for me, so I just kept working. It didn’t hurt that conditions were changing almost as quickly as I could compose. Clouds ascended from behind Mt. Williamson as if churned out by a cloud making machine, sprinted south past Mt. Whitney, and disappeared behind Lone Pine Peak. On their way they took on whatever hue the rising sun was delivering, from white (before the sun) to vivid pink to amber.
Comparing today’s image to the image in my previous post, I see that my composition shifted to account for the moon. In the earlier image the most prominent boulder and Mt. Whitney serve as a set that anchors the center of the frame. In the later image I keep the set together but offset them to the left to balance the moon’s extreme visual weight. And while at first glance it appears both images were captured from the same spot with just slight focal length and direction adjustments, the height and position of the foreground boulder relative to Mt. Whitney’s summit shows that I’ve moved a little left and about twenty feet closer.

Before Sunrise, Mt. Whitney and the Alabama Hills, California
Relationships between elements in a frame are essential to an image’s success—controlling these relationships is a matter of moving up/down, left/right, forward/backward. Without remembering my decision to move that morning, I can still reconstruct my likely thought process: The more I worked the scene, the more clear I became on where the boulders’ left and right boundaries should be. Moving left and closer let me go wide enough to include the moon and clouds, fill the foreground with no more of the foreground boulders than I wanted, and balance the frame with the boulder/Whitney pair on the left and the moon on the right.
So while I do indeed stick with one scene for a long time, I’m far from static. Each frame is slightly different from the previous one. Like most of my favorite images, this Whitney sunrise moonset is an evolution; it started in the dark, evolving with the conditions and my growing familiarity with the scene’s elements.
There are no guarantees in nature, and I’ve had my share of “panic shoots” when something unexpected forced me to run around frantically searching for a scene to go with the moment. But when this morning’s dance of light, clouds, and moon blended into one of those magic moments photographers dream about, I was ready.
Photo Workshop Schedule
An Eastern Sierra Gallery
Click an image for a closer look and slide show. Refresh the screen to reorder the display.


The secret world before the sun
Posted on February 24, 2013
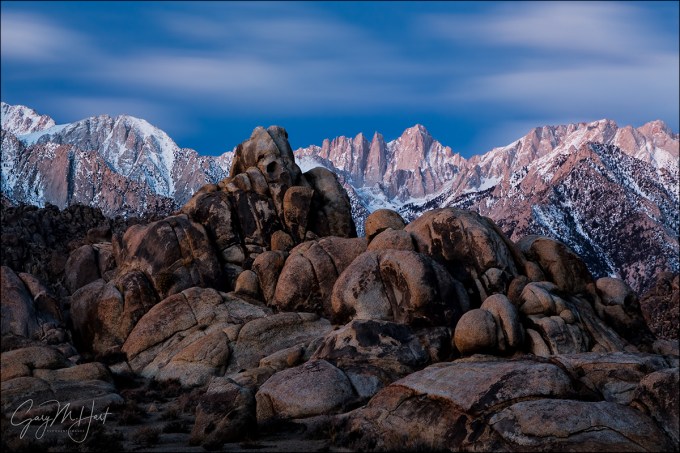
Before Sunrise, Mt. Whitney and the Alabama Hills, California
Canon EOS 5D Mark III
30 seconds
F/16
ISO 400
70 mm
Compared to the human eye, the camera’s vision has many shortcomings (as photographers are quick to lament). At the top of photographers’ list is the very narrow gap separating the brightest and darkest tones a camera can capture: dynamic range.
But while the camera taketh away, it also giveth. Experienced photographers understand that what we perceive as complete darkness is really just our eyes’ relatively limited ability to gather light, combined with the brain’s insistence on processing this limited input instantaneously. But a camera’s sensor (or a rectangle of unexposed film) can accumulate all the light striking it for whatever duration we prescribe, thereby stretching its “instant” of perception indefinitely. Advantage camera.
For example, the camera’s narrow dynamic range is (exquisitely) mitigated in the barely perceptible light preceding sunrise and following sunset. Unlike night photography, when the light in the sky is so faint that extremely long exposures are required to register any foreground detail, and daylight/moonlight photography, when unidirectional light casts high contrast shadows that exceed a camera’s dynamic range, pre-sunrise/post-sunset twilight light is spread so evenly overhead that most shadows disappear.
About this image
Horizon-to-horizon skylight made dynamic range a non-factor in the above Alabama Hills pre-sunrise scene, while my camera’s instant-stretching ability revealed beauty present in a landscape that was nearly invisible to my eyes.
I arrived at this scene about 45 minutes before sunrise, but knew from experience I wasn’t too early to get to work. White with snow and towering 10,000 vertical feet above my location in the Alabama Hills, Mt. Whitney jutted in dramatic contrast to the dark sky. As my eyes adjusted to the limited light, the jumbled rocks of the Alabama Hills became vague, colorless shapes. Anyone relying on their eyes on this January morning would likely conclude that there’s not yet enough light for photography. But I knew better.
I started by juxtaposing a nearby fortress of boulders against Whitney’s serrated outline. While the mountains were the dominant feature to my eyes, I knew a long exposure would make the nearby rocks equally prominent, making their sharpness essential. Limited light made autofocus out of the question, so I stopped down to f16 to increase my margin for error and focused manually.
As expected, a thirty-second exposure at ISO 400 uncovered volumes of invisible detail and color my eyes missed. (It took two or three exposures to get the focus, exposure, and composition right, as I felt like I was working blind, and my meter was of little value in the darkness.) Though I was photographing in a fairly stiff (and frigid!) breeze at 4,500 feet, it was nothing like the hurricane wind that smeared the clouds above Whitney into an ethereal glaze. Another revelation of the long exposure was the sky’s exquisite, natural (not processing-enhanced) blue-hour hue.
Workshop Schedule || Purchase Prints
A twilight gallery
Click and image for a closer look, and to enjoy the slide show


Sandstorm
Posted on February 19, 2013
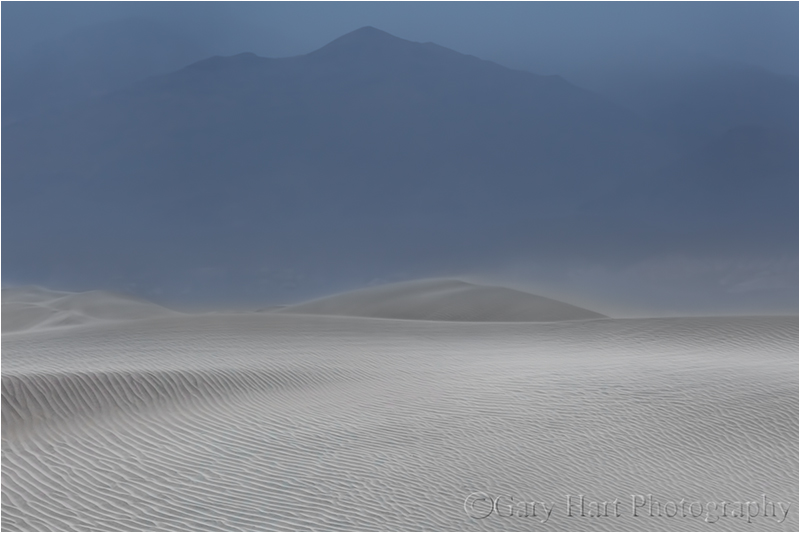
Sandstorm, Mesquite Flat Dunes, Death Valley
* * * *
Read my February 9 blog for more about this amazing evening on the dunes.
____________________
For nearly an hour my workshop group played in relative peace on the dunes, but about fifteen minutes before sunset the clouds dropped and our window of calm slammed shut. Just like that sand was everywhere, invading every camera, clothing, and exposed body orifice. After a few minutes of extreme photography packed up and started traipsing in the diminishing light in the general direction of the highway. Not only was the visibility limited, the tracks we’d just left and that might have guided us back to the cars had already been all but erased. But despite the difficulty it was impossible to ignore the photo opportunities brought by these new conditions and most in the group continued shooting until we were off the sand.
Looking east I saw the crest of Red Top, the tallest of the Death Valley Buttes, poking through the blowing sand, hovering like a spaceship above the dunes. I moved around a bit until I found a complementary foreground of aligned ripples and curved ridges. Wanting to ensure that the exquisite sand at my feet was sharp I closed down to f16; to capture the steady stream of sand blowing parallel to the dunes I experimented with ISO/shutter combinations before finding the effect that worked. (And said a prayer of thanks to Gitzo and Really Right Stuff for keeping everything stable.)
Contrast the color of the sand between this image and the image in my February 9 blog. The earlier image was partially warmed by rays of unfiltered sunlight breaking through gaps in the clouds; today’s image is entirely illuminated by cool, diffused light spread by the thick clouds overhead. It’s a good reminder that color isn’t simply an inherent quality of an object, but rather is a function of the object and the light illuminating it. While white balancing a scene to ensure a fixed color cast might be great for a wedding (God forbid you get Aunt Mabel’s dress wrong), it can rob landscapes of the very qualities that make them special.

Join my next Death Valley photo workshop
Greetings from Squirrel Rock
Posted on February 14, 2013

Sunset Reflection, El Capitan and Horsetail Fall, Yosemite
* * * *
Every workshop has its inside jokes, some comment or reference that gets everyone laughing and somehow seems to find its way into every location or mealtime conversation. So today I offer this beautiful reflection of Yosemite’s Squirrel Rock. Often mistakenly referred to as “El Capitan,” this frequently photographed granite monolith…. Okay, okay, I know, I know, this really is El Capitan, but for the duration of my just completed Yosemite Winter workshop our group affectionately referred to this Yosemite icon as “Squirrel Rock.”
Huh? It seems that my friend Don Smith, who was assisting me in this workshop (I’ll return the favor by assisting Don’s Northern Arizona workshop next month), was photographing at Tunnel View the day before the workshop when a man approached and introduced himself as a fellow pro photographer, then proceeded to position himself as a Yosemite-expert extraordinaire. As if to make his point, he went on to tell Don and all who would listen that the rocks above Bridalveil Fall that we all know as Cathedral Rocks are in fact the “Three Graces.”
In all fairness, the Tunnel View perspective of Cathedral Rocks was once upon a time called the Three Graces (I haven’t heard this reference in years); if he’d have stopped at that all would have been fine and his audience might have learned something. Our amusement was fuel by his adamant insistence, delivered with professorial authority (picture Cliff Clavin), that this ancient Three Graces label (and ignoring National Park and USGS topo maps to the contrary) means the rock formation above Bridalveil Fall cant’ be Cathedral Rocks. That his proclamation was uttered almost literally in the shadow of a National Parks Service sign labeling said icon Cathedral Rocks seemed no deterrent.
Fast forward to workshop Day-1: Don shared his story with the group at Tunnel View, finishing with a grand wave in the direction of El Capitan and telling us all in Clavinesque fashion that its true name is Squirrel Rock. It wasn’t long before Yosemite Falls became Kangaroo Falls, and with these new monikers grew Native American legends of their origins and…, well let’s just say that a workshop’s worth of laughter ensued.
If all this sounds a little silly, please understand that the workshop’s prime objective was Horsetail Fall, a February phenomenon with far more photographers than room to photograph. To ensure a front row seat at the best spot, for two nights in a row we queued up at my favorite vantage point beside the Merced River two hours before sunset. That’s a lot of waiting (and story swapping, and joking, and embellishing, and just plain frivolity).
Our time passed quickly, and while (if the goal is the classic Horsetail blood red sunset stripe) neither night will go down in the annals of Horsetail Fall photo moments, we were nevertheless rewarded with some magnificent photography. On Monday billowing cumulus clouds decorated Squirrel Ro…, uhhh, El Capitan and reflected in the Merced River. Tuesday night we almost hit a home run, but as we rounded third, thin clouds unseen on the western horizon dulled the setting sun and we had to settle for a stand-up triple. Very nice nevertheless.
Both evenings were a blast, well worth the waiting, both for the photography and the good time. Because I already have my tight Horsetail Fall shot from this spot, and the highlight of the first evening was the clouds and reflection, I opted for the wide composition you see above. This location has far more compositional options than the popular El Capitan picnic area spot (which has more room). In fact, even though Horsetail didn’t perform to perfection, both evenings we had things to photograph for the duration of our wait. At one point the tree on the shore at the right of the frame lit up like it had been hit by a spotlight, and Sentinel Rock, directly behind and above us, spent much of the afternoon bathed in warm light.
It seems every workshop has something memorable to set it apart from all the others. In this case it was night after night of warm light and crisp reflections, plus a large dose of laughter. Long live Squirrel Rock.
Pure as the driven sand
Posted on February 9, 2013

Storm Brewing, Mesquite Flat Dunes, Death Valley
Canon EOS-5D Mark III
21 mm
1/6 second
F/22
ISO 400
February 2013
Sand dunes’ graceful curves and intricate textures move and intrigue the eye, and few things better convey nature’s purity than a windswept dune. Ironically, it’s the dunes’ aesthetic magnetism that hastens their demise as photographic subjects—their fragile sand, so easily sculpted by Mother Nature’s fickle winds, is hopelessly marred by any contact with the humans drawn by their beauty.
While Death Valley has several sets of dunes, by virtue of their ease of access, the most popular by far are the Mesquite Flat Dunes near Stovepipe Wells. Every day hundreds (thousands?) of gawkers seeking a closer look trudge up and down the undulating sand—with each footstep a small amount of purity is lost. Fortunately, it’s rarely long before Mother Natures has had enough and sends in scouring winds that erase the scars like a shaken Etch-A-Sketch.
This year’s Death Valley workshops landed in the middle of an extended static without significant wind, so I knew pristine sand would be hard to find. To minimize the footprints I take my groups to a spot that’s away from the tourist foot traffic, but this time I knew that wouldn’t be enough. Nevertheless we gave it a shot and managed to find enough patches of untouched sand to isolate with a telephoto and everyone was satisfied. Except me.
So when a stiff wind kicked up the afternoon of our final full day in Death Valley I took them back out to the dunes with fingers crossed. On our drive from Furnace Creek the cars were buffeted by gusts and the entire northern horizon was obscured by dark clouds that I soon realized were in part blowing sand—a very good sign indeed. I pulled up to a spot I’d scouted a few days earlier, far removed from the paved parking area and tall dunes that draw people, and surveyed the conditions. The wind whipped anything not buttoned down and pewter clouds were rapidly overtaking the late afternoon light skimming the Cottonwood Mountains.
The group prepared for strong wind and blowing sand similar to the way we’d prepare to photograph in the rain, but in the five minutes it took to get onto the dunes the wind had mysteriously diminished to an eery calm. Before us spread pure, rippled sand for as far as the eye could see. And except for one distant photographer who quickly passed out of sight, we were the only people out there.
Fearing a shotgun approach to setting the group free would result in inadvertent footprints marring the scenes of others, I gathered everyone and suggested that we move together and agree to stay behind a predetermined imaginary line. The problem, I explained, wasn’t just staying out of everyone’s frame, it was that each step in the sand would ruin all shots in that direction. So they all followed me until I found a nice scene with a good amount variety, which we all photographed for a few minutes before I guided them to another scene. After two or three of these cycles, it seemed everyone had become comfortable enough with the environment and the ground rules that we could scatter without interfering.
I have to say that there is no kind of photography that makes me happier than what we did that evening. With virgin, textured sand and a dramatic, rapidly changing sky, the creative possibilities were off the charts. Surveying the group, it was clear that everyone was as thrilled as I was, each fully engaged in their own photographic zone. I kept telling them that they had no idea how lucky they were to be photographing these dunes without a single footprint, but I’m not sure anyone was listening at that point.
About this image
Most successful images provide a clear path for the eye to follow, or an obvious place for the eye to rest—often both. With sand dunes, so much visual motion (curves and lines) and activity (texture) makes a visual resting point particularly important. The first place I stopped the group was in front of this solitary shrub atop a low, curving ridge of sand. The scene had all the compositional elements you could ask for: elegantly arcing sand, rich texture, a dramatic sky, and a potential focal point. After pointing all this out and encouraging the group to assemble the key elements into a composition that resonates with them, I was pleased to see lenses of all focal lengths, horizontal and vertical compositions, and lots of repositioning to arrange foreground and background relationships.
Surveying the scene for myself, I noticed clouds moving in from the north painted a texture overhead that complemented the ridged sand at my feet. The filtered sunlight on the western horizon, while waning, was still sufficient to warm the scene. Finding the sand and sky equally appealing, and the shrub more interesting for its lofty perch than its inherent beauty, I tried to identify a composition that incorporated these elements.
To emphasize the foreground and sky, and to shrink the shrub, I twisted on my widest lens and dropped to about a foot above the sand. A vertical composition allied the dune’s parallel ridges with the frame’s long side to move the eye from front to back and created the impression that the entire world is converging on my little shrub. The vertical composition also narrowed the frame enough to eliminate incongruous clouds lowering on my left and right. I stopped-down to f22 and focused about three feet in front of my lens, ensuring perfect close sharpness and acceptable distant sharpness. A soft breeze swayed the shrub intermittently so I bumped to ISO 400 to allow a faster shutter speed.
In typical Death Valley fashion, it never did rain that evening. As the storm approached, all menace and bluster, our cocoon of calmness soon gave way to sand-whipping, tripod-tipping winds that lowered a cloudy shroud onto the Death Valley Buttes and Funeral Mountains to the east, cooling the light and creating an altogether different mood (that I’ll share in a future post).
Workshop Schedule || Purchase Prints
A Death Valley Gallery
Click an image for a closer look, and a slide show. Refresh your screen to reorder the display.


Death Valley Winter Moon Photo Workshop
The Road to the Racetrack, Part Deux
Posted on January 31, 2013

Last Light, The Racetrack, Death Valley
* * * *
Previously on “The Road to the Racetrack”
Racetrack Road approaches from the north and skirts the west side of Racetrack Playa in the shadow of Ubehebe (yuba-he’-be) Peak. We crested the saddle above the playa’s north perimeter and dropped out of the gray soup that had confined our world for about two hours. Before us spread the entire Racetrack Playa, its surrounding mountains draped in clouds that cascaded down their slopes like slow motion waterfalls. The light rain that had barely required windshield wipers stopped completely. Descending the saddle’s south side into the basin, our view was monopolized by the Grandstand—a cruise ship size chunk of adamellite (a dark, igneous intrusive rock similar to granite) jutting from the paper-flat playa. This is what the submerged portion of an island looks like. As we rolled past I couldn’t help thinking that the Grandstand would be a far more sought-after subject were it not for the moving rocks that take top bill here.
As much as I’d loved to have stopped to photograph the Grandstand, it was late afternoon and I was anxious to locate the main attraction before the good light came and went. The drive to the south side of the Racetrack is just one mile, but the road’s extreme washboard surface is a natural speed inhibitor; every time my speedometer nudged toward fifteen miles per hour our SUV started bouncing like an off-balance washing machine and I had to back off. Doug, Jay, and I had chuckled when the Stovepipe Wells grocery clerk told us that the rocks had mysteriously disappeared from the Racetrack, but I’ll admit to taking advantage of our slow speed to (anxiously) scrutinize the playa as we skirted its perimeter—what if it was true? Vibrating along, I saw a couple of grapefruit-size rocks trailing short tracks just west of the Grandstand, but nothing like the rocks we’d come for.
We finally stopped at the playa’s extreme south end where a couple of photographers were photographing a handful small rocks just a couple of hundred feet from the road. These rocks just didn’t seem natural to me—partly because of the nearby tire tracks marring the playa’s surface (the selfish ignorance of humans in nature never fails to disappoint me) and partly because they were so far from any rock source (these things don’t just drop from the sky). Standing there on the playa’s southwest edge, it was clear that the rocks we sought could only originate from the base of the steep mountain abutting the southeast corner. And indeed, looking more closely in that direction, we could just make out a large accumulation of black dots that could only be rocks. The playa’s utter flatness can be disorienting, but given that the Racetrack stretches one mile on its long, north-south axis, I estimated that the east side was about a half mile away. So off we set.
The playa’s color and chalky dust reminded me of a flour tortilla; its surface is a jigsaw of round polygons about three inches in diameter, separated by shallow cracks that have been filled in by the fine dust. When dry like this (there was no noticeable accumulation of the nearby rain) it’s an easy surface to walk. After ten minutes we arrived at the first rocks, toaster- to microwave-size, each with its own straight, curved, or zig-zag track. Eureka! We immediately spread out, claimed a specimen of our own, and went to work. Initially the best light was on the southwest horizon, where a hole in the clouds, obscured by Ubehebe Peak, passed enough sun to illuminate the low overcast (see the image in my previous post).
Soon our attention was drawn to the playa’s north end, toward the Grandstand, where a shaft of golden light had started skimming the dark hills and firing up the clouds there. I quickly circled the rock I was working on to swing my camera in that direction. As the shaft warmed it stretched further, eventually extending from edge to edge. As the light seemed to reach a crescendo Doug, who was set up about a hundred feet away, called out, “That almost looks like a rainbow.” I looked closer and sure enough, there was indeed a (quite faint) prism of color splashed above the sunlit hills bounding the playa’s northeast edge.
The one frame with my polarizer properly oriented for the rainbow that I managed to get off is at the top of the post. You have to look closely to see the rainbow (it’s there, I swear); careful examination reveals that the rainbow moves from green on the outside (left) to red on the inside (the shorter wavelength colors that would be left of green aren’t visible), meaning that our angle of view only gave us the fainter, outer band of a double rainbow. By the time I’d set up my next composition the light faded and with it the rainbow. Visions of a full rainbow arcing above the Racetrack dashed, we nevertheless couldn’t help feel that we’d been granted a very rare treat in this land of interminable blue sky.
The rest of our trip, though not without its moments, was anticlimax. After sunset we walked back to the car and ate dinner (soggy sandwiches for Jay and me, ramen noodles for Doug-the-chef), then went back out in the dark for a moonlight shoot without stars. By then the clouds had thickened and dropped, making it difficult to get anything that really looked like night. After a very restless night (one hour awake for every hour asleep for me), we rose for “sunrise” (or more accurately, “fogdrop”). While not quite spectacular, the low clouds swirling above the playa, spilling down the mountains in the thin light no doubt gave us unique images (that I haven’t had time to get to). And on the drive back we were able to see the terrain that had been completely obscured by clouds on our inbound trip, the highlight of which was several miles of joshua tree forest we’d been completely oblivious to earlier. In fact, despite my extreme need to be back in Furnace Creek in time for my workshop (that started at 1:00 that afternoon), at one point we encountered a scene with nearby joshua trees juxtaposed against distant, fog-wrapped mountains that we couldn’t help stopping to shoot for fifteen minutes or so.
After depositing Jay at his car in Stovepipe Wells, Doug and I made it back to Furnace Creek by 11:45 and managed to clean up, have lunch, and set up for orientation with time to spare. Piece of cake.
The Road to the Racetrack
Posted on January 28, 2013

Sliding Rock, The Racetrack, Death Valley
* * * *
A couple of weeks ago I got the bright idea to spend the twenty-four hours separating my two Death Valley workshops with a trip out to the Racetrack. While it seemed like such a good idea at the time, as my first workshop drew to a close I started longing for a bit of recharge time before the next one (it didn’t help that the first workshop’s final night was in Lone Pine near Mt. Whitney, an hour-and-a-half drive from Death Valley). But since I’d invited my brother Jay (who assisted my first workshop) and friend Doug (who would assist my second workshop), and they’d changed plans to join me, I sucked it up and made the trip (much to my ultimate delight).
You’ve probably seen pictures of the Racetrack, which, like many features in Death Valley, defies common logic. The Racetrack is a perfectly flat playa (dry lakebed) surrounded by rocky mountains that frequently shed large chunks of dolomite, many of which come to rest on the playa surface. But unlike the rocks you and I have known, the Racetrack rocks move. A lot. And as they scoot along the playa they carve tracks in the otherwise flat surface, sometimes several hundred yards long. The creepiest thing is that nobody has actually seen these rocks move. Science still doesn’t have a perfect explanation for what goes on here, but the general consensus is a combination of water, wind, and (possibly) ice is involved.
A major part of the Racetrack legend is the road out there. It’s a two hour drive on twenty-seven unpaved, unpatrolled miles of sharp rocks and jarring ruts. The road, a notorious tire eater, twists up to 5,000 feet elevation before dropping back down to 3,700 feet at the playa.
Given the time and effort it takes to get to the Racetrack, our plan was to land in time photograph sunset, wait for dark and photograph by moonlight, then throw down sleeping bags and spend the night, rising early enough to photograph sunrise. Armed with my rental SUV, if all went as planned (no flat tires), we’d make it back to Furnace Creek by noon and (fingers crossed) have time to clean up and eat lunch before starting workshop number two at 1 p.m. Piece of cake.
So, at the conclusion of workshop number one, my brother and I hustled back from Lone Pine and picked up Doug in Stovepipe Wells. Before setting out we made a quick stop in the general store, where the clerk reported that a recent Racetrack visitor had told him earlier that day that all the rocks had been stolen. Hmmm. Undeterred, we set off on our adventure with high hopes.
A light rain fell for much of the drive, quite unusual in this arid region that gets less than two inches of rain per year. And with rain comes clouds, one of which we entered not long after turning onto Racetrack Road. Instantly the visibility dropped to about one hundred feet and remained that way for much of the journey. Of course the lack of a view was of little concern to me, since my eyes strayed from the road only long enough check the dashboard tire pressure indicator.
Given the limited visibility and my targeted focus, I’m afraid I have little to report of the journey, except that it was with great relief that we somehow pulled up to the playa on schedule and without consequence. The rest of our adventure will need to wait until my next post—until then, above I offer proof that we did indeed make it, and that the trip was very much worth the effort.
Color, color everywhere
Posted on January 24, 2013

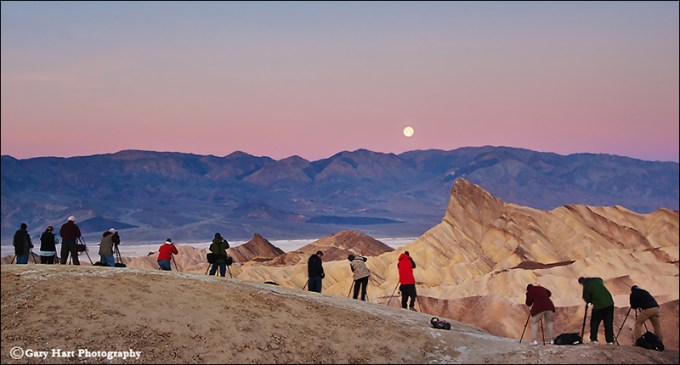
Magenta Sunrise, Zabriskie Point, Death Valley
* * * *
After three days of solid blue skies (Zzzzzzzzzzzz), yesterday morning my Death Valley workshop group was rewarded with a sunrise for the record books. I’ve seen color like this in Yosemite, Hawaii, and the Grand Canyon to name a few, but never at Death Valley.
As the group gathered at the hotel about an hour before sunrise, a deep ruby glow stained the eastern horizon. Hmmm. Second-guessing my tried and true policy of getting on location at least forty-five minutes before sunrise, I hustled everyone into the cars and we bolted for Zabriskie Point, just five (extremely long) minutes up the hill. At Zabriskie I gave a brief orientation with one eye on the expanding red that now stretched from the eastern horizon nearly to the zenith—in a matter of minutes it would reach all the way to the Panamint Mountains on the western horizon, filling the sky behind Death Valley’s most celebrated vista.
After explaining that the best place to photograph Zabriskie Point is on the dirt hilltop directly below the viewing platform, I set off with a “Follow me.” By the time I made it to the prescribed vantage point the red had indeed spilled all the way down to the Panamints. Thrilled with our good fortune I looked around—imagine my surprise to find that only two others had heeded my advice; the rest of the group had stopped well behind me to photograph in the opposite direction, lured by the electric show playing above the not-too-photogenic scene facing the sun.
Paradox alert: I spend a good deal of time teaching photographers that light trumps landscape—in other words, don’t get so locked in to the scene you came to photograph that you miss better light happening elsewhere. They had heeded my advice so well that they overlooked another truth I try to hammer home: See the world with your camera’s eye. In this case the most spectacular light was indeed behind the classic Zabriskie scene, where the eastern sky was infused with a magenta hue that was equal parts vivid and bright. On the other hand, the red sky to the west, above nearby Manly Beacon and the distant Panamints, was still quite dark to our human vision. What everyone had overlooked was that their camera’s ability to accumulate light would bring out color their eyes missed.
Fortunately, I was able to get everyone’s attention and to convince them where the real show was. We started with long exposures like the one here (30 seconds at f8 and ISO 400) that brightened the scene beyond what our eyes saw. Often sunrise color rises to a tantalizing level only to fade without warning. But this morning as the light increased, the color rose right along with it, faded briefly, then bounced back stronger than ever. At its peak the entire landscape glowed pink and the only sound was clicking shutters.
* * * *
A few words about color: I’m always amused when people question the credibility of sunrise and sunset color. I’ll grant that many people enhance their color in processing, but that doesn’t mean that every brilliant sunrise or sunset was manipulated. The truth is, there’s nothing subtle about color in nature, and when people question the color in a sunrise/sunset image, my first thought is to wonder how many sunrises/sunsets they’ve seen.
My group yesterday morning was chuckling about that problem as we packed up—we were all anticipating the inevitable doubts, some explicit, others implicit, but there was comfort in the knowledge that we all had witnesses. And for the record (I just checked), the only color work I did on this image was a slight desaturation of the blue in the sky and the magenta for the entire image.
How to photograph Comet PanSTARRS
Posted on January 16, 2013

Above: Illustration courtesy of Starry Night software; it shows Comet PanSTARRS 8 degrees above the horizon 25 minutes after sunset on March 12. The software has no idea of the comet’s brightness or the length of its tail (it just adds a generic comet tail)—it’s unlikely PanSTARRS will look this dramatic (but we can dream). That’s a thin (1%) crescent moon just to the right of the comet.
* * * *
PanSTARRS Update, February 6, 2013: Latest word on the street is that PanSTARRS isn’t brightening as fast as hoped. Current predictions put it in the magnitude 2-3 range, about the brightness of the stars in the Big Dipper. This is likely to change, either up or down (welcome to the world of comet watching), as PanSTARRS approaches and passes perihelion (March 10). ISON remains on track for something truly special late this fall. Stay tuned….
PanSTARRS Update, February 23, 2013: After enduring a few weeks of fading hope for PanSTARRS brightness (revised estimates were calling for best-case magnitudes ranging from 2 to 3, and some were in the magnitude 4 range), recent observations have the comet brightening at a faster rate that might put it at magnitude 2 or brighter. I still don’t think we’ll really know what to expect until PanSTARRS reaches perihelion on March 10, but suffice to say it continues to bear watching. Keep your fingers crossed.
PanSTARRS Update, March 4, 2013: Things just keep getting better. PanSTARRS is putting on a great show for the Southern Hemisphere, and it’s about ready to enter Northern Hemisphere skies. Current estimates have PanSTARRS brighter than magnitude 2 right now, and we’re still nearly a week out from perihelion. As it continues to approach the sun, look for PanSTARRS to brighten to magnitude 1 or maybe even brighter. That means it could be visible north of the equator as early as March 7, with improving chances for viewing for at least the next week as it separates from the sun a little each evening.
The year of the comet
There’s a lot of excitement in the astronomy community about a pair of comets heading our way in 2013. In late-November and December (and maybe into January), Comet ISON could put on a once-in-a-lifetime celestial display, but before ISON we may be treated to a pretty good warm-up when Comet PanSTARRS graces Northern Hemisphere skies in March. Media hyperbole notwithstanding, the unpredictability of comets is a source for great anxiety among those anticipating these celestial visitors. The safest bet is that PanSTARRS and ISON will either be brighter or fainter than predicted (comet history is rife with examples of both), but it’s just that kind of uncertainty that makes comets so special.
First the facts (Comets 101)
(If all you’re interested in is the photography stuff, feel free to skip to the “PanSTARRS: When and where” section below.)
A comet is a ball of ice and dust a few miles across (more or less) orbiting the sun in an eccentric elliptical orbit: Imagine a circle stretched way out of shape by grabbing one end and pulling–that’s what a comet’s orbit looks like. Looking down on the entire orbit, you’d see the sun tucked just inside one extreme end of the ellipse.
The farther a comet is from the sun the slower it moves, so a comet spends the vast majority of its life in the frozen extremities of our solar system. Some comets take thousands or millions of years to complete a single orbit; others complete their trip in just a few years.
As a comet approaches the sun, stuff starts happening. It accelerates in response to the sun’s increased gravitational pull (though just like the planets, the moon, or the hour hand on a clock, a comet will never move so fast that we’re able to perceive its motion). And more significantly, as the comet approaches the sun, increased heat starts melting the frozen nucleus. Initially this just-released material expands to create a mini-atmosphere surrounding the nucleus; at this point the comet looks like a fuzzy ball when viewed from Earth. As the heat increases, some of the material set free is discarded to form a glowing tail (glowing by reflected sunlight—a comet doesn’t emit its own light) that points away from the sun. The composition and amount of material freed by the sun, combined with the comet’s proximity to Earth, determines the brilliance of the display we see.
With millions of comets in our Solar System, it would be easy to wonder why they’re not a regular part of our night sky. Actually, they are, though most comets are so small, and/or have made so many passes by the sun that their nucleus has been stripped of reflective material, that they just don’t have enough material left to put on much of a show. And many comets don’t get close enough to the sun to be profoundly affected by its heat, or close enough to Earth to stand out.
Most of the “periodic” comets—comets that make regular appearances—are well known to astronomers. These comets have usually lost so much of their material that they’re too faint to be seen without a telescope; a notable exception is Halley’s Comet, perhaps the most famous comet of all. Halley’s Comet returns every 75 years or so and usually puts on a memorable display. Unfortunately, Halley’s last visit, in 1986, was kind of a dud; not because it didn’t perform, but because it passed so far from Earth that we didn’t have a good view of its performance on that pass.
Then there are the “non-periodic” comets, which pivot the sun only once in thousands or millions of years. New non-periodic comets are discovered each year; every once in a while astronomers determine that one of these discoveries is large enough, with a favorable orbit that sends it close enough to the sun to ensure lots of reflective material will be shed, and close enough to Earth that we’ll have a good vantage point, that it just might put on a spectacular display. Enter Comets PanSTARRS and ISON.
What can go wrong
Every comet has a different physical make-up, so there’s no way we can tell how it will react during its encounter with the sun. Astronomers also suspect that on its first solar approach an incoming comet may shed a thin, highly reflective outer layer when it’s still a good distance out, giving us a false impression of its intrinsic albedo (reflectivity). Therefore we can’t be certain if a newly discovered comet that appears relatively bright at a great distance (but still much too dim to be seen without a telescope) is going to continue shedding reflective material, or peter out before it arrives.
An even bigger concern is whether the comet will survive its encounter with the sun at all. The closer a comet passes to the sun, the more it is likely to shed the ice and dust a spectacular display requires, but some sun-grazing comets have passed so close to the sun that they completely disintegrated.
In other words, we have no way of knowing whether PanSTARRS and ISON dazzle or fizzle—all we can do is wait. And prepare.
PanSTARRS: When and where
Fortunately, we do have one certainty to work with: the comet’s orbit. We know with great confidence where it will appear (or where it should have appeared had it survived its encounter with the sun) and when it will be there.
PanSTARRS makes its closest approach to the sun, “perihelion,” on March 10. If we’re lucky it will appear as a fuzzy ball low on the western horizon of Northern Hemisphere skies shortly after sunset in the second week of March (it’s done with the Southern Hemisphere). Each evening PanSTARRS will appear above the western horizon shortly after sunset, a little higher and (probably) a little dimmer than the night before. But as it rises each night, it moves farther from the sun into darker sky, so while PanSTARRS may be dimming slightly, the sky surrounding it may darken faster than the comet dims, perhaps and for a week or so (this is anybody’s guess). That would make PanSTARRS more visible as the first week after perihelion progresses. Since PanSTARRS’ tail material may have been stripped by its close encounter with the sun, it will need time to reform and may lengthen with each passing day, another variable that can’t be predicted.
PanSTARRS will eventually rise into the darker part of the sky; by the end of April it will be visible all night in the Northern Hemisphere. But by then it’s very unlikely to be bright enough to be viewed with the unaided eye.
But one of the great thrills of comet watching is the uncertainty. Just as some comets disappoint (Google Comet Kohoutek), others astonish. Hale-Bopp was much heralded before it arrived in late 1996, but nobody expected it to remain visible to the naked eye for eighteen months. And in January 2007 Comet McNaught caught everyone off guard by suddenly brightening to become a spectacular (albeit brief) sight trailing the sun to the horizon in the post sunset twilight.

Comet McNaught, January 2007
PanSTARRS approximate location 45 minutes after sunset at 38 degrees north latitude
March 8: Altitude 0º (right on the horizon) Azimuth 260º (due west is 270º)
March 9: Alt. 1º Az. 262º
March 10: Alt. 3º Az. 264º
March 11: Alt. 4º Az. 267º
March 12: Alt. 5º Az. 269º
March 13: Alt. 6º Az. 272º
March 14: Alt. 7º Az. 274º
March 15: Alt. 7º Az. 277º
Photographing PanSTARRS
Composition
Since we know when and where PanSTARRS will be visible, there’s no excuse for not preparing now (right?). Preparation starts with knowing where you’re going to shoot PanSTARRS beforehand. Look for unobstructed views to the west with no terrain for PanSTARRS to set behind before the sky is dark enough for it to appear—think beach, hilltop, mountaintop, or flat landscape. The best scenes are worthy of photographing regardless of what’s in the sky, scenes that can use the comet as an accent to take the image to the next level.
I’m guessing that PanSTARRS won’t have a tail anywhere near as dramatic as the tail in the Starry Night illustration above (though I could be, and hope I am, wrong), so unless it brightens far beyond predictions and the tail lengthens more than normal (it’s happened with comets before), you won’t want to go too wide with your composition if the comet is to be your primary subject. On the other hand, even with a relatively short tail, PanSTARRS could make a magnificent accent to an otherwise nice wide scene. I plan to prepare for both tight telephoto and wider landscape shots.
Because PanSTARRS will be in the relatively bright post-sunset sky, and any foreground subject will be in full shade (the sun’s down, but it isn’t completely dark yet), look for striking nearby shapes to silhouette against the sky with PanSTARRS glowing in the distance. For example, near my home in Sacramento the best candidates will be the oak trees dotting hillsides east of town. I’ll need to be on their east side, facing west.
Mountains that stand out against the horizon will work nicely too, though remember that PanSTARRS will already be quite low as the sky darkens, and it will be dropping toward the horizon with each minute (along with everything else in the sky)—if the mountains you choose are too high, or too close, PanSTARRS will disappear below your horizon before the sky is dark enough. For example, Mt. Whitney as viewed from the Alabama Hills might make a great foreground subject for PanSTARRS, but from the Alabama Hills Mt. Whitney juts about 10 degrees above the horizon—on March 15 PanSTARRS will set behind Whitney (drop below 10 degrees) about 30 minutes after sunset. So unless PanSTARRS is extremely bright, it might not be visible at all before it disappears below the mountains.
And before you ask about photographing PanSTARRS in Yosemite, let me strike preemptively and say that pretty much all of the views in Yosemite Valley face east, which means even if you’re lucky enough to glimpse PanSTARRS above Yosemite Valley’s steep walls, while you’re photographing it Half Dome and El Capitan will be behind you. (Wait for ISON, which could be a spectacular pre-sunrise object in the east.)
Exposure
(I’m assuming you understand the basics of exposure—if not, read this.)
First, it’s important to understand that, unlike ISON in December, photographing PanSTARRS at its brightest will not be night photography, it will be twilight photography. Because it will be in the same area of the sky as a crescent moon, regardless of your focal length choice the rules for photographing PanSTARRS will be similar to those for photographing a crescent moon. (You can read more about that on my Crescent Moon Photo Tips page.)
My general approach to capturing foreground detail in twilight scene like this is to meter on the brightest part of the sky, setting an exposure that’s as bright as possible without overexposing (a graduated neutral density filter helps). After you click, check your histogram to make sure you haven’t blown out the highlights. If at all possible (if your camera shows it and you understand how to read it), I strongly recommend checking each of the channels in the RGB histogram to make sure you haven’t lost any color. On the other hand, if it’s a silhouette I’m going for, I’ll underexpose slightly to hold the color in the sky and/or water. In this case a graduated neutral density filter is unnecessary.
By the time PanSTARRS drops below the horizon, the foreground will be so dark that my exposures will need to be quite long. But since PanSTARRS is in fact moving at the same speed (from our terrestrial perspective) as all the stars and planets, I’ll want to monitor my shutter speed to avoid motion blur (the longer my focal length, the more I’ll need to worry about long exposure motion blur). I’m guessing for my wider shots I’ll be okay at 15 seconds, but I’ll still magnify the image on my LCD to determine whether I need to bump my ISO further to allow an even faster shutter speed.
For wide shots a graduated neutral density filter will help hold down the brightness of the sky enough to enable you to save the twilight color while bringing out some foreground detail. For ocean scenes, where the horizon is flat, I prefer a hard-transition GND; my 3-stop reverse GND will probably get the most use.
Telephoto
You could go super-tight and fill the frame with nothing but comet and sky—I’ll probably try a few of these. But with no foreground, nothing about these compositions will set them apart from the thousands of similar compositions taken from anywhere else in the Northern Hemisphere. Most of my tight shots will include some landscape feature silhouetted against the sky or water. In the telephoto shots that include a foreground subject, the farther from the silhouetted subject I can position myself, the longer the focal length I can use, and the larger the comet will appear in my frame. But don’t forget that the more you magnify with a long focal length, the greater the motion blur you’ll capture—a higher ISO to increase your shutter speed is usually a good idea.
Wide
Remember that we’re photographing PanSTARRS after the sun has gone down, but before the sky is completely dark. So for my wide shots I’m going to look for water because water reflects the twilight sky so nicely. I’ll be leading a workshop on Maui during what promises to be PanSTARRS prime-time (the week of March 8-15), so finding water won’t be a problem for me. But no matter where you are, you should be able to find a westward view of a river, lake, or beach.
A particular advantage of photographing PanSTARRS from the beach is the an unobstructed view of the horizon, giving me a very long and clear line of site to PanSTARRS (even better would be shooting downward at the horizon from a mountaintop, like Haleakala).
Fingers crossed
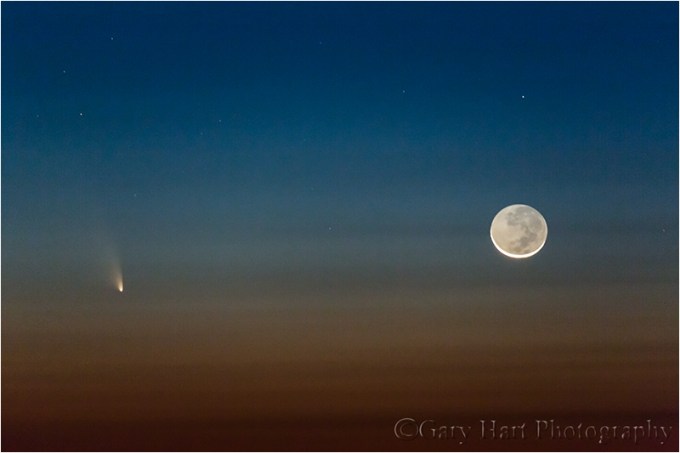
The night I’m targeting as potentially off-the-charts-special is March 12 (image at the top of the page). That evening PanSTARRS will be aligned with a sliver-thin slice of crescent moon, separated by less than 4 degrees. The next night the moon will be higher, about 10 degrees (the width of a fist held at arm’s length) directly above the moon, with PanSTARRS’ tail pointing directly at the moon. If the tail is long enough, it will appear to pass right through the moon.
On the other hand, I’m fully prepared for disappointment too—I’ve followed comets long enough to understand why astronomer David Levy said, “Comets are like cats: they have tails and do precisely what they want.”
* * * *
Read the history of my relationship with comets in my January 11 post.
A lifelong love affair with comets
Posted on January 11, 2013

Comet McNaught in the western twilight, January, 2007
When I was ten, my best friend Rob and I spent most of our daylight hours preparing for our spy careers—crafting and trading coded messages, surreptitiously monitoring classmates, and identifying “secret passages” that would allow us to navigate our neighborhood without being observed. But after dark our attention turned skyward. That’s when we’d set up my telescope (a castoff generously gifted by an astronomer friend of my dad) on Rob’s front lawn to scan the heavens in the hope that we might discover something—a supernova, comet, black hole, it didn’t really matter.
Our celestial discoveries, while not Earth-changing, were personally significant. Through that telescope we saw Jupiter’s moons, Saturn’s rings, and the changing phases of Venus. We also learned to appreciate the vastness of the universe with the observation that, despite their immense size, stars never appeared larger than a pinpoint no matter how much magnification we threw at them.
To better understand what we saw, Rob and I turned to illustrated astronomy books. Pictures of planets, galaxies, and nebula amazed us, but we were particularly drawn to the comets: Arend-Roland, Ikeya–Seki, and of course the patriarch of comets, Halley’s Comet (which we learned was scheduled to return in 1986, an impossible wait that might as well have been infinity). With their glowing comas and sweeping tails, it was difficult to imagine that anything that beautiful could be real. When it came time to choose a subject for the annual California Science Fair, comets were an easy choice. And while we didn’t set the world on fire with our project presentation, Rob and I were awarded a ribbon of some color (it wasn’t blue), good enough to land us a spot in the San Joaquin County Fair.

Here I am with the fifth grade science project that started it all. (This is only half of the creative team—somewhere there’s a picture that includes Rob.)
The next milestone in my comet obsession occurred a few years later, after my family had moved to Berkeley and baseball had taken over my life. One chilly winter morning my dad woke me and urged me outside to view what I now know was Comet Bennett. Mesmerized, my dormant comet interest flamed instantly, expanding to include all things astronomy. It stayed with me through high school (when I wasn’t playing baseball); I actually entered college with an astronomy major that I stuck with for several semesters, until the (unavoidable) quantification of concepts sapped the joy from me.
While I went on to pursue other things, my affinity for astronomy continued, and comets in particular remained special. Of course with affection comes disappointment: In 1973 Kohoutek broke my heart, a failure that somewhat prepared me for Halley’s anticlimax in 1986. By the time Halley’s arrived, word had come down that it was poorly positioned for its typical display (“the worst viewing conditions in 2,000 years”), that it would be barely visible this time around (but just wait until 2061!). Nevertheless, venturing far from the city lights one moonless January night, I found great pleasure locating (with much effort) Halley’s faint smudge in Aquarius.
After many years with no naked-eye comets of note, 1996 arrived with the promise of two great comets. While cautiously optimistic, Kohoutek’s scars prevented me from getting sucked in by the media frenzy. So imagine my excitement when, in early 1996, Comet Hyakutake briefly approached the brightness of Saturn, with a tail stretching more than twenty degrees (forty times the apparent width of a full moon). But as beautiful as it was, Hyakutake proved to be a mere warm-up for Comet Hale-Bopp, which became visible to the naked eye in mid-1996 and remained visible until December 1997—an unprecedented eighteen months. By spring of 1997 Hale-Bopp had become brighter than Sirius (the brightest star in the sky), its tail approaching 50 degrees. I was in comet heaven.
Things quieted considerably comet-wise after Hale-Bopp. Then, in 2007, Comet McNaught caught everyone off-guard, intensifying unexpectedly to briefly outshine Sirius, trailing a thirty-five degree, fan-shaped tail. But because of its proximity to the sun, Comet McNaught had a very small window of visibility and was easily lost in the bright twilight—it didn’t become anywhere near the media event Hale-Bopp did. I only found out about it by accident on the last day it would be easily visible in the Northern Hemisphere. With little time to prepare, I grabbed my camera and headed to the foothills east of Sacramento, where I managed to capture the image at the top of this post.
Following McNaught I vowed not to be caught off guard by a comet again. After enduring the frustration of seeing others’ images of spectacular Southern Hemisphere-only comets, my heart jumped last year when I came across a website proclaiming the approach of Comet PANSTARRS (a.k.a, C/2011 L4 in less glamorous astro-nerd parlance), discovered not by an individual, but by the Pan-STARRS automated telescope array atop Haleakala on Maui. Researching further, I learned that PANSTARRS could (fingers crossed) hang low in the western sky at magnitudes brighter than Saturn, for about a week beginning around March 10, 2013 (it will rise slowly each night, remaining visible as it fades for a few more weeks). Checking my calendar to see if I had any conflicts that week, I immediately remembered why those dates sounded so familiar—I’ll be on Maui for my workshop then! In fact, my first viewing of PANSTARRS could be almost literally in the shadow of the telescope that discovered it. It’s a sign*.
Since its discovery in June of 2011, astronomers have been monitoring PANSTARRS and updating its orbit and brightness curve—so far everything remains on track (and my crossed fingers are cramping). And as I followed PANSTARRS’ progress, rumbling of another comet could be heard, a comet that may significantly outshine PANSTARRS to achieve historic proportions: In December of this year, Comet ISON (how I long for the days when comets were people and not acronyms) may rival or surpass Hale-Bopp, perhaps even becoming bright enough to be viewed in daylight. (I have to say that you must be careful about such reports—the media seem more interested in generating audience than in actually getting things right.)
Are these comets a sure thing? Of course not. So I make no promises, except that I’ll be checking for updates daily (can you say OCD?) and will keep you posted. Chances are, if they develop as promised (hoped), you won’t have any trouble keeping track on your own (just Google their names for more information than you’ll ever need). And of course if I get any images of PANSTARRS when I’m on Maui, I’ll post them here. Stay tuned….
June 7, 2013
Comet PanSTARRS turned out to be a huge thrill (click image for details):
Comet PanSTARRS and New Moon, Haleakala, Maui

Comet PanSTARRS and the Grand Canyon by Moonlight, Yavapai Point

Moonlight, Comet PanSTARRS above the Grand Canyon, Yavapai Point
* Speaking of signs, Rob and I recently reconnected after many years with no contact (sadly, he didn’t go on to become a spy or astronomer either). We’re already talking about going out to see one or both of these comets together.
