Eloquent Images by Gary Hart
Insight, information, and inspiration for the inquisitive nature photographer
Yosemite at its Best
Posted on April 5, 2026
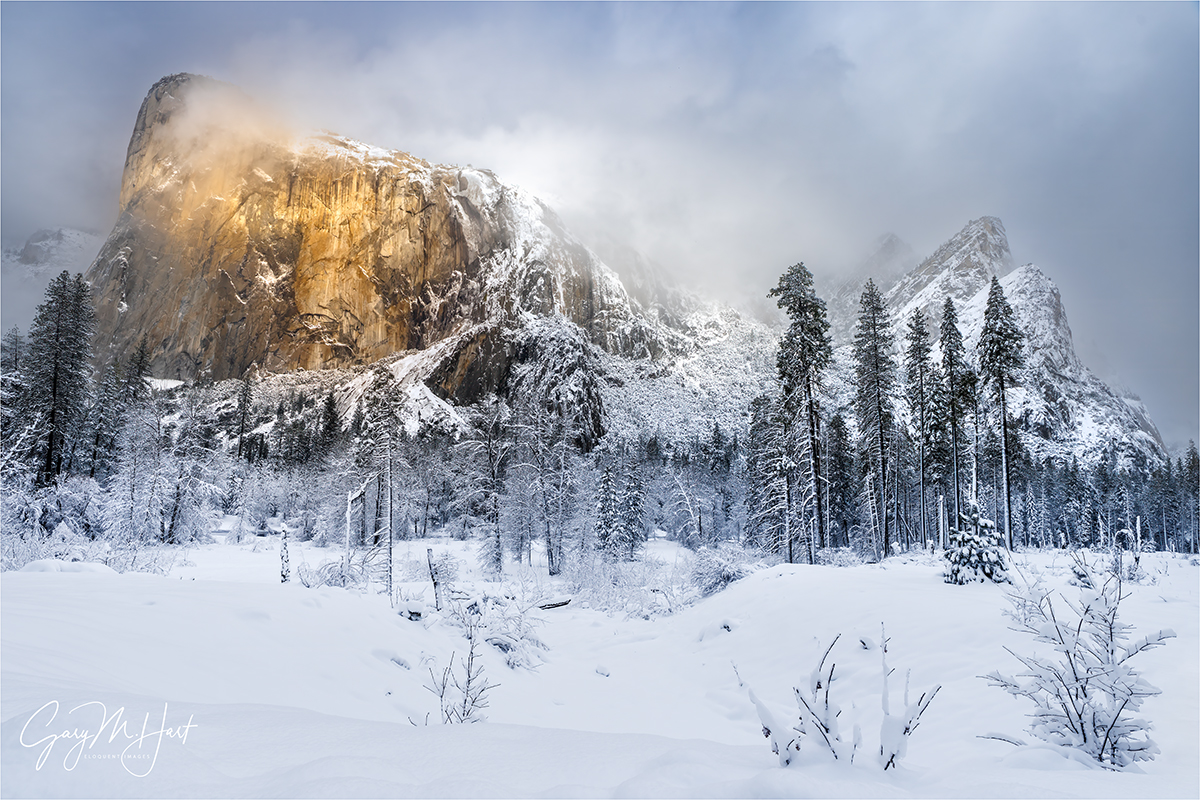
White Gold, El Capitan and the Three Brothers, Yosemite
Sony α1
Sony 16-35 GM II
1/100 second
F/10
ISO 100
If anyone had told me that my annual Yosemite Horsetail Fall photo workshop would get no opportunity to photograph the molten sunset light on El Capitan; that many of my go-to locations, including Tunnel View, would be inaccessible for the entire workshop; that Half Dome would be shrouded in clouds for all but a few hours; that the park would actually shut down the afternoon before our final day, I’d have started preparing to placate a lot of disappointed photographers. Instead, though all of that did in fact come true, this group got to see Yosemite at its absolute best.
Rather than the clear skies and sunset fire every Horsetail chaser prays for, the day before the workshop a series of cold winter storms descended on Yosemite, obscuring the sun and delivering more snow than I’ve ever had to deal with in 20 years of Yosemite photo workshops. In fact, I can’t think of any workshop at any location, including Iceland and New Zealand in winter, that had this much snow.
With all this white stuff came all the inconveniences you might imagine (and some you might not): challenging driving, difficult (to impossible) access to many photo sites, chilly photography conditions, wet clothes and gear, and vanishing Yosemite icons. Not only were some of my favorite views inaccessible, the views that were accessible aren’t much use when the featured monolith or waterfall isn’t visible.
Some of my workshops locations are so spread out, I don’t have a lot of location timing flexibility. But Yosemite Valley’s compactness enables me to change plans on the fly. I start each workshop with a mental list of must-see locations, plus a list of secondary and tertiary locations to augment the prime spots as schedule permits—exactly when we get to these locations depends on the conditions. But all this workshop’s snow really forced me to dig deep into my (lifetime’s worth) bag of location tricks.
One of my favorite locations to take my groups is a riverside view of El Capitan that has been unofficially, and affectionately, dubbed “Tahiti Beach.” Though no secret to photographers, being a little bit off the road with no obvious trail to the river makes Tahiti Beach relatively free of tourists. But if you’ve been in one of my Yosemite workshops, you’ve been here. Not just a great El Capitan view, it’s hands-down the best Yosemite Valley view of the Three Brothers. And if that’s not enough, Tahiti Beach’s proximity to an especially flat stretch of the Merced River means great reflections. (Continued below)
“Tahiti Beach”


Throughout Yosemite, the best Merced River reflections are possible when the spring snowmelt has subsided and the rushing Merced has slowed to a more leisurely pace—that’s usually from mid-summer through early the following spring. That’s the case at Tahiti Beach too, but if you’re especially lucky, you’ll find yourself here at peak spring runoff following a wet winter, usually sometime in May, when the river rises enough to leave its banks and flood the meadow and form a shallow, perfectly still reflective pool.
Tahiti Beach can be very nice in late afternoon light, but I’m especially fond of the morning’s first sun on El Capitan, and the opportunity to add a reflection makes this one of my favorite spots for that. In a normal Yosemite workshop, conditions are predictable enough that I can get my group to each of my prime locations in the best conditions, and Tahiti beach is often on the menu for our second morning.
This year, a look at the forecast was enough to know that the conventional location rules would be completely different for this workshop, and I emphasized in the orientation that we’d need to be quick on our feet to adjust to rapidly changing conditions. That reality became immediately clear from the instant we set out for our first shoot, and was further reinforced the following morning, when my plans were immediately thwarted by closed roads and low clouds at several of my first-choice locations.
Refusing to be defeated, we slowly circled the valley, waiting for the inevitable clearing. I eventually took everyone on a short but sweet hike to an off-the-beaten-path spot where we enjoyed a brief but beautiful view of Half Dome before the clouds lowered again. Leaving there in very limited visibility, my plan was to circle back to the Lower Yosemite Fall trail, hoping that we might be able to get close enough to the fall to photograph it through the low clouds. I was afraid that this driving and waiting for openings was frustrating my group, but took heart in their unbridled awe for the beauty surrounding us.
Most of Yosemite Valley is navigated via a pair one-way roads: eastbound Southside Drive for those entering the park; westbound Northside Drive for those exiting; and a mid-point crossover to shortcut the loop. As we navigated the crossover and headed back east on Southside Drive, I saw hints that El Capitan might soon emerge and made a quick decision to pull over at the parking area for Tahiti Beach. Tahiti Beach wasn’t part of my plan for this morning, but I knew there were no more good views of El Capitan beyond here.
I parked and exited my car, and told everyone to stay put while I surveyed the scene. Though access to Tahiti Beach isn’t treacherous, even in good conditions it can be a little problematic for people with mobility problems—fortunately, multiple routes down to the river that range from short-but-steep to long-but-gradual allow me to offer my group multiple choice. But this morning I also had to factor in all this fresh snow that meant whichever route we chose, we’d be blazing a new trail.
About the time I decided I probably could get everyone down to the river, El Capitan and the Three Brothers popped out of the clouds. Though this roadside parking area provides nice views of El Capitan and the Three Brothers, its foreground—a scrubby meadow filled with similarly scrubby shrubs and small trees—can’t compete with the reflections possible at the river. But the snow had erased all of the negatives, replacing it with an undulating carpet of pristine white. Since there was no telling how long the increasingly spectacular El Capitan and Three Brothers view would last, I made a snap decision to not attempt to get to the river and just shoot from here.
Within minutes a shaft of warm sunlight split the swirling clouds to spotlight El Capitan, and I knew I’d made the right call. That was further validated when the direct light disappeared for good within a few minutes. Fortunately, the clouds stayed open long enough for everyone to get a wonderful assortment of beautiful and truly unique images of two Yosemite icons.
This workshop was filled with stories like this: frustrating disappearances, surprise appearances, sudden adjustments to plans, and ubiquitous beauty. Through it all, my group responded with euphoric enthusiasm, ignoring minor discomfort and inconvenience. Despite ending a day early, we all came away with memory cards filled with one-of-a-kind Yosemite images—no small feat in one of the most photographed places on Earth.
Workshop Schedule || Purchase Prints || Instagram
The Many Faces of El Capitan
Click any image to scroll through the gallery LARGE


, Yosemite")


Let’s Get Vertical (Again)
Posted on November 16, 2025

New Day, Tunnel View, Yosemite
iPhone 17 Pro
(This seed of today’s blog is a post from many years ago—but the image and its story are brand new.)
What’s your orientation?
I’ve always questioned the reasoning behind labeling horizontally oriented images, “landscape,” and vertically oriented images, “portrait.” Despite my profession as a landscape (-only) photographer, nearly half of my images use “portrait” orientation. So it concerns me that this arbitrary naming bias might subconsciously encourage photographers to default to a horizontal orientation for their landscape images, even when a vertical orientation might be best.
The orientation of an image imparts implicit visual motion that’s independent of the eyes’ movement between an image’s visual elements. Photographers who understand that viewers’ eyes tend to move along the frame’s long side have an extra tool for guiding those eyes, and even to convey a mood.
For example, when orienting an image of a sunset on the coast, it’s easy to default without thinking to the same horizontal orientation that the distant horizon follows. And a waterfall image that’s oriented vertically certainly encourages the viewers’ eyes to move in the same direction as the water’s motion, so orienting the frame to match certainly seems reasonable. But, despite the natural instinct to match the frame’s orientation to the scene’s dominant flow, there is no absolute best way to orient an ocean, waterfall, or any other scene—there’s always a choice, and that choice matters. While matching the image’s orientation to the scene’s natural movement in this manner can instill a calmness to the image, a vertical ocean sunset, or horizontal waterfall, can create visual tension that can also be quite compelling.
Since I don’t need to convince most landscape photographers to take more horizontal pictures, I’m going to concentrate on the benefits of a vertical frame. One thing I especially like about orienting my landscape scenes vertically is the way it moves my viewer’s eyes through the scene from front to back, enhancing the illusion of depth that’s so important in a two-dimensional photo. And because of a vertical frame’s relative narrowness, a foreground element (that might get lost in a wider horizontal frame) instantly becomes the focal starting point that starts my viewer’s visual journey through the frame to whatever striking background I want to feature.
More than just guiding the eye through the frame, vertical orientation narrows the frame, enabling me to eliminate distractions or less compelling objects left and right of the scene’s prime subject(s). This makes vertical my preferred orientation when I want to emphasize an especially striking foreground from above (like Tunnel View), or a sky brimming with colorful clouds or a host of stars.
While a horizontally oriented scene is often the best way to convey the sweeping majesty of a broad landscape, I sometimes enjoy guiding my viewers’ eyes with vertical compositions of traditionally horizontal scenes. Tunnel View in Yosemite, where I think many photographers tend to compose too wide, is a great example. The scene to the left of El Capitan and the right of Cathedral Rocks just can’t compete with the El Capitan, Half Dome, Bridalveil Fall triumvirate, yet the world is full of Tunnel View images that shrink this trio to include (relatively) nondescript granite.
That’s why, when the foreground and sky aren’t particularly interesting, I often go for fairly tight horizontal compositions at Tunnel View. And while Tunnel View is among the most spectacular views on Earth, the foreground beneath the vista is usually quite bland, and overhead California’s chronic blue skies are frustratingly boring. So I’m afraid many of my Tunnel View images are horizontal, and rarely stray far left of El Capitan, or right of Cathedral Rocks.
Fortunately, there are exceptions. One of my favorite exceptions is those rare times when fresh snow smothers the evergreen valley floor. Another favorite is dramatic clouds, whether in the valley below or sky above. Faced with visual treats like this, vertical frames are wide enough to feature the foreground and/or sky without diluting the Tunnel View drama by including extraneous granite.
More specifically…
In Yosemite, one thing I never count on when there’s no weather in the forecast is a nice sunrise. That’s because Yosemite’s (default) blank skies, coupled with Tunnel View’s east-facing view, forces sunrise shooters to photograph fully shaded subjects (El Capitan, Half Dome, Cathedral Rocks, and Bridalveil Fall) against the brightest part of the sky. That’ why, without clouds, Tunnel View is much better late afternoon to sunset. For me, on a typical (empty sky) Yosemite morning, the real show is the first light on El Capitan, which arrives about 15 to 20 minutes after sunrise. On mornings with no clouds forecast, I usually start my groups with an El Capitan reflection of that first light—not only is this a reliably beautiful sight, everyone gets to sleep an hour longer (since going for the actual sunrise means being on location at least 30 minutes before sunrise instead of 20 minutes after).
But for whatever reason, and despite a promise of clear skies all morning (until a storm was forecast to start moving in that afternoon), I decided to hedge my bets on the final sunrise shoot of this month’s Yosemite Autumn Moon photo workshop. Normally we spend this final morning at Bridalveil Creek, arriving as soon as it’s light enough to start shooting in the dense shade there. Instead, I got everyone out about 30 minutes earlier and headed straight to Tunnel View. While this wouldn’t be early enough to shoot sunrise from start to finish, it would get us there in time for the best color in the remote chance the clouds arrived earlier than forecast. And that’s exactly what happened.
We were pulling in just as the cirrus precursors to the evening rain started lighting up. Since my group had already been up here twice, everyone was out of the cars and grabbing their gear before my seatbelt was off. Half the group beelined to the standard view with my brother (who was assisting me in this workshop), while the rest joined me on a granite ledge above the TV parking lot (a similar view, but with fewer people—also a little more physically challenging, and not the favorite spot of anyone bothered by heights).
As beautiful as the sky was, since I rarely photograph at Tunnel View anymore, my camera stayed in the car and I was content to just enjoy the show. Or so I believed. But as I stood there watching the color keep getting better and better, I started to second guess my decision to forego my camera. I knew I could be down to my car any back in less than 5 minutes, but the color was changing so rapidly, I also knew that would mean missing the best stuff. So I whipped out my iPhone 17 Pro, put it into RAW mode, and quickly framed up the scene.
With the great sky and bland foreground, I didn’t consider anything but vertical compositions. At first I went wide enough to include Bridalveil Fall, and though it was flowing nicely for autumn, it really wasn’t impressive enough to justify going that wide. So I quickly tightened my framing to include only El Capitan and Half Dome, putting in only the minimum amount of foreground so I could maximize the spectacular sky. I’d love to tell you what focal length, f-stop, and shutter speed I used, but my iPhone made all those decisions for me, and clearly did a pretty great job. What a time to be alive!
A few thoughts on iPhone image quality
Okay, seriously, as great as the iPhone (or any other current smartphone) camera is, let me remind you that smartphone image quality is nowhere near the quality of today’s full frame sensors and lenses. And I actually got a firsthand reminder of this fact while processing this image. Though I was truly blown away by the detail my iPhone captured, on the day I processed today’s image, I also prepared three large prints that had been ordered by an interior designer for the home of one of her customers. Though two of these images were captured more than 15 years ago with my Canon 1DS III (21 megapixels); the other was about 10 years old, from my Sony a7R II (42 megapixels), I was pretty confident the quality and detail this job required was all there.
-

- Stillness, South Tufa, Mono Lake
-

- First Light, Yosemite Valley
-

- Yosemite Sky, Tunnel View, Yosemite (2016)
And because maximizing this quality was the highest priority for her customer, she opted for custom prints rather than just going through my standard (much cheaper) SmugMug prints website (www.garyhartprints.com), where the images are pre-uploaded, medium resolution jpegs waiting for anyone to order (full disclosure: I’ve never had a single complaint about one of these prints). To prepare the images for printing, I returned to the original files and did extensive prep (using the latest processing technology) to ensure that the noise reduction, up-res, and sharpening got the most out of every single pixel.
I am absolutely certain I could print an iPhone image as large as these custom orders were (24×36) without apologizing. But getting up-close and personal with these three full-frame sensor prints at the same time I was processing an iPhone image, the detail captured left little doubt that, for anything much larger or more demanding than computer/web display, smartphone capture has a long way to go to catch “real” cameras. (But I’m still pretty thrilled to know that I can get useable quality any time Nature catches me without my real camera.)
Join me in Yosemite
Workshop Schedule || Purchase Prints || Instagram
Let’s Get Vertical
Click any image to scroll through the gallery LARGE
, Yosemite")


Super? Moon
Posted on November 8, 2025
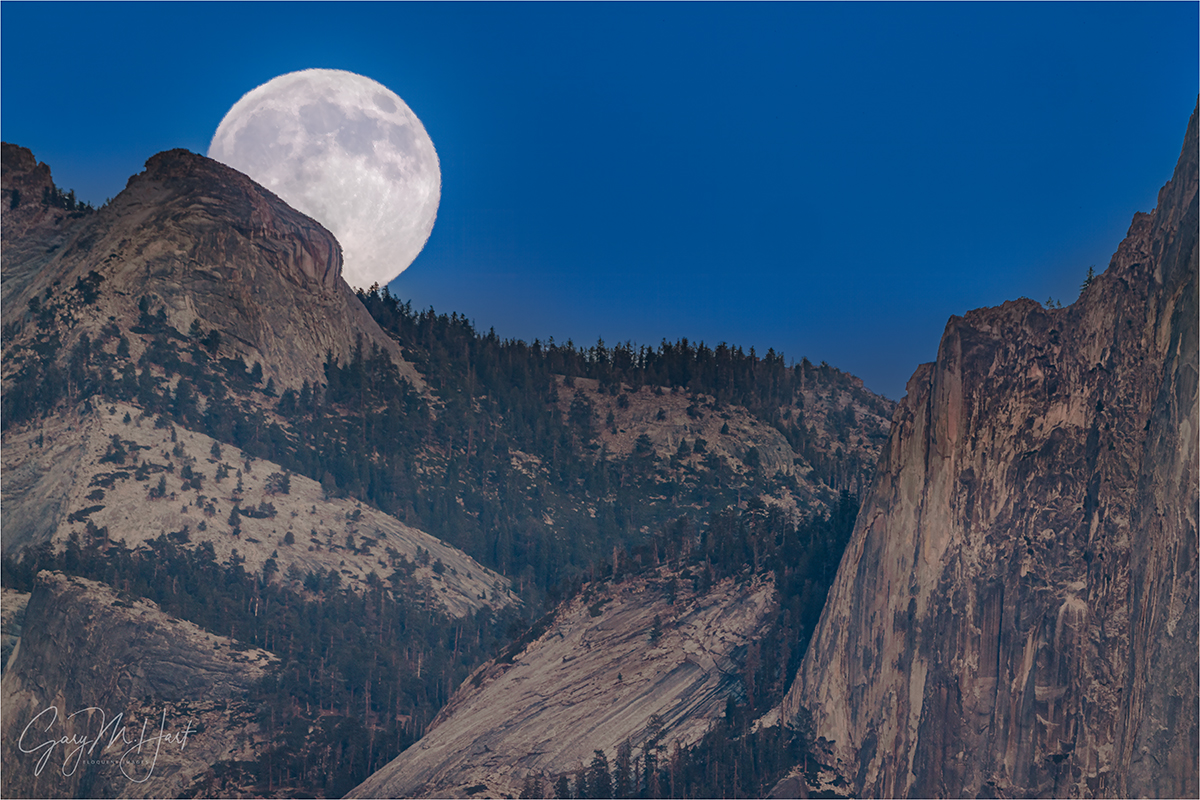
November Moon, Half Dome from Tunnel View, Yosemite
Sony a7R V
Sony 200-600 G
Sony 1.4x teleconverter
ISO 200
f/9
1/80 second
This week’s full moon was a “supermoon”—or, as the media frequently proclaimed, “The biggest moon of 2025!” And while that is technically true, the size difference between a super and average moon is barely perceptible.
So, as a public service, I’ve dusted off and updated a prior article explaining the supermoon phenomenon (any hyperbole)—and what better time to share it than just days after photographing the November supermoon?
What’s the big deal?
So what exactly is so “super” about a “supermoon?” Answer: Not much. Or, maybe a better way to answer the question would be: When presented with a random series of full moon images, would you in fact be able to identify the supermoon? Doubtful. So why the media frenzy? And why do we see so many huge moon images every time there’s a supermoon? So many questions….
Celestial choreography: Supermoon explained
To understand what a supermoon is, you first have to understand that all orbiting celestial bodies travel in an ellipse, not a circle. That’s because, for two (or more) objects to have the gravitational relationship an orbit requires, each must have mass. And if they have mass, each has a gravitational influence on the other. Without getting too deep into the gravitational weeds, let’s just say that the mutual influence the earth and moon have on each other causes the moon’s orbit to deviate ever so slightly from the circle it seems to be (without precise measurement): an ellipse. And because its orbit isn’t round, as the moon circles Earth, its distance varies with the position in its orbit.
An orbiting object’s closest approach to the center of its ellipse (and the object it orbits) is at perigee; its greatest distance from the ellipse’s center is apogee. And the time it takes an object to complete one revolution of its orbit is its period. For example, earth’s orbital period around the sun is one year (365.25-ish days), while the period of our moon’s orbit is slightly more than 27 days.
But if the moon reaches perigee every 27 days, why don’t we have a supermoon every month? That’s because we’ve also added “syzygy” to the supermoon definition. In addition to being a great Scrabble word, syzygy (though it would cost you 2 blank tiles) is the alignment of celestial bodies—in this case it’s the alignment of the sun, moon, and earth (not necessarily in that order). Not only does a supermoon need to be at perigee, it must also be syzygy.
Syzygy happens twice each month, once when the moon is new (moon between the sun and Earth), and again when it’s full (Earth between the sun and moon). While technically a supermoon can also be a new moon, the full moon that gets all the press because a new moon is lost in the sun’s brightness and never visible, so no one cares. Since Earth circles the sun while the moon revolves around Earth, to achieve syzygy, with each orbit the moon has to travel a couple extra days to catch up. That’s why the moon reaches perigee evey 27 days, but syzygy comes every 29.5 days—the moon’s distance from earth is different with each syzygy because it comes at different points in the orbit.
The view from earth: Supermoon observed
While lunar perigee, apogee, and period are precise terms that can be measured to the microsecond, a supermoon is a non-scientific, media-fueled phenomenon loosely defined as a moon that happens to be at or near perigee when it’s full. To you, the viewer, a full moon at perigee (the largest possible supermoon) will appear about 14% larger and 30% brighter than a full moon at the average distance. The rather arbitrary consensus definition of the distance that qualifies a moon as a supermoon is a full moon that is within 90 percent of its closest approach to earth.
I really doubt that the average viewer could look up at even the largest possible supermoon and be certain that it’s larger than an average moon. And all those mega-moon photos that confuse people into expecting a spectacular sight when there’s a supermoon? They’re either composites—a picture of a large moon inserted into a different scene—or long telephoto images. (I don’t do composites, but they’re a creative choice that I’m fine with others doing as long as they’re clearly identified as composites.)
For an image that’s not a composite, the moon’s size in the frame is almost entirely a function of the focal length used. I have no idea whether most of the moons in the full moon gallery below were super, average, or small.
Can you identify the supermoon?
, Yosemite")

Well, if you said the big moon is a supermoon, you’d be right. But it’s kind of a trick question, because these are both images of Tuesday’s supermoon. The size difference is entirely a function of the focal length I used: around 100 mm for the small moon, more than 800 mm for the large one. What these images also make clear is that what I gain in moon size, I lose in field of view—you can’t have both. So when you see a wide angle scene with a huge moon, don’t think supermoon, think composite: a big moon dropped into a wide scene. Or worse still: AI. (Yuck.)
Every full moon is super
As far as I’m concerned, a rising or setting full moon is one of the most beautiful things in nature. But because a full moon rises around sunset and sets around sunrise, when most people are eating dinner or sleeping, seeing it is often an accident—maybe the moon catches your eye as you walk out of the store, or you spot it in near the horizon when your car rounds a bend. But viewing a moonrise or moonset doesn’t need to be an accident. There’s loads of information available online that will tell you which night to look for a full moon, and the general time and direction to look. And for people like me, who try to photograph moonrises and moonsets around an alignment with a terrestrial feature, there is also slightly more technical info that enables more precise planning.
About this image
Which brings me to this week’s image (images), captured Tuesday evening from my very favorite location to view a moonrise: Tunnel View in Yosemite. Why is Tunnel View my favorite moonrise location? Because I can’t think of a better combination beautiful subjects and distant view (nearly 9 miles to Half Dome), that allows me to photography the moon large with with a long telephoto lens and include a striking foreground subject. And if I just want to use the moon to accent a broader scene, the wide angle view at Tunnel View is not too shabby either.
As with most of my moonrise images, this one had been on my radar for over a year. And like many of my moonrise opportunities, I scheduled a workshop so I could share it with other enthusiastic nature photographers. But, since I don’t care about supermoons, I had no idea this November full moon would be a supermoon—and as I grew tired of hearing in the preceding weeks, the largest full moon of 2025! (Yawn.)
The way this month’s full moon set up, I was able to get my group a couple of practice moonrises from other Yosemite locations leading up the Tuesday moonrise—one with a reflection of Half Dome, and another from Glacier Point. Not only did they lear exposure and processing techniques that allow the capture of lunar and landscape detail with a single click, they got beautiful (albeit wider, with a small moon) moon images. I also demonstrated in a training session how I plot the moonrise (without using celestial plotting apps like Photographer’s Ephemeris and Photo Pills).
There’s often drama surrounding an impending moonrise as I stress about forecasts that promise clouds, or a sky filled with more clouds than forecast. This year, despite the threat of rain the following day, the Tuesday evening forecast was clear skies. And true to expectations, the entire afternoon was cloud free.
I got my group up to Tunnel View about a half hour before the moon’s expected arrival, so we all had plenty of time to get set up and settled in. About half of the group joined me on a granite slab above the Tunnel View parking lot, with the rest of the group setting up with my brother Jay and the hoards of other photographers at the wall in front of the parking lot (the standard Tunnel View vista).
I had two tripods set up: one with my (big and sturdy) RRS TVC-24L, with my Sony a7R V and 1.4X teleconverter; one with my Sony a1 and 100-400. My plan was to switch between the two bodies, and to switch out the 200-600 for my 24-105 once the moon separated from the landscape. In other words, I’d be using the a1 with the 100-400 for the entire shoot, and the a7R V with the 200-600 (first) and 24-105 (after a few minutes).
As we waited, I reminded my group that the moon would appear just a little left of Half Dome at around 4:45 (about 15 minutes before sunset), plus/minus 5 minutes. I also told my group that, depending on their camera and metering skills, we’d be able to continue photographing up to 15 minutes after sunset before the foreground became too dark to capture both lunar and landscape detail with one click. The moon arrived right on schedule, right around 4:44 and we were in business….
So maybe the best thing to come of the recent supermoon hype is that it’s gotten people, cameras or not, to appreciate the beauty of a full moon. If you like what you see, mark your calendar for every full moon and make it a regular part of your life—you won’t be sorry.
Join me in a Yosemite workshop
Workshop Schedule || Purchase Prints || Instagram
Tunnel View Moonrise Collection (Super and Otherwise)
Click any image to scroll through the gallery LARGE


, Yosemite")


Grand Finale
Posted on February 6, 2025

Lunar Lift Off, El Capitan, Yosemite
Sony α1
Sony 200-600 G
Sony 1.4x teleconverter
ISO 800
f/13
1/25 second
For most of my full moon workshops, I try to schedule the moonrise main event for the workshop’s final sunset. Sometimes other factors prevent this (for example, in Yosemite I try to avoid weekends), but when the schedule works, a nice moonrise gives the group something exciting to anticipate throughout the workshop. This becomes especially important when some or all of the workshop’s hoped-for conditions fail to materialize.
Last month’s Yosemite Winter Moon workshop lacked to winter snow and cloudy skies we hope for in a Yosemite winter workshop, but the moon (among other things) saved the day for us by not only giving us something to look forward to, but also by photobombing an earlier sunset. The true star of that prior sunset was the clouds and color, and as nice as it was to accent the scene with the moon, it was the final night moonrise that I most looked forward to.
As I’ve written before, despite all the unjustified “supermoon” hype, the key to photographing a big moon is focal length—the longer the better. Period. If you don’t care about what’s in the foreground, or for that matter choose not to include any foreground at all, any location where the moon is visible will do. But if you want to complement your legitimate big moon (a moon image that happens in one click) with a striking landscape feature, the farther you position yourself from your landscape subject, the longer the focal length you can use, and the bigger the moon will be. Of course if you make the moon bigger with a longer focal length, the less of your foreground you can include, and the more precise the moon/foreground alignment must be.
In Yosemite, the best place to set up for a telephoto moonrise that also includes photo-worthy foreground features, is Tunnel View. At Tunnel View, the prime moonrise subjects are El Capitan and Half Dome, three and eight miles distant. From there, I can include all of Half Dome with a focal length up to 400mm; with a longer lens, I can enlarge the moon further, while still including some of Half Dome—if the alignment is right.
The most important part of photographing a moonrise from Tunnel View is to align it with a desirable foreground subject. Most of the year, the moon rises much too far south to include in a Tunnel View scene, but for 2 or 3 months each winter, the full moon rises far enough north to align beautifully with Tunnel View’s magnificent monoliths.
But success is not simply a matter of showing up at Tunnel View the night of the full moon. Each winter the solar/lunar choreography is different, which is why the moon is all over the place in my many Tunnel View moonrise images in the gallery below: left of Half Dome, right of Half Dome, directly aligned with Half Dome, and occasionally closer to El Capitan than Half Dome.
This winter’s geometry was especially exciting to me when I realized the January moon would rise farther north, and therefore closer to El Capitan, than I’d ever photographed it. I have photographed the moon arriving from behind El Capitan’s vertical face, but I’d never seen it come up from behind the top of El Capitan. Always up for photographing something new (especially in Yosemite), I scheduled a workshop for it.
Which is how my workshop group and I ended up at my favorite Tunnel View vantage point on a Sunday evening last month. Sunset that evening was 5:05, and my calculations said the moon would at just about the same time—pretty much perfect timing for a moonrise, because you want the sky dark enough for the moon to stand out in contrast, while still bright enough that the landscape has enough light to reveal detail without blowing out the moon.
I’d set up with two tripods and cameras, one with my 200-600 lens, the other my 24-205 lens. The long telephoto was for the moon’s arrival; the wider lens was for when the moon elevated enough to separate from El Capitan. I’d planned to increase the magnification of the telephoto with my 2x teleconverter, but trying to attach the teleconverter to the lens, I fumbled it and helplessly watched it roll down the steep granite toward a vertical drop of several hundred feet. Fortunately, it lodged in small crack just before taking the plunge, but when I put it on the view was completely blurred, so I switched to my 1.4X teleconverter, giving me a focal range of 280-840.
As the sun dropped and the time approached, I became aware that a thin film of clouds had drifted across the eastern horizon above El Capitan—so thin that they weren’t visible at all in daylight brightness, but just substantial enough to reflect some color as sunset approached.
The moon arrived right on schedule, and we immediately started clicking. My earliest shots were almost entirely long telephotos, like this one at 840mm. It’s always shocking to see how fast the moon moves across a long telephoto frame, but I soon started mixing in a few wider frames (that required less frequent adjustments) as the moon started separating from El Capitan. By this time sky had pinked up beautifully, adding an element of color I hadn’t expected.
We all come to a workshop with expectations, students and leaders alike, but rarely are all of them met. And while the January group’s hopes for snowy winter scenes were dashed, I think that loss was more than made up for by other things we witnessed, some complete surprises, and some just a little better than our already high expectations—like this sunset moonrise to finish the workshop.
Join me in a Yosemite photo workshop
Workshop Schedule || Purchase Prints || Instagram
Yosemite Moonrise Collection
Click any image to scroll through the gallery LARGE


The Best Camera Is…
Posted on January 22, 2025
Framed Reflection, El Capitan, Yosemite
Apple iPhone 16 Pro
24mm focal length equivalent
ISO 64
f/1.8
1/1150 second
… The one that’s with you
Yes, I know it’s a cliché, but like most clichés, this one is founded on truth. Even people like me, who pay the bills with our pictures, don’t carry our “real” cameras 24/7. In those instances, when I see beauty I deem worthy of recording, I’m happy that my iPhone (which is always with me) gives me serviceable images.

Mobile Dinosaur
In my prior post, I listed 10 reasons to become a nature photographer. Number one was saving memories; number three was low-cost start-up, and cited the very good cameras included in every smartphone.
I resort to iPhone photography not to save money, but for convenience in day-to-day living. Virtually all of my iPhone photos are quick snaps of transient life moments, from special family times that I want to save, to quirky observations worthy of sharing (like a dinosaur riding in the back of a pickup on Highway 99), to simply saving things I don’t want to forget (for example, a business card, or a humorous comment on my daily Starbucks drink).

Inner Beauty, Japanese Maple, Portland Japanese Garden
I’m definitely not one of those photographers who actively pursues creative smartphone photography, but I don’t hesitate to pull out my iPhone when natural beauty moves me and my adult equipment isn’t available. Though the resulting images rarely amount to anything, the simple ability to save the moment gives me comfort.
On the other hand, there was that time in May 2023, when my iPhone enabled me to capture the famous maple tree at the Portland Japanese Garden. I’d arrived just hoping to get a simple snap of the celebrity tree, but soon found myself in full photographer mode, switching my phone to raw capture, dropping down to grass level, and going ultra-wide to get an angle that emphasized the web-like canopy and its shadow on the grass. Even though there are already thousands of similar images of this beautiful little tree, my own version turned out to be one of my favorites of the year.
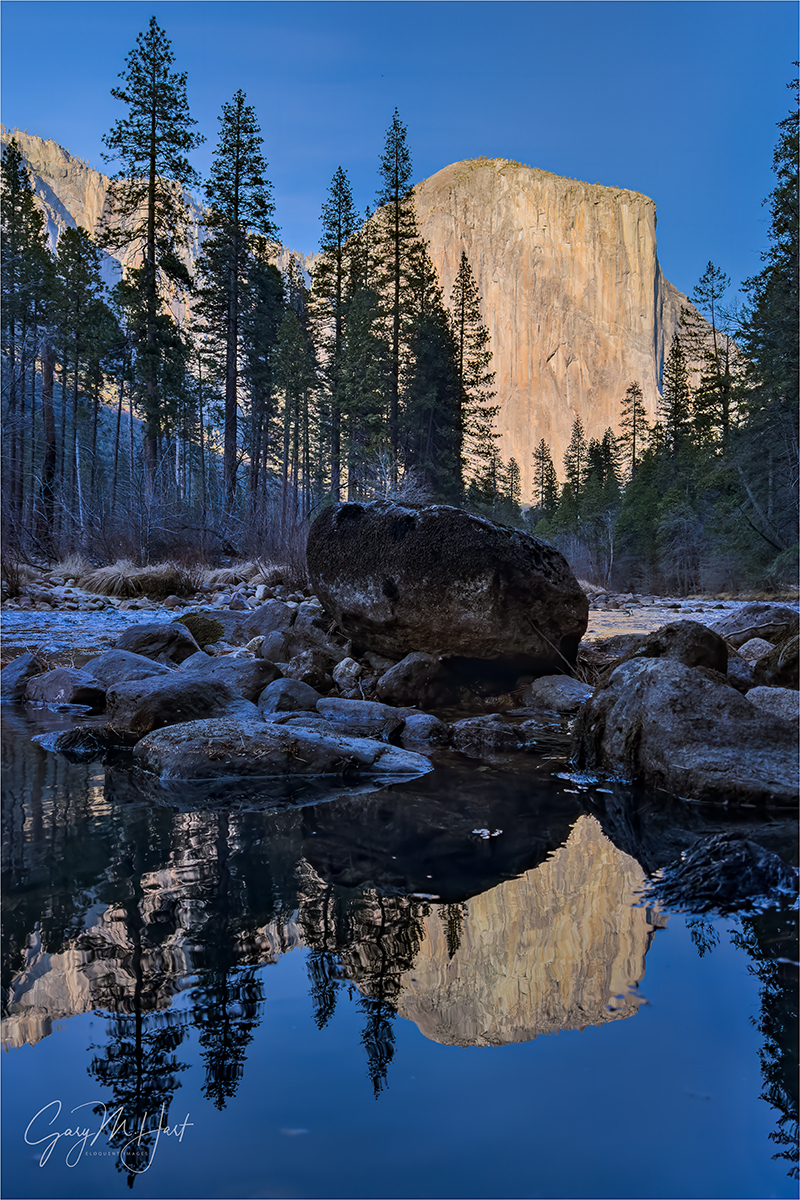
In that case, I was on vacation with my wife and had made the conscious decision before leaving not to take my camera gear, with zero regrets. The situation behind today’s image, that found me with my workshop group a mile or so downriver from El Capitan, was a little different.
It was earlier this month, and I’d taken my group to a view of El Capitan that I’ve photographed so many times, in far more photogenic conditions, that I didn’t expect to find anything new. Given the blank sky, I just left my camera bag in the car and I guided them on the short walk to my spot, fully intending to simply enjoy the view.
I actually have history with this location that goes way back to my earliest digital photography days. One night I was here with my Canon 10D for moonlight photography. Perched 15 vertical feet above the Merced River, I set up my tripod and reached for my 17-40 f/4 L lens, but somehow fumbled it into the dark void below. I couldn’t see a thing, but will never forget the sounds: thump (one bounce off the dirt wall), crack (another bounce off a rock), and splash. Without hesitation, I grabbed my tripod and camera bag and pivoted to the car. The next morning I returned, risking life and limb to scramble down to the river, where I eventually extracted my lens from about 18 inches of water. There was no sign of external damage, but the front lens element revealed water to above the mid-point—enough that if this had been a cartoon, I’d no doubt have seen small fish swimming by.
This spot has changed somewhat since then. Directly on the downstream side of a 90-degree bend in the river, 20 or so years of spring high water have eroded the riverbank, at some point taking a fairly large tree with it. Though the route down to the river is still quite steep, it’s no longer as treacherous as it was when I recovered my drowned lens all those years ago. When one of the people in my group found his way down to the river, a couple more followed, and soon I had to climb down to check out the view myself.
I’d never actually photographed from river level here, so it was cool to find a new perspective. As I can’t help doing, even when I don’t have my camera with me, I started composing shots in my head. My eyes went to a nearby pool, mostly walled-off by rocks from the Merced River’s main flow, reflecting nothing but blue sky. But when I got down on my knees and leaned out over the water as low and as far as my body would allow, I found a position that included a mirror reflection of El Capitan’s upper half—definitely photo-worthy. Because I didn’t have my gear, I hailed one of my workshop students and pointed the shot out to him. He came over to check it out, but decided getting his camera in position for the reflection would be a little too treacherous—both for him and his camera.
When he returned to what he’d been working on, I got the bright idea to whip out my iPhone and give it a try. Had I had my own camera and tripod, I might have tried the shot that way, come to the same conclusion my student did, and just forgotten about it. But with my phone, I was able to lie on my stomach, stretch my arm as far across the water as I could, and snap a one-handed picture.
Since I couldn’t actually see the screen while taking that picture, I retracted my arm and reviewed my result. Despite being not straight, and riddled with several other compositional flaws, it was instantly clear that there really was something photo-worthy there. I switched my Camera app to raw capture and tried again. And again, and again, reviewing and refining like this about a half dozen times, until I was satisfied that I’d gotten it right—the last shot I took is the one you see here.
I know people who claim that today’s smartphone cameras rival full frame cameras, and that there really is very little reason to invest in large-sensor mirrorless or DSLR camera systems anymore. And I’ll acknowledge that today’s smartphone cameras are indeed amazing, absolutely worthy of “best” camera status when no other cameras are available. Which is why I’m very happy to have had my iPhone when I came across a view of El Capitan that I didn’t have. For digital display, and even decent size prints, this iPhone image is fine. But at full resolution, when compared side-by-side with this iPhone 16 Pro image, the difference in detail and clarity captured by my full-frame Sony gear is not even close. (Other large-sensor cameras, versus other smartphone cameras, will yield similar differences.) So it should come as no surprise that, for the foreseeable future, I’ll be lugging my full frame cameras, bulky lenses, and sturdy tripod, any time quality is essential.
Join Me in Yosemite
Workshop Schedule || Purchase Prints || Instagram
Speaking of Seeking Different Views of El Capitan…

, Yosemite")


Visualize the Future
Posted on May 6, 2024

Twin Falls, Ribbon Fall and Bridalveil Fall, Yosemite
Sony α1
Sony 16-35 f/2.8 GM
ISO 50
f/16
2.5 seconds
Virtually every scene I approach with a camera is beautiful, but a beautiful scene isn’t enough if all the parts don’t work together. Human experience of the world differs greatly from what the camera captures—the photographer’s job is to understand and use those differences.
Ansel Adams and visualization
Most photographers know that Ansel Adams visualized his final print, and the darkroom work necessary to create it, before clicking the shutter. This ability to look into the future of each capture is part of what set Ansel Adams apart from his peers.
But Adams’ extensive darkroom work is often cited by digital photographers defending their over-processesed images. We’ve all heard (and perhaps even uttered ourselves) statements like, “Ansel Adams spent more time in the darkroom than he did in the field,” or “Ansel Adams would love Photoshop.” Perhaps true, but using Ansel Adams’ darkroom mastery to justify extreme Photoshop processing misses a significant point: Adams’ mental picture of the ultimate print was founded upon a synergistic relationship between his own vision and his camera’s vision, coupled with a master’s control of capture variables like composition, light, motion, and depth. In other words, Adams’ gift wasn’t merely his darkroom skills, it was an overarching vision that enabled him to make decisions now based on invisible realities he knew he’d encounter later.
I bring this up because I’m concerned about many photographers’ Photoshop-centric “fix it later” approach that seriously undervalues capture technique. This mindset ranges from simple over-reliance on the LCD for exposure with no real understanding of the histogram or how metering works (shoot-review-adjust, shoot-review-adjust, shoot-review-adjust, until the picture looks okay; or shoot so it looks good, not realizing the exposure is wrong until they get it on their computer), to photographers who channel their disappointment with an image into an overzealous Photoshop transformation, pumping color, adding “effects,” or inserting/removing objects until they achieve the ooooh-factor the image lacks.
The better approach is to understand the potential in a scene while actually viewing it in Nature, camera in hand, then to anticipate the processing the image will require and shoot accordingly. In other words, Photoshop should inform capture decisions, not fix them.
Putting Photoshop in its place
Every image ever captured, film or digital, was processed. Just as the processing piece was easy to ignore when the exposed film you sent to a lab magically returned as prints or slides, many digital shooters, forgetting that a jpeg capture is processed by their camera, brag that their jpeg images are “Exactly the way I shot them.” Trust me, they’re not.
Whether you shoot monochrome film, Fuji Velvia slides, low-compression jpegs, or (especially) the latest smartphone there’s nothing inherently pure about your “unprocessed” image. On the other hand, digital landscape photographers who understand that processing is unavoidable, rather than relinquish control of their finished product to black-box processing algorithms built into the camera, usually opt for the control provided by raw capture and hands-on processing.
Unfortunately, Photoshop’s power makes it difficult for many (myself included) to know where to draw the processing line. And every photographer draws that line in a different place—one photographer’s “manipulation” is another’s “masterpiece.” The reality is, Photoshop isn’t a panacea—its main function should be to complement the creativity already achieved in the camera, and not to fix problems created (or missed) at capture.
While I’m not a heavy Lightroom/Photoshop user, I readily acknowledge that they’re amazing tools that are an essential part of my photography workflow. I particularly appreciate that LR/PS give the me ability to achieve things possible with black and white film and a decent darkroom, but difficult-to-impossible with the color transparencies I shot for over 25 years. Of course processing is an ever-evolving art itself, one I’m still learning. I’m afraid to this day I find myself mortified by some of my earlier processing choices—as I no doubt will be at some later date by processing choices I make today.
Creating an image, from start to finish
Normally when I find myself at a popular Yosemite location like Valley View, I won’t get my camera out unless I can find something that feels truly unique. Last month, not wanting to stray from my workshop group, I was content to observe and assist. But when the clouds draping El Capitan and Cathedral Rocks started turning pink in the evening’s last light, I couldn’t resist.
I raced to my car and grabbed my tripod and Sony a1, already loaded with my 16-35 GM lens, and headed down to the large log embedded along the riverbank, just downstream from the parking lot. This log has been a Valley View fixture for years, but each year it gets nudged a little by spring runoff—some years more than others. I’m sure it will eventually be swept away entirely.
A trio of photographers was already in place on and around the log, but spying a spot I could squeeze into, I scaled the log and tightroped my way toward the small opening. Despite an extreme language mismatch, we were able to pantomime our way into a friendly equilibrium—lots of smiles and pointing, with a mutual thumbs-up for punctuation—that enabled me to set up in a spot that worked for me without disturbing them.
With the light changing quickly, I went right to work, framing up a wide draft version that included the entire Valley View scene: clouds, Ribbon Fall (on the left), El Capitan, Cathedral Rocks, Bridalveil Fall, and the Merced River. I was especially excited to be able to frame the scene with the two prominent waterfalls: well known and year-round Bridalveil on the right, and somewhat anonymous, seasonal Ribbon Fall (Yosemite’s highest vertical drop).
I wasn’t super crazy about the log in the middle of the river, but since it was right in the middle of the scene I wanted to photograph, I decided to lean into it and just make it part of my composition. And while I liked the whitewater, I was less than thrilled by its position in the lower right corner of my frame. Again, just something I’d need to accept and deal with.
Balanced atop my log, I raised my tripod as high it would go to prevent the foreground log’s protruding vertical branch from intersecting the far riverbank. To remove distracting texture from the whitewater, I decided to smooth the water with a long shutter speed, dialing to ISO 50 and stopping down to f/16. Exposure was tricky because the sky still held onto a fair amount of light, while the foreground was darkening fast, so I took care to monitor my histogram until I found a shutter speed that didn’t wash out the color, while still creating a pleasing (to my eyes) motion blur.
The preview image on my LCD looked mostly too dark, with the sky too bright, but I know my camera well enough to know that all the beautiful detail in the shadows and highlights would return like magic in Lightroom. Besides pulling down my highlights and dragging up my shadows, a small color temperature tweak, and some selective dodging/burning, this turned out to be a relatively simple image to process and get to come out exactly as I’d visualized it that evening.
One more thing
Check out the gallery below. All of these images were captured at Valley View. Rather than base my composition on the “standard” shot here, I crafted each to take advantage of whatever conditions were before me at the time. And while a few images do indeed settle for the more conventional composition, my decision to photograph that way was justified (in my mind) by the exceptional conditions that told me I should just get out of the way and let the scene speak for itself. So I guess the moral is, trust your instincts and don’t settle for the obvious—unless the obvious just hits you right over the head and you just can’t ignore it.
Valley View Variety
Click any image to scroll through the gallery LARGE


, Yosemite")


Happy Earth Day
Posted on April 26, 2024

Valley Fog, Tunnel View, Yosemite
Sony a7R V
Sony 24-105 f/4 G
ISO 100
f/10
1/6 second
My commitment for this blog is one image/post per week. With a workshop that started Sunday and ended Wednesday, I’m a little behind this week, but I made it! Next week I have a workshop that goes from Monday through Thursday, and the following week I’ll be completely off the grid rafting the Grand Canyon. But one way or the other, I’ll continue with my once per week commitment, even if I’m a little late. And if I do have to skip a week, I’ll catch up eventually, I promise. I return you now to your regular programming…
Happy Earth Day to you
How did you celebrate Earth Day (April 22) this year? I was fortunate enough to celebrate up close and personal, guiding a workshop group around Yosemite. It’s easy to appreciate a planet when you’re surrounded by some of its most exquisite beauty, and with a group of people who appreciates it as much as you do, but every time I visit, I’m reminded that we may in fact be loving our wonders to death.
It’s impossible to have zero impact on the natural world. Every day, even if we never leave the house, we consume energy that, directly or indirectly, pollutes the atmosphere and contributes the greenhouse gases that warm our planet. The problem only worsens when we venture outdoors. Our vehicles belch exhaust, or consume electricity that was the product of invasive mining. At our destination, the clothing we wear introduces microscopic, non-indiginous flora and fauna, while the noise we create clashes with the natural sounds that comfort others and communicate information to animals. Even foot travel, the oldest, most fundamental mode of transportation, crushes rocks, plants, and small creatures with each footfall. And let’s not forget the artificial light that dilutes our once black night sky.
I’m not suggesting that we all hole up beneath a rock. If everyone just considered how their actions impact the environment and acted responsibly, our planet would be a better, more sustainable place.
Let’s get specific
The damage that’s an unavoidable consequence of keeping the natural world accessible to all is a tightrope our National Park Service does an excellent job navigating. With their EVs, organic, and recycling mindset, it’s even easy for individuals to believe that the problem is everyone else.
I mean, who’d have thought merely walking on “dirt” could impact the ecosystem for tens or hundreds of years? But before straying off the trail for that unique perspective of Delicate Arch, check out this admonition from Arches National Park. And Hawaii’s black sand beaches may appear unique and enduring, but the next time you consider scooping a sample to share with friends back on the mainland, know that Hawaii’s black sand is a finite, ephemeral phenomenon that will be replaced with “conventional” white sand as soon as its volcanic source is tapped–as evidenced by the direct correlation between the islands with the most black sands beaches and the islands with the most recent volcanic activity.
Sadly, it’s Earth’s most beautiful locations that suffer most. Yosemite’s beauty is no secret—to keep it beautiful, the National Park Service has been forced to implement a reservation system to keep the crowds (marginally) manageable. Similar crowd curtailment restrictions are in place, or being strongly considered, at other national parks. And while the reservations have helped in Yosemite and elsewhere, the shear volume of visitors who make it through guarantees too much traffic, garbage, noise, and too many boots on the ground.
While Yosemite’s durable granite may lull visitors into environmental complacency, it is now permanently scarred by decades of irresponsible climbing. And Yosemite’s fragile meadows and wetlands, home many plants and insects that are an integral part of the natural balance that makes Yosemite unique, suffer from each footstep to the point than some are now off-limits.
A few years ago, so many people crowded the elevated bank of the Merced River to photograph Horsetail Fall’s sunset show, the riverbank collapsed—that area is now off limits during Horsetail season. Despite all this, I can’t tell you how often I see people in Yosemite cavalierly trampling meadows to get in position for a shot, as a trail shortcut, or to stalk a frightened animal.
Don’t be this person
Despite the damage inflicted by the sheer volume of garden variety tourists, my biggest concern is the much smaller cohort doing a disproportionate amount of damage: photographers. Chasing the very subjects they put at risk, photographers have a vested interest and should know better. But as the urge to top the one another grows, more photographers seem to be abusing nature in ways that at best betrays their ignorance of the damage they’re doing, and at worst reveals their startling indifference to the fragility of the very subjects that inspire them to click their shutters in the first place.
If I can’t appeal to your environmental conscience, consider that simply wandering about with a camera and/or tripod labels you, “Photographer.” In that role you represent the entire photography community: when you do harm as Photographer, most observers (the general public and outdoor decision makers) simply apply the Photographer label and lump all of us, even the responsible majority, into the same offending group.
Like it or not, one photographer’s indiscretion affects the way every photographer is perceived, and potentially brings about restrictions that directly or indirectly impact all of us. So if you like fences, permits, and rules, just keep going wherever you want to go, whenever you want to go there.
It’s not that difficult
Environmental responsibility doesn’t require joining Greenpeace or dropping off the grid (not that there’s anything wrong with that). Simply taking a few minutes to understand natural concerns specific to whatever area you visit is a good place to start. Most public lands have websites with information they’d love you to read before visiting. And most park officials are more than happy to share literature on the topic (you might in fact find useful information right there in that stack of papers you jammed into your car’s center console as you drove away from the entrance station).
Most national parks have non-profit advocacy organizations that do much more than advocate, maintaining trails and underwriting park improvements that would otherwise be impossible. For example, the Yosemite Conservancy funded Bridalveil Fall’s recently completed (significant) upgrade that included new flush toilets (yay!), new trails and vistas, and enhanced handicapped access.
If you spend a lot of time at a national park, consider supporting its non-profit partner. The two I belong to are Yosemite Conservancy and Grand Canyon Conservancy.
Develop a “leave no trace” mindset
Whether or not you contribute with your wallet, you can still act responsibly in the field. Stay on established trails whenever possible, and always think before advancing by training yourself to anticipate each future step with the understanding of its impact. Believe it or not, this isn’t a particularly difficult habit to form. Whenever you see trash, please pick it up, even if it isn’t yours. And don’t be shy about gently reminding (educating) other photographers whose actions risk soiling the reputation for all of us.
A few years ago, as a condition of my national parks’ workshop permits, I was guided to The Center for Outdoor Ethics and their “Leave No Trace” initiative. There’s great information here–much of it is just plain common sense, but I guarantee you’ll learn things too.
Armed with this mindset, go forth and enjoy nature–but please save some for the rest of us.
About this image

Valley Fog, Tunnel View, Yosemite
When I started taking pictures, long before the dawn of digital, my emphasis was outdoor subjects ranging from natural landscapes to urban skylines and bridges. But as my eye and overall relationship with the world has evolved, I’ve gravitated naturally toward landscapes and away from the cityscapes.
I understand now that this evolution has much to do with my love (and concern) for the natural world, both the beauty that surrounds us and damage we’re doing, and a desire to honor it. In recent years I’ve very consciously striven to, as much as possible, create images that allow people to imagine our planet untouched by humans—perhaps hoping that they’ll understand what’s at risk somehow do their share to stem the tide.
Though only number six on the current list of most visited national parks, Yosemite needs to cram the vast majority of its nearly 4-million annual visitors into the less-than 10 square miles of Yosemite Valley. In fact, for more than half the year, almost all of the park outside of Yosemite Valley is smothered in snow and closed to vehicles. This creates congestion and other problems that are unique to Yosemite.
One of the most beloved vistas on Earth, Tunnel View attracts gawkers like cats to a can-opener—all I have to say about that is, “Meow.” Despite its popularity, and the fact that the vista has indeed been crafted by the NPS (paved parking, enclosed by a low stone wall, and many trees removed to maintain the view), Tunnel View remains one of my favorite places to imagine a world without human interference.
My history with Tunnel View in Yosemite dates back to long before I ever picked up a camera, but I never take it for granted. Each time I visit, I try picture Yosemite before paintings, photographs, and word of mouth eliminated the possibility for utter surprise and awe, and what it must have been like to round a corner or crest a rise to see Yosemite Valley unfolding before you (earlier views of Yosemite were not at the current location of Tunnel View, but the overall view and experience were similar).

Dance of the Veils, Tunnel View, Yosemite
Today, unless I’m there for a moonrise, I rarely take out my camera at Tunnel View, preferring instead to watch the reaction of other visitors—either my workshop students or just random tourists. But every once in a while, the scene is too beautiful to resist. That happened twice for me in February, when I added two more to my (arguably already too full) Tunnel View portfolio: today’s image and the one I shared last week.
This week’s image came in the first workshop, before sunrise following an overnight rain. Though the compositions are similar, the moods of the two images are completely different. First, in last week’s image, the valley sported a thin glaze of snow, while the overnight temperatures for this week’s image weren’t quite cold enough to turn the rain to snow in Yosemite Valley (though we did find some had fallen on the east side of the valley).
But to me the biggest difference between the two images is the mood. In the snowy image I shared last week, the storm had moved on and the sky had cleared—most of the remaining clouds were local, radiating from the valley floor. The warm light of the approaching sun coloring the sky gives the scene a brighter, more uplifting feel.
The new image I share this week came during a break in the storm, but not at its end. With more rain to come, the moisture-laden sky darkened and cooled the scene, creating a brooding atmosphere. I especially like these scenes for the way they convey the timeless, prehistoric feel I seek.
Workshop Schedule || Purchase Prints || Instagram
Tunnel View Views


This is Why We Can’t Have Nice Things
Posted on February 20, 2024

Golden Touch, El Capitan and Horsetail Fall, Yosemite
Sony a7R V
Sony 24-105 f/4 G
ISO 64
f/10
1/10 second
I was planning to just write a brief Horsetail Fall update following last week’s workshop, but before I get into that, a couple of recent experiences have me wanting to say a few words about the bad photographer behavior I witness in my many travels.
The first occurred in Iceland, where Don Smith and I, along with our tour guides Albert Dros and Vincenzo Mazza (look them up!), guided our group on a short hike to a beautiful, and slightly off the beaten path, waterfall. Thrilled to find the scene blanketed with pristine snow, and to be the only ones there, we quickly set up on the footbridge spanning the river (the only place to photograph legally).
Everyone was quite content until a couple of other photographers wandered up the trail and joined us. Despite the fact that there was more than enough room for all of us on the bridge, these two newcomers ignored the “Keep Out” signs and hopped the barricade, trampling our perfect snow to set up shop in everyone’s frame as if we were all invisible. We tried in vain to get their attention (they clearly heard us but refused to acknowledge). Soon one of them whipped out a drone (also a violation of posted rules), launching it directly in front of the fall, while the other guy walked straight up to the base of the fall and planted himself directly in the middle of the scene (where it was impossible to compose him out).
I try not to stress too much about photographers who are simply unaware that they’re in my frame because it’s usually not too hard to remove them later, in Photoshop. But this kind of willful disregard for others transcends photography, damaging the experience for all visitors and reflecting poorly on all photographers.

Horsetail Fall Southside Drive crowd (2017): This is why we can’t have nice things (picture from the Yosemite Exploration Center)
The other instance of selfish photography is the “My shot is more important than the wellbeing of the natural beauty I’ve come to photograph” attitude that I witness every time I try to photograph Horsetail Fall. (This isn’t unique to Horsetail Fall.)
The general consensus among Yosemite photographer, with which I agree, is that the best Horsetail Fall photography spot on the valley floor is a raised riverbank on the Southside Drive side of the Merced River. Believe it or not, I used to be able to show up with a group to this location about 45 minutes before sunset, confident that all in my care would be able to find an unobstructed view.
But when the crowds took over (some photographers even claiming the prime spots for this sunset shot before breakfast) and the number of photographers far exceed the number of available places to set up, I started opting for the relative peace of the Northside Drive locations. I wasn’t terribly surprised to witness cars actually driving off-road and into the forest to park, and by the reports of Southside Drive fisticuffs that started to appear. All this Southside mayhem culminated with the riverbank’s collapse under the weight of the assembled masses, leading to the complete shutdown of Merced River south bank Horsetail Fall photography. Problem solved—or so I believed.
Put me in the camp of those who think that the NPS does an amazing job managing the virtually unmanageable crowds that swarm Yosemite Valley to photograph Horsetail Fall each February. The whole experience has gotten better (more enjoyable) with the Southside Drive ban, relatively liberal reservation system (it’s not that hard to view the Horsetail phenomenon with only a little planning and effort) to curtail crowds, and Northside Drive pedestrian accommodations.
Nevertheless, each year I still see photographers attempting to sneak into the prime Southside Drive view as if the rules don’t apply to them. Some simply park in the Southside Drive turnouts clearly marked “No Parking,” apparently oblivious to the $280 that will await their return.
More egregious (because it can’t be written off to ignorance) in my mind are the photographers who park legally, then sneak along the south river, shielded from view from the road by the elevated riverbank. This year, while waiting with the joyful crowd on Northside Drive, I actually saw several of these scofflaws (such a great word) skulking about across the river, apparently completely oblivious to the fact that they are quite visible to everyone on Northside Drive, including the numerous rangers (with 2-way radios), or to the fact that the rangers actually patrol the south riverbank each February afternoon and evening.
Maybe I’m just getting old, but it both angers and saddens me that there are photographers whose selfish desire exceeds their respect for their subjects, because it’s attitudes like these that lead to even further restrictions for everyone. A photograph should never be more important than its subject.
Now I need to go chase some kids off my lawn…
So anyway…
Some years Horsetail Fall is completely dry in February, other years it’s there but you really have to look closely to locate the Horsetail wet spot on El Capitan. This year I’d say the baseline flow in Horsetail Fall is good but not great, clearly visible as a thin white stripe descending from the top of El Capitan’s sloped east shoulder. By “baseline flow” I mean the minimum you can expect on any given day—a decent flow with the potential to ramp up nicely with a warm storm that drops heavy rain on the Horsetail watershed (above 7000 feet). Also this year, thanks to recent high country snowfall, there’s enough snow in that watershed that a few days of sunlight and above average temperatures could bring a noticeable flow increase.
FYI, if you want to photograph the Horsetail Fall phenomenon this year, you have about a week of good light remaining (as I write this on February 20)—but don’t forget that weekend visits require reservations. The crowds this year seem pretty typical, and shouldn’t pose a problem if you can park and start the 1 1/2 mile walk a couple of hours before sunset (the longer you wait to park, the farther you’ll need to walk). (Learn more about photographing Horsetail Fall in my Horsetail Fall Photo Tips article.)
Last week’s workshop group had two successful Horsetail Fall shoots—neither “epic,” but both very nice in their own way (and definitely worth the walk and wait). The workshop started last Tuesday—given the week’s weather forecast, I was more hopeful than optimistic about our Horsetail Fall chances. Since it looked like that first day might be our best (and maybe only) shot at getting it, after our orientation we headed straight up to Yosemite Valley and got ourselves into position beneath the fall, near the El Capitan Picnic Area (not my favorite spot, but the best for this group because of some mobility challenges).
We found the fall flowing decently (well enough to photograph) and the light good, until about 40 minutes before sunset when the afternoon’s promising mix of sunlight and clouds was replaced without warn by sunlight-swallowing clouds. As we waited (hoped) for the sunlight to return, I kept telling my group about my many last-minute Horsetail Fall miracle experiences, when the has dropped into an unseen (from our location the valley floor) gap on the horizon to paint the fall red.

Red Horsetail Fall, El Capitan, Yosemite
And that’s exactly what we got. This time it came so late that the light completely skipped the golden phase, going straight to red for about five minutes before turning off for the night. While the light this evening wasn’t as intense as I’ve seen it, the color was great and everyone was pretty thrilled.
But we weren’t done. The forecast improved as the week progressed, so after a Wednesday rain that recharged the flow, combined with a (new) “mostly sunny” Thursday promise from the weatherman, I decided to give the group another shot. I wouldn’t have done this if I thought the best we could do would be to repeat Tuesday, but because I knew the fall was flowing better, and I’d formulated a plan to get the whole group into an even better position about a quarter mile east of the picnic area, I thought it would be worth going for it. Still, I gave everyone the option to opt out for a different location, but no one took me up and we all returned to Horsetail.
For most of Thursday evening everything went exactly as planned: the fall’s flow was noticeably better, we ended up exactly where I’d hoped, and the sunlight was brilliant. Better still, a collection of clouds spent the evening performing a beautifully choreographed dance atop El Capitan.
The Horsetail Fall great light window lasts less than 10 minutes, starting out brilliant gold before slowly transitioning to orange, then coral, and ultimately (if the light lasts all the way to the end) ruby red. This evening we clicked like crazy as the shadow approached Horsetail and the light warmed to the intense gold stage. But just about the time started to get just a little optimistic that we might be in store for something truly special, the sunlight faded and never returned.
Fortunately, we did end up catching all of the gold phase, which was further enhanced by a few puffy clouds catching the same light, so all was not lost. Even though we missed the red of Tuesday evening, it seemed pretty unanimous that this was the better of the two shoots.
So I guess maybe sometimes we still can have nice things.
Join Me In Yosemite
Workshop Schedule || Purchase Prints || Instagram
Horsetail Fall
Click any image to scroll through the gallery LARGE


Upping Your Vertical Game
Posted on January 16, 2023

Moonrise and Clouds, El Capitan, Yosemite
Sony a7R IV
Sony 24-105 G
1 second
F/11
ISO 100
Greetings from Iceland. Perhaps you noticed that this picture is in fact not Iceland, but that’s only because I simply haven’t had a chance to process my images from the past week. There are many reasons to visit Iceland in winter, and I will very enthusiastically share examples in future posts (northern lights, anyone?), but today I’m sharing one more image from last month’s Yosemite workshop. And because I’m fully immersed in a workshop that occupies me day and night (chasing the low light by day, and the aurora by night), I’m dusting off (and polishing up) a post on a topic that is as important to me today as it was when I wrote it 12 years ago.
Let’s Get Vertical
Who had the bright idea to label horizontal images “landscape,” and vertical images “portrait”? To that person let me just say, “Huh?” As a landscape-only photographer, about half of my images use “portrait” orientation. I wonder if this naming bias subconsciously encourages photographers to default to a horizontal orientation for their landscape images, even when a vertical orientation might be best.
Every image possesses an implicit visual flow that’s independent of the eyes’ movement between the scene’s elements. Understanding that the long side of an image subtly encourages the visual motion through the frame—left/right in a horizontal image, up/down in a vertical image—photographers can choose visual symmetry or tension with the visual movement between the scene’s visible elements.
For example, because a waterfall flows down, orienting a waterfall image vertically complements the water’s motion, instilling a feeling of calm. Conversely, a waterfall image that’s oriented horizontally can possess more visual tension because of the natural inclination for the eye to move laterally in a horizontally oriented image. While there’s no absolute best way to orient a waterfall image (or any other scene), you need to understand that there is a choice, and that choice matters.
By moving the eye from front to back, vertical images can enhance the illusion of depth so important in a two-dimensional photo. Even though a still image lacks the depth dimension, there’s a sense that distance increases from the bottom up in its 2-dimensional world. The viewer’s eye is drawn first to a strong visual element in the foreground, then naturally flows up, and away, from there. The left/right tug of a horizontal image conflicts with this. (Many factors go into creating the illusion of depth, so I’m not saying that horizontal images inherently lack depth.)
More than just guiding the eye through the frame, vertical orientation narrows the frame, enabling us to eliminate distractions or less compelling objects left and right of the prime subject(s). Vertical is also my preferred orientation when I want to emphasize a sky full of stars, dramatic clouds and color, or (as I was reminded earlier this week) an aurora that rockets skyward.
In these scenes with especially dramatic skies, not only do I orient them vertically, I put the horizon near the bottom of the frame to further underscore the drama. When the sky is dull and all the visual action is in the landscape, I’ll put the horizon at the top of my frame. And when the landscape and sky are equally compelling, I have no problem splitting the frame in the middle (regardless of what the photo club rule “experts” might proclaim).
While a horizontally oriented scene is often the best way to convey the sweeping majesty of a broad landscape, I particularly enjoy guiding and focusing the eye with vertical compositions of traditionally horizontal scenes. Tunnel View in Yosemite, where I think photographers tend to compose too wide, is a great example. The scene left of El Capitan and right of Cathedral Rocks can’t compete with the El Capitan, Half Dome, Bridalveil Fall triumvirate, yet the world is full of too-wide Tunnel View images that shrink this trio to include (relatively) nondescript granite that can’t hold a candle to the main scene.
When the foreground and sky aren’t particularly interesting, I tend to shoot fairly tight horizontal compositions at Tunnel View. But when a spectacular Yosemite sky, snow-laden trees, or cloud-filled valley below demand attention, vertical is my go-to orientation because it frees me to celebrate the scene’s drama without diluting it.
When I composed the scene in this image, the moon had just popped out of the clouds. Knowing when and where it was supposed to arrive, I’d been set up with my Sony a7R IV mounted with my Sony 200-600 lens and 2X Teleconverter, hoping to capture the moon BIG as it edged up from behind El Capitan. When the clouds threatened to completely wipe out the moonrise, I’d have been thrilled with any lunar appearance. By the time this wish was fulfilled, I’d long since abandoned my big moon plan and switched to my Sony 24-105 lens.
Because the clouds and color stretched across the sky, and Bridalveil Fall was flowing nicely, I naturally did a horizontal composition of this scene wide enough to include all the good stuff. But that composition shrunk the moon to more of a strong accent, and I wanted something with the moon more front-and-center.

Moonrise and Clouds, Tunnel View, Yosemite
Flipping my camera to vertical, I increased my focal length to limit my terrestrial subjects the business end of El Capitan, with an incognito Half Dome lurking in the background. The longer focal length enlarged the moon enough that, while not the BIG moon I’d once imagined, it stands out far more prominently than it does in my horizontal version.
Breaking News
The night before last, my Iceland workshop group was treated to what may have been the most spectacular northern lights display I’ve ever witnessed. Until last night, when we topped it. Stay tuned to this channel for images (as soon as I get a chance to process them and write some—by my next blog, I hope).
Let’s Get Vertical
Click any image to scroll through the gallery LARGE


, California")


Nature’s Gifts: Reflections
Posted on January 2, 2023

Autumn on Ice, El Capitan Reflection, Yosemite
Sony α1
Sony 16 – 35 f/2.8 GM
1/4 second
F/18
ISO 100
Sometimes Nature delivers us something that’s so beautiful, it just has to be a gift. When we think of Nature’s gifts, it’s often in terms of locations, like Yosemite or Grand Canyon (gifts indeed!). But today I’m thinking about Nature’s transient beauty: the perfect arc and vivid colors of a rainbow, a brilliant crimson sunrise or sunset, or an aurora dancing among the stars (I could go on)—beauty that can simultaneously surprise and wow us.
Underrated on Nature’s list of gifts are reflections. Doubling the scene, reflections signal tranquility. And like a metaphor that engages the brain in ways different than we’re accustomed, a reflection is an indirect representation that can be more powerful than its literal double. Rather than allowing us to process the scene directly, a reflection challenges us to mentally reassemble its reverse world, and in the process perhaps see the scene a little differently.
Reflections can feel like a fortuitous gift that we just stumbled upon. But given that reflections are entirely beholden to the laws of physics, they’re far more predictable than many of the natural phenomena we photograph. Taking a little time to understand the nature of reflections and how they’re revealed by a camera enables photographers to anticipate their appearance and craft their relationship to the surrounding landscape in an image.
Without getting too far into the physics of light, it’s important to understand that every object we see (and photograph) that doesn’t generate its own light, comes to us courtesy of reflected light. In other words, what we call a reflection is in fact re-reflected light (reflected first from the object itself, then by the water).
For example, when sunlight strikes El Capitan in Yosemite, some of the sun’s photons bounce back into our eyes, and there it is. But other photons head off in different directions—some to be captured by different sets of eyes, while others land on the surface of the Merced River far below. A few of these photons penetrate the water, illuminating leaves and rocks on the submerged riverbed, while others carom off the water at the same angle at which they struck—only in the other direction, much the way a pool ball ricochets off the pool table’s cushion. When our eyes are in the path of these bounced photons, we see a reflection.
The recipe for a mirror reflection
Water reflections come in many forms, from a mirror-sharp inverted mountain peak glistening atop a still pool, to an abstract shuffle of color and texture on an undulating lake. Both have their place in creative photography.

Autumn Reflection, El Capitan and Three Brothers, Yosemite
The ideal recipe for a mirror reflection is pretty simple: still water, a sunlit subject that’s much brighter than the water’s surface (the greater the contrast the better), and a view angle that matches the angle at which the sunlight struck the water’s surface. And while a sunlit subject and shaded surface aren’t essential, the more photons striking the reflected subject, and the fewer non-reflected photons (ambient light) striking the reflective surface, the greater the contrast that helps the reflection stand out.
El Capitan Autumn Leaves, Yosemite: With El Capitan getting direct sunlight and the slow moving Merced River still shaded, I had the sharp reflection I hoped for. With just a little bit of searching, I positioned myself to include nearby floating autumn leaves.
Playing the angles
Just because you don’t see a reflection in the still water in front of you, doesn’t mean there’s no reflection—it just means you’re viewing from the wrong angle.
Understanding that reflected photons leave the water’s surface at the same angle at which they arrive—imagine the way a tennis player anticipates the ball’s bounce to get in position—allows us to position ourselves to photograph the reflection we want. For example, if the angle from your subject to the water is 40 degrees, its reflection will bounce off the water at 40 degrees in the other direction.

Sunset Palette, Half Dome from Sentinel Dome, Yosemite
To locate the reflection, set your camera aside and move up/down, backward/forward, and left/right until you see find it. Then bring your camera back in and position it exactly where your eyes were when you saw the reflection.
Half Dome from Sentinel Dome, Yosemite: One summer evening I found myself atop Sentinel Dome shortly after an intense rain shower had turned indentations in the granite into small, reflective pools. Seeing the potential for a spectacular sunset above Half Dome, I wanted to include the colorful clouds reflected in the pools. At eye-level the pools reflected nothing but empty sky, so I dropped my tripod almost to granite level until my lens found the angle that intercepted the red clouds just above Half Dome bouncing off the still water.
When the water’s in motion
As spectacular as a crisp, still water mirror reflection is, it’s easy to overlook the visual potential of a reflection that’s not crisp, and to forget your camera’s ability to render a soft or abstract reflection much better than your eyes view it.

Before the Sun, South Tufa, Mono Lake
While a crisp reflection can dominate an image, a splash of reflected color or shape can beautifully accent a striking primary subject. And a reflection that’s lost to the continuously varying angles of rippled or choppy water, magically appears as a soft outline when a long exposure smooths the water’s surface into a gauzy haze.
South Tufa, Mono Lake: In this sunrise image, all the ingredients were in place for a special reflection. Just as the color arrived, a light breeze stirred the lake’s surface with gentle undulations. I used a 6-stop neutral density filter to enable a multi-second exposure that completely smoothed the lake’s surface. While not a perfect mirror, the resulting reflection has a very pleasing soft, gauzy look.

Autumn Reflection, El Capitan, Yosemite
Where to focus
An often misunderstood aspect of reflection photography is where to focus. Though counterintuitive to some, the focus point of a reflection is the reflection’s subject, not the surface it reflects on. This isn’t a big deal when the focus point of everything of visual significance is infinity, but it’s a very big deal when you want both your distant subject’s reflection and the nearby rocks or leaves on or in the water surface to be sharp.
Photographing a distant subject reflecting in a pool of leaves requires the same hyperfocal depth of field approach you’d use for any other close-to-distant image: small aperture and a focus point slightly beyond the closest thing that needs to be sharp.
El Capitan Reflection, Yosemite: Photographing autumn leaves atop El Capitan’s reflection required impossible depth of field to capture sharpness throughout. Even though the leaves and reflection were just a few feet in front of me, focusing for a sharp reflection would have softened the leaves. To increase my depth of field, I stopped down to f/18 and focused toward the back of the closest group of leaves, then magnified the image on my LCD to verify that all of the leaves were sharp. Though El Capitan’s reflection is slightly soft, a soft reflection is almost always more forgivable than a soft foreground.
Polarizer

Reflection on the Rocks, Lake Wanaka, New Zealand
Put simply, a polarizer cuts reflections. Most photographers use a polarizer to darken the sky, and while that can be a nice effect, the polarizer’s value is far greater than that. More than to darken the sky, polarizers remove subtle reflective sheen that washes out color on foliage and rocks.
An underappreciated polarizer use is to erase a reflection to reveal submerged rocks, leaves, and texture. After photographing a reflection with no polarizer or polarization minimized (maximum reflection), rotate the polarizer to minimize the reflection (maximum polarization) and capture submerged features hidden by the reflection. You might be surprised by how different the two images are, and how much you like both versions.
Lake Wanaka, New Zealand: But a polarizer isn’t an all or nothing tool. When photographing the solitary willow tree in Lake Wanaka, I carefully watched the reflection in my viewfinder while rotating my polarizer, stopping when I reached a polarization midpoint that included some reflection, while still revealing the mosaic of stones just beneath the lake’s surface.
Rainbows
Rainbows are a very special kind of reflection that happens when light is refracted (separated into its colorful wavelengths) upon entering airborne water droplets. This refracted light reflects off the back of the droplet to create a rainbow.
Because the laws of physics apply to all reflections, we know that a rainbow would actually form a full, 42 degree circle if it didn’t encounter the horizon. The center of this circle is at the anti-solar point—the point exactly opposite the sun (with your back to the sun, imagine a line from the sun through the back of your head and exiting between your eyes). That means that your shadow will always point at the rainbow’s apex. And the lower the sun, the higher the apex will be. Read more about rainbows.

Rainbow Bridge, Colorado River, Grand Canyon
Double Rainbow, Colorado River, Grand Canyon: Understanding rainbow physics allowed me to anticipate a rainbow despite a black cloud blocking the sun and drenching everyone in my raft trip group. When I saw that the sun was about to pop out of the cloud and into a large patch of blue sky, I rallied my group and pointed to where the rainbow would appear. A few minutes later their skepticism turned to ecstasy when we all started capturing images of a double rainbow bridging the Grand Canyon.
Outside the box
Reflections also provide wonderful creative opportunities. An often overlooked opportunity is the potential found in reflections that aren’t mirror-like. And, in addition to the more conventional reflection composition that’s split somewhere near the middle to give more or less equal frame real estate to the subject and its reflection, some of the most creative reflection images concentrate entirely, or almost entirely, on the reflection.

Autumn on Ice, El Capitan Reflection, Yosemite
I found this El Capitan reflection at Cathedral Beach on the final afternoon of last month’s Yosemite Winter Moon photo workshop. After capturing a crisp, top-to-bottom El Capitan reflection, I repositioned myself to juxtapose much of El Capitan against the faceted veneer of ice topping the river. An added bonus of water still enough for ice to form was that it allowed drifting, recently fallen autumn leaves to settle and accumulate on the river-bottom here.
Finding the best spot combine the reflection, ice, and leaves in a single frame, I dropped low enough to get a sharp reflection El Capitan’s nose in the still, iceless water close to the shore. To ensure sharpness in the ice and the reflection (as well as the distant trees and El Capitan), I stopped down to f/18 and focused midway into the ice.
Almost all of the foreground was shaded, but with bright, direct sunlight brightening the clouds and El Capitan, this scene’s dynamic range was a real factor. But my reflection-centric composition eliminated the clouds brightest granite, making the exposure much easier. Finally, I tried multiple polarizer positions until I found the one with the best combination of reflection and submerged leaves.

Sunset Mirror, Yosemit
I was so focused on the other visual elements in this scene, I didn’t fully appreciate the bare trees across the river. But when I started processing the image and viewed it on my large monitor, I was pleased by how much they add to the wintry feel of this image.
Double your pleasure
Whether it’s a shimmering mirror, a gauzy haze of color and shape, or a colorful rainbow, reflections are a gift from Nature—camera or not. By doubling the beauty surrounding us, reflections have the power to elevate ordinary to beautiful, and beautiful to extraordinary.
For photographers, reflections provide boundless creative opportunities. When exploring outdoors with a camera, some reflections seem to jump out and grab us by the eyeballs, while others require a little more work. Either way, when properly conceived and executed, a reflection image possesses a visual synergy, conveying beauty that more than doubles the scene’s two halves.
Workshop Schedule || Purchase Prints || Instagram
El Capitan Reflections
Click any image to scroll through the gallery LARGE


