Eloquent Images by Gary Hart
Insight, information, and inspiration for the inquisitive nature photographer
An Old Friend Returns
Posted on May 22, 2026
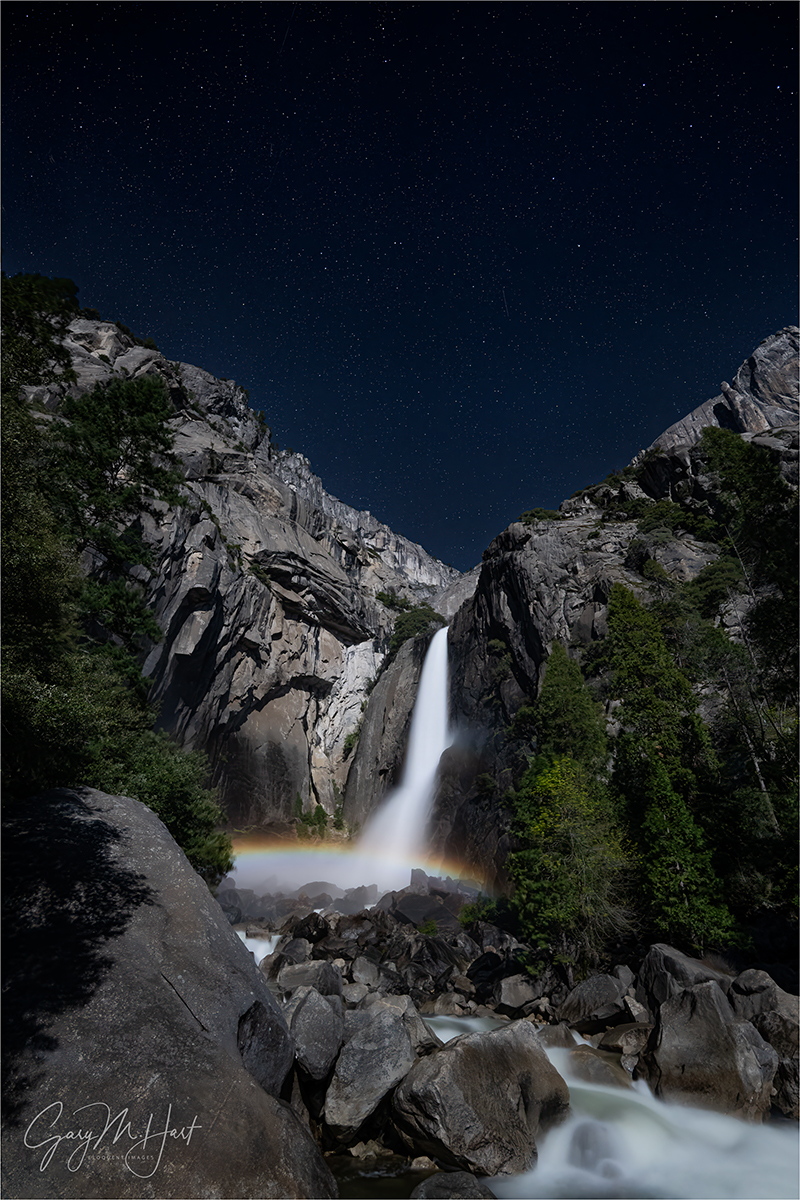
Moonlight Prism, Lower Yosemite Fall Moonbow, Yosemite
Sony α1
Sony 14mm f/1.8 GM
ISO 1600
f/1.8
4 seconds
Has anyone noticed that Yosemite becomes a completely different park with each season? I feel quite fortunate to live close enough that I’m able to enjoy each Yosemite season, and to offer Yosemite workshops in three of four seasons. (Actually, you can probably infer that I live close enough to offer workshops in all four seasons, but I leave summer to the tourists.)
Each Yosemite season offers its own distinguishing qualities. In autumn, though the falls are nearly dry (Bridalveil still trickles), red and gold leaves fill the trees, carpet the ground, and reflect gloriously in the low and slow Merced River. Winter is when the waterfalls return to life, and also the best time to find Yosemite draped in powdery white—but since snow is never guaranteed, I always schedule a workshop around the natural firefall light on Horsetail Fall (while still crossing my fingers for snow). Spring is the Yosemite of postcards and calendars, when waterfalls peak, dogwood blooms abound, low-lying meadows host (reflective) vernal pools, and rainbows color the waterfalls.
Each of these Yosemite workshops has a potential bonus lunar event that I try to include when it corresponds with the season’s primary distinguishing quality. Many autumns and winters I can align a rising full moon with Half Dome at sunset, and spring is when the light of a full moon paints a rainbow at the base of Lower Yosemite Fall.
For years I scheduled two workshops around this moonbow, but finally decided that the window for the absolute best moonbow experience is open only during a four week span from early April into early May. Though a moonbow also happens with the full moon from late March and into June, in late March and early April the moonbow appears in the mist billowing too far left of the fall; later in May and into June, the crowds swarming Yosemite Valley make an unpleasant experience for everyone.
Despite the remarkably predictable moon/landscape geometry that creates a moonbow, its appearance is never certain. Clouds are the biggest nemesis, but low water can also diminish the experience. Coming into this year, limiting my moonbow workshops to a single full moon in that four-week window, combined with factors beyond my control (in addition to clouds, you can add a sudden park closure and global pandemic), has meant that my previous successful moonbow sighting was in 2019. And for a while, it appeared 2026 would continue that streak of futility.
There was a time when I didn’t believe it possible for Yosemite’s spring runoff to be so low that the moonbow would essentially be erased. But as California’s wet season progressed and the Sierra Nevada range found itself on the way to an historically poor snowpack year, I couldn’t help flashing back to 2015. That’s the year PBS Newshour arranged for a film crew to follow me and my Yosemite spring workshop group as we photographed Yosemite’s spring splendor, with a particular emphasis on the moonbow. But 2015 also happened to be the year an unprecedented drought shrunk Yosemite’s normally booming spring waterfalls to mere trickles. Rather than cancel the Newshour segment and keep the film crew home, they adroitly pivoted to a piece on California’s drought and its impact on Yosemite. Check it out. (FYI, I haven’t aged a bit since then.)
Would history repeat this year? As April approached, the answer appeared to be yes. Then a series of unseasonably cold storms arrived, filling our rivers and bolstering the Sierra snowpack just in the nick of time. A couple of days before the workshop (scheduled for the last four days of April), another storm landed, further recharging the falls and even lingering through the workshop’s first couple of days—just enough rain and clouds to provide excellent photography, but not enough to wash us out. Suddenly, my concern wasn’t that there would be enough water, it was whether the clouds would depart in time for my planned Wednesday night moonbow shoot.
Even with all this last-minute moisture, spring 2026 was not especially wet in Yosemite. Though still flowing beautifully, all the falls were noticeably on the low side of average for this time of year (peak runoff is usually around May 1). Nevertheless, there was more than enough water exploding on the rocks beneath the falls to form the billowing mist Yosemite’s signature waterfall rainbows require.
Throughout the workshop my group enjoyed an assortment of daylight rainbows, from various vantage points (I have the timing down to the minute for each location, creating the illusion that I’m much smart than I am), but it was the moonbow everyone was crossing their fingers for. I had one person in the group who had already taken this workshop twice, each time with the expressed desire to photograph the moonbow. With Kent was returning for a third attempt, the pressure was on and I was pretty committed to making it happen for him if at all possible.
Since the moonlight timing and angle would be best on Wednesday, the workshop’s penultimate night, I tried to get everyone up to speed on moonlight and moonbow photography during that afternoon’s training session. The evening’s sunset shoot featured the full moon rising over Bridalveil Fall, photographed from an elevated turnout on Big Oak Flat Road. As soon as we finished there, I zipped the group back down to the Yosemite Valley Lodge parking lot, where we grabbed our gear and made the short walk, in the gathering dark, up to the bridge at the base of Lower Yosemite Fall.
The below average flow in the fall meant that this year’s moonbow wouldn’t be as big, or last as long, as it does in the wettest years. That’s because less water means a smaller cloud of mist for the bow to form in, not only shrinking the moonbow’s breadth, but also terminating the show sooner, as the rising moon shifts the necessary 42 degree rainbow angle downward and eventually out of the mist. (Rainbows drop as the sun or moon rises—read more about the geometry of rainbows on my blog) But this year’s moonbow was plenty big enough to thrill everyone, providing about 40 minutes of quality photography between the time the sky was dark enough for the moonbow to appear, and when it dropped out of the mist.
Even with less water than usual, the moonbow was obvious to the unaided eye as a shimmering silver band. And the rainbow colors were clearly visible in our mirrorless viewfinders or live-view LCD screens, even before a picture was captured.
The diminished flow in Yosemite Fall had one major advantage: at no point did we feel like we were photographing in a rainstorm. Every once in a while we’d get sprinkled with a small amount of mist, but I’ve photographed the moonbow from here when everyone had to don rain gear, and even a single 5-second exposure—that started with a dry lens—would finish with the front lens element completely misted over. When it gets like this, the only way to do it is with an umbrella in one hand and a towel in the other.
There were quite a few people the bridge this evening, but I’ve seen far more here. We’d become a little scattered on the walk up to the fall, so it took me a little while in the darkness to ensure everyone in my group had found a suitable spot to set up. Once I was confident my group was positioned satisfactorily, I tried to get around to everyone to make sure they were doing okay.
Exposure for the moonbow is pretty easy, and I’d given them settings to use before we started. Composition is a little tougher given the limited light, but I’d very strongly encouraged everyone to put their lens at its widest focal length and leave it there—this simplifies things, and today’s digital cameras have more than enough resolution to allow ample cropping later.
Not only does shooting wide streamline composition in the dark, it simplifies the most challenging aspect of night photography: focus. Since changing focal length requires refocusing, and finding focus in the dark is not easy, once you’ve achieved sharpness you don’t want to do it again. Most of my time this evening was spent moving around between the members of my group, helping them get focused, or checking their focus to make sure it was good. I started with Kent, but eventually made it around to nearly everyone (and even helped one or two people who weren’t in my group).
Eventually I found a few minutes for some frames of my own, squeezing in between a member of my group and another person who was okay with me and my tripod up in his space (I checked). I take both horizontal and vertical versions of virtually every scene I photograph, but I always photograph the moonbow vertically because I just haven’t found a horizontal composition that pleases me. For starters, I want to include as much sky as possible, and I think Yosemite Creek churning through granite boulders is a far more interesting than the trees on the left and right. This evening, I used my 14mm prime lens, enabling me to include a lot of starry sky above the fall (including 5/7 of the Big Dipper), while still getting plenty of moonlit creek and granite beneath it.
You can tell that I captured this toward the of the moonbow window by how low the moonbow is. When we arrived, it hovered above the visible mist, just below the top of the lower section (where the fall starts to spread). So even though my moonbow is not quite as broad as the earlier ones, it is brighter, thanks to all that water.
I should probably add a few words about my exposure. I started doing moonlight photography about 20 years ago, and established my full moonlight exposure values very early on. Back then, then ISO 400 was about as high as I could go without noticeable noise; since my fastest lens at the beginning of my digital years was f/4, so my exposure settings were usually in the ballpark of ISO 400, f/4, 30 seconds.
The problem with 30 seconds is you get a little star movement—not a deal-breaker, but enough to be visible if you look closely. So as sensor technology improved, and I acquired faster lenses, my ISOs went up and my shutter speeds dropped, while my exposure values (amount of light captured) remained constant. For this one, I used f/1.8, ISO 1600, and 5 seconds.
With limited time, and even more limited ability to move around, I still managed to get a handful of frames this night. But that was fine because my photography is never the priority in a workshop (and I certainly don’t lack for moonbow images from past years). Even though this year’s version may not be my best moonbow shot ever, I’m still pretty pleased with my results.
In the image review the next day, I invited everyone to share a moonbow image in addition to their review image—it was wonderful to see that everyone had a success! That includes Kent, who had to leave the workshop early, but who reported to me that his moonbow image is beautiful and he’ll no longer need to repeat the course.
Workshop Schedule || Purchase Prints || Instagram
Yosemite Falls, Day and Night


Open Mind and Open Eyes
Posted on November 1, 2025

Splash of Rainbow, South Tufa, Mono Lake
Sony α1
Sony 16-35 GM II
6 seconds
F/11
ISO 100
As landscape photographers, it’s easy to arrive at a photo location with a preconceived idea of what we’re going to shoot. That’s often because there’s a single perspective that gets all the attention, dominating the images of the location shared online and skewing the perception of what its images should look like.

Stillness, South Tufa, Mono Lake
At Mono Lake, despite its sprawling layout with lake views that span 270 degrees, photographers (myself included) tend to gravitate the east-facing beach with a solitary tufa tower that resembles a battleship floating just a couple hundred feet offshore. I can’t deny that it’s a striking feature worthy of photographing, but certainly not to the exclusion of other opportunities at South Tufa.
Fortunately, since this spot is at the most distant corner of South Tufa, getting out there requires walking past most of the other views on the route. So each time I take a workshop group for its first visit to South Tufa, as I guide them out to this distant beach, I make a point of emphasizing all the possibilities along the way, encouraging them to stick with me all the way out to the battleship view, but to file away other scenes they might want to return to as they go.
But photography at South Tufa isn’t just about the views—equally important is the light. So another point I try to emphasize on that initial walk is understanding—given that there are photo-worthy views that include both lake and tufa facing east, north, and west—how much the scene will change with the direction of the sunlight. Since our first visit is usually a sunset shoot, I remind everyone how different the light will be when we return for sunrise the next morning. I point out where the sun will rise and encourage them to visualize the different light we’ll see that will opportunities in multiple directions, and to identify potential compositions that might work in that light.
Since we’d been there the prior evening, as soon as this year’s group arrived dark and early on this autumn morning, everyone scattered quickly. I brought up the rear, checking in with everyone on my walk out to the battleship tufa beach. As much as I like the scene at this east-facing beach, one challenge is that it’s in the midst of what might be best describes as a tufa garden—a collection of stubby shrubs and 10-15 foot high tufa towers—that makes it very difficult to see what’s happening in the other directions. But with a nice mix of clouds and sky this morning, I knew the potential existed for a nice sunrise and made a point of keeping my head on a swivel to avoid missing something in the other directions.
About 15 minutes before sunrise I noticed the clouds in the west start catching light, and shortly thereafter the Sierra peaks in the same direction lit up. I let the near me know that this might be a good time to wander over to the other side of the tufa garden and headed in that direction. The walk to the other side is probably less than 100 feet, but by the time I got there the light on the base of the clouds had intensified significantly. And much to my amazement—given that there was no sign of rain here, nor any rain at all forecast for the area that morning—realized that a splash of rainbow was perched atop the hills across the lake.
Not knowing how long the rainbow would last, I ran around hailing as many in my group as possible, and we all went straight to work trying to make a photo before it went away. I’m a strong proponent of finding compositions where all the elements work together, which is no small feat at South Tufa, given all the randomly situated tufa towers and rocks jutting from the water. Fortunately, as I moved around trying to organize all the visual elements in my scene, not only did the rainbow seem to be waiting for me to finish, it actually intensified as I did it.
It probably didn’t take more than a minute or two, but it felt like forever before I found a composition that satisfied me. As you can see, this rainbow was never destined to be the main subject—at its best it was simply a colorful accent to an already beautiful scene. But what an accent it was.
In addition to the distant rainbow and sunlit clouds, the other important elements I needed to organize were primarily in my foreground: the tufa peninsula jutting in from the left; the small tufa island at my feet, the submerged tufa stones; and (especially) the reflection.
To make all this work together, I started by centering the little island in my frame, and balancing the rainbow with the tallest spire of the peninsula. With the scene left/right balanced, I decided I need to get my boots muddy and set my tripod in shallow water to turn the foreground tufa into an actual island. Since the best clouds were fairly low, I only included enough sky to include them (by putting the top of my frame where I did, viewers can infer that the clouds stretch much farther than they did), and was careful not to put the little blip of tufa on the far right too close to the edge.
Now for the reflection. I didn’t really care for the empty water between the reflection and the little island, so I slowly dropped my tripod, keeping an eye on my LCD and stopping when the reflection filled almost all of that watery void. I put on my Breakthrough 6-stop dark polarizer to smooth the water, and it to reveal the interesting detail on the lakebed without erasing the colorful part of the reflection. Finally, I focused on the small rocks just beyond my foreground island, and clicked.
This is not a scene I’d have normally gravitated to, but I was drawn by the light (and stayed for the rainbow). Had I not seen the rainbow, I’m not even sure I’d have taken the time to build the composition I ended up with, but this is just one more reminder that if you open your mind and your eyes, things just have a way of working out.
Workshop Schedule || Purchase Prints || Instagram
Mono Views
Click any image to scroll through the gallery LARGE


Fire and Rainbow
Posted on October 10, 2023

Fire and Rainbow, Kilauea, Hawaii
Sony a7R V
Sony 100-400 GM
ISO 250
f/11
1/200 second
One concern about returning to the same location, at the same time, in the same workshop, is finding something new to photograph. But last month’s Hawaii workshop group was so excited about our first shoot of the Kilauea eruption, going back on the workshop’s final night was a no-brainer. Not only were we looking forward viewing the fountaining lava one more time, we all wanted to apply some of the lessons learned from the Tuesday shoot. And Mother Nature delivered a surprise that guaranteed something new for everyone.
Surprise or not, many in the group returned with plans for different exposure or focal length choices; I want to use the knowledge gained in the first visit to position my group better, because the eruption had been so new on that first visit, I’d arrived at Kilauea with no idea of what we’d encounter and how we’d access it. I knew enough this second time to arrive with an actual strategy.
The first night we had to park in the overflow parking lot and walk about a mile along the caldera rim to reach the best vantage points; this time we arrived nearly 90 minutes earlier and drove directly to Kilauea Overlook, our favorite vantage point from the earlier visit. Even arriving that much earlier, we ended up snagging the last three parking spaces in the lot—one more kiss of good fortune to bless this especially fortunate workshop group.
Though the eruption was still going strong, we found the shooting conditions this second evening much different. The first time it was dry, with a mix of sky and clouds; this time we found ourselves surrounded by low clouds that dampened every surface and filled the caldera with a heavy mist. By the end of the evening I’d labeled this a “stealth” rain—microscopic drops that couldn’t really be felt as they landed, but somehow managed to saturate our clothes and accumulate on our lenses. But at first it just seemed a little damp.
As early as we were, the sun still hadn’t set behind Mauna Loa. As we unloaded our gear from the cars, I noticed blue sky visible above Mauna Loa and pointed out to the group that there may actually be enough moisture in the air to create a rainbow if the sun came out. And it wasn’t long after making our way to the rim that the sun did indeed pop out enough to create a fuzzy rainbow far to the left of the lava.
The rainbow’s location was close enough to the eruption that we could include both in the same frame without going too wide, but I wanted to get it even closer to minimize the (not especially appealing) brown caldera floor separating them. This is where understanding basic rainbow science pays off. A rainbow forms a 42 degree circle around the anti-solar point: the point in the sky at the other end of an imaginary, infinitely long line starting at the sun, passing through the back of the viewer’s head, and exiting between the eyes. Since we each have our own anti-solar point (and therefore our own rainbow), which is entirely a function of our position relative to the sun, we can change the location of any rainbow (relative to the landscape) by simply repositioning. In this case I knew I could move about 300 yards to my right before the trail (and eruption view) curved out of view of the eruption and rainbow.
Since this was the workshop’s final evening, and we’d all photographed the eruption from here before, everyone was pretty comfortable scattering (rather than sticking close to me for guidance)—which is exactly what they’d done. I hailed as many as I could and explained what I was doing and why, encouraged them to join me, then rushed up the trail.
Not knowing how long the rainbow would last, on the way I stopped a couple of times to fire a frame or two. Turns out I needn’t have worried because the rainbow lasted, in one form or another, for at least 30 minutes. Once I reached the vantage point that positioned the rainbow closest to the eruption, I set up and went to work. The rainbow seemed most intense near the lava, but at times I could make out a faint full arc, and once even pulled out my 12-24 lens to capture a few frames of it. But for the most park I was interested in the tighter, brighter compositions.
Finally working in one spot long enough to get settled, I started to fully comprehend how wet it was. I was wearing a thin rain shell, but could tell that it was already soaking through to my flannel. (Flannel in Hawaii? Indeed—here at 4,000 feet conditions were both wet and windy, with temps in the low 50s.) The wind made my umbrella pointless, so the mist/rain also assaulted my front lens element enough that I had to wipe it clear every few frames.
The difficult problem was getting focus. I’ve come to trust the autofocus on my Sony mirrorless cameras so much, the only time I manually focus anymore is when I have a critical focus point requirement—in 100% infinity scenes like this, I just autofocus anywhere in the scene (wherever my focus point happens to be positioned) and call it good. But the mist this evening was so dense, I could rarely get a focus confirmation—and even when I did, I wasn’t completely confident of it. So I scanned my surroundings and spied a couple hundred yards behind me one of the volcano observatory buildings (near the now shuttered Jagger Museum) to auto-focus on.
This worked well, especially since I use back-button focus and didn’t need to switch between auto and manual focus each time I refocused. Of course each time I changed my focal length I had to pop my camera off my tripod and turn around to refocus, but this became second nature soon enough.
We stayed until dark, battling the wetness and chill to add to our already brimming Kilauea eruption collections. Once darkness fell, the eruption didn’t look much different than it had the first time, so as soon everyone felt like they’d had enough success and addressed whatever problems they’d identified in their prior images, we retreated to the cars and headed back down to Hilo.
Who wants to find out what we’ll see in Hawaii next year?
Workshop Schedule || Purchase Prints || Instagram
Lots More Rainbows
Click any image to scroll through the gallery LARGE


Tunnel Vision
Posted on April 24, 2023

Spring Rainbow, Bridalveil Fall, Yosemite
Sony a7R V
Sony 24-105 f/4 G
ISO 100
f/10
1/250 second
For everyone who woke up today thinking, “Gee, I sure wish there were more Yosemite pictures from Tunnel View,” you’ve come to the right place. Okay, seriously, the world probably doesn’t actually need any more Tunnel View pictures, but that’s not going to stop me.
Visitors who burst from the darkness of the Wawona Tunnel like Dorothy stepping from her monochrome farmhouse into the color of Oz, are greeted by a veritable who’s who of Yosemite icons: El Capitan, Cloud’s Rest, Half Dome, Sentinel Rock, Sentinel Dome, Cathedral Rocks, Bridalveil Fall, and Leaning Tower.

Yosemite Tunnel View subjects
Camera or not, that’s a lot to take in. First-time visitors might just just snap a picture of the whole thing and call it good. For more seasoned visitors like me, the challenge at Tunnel View is creating unique (or at least less common) images. But that’s not enough to keep me from returning, over and over.
Many people’s mental image of Yosemite was formed by the numerous Ansel Adams prints of this view. And while it’s quite possible those images were indeed captured at Tunnel View, many Adams prints assumed to be Tunnel View were actually captured from nearby Inspiration Point, 1,000 feet higher.
Before Wawona Tunnel’s opening in 1933 completed the current Wawona Road into Yosemite Valley, the vista we now know as Tunnel View was just an anonymous granite slope on the side of a mountain. Before 1933, visitors entering Yosemite from the south navigated Old Wawona Road, a steep, winding track more suited to horses and wagons than motorized vehicles. Inspiration Point was the Tunnel View equivalent on this old road.
To complicate matters further, there are actually three Inspiration Points in Yosemite. The original Inspiration Point is the location where the first non-Native eyes feasted on Yosemite Valley in the mid-19th century. Decades later, Old Wawona Road was carved into the forest and granite to provide an “easier” (relatively speaking) route between Wawona and Yosemite Valley. The valley vista that was established on this route and labeled Inspiration Point is the one popularized by Ansel Adams. But today that version of Inspiration Point has become so overgrown that hikers hardy enough to complete the steep climb up to the Ansel Adams Inspiration Point, must make their way a short distance down the slope to a spot where the view opens up, forming the New Inspiration Point. But I digress…
Almost certainly not my first visit
My total visits to Tunnel View, which predate my oldest memories, by now have to exceed 1,000. At first I had no say in the matter, having simply been a passenger on family trips since infancy. But when I became old enough to drive myself, my Tunnel View visits increased—most Yosemite trips included multiple visits.
The Tunnel View counter started clicking even faster as my interest in photography grew. More than just a one-of-a-kind scene to photograph, Tunnel View is also the best place in Yosemite to survey Yosemite Valley for a read on the current conditions elsewhere in the valley.
And as I’ve mentioned (ad nauseam), the view at Tunnel View is beautiful by any standard. And as it turns out, beauty is a pretty essential quality for a landscape image. Unfortunately, another essential landscape image criterion, especially for landscape photographers who pay the bills with their photography, is a unique image—ideally (aspirationally), but not necessarily, a one-of-a-kind image. So Tunnel View’s combination of unparalleled beauty and easy access means million of visitors each year, which makes finding something literally unique (one-of-a-kind) here virtually impossible.
But there are a few things I do to increase my chances of capturing something special enough to at least stand out—things you can do at any popular photo spot. Here are three:
- Experiment with focal length — At Tunnel View usually means using a telephoto to isolate individual elements, or combinations of elements: just El Capitan, or El Capitan and Half Dome; just Half Dome, or Half Dome and Bridalveil Fall; and so on. And an extreme telephoto allows me to zero in on just one aspect of a Tunnel View icon: Half Dome’s summit draped by clouds, El Capitan’s bold diagonals, the mist explosion at Bridalveil’s base, to name just three.
- Look behind you — Even though the granite walls outside Tunnel View’s classic view can’t compete with the money shot, failure to keep an eye on the surrounding walls risks missing light and clouds that can at times be spectacular. And even though I don’t photograph manmade objects, I’ve seen some great images by others using Wawona Tunnel to frame Yosemite Valley, or with the tunnel itself as the subject.
- Include special conditions — My favorite Tunnel View approach is to pair this already beautiful scene with one of the many ephemeral natural events possible here. Not only does the east-facing view mean warm late light on all the granite features, it also makes Tunnel View ideally situated for rising crescent (sunrise) and full (sunset) moons, and afternoon rainbows. And its position on Yosemite Valley’s west end means it’s usually the first place in Yosemite Valley that storms clear. Few sights in Nature more spectacular than a Tunnel View clearing storm, and no two are exactly the same.
The image I’m sharing today combines a couple of these approaches: a tighter than typical focal length, and special conditions. Though the Bridalveil Fall rainbow isn’t exactly unique, its combination of beauty and relative rarity keeps me coming back. And because the sun’s angle at any given moment, as well as the angle of view to Bridalveil Fall, are precisely known, I can predict the rainbow’s appearance each spring afternoon to within a few minutes (it varies slightly with the amount of water in the fall).
This rainbow makes a fantastic first shoot for my spring workshops. Usually I’m content to just stand and watch—and listen to the exclamations from my workshop students—but sometimes it’s to beautiful to resist. This year, with beautiful clouds overhead, dappled sunlight below, and a strong breeze to spread the rainbow’s palette, was one of those times.
Workshop Schedule || Purchase Prints || Instagram
A Tunnel View Gallery


Just a Dash of Rainbow
Posted on May 22, 2022

Bridalveil Rainbow, Tunnel View, Yosemite
Sony 𝛂1
Sony 24-105 G
1/60 second
F/10
ISO 100
I’ve spent the last week moving, and with my annual Grand Canyon Raft Trip for Photographers launching Tuesday, I haven’t had a lot of time for blogging (and much else). But I’m still committed to posting a new blog each week, so I’m sharing a new image from one of this spring’s Yosemite workshops, and a brief description of its capture. I also dusted off and polished up the Rainbow article from my Photo Tips tab. I’ll be off the grid until May 31, so next week’s post will likely be a little late.
It’s become a tradition to kick off my Yosemite spring workshops with a rainbow on Bridalveil Fall. Though the timing varies with the date, I’ve done it enough to narrow the rainbow’s start down to about a 2 minute window for whatever date I’m there. Not only is this little dash of rainbow a thrilling spectacle and beautiful introduction to Yosemite, it also creates an (unjustified) illusion of genius for the workshop leader.
With rain and maybe even a little snow, this year’s weather forecast for our first day looked great in many ways, but not so much for rainbows. But rainbow or not, Tunnel View is a great spot to start a workshop because it’s the most complete view of all things Yosemite. It’s also the first place Yosemite’s storms clear, so even without sunlight something special might be in store.
The storm was just starting to clear when we arrived and I almost got trampled as my group raced to set up. Between the swirling clouds and Half Dome’s appearance (not always a sure thing during a Yosemite clearing storm), things were already going pretty well when shafts of light broke through to illuminate random parts of the valley and surrounding granite.
I checked my watch and crossed my fingers when I realized that we’d be able to add a rainbow to Bridalveil if the light were to make it there. A couple of minutes later Leaning Tower (the diagonal just to the right of the fall) lit up, and a few seconds later a small patch of light hit the evergreens in front of the fall.
After telling everyone what was about to happen, I set up my composition and said a little prayer that the light would cooperate. The patches of light quickly expanded and merged and there it was. I often shoot this rainbow with a telephoto because the sky is so often blank blue, but the whole scene was so beautiful this afternoon that I went with my Sony 24-105 G lens on my (brand new!) Sony a1.
This was the very first time I’d used this camera, and while I thought I’d set it up to match my Sony a7RIV, I soon discovered that I’d missed a few things. For example, I usually shoot in single shot mode, but my a1 was in fast continuous mode, an oversight that became apparent when my first shutter press (slow and gentle, as always) fired off 6 identical frames before I released my finger. My goodness is this camera fast.
I have so many images of this rainbow that I only photographed it for a couple of minutes—just long enough to be confident that I’d captured something I didn’t have. When I finished shooting I just stood back to watch the rainbow move up the fall—and to listen to the exclamations of marvel from the group.
Fortunately none of my settings oversights were a major hindrance and were quickly corrected. Since that afternoon I’ve used my a1 enough to know that I’m going to love using it, and can’t wait to try it out in the Grand Canyon this week.
Read on to learn about rainbows, how to anticipate them, and how to photograph them…
All About Rainbows
Let there be light
Most people understand that a rainbow is light spread into various colors by airborne water drops. Though a rainbow can feel like a random, unpredictable phenomenon, the natural laws governing rainbow are actually quite specific and predictable, and understanding these laws can help photographers anticipate a rainbow and enhance its capture.
The sun’s visible wavelengths are captured by our eyes and interpreted by our brain. When our eyes take in light comprised of the full range of visible wavelengths, we perceive it as white (colorless) light. Color registers when some wavelengths are more prevalent than others. For example, when light strikes an opaque (solid) object such as a tree or rock, some of its wavelengths are absorbed; the wavelengths not absorbed are scattered (reflected). Our eyes capture this scattered light, send the information to our brains, which interprets it as a color. When light strikes water, some is absorbed, some passes through to reveal the submerged world, and some light is reflected by the surface as a reflection.

Light traveling from one medium to another (e.g., from air into water) refracts (bends). Different wavelengths refract different amounts, causing the light to split into its component colors.
To understand the interaction of water and light that creates a rainbow, it’s simplest to visualize what happens when sunlight strikes a single drop. Light entering a water drop slows and bends, with the shorter wavelengths bending more than the longer wavelengths: refraction. Refraction separates the originally homogeneous white light into the myriad colors of the spectrum: red, orange, yellow, green, blue, indigo, violet (in that order).
But simply separating the light into its component colors isn’t enough to create a rainbow. Actually seeing the rainbow spectrum caused by refracted light requires that the refracted light be reflected back to our eyes somehow.
A raindrop isn’t flat like a sheet of paper, it’s spherical, like a ball. Light that was refracted when it entered the front of the raindrop, continues through to the back of the raindrop, where some is reflected. To view a rainbow, our eyes must be in the correct position to catch this reflected spectrum of color—fortunately, this angle is very consistent and predictable.
Red light reflects at 42 degrees, violet light reflects at 40 degrees, while the other spectral colors reflect back between 42 and 40 degrees. That’s why the top color of the primary rainbow is always red, the longest visible wavelength; the bottom color is always violet, the shortest visible wavelength.
Follow your shadow
Every raindrop struck by sunlight creates a rainbow somewhere. But just as the reflection of a mountain peak on the surface of a lake is visible only when viewed from the angle the reflection bounces off the lake’s surface, a rainbow is visible only when you’re aligned with the 42 – 40 degree angle at which the raindrop reflects light’s refracted spectrum of rainbow colors.
Lucky for most of us, viewing a rainbow requires no knowledge of advanced geometry. To locate or anticipate a rainbow, put your back to the sun and picture an imaginary line originating at the sun, entering the back of your head, exiting between your eyes, and continuing into the landscape in front of you—this line points to the “anti-solar point,” an imaginary point exactly opposite the sun from your viewing position.
It helps to remember that your shadow always points toward the anti-solar point—and toward the center of the rainbow, which forms a 42 degree circle around the line connecting the sun and the anti-solar point. Unless we’re in an airplane or atop a mountain peak, we don’t usually see the entire circle because the horizon gets in the way. So when you find yourself in a mixture sunlight and rain, locating a rainbow is as simple as following your shadow and looking skyward—if there’s no rainbow, the sun’s probably too high.
High or low
Sometimes a rainbow appears as a majestic half-circle, arcing high above the distant terrain; other times it’s merely a small arc hugging the horizon. As with the direction of the rainbow, there’s nothing mysterious about its varying height. Remember, every rainbow would form a full circle if the horizon didn’t get in the way, so the amount of the rainbow’s circle you see (and therefore its height) depends on where the rainbow’s arc intersects the horizon.
While the center of the rainbow is always in the direction of the anti-solar point, the height of the rainbow is determined by the height of the anti-solar point, which will always be exactly the same number of degrees below the horizon as the sun is above the horizon. It helps to imagine the line connecting the sun and the anti-solar point as a fulcrum, with you as the pivot—picture yourself in the center of a teeter-totter: as one seat rises above you, the other drops below you. That means the lower the sun, the more of the rainbow’s circle you see and the higher it appears above the horizon; conversely, the higher the sun, the less of the rainbow’s circle is above the horizon and the flatter (and lower) the rainbow appears.

Assuming a flat, unobstructed scene (such as the ocean), when the sun is on the horizon, so is the anti-solar point (in the opposite direction), and half of the rainbow’s 360 degree circumference will be visible. But as the sun rises, the anti-solar point drops—when the sun is more than 42 degrees above the horizon, the anti-solar point is more than 42 degrees below the horizon, and the only way you’ll see a rainbow is from a perspective above the surrounding landscape (such as on a mountaintop or on a canyon rim).
Of course landscapes are rarely flat. Viewing a scene from above, such as from atop Mauna Kea in Hawaii or from the rim of the Grand Canyon, can reveal more than half of the rainbow’s circle. From an airplane, with the sun directly above you, all of the rainbow’s circle can be seen, with the plane’s shadow in the middle.
Double Your pleasure
Not all of the light careening about a raindrop goes into forming the primary rainbow. Some of the light slips out the back of the raindrop to illuminate the sky, and some is reflected inside the raindrop a second time. The refracted light that reflects a second time before exiting creates a secondary, fainter rainbow skewed 50 degrees from the anti-solar point. Since this is a reflection of a reflection, the colors of the secondary rainbow are reversed from the primary rainbow.
And if the sky between the primary and secondary rainbows appears darker than the surrounding sky, you’ve found “Alexander’s band.” It’s caused by all the light machinations I just described—instead of all the sunlight simply passing through the raindrops to illuminate the sky, some of the light was intercepted, refracted, and reflected by the raindrops to form our two rainbows, leaving less light for the sky between the rainbows.
Waterfalls are easy
Understanding the optics of a rainbow has practical applications for photographers. Not only does it help you anticipate a rainbow before it happens, it also enables you to find rainbows in waterfalls.
A rainbow caused by sunlight on rain can feel random because it’s difficult to know exactly where the rain will fall, when the sun will break through, and exactly where to position yourself to capture the incongruous convergence of rainfall and sunshine. A waterfall rainbow, on the other hand, can be predicted with clock-like precision because we know exactly where the waterfall and sun are at any give time—as long as clouds don’t get in the way, the waterfall rainbow appears with clock-like precision.


Yosemite is my location of choice for waterfall rainbows, but maybe there’s a waterfall or two near you that might deliver. Just figure out when the waterfall gets direct sunlight early or late in the day, then put yourself somewhere on the line connecting the sun and the waterfall. And if you have an elevated vantage point, you’ll find that the sun doesn’t even need to be that low in the sky.
Spring in Yosemite is waterfall rainbow season, and I know exactly where to be and when to be there for both of Yosemite Valley’s major waterfalls. In fact, given the variety of vantage points for viewing each of these falls, I can usually get two or three rainbows on each fall on any given day.
In addition to clouds, there are other variables to deal with. One is the date, because the path and timing of the sun’s arc across the sky changes with each passing week. Another thing that can throw the timing off slightly is the amount of water in the fall—following a wet winter the spring runoff increases, and with it the amount of mist. Generally, the more mist, the sooner the rainbow will appear and the longer it lasts. And finally there’s wind, which spreads the mist and usually improves the rainbow by increasing its size.
While all these variables make it difficult for me share the exact schedule of Yosemite’s waterfall rainbows from the variety of vantage points, I can give you some general guidance: look for a rainbow on Yosemite Falls in the morning, and Bridalveil Fall in the afternoon. And if you don’t mind a short but steep hike, you can also find a rainbow on Vernal Fall in the afternoon.
Moonbows
Understanding rainbow optics can even help you locate rainbows that aren’t visible to the naked eye. A “moonbow” (lunar rainbow) is a rarely witnessed and breathtaking phenomenon that follows all the natural rules of a daylight rainbow. But instead of resulting from direct sunlight, a moonbow is caused by sunlight reflected by the moon.
Moonlight isn’t bright enough to fully engage the cones in your eyes that reveal color, though in bright moonlight you can see the moonbow as an arcing monochrome band. But a camera on a sturdy tripod can use its virtually unlimited shutter duration to accumulate enough light to bring out a moonbow in full living color. Armed with this knowledge, all you need to do is put yourself in the right location at the right time.


Probably the best known moonbow is the one that appears on Yosemite Falls each spring. Usually viewed from the bridge at the base of Lower Yosemite Fall, the best months are April, May, and June, with May probably being the best combination of moonlight angle and ample water.
Unfortunately, this phenomenon isn’t a secret, and the bridge can be quite crowded on spring full moon nights—in high runoff springs, it can also be extremely wet (pack your rain gear). The base of Upper Yosemite Fall can also have a moonbow when viewed from the south side of Cook’s Meadow, especially in wet springs.
Workshop Schedule || Purchase Prints || Instagram
A Gallery of Rainbows
Click an image for a closer look, and to view a slide show.


The Reason I Do This: Redux
Posted on August 8, 2021
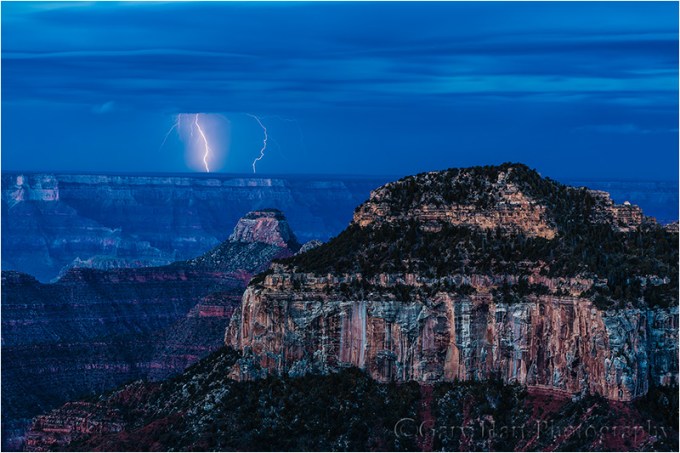
 Three Strikes, Lightning and Rainbow from Bright Angel Point, Grand Canyon
Canon EOS 5D Mark III
1/3 second
24-105L
ISO 100
f/11
August 2013
Nature photographers plan, and plan, and plan some more, but no amount of planning can overcome the fickle whims of Mother Nature. Few things are more disappointing than a long anticipated and perfectly executed shoot washed out by conditions beyond my control. But when all of nature’s variables click into place, the world becomes a happy place indeed. And when nature ups the ante by adding something unexpected, euphoria ensues.
Don Smith and I just returned from two weeks photographing the Grand Canyon. We did a little of our own photography on the trip, but the prime focus was our two four-plus day photo workshops, split evenly between the Grand Canyon’s North and South Rims. These workshops were scheduled to give our groups the opportunity to photograph the Grand Canyon, day and night, under the influence of the annual Southwest monsoon: billowing clouds, vivid rainbows, and (especially) lightning. But any workshop requiring specific weather conditions is fraught with uncertainty and anxiety—we were fairly certain the photography would be great (after all, it is the Grand Canyon), but few natural phenomena are more fickle than lightning.
When plotting a workshop schedule (or any landscape photo shoot), the best a photographer can do is maximize the odds: We try to schedule all the non-photography requirements (meals, sleep, travel, training) for the times least likely to conflict with the best photography. For example, we know that because the monsoon thunderstorms usually don’t develop before midday, Grand Canyon summer sunrises often lack the clouds and pristine air necessary for the vivid color photographer’s covet. Therefore our photography emphasis for this workshop is on getting our groups out from mid-morning through (and sometimes after) sunset. That doesn’t mean we blow off sunrise, it just means that the sunrises are generally better for exhausted, sleep-deprived photographers to skip than the sunsets are.
Nevertheless, we rallied the troops at 5 a.m. Friday for our second workshop’s final shoot, a ten minute walk from our rim-side cabins to Bright Angel Point. The forecast was for clear skies, but the workshop had already had so many wonderful shoots, I considered this final one just a little bonus, the cherry atop an already delicious sundae.
My mind was already on the long drive home—in fact, as Don and I exited our cabin in the pre-dawn darkness, I predicted that I wouldn’t even take my camera out of my bag that morning. My words as I turned the doorknob were, “But if I leave my bag here, we’ll probably get lightning and a rainbow.” Little did I know how grateful I’d be to have brought my gear….
What followed was what Don and I later agreed was probably the single most memorable workshop shoot either of us had ever experienced. Gathering in the lobby of Grand Canyon Lodge, we saw lightning flashes across the canyon, but it was impossible to tell in the darkness how far away it was. Hiking to the vista, we saw several distinct bolts stab the rim, and by the time our gear was set up, the show had intensified, delivering numerous violent strikes in multiple directions that illuminated the canyon several times per minute.
The morning’s pyrotechnics continued for over two hours, awing us first in the dark, then through twilight, and finally into and beyond a magenta sunrise. And as if that wasn’t enough, as the sun crested the horizon behind us, a small but vivid fragment of rainbow materialized on the canyon’s rim, hanging there like a target for the lightning to take potshots at it.
This was more than just good photography, this was a once-in-a-lifetime convergence of weather, location, and light that more than made up for the many times nature has disappointed. Rather than bore you with more words, here are a few images from that morning:
Lightning Before Dawn, Bright Angel Point, North Rim, Grand Canyon
Arriving on the rim about 45 minutes before sunrise, we found the South Rim under full attack. This 30 second exposure captured a pair of strikes near Mojave Point. Little did we know what was in store…

Three Strikes, Bright Angel Point, Grand Canyon
As the sun neared the eastern horizon, I couldn’t help sneaking an occasional peek behind me. Seeing clear skies in the rising sun’s direction, I crossed my fingers for the clouds to hold off long enough to allow the sunlight to illuminate the lightning show before us. As the sun topped the horizon, its rays caught the rain falling along the rim, balancing a nearly vertical section of rainbow atop Powell Point. In this single, 1/3 second exposure, I managed to capture the rainbow briefly sharing the rim with three simultaneous lighting strikes.

Color and Light, Grand Canyon Lightning, Bright Angel Point
Canon EOS 5D Mark III
1/3 second
F/11
ISO 100
24-105 f4L lens
The rainbow persisted as the lightning continued. Confident that I’d captured enough horizontal frames, I switched to a vertical composition in time to catch one more strike with the rainbow.

Approaching Storm, Grand Canyon North Rim
As the sun rose, the rocks reddened and the storm edged closer. Ridges visible earlier were slowly overtaken by the advancing rain, and long, rolling waves of thunder echoed overhead. Preceding the rain were billowing clouds; here I went with an extreme wide (17mm) vertical composition to capture the incoming storm skewering the rim with by a single bolt. I had to retreat to shelter shortly thereafter.
Grand Canyon Photo Workshops
Learn how to photograph lightning
A Lightning Gallery


Return to Civilization
Posted on May 18, 2021

Rainbow Bridge, Colorado River, Grand Canyon (2016)
Sony a7R II
Sony/Zeiss 16-35 f4
1/80 second
F/11
ISO 100
Yesterday I returned from my annual Grand Canyon raft trip, a week of white water, waterfalls, slot canyons, hiking, and star gazing in some of the most spectacular scenery on our planet—with some of the most spectacular people on our planet. This was my seventh trip, and while each trip is different, each has been unforgettable in its own way.
With highs in the low hundreds and lows in the 60s, this year was probably my hottest trip. But 100 degrees is pretty tolerable when the humidity is low and you’re never far from a splash of 50-degree Colorado River water. And our clear skies, while not ideal for daytime photography, gave us nights-after-night of skies filled with more stars than you’ve ever seen.
I had visions of processing an image or two as soon as I returned to Las Vegas on Sunday afternoon, then whipping out a quick blog post to keep my self-imposed every Sunday blog post schedule. But I hadn’t taken into account the post-trip pizza party I was to host, the shear exhaustion that always follows this trip, and the fact that I’d be breaking my glasses on the trip’s final day (a funny story—more on that in a future post), a mishap that makes spending more than a few minutes at a time on my computer very difficult. So I’ve dusted off this image, and its corresponding blog post (with a few small edits), from 2016.
The Illusion of Genius (May 2016)
Perhaps you’ve noticed that many popular nature photographers have a “hook,” a persona they’ve created to distinguish themselves from the competition (it saddens me to think that photography can be viewed as a competition, but that’s a thought for another day). This hook can be as simple (and annoying) as flamboyant self-promotion, or an inherent gift that enables the photographer to get the shot no one else would have gotten, something like superhuman courage or endurance. Some photographers actually credit a divine connection or disembodied voices that guide them to the shot.
Clearly I’m going to need to come up with a hook of my own if I’m to succeed. Flamboyant self-promotion just isn’t my style, and my marathon days are in the distant past. Courage? I think my poor relationship with heights would rule that out. And the only disembodied voice I hear is my GPS telling me she’s “recalculating.”
Just when I thought I’d reached an impasse that threatened to keep me mired in photographic anonymity, a little word percolated up from my memory, a word that I’d heard uttered behind my back a few times after I’d successfully called a rainbow or moonrise: “Genius.” That’s it! I could position myself as the Sherlock of shutter speed, the Franklin of f-stops, the Einstein of ISO. That’s, well…, genius!
And just as the fact that none of these other photographers are quite as special as their press clippings imply, the fact that I’m not actually a genius will be of no concern.
But seriously
Okay, the truth is that photography is not rocket science, and nature photographers are rarely called to pave the road to scientific or spiritual truth. Not only is genius not a requirement for great photography, for the photographer who thinks too much, genius can be a hindrance. On the other hand, a little bit of thought doesn’t hurt.
It’s true that I’ve photographed more than my share of vivid rainbows and breathtaking celestial phenomena—moonrises and moonsets, moonbows, the Milky Way, and even a few comets—from many iconic locations, but that’s mostly due to just a little research and planning, combined with a basic understanding of the natural world. An understanding that’s basic enough for most people who apply themselves.
Take, for example, this rainbow. It was clearly the highlight of this year’s Grand Canyon raft trip, and while I did predict it about fifteen minutes before it appeared, that doesn’t make me a genius. Like most aspects of nature photography, photographing a rainbow is mostly a matter of being in the right place at the right time. Of course there are things you can do to increase your chances of being in the right place at the right time. Mostly it’s an understanding of the science of rainbows, and the patience to wait, that makes me appear more prescient than I really am.
The essentials for a rainbow are simple: airborne water droplets and sunlight (or moonlight, or any other source of bright, white light) at 42 degrees or lower. Combine these two elements with the correct angle of view and you’ll get a rainbow. The center of the rainbow will always be exactly opposite the sun—in other words, your shadow will always point toward the rainbow’s center. And the lower the sun, the higher (and more full) the rainbow. There are a few other complicating factors, but this is really all you need to know to become a rainbow “genius.”
In this case it had been raining on and off all day, and while rain is indeed half of the ingredients in our rainbow recipe, as is often the case, this afternoon the requisite sunlight was blocked by the very clouds delivering the rain. Not only do rain clouds block sunlight, so do towering canyon walls. Complicating things further, the window when the sun is low enough to create a rainbow is much smaller in the longer daylight months near the summer solstice (because the sun spends much of its day above 42 degrees). So, there at the bottom of the Grand Canyon on this May afternoon, the rainbow odds weren’t in our favor.
But despite the poor odds, because this afternoon’s rain fell from clouds ventilated by lots of blue holes, I gave my group a brief rainbow alert, telling them when (according to my Focalware iPhone app, the sun would drop below 42 degrees at 3:45) and where to look (follow your shadow), and encouraging them to be ready. Being ready means figuring out in advance where the rainbow will appear and finding a composition in that direction, then regularly checking the heavens—not just for what’s happening now, but especially for what might happen soon.
We arrived at our campsite across from Deer Creek Fall with a light rain falling. The sun was completely obscured by clouds, but seeing that the sun would eventually drop into a large patch of blue on the western horizon, I went scouting for possible rainbow views as soon as my campsite was set up. When the rain intensified an hour or so later, I reflexively looked skyward and realized that the sun was about to drop beneath the clouds into a patch of blue that reached all the way to the western horizon. I quickly sounded the alarm (“The rainbow is coming! The rainbow is coming!”), grabbed my gear, and beelined to the spot I’d found earlier.
A few followed my lead and set up with me, but the skeptics (who couldn’t see beyond the heavy rain and no sunlight at that moment) continued with whatever they were doing. After about fifteen minutes standing in the rain, a few splashes of sunlight lit the ridge above us on our side of the river; less than a minute later, a small fragment of rainbow balanced above the right riverbank just upstream. Then, right before our eyes, the color quickly spread across the river to connect with the other side. Soon we had a double rainbow, as vivid as any I’ve ever seen.
Fortunately for the skeptics, this rainbow lasted so long, everyone had a chance to photograph it. Our four guides (with an average of 15 years Grand Canyon guiding experience), agreed that this had been the most vivid and longest lasting rainbow they’d ever seen. (I actually toned it down a little in Photoshop.)
Genius? Hardly. Just a little knowledge and preparation mixed with a large dose of good fortune.
One more thing (May 31, 2016)
The vast majority of photographers whose work I enjoy viewing achieved their success the old fashioned way, by simply taking pictures and sharing them (rather than blatant self-promotion or exaggerated stories of personal sacrifice). In no particular order, here’s a short, incomplete list of photographers I admire for doing things the right way: Charles Cramer, Galen Rowell, David Muench, William Neill, and Michael Frye. In addition to great images, one thing these photographers have in common is an emphasis on sharing their wisdom and experience instead of hyperbolic tales of their photographic exploits.
Read more about the science of rainbows, and how to photograph them
A Gallery of Rainbows


Something new
Posted on May 31, 2020
For many years my website has featured my workshops, while my social media pages (WordPress blog, Instagram, and Facebook) have been where I’ve shared my latest photography. While I originally kept galleries on my Eloquent Images website, I rarely updated them and after a while the website galleries ceased being a reliable reflection of my current work.
About three years ago I redesigned my website, completely changing the interface and removed the galleries entirely, doubling-down on my blog galleries. But when I started hearing from people that they couldn’t find my latest images online, I realized that, even though they’re really easy to find in the galleries right here on my blog, many people don’t take the trouble to look for them—if they don’t see a Galleries option on the website, they just move on. I made a mental note that I need to bring my website galleries back, but between workshops and travel, I never found the time.
Well guess what—suddenly I have time! So a few weeks ago I asked my webmaster to add galleries to my website, and I’ve spent the last couple of weeks populating them, and having far more fun than I could have imagined. My webmaster labeled my six galleries Gallery 1, Gallery 2, …, Gallery 6. Hmmm, surely I can do better than that. I thought long and hard about more descriptive names, trying on locations and other similarly prosaic labels, before deciding I need themes to describe my motivations for clicking my shutter.
Backstory
You may or may not know that when I decided to make photography my profession, I promised myself that I’d only photograph what I want to photograph, that I would never take a picture just because I thought it would earn me money. I’d just seen too many miserable photographers earning a living but hating what they do. But since all I want to photograph is nature (which, while universally loved, is not universally purchased), I needed to come up with a way to earn money. I landed on photo workshops, which perfectly leveraged my prior career in technical communications (tech writing, training, and support) and my love for both photography and nature. Not only did this enable me to photograph only what I love, my images turned out to be the perfect intro and marketing tools for my workshops: if you like my images, you’ll probably like my workshops; if you don’t like my images, you probably won’t be happy with my workshops. (Of course I do sell images too, but image sales isn’t an essential part of my business and never motivates me to take a picture.)
Rabbit hole
So I guess it should have been no surprise that thinking about what my gallery themes should be would lead me down this rabbit hole of introspection. Many photographers create spectacular images that reveal the damage humans are doing to our natural world, but I seem to simply be driven to share nature’s beauty, both the obvious and the overlooked. Rather than a conscious choice, this is more an organic outcome of a life spent seeking and finding happiness in the natural world, combined with regular old human nature that causes most of us to find pleasure sharing the things we love most: “Here’s something that makes me happy—I hope it makes you happy too.” Here’s where the rabbit hole led me—I can’t think of a clearer distillation of the things in nature that move me:
- Four Seasons: Winter, Spring, Summer, Fall
- Color and Light: Sunlight’s interplay with air, land, and water
- Water Like Glass: A Time for Reflection
- It Came from the Sky: Unexpected gifts from above
- In the Flow: Water on the move: Waves, waterfalls, and whitewater
- Celestial Carousel: Sun, Moon, and Stars
These galleries are a work in progress. Assembling them, I quickly realized that many of my images would work in more than one gallery, but I decided not to duplicate any image. Rather than a comprehensive retrospective, my new galleries are more of a summary of my own favorites. But I’m still adding to them, so feel free to suggest additions you think I’ve overlooked. Or simply browse and enjoy.
Gallery Highlights
Click an image for a closer look, and to view a slide show.


Moonlight Magic
Posted on May 12, 2020
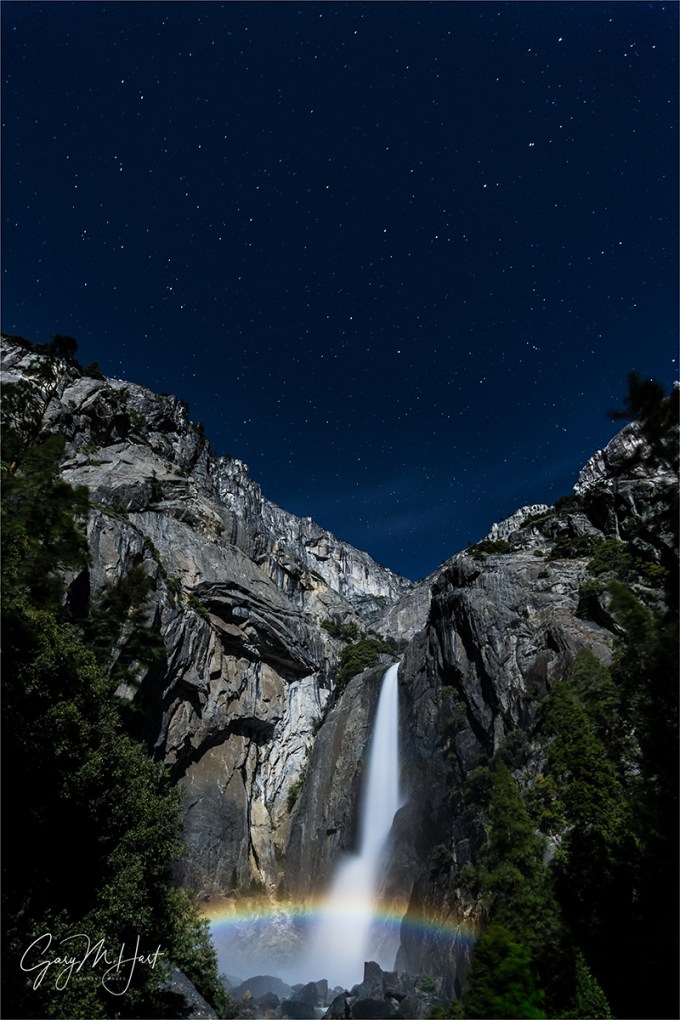
Moonbow and Big Dipper, Lower Yosemite Fall, Yosemite
Canon EOS-1Ds Mark III
22 mm
30 seconds
F/4
ISO 800
Rainbows demystified
A rainbow forms when sunlight strikes airborne water droplets and is separated into its component spectral colors by characteristics of the water. The separated light is reflected back to our eyes when it strikes the backside of the droplets: Voila—a rainbow!
There’s nothing random about a rainbow—despite their seemingly random advent and location in the sky, rainbows follow very specific rules of nature. Draw an imaginary line from the sun, through the back of your head and exiting between your eyes—when there are airborne water droplets to catch that light, a will rainbow form a full circle at 42 degrees surrounding that line (this won’t be on the test). Normally, because the horizon (almost always) gets in the way, we see no more than half of the rainbow’s circle (otherwise it might be called a “raincircle”). The lower the sun is, the more of the rainbow’s circle we see and the higher in the sky the rainbow extends; when the sun is higher than 42 degrees (assuming a flat horizon), we don’t see the rainbow at all unless we’re at a vantage point that allows us to look down (for example, looking into the Grand Canyon from the rim).
Read more about rainbows on my Photo Tips Rainbows Demystified page.
Moonbows
Moonlight is nothing more than reflected sunlight—like all reflections, moonlight is a dimmer version its source (the sun). So it stands to reason that moonlight would cause a less bright rainbow under the same conditions that sunlight causes a rainbow. So why have so few people heard of lunar rainbows (a.k.a., moonbows)? I thought you’d never ask.
Color vision isn’t nearly as important to human survival in the wild as our ability to see shapes, so we evolved to bias shape over color in low-light conditions. In other words, colorful moonbows have been there all along, we just haven’t be able to see them because they’re not bright enough. But cameras, with their ability to dial up sensitivity to light (high ISO) and accumulate light (long exposures), “see” much better in low light than you and I do.
While it’s entirely possible for a moonbow to form when moonlight strikes rain, the vast majority of moonbow photographs are waterfall-based. I suspect that’s because waterfall moonbows are so predictable—unlike a sunlight rainbow, which doesn’t require any special photo gear (a smartphone snap will do it), capturing a lunar rainbow requires at the very least enough foresight to carry a tripod, and enough knowledge to know where to look.
Nevertheless, even though we can’t see a moonbow’s color with the unaided eye, it’s not completely invisible. In fact, even without color, there’s nothing at all subtle about a bright moonbow—it may not jump out at you the way a sunlight rainbow does, but if you know where to look, you can’t miss a moonbow’s shimmering silvery band arcing across the water source.
Yosemite Falls moonbow
Despite frequent claims to the contrary, moonbows can be seen on many, many waterfalls. Among the more heralded moonbow waterfalls are Victoria Falls in Africa, Cumberland Fall in Kentucky, and (of course) Yosemite Falls in Yosemite National Park.
Yosemite Falls is separated into three connected components: Upper Yosemite Fall plummets about 1400 feet from the north rim of Yosemite Valley; the middle section is a series of cascades dropping more than 600 feet to connect the upper and lower falls; Lower Yosemite Fall drops over 300 feet to the valley floor. While there are many locations from which to photograph the moonbow on Upper Yosemite Fall, the most popular spot to photograph it is from the bridge at the base of Lower Yosemite Fall.
The Lower Yosemite Fall moonbow is not a secret. Arrive at the bridge shortly after sunset on a full moon night in April, May, and (often, if the fall is still going strong) June, and you’ll find yourself in an atmosphere of tailgate-party-like reverie. By all means come with your camera, tripod, and rain gear, but don’t get so caught up in the photography that you fail to appreciate the majesty of this natural wonder.
Following a typical winter, in spring the mist and wind (the fall generates its own wind) on and near the bridge will drench revelers and cameras alike. After a particularly wet winter, the airborne water and long exposures can completely obscure your lens’s view during the necessarily long exposures. And if the wet conditions aren’t enough, if you can find a suitable vantage point, expect to find yourself constantly jostled by a densely packed contingent of photographers and gawkers stumbling about in limited light. Oh yeah, and then there are the frequent flashes and flashlights that will inevitably intrude upon your long exposures. But despite all these challenges, I’ve done this long enough to know that success is very possible if you know what you’re doing.
If, knowing all that, you still have visions of a moonbow image, it’s best to come prepared:
- A tripod and digital SLR camera are must (a film camera will work too, but it adds complications I won’t get into here)
- Wear head-to-toe rain gear so you can concentrate on keeping your camera dry
- Bring a chamois or towel—you’ll be using it frequently
- An umbrella can help keep water off your lens during a long exposure
- Practice moonlight photography (you’ll find my how-to of moonlight photography, including exposure settings and focus techniques, in the link) before you get there—trust me when I say that you don’t want to be learning how to photograph by moonlight while you’re trying to capture a moonbow in a mosh pit.
- Don’t have time to practice before your visit? Stop at the top of the Lower Yosemite Falls trail, where you can see the entire fall from top-to-bottom, and practice there—you won’t see a moonbow (the angle is wrong), but the conditions are much easier, and these might just turn out to be your favorite images of the night.
About this image
I’d taken my May workshop group to Glacier Point on this night, so we didn’t arrive at Yosemite Falls until nearly an hour after the moonbow started. This late arrival was intentional because California’s severe drought has severely curtailed the mist at the base of the lower fall. In a normal year the mist rises so high that the moonbow starts when the moon is quite low (remember, the lower the sun or moon, the higher the bow); this year, I knew that the best moonbow wouldn’t appear until the moon rose and the bow dropped into the heaviest mist. Not only that, the later it gets, the few people there are to deal with.
I’d given the group a talk on moonlight photography that afternoon, but we stopped at the top of the trail to practice for about 20 minutes, using the exquisite, tree-framed view of the entire fall. When everyone had had success, we took the short walk up to the bridge and got to work.
We found conditions that night were remarkably manageable—by the time we arrived at the bridge, at around 9:45, the crowd had thinned, and our dry winter meant virtually no mist on the bridge to contend with. I started with couple of frames to get more precise exposure values to share with the group (moonlight exposures can vary by a stop or so, based on the fullness of the moon, its size that month, and atmospheric conditions), then spent most of my time assisting and negotiating locations for my group to shoot (basically, wedging my tripod into an opening then inviting someone in the group to take my spot).
This image is one of my early test exposures—I went just wide enough to include the Big Dipper (just because it’s a test doesn’t mean I’ll ignore my composition). In wetter years I’ve captured move vivid double moonbows and complete arcs that stretch all the way across the frame, but I kind of like the simplicity of this image, and the fact that I was able to include the Big Dipper, which appears to be pouring in the the fall.
Chase the Moonbow With Me in April
Workshop Schedule || Purchase Prints || Instagram
Moonlight Magic


Thanking My Stars (and Moon, and Lightning, and Rainbows, and…)
Posted on August 18, 2019

Surprise Rainbow, Point Imperial, Grand Canyon
Sony a7RIII
Sony 24-105 f/4 G
1/4 second
F/8
ISO 100
So lately I’ve been thinking about the things I photograph and why I photograph them. Then the other day, after boarding a plane following my recent Grand Canyon monsoon trip, I squeezed into my seat and rummaged through my computer bag, loading the knee-jamming magazine holder on the seat-back in front of me with the two books I’m currently reading. One was “All About Lightning,” by Martin Uman (published in 1971 and revised in 1986); the other was “The Weather Machine: A Journey Inside the Forecast,” by Andrew Blum. On my AirPods was an astronomy podcast (“Orbital Path”). I have no illusions (anymore) of becoming an astronomer or a meteorologist, and the movie version these books is unlikely to be coming soon to a theater near you—no, I’m filling my mind with this stuff simply because it interests me. A lot.
I think everyone has those things that fascinate them so much that there’s no effort learning them. I have a history of finding something interesting and devouring every possible word on the subject. Some were passing obsessions (handwriting analysis, Lincoln head pennies, and—uhhhhh… The Monkees), and others have stuck with me (baseball, astronomy, geology, meteorology, and certain writers).
Which brings me back to the things I photograph, and the realization that we can probably tell a lot about most photographers’ relationship with the world by viewing their images. Anyone who checks the percentage of my images that have a weather or celestial component wouldn’t (or shouldn’t) be surprised by my in-flight entertainment, or to learn that for a few misspent college semesters I majored in astronomy, then geology (and have since kept them as hobbies, where they belong).
The longer I do this, the more I appreciate how lucky I am to actually make my living photographing only the things I love. Nearly 15 years ago I left a good career in the tech industry, naively planning to turn a photography passion into a profession. I can’t tell you how many people since then have told me that doesn’t work—fortunately, I didn’t hear them until it was too late.
For photographers, there’s a fine line between self-employed and unemployed, a line I didn’t fully appreciate when I made my decision to jump into it with both feet. Like millions of other photographers, all I wanted to make a living photographing the beautiful natural world I love so much—how hard could that be? But as many have learned (some sooner than others), not only is there very little market for landscape images, there seems to be pretty much infinite competition—competition that causes landscape photographers to sell digital images for pennies, and prints for little more than their cost. But somehow, for reasons I like to attribute to foresight but must acknowledge dash of shovel full of good luck as well, I’ve managed to make my living photographing only what I love.
Before leaving my tech job, I was doing art shows and making pretty decent money for a weekend’s work. But a weekend art show is so much more than just a weekend of effort, and after doing the math I realized that I’d need to be on the road at least 40 weeks per year to even have a chance to make ends meet through art shows. Gallery sales were a non-starter because the galleries just want too much of the small number of sales they generate, and the stock photography market was already on life support. Open my own gallery? That just sounded like an anchor that would prevent me from taking pictures.
So I started leading photo workshops, which were just starting to catch on and seemed ideally suited to my skillset. Not only was I intimately familiar with Yosemite and other California destinations that pretty much sell themselves, my background was in technical communications (tech writing, training, support), and I genuinely like people.
When I started offering workshop, I still did the art shows, but then came 2008 and the economic downturn. Despite a lot of hand wringing, my workshops continued filling, helped a lot by repeat customers who kept me afloat through the recession. And after one particularly unsuccessful weekend in San Francisco, I decided to drop the art shows altogether and focus on the workshops. I haven’t looked back.
Since making my mid-life career change, I’ve also managed to create a small niche as a writer, both through this blog (which pays nothing but has developed a pretty loyal following), and as a regular contributor to “Outdoor Photographer” and other photography publications (and which earns just slightly more than nothing). Not enough to live on, but at least enough to scratch my life-long writing itch.
So here I am, nearly 15 years into this ride and still going strong. I’m not getting rich, and least financially, but there are better measures of success than dollars. Whether alone or sharing with others, I still get as excited as anyone when the moon rises behind Half Dome, the Milky Way brightens above a New Zealand lake, or the setting sun paints a rainbow against a Grand Canyon sky.
About this image
After a day with a lot more rain than lightning, Don Smith and I took our Grand Canyon Monsoon photo workshop group up to Point Imperial for sunset. The vestiges of the storm still lingered as we set up, but there was no sign of the lightning that had been in the forecast, or even the rain that had drenched us for most of the day. Though lightning was on everyone’s mind, soft light in the canyon and the play of sunlight and clouds overhead kept everyone happy as we waited for sunset.
We’d been photographing for about a half hour when I noticed a tiny fragment of rainbow balanced atop the rim in the south. Not nearly prominent enough to be a prime subject, I nevertheless pointed it out to others and composed a few frames of my own before moving on to other opportunities in a view filled with them. Since there was no sign of rain, I only occasionally checked on the tiny rainbow, each time fully expecting it to have vanished, but each time noticed that it was hanging in there—not really any bigger, but still somewhere on the continuum from vivid to nearly-faded-to-oblivion.
Just a few minutes before sunset and with no rain visible, that little spot of color intensified and stretched skyward. Those of us with eyes on it alerted the rest of the group, sending everyone into a shooting frenzy that lasted until the light faded with the setting sun. I’ve photographed bigger rainbows, and (slightly) brighter rainbows, but only a few that have thrilled me as much as this one that seemed to come out of nowhere.
Grand Canyon Workshops
Personal Favorites: Moon, Stars, and Weather
Click an image for a closer look and to view a slide show.


