Eloquent Images by Gary Hart
Insight, information, and inspiration for the inquisitive nature photographer
Going Out a Winner
Posted on January 17, 2026
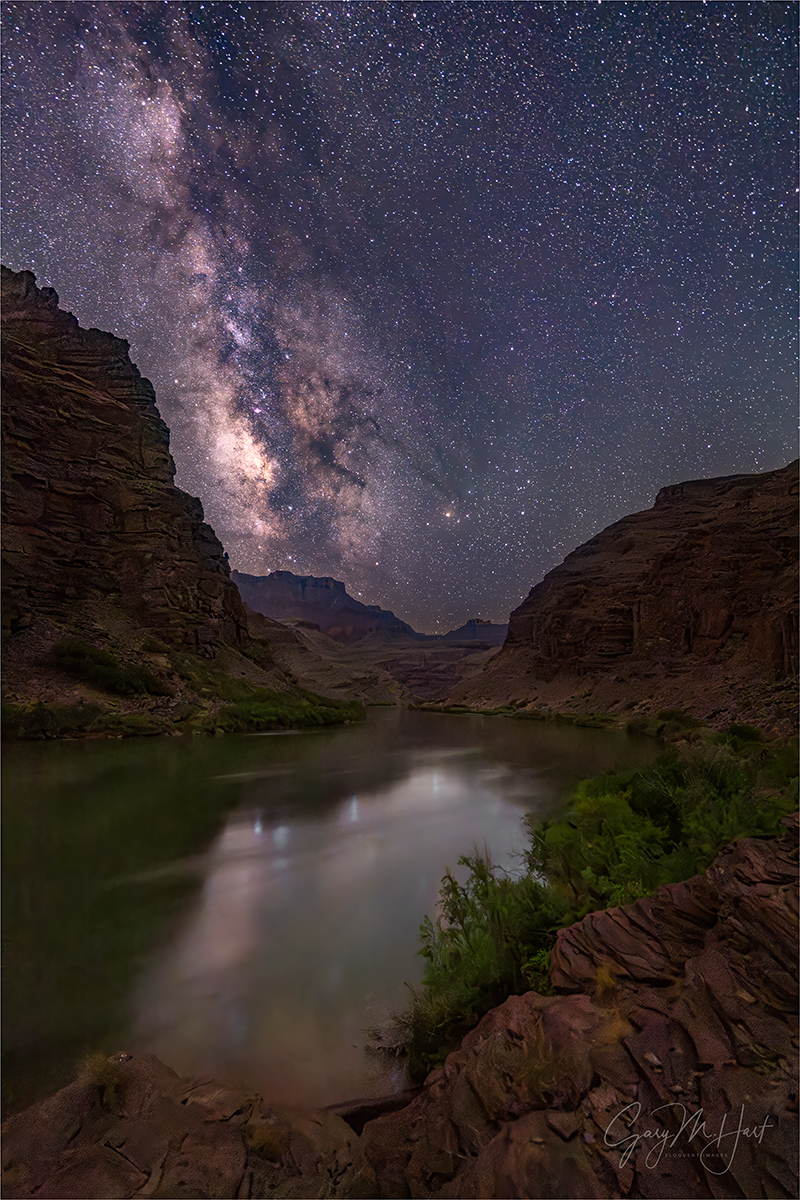
Milky Way Reflection, Colorado River, Grand Canyon
Sony α1
Sony 14mm f/1.8 GM
ISO 6400
f/1.8
20 seconds
There was nothing easy about this picture. Milky Way photography in general is a challenge, but trying it at the bottom of Grand Canyon is especially harrowing. In addition to the standard Milky Way photography difficulties, like insufficient light essential for composition and focus, any kind of night photography at the bottom of a mile-deep hole adds another level of dark.
In this extreme darkness, some locations are worse than others, and navigating to this one in particular was difficult enough to put it on the fringe of my safety comfort zone. Not only did getting here require a longer than usual walk on uneven and sometimes trailless (is that a word?) terrain, the last section was along a series of narrow ledges where a single misstep might result in a sudden plunge into the Colorado River. Oh, and as if all that wasn’t enough to test me, on the entire walk out here this night, I couldn’t push down the thought that the name of this particular camp is Rattlesnake.
But I was especially motivated to make this shoot work, because…
I knew before the trip started that this, my tenth Grand Canyon raft trip, would be my last one. Rafting Grand Canyon had been a bucket-list item for as long as I could remember, but when I scheduled my first trip way back in 2014, I had no plan to continue once it was it off my list. But, for many reasons, that initial experience so far exceeded expectations, I vowed to continue doing it until people stopped showing up. Fast forward nine more trips: turns out, I’m the person who will stop showing up…
Let me explain. The trip still fills, but not nearly as quickly as it did those first few years, when I already had a waiting list for the next year before the current year’s trip even pushed off. And with costs rising faster than I’ve been able increase the price (see slowing enrollment reference in the previous sentence), and understanding that I’m on the financial hook for a full trip whether or not it fills, somehow my Grand Canyon raft trip had become the most stress-inducing offering on my schedule. So, while I still love the whole rafting experience as much as ever, when I decided to pare a few workshops from that schedule, it seemed like ten (!) Grand Canyon raft trips was a nice round number to go out on.
But I will miss it. Between the sights, the rapids, the guides, and the fantastic people I got to share it all with, it’s pretty difficult to single out one thing I’ll miss most about rafting Grand Canyon. But hold a gun to my head, and I’d have to say it will be the night sky filled with more stars than I’ve ever seen, and so dark the Milky Way actually casts a shadow.
As desperately as I craved a good Milky Way experience (and when I say Milky Way, I refer specifically to our galactic core) on this farewell trip, I always go in knowing that, for many reasons, Milky Way success is far from a sure thing. Even though it’s always a priority, before this one, I’d had trips that had two nice Milky Way shoots, one nice Milky way shoot, and zero nice Milky Way shoots.
First obstacle is that, despite Grand Canyon’s typically clear skies, clouds do happen—I had two trips with so many clouds we never even saw the Milky Way. But even when the sky is clear every night, we still need a little luck to even see the galactic center because, from most campsites, the Colorado River’s general east/west orientation through the canyon puts views of the southern horizon (where the Milky Way hovers in May) behind the looming south wall. It helps that over the years I’ve been able to identify a handful of campsites that are either on the north/south trending Marble Canyon section of the canyon (where we spend our first two nights), or (more rarely) on a south-facing bend in the river. But they’re few and far between.
Since all Colorado River campsites in Grand Canyon are first-come, first-served, my trips can never count on getting one with a Milky Way view. And the Colorado River is unforgivingly one-way—if your first choice campsite is taken, there’s no way to return to that wide open second choice campsite you passed two miles back. This fact sometimes forces us to settle for whatever campsite is available. And with a schedule to maintain, even coming upon an empty ideally oriented campsite is of no value if we’re floating past it at 11 a.m. because we don’t have enough wiggle room in our schedule to lose a half day of rafting.
With all this in mind, at the start of each trip I powwow with the guides to explain (emphasize) my Milky Way and other photography priorities (for example, if it’s sunny, there are several key locations I only want to photograph in the full shade of early morning or late afternoon). We come up with the framework of a plan that by Day-2 is usually out the window, or at least is significantly renegotiated, as things invariably don’t go exactly as planned. And each plan change factors in downstream Milky Way possibilities.
The first thing I do after arriving at a new camp is check its Milky Way opportunities—specifically, I identify south and whether it’s behind a canyon wall (bad), or between the two walls (good). But even an open southern exposure isn’t enough—I know of at least one campsite with a great view of the southern sky, but it’s so overgrown along the river that all we get for a foreground is a bunch of scruffy shrubs. And my groups have also had several campsites where the only place to park the boats is smack in the middle of the only open view of the southern sky. So all the tumblers need to click into place for the Milky Way to work at the bottom of Grand Canyon.
If I determine that tonight’s campsite does have a good view of the Milky Way, at some point (usually at dinner) I give group the night’s Milky Way plan: where it will appear, when it will appear, and the best place to photograph it. I also give a basic Milky Way photography primer (focus, composition, and exposure tips), lecture them about the damage flashlights will do to everyone’s shots (especially red lights!), then make myself available for the inevitable, “Which lens…?,” “How do I get my camera to do…?” questions. By bedtime, most people who hope to photograph the Milky Way are ready (-ish). And of course they know where I’ll be set up if they have problems (but they’ll need to come me, because it’s too dark to safely move around to everyone).
All of my Grand Canyon night shoots are no-host: I tell people where I’ll be and roughly when I’ll be there. In May the earliest the Milky Way rises into view is around 1:30, but to avoid disturbing people who value their sleep more than I do, I never set an alarm because that might disturb those nearby who would rather sleep. Fortunately, I have no problem waking myself up at a specific time, give or take 15 minutes.
There are six nights on this trip. The way the trip usually unfolds, our best chances for the Milky Way are the first two nights, and (if we’re very lucky) the fourth night. On our first night of this trip, we ended up at a spot beneath a wall that blocked the lower half of the Milky Way, but the few of us went for it and did okay—but I knew we could do much better.
Not wanting to hang all our hopes on getting the very nice but difficult to secure campsite on night four, I felt very motivated to make the second night work. But as the afternoon wore on and we continued to encounter good campsites that were already taken, we just floated on. And there comes a point where you just have to take whatever is available so we can start the business of setting up camp and making dinner before it gets too dark. Which is why the guides were actually relieved as we floated up to Rattlesnake camp and found it open, Milky Way be damned. The first thing I did when we landed was pull out my phone and check the compass to find south, and as feared, the S-needle pointed right at a towering wall. Oh well…
But after setting up my campsite, I got my (iPhone) compass out and went exploring. My eye was on a bend in the river a few hundred yards downstream, and I wondered if it might bend far enough to the south to provide a view to the southern sky, and whether it was even possible to get down that far.
As I moved downstream, the route along the river got rockier, eventually turning into a series of sandstone ledges with a steep drop straight to the water. Each time it looked like I couldn’t go any farther downstream, I found a I found a route that got me a little farther. I was at least a quarter mile downstream before reaching a spot where I could go no farther without climbing. (A quarter mile doesn’t sound very far, but in total darkness and without a trail, it feels like forever.) Looking downstream, I saw that this vantage point still didn’t face due south as I’d hoped, but it did provide a clear view southwest. Hmmm—not ideal, but… maybe?
Checking (and re-checking) my astronomy app, I guessed (crossed my fingers) that we might have about a 45-minute window from the time the Milky Way rotated out from behind the canyon wall, until the sky started to brighten enough that we’d start losing essential contrast. And the longer I took in the entire view, the more I liked the river scene we’d be able to put with the Milky Way. If it worked.
Walking back, I took special note of the route, identifying distinctive rocks and shrubs I might be able to use as landmarks in the dark. At camp, I told my group what I’d found, and that the window of opportunity is very small (even the slightest miscalculation on my part could make a difference). I also warned the that the route out there, while only slightly treacherous in daylight, would be exponentially more-so in virtually total darkness. I also told them I’d be going for it. I finished by encouraging anyone even considering going out there in the dark to scout it and make a route plan now.
Before crawling into my sleeping bag, I got my camera and lens combo set up on my tripod and stood it next to my cot. The last thing I did before closing my eyes was set my mental alarm clock for 3 a.m.
I woke up a little before 3:00, grabbed my tripod, and made my way out. Because other people might be either shooting or sleeping, I try not to use any kind of flashlight or headlamp when walking around at night, but using only my cell phone screen to illuminate my next step, I didn’t really have much trouble finding the way, one step (as far as I could see) at time until I was there.
I was surprised and pleased to see how many people were already out there—on this trip I have a lot of non-photographers who join photographer friends and loved-ones, but I’d guess close to a third of the group was there already, and a few more joined shortly after I arrived. With no light, I poked around on the sandstone until my eyes to completely adjusted, and eventually edged my way out to the farthest ledge. Then I went to work.
I did my usual vertical (first) and horizontal composition mix, trying different ISO and shutter speed settings to give myself more processing options. I also moved around a little, eventually photographing from three different positions within about a 30-foot radius. From my first frame to my last was only 25 minutes, but by the time I’d finished, I knew I’d had a Milky Way success I so wanted on my final trip.


The Show Must Go On
Posted on August 13, 2025

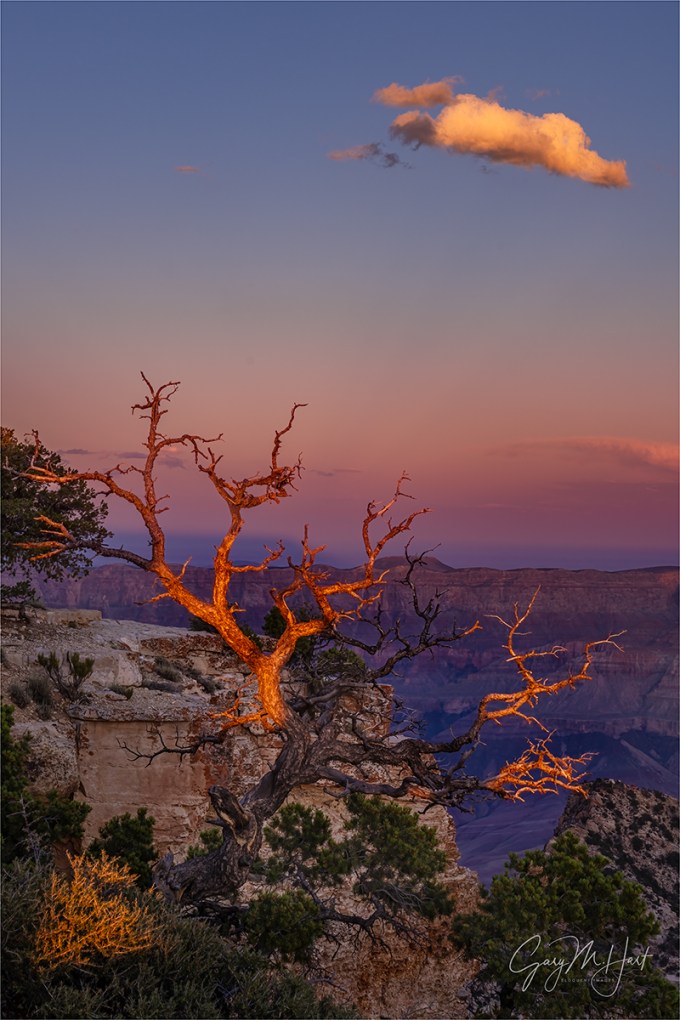
Ablaze, Desert View Sunset, Grand Canyon
Sony a7R V
Sony 100-400 GM
Sony 1.4x Teleconverter
ISO 100
f/9
1/1600 second
Greetings from Grand Canyon.
A big part of nature photography is anticipation and planning. And with planning comes expectations. Sadly, expectations often don’t live up to reality, so another big part of nature photography is how you handle the situations when expectations aren’t met.
To those people who preempt disappointment by simply avoiding expectations (after all, if you don’t have expectations, you can’t be disappointed) I say, what fun is that? Despite the risk of disappointment, I truly enjoy getting excited about upcoming trips—then just do my best to make the most of whatever situation has dashed my expectations.
When planning my workshops, I try to remember that it’s not just my own expectations on the line—big promises also means the potential for big disappointment. And few things ramp up expectations, both my own and my workshop students’, more than the possibility of photographing lightning at the Grand Canyon. Of course with or without lightning, Grand Canyon is special. But let’s be honest—the only reason I schedule this workshop in Grand Canyon’s most crowded month is because that’s the best time for lightning. And despite all the inherent beauty here, lightning is the prime reason most of my workshop students sign up. The number two reason? Probably the opportunity to visit the North Rim.
This year, the first threat to everyone’s expectations came in July, when Grand Canyon Lodge on the North Rim burned, forcing the closure of that side of the park. Though the North Rim doesn’t have the views to match the South Rim, I’ve always believed the rest of the North Rim experience exceeds the South Rim: fewer people, evergreen forest setting, and rustic Grand Canyon Lodge. Additionally, the North Rim has been the site of some of my groups’ most spectacular lightning successes. But rather than cancel the workshop because we lost our two North Rim nights, I just switched those lost nights to the South Rim, where I believed (crossed my fingers) that the overall experience could be just as good, only different: expectations reset.
Smoke can create havoc at Grand Canyon, but at the time the fire changed my plans, I fully expected that it would be extinguished when my workshop came around (a month later). I also consoled myself with the belief that the chances for lightning this year would be no different than any other year (extremely good). In other words, expectations were back on the rise.
But, as the workshop drew near, the fire actually exploded from fewer than 10,000 acres to its current 145,000 acres (and climbing), with the containment percentages barely budging each day (it’s currently only 44% contained). Worse still, as August approached, it started to become clear that this was not a good monsoon year in Northern Arizona. Expectations cratered.
The workshop’s first day dawned with no hope for lightning, and a canyon filled with smoke—not a great combo. But by this time, we were in “the show must go on” mode, and I was grateful to have a group that was happy to stay as positive as I was. At the orientation I laid out the scenario, and gave them a rundown of all the ways we could make the best of it. I reminded them that some of my favorite Grand Canyon images were only possible because the smoke subdued a brilliant sun, and I’ve seen the forecast turn from clear to thunderstorms with very little warning.


Making it out to the east-side views on our first shoot, we found the skies cloudless, and a fair amount of smoke. But the smoke could have been much worse, and was thin enough to permit at least a decent view into the nearby portions of the canyon, with outlines of the canyon’s internal ridges receding down the canyon to the west. Not the iconic red rock grandeur people expect at Grand Canyon, but quite photogenic for anyone with a telephoto lens and reasonable understanding of exposure.
The view that evening enabled me to reemphasize the point I’d made in the orientation: this would likely be a sunset where the sun, receding ridges, and a telephoto lens would take the day. Even with the smoke, careful exposure would be required to capture (in a single frame) enough canyon detail for silhouettes, without blowing out the sun.
That’s exactly the approach I took for this Desert View sunset image from that first evening. I started by setting up my 100-400 with a 1.4 teleconverter for the biggest sun possible, then composed a few sample frames while the sun was about 15 minutes from the horizon. This gave me enough time to anticipate the spot on the distant canyon rim where the sun would disappear, and to play with the possible compositions, finally arriving at this one at a little less than 500mm. Then I waited.
I held my breath a few minutes later when the sun disappeared into a layer of clouds, exhaling only when it reappeared shortly thereafter. As it dropped to within a sun’s-diameter of the horizon, I started clicking, keeping a close eye on my camera’s histogram and highlight alerts (“zebras”), while pushing the exposure to as bright as I could make it without losing color in the sun. To hedge my bets, I varied my exposure up and down by a couple of stops, my standard practice any time the sun is in my frame. (This allows me to use my large monitor at home to select the image with the best highlights/shadows balance.)
Honestly, the resulting images looked like crap on my LCD: the sun appeared too bright, while the canyon was virtually black. But I know my camera well enough to know that both highlights and shadows were within the recoverable range. Not only that, underexposing everything but the sun turned the clouds a fiery orange-red.
Processing this image was actually a piece of cake: I just pulled Lightroom’s Highlights slider all the way to the left, the Shadows slider all the way to the right, then adjusted the Exposure slider upward until everything felt right. Believe it or not, as soon as I finished those three moves, the sun and clouds looked pretty much like this (no special masking, blending, or color adjustment required)—I actually chose to desaturate the color a bit in Photoshop to make everything look more credible. Besides some moderate noise reduction in the darkest areas of the frame, this image required very little more than that. (Amazing how much simpler processing is when you nail the exposure.)
We’re now on workshop Day 3, and it turns out that initial shoot was our smokiest. Though we haven’t seen many clouds (yet), and have had lots of smoke in the distance, the canyon itself, as well as the sky above, has been sufficiently smoke-free to permit very clear views all the way down to the river, and brilliant sunstars (which require the brightest possible sun) at each sunrise/sunset shoot after that first one.
I’ve also found myself even more thrilled than I expected to be to have much more time on the South Rim—not only do we have two more days here, we also didn’t lose most of one day to the drive to the North Rim. That’s allowed me to take group to a few favorite locations that I’ve never had time to share with groups before. And I’ve been doing this so long, I’ve found very effective workarounds to the daunting South Rim crowds.
And as if to reward everyone’s positive spirit, now the National Weather Service has dangled hints of thunderstorms for tomorrow, and completely dropped the hints in favor of downright promises for the day following (fingers crossed). So things are definitely looking up.
Having lost the North Rim for the foreseeable future, I wasn’t sure I was going to continue this workshop. But after this week’s experience, even without the normal amount of lightning, all systems are go for next year.
Workshop Schedule || Purchase Prints || Instagram
More Monsoon Magic


What Would Tom Cruise Do?
Posted on May 31, 2025

Rising Crescent, Grand Canyon
Sony a7R V
Sony 24-105 f/4 G
ISO 400
f/11
.6 second
As you might imagine, at the bottom of Grand Canyon the sleep schedule syncs with the sun. In May, that means flopping into our cots to await the stars around 8:00 p.m., then rising around 5:00 a.m. On a typical day, the morning pace is fairly leisurely, providing time for packing up our campsites, coffee, relaxed chat, breakfast, and even a little photography. While all this happens, the guides clean up breakfast and pack up the kitchen and toilets, then let us know when it’s time to queue up for the 5-minute fire-line that loads the boat. By 8:00 a.m. we’re on the water.
But this was not a typical day. The plan this morning, my annual Grand Canyon raft trip’s final full day, was to compress all that morning activity into one hour so we could beat the crowds to Havasu Creek, and catch the best light there. Photographers love clouds, but when clouds aren’t in the forecast, we go for the next best thing: shade. We formulated the Havasu shade strategy the prior afternoon, then sold it to the group at dinner that night. Though some were dubious of our seemingly impossible mission, the guides assured us it was doable if everyone bought in and worked together. And it didn’t hurt that, unlike the trip’s prior nights, this campsite wasn’t positioned with the view toward the southern horizon necessary for a sleep-interrupting Milky Way shoot.
Turns out I actually had a pretty good sleep that night, waking about 4:45 and instantly springing fully rested from bed, very much geared up for the morning’s tight schedule. The first thing I did was pack my cot and walk it down to the staging area in front of the rafts, greeting a few still groggy fellow rafters on the way. But after depositing my cot, I glanced up upstream and did an actual double-take….
Before continuing, I should probably let you know, or at least remind you, that I’m something of a moon fanatic—which I guess would make me quite literally, a “lunatic,” given that the word derives from the Latin word for moonstruck. I’ve always believed that the moon’s presence enhances pretty much any scene, and work hard to include it whenever possible.
Which is why, more than 20 years ago, I started plotting the moon’s potential arrival upon, or departure from, every scene I hoped to photograph, going to great lengths to capture this arrival or departure whenever possible. In fact, many photo trips and workshops are scheduled specifically for a landscape/lunar confluence. And even when the moon isn’t a prime objective, it’s a rare photo trip that I don’t at least know the moon’s status before departing, its phase and daily rise/set positions and times, just in case.
But since the primary celestial goal of my Grand Canyon raft trip is the Milky Way, and it requires moonless nights for the absolute darkest skies possible, I always schedule this trip for the moonless nights around a new moon. Not only that, given that we spend the entire trip in the shadow of vertical walls soaring up to a mile above us, including the moon in my Grand Canyon raft trip images is never a consideration—I simply don’t think about it.
So imagine my surprise when that casual upstream glance revealed a thin slice of moon suspended in the pre-sunrise gloaming, perfectly framed by the canyon’s towering limestone layers. Overcoming my disbelief, I reflexively shouted, “Look at the moon!,” then ran like Tom Cruise to grab my camera gear and race back to the best view. (I also do all my own stunts.)
For about 10 minutes I photographed in rapturous frenzy, completely forgetting our compressed morning. I composed horizontal and vertical, recording many versions of the ever-changing moon, clouds, color, and light. Given the weight restrictions on this trip, my longest lens was a 24-105, but I didn’t stress and (correctly) reasoned that I have more than enough resolution to crop my images down to the tighter compositions the scene called for.
By the time the crescent ascended behind the south wall and I put my camera away (and remembered the departure deadline I’d lobbied the group so hard for), my adrenaline was ramped so high that I had no problem packing the rest of my stuff and catching the last raft out of camp. (Okay, there are only two rafts and we depart together—I’m reasonably confident they wouldn’t have left without me, though I imagine I’d have had to endure a fair amount of good natured abuse.)
I’m fully willing to acknowledge that my passion for moon photography is extreme, a fact confirmed by the fact that most of the group didn’t join me photographing the moon this morning. But that’s okay—we each have our own relationship with the natural world, and my own deep interest in all things celestial predates my interest in photography by more than a decade. The fact that today’s technology (finally) enables me to combine these loves is a true blessing I will never take for granted.
One more truth was with me as I photographed that morning. All week I’d been fully aware that this was my final Grand Canyon raft trip. Drifting downstream, bouncing over rapids, and hiking to so many familiar spots, I’d spent the week silently saying goodbye to all the scenes that had moved me so profoundly on my ten visits. As I composed and clicked, I couldn’t help feel overwhelmed by the realization that this magic place had bestowed a divine parting gift.
I Still Do My Grand Canyon Monsoon Workshop
Workshop Schedule || Purchase Prints || Instagram
Grand Canyon Raft Trip Collection
Click any image to scroll through the gallery LARGE


Grand Canyon Lightning 2024: Part 2
Posted on August 16, 2024

Bent, Grand Canyon Lightning
Sony a7R V
Sony 24-105 f/4 G
ISO 50
f/18
1/6 second
When I returned from my Grand Canyon Monsoon photo workshop earlier this month, I was so excited about this year’s last-day lightning experience that I immediately processed a few images and sat down to blog about them. But when my blog started approaching 4000 words, I thought for everyone’s sanity (both yours and mine), it might not be a bad idea to split my ramblings into two blogs. In the first one I detailed, among other things, the story of the actual shoot that produced nearly 60 lightning images on the day the workshop ended. I also wrote about the Southwest monsoon in general, and the genesis of my lightning chasing obsession.
Now I’ll move on to some of the science of lightning, and my thoughts on including lightning in an image. Without further adieu…
Here’s Part 2
When you’ve been writing a weekly photo blog for over 13 years, at some point you’re bound to run out of new things to say. When that happens, the goal becomes finding fresh ways to express potentially stale thoughts. So forgive me if you’ve heard this before, but it bears repeating: Landscape photography captures the relationship between Nature’s enduring and ephemeral elements.
In the simplest terms possible, Nature’s enduring elements are those landscape features we travel to view and photograph, confident in the knowledge that they’ll be waiting for us when we arrive: mountains, lakes, rocks, trees, waterfalls, and so on. On the other hand, Nature’s ephemeral phenomena include the always changing light and weather, celestial events, and seasonal variations that play in, on, and above the landscape—never-guaranteed phenomena we might hope (and plan) to find when we arrive at our enduring destinations, but also those conditions that simply surprise (or disappoint) us. Regardless of how they converge, the landscape photographer’s job is to combine the best of Nature’s enduring and ephemeral elements in the most compelling way possible.
Pretty straightforward, right? For some things perhaps, but maybe not so much for others. I’d put lightning in the not-so-much category: for starters, we never know where it will strike next, or if it will even strike at all. And even when it does happen, lightning comes and goes faster than our shutter fingers can respond. But, like most of Nature’s most fickle ephemeral phenomena (alliteration anyone?), the more I understand lightning, the better my success.
Where my lightning pursuit is concerned, it doesn’t hurt that I’ve always been something of a weather nerd, starting in my early teens with an inexplicable fascination with the weather forecast segment of KGO-TV’s (Channel 7 in San Francisco) nightly news (thank you, Pete Giddings), continuing with meteorology classes in college, as well as my ongoing consumption of weather articles, books, blogs, and podcasts.
Despite this general interest in meteorology, I never really took the time to study lightning closely until I started trying to photograph it. I knew the basics, but the deeper I looked, the more fascinated I became. And not coincidentally, the more lightning success I had.
For starters, a lightning bolt is an atmospheric manifestation of the truism that opposites attract. When two oppositely charged objects come in close proximity, an equalizing spark is produced. For example, when you get shocked touching a doorknob, on a very small scale, you’ve been struck by lightning.
On the atmospheric scale, understanding the mechanism isn’t too difficult to get your mind around if you remember a few basic facts:
- Warm air rises because it’s less dense than cold air. And cold air falls because it’s more dense.
- This warm air rising, cold air falling thing is the underlying engine of convection: air that’s warmer than its surroundings rises, until it cools enough be colder than its surroundings.
- Since warm air holds more moisture (water vapor) than cold air, anything that makes air cooler (like rising through the atmosphere) squeezes its moisture out, which causes its contained water vapor to condense and form clouds.
- The greater the temperature difference between the warmer lower layers of the atmosphere, and colder higher layers, the more unstable the atmosphere is said to be. This instability drives the convection process that leads to thunderstorms.
- Warm air will continue rising until it is no longer warmer than the surrounding air, potentially ascending high enough for the water vapor it carries to condense and freeze. Or until it encounters an inversion.
- An inversion is a cap (layer) of warmer air sitting atop cooler air, an aberration that puts the brakes on the rising warm air.
Of course weather phenomena are rarely simple, but in general the ingredients for lightning are moist air (high humidity), an unstable airmass atmosphere uncapped by inversion, and surface heating to initiate the convection process. With these ingredients in place, adjacent columns of ascending and descending air generate collisions between the contained water molecules.
When ascending and descending water molecules collide, negatively charged electrons stripped by the collision attach to descending molecules, giving them a net negative charge; the remaining molecules, now with a missing electron and a net positive charge, are lighter and continue upward. This electron imbalance is called ionization. The result is a polarized cloud that’s positive on top and negative at the bottom. The most powerful convective updrafts carry water droplets high enough that they freeze, shifting the ionization process into overdrive with ice particle collisions.
Since nature really, really wants to correct a charge imbalance, and always takes the easiest path, if the easiest path to electrical equilibrium is between the cloud top and cloud bottom, we get intra-cloud lightning; if it’s between two different clouds, we get inter-cloud lightning. And when the net charge beneath the cloud is positive while the cloud bottom is negative, we get cloud-to-ground lightning. (This describes negative lightning; positive lightning, where the cloud/ground charges are reversed, is also possible, but less common.)
In addition to the vertical motion within a thunderstorm, there is also horizontal motion that moves a cell across the landscape. This movement feels a little more random because it’s driven by invisible winds in the middle levels of the atmosphere. But keeping an eye on a storm can at least enable a general understanding of the direction it’s moving—important information when you want to photograph lightning (also when you want to stay alive).
With lightning comes thunder, the sound of air expanding explosively when heated by a 50,000-degree jolt of electricity. While lightning’s flash zips to our retinas at more than 186,000 miles per second, thunder lumbers along at the speed of sound, a pedestrian 750 miles per hour—nearly a million times slower than light.
Knowing that the thunder occurs at the same instant as the lightning flash, and the speed at which both travel, we can calculate the approximate distance of the lightning strike. While we see the lightning pretty much instantaneously, thunder takes about 5 seconds to cover a mile. So dividing by 5 the number of seconds between the instant of the lightning’s flash and the arrival of the thunder’s crash gives you the lightning’s approximate distance in miles (divide by 3 for kilometers).
Technically, if you’re close enough to hear the thunder, you’re close enough (probably within 10 miles) to be struck by the next lightning bolt. But watching lightning at Grand Canyon over the last dozen years, I’ve become pretty comfortable reading the conditions and determining when the storm’s too close. I still err on the side of safety, shutting down a shoot sooner than many in the group might like, but I haven’t lost anyone yet, so I must be doing something right. (And seriously, I know people understand when I terminate a shoot because lightning is too close, and it frustrates me just as much as it does them.)
Understanding thunderstorms in general, and lightning creation in particular, has helped me more accurately determine where to point my camera for the best chance of success. Given the number of Grand Canyon vistas with views extending dozens of miles up, down, and across the canyon, at the beginning I’d just point my camera and Lightning Trigger in the direction of any cloud that was producing rain. But now I know that all rainclouds aren’t created equal, and that the clouds most likely to produce lightning are the darkest and tallest. The darker a cloud, the more moisture it contains, and the greater the potential for ionizing collisions. The taller a cloud, the more likely it is to contain the ice that supercharges the ionization process.
And since lightning often precedes thunderstorm’s motion, striking the rim (or inside the canyon) in front of the falling rain I’d previously targeted my compositions on, I’ve become better able to anticipate where the next bolt might strike and adjust my composition proactively.
On the day I captured this (and nearly 60 other) lightning images, with ample monsoon moisture from the Gulf of Mexico and an uncapped atmosphere, all that was needed was warming sunlight to kick off the convection process that sends the moisture skyward. The morning started cloudless, and from my vantage point at Grand Canyon Lodge (right on the North Rim), by midmorning I could see billowing clouds far to the south. Even though the workshop had ended that morning, about half the group had stayed, so I summoned them with a text message.
We started seeing lightning less than an hour later. During the three or so hours of activity, it was fun watching various cells bloom, mature, and peter out. During most of that period of activity there was overlap, as one cell was diminishing, another was starting up—sometimes in the same general direction, other times over a completely different part of the canyon. The overall trend of the storms’ motion was east-to-west, across the canyon, along the South Rim.
I’ve said it before, but it bears repeating that I think the absolute best way to really appreciate lightning is to spend time closely scrutinizing a still image. With a lifespan measured in milliseconds, a lightning bolt is the epitome of ephemeral—whether in person or in a video, it’s a memory before we fully register that lightning just fired. We have a general idea of its location and overall shape, but it’s not until we’re presented with a frozen instant of that lightning bolt’s peak energy that we fully understand the details of what took place.
It doesn’t take long to realize that each strike has its own personality, distinctly different from all others. Examining my images later, I always look to process the lightning images with the most personality. One bolt’s most striking (pun unavoidable) feature might be the circuitous route it followed to get from cloud to ground, or the network of related simultaneous bolts associated with it, or the numerous spiderweb filaments it produced, or maybe the sheer power and brilliance it displayed.
Thinking in terms of matching these ephemeral features with the enduring canyon, on a macro scale the enduring aspect was determined when I decided to visit Grand Canyon during monsoon season. But my decisions for how to combine the landscape ephemeral lightning have evolved, influenced now by the knowledge I’ve gained, and also by shifting priorities. With so many in my images lightning portfolio, my goal is no longer to capture lightning no matter what (by simply pointing in the direction most likely to get lightning, regardless of the scene there)—now I can now afford to factor the better composition into my framing decisions. While that shift might reduce the number of strikes I capture, it increases the chance of getting strikes I especially like.


Above is a series of four strikes from the afternoon’s most active cell, captured over a 12 minute span. Despite similar origin and landing locations, you can see that each bolt is unique. I remember them in a very general sense because each induced from the group reflexive, giddy exclamations that far surpassed the standard “Ooooh!” every lightning bolt elicits. Despite retaining a vague memory of their shapes and paths, I love that I was able to freeze each one for detailed examination.
JOIN ME FOR NEXT YEAR’S GRAND CANYON LIGHTNING CHASE
Workshop Schedule || Purchase Prints || Instagram
Lots More Lightning
Click any image to scroll through the gallery LARGE


Grand Canyon Lightning 2024: Part 1
Posted on August 11, 2024

Fire in the Hole, Grand Canyon Lightning
Sony a7R V
Sony 24-105 f/4 G
ISO 50
f/18
1/6 second
Back at it—the chase is on
Every year I schedule one or two (and one time three) photo workshops for the peak weeks of the Southwest US monsoon. Despite the summer crowds (which I’ve become pretty good at avoiding), I’d argue that monsoon season is the best time to photograph Grand Canyon. Given the monsoon’s frequent mix of thunderstorms and sunlight, adding colorful sunrises/sunsets and rainbows to Grand Canyon’s splendor are always a real possibility. And photographing the Milky Way above Grand Canyon is a true highlight for everyone. But despite these undeniable visual treats, more than anything else, foremost in almost everyone’s mind is lightning.
Each time I start with a new workshop group (that is clearly brimming with lightning aspirations), I’m reminded of the first time I tried chasing lightning—both the extreme disappointment of failure, and (especially) the ultimate euphoria of success. So even with hundreds (thousands?) of lightning images to my name, reviving these memories help me live vicariously through the joy and disappointment of my workshop students.
Though (or maybe because) I’ve never lived anywhere that got much lightning, I’ve been fascinated by lightning since I was a child. (Lightning is so rare here, when Californians hear thunder, instead of sheltering safely like sane people, we run outside so we don’t miss anything.) So I guess it makes sense that ever since I picked up a camera, I’ve dreamed of photographing lightning.
In the beginning…
In 2012, Don Smith and I drove to Grand Canyon to try and make that happen. I mean, how hard could it be? Armed with our cameras and virgin Lightning Triggers, on that first trip we endured enough frustration—lots of lightning that for a variety of rookie reasons, we couldn’t seem to capture—our initial dreams of dozens of lightning images became prayers for just one.

Lightning Strike, Zoroaster Temple and Brahma Temple, Grand Canyon (2012)
Those prayers were answered many times over toward the end of the visit, when a surge in monsoon thunderstorms on and near the South Rim coincided with just enough of a bump in experience (and humility) to equal success. On our last day, so thrilled were we by our South Rim lightning experience, that instead of heading straight home as planned, we detoured four hours in the opposite direction to the North Rim. There, in just a few hours, we captured even more new lightning, more than enough to energize our long drive back to California. I was hooked.
After those beginner’s ups and downs, my lightning success has increased each year. Of course when no lightning happens, there isn’t much I can do about it, but learning to interpret the forecasts (including the fairly technical NWS forecast discussions), understanding the patterns of monsoon storm development and behavior in and around Grand Canyon, increased familiarity with my Lightning Trigger, and (finally) finding an app that reliably alerts me about lightning far outside my range of vision, has significantly increased my lightning success rate.
Lightning Trigger love
For daytime lightning, I can’t overstate the importance of a reliable lightning sensor with range. First, don’t even think about trying to photograph lightning in daylight without a device that detects the lightning and triggers your camera. I know people try the see-and-react technique, but success with this approach is mostly luck—if you do get a bolt, it was almost certainly not the one that made you press the shutter, it was a secondary or tertiary (or later) bolt that followed the initial one. And one of the most common mistakes I see aspiring daylight lightning shooters make is adding an extreme neutral density filter to achieve the long exposures that yield so much success at night. But night lightning shows up because of the extreme contrast between the brilliant lightning against black surroundings; that contrast disappears in daylight, so you end up with a many-second/minute exposure with lightning bolts that last a minuscule fraction of a second, rendering the lightning faint or (more likely) invisible.
Fortunately, the lightning sensor Don and I started with has turned out to be the best, saving us lots of frustration, research, and money. You’ll find many lightning sensor options, most of which I’ve encountered in a workshop, but the only one that I’ve seen work reliably is the Lightning Trigger (though people use the name as a generic, this is the only one that can use it legally). There are fancier sensors, and cheaper sensors, but I’ve found none that combine reliability and range as well as the Lightning Trigger. (I’m not saying that the others don’t work, I’m saying that I’ve never seen any that work as well as the Lightning Trigger, so even though I get no kickback or other benefit from pushing it, the Lightning Trigger is the only lightning sensor I recommend.)
Playing the odds
On a textbook monsoon day, the storms start firing south of the canyon (around Flagstaff and Williams) mid-/late-morning, and move northward as the sun ascends, usually arriving at the canyon late morning or early afternoon. While waiting for the storms to arrive, I rely on my Lightning Tracker Pro app to monitor the approaching activity and get ahead of it, especially when I’m on the South Rim, where my groups stay about 10 minutes from the rim. (It’s easier on the North Rim because our cabins are right at the rim.)
Chasing lightning means obsessive monitoring of weather forecasts. And counterintuitively, my workshop groups have the most success not when the forecast calls for lots of thunderstorms, but when the thunderstorm odds are in the 20 to 40 percent range. That’s because Grand Canyon has a multitude of the vistas with broad, distant views up, down, and across the canyon. These views, combined with the Lightning Trigger’s incredible range (I’ve used mine to capture daylight lightning more than 50 miles away), enables us to safely photograph distant storms—storms usually so far away that we don’t hear the thunder.
So a 20 percent chance of thunderstorms means that (very roughly) 20 percent of the forecast area will get lightning, so it’s usually not difficult to stand on the rim and find lightning happening somewhere within the Lightning Trigger’s range. On the other hand, when the forecast calls for a 50 percent or higher chance of thunderstorms, we do indeed get much more rain and lightning, but usually there’s too much to photograph safely because you never want to be photographing the storm you’re in.
Let’s go fishing
As thrilling as chasing lightning might sound, it’s really about 95 percent arms folded, toe-tapping, just-plain-standing-around-scanning-the-horizon, suddenly interrupted by random bursts of pandemonium. Often, (and despite years of experience) after all that anticipation-infused waiting, the response to the first lightning bolt is either: 1) Crap, the lightning is way over there; or 2) CRAP! The lightning is right here! What ensues is a Keystone Cops frenzy of camera bag flinging, tire screeching, gear tossing, tripod expanding, camera cursing, Lightning Trigger fumbling bedlam. Followed by more waiting. And waiting. And waiting….
I’ve always found the waiting part of lightning photography a lot like fishing—spiced up by the understanding that these fish have the ability to strike you dead without warning. Both fishing and lightning chasing are an intoxicating mix of serene communing with nature, with an undercurrent of giddy anticipation. And whether you’re fishing or trying to photograph lightning, a strike is far from a guarantee that you’ll reel anything in.
Just as fish somehow slip the hook, seeing a lightning bolt is no guarantee that my camera recorded it. Some of my lightning “the one that got away” stories, especially when I was just starting, turned out to be something I did wrong (and my list of stupid mistakes is too long, and embarrassing, to detail in public), but usually it’s simply because lightning can sometimes come and go before even the fastest camera can respond.
One frustration that I’ve learned to deal with is that when a Lightning Trigger is attached and turned on, the camera is in its shutter half-pressed mode (to allow the absolute fastest response), which disables many/most (varies with the camera) controls and the LCD image review—and I guarantee that the surest way to ensure another lightning strike is to turn off your Lightning Trigger to review the last frame, because the instant you do, a spectacular triple-strike will fire right in the middle of your frame. Guaranteed. (This is an extension of the axiom every photographer knows: The best way to make something you’ve been waiting for happen, is to put away your camera gear.) And though there’s no way to prove it, I think we all know that each time we pull the line out of the water to make sure the worm is still there, the “big one” swims right by.
Better late than never
This year I only did one Grand Canyon Monsoon workshop, and true to form, nearly got carpal tunnel scrolling through the weather forecasts in the weeks leading up to the trip. One week in advance, the conditions looked promising, but as the workshop approached, I was alarmed to see it trending drier with each forecast. By the time we started, the NWS was promising clear skies from start to finish.
I’ve seen forecasts like this before, and while they often do come true, I’ve also seen them change on a dime. I also found hope in the forecasts for Flagstaff and Williams to the south (that’s right, I don’t just obsessively scroll the Grand Canyon forecasts, but the nearby forecasts as well), which had thunderstorm chances in the 20-30 percent range all week. This told me that the moisture was nearby, and only a very slight change would send it the 70 or so miles north to Grand Canyon.
The evening of the workshop’s first day (Monday), a few clouds were added to the Thursday forecast—no rain, but at least the moisture was moving in the right direction. Then, in the forecast released Tuesday evening, we were “promised” a 20 percent chance of rain on Friday. With each subsequent forecast (they’re updated several times a day), it appeared things were trending in the right direction for the end of the week and beyond. Unfortunately, the workshop ended Friday morning. So I encouraged everyone with flexibility in their schedule to extend their stay at least through Friday afternoon, and about half the group was able to do it—including Curt (the photographer assisting me) and me.
This workshop enjoyed beautiful sunrises and sunsets, including a real jaw-dropper at Cape Royal on Thursday evening, plus a pretty great Milky Way shoot the night before. And a few in the group stayed up late on Thursday night and got some nice, though fairly distant, night lightning from the Grand Canyon Lodge deck. But those of us who opted to stay an extra day hung our lightning hopes on the Friday and Saturday forecasts.
Much to the consternation of those who added a night hoping for lightning, Friday morning dawned cloudless. But I reassured everyone that this is actually a good thing (it really is), because clear skies maximize the surface heating that fuels the convection thunderstorms require. Though the workshop officially ended after that morning’s sunrise shoot, I promised them I’d be around and happy to help. For starters, I created a text thread that enabled me keep them up to date on the thunderstorm development.
Then I camped out in the Grand Canyon Lodge Sun Room, keeping one (or more) eye on the spectacular view across the canyon to the South Rim and beyond. Late morning my lightning app started reporting strikes north of Williams, less than 60 miles due south. A little before 1:00 p.m. clusters of towering cumulus started blooming just south of the rim, and I knew the lightning wouldn’t be far behind—right on schedule. I texted the group that it’s go-time, then started setting up.
I captured my first lightning strike at 1:15, and between then and 4:00 p.m. captured a total of 59 frames with lightning. I know the others who stayed also captured many nice strikes. Though first bolts were relatively distant, things started to get really good a little before 2:00. I can’t express how much fun it is to be set up and ready, waiting for the next strike, and hearing the exclamations from the group when one hits.
The first strikes started behind the South Rim, a little east (left) of straight across, more or less in the direction of (and beyond) Grandview Point. Gradually the activity moved to the right and closer, approaching the rim, with the strikes increasing in frequency, proximity, and size as they moved. The quantity and volume of the exclamations increased correspondingly. In the nearly two hours of peak activity, the best stuff happened south and southwest of our position.
The two things that I wish for most in a lightning image is a bolt that lands inside the canyon, and capturing a bolt’s actual point of impact. This image checks both boxes. You can clearly see the lightning strike several hundred feet below the rim, and while it might not be clear in this downsized jpeg, my full-size original clearly shows the red/orange point of impact, as well as a fainter branch landing even farther down.
Another thing I love about this image in particular (and one other very similar capture titled “Rim Shot” in the gallery below), is the distance it traveled, and the circuitous route it took. Those familiar with Grand Canyon might be interested to know that this bolt emerges from the clouds more or less above Pima Point on Hermit’s Rest Road, and after more random direction changes than a frightened squirrel, finally smacks the wall a few hundred feet below Yavapai Point, about 5 horizontal miles away. Pretty cool.
Epilogue
Given our successful Friday, Curt and I hit the road for home Saturday morning. But I did keep in contact with others, and the reports were that the Saturday lightning was at least as good as Friday.
In a few days I’ll post Part 2, with more images from this day, plus an updated explanation of the science of lightning.
Join me for next year’s Grand Canyon lightning chase
Lots of Lightning
Click any image to scroll through the gallery LARGE


A Dose of Perspective
Posted on December 6, 2023

Celestial Reflection, Milky Way Over the Colorado River, Grand Canyon
Sony a7SIII
Sony 20mm f/1.8 G
ISO 12800
f/1.8
30 seconds
Nothing in my life delivers a more potent dose of perspective than viewing the world from the bottom of the Grand Canyon. Days are spent at the mercy of the Colorado River, alternately drifting and hurtling beneath mile-high rock layers that reveal more than a billion years of Earth story. And when the sun goes down, the ceiling transforms into a cosmological light show, each stellar pinpoint representing a different instant in our galaxy’s past.
I’ve done this raft trip eight times now—long enough to know that when I stop doing it, the night sky is what I’ll miss most. To ensure the darkest skies (and the most stars), each trip is timed around the lunar minimum when the moon’s only appearance is a thin crescent is shortly before sunrise or after sunset. For most of my rafters, these are the darkest skies they’ll ever see—so dark that the Milky Way actually casts a faint shadow.
While cloudless nights down here always deliver a seemingly impossible display of stars, viewing the glowing core of our Milky Way galaxy is never assured. In the Northern Hemisphere, even when the galactic core reaches its highest point, it’s still relatively low in the southern sky. So, given the Grand Canyon’s general east/west orientation (high walls north and south), the best Milky Way views are usually blocked by the canyon’s towering walls. But these trips spend the first two nights in the north/south-trending Marble Canyon stretch of Grand Canyon, where we can enjoy open views of the north and south sky. And even after the canyon’s westward bend just downstream from the Little Colorado River confluence, a few fortuitous twists in the river open more nice southern views.
Campsites along the Colorado River are all first-come, first-served—if you set your sights on a Milky Way spot and arrive to find it occupied, there’s no option but to continue downstream. Over the years my (incomparable) guides and I have become pretty adept at identifying and (equally important) securing the best sites for Milky Way views—if the weather cooperates, we always score one or (usually) more quality Milky Way shoots.
One more Grand Canyon Milky Way obstacle I should mention is that even in the most favorable locations, the galactic core doesn’t rotate into the slot between the canyon walls until around 1:00 or 2:00 in the morning. Often rafters go to bed with every intention of rising to photograph it, but when the time comes to rise and shoot, their resolve has burrowed somewhere deep in the cozy folds of their sleeping bags. The best antidote for this is willpower, bolstered by bedtime preparation. To assist my rafters, I prescribe at the very least:
- Pick your campsite strategically, with the Milky Way in mind. (The first thing I do when we land is let everyone know where the Milky Way will appear.) That means either setting up your cot or tent with a good view of the southern sky, or at a place with easy access (in pitch darkness) to your desired shooting spot.
- Before going to bed, identify your composition, set up your camera, lens, and tripod, set your exposure (a relative constant that I’m able to help with), and focus at infinity.
- Have your camera ready atop the tripod and beside your cot (or outside your tent) when you go to bed. Some people just wake and shoot from their campsite (sometimes not even leaving their cot), but I usually prefer walking down to the river for the best possible foreground.
- Better still, if it can be done without risk of someone stumbling over it in the dark, leave the camera composed and focused at your predetermined shooting spot. But if this spot happens to be beside the river, check with the guides because the river level fluctuates on a known schedule (based on releases from Glen Canyon Dam timed for peak flow during peak electricity demand, and distance downstream).
I’ve learned that it isn’t practical to plan a group shoot for the wee hours of the morning, so I let people know when I plan to be up and where I’ll be, then let them decide whether to join me, choose their own time or place, or just stay in bed.
Regardless of the night’s Milky Way plan, I always forego the available but optional tent in favor of the unrivaled celestial ceiling. At home I’m a read-until-the-book-drops-to-my-chest guy, but down here I just lie flat on my back with my eyes locked heavenward, scanning for meteors, constellations, and satellites until my eyelids fail me. Here’s a sample of the mind-boggling thoughts that crowd my mind as I gaze:
- The light from every single pinpoint up there was created at a different time, and took many, sometimes thousands of, years to reach us—I really am peering back into the past.
- That streaking meteor was no larger than a pea and had probably been drifting around the solar system for millions, or billions, of years.
- Many of these stars host planets capable of hosting life.
- Our Milky Way galaxy is home to 10 times as many stars as there are people on Earth.
- For each star in the Milky Way, there are at least 20, and possibly as many as 200, galaxies in the Universe—many with trillions of stars.
Mind sufficiently boggled, I’ll eventually drift off to sleep (resistance is futile), but am fortunate that I don’t usually need to set an alarm to wake up—at bedtime I just tell myself what time I want to be up and trust my body’s clock. Then I psych myself into getting up by thinking I’m just going to fire off a dozen or so frames and then go back to bed. Of course I usually end up staying out much longer—always when there are others up and needing help, but often just because once I’m awake, the sky is just too beautiful to go back to sleep.
Rising for the galactic core’s arrival gives a good two or three hours of quality Milky Way time before the sky starts to brighten noticeably in the camera, sometime around 4:00 a.m. (the eyes don’t see the brightening for another half hour or so). I use all that dark time to work on a variety of compositions and exposure settings, sometimes moving around, but often staying put and just letting the Milky Way do the moving across the scene, from one side of the canyon to the other.
Since the “star” of the Grand Canyon night images is the sky, and vertical orientation gives me more of the vertically oriented Milky Way framed by the canyon’s vertical walls, my initial compositions are usually vertical. But the longer I do this, the more I’ve tried to lean into horizontal compositions as well, giving the canyon walls billing equal to the Milky Way.
Today I’m sharing a newly processed image from my 2021 raft trip—you can read the story of this night, and see a vertical version of the scene, here. This spot has become one of my favorite campsites because of the way, when the flow is just right, the water here spreads and pools at an extreme bend in the river. The reflection this night was spectacular, probably the best I’ve ever seen here, and (needless to say) I got very little sleep.
FYI
This image (like all of my images) is a single click (no compositing of multiple frames) with no artificial light added (no light painting or any other light besides stars and skylight). I was using my 20mm f/1.8 lens, which was wide enough, but I sure wish I’d have had the 14mm f/1.8 that was on order but didn’t arrive on time.
I had to skip the 2023 Grand Canyon raft trip, but am excited to be returning in May of 2024—and I just scheduled my 2025 trip.
Milky Way Favorites (one click—no blending)
Click any image to scroll through the gallery LARGE


Storm Chasing Grand Canyon Style
Posted on September 19, 2023

Electric Sunset, Desert View Lightning, Grand Canyon
Sony a7R V
Sony 24-105 f/4 G
ISO 200
f/8
10 seconds
Before returning to the Hawaii trip, I want to wrap up my Grand Canyon trip with another image from the wonderful lightning show on the last night of the second workshop. I wrote about this evening, and the frustrations that preceded it, in my August 29 “Feast or Famine” post. I’ve actually processed three of my favorite lightning strikes from that evening, and it occurs to me that viewing them in sequence adds a little context to the experience—not just for this storm, but for most of the best storms I’ve photographed over my many years storm chasing here.
My approach to photographing Grand Canyon lightning is to take advantage of the broad, distant views along the canyon’s rim to keep a safe(-ish) distance from the storms we photograph. These wide views are a prime reason I use (and strongly recommend to all of the photographers in my workshops) a Lightning Trigger LT IV from Stepping Stone Products in Colorado (I get no kickback or other perks from Stepping Stone—they’ve even discontinued the 10% discount my workshop participants used to get). Not only does the Lightning Trigger miss fewer lightning bolts than any lightning sensor I’ve seen, my groups and I have captured lightning up to 60 miles away—a huge advantage for the kind of lightning photography I do at Grand Canyon.
Since at least 80% of the storms my groups photograph are too distant for the thunder to reach us, the lens I recommend (and use more than 90% of the time) is a 24-105 (for anyone who doesn’t have a 24-105, a 24-70 is a good second choice). Since we can only guess where the next lightning bolt will strike, this focal range is wide enough for the loose compositions that ensure lightning somewhere in the frame, and long enough to pull in even the most distant lightning the LT captures. And we make our composition decisions with the full understanding that we’ll almost certainly be cropping any resulting lightning image—one of the few times I’m grateful for every single one of the 61 megapixels on my Sony a7R V’s sensor.
Having a distant vantage point has the added benefit of providing a ringside seat for the storms’ evolution and motion. I’ve watched storms develop in place, going from puffy white clouds to towering thunderheads in a matter of minutes. Often the storms will drift up from the south—some traveling great distances and lasting an hour or more, others building and dissipating quickly, only to be replaced by another new storm just a little farther north, until the activity reaches the canyon.
The North Rim is the best place to view these northward-trending storms. Since our North Rim lodging is right on the rim, we’ll often just hang out on one of the (lightning rod shielded) view decks at the lodge and wait for the lightning to come to us. Usually the storms don’t make it all the way across the canyon, but we have been chased inside a few times.
The South Rim is a little trickier for lightning photography for several reasons: more people; our hotel is 15 minutes from the rim; and many storms sneak up behind us. But when we do get in position to photograph a storm on the South Rim, it’s a real treat because this is where we find Grand Canyon’s most expansive views.
The Grand Canyon south-to-north storm path I describe is simply a tendency—far from a rule. We’ve also photographed many storms that have moved down from north of the canyon, as well as many that have moved toward us from up- or down-canyon. The storms can move east-to-west, west-to-east, or curve from a north/south to an east/west path (or vice versa). And then there are the storms that just stay put, dumping rain and stabbing the rim with lightning in one spot for more than an hour.
Because of the storms’ unpredictability, it’s very important to keep a constant eye on them, monitoring the general direction of movement. For safety reasons of course, but also to make the most informed composition decisions. Unlike pretty much every other kind of photography, in lightning photography you really don’t know where the scene’s most important feature will be. The difficulty is balancing the best composition for the scene, with where the lightning is most likely to strike.
I got my latest reminder of this for the Desert View lightning shoot on the the workshop’s final night. After starting the day with lots of optimism, we’d pretty much given up hope for a lightning experience. Sunset that evening was Desert View, one of my favorite Grand Canyon locations. The sunset was a treat, but as the sun dropped, I noticed the rain increasing about 15 miles down-canyon (west), to the point where I thought in might be worth breaking out the Lightning Triggers and crossing our fingers.
Fortunately, this was in the direction of one of Desert View’s best compositions, so we weren’t really losing much pointing this way. Meanwhile, I noticed some clouds with potential moving up from the south, just east of the canyon. Though the clouds to the west looked a little more promising for lightning, I liked a northeast-facing composition (wide enough to capture any lightning out there) even better and soon pointed my camera in that direction—a luxury I had (to choose the best composition over the best chance for lightning) because I have more than enough lightning images already.
To make a long story just a little shorter, I got nothing with my northeast composition, but the people facing west weren’t having any luck either. The (still unproductive) cell to the west seemed to be in a great hurry to move north, across the canyon, and I encouraged everyone pointing in that direction to adjust their compositions accordingly (and to keep their fingers crossed)—while I stubbornly stuck with my composition in the opposite direction.
As soon as the western cell made it across the rim, it made a 90 degree turn and started scooting across the North Rim, directly in front of us. It took a couple of excited exclamations (that could only mean lightning across the canyon) to change my mind, and I turned my camera in that direction (now northwest).
I like the Desert View compositions due west (where the rain had been), and northeast (where I’d been pointing). But the lightning was firing directly across the canyon—my least favorite canyon view at Desert View. So I widened up enough to include some of the really nice view to the west—if I’d guessed right, I’d get that view on the left of my scene, with lightning on the right.
I ended up with three really nice lightning images this evening, each well after sunset. The first one (shared above) came the earliest, when I still had most of the down-canyon view I like so much. The second came nine minutes later, after it had become clear that the lightning was moving east and I needed to adjust accordingly. The final strike was six minutes later, after the darkness had really started to take hold, but the activity had moved far enough east that I could completely change my composition to include the up-canyon northeast view I like so much.


I think from this series of images you can really get a sense for the storm’s movement, and my attempts to balance the best composition with the potential for the best lightning. I’m not always as successful as I was this evening, but I guess that’s part of the thrill of lightning photography.
Join me at the Grand Canyon
Lightning Sequences
Here’s a collection of groups of 2 or 3 images captured together (same shoot); I’ve placed each sequence together, in the order they were captured (it’s probably easier to see the sequences if you click through the gallery)
Click any image to scroll through the gallery LARGE


Watch Your Back
Posted on August 21, 2023
Day’s End, Cape Royal, Grand Canyon
Sony a7R V
Sony 24-105 f/4 G
ISO 100
f/13
1/13 seconds
Landscape images can be divided into two categories: the right place at the right time images, and the “Hey, look at this!” images (that creatively reveal something easily overlooked). While I do everything I can to get myself and my workshop groups in the right place at the right time for something special, it’s the HLAT! images that I find most satisfying.
Right-place/right-time can be an anticipated event that we mark on a calendar and make an effort to be present for (or schedule a photo workshop for)—things like a Yosemite moonrise, Iceland’s northern lights in January, or the lightning of the summer monsoon at Grand Canyon. Or they can be one of those surprises that sometimes just seem to fall into our laps—for example, a SpaceX rocket launch photobombing a workshop Milky Way shoot. As thrilling as these moments can be, photographing them is mostly just a matter of combining a decent eye for composition with an understanding of your camera and mastery of photographic craft (like exposure and depth of field).
The HLAT! images start with those basic skills, but also require creative vision and an uncommon attention to detail. It’s a mindset that knows there’s something better here, and a determination to find it.
Rather than settling for the obvious, I strive for that mindset and approach. And while I think I have decent success with it, in pretty much every workshop image review I’m reminded by my students’ images that I still miss things. My students’ images are a great reminder to everyone present, myself included, of the creative possibilities at every location.
I do find it ironic that those spectacular right-place/right-time moments we covet so much can so easily blind us to all the subtle, but no less beautiful, opportunities nearby. And while a few fortunate photographers seem naturally predisposed to recognize Nature’s subtleties and convey them in unique ways, most of us need to actively cultivate that vision. For me that means having the discipline to regularly check my surroundings—look behind me, look closer, and just plain slow down—no matter what else is going on.
Most times I start by identifying the best light and finding a composition that uses it, regardless of the scene’s primary subject. Something else that helps is switching to a different lens—for example, using an ultra-wide when the more obvious composition calls for something longer, then getting right up in a close foreground subject. Or I’ll add telephoto lens when my first inclination is to shoot wide, then remove my camera from the tripod and slowly scan the scene to see what stops me.
I had a good opportunity to apply all this at Grand Canyon earlier this month. Anyone who has photographed sunset at Cape Royal on the North Rim of the Grand Canyon knows that “the shot” there is facing west and southwest. Not only is west the direction of the setting sun, it’s also where you’ll find the North Rim’s most impressive canyon view. And starting with that view, going wider and angling your camera just a little to the left (southwest) allows you to include all of massive Wotan’s Throne, arguably the Grand Canyon rim’s most iconic feature, jutting front-and-center.

Last Light, Wotan’s Throne, Cape Royal, Grand Canyon
Though Wotan’s Throne is a prominent feature at most of the South Rim vistas, Cape Royal on the North Rim is the closest vantage point, and the absolutely best place to catch it throbbing with the warm light of the sun’s last rays. Less heralded Cape Royal views to south and east include Vishnu Temple and more canyon, but they’re not nearly as expansive as the view west and southwest.
My workshop groups always do a sunset shoot here, and when conditions permit, we top it off with a Milky Way shoot. As you might imagine, no matter which way their cameras were pointed, no one leaves Cape Royal disappointed.
First time photographers here can be forgiven for giving all of their sunset attention to these west/southwest views. This evening it seemed everyone in my group had found some version of the obvious sunset- and Wotans-facing view. Some had visions of capturing a sunstar or red rubber ball sun, while others set up to include Wotan’s Throne’s last light (a wide shot will get both). But as you’ll hear from any quarterback who has fixed his gaze on the primary receiver while the (unguarded) tight end frantically waves his arms in the end zone, the first choice isn’t always the best choice.
In a workshop I generally don’t shoot unless I think I can get something new, but no matter how “ordinary” I think the sunset might be, I’ve learned never to walk out to Cape Royal without my camera bag. This time, as expected, my gear had spent the entire evening resting on a rock, undisturbed.
One of my roles during a shoot with a group is to be the eyes in the back of everyone’s head—not only does this benefit them, foregoing my camera keeps me from being so locked in on what’s in my viewfinder that I miss other good stuff. So while the group concentrated on the primary scene, I kept my head on a swivel, scanning for less obvious opportunities.
Long aware of the aesthetic appeal of the dead tree clinging to the cliff at Cape Royal, I’ve attempted to photograph it (with varying degrees of success) on previous visits. Usually it’s been as an accent to the primary subject (as in the Wotan’s Throne image above), and I’ve never really emphasized it. But this time, after seeing its gnarled branches bathed in golden sunset light and accented by a single lit cloud, I sounded the alarm.
Of course this was also the moment when the sun had just balanced in the horizon, so most of the Wotan’s light, sunstar, red ball crowd were otherwise engaged. But a couple in the group saw what I saw and pulled themselves away, and when I raced to my bag to pull out my own camera and tripod and set up facing the opposite direction of everyone else (Tip: when you see a pro photographer point his or her camera in the opposite direction, take a second to figure out what the attraction is), one or two more joined the fun.
With only a couple of minutes before the sun disappeared, I worked fast, starting with vertical compositions, but making sure to include horizontal options as well. The cloud was a fortuitous addition, just enough to carry the sky. And while I try to avoid cutting subjects with the horizon line, I didn’t have much choice and was grateful that the lit part of the tree was almost entirely below the horizon.
As the sun dropped, the light on the tree just kept getting warmer, but also the amount of the tree actually receiving light shrunk. At some point I realized that the tree was actually catching some of my shadow (duh), so every time I clicked my shutter (using a 2-second timer because I hate the Sony remote), I ducked to hide my shadow.
Turns out, this is one of those images that’s equal parts right place, right time, and “Hey, look at this.” I happened to be at the right place at the right time for this light and cloud, but I’d have completely missed it if I’d been too focused on the more obvious scene. In this case I was especially pleased because not only did I get an image that’s a little different than the conventional scene, I was actually able to encourage a few others in the group into photographing something they otherwise would have missed—and in the process remind them to always watch their back.
Epilogue
Less than 2 hours after this we were photographing Wotan’s Throne beneath the Milky Way, when Elon Musk’s SpaceX Falcon 9 rocket crashed the party. And at this point in the workshop it still looked like we’d be lucky to get lightning, but that changed quite suddenly two nights later. Stay tuned…
Join me at the Grand Canyon
Workshop Schedule || Purchase Prints || Instagram
The Less Obvious Shot
Click any image to scroll through the gallery LARGE


That Time Elon Musk Photobombed My Workshop…
Posted on August 15, 2023
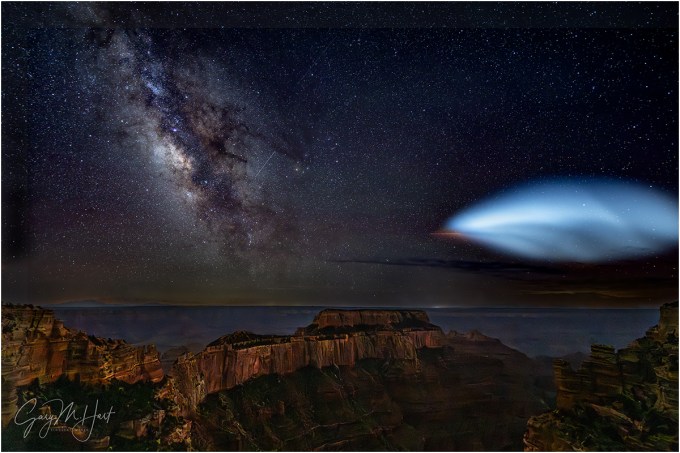
Milky Way and SpaceX Falcon 9, Wotan’s Throne, Grand Canyon
Sony a7R V
Sony 14mm f/1.8 GM
ISO 4000
f/1.8
25 seconds
Last week’s Grand Canyon Milky Way shoot almost didn’t happen, but by the time all was said and done, we ended up with far more than we’d bargained for.
My Grand Canyon monsoon workshops are ostensibly about photographing all of Grand Canyon’s unrivaled beauty, but ask anyone who signs up and they’ll tell you their number one goal is lightning. About 70 percent of my monsoon groups have what I consider lightning success: everyone in the group gets at least one nice lightning image. Of course that also means in 30 percent of my groups, not everyone gets lightning—I can prepare them, monitor the activity, and put us in the locations that maximizes our chances, if the lightning isn’t happening, there’s not much I can do. On the other hand, the clouds that bring lightning often wipe out the night sky, so the (generous) consolation prize for the clear-sky groups is the opportunity to photograph the Milky Way in the dark Grand Canyon sky.
After spending the first two days of this year’s second Grand Canyon workshop beneath wall-to-wall blue skies, all of us were excited about photographing the Milky Way on that second night. Though I was a little concerned about the wind during the Cape Royal sunset shoot, it wasn’t until walking over to my nearby Milky Way location in the darkening twilight (for a less obstructed view and better angle to our foreground subject, Wotan’s Throne), that I really started to fear our Milky Way shoot might not happen. I’d hoped that the more sheltered location would help, but the wind there was just as intense, blowing so hard that I wasn’t sure we’d be able to keep our cameras stable throughout the long exposures a Milky Way shoot requires.
Not only that, the views this spot offers are very exposed, with no railings above a precipitous vertical drop (there’s also room back from the edge for all who aren’t comfortable with heights, so no one is forced to stand on the edge). That meant, given the wind gusting to 40 MPH, in addition to camera stability concerns, I was more than a little concerned about someone straying too close to the edge and getting knocked off balance by a sudden gust. Yikes.
After pondering all this, I decided that we’d hang out a safe distance from the edge at least long enough for the darkening sky to reveal the Milky Way. Best case, the wind would die enough for us to photograph; worst case, we’d at least get to see the Milky Way, always a treat. (Okay, the real worst case would be someone stumbling over the cliff in the dark, but there was really no need for anyone to vacate their safe vantage point once we were established.)
As we waited, I realized that the gusty wind often slowed long enough that we might be able to time our captures between gusts and decided we may as well give the Milky Way a shot—when darkness was complete, we were open for business. With each person’s camera safely affixed to their tripod, Curt (the photographer assisting me) and I moved around to ensure that all had achieved reasonable focus, the right exposure settings, and a good composition. Thanks to our optional practice shoot at Grand Canyon Lodge (where the South Rim lights make for less than ideal Milky Way conditions) the prior night, the group got up to speed quickly.
With exposures in the 10 to 30 second range (double that if long exposure noise reduction is turned on), we had lots of time while waiting for each exposure to complete to simply appreciate skies darker than any of us get at home—for some, darker than they’d ever seen.
It truly is a joy to watch the stars pop out in a darkening sky. There’s Spica in Virgo, Arcturus in Bootes, Antares in Scorpius, plus a host of less prominent stars. Splitting the dark like sugar spilled in ink was our Milky Way galaxy’s luminous core. Two or three times a meteor flashed through the scene, perhaps a stray Perseid streaking from behind us, but most likely just a random piece of space dust.
But wait a minute… What’s that? As I mentally checked through all the familiar skymarks (I just made-up that word), something new caught my eye. Expanding in the southwest sky was a large diaphanous disk. We all saw it at about the same time, which told me that it had just appeared. My first thought, which I uttered out loud only half joking, was, “I hope it’s one of ours.”
Living in California my entire life means I’ve seen a few rocket launches—none that looked exactly like this, but similar enough that I was pretty confident that’s what we were seeing. I did a quick Google search and the first thing that popped up was a SpaceX Falcon 9 Starlink mission launching from Vandenberg Air Force Base on California’s Central Coast, nearly 500 miles away, at 8:57 that night. I checked my watch: 9:04 p.m.—mystery solved.
SpaceX was founded in 2002 by Elon Musk to further his dreams of space dominance. Propelled by reusable Falcon and (soon) Starship rockets, SpaceX crafts deliver both human and electronic payloads to space. Today the human payloads are primarily mega-rich tourists, but the eventual goal is to put humans on the Moon, Mars, and perhaps beyond.
A more practical current SpaceX implementation is the Starlink satellite system that blankets Earth and is capable of providing Internet service anywhere on the planet. I’ve used Starlink at a location where I’d previously had no Internet (the Grand Canyon North Rim, actually) and was absolutely blown away by the speed and reliability—not as fast as home, but certainly fast enough for reasonable use (I didn’t stream any movies, but I did stream shorter videos without problem). On the other hand, this year we tried Starlink on the North Rim and didn’t have a clear enough view through the trees to get a reliable signal—sometimes it worked, but mostly it didn’t.
Which is why SpaceX is still adding satellites. As of August 2023 4,500 Starlink satellites orbit roughly 200 – 350 miles above Earth’s surface. The launch we witnessed last Monday added another 15, with the ultimate goal being as many as 42,000!
I found a video of the launch and learned that 7 1/2 minutes after liftoff, a few seconds before I captured this image, the rocket propelling the satellites toward orbit was 175 miles above Earth’s surface, traveling over 10,000 MPH. But the the Falcon 9 rocket achieves this altitude and speed by using two stages—when the first one has exhausted its fuel, it steps aside and defers to stage two. After doing a little research I’m pretty sure what we witnessed was the beginning of the stage-1 rocket’s return to Earth—the second stage and its satellite payload were out of sight.
Five minutes earlier (2 1/2 minutes into the flight), it’s job done, stage 1 had shut down and separated from the moneymaking section of the rocket, turning control of the payload delivery to stage 2. At that point the rocket was about 50 miles above Earth, traveling about 4,700 MPH. As stage 2 took over, accelerating its payload of satellites even further heavenward, it rapidly outpaced the jettisoned first stage.
With nothing propelling stage 1 forward, Earth’s gravity became the only force acting on it, causing immediate deceleration. But with so much momentum and virtually no atmosphere to slow it further, the depleted stage 1 continued climbing for about 2 1/2 more minutes.
Without further intervention, stage 1 would have plummeted far out in the Pacific. But SpaceX wants to reuse it, so about 7 1/2 minutes into the flight, when it was about 42 miles above the ocean and traveling more than 4,800 MPH, stage one threw on the brakes with a 20-second entry burn timed to deliver it into the waiting “arms” (landing pad) of a SpaceX ship positioned in the east Pacific, west of Baja California. Bullseye (watch the video and be amazed).
I believe the glowing cloud my group and I witnessed was the exhaust from this entry burn, illuminated by the sun. The red streak is the rocket burn itself.
The opportunity to view this phenomenon is relatively rare. Because the exhaust cloud has no inherent luminance, it’s visible only when illuminated by sunlight. That means Earth-bound viewers must be beneath dark skies, and the exhaust plume must be high enough to still have a direct line of sight to the sun—in other words, night below, daylight above. Too far east and the plume would get no sunlight; too far west and it wouldn’t have been visible to anyone beneath a night sky. This convergence requires a twilight launch, cloudless skies, and a viewing position within a relatively small terrestrial zone just into the dark side of night’s advancing shadow.
I virtually never photograph anything manmade, but this was too cool to lose to silly personal rules. At this point, still completely ignorant of all I detailed above, I quickly adjusted my composition to include more of the glowing exhaust plume without losing the Milky Way and Wotan’s Throne. I just stuck with the exposure values I’d already been using. I got exactly one frame before the rocket and its cloud faded noticeably—I just hoped the image was sharp.
I come from the generation where space flight was celebrated, a time when the world stopped to watch every launch, splashdown, and space milestone. Teachers would wheel televisions into classrooms so we could all view together, and I still have vivid memories of watching Neil Armstrong’s first steps on the moon. But as amazing as this SpaceX launch was to view and photograph, and no matter how beneficial this technology is, I can’t help being more than a little concerned about what all this hardware in space is doing to our once pristine night sky.
When I was a kid gazing up at the night sky, spotting a satellite was a rare and thrilling event. But in this 25-second exposure I count at least 9 satellites of varying degrees of brightness—what’s our night sky experience going to be like when Starlink’s count reaches its 42,000 goal, and SpaceX’s inevitable competitors try to match them?
And if scientific exploration is important to you, consider that satellites have become the bane of optical astronomers’ existence. SpaceX has started applying a less reflective surface to its Starlink satellites, reducing their visibility by about 50% (better than nothing but still not great), but also increasing their surface temperatures, making them more problematic for infrared astronomy.
I don’t really have a solution for this conundrum, I just hope that moderation is applied to these technological advances, and that factors beyond the bottom line are considered as we dig deeper into space.
(And I still love this image.)
Join me at the Grand Canyon
To Infinity and Beyond
Click any image to scroll through the gallery LARGE


Where to Draw the Line
Posted on August 7, 2023

Beams of Gold, Desert View, Grand Canyon
Sony α1
Sony 16-35 f/2.8 GM
ISO 100
f/16
1/25 second
I’m in the midst of 11 days and two workshops chasing lightning at Grand Canyon. Despite daily 4:15 a.m. wake-ups, very late dinners, and lots of waiting for something to happen punctuated by bursts of extremely intense activity, I am in fact (to quote Cosmo Kramer) lovin’ every minute of it.
The first workshop group photographed an assortment of monsoon thrills that included lightning, dramatic clouds, and vivid sunrises and sunsets. We also enjoyed skies as clean (haze-free) as I’ve ever seen at the Grand Canyon, which made for a spectacular Milky Way shoot on the North Rim. The second group started yesterday afternoon, and while the lightning spigot has briefly turned, starting this afternoon it’s forecast to return for the rest of the workshop. (Fingers crossed.)
One mantra I find myself frequently repeating to all Grand Canyon workshop groups is, “Less sky, more canyon.” That’s because, even though a landscape photographer’s objective is to maximize beauty (right?), and it’s a rare sky that rivals with the beauty of Grand Canyon, I frequently see photographers here giving too much of their frame to a sky that simply can’t compete with the canyon below.
This doesn’t mean Grand Canyon images should never include lots of sky, but it does mean that the sky you give your Grand Canyon (and other scenic locations) image should be earned. A towering rainbow? Shimmering Milky Way? Horizon-to-horizon sunrise or sunset color? By all means, widen your lens and tilt the camera skyward. But don’t forget that even when the sky is spectacular, it’s the canyon below that makes your image special.
For example, below are a couple of images captured from Hopi Point at different sunsets. The first one was a blank sky day, so I used the absolute least amount of sky possible, and augmented it with a sunstar. The second one was an electric sunset that filled the sky with red. To include even more sky without sacrificing the best part of the canyon, I even went with a vertical composition.


I suspect people’s too much sky choice happens for a few reasons. Many photographers, so focused on their prime subject, tend to forget about the rest of their frame. Less experienced photographers often reflexively split their frame with the horizon, while other photographers, victims of bad advice, have become slaves to rigid rules. These photographers avoid putting the the horizon in the middle with biblical fervor, instead putting it 1/3 of the way down from the top, or 1/3 up from the bottom. But despite what you might have heard from the “expert” judging images at your neighborhood camera club, or viewed from that YouTube photography pro your brother-in-law swears by, there is no rule for where to place the horizon line.
In other words, I’ll put my horizon wherever I want to, thankyouverymuch. If I think the horizon belongs 1/3 of the way down from the top, 1/5 of the way up from the bottom, or straight across the middle of the frame, that’s exactly where it will go.
How do I determine where the horizon belongs? Put simply, that’s entirely dependent on the relative merits of the sky versus the landscape in the scene I’m photographing.
Without doing actual math (heaven forbid), I mentally weigh the landscape versus the sky and arrive at some kind of virtual score: if I like the landscape 4-times more than the sky, the landscape gets 4-times more frame than the sky; if I like the sky twice as much as the landscape, the sky gets twice as much frame as the landscape.
As I said, I don’t actually do this math in my head, I just end up here by feel. You can too, by trusting your instincts. And if you don’t trust your initial instincts, try popping the camera off the tripod (you are using a tripod, right?), pointing it in the direction of your scene, then slowly moving horizon line up and down the scene until a position feels right. Over time you’ll grow to recognize and trust the subtle signals your instincts send.
The image I’m sharing today was captured last Tuesday, on the first sunset of the first workshop. Because I’d started the shoot with my 100-400 lens, the foreground wasn’t a factor in my decision where to set up—I just chose an opening amidst the rest of my group. But as sunset approached, it started to look like something special was possible. Not only had a narrow gap appeared in the clouds near the horizon, the clouds were riddled with small openings with potential to allow sunlight to stream through as the sun dropped.
Because I was with my group and this was our first day, I didn’t do my usual anticipatory exploration for the best foreground, I just worked with the scene right there among my group. After replacing the 100-400 with my 16-35 f/2.8 lens, I started by trying to figure out the best way to handle the dead tree jutting up from below the canyon wall.
By shifting a couple of feet to my left to stand atop a light-color rock platform, I was able to block the less appealing middle foreground hill with the dense green shrub on the right, and to frame the dead tree (which had now become an important foreground element) between the two nearby shrubs. After determining that I wanted as little of the rocky dirt on the left as possible, I went to work on establishing the top of my frame.
The sky above the contiguous cloud bank blocking the sun was a lot of blue with a scattering of individual clouds. It was pretty in an ordinary way, but nowhere near as beautiful as the sunlit clouds and canyon below. That left me with two options for the top of my frame: directly above the clouds to include no more than a thin stripe of blue sky, or somewhere in the clouds with no blue sky.
I photographed it both ways for multiple options to choose between when I review my images on my computer. As you can see, I chose the former because I couldn’t find a good place to cut the clouds without putting a bright spot at the top of the frame and/or cutting off part of the sunstar.
This sunset display continued for about 15 minutes, continually changing as the sun dropped. I’ve actually processed another, very similar, image captured a few minutes later, without beams but with a better sunstar and have added it to the gallery below.
Of course all this advice applies pretty universally to whatever location you’re photographing, but few places provide examples as dramatic as Grand Canyon. Check out the gallery below for proof.
Join me at Grand Canyon
More Grand Canyon Skies
Click any image to scroll through the gallery LARGE


