Eloquent Images by Gary Hart
Insight, information, and inspiration for the inquisitive nature photographer
A rite of spring
Posted on February 26, 2014

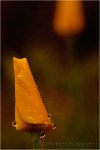
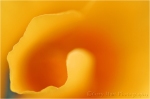
Backlit Poppies, Folsom, California
Canon EOS 10D
1/30 second
F/3.5
ISO 100
100 mm
Today it’s gray and wet in Sacramento, a refreshing break from our ridiculously warm and dry winter (sorry, pretty-much-everywhere-else-in-the-U.S.). Usually by the end of February my thoughts have turned to spring, but this year I find myself feeling a cheated of winter (and wishing the rest of you would have shared). As miserable as it can be, I’ve always loved winter photography—not just snow (which I have to travel to see), but rain, clouds, bare trees, and the low angle of the sunlight.
Another aspect of winter I like is the precipitation that rejuvenates our creeks and rivers and nourishes the wildflowers. It’s hard to know what combination of winter conditions will make a good wildflower spring, but I do know that ample rainfall is an important component. Which makes me a little nervous about the wildflowers’ prospects this spring. But that won’t stop me from what has become an annual ritual, meandering through the foothills east of town, Spring Training baseball on the radio (go Giants!), photographing poppies. I have several go-to poppy spots, but I’m easily distracted and often never make it to my original destination.
The image here is from one of my earliest spring excursions, nearly ten years ago. On my way home, I detoured at the last minute to a spot I knew I’d find a few nice poppies—(believe it or not) the Intel parking lot in Folsom. The poppies were in an elevated bed atop a retaining wall, allowing me to easily drop low and capture them backlit by the setting sun. The sun, distorted and dulled by horizon haze, was a throbbing orange ball that I blurred beyond recognition with an extension tube and a large aperture on my 100mm macro lens. Without wind, focus through my viewfinder on the center poppy’s leading edge was pretty easy (today I’d have used live-view focus). The translucent petals caught the fading sunlight, igniting the flowers like orange lanterns. I underexposed slightly to save the highlights and color, and to turn the shaded background into a black canvas.
One other thing I remember about this shoot was my brief brush with the law. Apparently my activity aroused the interest of Intel Security—after just a few minutes of shooting I was visited by an officer who clearly took his job quite seriously. It took me a few minutes, but I was finally able to convince him that, despite my sinister appearance, I was in possession of no explosive device, nor was I an AMD (Advanced Micro Devices, Intel’s leading competitor) spy seeking the secrets of Intel’s fertile flower bed. After making a theatrical display of checking of my license plate (that clearly communicated, “We know who you are”), and in a tone that made let me know he wasn’t quite convinced and would be watching me, he allowed me to finish.
-
- Raindrops on Poppy, California Gold Country
-

- Brilliant Poppy, American River Parkway, Sacramento
-

- Poppies, Hite Cove Trail, Merced River Canyon
-

- Backlit Poppies, Folsom, California
-
- Spring, California Gold Country, Sierra Foothills
-

- Champagne Glass Poppies, Merced River Canyon, California
-

- Poppy Pastel, Sierra Foothills, California
-
- Poppy and Surf, Point Reyes National Seashore
-

- Sparkling Poppies, Merced River Canyon
-

- Poppy Lanterns, Merced River Canyon
-

- Poppies and Oak, Big Sur
-

- Poppy Hillside, Sierra Foothills
Fire at will
Posted on May 20, 2013

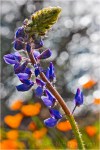
Poppy Pastel, Sierra Foothills, California
Canon EOS 5D Mark III
1/125 second
F/4.0
ISO 400
100 mm with 12mm extension tube added
Maximize your investment
I clicked 54 versions of this scene (I just counted). I’m usually a pretty low volume shooter, sometimes not taking 54 pictures on an entire trip. And I have to admit, after years as a film shooter, the whole digital “fire at will” paradigm took some getting used to. But I’ve finally reached a place where I have no problem firing 54 frames in 30 minutes when the scene calls for it. The light came on for me when I realized that, while in my film days every single click cost money, with a digital camera, every click increases the return on my investment (the more images I have, the less per image my camera cost).
For example
These poppies were just a small handful of the thousands coloring a steep hillside near the Mokelumne River in California’s Gold Country. I’d been working the area for a couple of hours, using various combinations of macro, telephoto, and extension tubes to isolate and selectively focus poppies with various foreground/background relationships. I spent about an hour futzing around with compositions, occasionally stumbling upon something decent, but more often than not moving on to something else after a handful of mediocre frames. But the longer I worked, the more productive I became and the more I started seeing things the way my camera saw them.
The late afternoon sun that I’d been working with (and around) had just about left the scene when I decided to shift from one patch of poppies to similar patch about twenty feet away. I’d been concentrating on extremely close shots (inches from my subject) with at least 36mm of extension on my 100mm macro and 70-200 lenses, but when I saw this trio of poppies on (more or less) the same plane, I immediately pictured a slightly wider scene featuring this group sharp against a blurred background of poppies and grass.
Cutting back to a 12mm extension tube on my macro lens, I started with a wide aperture to limit the depth of field and spread the grass into a textured green canvas. With a slight breeze intermittently nudging the poppies, I switched to ISO 400 (in the few frames where I went smaller than f5.6, I bumped up to ISO 800). The preliminaries out of the way, I went to work refining my composition, framing the more or less centered foreground (sharp) poppies with the soft orange background poppy splashes.
Given the minuscule margin for error, I can’t imagine shooting something like this without a tripod. With my tripod I was able to use live-view to ensure precise focus, after each click evaluating everything from sharpness to exposure to composition, all with the security of knowing that the shot I’m reviewing is still sitting right there in my viewfinder, just waiting for whatever refinement I deem necessary.
Fifty-four frames later….
They don’t all have to be winners
Not only should you not be shy about shooting, your goal for each shot doesn’t necessarily need to be a “keeper” image. Often the purpose of a frame is to simply move you toward that keeper image. Sometimes that means a tangible improvement, but many times it’s just an education because nothing fosters creativity better than taking an “I wonder what happens if I do this” approach (followed by an effort to actually understand what happened). On the other hand, indiscriminate clicking (“The more I shoot, the better the chance I’ll find a keeper when I get home”) will wear out your camera faster than it improves your photography. In other words, shoot a lot, but make each shot serve a purpose.
Each frame that afternoon was a little different from the one before it: nearer, farther, up, down, left, right, more DOF, less DOF. While each wasn’t necessarily an improvement over the preceding frame, at the very least it advanced my understanding of the scene and gave me ideas for the next frame. And each gave me a variety of options from which to select when I could review and compare everything on a 27″ monitor. It was also lots of fun.
A Poppy Gallery
Click an image for a closer look and slide show. Refresh the window to reorder the display.


A background check we can all agree on
Posted on April 20, 2013

Evolution, Gold Country Poppies, Sierra Foothills
Canon EOS 5D Mark III
1/400 second
F/2.8
ISO 800
100 mm
* * * *
Distractions
We photographers often concentrate our attention so closely on our primary subject that we’re oblivious to the subject’s surroundings, forgetting that everything in our frame potentially competes for attention with our subject. Eye-pulling distractions frequently skulk about the frame’s edges, but for most photographers a more insidious problems is the stuff lurking in the background.
Regardless of the problem, careful attention to the entire frame can turn these potential problems into advantages. For example, sometimes merely tightening the composition will eliminate offending elements. For objects not so easily eliminated, we can position the camera and orient the image so potential distractions actually frame the subject and hold the eye in place. Or we can create virtual lines that connect secondary and tertiary elements in a way that guides the eye to our subject.
Background check
But what about a busy background that creates visual noise throughout the frame? In large scenes repositioning can usually rearrange the foreground/background relationship enough to eliminate the problem. But in macro scenes the foreground and background are usually so closely tied that repositioning has little effect, or completely changes the view of the macro subject.
My favorite solution in these images is to soften my background, sometimes only enough to reduce the background’s visual weight, other times blurring it beyond the point of recognition. Take a look at all of my macro and close-focus images—virtually all use a narrow depth of field with very careful attention to what’s behind my subject, no matter how blurred.
For example
Photographing recently in the Sierra foothills, I was drawn to a trio of poppies in varying stages of evolution, from tight bud to partially open mature bloom (poppies open for sun and calm air, and close for shade/overcast and wind). I particularly wanted to capture the sensual curves of the unfurling poppy, but weeds and rocks in the background were both harsh and disorganized. Depth of field sufficient to allow sharpness along the poppy’s stamen from tip to base would have also sharpened the background enough that it would surely compete with the poppy. Instead, I chose to minimize my depth of field and emphasize only the outer fringe of the main poppy’s delicate petals.
The depth of an image’s range of sharpness varies with the closeness of the focus point and the size of the aperture: the closer the focus point (achieved by moving physically closer and/or by zooming tighter) and the larger the aperture, the thinner the plane of sharpness. In this case I minimized the distance of my focus point by moving close with my 100mm macro; to get even closer, I added a 36mm extension tube. Focusing this close at my lens’s widest aperture, f2.8, gave me a razor thin plane of sharpness with virtually no margin for error.
In images with a thin range of focus, the point of focus (that will hold all of the image’s visual weight) is the difference between success and failure. Here even the slightest twist of the lens’s focus ring brought radically different planes of the poppy into sharp focus (I can’t even imagine attempting something like this without a tripod). To ensure essential precision, after framing my composition I switched into live-view mode and magnified the inner petal’s outer edge, then waited for the pauses in the breeze before clicking.
To hedge my bets, I bracketed for depth of field, clicking several more frames at apertures progressively smaller, in one stop increments. As I suspected, the sleight increase in the region of poppy-sharpness wasn’t enough to justify the detail added to the background and what you see here is my original f2.8 frame. I love the way the individual weeds and rocks so clear to my eye blur into a homogenized canvas of soft color and texture, a perfect background that elevates my poppies to prominence—a potential fatal flaw turned into an essential feature. (BTW, despite the slight breeze I probably could have gotten by with ISO 400 and 1/200 here, but my 5DIII is so good at ISO 800, rather than constantly having to remember to adjust the ISO as my aperture and the light changed, I just went ahead and did most of this shoot at 800—sometimes simple is better than perfect.)
Closer than the eye can see
Posted on April 15, 2013

Intimate Poppy, Point Reyes National Seashore
Canon EOS 10D
1/125 second
F/2.8
ISO 100
100 mm
* * * *
Photography’s gift isn’t its ability to show the world we already know, photography’s gift is its ability to reveal a world we haven’t imagined.
I found this poppy on a visit to Point Reyes about nine years ago, just one of thousands sprinkled among a collage of swaying wildflowers. Before this day I’d aborted any attempt to photograph poppies that hadn’t yet opened to the sun, but with the fog showing no sign of lifting, I dropped to my knees for a closer look at this poppy furled tightly against the morning chill. Despite all the visual activity to distract my eyes, my camera distilled the scene’s kaleidoscope of color a single poppy’s buttery swirl.
With an extension tube and 100mm macro lens, my camera provided a far more intimate view than my eyes were capable of. Setting my aperture wide open, I focused on the poppy’s outer edge and blurred the rest of the poppy to liquid gold. The resulting image was nothing like what I saw on my hike that morning, but because my camera’s reality is no less valid than my own, I now know poppies just a little better than I did before this image.
It’s not a click, it’s a process
Posted on October 3, 2012

Aspen in Autumn, Bishop Creek Canyon, Eastern Sierra
Canon EOS-1Ds Mark II
1/13 second
F/7.1
ISO 84
36 mm
A landscape image isn’t just a click, it’s a process that starts with an idea, a plan for the best way to organize and emphasize the scene’s significant elements, then improves with each subsequent click until the photographer is satisfied. The first click is like a writer’s draft, and subsequent clicks are the revisions. After each click, a photographer should stand back and evaluate the image on the LCD (I love the large LCDs on today’s DSLRs), refine (exposure, composition, depth of field, focus point), then click again. Repeat as necessary.
This approach is particularly valuable in macro and close-focus images, intimate scenes where even the slightest adjustment in composition, depth of field, and focus point can dramatically alter the result. It’s a prime reason I’m such a strong tripod advocate (evangelist)—when I’m done evaluating, the shot I just evaluated is sitting right there on my tripod, waiting for me to apply the adjustments I deem necessary.
When photographing fall color, I look for a leaf, or group of leaves, to isolate from the rest of the scene. In the above image, captured in an aspen stand just down the hill from North Lake, west of Bishop, I started with this collection of four vertically stacked leaves, positioning myself so leaves were suspended in front of a receding line of bleached aspen (they’d have been lost against the background foliage). I wanted the background soft but recognizable.
Using my 70-200 lens with a 25 mm extension tube, and a neutral polarizer to help the color come through the leaves’ waxy sheen, I settled on the general framing fairly quickly—vertical orientation, fairly tightly composed. Exposure was pretty straightforward in the soft overcast, though an intermittent breeze meant I had some decisions to make. Since the breeze ranged from light to completely still, I used ISO 400 to enable a faster shutter speed, and timed my click for the brief pauses.
Though I don’t always catch balance, relationship, and border problems through the viewfinder, after two or three click/evaluate/refine cycles, I had the composition nailed. But I was far from finished—in fact, I’d just started. I don’t trust critical DOF decisions made through my viewfinder or even on my LCD, so when a composition I like a lot makes significant use of DOF and focus point, I always take a series of frames, bracketing DOF (f-stop) around the DOF I think is best. Sometimes I’ll range all the way from f2.8 to f22. In this case I tried frames ranging from f4 (my 70-200’s fastest aperture) to f16 (at f16 I increased my ISO to 800), in (more or less) one-stop increments. Since I thought f8 would give me about the right combination of sharp foreground and soft background, I even took a couple of extra frames in 1/3 stop increments around f8. Back home on my large monitor I scrutinized each frame closely and ended up choosing this one at f7.1.
In Lightroom I warmed the image slightly to remove a blue cast on the white trunks. Because I intentionally underexposed the scene at capture (to ensure that I didn’t clip any of the red channel, where most of the yellow is), in Photoshop I dodged the trunks to remove the dinginess introduced by my underexposure. Otherwise my processing was pretty much standard stuff—a subtle wiggle in Curves to add contrast, Topaz noise reduction, and selective sharpening of everything in focus with Unsharp Mask.
Join me for the next Eastern Sierra photo workshop
A gallery of nature intimates
Click an image for a closer look, and a slide show. Refresh the screen to reorder the display.


Returning to the scene of the crime
Posted on May 7, 2012
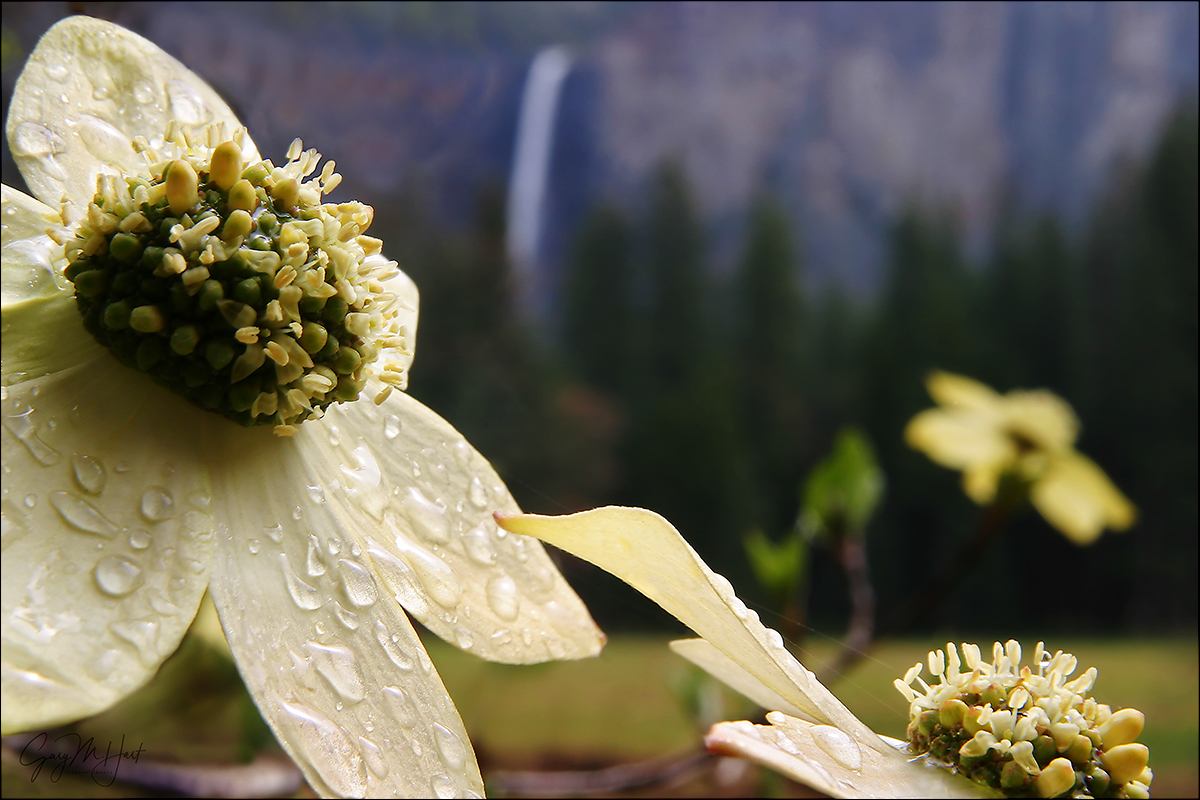
Bridalveil Dogwood, Yosemite
Canon EOS 10D
1/15 second
F22
ISO 100
48 mm
My Bridalveil Dogwood image is eight years old now. It remains one of my most popular images, and is still a personal favorite because it represents so many of my personal goals for each image:
- Use camera’s unique vision to reveal nature’s frequently overlooked details
- Manage the front-to-back plane to create the illusion of depth
- Guide the eye and create location context with selective focus
- Render the world in ways that allow others to imagine a world without human influence
My goal that morning, crystalized on the drive to Yosemite, was to juxtapose a sharply focused, foreground dogwood flower against a Yosemite icon softly focused in the background. I wandered Yosemite Valley in a light rain for a couple of hours before stumbling upon this blooming dogwood tree with Bridalveil Fall in the background. To frame Bridalveil with this pair of flowers I had to drag a log over to stand on, and extend my tripod’s center post much farther than I’m comfortable with (the center post is not terribly stable). An extension tube enabled a close focus that exaggerated the dogwood and softened Bridalveil Fall. Focused that close, getting Bridalveil sharp enough to be recognizable required me to stop down to f22. Fortunately there was no trace of wind.
Someone recently told me they overheard a couple of photographers stalking this tree, talking about my dogwood image, hoping they could duplicate it. While I was flattered, this need to replicate images makes me scratch my head. It’s what creates tripod traffic jams in Antelope Canyon on sunny days, at Mesa Arch every sunrise, and beneath Horsetail Fall each February, to name a few. I’m not saying I don’t have my share of derivative images, but they just don’t give me the satisfaction I get from creating something that I feel is uniquely my own. I tell my workshop students that images that move them to action are great, but they should be the starting point and never the goal. In other words, take an image that excites you and find put your own creative twist to it.
For example, while I have no desire to duplicate any image (my own or anyone else’s), I do return to “my” dogwood tree because I love the way it aligns so perfectly with Bridalveil Fall. A couple of years ago I was in Yosemite during an early snow storm. Many (shocked) colorful fall leaves remained on the trees, suddenly fringed with snow. Wanting to create something that showed the collision of fall and winter and still said Yosemite, I thought of this dogwood. Sure enough, I found a host of colorful leaves clinging like Christmas ornaments and composed something that achieved my goal.

Fall in to Winter, Yosemite
The dogwood were blooming beautifully during my Yosemite workshop that ended Saturday, so one morning I took my group to the Bridalveil dogwood tree. Of course the conditions were entirely different, but from what I saw on several LCDs and during the workshop image review, lots of new images were created. I even tried my own hand at something different, breaking out my 100-400 lens and isolating a sunlit branch wide open at extreme telephoto. I haven’t had a chance to see whether I captured anything worthwhile, but I’ll let you know….
Isolation
Posted on November 11, 2011

Forest Autumn, Yosemite
Canon EOS-1Ds Mark III
200 mm
1/25 second
F/4
ISO 200
I love sweeping panoramas, but when I’m alone I often gravitate to the intimate locations that make nature so personal. In Yosemite’s dark corners, places like Bridalveil Creek beneath Bridalveil Fall, and the dense mix of evergreen and deciduous trees lining Merced River near Fern Spring and the Pohono Bridge, I scour the trees and forest floor for subjects to isolate from their surroundings.
Helping your subjects stand out is often the key to a successful image. Sometimes subject isolation is a simple matter of finding something that stands out from its surroundings, an object that’s physically separated far from other distractions. But more often than not, effective isolation requires a little help from your camera settings, using contrast, focus, and/or motion to distinguish it from nearby distractions.
A disorganized tangle of weeds or branches can become a soft blur of color when you narrow your depth of field with a large aperture, close focus point, and/or long focal length. Likewise with motion, where a long shutter speed can smooth a rushing creek into a silky white ribbon. And a camera’s inherently limited dynamic range can render shadows black, and highlights white, creating a perfect background for your subject.
After finding these dangling leaves, just across the road and a little downriver from Fern Spring in Yosemite Valley, I juxtaposed them against the vertical trunks of background maples and evergreens. Zooming to 200mm reduced my depth of field, separating the sharp leaves from the soft background of trunks and branches. A large aperture further blurred the background to a simple, complementary canvas of color and shape. Slight underexposure and a polarizer (to remove glare) helped the color pop.
On my website you can read more about my favorite Yosemite photo locations.
A gallery of isolation


Bracketing in the digital age
Posted on April 23, 2011

Poppy With a View, Point Reyes National Seashore, California
Canon EOS 10D
1/90 second
F8
ISO 100
24 mm
Remember the uneasy days of film, when we never knew whether we had exposed a scene properly until the film was processed? As insurance we’d bracket our exposures, starting with the exposure we believed to be right, then hedge our bets by capturing the same composition at lighter and darker exposure values. Today digital capture gives us instant exposure confirmation, yet the practice of exposure bracketing persists among inexperienced photographers.
Film shooters carefully budget their shutter clicks because they pay for film and processing by the exposure; digital photographers paid for their exposures when they purchased their camera. In other words, while every film click costs you money, every digital click increases the return on your investment. This means that using a digital camera, you can shoot to your heart’s content with little to no added cost, a great opportunity get the most out of your significant hardware investment and grow as a photographer. These “free” captures may also explain the persistence of exposure bracketing by so many digital photographers who think nothing of tripling the number of shutter clicks. But unless you plan to blend images later, exposure bracketing is a waste of time, shutter-cycles (the shutter is often the first thing to wear out on digital SLRs), and storage. Instead, trust your histogram and spend your extra shutter clicks on a more productive approach: composition bracketing.
Composition bracketing is “working” a scene by capturing composition and camera-setting variations to be decided upon later, when you review your images on a large screen. If you shoot your scenes both horizontally and vertically, you already composition bracket. But don’t stop there: Before looking for something else to shoot, shoot the current scene wider and tighter, move around to change the foreground or background, experiment with depth of field and motion blur, and so on.
For example, a few years ago I spent a couple of days photographing wildflowers in Point Reyes. Visualizing a solitary poppy with the coastline soft in the background, I was pleased to find this fearless subject clinging to Chimney Rock’s precipitous west slope. From my vantage point above the poppy, the background was a mix of dirt and weeds, but dropping down to poppy-level instantly juxtaposed it against the ocean. A blue ocean was better than dirt and weeds, but I wanted coastline so I rotated (with one eye on the cliff) until the poppy was framed by the curving shore. To fill the frame with the poppy and achieve the narrow depth of field I sought, I added an extension tube to my wide (24-70) lens.

Here I am refining my composition for this poppy. I ended up dropping lower and closer before bringing in my tripod. (The slope was as steep as it looks here.)
Dropping low enough to place the entire poppy against the surf put me too low for the tripod I was carrying. But since nailing the focus point is particularly essential these shallow depth of field images, I don’t even consider hand-holding close focus shots. In this case I placed my tripod on its side and carefully rested the lens on one of the legs, using my bunched jacket to cushion against vibration and my remote release to click without disturbing the precarious equilibrium. As you might imagine, because this was in the days before live-view, composing was an exercise in contortion and patience.
Exposure was easy, a fact confirmed by my histogram. But after going to all this trouble to set up my shot, I wasn’t about to fire off a single frame and move on. So I bracketed my compositions, timing several exposures for different background wave action, a surprisingly significant frame-to-frame change. And even though I believed minimal DOF was best, I knew that my postage stamp sized LCD wouldn’t tell me if I’d achieved the best DOF. So I followed my initial wide-open shot with several frames at a variety of smaller f-stops (and a correspondingly slower shutter speeds). Good thing, because the background in the original f4 exposure was far too soft–the frame I ended up choosing was at f8. While the exposure was identical for each frame, I attribute my satisfaction with this image to the choices due to my calculated composition bracketing.
Is it spring yet?
Posted on March 6, 2011

Poppy Lantern, Merced River Canyon, California
Canon EOS-1Ds Mark II
1/50 second
F/4
ISO 200
100 mm
March 3, 2011
With all the recent snow posts, it’s kind of hard to believe that spring has arrived in California. We’re still getting rain here in the Central Valley (and snow in the Sierra), but Northern California skies are more blue than gray, and colorful blossoms are popping up everywhere. While the soon-to-be-ubiquitous foothill poppies haven’t quite kicked in, I know by the end of the month my camera and I will be enjoying leisurely drives through the Gold Country to photograph my favorite wildflower. My foothill drives have become quite a treat for me, not just for the photography, but for the opportunity to meander quiet country roads with the window down and baseball on the radio.
On these drives I often find entire hillsides blanketed with poppies beneath billowing cumulus pillows. Sometimes a spring shower sprinkles the blossoms, closed tight against the weather, with glistening water jewels. When I’m fortunate enough to find the sun diffused by a veneer of translucent clouds, I like to sprawl in the dirt for a bugs-eye view of the tissue-thin, backlit petals that light up as if they have their own internal light source like colorful little lanterns.
I found the poppy in this image at one of my favorite spots near the Merced River west of Yosemite. An extension tube on my 100mm macro lens enabled me to get close enough to smooth the background lupine into a blur of purple. I chose this tight composition of just the base of the closest backlit poppy for the way it emphasized the glowing lantern effect I love so much. Believe it or not, the color was so vivid that I actually had to desaturate it a bit in Photoshop.
-
- Champagne Glass Poppies, Merced River Canyon, California
-
- Intimate Poppy, Point Reyes National Seashore
-
- Poppy and Surf, Point Reyes National Seashore
-
- Sparkling Poppies, Merced River Canyon
-
- Poppies, Hite Cove Trail, Merced River Canyon
-

- Wildflower Collage, Sierra Foothills, California
-
- Poppy Hillside, Sierra Foothills
-
- Poppy Lanterns, Merced River Canyon
-
- Lupine and Poppies, California Gold Country
-
- Poppies, Hite Cove Trail, Merced River Canyon
-
- Wildflower Collage, Sierra Foothills, California
-
- Sparkling Poppies, Merced River Canyon
-
- Lupine and Poppies, California Gold Country
-
- Champagne Glass Poppies, Merced River Canyon, California
-
- Poppy Hillside, Sierra Foothills
-
- Poppy and Surf, Point Reyes National Seashore
-
- Intimate Poppy, Point Reyes National Seashore
-
- Poppy Lanterns, Merced River Canyon
Simple
Posted on February 8, 2011

Champagne Glass Poppies, Merced River Canyon
Canon EOS 10D
1/1000 second
F/2.8
ISO 100
100 mm
Yesterday NPR and Jazz24.org released their Jazz 100, “the 100 quintessential jazz songs of all time.” Topping the list was one of my jazz favorites, the Dave Brubeck Quartet’s “Take Five.” Listening to “Take Five” this morning I was particularly struck by the simplicity of its sound, and it occurred to me that simplicity is an essential and often overlooked element in photography.
Spend a little time on photography websites and it’s easy to come away feeling visually assaulted. Saturated sunsets, crashing waterfalls, and swirling clouds can make wonderful photographs, but some of nature’s most divine beauty is best revealed by subtracting elements we’ve been brainwashed into thinking are necessary. Just as many of the pieces on the Jazz 100 are quite complex, simplicity is certainly not necessary for a successful image. But it seems many photographers have forgotten how effective a simple image can be. As my parents used to advise (shout), louder is not necessarily better. And neither is a lot of activity in a frame. To be effective, a scene’s elements (shape, color, lines, texture) need to work together; if they can’t, it’s better to isolate the most compelling aspect and remove distractions, no matter how beautiful they are.
Case in point: A poppy-covered hillside is a beautiful thing, but so are the graceful curves and translucent gold of a single poppy. The poppy in the foreground of this image was just one of thousands blanketing a hidden hillside in the Merced River Canyon just west of Yosemite Valley. After photographing the entire scene I gradually moved closer until I found myself sprawled on my stomach beneath this one poppy. Conveying its simple elegance was all about removing distractions: rocks, weeds, and yes, even the thousands of other beautiful poppies in the background. In this case I used selective focus, attaching an extension tube and dialing up a wide aperture to limit the depth of field. Focusing on the poppy’s leading edge turned everything else in the frame to a smear of color.
Did I achieve Brubeck’s mastery of my world? I think not—but it’s nice to have something to aspire to.

