Eloquent Images by Gary Hart
Insight, information, and inspiration for the inquisitive nature photographer
A Different Kind of Thrilling
Posted on September 6, 2025

Quiet Dawn, Aoraki and Lake Pukaki, New Zealand
Sony a7R V
Sony 24-105 G
30 second
F/18
ISO 50
Chasing tornadoes is undeniably thrilling, but photographers don’t live by thrills alone. Or maybe a better way to put that would be, thrills don’t necessarily need to set your heart racing. Because after nearly 2 weeks chasing supercells and their (thrilling) progeny, I was only home for a couple of days before jetting off to New Zealand for a completely different kind of thrills. Instead of action-packed targets like lightning, tornadoes, and the supercells themselves, our New Zealand thrills skew more toward soothing.
On any photo trip, whether it’s a workshop or personal, I like to balance the essential popular photo spots with a variety of less known, personal-discovery sites. For our New Zealand workshops, over the years Don Smith and I have assembled a nice variety of these spots to mix in with the Wanaka willows, Doubtful Sounds, and Tasman Lakes that justifiably attract the beauty-loving masses.
In New Zealand, and elsewhere, Don and I have learned that popularity doesn’t necessarily mean superiority, and some of our off the beaten path photo spots can be at least as beautiful as their more popular counterparts. With the added bonus of complete solitude.
When we scout workshop locations, we always get our eyes on the popular spots for a better understanding of things like light, foreground options, light, and so on. But we spend much more time poking around the perimeter of these known locations, venturing off-road (or at least off main and paved roads), studying maps, querying locals, and simply exploring the terrain for potential vantage points that are easily overlooked. (This doesn’t make us special—most good photographers take a similar approach.)
Which is how we came across this sweet location on the shore of Lake Pukaki in New Zealand. Many years ago, Don and I were just driving along the lakeshore, scouting possible photo locations in the Aoraki/Cook area. And while this spot is off the main highway, I’d hardly label it “hidden.” But we’ve never seen another photographer there. When we first saw it, we instantly realized that it checked every box on our list that day: mountains, lake, and foreground features (plus access that won’t kill anyone in the group).
From the get-go, Don and I made this a regular workshop sunrise location. And over the years we’ve learned that, like many spots, it’s a little different with each visit: the lake level goes up and down (and with it the rocks that are visible), the snow line on the surrounding peaks changes, amount of churn on the water varies, and of course the sky is always doing something different. Not only that, making our way from the van to the water in the pre-sunrise dark, it’s easy to end up a couple hundred feet one direction or the other from where we were the previous year. But one thing remains unchanged: we’re always alone.


One of the most important features of this spot is the prominence of Aoraki (Mt. Cook). At over 12,000 feet, it’s New Zealand’s highest peak. Sometimes clouds obscure its summit, but this year’s group got to watch Aoraki’s striking outline slowly materialize against the brightening sky.
With the group settled in and happily clicking away, I set about searching for this year’s foreground rocks. One of the things that makes this such a great location is the shallowness of the water near the shore here, which allows a few rocks to jut above the surface, with many more clearly visible just below the surface. For my foreground, I always look for the protruding rocks, but also stay very aware of the surrounding submerged rocks. This year, with Aoraki so visible, I hunted until I found a V-shaped collection of nearby rocks that complemented the distant peak.
Because the lake was fairly choppy, I decided on a long exposure to smooth the water, which provided the added bonus of better revealing the submerged rocks. We were still about 20 minutes out from sunrise, so achieving a 30-second exposure without a neutral density filter was a simple matter of dropping to ISO 50 and stopping down to f/18. To compose, I positioned myself so the nearby rocks framed Aoraki. Then I dropped my tripod a little to shrink the gap between the rocks and the peak, but didn’t drop as low as I might otherwise have because the lake’s glacial turquoise is such a beautiful feature itself.
One unsung perk of these pre-sunrise long exposures is the waiting. Nothing is more soothing, and dare I say thrilling, than simply standing and basking in morning’s quiet calm while my camera collects the faint light. Sublime.
Join Don and Me in New Zealand
Workshop Schedule || Purchase Prints || Instagram
Roads Less Traveled
Click any image to scroll through the gallery LARGE


, California")


New Zealand Rocks
Posted on July 22, 2024

New Zealand Rocks, Lake Pukaki
Sony α1
Sony 16-35 GM
13 second2
F/18
ISO 50
(Yes it does.)
This New Zealand winter morning dawned damp and gray, with a layer of low clouds hindering the light and obscuring the peaks. Not awful for photography, but far from the spectacular color and light photographers hope for. My workshop partner Don Smith was battling a nasty (non-Covid) virus, so I was solo with the group on the morning we visited an obscure beach on the south shore of Lake Pukaki. It wasn’t lost on me that last year I was the one who had to miss this Lake Pukaki sunrise shoot with some kind of food poisoning. I don’t know what it is about this spot, but I’m pretty sure that in all our years of doing New Zealand workshops, these are the only two times Don or I have had to call in sick to a shoot.
Our destination was a beach we’d found many years ago—we like it not only for the foreground rocks and view of snowy peaks across the lake, but also for the pristine water that is often calm enough for glassy reflections. Another appeal is that it’s one of our discoveries—not that we’re the only ones who visit here, but despite its obvious appeal, this spot hasn’t yet made anyone’s list of New Zealand’s must-photograph destinations.
Don and I always try to offer our workshop groups a mix of photo locations, from popular to unknown. We certainly need to take our groups to all the beautiful New Zealand scenes that inspired them to travel around the world in the first place (I’m looking at you, Wanaka Tree), but we want to balance those by providing opportunities to capture New Zealand scenes that feel more uniquely their own.
Driving out in the dark this morning, I remembered our visit here a couple of years ago, when we almost couldn’t find this unmarked location because (it turned out) a few landmark trees had been removed. And since I’d missed last year’s visit here, I was afraid I wouldn’t remember how to get there, but our driver Steve was pretty confident he knew where to go, and we did indeed find it without trouble.
Pulling up in the faint light of the approaching sunrise, I could see nearby shrubs swaying in a strong breeze, dashing my hope for a reflection that might compensate for the flat sky. After giving the group a brief orientation, I guided them down to the lake and encouraged everyone to take advantage of the plentiful boulders—both the few protruding from the water, and the many clearly visible just beneath the surface.
There’s no trail from the parking area to the lake—you just have to pick your way across dry lakebed covered with more boulders. Usually this walk is just a few yards from the unpaved road where we park, but with the lake lower than usual, the lakeshore was more than 100 yards away—still not far, but definitely farther than I’d seen before. As this realization sank in, I could also see that the lower water had exposed even more rocks than usual—a small bonus.
Having arrived at the water more than a half hour before sunrise, darkness still ruled. As everyone extracted gear and set up tripods, it seemed like a good time to remind them that they are under no obligation to expose their images as dark as their eyes see the scene, and that this is a perfect opportunity to soften the churn atop the lake with long exposures. Some in the group immediately chose their own foreground rock or rocks and went straight to work, while I spent a little time going over hyperfocal focus techniques with a few people concerned about front-to-back sharpness.
Most photographers understand that stopping down (small aperture) increases depth of field, and that the wider the focal length, the greater the depth of field as well. By far the trickiest factor in maximizing front-to-back sharpness is choosing the correct focus point—focus too far, and nearby subjects will be soft; focus too close, and distant subjects will be soft.
Some photographers use seat of the pants hacks that are (slightly) better than nothing, such as focusing 1/3 of the way into the frame or 1/3 of the way into the scene (these aren’t the same thing), but they provide a false sense of focus-security while too often being wrong. The most reliable way to maximize depth of field is to use a hyperfocal app or table (remember those?) that identifies the hyperfocal point: the closest you can focus and still be sharp all the way out to infinity. But that’s not always convenient.
Lacking a hyperfocal app (or, more likely, too lazy to pull my phone out and check it), I usually start with a rough (experience based) idea of what the hyperfocal distance is for my chosen focal length and f-stop. (The more you check your hyperfocal app and apply its results, the more accurate your rough ideas will be.) Armed with that knowledge, I determine the closest thing that must be sharp (CTTMBS). If it’s clearly farther away than my estimated hyperfocal distance, my focus point doesn’t really matter (as long as it’s farther than the CTTMBS) and I just focus on the most convenient distant object.
When I think my CTTMBS is fairly close to my hyperfocal distance, but I still feel like there’s a comfortable amount of wiggle room, I just pick a spot behind CTTMBS and focus there. (Because focusing on the CTTMBS gives me worthless sharpness in front of it, at the cost of essential distant sharpness.) At that point the decision becomes, how far behind? I usually find something about 50% beyond my CTTMBS. In other words, if the CTTMBS is 10 feet away, I’ll focus about 15 feet distant; if it’s 4 feet away, I’ll pick a spot about 6 feet away.
Any time I’m not 100 percent confident with my focus point choice, I magnify the image preview in my (mirrorless) viewfinder (if you’re shooting with a DSLR, you’ll need to use the preview on your LCD, but I find that less than ideal for critical sharpness decisions), checking both my CTTMBS and a distant object.
When I’m not comfortable guessing the focus point, or when my review reveals an area of the image isn’t sharp, I suck it up and check my hyperfocal app. (And it’s possible that the CTTMBS is so close, I just can’t get there from here and the only way to achieve front-to-back sharpness is focus stacking—something my one-click paradigm doesn’t allow me to do, but there’s absolutely nothing wrong with it if you choose to focus stack.)
I was comfortable with my seat of the pants approach this morning. I started by identifying a group of exposed and submerged rocks that made a strong foreground for the lake and distant mountains, then positioned myself to emphasize a coherent and balanced pattern in the rocks’ relationships to one another.
By the time I was ready to start shooting, it was still dark enough to do multi-second exposures without a neutral density filter. I spent a lot of time with this group of rocks and my 16-35 lens, gradually moving closer and dropping lower as I became more familiar with the scene. Closer and wider allowed me to fill the foreground with the rocks; lower reduced the amount of open lake in the middle of my frame. When I felt like I’d exhausted the possibilities, I moved on to other nearby rock relationships.
As we all worked, the sky that had looked completely socked in when we started, began opening up, first revealing the peaks, and soon thereafter coloring the clouds with warm sunlight. With this, what had been a nice but unspectacular morning of photography took a more dramatic turn, and I rushed back to my original rock grouping that remained my favorite foreground subject.
Armed with prior knowledge, I went straight to the version of the composition I liked best on my initial pass. I dropped my camera (on my tripod, of course) down to about 18 inches above the water, and moved it to about 3 feet from the closest rock (tripod in about 4 inches of water). This close, the focal length that filled the frame left/right with rocks was around 24mm, which I knew at f/16 would give me a hyperfocal distance of around 4 feet. To increase my margin for error, I stopped down to f/18, then focused at the front of the second-closest rock (right of the nearest rock).
By this time the sky was bright enough that the only way to achieve a shutter speed long enough to smooth the choppy water was to replace my regular polarizer with my Breakthrough Filters 6-Stop Dark polarizer. This, combined with f/18 and ISO 50, enabled a more than adequate 13-second exposure—that, it turned out, also picked up slight motion blur in the clouds.
If you’ve made it this far (kudos to you), before leaving (and after checking out my gallery, of course), take the time to study this image and appreciate the color and clarity of the water. If you thought this was unique to Lake Pukaki, you’d be wrong—in this workshop our groups get to enjoy many large New Zealand South Island glacial lakes—Lake Wakatipu, Lake Te Anau, Lake Wanaka and its sister, Lake Hawea, Tasman Lake, Lake Tekapo, and Lake Pukaki—and they’re all some version of the color and clarity you see here.
Don and I return to New Zealand next year
Front to Back
Click any image to scroll through the gallery LARGE


Channeling the Donner Party
Posted on July 18, 2024

Star Spangled Night, Milky Way and Tasman Lake, New Zealand
Sony a7R V
Sony 14mm f/1.8 GM
ISO 4000
f/1.8
20 seconds
Landscape photographers know suffering. With no control over the weather and light, we’re often forced to sacrifice comfort, sometimes even safety, in pursuit of our subjects. Cold, exhaustion, sleep deprivation, hunger—it all goes with the territory. But in the long run the successes, though never guaranteed, far outweigh the sacrifices.
So, when my wife and I scaled the short but steep trail (336 stairs—I counted) to the Tasman Lake overlook in New Zealand earlier this month, we knew it would be cold, and found out quickly that the route was treacherously icy as well. But we persevered and were rewarded with a lake view beneath the southern night sky that was almost beyond comprehension for our Northern Hemisphere brains.
Did I mention the cold? When I’m taking pictures, though I’m very much aware of the temperature, no matter how extreme, it never bothers me. For anyone with me who isn’t shooting? Not so much. But Sonya braved the frigid temps for 30 minutes—long enough to appreciate the majesty of the moment, and for me to get some nice pictures. Mission accomplished.
One of the things about planning a photo shoot in difficult conditions is anticipation and planning—not just for the shoot itself, but for all the other factors supporting it. In addition to the knowledge that the Milky Way would indeed be shining above the lake, and the moon wouldn’t be present to wash out the essential darkness, we also anticipated the possibility of an icy trail and carried a pair of Yaktrax for improved footing, made sure our lights were in working order, and had all the appropriate cold weather gear. And knowing that afternoon that we’d be driving into Aoraki / Mt. Cook National Park and possibly staying well past dark, I had the foresight (patting myself on the back) to check into our hotel in Twizel and make arrangements for dinner before embarking on our adventure.
Calling Twizel a sleepy town would be an understatement. Because our hotel locks the registration area and sends the staff home at 8:00 p.m., and most restaurants in town also close their doors at 8:00, at hotel check-in I inquired about a place in town to eat after 8:00. The woman at the front desk sent us to (raved about, in fact) a restaurant nearby. But not wanting to take her word that it would be open after 8:00, we drove over to talk to someone at the restaurant in person. When I explained to Carol, the nice lady who greeted us at the restaurant, that I wasn’t sure what time we’d be there, she said she’d just put us down for between 8:00 and 9:00. Great!
We were already getting hungry by the time we drove into the park and started our hike, but sucked it up like good photographers (well one of us at least—the other just sucked it up like a good human with a crazy partner). After our successful ascent and stay at the top, our prime emphasis on the descent was not falling on our butts, but rattling around the back of our minds was our extreme cold and hunger, and (especially) the relief waiting for us back in Twizel.
Back in town we beelined to the restaurant. Having checked the menu in advance, our mouths already watered in anticipation. It was still relatively full, but everyone was in the bar area watching the All Blacks vs. England rugby game (rugby is a religion in New Zealand, and the All Blacks are the deity of choice). There was no sign of Carol, any hostess or server, so I approached the bar and told the bartender we have a dinner reservation. He just stared at me like I’d asked where I could park my camel, finally saying with an implicit duh, “We stopped serving dinner at 8:00.” Dropping Carol’s name was met with a blank stare and a shrug. When I asked where else we might find dinner after 8:00 p.m., he just chuckled and said, “This is Twizel.”
By now it was after 8:45 and very clear that pleading with the bartender would be a waste of time, so we zipped over to town centre hoping to find something open. The only place with any sign of life was the local pub, so we parked and rushed in. Everyone here was watching the rugby game too, and try as we might, we couldn’t get enough of anyone’s attention to ask about dinner. Fortunately (or so it seemed), about then the game ended (All Blacks 16 — England 15) and the rugby zombies snapped out of their trances.
At least this time when we asked about dinner we got a little sympathy, but still no dinner. Walking back out into the cold and suddenly desperate, we remembered a gas station as we entered town—maybe we could at least find snacks there? Then we noticed a liquor store next door to the pub, a potential snack oasis in a frozen desert? Not so much. As we approached the entrance, a woman came out the front door and told us they’d just closed.
Turns out the gas station was fully automated, with no minimart, unlike pretty much every gas station in the US. So we limped back to the hotel, hoping maybe to find vending machines that would sustain us until breakfast. But with the lobby area locked tight, we had to enter through a side door that only provided access to the rooms, but none of the hotel’s other (meager) amenities.
By then we were so hungry we’d temporarily forgotten how cold we were. That is, until we turned the key in our door and walked into what surely must be a cryogenic chamber with beds. We were already accustomed to the unheated hotel hallways with temperatures that rival the temps outside (you can see your breath in a New Zealand hotel hallway in winter), but this was an entirely new level of cold. Before doing anything else, I went searching for the heater and finally found mounted to the wall a box with vents and a couple of knobs, about the size of a toaster. Surely this couldn’t be the heater?
It was in fact the heater. A heater, it turns out, that also doubles as a white noise machine. Genius! So we cranked it, keeping our outdoor clothes on while unpacking and rummaging for scraps of food in our luggage. Eventually Sonya struck pay dirt, excavating two pieces of hard candy from the bottom of her purse—dinner!
By 10:00 p.m. it had become pretty clear that the heater, despite achieving impressive decibel levels, was never going to generate enough warmth to make the room comfortable, and decided our best defense would be bed. While this did nothing for the hunger, perhaps sleep would mitigate our discomfort.
It’s amazing what being awake in a dark room does to the mind. Freezing cold, starving (okay, perhaps a bit of hyperbole but you get the idea), my thoughts kept drifting to the Donner Party. I discovered new empathy in their plight, but only the knowledge that Sonya is mostly vegetarian and doesn’t eat red meat allowed me to eventually drift off to sleep with both eyes closed.
Somehow, we survived the night.
(I should add that this is the only bad hotel experience I’ve ever had in New Zealand. Despite the chilly hallways, and bafflingly flaccid bacon, I truly love the hotels there.)
A few words about this image
In my prior blog post I shared the details of this night above Tasman Lake. But before checking out, I’d like to add a thought or two.
Most of my Milky Way shoots skew heavily to a vertical orientation that maximizes the amount of Milky Way in my frame. Between the wall of peaks stretching northward, and the Magellanic Clouds high in the southern sky, if ever a scene were to break me of this habit, it’s this view of Tasman Lake.

New Zealand Night, Milky Way Over Tasman Lake
So this night I made a conscious effort to emphasize horizontal orientation, and the image I shared last week reflects that choice. But I’ve learned to never leave a beautiful scene, night or day, without giving myself both horizontal and vertical options.
Sometimes as soon as I reorient and put my eye to the viewfinder I’ll see something I missed; other times, it’s not until further scrutiny with the benefit of my large monitor at home, that I’m surprised to find I actually prefer the less obvious orientation.
So, despite my plan to emphasize horizontal frames this evening, I made sure I didn’t leave without some verticals as well. In this case, since I’ve photographed here before, I didn’t find anything especially surprising. But I did try something new, entirely ignoring the lakeshore and small pool on the rocks directly beneath me, including only enough lake to feature a couple of icebergs. This minimal foreground allowed the maximum Milky Way. (Which, at 14mm, turned out to be quite a bit of Milky Way.)
And as I’ve said before, the color of the lake in this image is real, though at night there isn’t enough light to see it. This ability to reveal realities lost to human vision is probably my favorite thing about photography.
Join Don Smith and me for next year’s New Zealand adventure
Workshop Schedule || Purchase Prints || Instagram
The Joy of Suffering
Click any image to scroll through the gallery LARGE


New Zealand After Dark
Posted on June 19, 2024

Dark Night, Milky Way and Tasman Lake, New Zealand
Sony a7S II
Sony 12 – 24 f/4 G
ISO 10,000
f/4
30 seconds
This week I have New Zealand on my mind. In preparation for the New Zealand Winter photo workshop that begins next week, I started going through unprocessed images from prior New Zealand visits. I was actually looking for something else when I stumbled upon this Milky Way image from the 2019 trip, when Don Smith and I guided a group of Sony influencers around the South Island. I’d already processed a virtually identical composition of this scene back then, but since my Milky Way processing has evolved (improved), I decided to give it another shot.
Day or night, I love this Tasman Lake scene in particular because it so beautifully captures what I love most about New Zealand. We only do this workshop in winter, which of course leads to the inevitable question: “Why?” The simple answer is that the modest sprinkling of tourists, consistently interesting skies, and snowy peaks I love so much, are only possible in winter. I could go on and on with my answer, but since a picture is worth a thousand words, I’ll just save you some time and give you six-thousand words worth of examples. (You’re welcome.)


But even once I convince skeptics that winter in New Zealand is in fact quite beautiful, I’m usually hit with a follow-up: “But isn’t it cold?” Sure it’s cold, but by most people’s expectations of winter, New Zealand’s South Island is actually quite mild—with average highs in the 40s and 50s, and lows in the 30s, it’s similar to winter in Northern California and Oregon. I would venture that there’s not a single person reading this who doesn’t already have in their closet enough winter warmth to ensure cozy comfort in a New Zealand winter. Also like Northern California and Oregon, in winter New Zealand’s South Island gets rain and fog in the lowlands, and snow in the mountains, conditions I find so much better for photography (and for just plain being outside) than the sweltering blank-sky California summers I left back home.
All that said, for me the strongest argument for winter in New Zealand is Southern Hemisphere’s night sky. Inherently pristine air and minimal light pollution makes New Zealand is an astrophotographer’s paradise any season. But winter is when the Milky Way’s brilliant core shines in the east after sunset, already much higher above the horizon than my Northern Hemisphere eyes are accustomed to. The galactic core remains visible all night, ascending further and slowly rotating westward, before finally fading on the other side of the sky in the pre-sunrise twilight. That means more than 12 hours of quality Milky Way time, and the ability to place it above landscapes facing east, north, or west, by simply choosing the time of night you photograph it. And joining the celestial show are the Large and Small Magellanic Clouds—satellite galaxies of our Milky Way, only visible in the Southern Hemisphere.
Benefiting from our years of experience on the South Island, Don and I have identified many very nice locations for photographing the Milky Way, but our two favorites feature the galactic core above glacial lakes that are bounded by snowy peaks. One of these is on the shore Lake Wakatipu near Queenstown; the other is a vista above Tasman Lake in Mt. Cook / Aoraki National Park. This week’s image, from the 2019 trip, is of the Tasman Lake scene.
From the very first time my eyes feasted on it, I marveled at what a spectacular place the Tasman Lake view would be to photograph the Milky Way. In 2019, Don and I were especially pleased to be guiding this group of young photographers who were as excited about photographing the Milky Way as we were, so this shoot was in our plan since before the workshop started.
The sky this evening was crystal clear, but as the sky darkened, I found myself still down at the foot of the lake (just out of the frame on the far right), where I’d photographed sunset with most of the group. The majority decided to stay put for the Milky Way shoot, and while I couldn’t deny that this spot would likely be no less spectacular, I couldn’t pass the opportunity at the elevated lake view that had been on my radar for so long. I also thought the Milky Way would align better with the most prominent peaks from this vantage point. So I scrambled back up the boulders to the trail and race-walked more than a mile, then scaled more than 300 stairs in near darkness, to get in position.
I expected to find the few who weren’t down at the lakeside sunset spot (this group always scattered) would already be up here, but I arrived to find the view empty. While I was happy to eventually have the company of a couple of others, the utter solitude I enjoyed for the first 30 minutes felt downright spiritual.
Going with my dedicated night camera, the Sony a7S II, I started with my default night lens at the time, the Sony 24mm f/1.4. But the scene was so expansive, I quickly switched to my Sony 16-35 f/2.8 GM for a wider view. While that did the job for a while, it wasn’t long before I found myself wanting an even bigger view, so I reached for my Sony 12-24 f/4 G lens. Because light capture is the single most important factor in a Milky Way image, in general I find f/4 too slow. (Today I’d use my 14mm f/1.8 or 12-24 f/2.8, but back then those lenses were still at least a year away.) But really wanting the widest possible view, I rationalized that since the a7S II can handle 10,000 ISO without any problem, and the star motion of a 30-second exposure at 12mm would be minimal, and just went for it. Mitigating the f/4 exposure problems was the fact that the best parts of the scene’s foreground, the snow and water, were highly reflective, while the dark rock wasn’t really essential to the scene.
The result as processed in 2019, while noisier than ideal, was still usable. But as time passes, I’ve become less and less thrilled with many of my old Milky Way processing choices—that image was no exception. Since I’ve been pretty thrilled with the results reprocessing old Milky Way images with Lightroom’s latest noise reduction tool, I thought this might be a great time to reprocess this old scene to see if I could do it better.


For no reason in particular, I chose different image to process, but the compositions are nearly identical. As expected, the new Lightroom noise reduction did a much better job minimizing the inevitable noise that comes at 10,000 ISO, so I was already ahead of the game. The only other major processing improvement I made was the color of the sky, which, as my night sky processing evolves, I’m making much less blue.
Because no one knows what color the night sky supposed to be when given the amount of exposure necessary bring out foreground detail, I’ve always believed that the color of the sky in a Milky Way image is the photographer’s creative choice. I mean, scientists might be able to tell you what color it should be (there’s a very strong case for green), but to me the bottom line is image credibility (and green just won’t do it).
Whatever night sky color I’ve ended up with has entirely a function of the color temperature I choose when I process my raw file in Lightroom—no artificially changing the hue, saturation, or in any other way plugging in some artificial color. Since I do think the foreground (non-sky) of a night image looks more night-like (I don’t want a night image that looks like daylight with stars) with the bluish tint I get when the color temperature is cooled to somewhere in the 3000-4000 degrees range (photographers will know what I’m talking about—non-photographers will just need to take my word), for years I cooled the entire image that way—hence the blue night skies. But Lightroom now makes it super easy to process the sky and foreground separately and seamlessly, so I no longer cool my night skies nearly as much as before (or at all). Now my night skies tend to be much closer to black, trending almost imperceptibly to the purple side of blue (avoiding the cyan side).
Oh, and the color of Tasman Lake you see in this image is real, I swear—the color of the South Island’s glacial lakes is another reason to love this country, but that’s a story for another day.
Workshop Schedule || Purchase Prints || Instagram
This year’s New Zealand workshop is full, but Don and I will do it again next year.
New Zealand After Dark


A (Big) Mistake, and a (Small) Rant
Posted on January 29, 2024

Sunstar and Reflection, Lake Wanaka, New Zealand
Sony a7R IV
Sony 12-24 GM
1/320 second
F/18
ISO 100
By the time you read this, I’ll be done with my break and well into my Death Valley Winter Moon workshop. I’ll have gone from a stretch of two-and-a-half months with no workshops, to a stretch of one month with four workshops (and all the travel that entails): Death Valley, Iceland (10+ days), and two in Yosemite. And while I’ll kind of miss going through my old unprocessed images, I’m also really looking forward to creating new stuff—and there’s comfort in the knowledge that I only scratched the surface of my old images, and they’re not going anywhere.
I wrote that paragraph more than a week ago, on the day before I left for Death Valley, fully intending to complete last week’s blog post during workshop breaks. The plan was to expand on a prior post about how I seek and create new takes on scenes I’ve photographed many times, using the above newly discovered and processed image of the solitary Lake Wanaka willow tree in New Zealand.
So. Imagine my alarm (among other things) when I arrived in Death Valley at around 8:00 p.m. Sunday night (the day before the workshop started), and realized that I’d forgotten my computer. Oops. Suddenly, how to squeeze this week’s blog into my busy workshop schedule was the least of my worries, replaced in a heartbeat by concerns about how I’d run my workshop, and my ability to run my business.
I’ve been doing 12 to 18 workshops per year for more than 15 years and have forgotten many things, ranging from dental floss, to my Kindle, to important lenses, but never my computer. I mean, even forgetting my camera bag (which I’m proud to say has never happened…, well, not exactly) would be more frustrating and disappointing than the actual existential crisis this felt like.
Not only was all my workshop material (roster, permits, presentation material, and so on) on my computer, I have to connect my computer to a flatscreen TV to deliver my workshop orientation, training, and image reviews (a major part of the trip). And then there’s the business stuff I need to deal with each day—not just writing my blog, but answering e-mails, organizing upcoming workshops (see list of my next month’s workshops above), website maintenance, social media posts, among many more things that need my attention every day. Some can be accomplished on my iPhone, but at the cost of much time—a rare commodity during a workshop—and great effort.
Following a few minutes of hyperventilation (punctuated with a variety of choice words), I started working on solutions. With my brother Jay assisting me, I reasoned that I could use his computer to display the orientation and training material—which of course is at home on my computer. No problem, since all that material is on Dropbox too, all I have to do is login to Dropbox on his computer and download the files I need. With that insight I started to breath easier, until…
Also in the bag with my computer is the HDMI cable I need to connect to the TV in the meeting room. But surely, even at a place as remote as Death Valley, someone must have an HDMI cable for sale or loan. Apparently not—not even the general store in Furnace Creek (which, it turns out, is pretty much worthless), or the hotel front desk (which I thought must have a box of cables and adapters abandoned by prior guests), could help. My optimism was further dashed when, at some point during my cable search, I realized that even scoring an HDMI cable would be of little value without the USB-C adapter that allows it to connect to the computer.
So I pulled up Google on my phone and searched for the closest Walmart (desperate times), and found one only an hour away, in Pahrump (not a typo), Nevada. Since I’d always dreamed of making the two-hour roundtrip to Pahrump on the morning a workshop starts, you can probably imagine how thrilled I was. But like I say, desperate times…
Workshop solution in place, I went to work on solutions for handling the business stuff. First, I drafted my wife to box up my computer and overnight it first thing Monday morning—UPS Next Day Early ($$$gulp$$$). Next I logged into Dropbox on Jay’s computer, downloaded my business and workshop material, which went refreshingly smoothly. Then I went to bed.
Early Monday morning I made the drive to Pahrump without drama and was back with the necessary cable by 10:00 a.m. This pretty much solved my short term workshop problem, but since Jay’s computer is set up completely differently than mine, and he doesn’t have a mouse (pretty essential for the image review), I was still quite anxious for my computer to arrive.
As simple as that sounds, rest assured, it was not. After dropping the computer with UPS, we learned that FedEx might be better delivering to Death Valley, so my wife retrieved the box from the UPS Store (kudos to them) and drove it to FedEx. So far so good.
Now might be a good time for me to digress and express my overall frustration with national park concessionaires in general, before moving on to Xanterra in Death Valley in particular. Since national park concessionaires win a bid to service their parks, once they’re in they have little competition and, it seems, even less incentive to make their customers happy.
Since I have similar frustrations at all national parks, I can only assume that the concessionaire experience at the parks I don’t visit is similar. But I’ll limit expressing my specific frustrations to the concessionaires at the parks I visit most frequently: Yosemite (Aramark), Grand Canyon (Aramark, Delaware North, Xanterra), and Death Valley (Xanterra).
Most hotels and restaurants out in the real world seem to bend over backward to satisfy their customers, but at the national parks every request seems to be an inconvenience. My latest reminder of this was the difficulty I had simply taking delivery of my computer (that I’d spent significant dollars to get delivered as early as possible on Tuesday) in a timely manner.
For some reason the front desk at Furnace Creek Ranch doesn’t accept packages for customers (maybe this is a thing, but I’ve never encountered this at other hotels), with all incoming shipments going to either the commissary (open 1:00 to 4:00 p.m.) or Post Office (open 8:00 a.m to 4:00 p.m.). Worse still, for any given package, no one seems to know which one will get it.
Since my iPhone wouldn’t connect to the WiFi network (don’t know if the problem was on my end or theirs), and Death Valley cellular service is virtually useless for anything but phone calls, I spent most of my Tuesday break time (between the morning shoots and 1:00 p.m. image review) running around between the front desk, post office, and commissary trying to determine whether my computer had arrived. At each spot all I got was a shrug before being sent to one of the other choices.
It eventually became apparent that I wouldn’t have my computer in time for the Tuesday image review, but surely I’d have it afterward, so I could at least catch up on my business stuff Tuesday evening. When it still hadn’t arrived by the time we departed for our afternoon/sunset shoot, I remained confident that it would be waiting for me when I returned—especially since I’d made it abundantly clear to all parties (front desk, commissary, post office) how important it was that I get it today.
I returned after our sunset/moonlight shoot to learn that my computer had in fact been delivered to the commissary that afternoon (yay!), which as promised had tried to give it to the front desk for me to pick up later, but the front desk refused it (boooooo!) and instead hot-potatoed the package to the post office—which closed at 4 p.m. By the time I picked it up Wednesday I was so far behind with other stuff that finishing my blog was no longer a priority. So here we are, a week late…
So, did anyone die because I didn’t get my computer on Tuesday? No. But I don’t think I could have been more clear (and respectful) expressing my delivery’s importance. Just the slightest effort on the part of the people at the front desk (where my greatest frustration lies) would have meant the difference between an extremely satisfied and an extremely dissatisfied customer. If I treated my customers with the same disregard, I’d be an ex photo workshop leader.
End of rant…
Everything else about this workshop turned out to be wonderful. I had a fantastic group—lots of fun, and across the board extremely good photographers who thoroughly enjoyed each other. And the photography conditions were off-the-charts—between water at Badwater (reflections!), nice clouds (including unprecedented fog!) and great light throughout, spectacular sunrise/sunset color, and a couple of excellent sunrise moonset shoots, this was probably the best overall photography I’ve had in 15 years of Death Valley workshops. But since I haven’t had time yet to process my images, I return you now to the original programming…

Sunstar and Reflection, Lake Wanaka, New Zealand
Rather than duplicate the information in my June Variations on a Tree post, I’ll just add to what I wrote there with a few more words about this New Zealand morning in June 2022.
Every time I Don Smith and I take a workshop group to Lake Wanaka, I try to find a new way to photograph this tree. I’ve featured clouds, sunrise/sunset color, fog, reflections, submerged rocks, the moon, the Milky Way, and stars. I’ve also varied my perspective, focal length, and orientation to vary the background and framing. But for some reason, I’ve never tried a sunstar.
It didn’t take long to realize that this crystal clear morning was ideally suited for checking the Wanaka Tree sunstar box. Not only was the morning sky virtually cloudless, the lake surface was unusually disturbed, making for less than ideal clarity and reflections.
Anticipating the sunstar opportunity with the approaching sun, I put on my 12 – 24 lens (great sunstar lens), dialed my aperture to f/18, and positioned myself for a horizontal frame with the sun offset from the tree. As soon as the sun appeared I started clicking like crazy, adjusting my shutter speed with each click to maximize my exposure options later (not to blend, just so I’d have a lot to choose from). After about 30 seconds of this, I spontaneously decided to race along the lakeshore to align the tree and sun, and had enough time squeeze off a handful of vertical frames before the sun rose too high.
Join Don Smith and me in New Zealand
Workshop Schedule || Purchase Prints || Instagram
Wanaka Tree Collection


Peak Color
Posted on January 9, 2024

Twin Peaks, Mt. Tasman and Aoraki / Mt. Cook, New Zealand
Sony α1
Sony 24 – 104 f/4 G
ISO 100
f/11
.6 seconds
The first time I visited New Zealand (way back in 1995), I was surprised not just by the number of mountains, but also by their size. New Zealand’s mountains reminded me very much of the Eastern Sierra peaks I visit every year for the way their serrated profiles tower above the surrounding landscape. And while the east-side view of the Sierra Crest is truly spectacular, the New Zealand mountain experience also includes glaciers, rainforests, and an assortment of massive, glacier-carved turquoise lakes that are so pristine, locals drink straight from them.
It’s no coincidence that Don Smith and I concentrate our annual New Zealand winter workshop in the Southern Alps, the backbone of the South Island and home to all 20 of New Zealand’s 10,000+ foot peaks and all of its glacial lakes. We choose winter not just for the Milky Way’s prominence in the night sky, but also to maximize the snow on the Southern Alps.
Fox Glacier on the South Island’s West Coast is the farthest north our groups get. Our stated reason for being here is our heli-hike on Fox Glacier (we helicopter onto the glacier for a guided hike and an intimate view of its crevasses, caves, pools, and seracs), we’ve come to appreciate many other features of this segment of our workshop—specifically, the (aptly named) Blue Pools as well as the various waterfalls of Haast Pass, and the spectacular views of New Zealand’s two tallest peaks, Mt. Tasman (on the left in this image; 11,473 feet) and Aoraki / Mt. Cook (12,218 feet).

Dark Sky Dreams, Lake Matheson, New Zealand
Our Lake Matheson hike during our stay in Fox Glacier (also the name of the town where we stay) is a particular highlight because of its mirror reflection of Tasman and Aoraki/Cook. But on our last morning in Fox Glacier, we photograph sunrise on the two peaks from Fox Glacier Vista, an underrated vantage point that’s a great way to wrap up our stay.
Given all the sights we see throughout the 10 days of this workshop, it’s easy to overlook this brief stop before our long drive to Aoraki / Mt. Cook National Park on the other side of the Southern Alps (less than 30 miles as the crow flies, but nearly 300 (breathtaking) miles as the Mercedes Sprinter Van drives). But the view here is nice, even during an ordinary sunrise, and always worth the stop.
The sunrise on our Fox Glacier departure morning in 2022 was anything but ordinary. We always depart for this shoot expecting a nice shoot, but usually my mind is more on the long drive ahead and I’m content to stand back an drink in the view. But this morning we could tell from the instant we arrived that the ingredients were in place for something truly special: Right at our feet, a frosty glaze covered the meadow and spread all the way to the trees, and in the distance, layers of broken clouds hovered above the peaks, which in the crystal clear air appeared etched against the horizon.
Read about the science behind sunrise/sunset color
Though it was still fairly dark, hints of color were already seeping into the clouds behind the Southern Alps. This was Don’s and my first visit following two years lost to COVID, and I immediately saw that the vista we knew so well had been expanded and upgraded, something I initially found disorienting. While the rest of the group rushed to set up at the most obvious vantage point, I took a couple of minutes to explore along the short trail to make sure we weren’t missing something new, before returning confident that we were indeed in the best place. (I was so focused on the view during this little jaunt that I failed to notice a small piece of jutting root that aggressively reached out to send me sprawling in the dirt—my skinned knees and bruised ego were only slightly comforted by the knowledge that no one actually witnessed my face-plant.)
In these situations, when spectacular conditions rival the scene I came to photograph, I try not to get too cute with my compositions. If there’s an obvious complex option that doesn’t distract from the natural beauty of the moment, I’ll take it, but generally I prefer to let the scene speak for itself by keeping my composition as simple as possible.
But that doesn’t mean I don’t pay attention to the entire scene. In this case we were limited by a fence between us and the meadow, and since I already knew the view, I concentrated on simple framing. With the combination of matching snow-capped Tasman and Aoraki bookending the closer Craig Peak, and parallel horizontal layers throughout the scene, it didn’t take a rocket scientist to identify an opportunity for what I call “aggressive symmetry.” The pair of larger foreground trees, while not perfectly in balance with the rest of the frame, were close enough to symmetrically arranged that I was pleased with their (unavoidable) inclusion.
Given the way the color was progressing as the sun brightened behind the mountains, I worked out my composition long before it peaked, clicking every few seconds while saying to myself each time, surely this must be maximum color. But it just kept intensifying—the thrill of witnessing it was matched only by the thrill of listening to the rest of the group react to what we were seeing.
As I clicked, I couldn’t help think that this was turning out to one of those sunrises (or sunsets) with color so vivid that I know people viewing the images won’t believe they’re real. Fortunately, from sunrises/sunsets to wildflowers to auroras, photographers know that there’s nothing subtle about color in Nature, and that when Mother Nature wants to, she really can dial the vivid up past the point of credibility. The best way to describe these moments is that to me it feels like the atmosphere possesses a physical component that penetrates my skin and pretty much everything else it touches until I feel like the entire world is actually humming with color.
You never know when Nature’s little (or big) surprises will happen, but their possibility is the thing gets me out of bed in winter darkness, keeps me out well past dinnertime, and makes all the cold, rain, snow, or whatever other hardships Mother Nature wants to throw my way, tolerable.
Join Don and me in New Zealand
Workshop Schedule || Purchase Prints || Instagram
Sunrise / Sunset Color
Click any image to scroll through the gallery LARGE


, Yosemite")


The Exception That Proves the Rule
Posted on January 2, 2024
Lush Reflection, Doubtful Sound, New Zealand
Sony a7R V
Sony 24-105 f/4 G
ISO 800
f/8
1/80 second
A few years ago I blogged about shooting sans tripod on my annual Grand Canyon raft trip. You have no idea how large a paradigm shift this was for me, but I tried to rationalize my sacrilege by saying that any shot without a tripod is better than no shot at all. Since then I’ve been a little more willing to forego my tripod when the situation calls for it, but each each time I do only reinforces for me all the reasons I’m so committed to tripod shooting in general.
But I can’t deny that there are times when a tripod just won’t work. For example, sports and wildlife shooters who deal with moving targets can’t be tied down by a tripod. And climbers usually have better things to do with their hands than fumble with a tripod, not to mention the fact that tripods tend to perform less than optimally on a vertical surface. On the other hand, because I only shoot landscapes on solid ground, my own style has evolved to incorporate the tripod’s many benefits, with only extremely rare exceptions.
Part of my landscape-centric, tripod-only approach is a simple product of the way I’m wired—I’m pretty deliberate in my approach to most things, usually tilting toward planning and careful consideration over quick decision making and cat-like reflexes. That likely explains why my sport of choice is baseball, (even though I’m not a golfer) I actually enjoy golf on TV, and prefer chess and Scrabble to any video game (I’m pretty sure that the last video game I played was Pong). It also explains my preference for photographing stationary landscapes—I just need to know that my subject will still be there when I’m ready, no matter how long that takes.
But no matter how stationary the subject is, adding a bobbing boat to the equation pretty much negates the tripod. One example is the Grand Canyon raft trip, which involves many hours each day floating through spectacular, continuously changing scenery, and where every bend in the river advances the story like turning pages in a novel. And every (non-COVID) winter Down Under since 2018, Don Smith and I have done a New Zealand photo workshop, that, among many spectacular solid ground opportunities, features an all day cruise on Doubtful Sound.
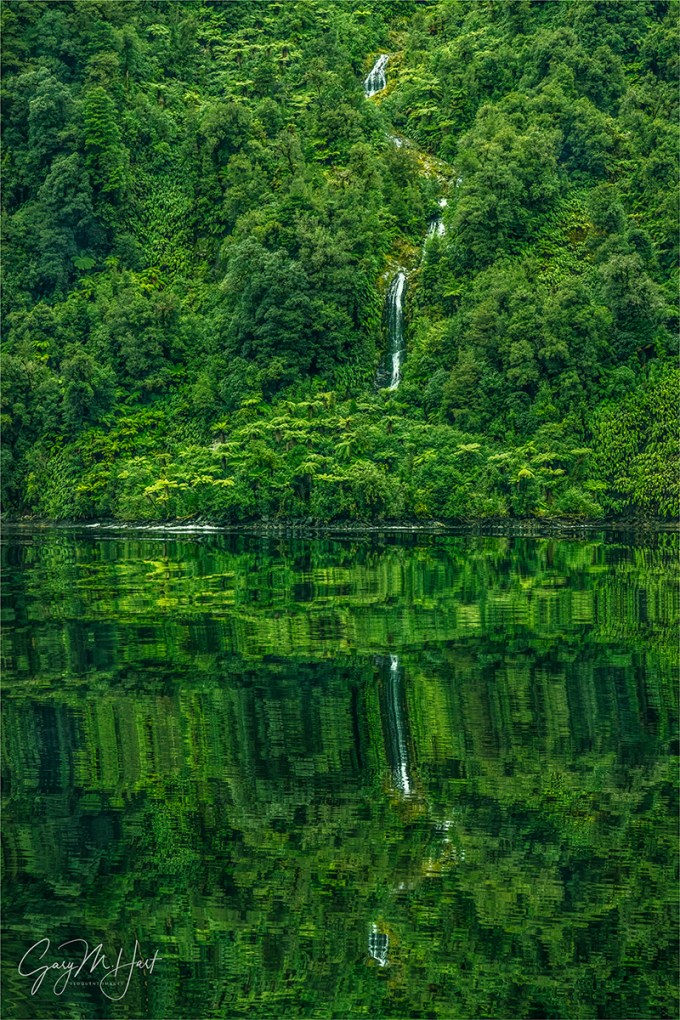
Misnamed, Doubtful Sound isn’t a sound at all, but rather a spectacular fiord (FYI, that’s how they spell fjord down there)—a narrow, twisting, multi-fingered ocean inlet lined with towering glacier-carved walls cut by plunging waterfalls. And as if that’s not beautiful enough, consider also the sound’s ubiquitous rainforest green against a background of snow-capped peaks, and you might understand why this breathtaking fiord is near the top of my list of reasons for declaring New Zealand the most beautiful place I’ve ever photographed.
Because I once rigidly proclaimed that I never take a (serious) photo without my tripod, on my earliest Grand Canyon raft trips I settled for low-res, “I was there” jpeg snaps with a waterproof point-and-shoot—fine for social media, but far from the quality a professional photographer requires. But after several years I finally (I’m a slow learner) admitted to myself that I was missing too many great images by only shooting solid ground images, and started breaking out my “adult” camera while floating the Colorado River’s many long stretches between rapids.
So, by the time Don and I started doing the annual Doubtful Sound cruise, I was mentally fortified enough to forego my tripod for a full day without suffering a panic attack. This transition wasn’t without its growing pains—photographing “stationary” landscapes from a moving boat was challenging enough (as far as I was concerned, my subjects were no longer stationary), but me trying to capture, using a camera set-up for tripod-only landscapes, dolphins leaping in our boat’s wake was downright downright comical. The best dolphin images I could manage that first year were of the splashes left after their tails disappeared beneath the water. Since then I’ve just accepted the fact that I’m not a wildlife shooter and have just been content to watch the (thrilling) show—but I do now at least take the time before each cruise to set up my camera for action, just in case…
Thanks to its lofty walls and numerous twists, most of Doubtful Sound is sheltered enough to allow glassy reflections throughout. And given the number of waterfalls plunging into the sound—many that that flow year-round, far more that pop up only after one of the sound’s (frequent) showers—I don’t know if anyone has bothered to name the smaller ones like the one in this image from last year’s cruise.
This waterfall stood out for its verdant surroundings and shimmering reflection. With our boat moving laterally fast enough that the scene changed by the second (my worst nightmare), I moved much more quickly than I’m comfortable to capture it, pretty much just framing and clicking by feel.
Of course this whole experience further underscored why I prefer using a tripod. But it also fortified my resolve not to be limited by my tripod-always-no-exception rule. As this image demonstrates, today’s stabilization and high ISO technology obviates what was once considered the tripod’s primary value: eliminating hand-held motion blur. Despite standing on a rocking boat and shooting at 104mm and 1/80 second, this image really is just as sharp as it would have been with my tripod.
But just as sharp is only part of the quality equation, because capturing it also forced me to compromise by using 800 ISO—far from a dealbreaker, given my camera’s high ISO capability and today’s noise reduction processing tools, but less than ideal. Nevertheless, the thing I most miss without my tripod (or at least, without the stationary world that allows me to use a tripod) is the ability to craft my image and give a beautiful scene like this enough attention to find those extra little somethings that take it to the next level.
As much as I appreciated the ability to fire at will while floating beneath Doubtful’s vertical green walls, the landscape photographer in me missed the ability to savor the scene, and to be the one who decides when it’s time to click, and time to move on. In this case, had my tripod and I been solidly planted on terra firma, I’d have taken the time to study the subtly variegated foliage, identify the most distinctive shrubs and patterns, and monitor the shifting reflection, before framing and clicking. And had I been using a tripod, I’d also have had much more shutter-speed flexibility for managing the scene’s motion—both in the tumbling fall and the undulating reflection.
But alas, none of that was possible in this situation. So I have to settle for being extremely happy that I was able to capture a very small part of what makes Doubtful Sound (and New Zealand) so special.
Don and I would love to share New Zealand with you in person
Workshop Schedule || Purchase Prints || Instagram
The Most Beautiful Place on Earth
Click any image to scroll through the gallery LARGE


One Morning in Middle Earth
Posted on November 15, 2023

Middle Earth Morning, Matagouri Trees Near Glenorchy, New Zealand
Sony a7R V
Sony 24-105 f/4 G
ISO 100
f/16
1/40 second
Having reached a much anticipated break in my workshop schedule, I’m excited for the opportunity to carve out a little time to process images from past trips. For as long as I’ve been doing this photo workshop thing, I’ll return from a workshop, take a cursory trip through my captures, process one or two (maybe a couple more if time permits), make a mental note of the images I want to return to, then get to work on the business stuff that has to take priority. But about 80 percent of those “return to” images just seem to languish on my hard drive like the books on my Kindle that I always plan to get to later.
With no illusions of making a significant dent in this multi-year image accumulation, I started browsing my 2023 trips with no particular agenda, finally landing on the folder from the New Zealand workshop Don Smith and I do each June (winter Down Under). I got no farther than the images from our first morning…
Journey With Me
After leaving Queenstown (FYI, without a doubt the most beautiful city I’ve ever laid eyes on) dark and early, our sunrise stop is a sheltered cove on shore of Lake Wakatipu. Despite dense, low clouds obscuring the cross-lake mountain views Don and I love so much about this spot, our group enjoys nice reflections in the always crystal clear water (people actually drink from the lakes in New Zealand!)—not spectacular, but a lovely start to a day that will soon get much better.
I love the drive along Lake Wakatipu’s northeast shore. I’ve made it more times than I can count, and each time I like to imagine I’m being transported back to Middle Earth. This morning is no different.
A few miles beyond our sunrise spot, the clouds start teasing us with ephemeral views of the Thomson Mountains’ snowy summits across the lake, but the overcast’s overall persistence only adds to the drive’s ethereal feel. With clouds still ruling the sky as we enter the tiny village of Glenorchy at the top of the lake, we stop at Mrs. Wholly’s General Store for warm greetings, hot coffee, and tasty treats (not to mention handmade New Zealand wool goods), and to allow the overcast time to clear for the journey’s next leg. Clouds or not, this stop has become something of a workshop tradition.
The world really starts changing after putting Lake Wakatipu, Glenorchy, and the paved road in the mirror—a transformation enhanced this morning by patches of blue sky and a brightening landscape that hints at the sun’s imminent arrival. Despite the missing pavement, the road is quite smooth as we approach tiny Paradise, known in Middle Earth as Parth Galen and Lothlórien. Just beyond is Mt. Aspiring National Park—Isengard and more Lothlórien.
Now the undulating terrain is punctuated by native matagouri trees; in the distance, the highest peaks of the Humboldt and Richardson Mountains are starting to emerge in all their snowcapped glory and our transition to Middle Earth feels complete. The view is spectacular and the group wants to stop to photograph, but Don and I know this route well and ask our driver to continue to a spot that will allow us to add a foreground of matagouris to our dramatic mountain background. In a couple of minutes we round a bend and pull to a stop in front of a stand of twisted matagouri trees jutting from a frosty pasture.
Seeing the trees and the distant mountains haloed by the last vestiges of the diaphanous clouds, I barely avoid getting trampled as the group rushes out to capture the scene. As beautiful as the mountains are, I’m especially thrilled by the trees and want to find the best way to feature them without diminishing the peaks.
I digress
Rendering our three dimensional world in a two-dimensional medium requires a paradigm shift for photographers accustomed to capturing the world as it appears to their eyes. But while it’s impossible to create a true three-dimensional image, it is possible to create the illusion of that missing dimension.
Creating illusion of depth starts with of a couple of simple principles. First, never settle for your primary subject. When your primary subject is in the distance, look for a complementary element nearby. Conversely, when your subject is in the nearby, pay special attention to the image’s background.
While leading lines, like a fence, road, creek, or lakeshore, can guide the eye through the frame, you can also create virtual leading lines with a prominent rock, shrub, or tree that your viewers can subconsciously connect to other visual elements. Your complementary subjects don’t need to be especially compelling, they just needs to provide a brief stopping point that starts your viewer on a visual journey between the scene’s near and distant elements. When possible, I try to connect my complementary elements diagonally to move my viewers simultaneously across both of my (2-dimensional) image’s planes.
An easily overlooked flaw that can rob a scene of depth is merged visual elements on different front-to-back planes. For example, even though to your eye that distant rock is clearly behind the tree right in front of you, unless the two are completely separated horizontally (left/right, up/down), in the camera’s two-dimensional world they’ll appear at first glance to be a single object. Often the solution is as simple as moving left/right, forward/backward, or up/down.
Meanwhile, Back in Middle Earth
I start by scanning the scene to identify the most striking tree, then position myself to put the tree front-and-center in my frame. Once there I realize that I can actually frame the tallest peaks with the tree’s most prominent branches and set up at a spot that puts the other nearby trees along a more or less diagonal line that recedes from the primary tree. I compose the scene as tightly as I can to minimize the now empty sky and relatively bland grass at my feet.
While the exposure itself isn’t particularly difficult for my camera, the way I achieve it is important—given the need for front to back sharpness, I start by stopping down to f/16. With no wind this morning, I just go with ISO 100 and dial my shutter speed until the histogram looks good.
The final critical decision I need to make is exactly where to focus. The closest tree is about 10 feet away; at f/16, my hyperfocal app gives me a hyperfocal distance of about 13 feet. But those numbers are never precise and in fact vary depending on many variables, so I always like leaving myself some hyperfocal wiggle room. Focusing on the tree itself will soften the mountains, and focusing right at the hyperfocal distance will still give me nearly 4 feet of sharpness in front of the tree that I don’t need (since focusing on the hyperfocal point gives “acceptable” sharpness from half that distance to infinity). So I focus a little farther back—using that small piece of wood about 3/4 of the way to the second tree—to ensure distant sharpness. Click.
After leaving here we continue into the dense forest of Mount Aspiring National Park. No Elves or Hobbits this time, but it’s only our first day…
Don and I still have a couple of openings for New Zealand 2024
Workshop Schedule || Purchase Prints || Instagram
The Illusion of Depth


, Yosemite")


Smart Luck
Posted on July 30, 2023

Milky Way and the Southern Alps, Mt. Cook / Aoraki National Park, New Zealand
Sony a7R V
Sony 14mm f/1.8 GM
ISO 12800
f/1.8
10 seconds
Once upon a time I posted a rainbow image on Facebook and someone commented that getting a shot like that is simply dumb luck. After having a good chuckle, I actually felt a little sad for the commenter. Since we all tend to make choices that validate our version of reality, imagine going through life with that philosophy.
No one can deny that photography has a significant luck component, but each of us chooses our relationship with the fickle whims of chance—I prefer to look for smart luck. Smart luck embraces Louis Pasteur’s conviction that chance favors the prepared mind. Ansel Adams was quite fond of repeating Pasteur’s quote, and later Galen Rowell as well as many other photographers have jumped on board. So while many may indeed feel lucky to have witnessed special moments in Nature, let’s not lose sight of our opportunities to create our own “luck.” Smart luck.
Some examples

Double Rainbow, Tunnel View, Yosemite
As nature photographers, we must acknowledge the tremendous role chance plays in the conditions that rule the scenes we photograph, then do our best to maximize our odds for witnessing whatever special something Mother Nature might toss in our direction. A rainbow over the Safeway parking lot or the sewage treatment plant is still beautiful, but a rainbow above Yosemite Valley can ascend to a lifelong memory (not to mention a beautiful photograph).
I’ll never forget the time, while driving to Yosemite to meet new clients to plan the next day’s tour over dinner, I saw conditions that told me a rainbow was possible. When I met the clients at the cafeteria, I “suggested” (pleaded?) that we forget dinner and take a shot at a rainbow instead. Despite no guarantee of success, we raced our empty stomachs across Yosemite Valley, scaled some rocks behind Tunnel View, and sat in a downpour for about twenty minutes. Our reward? A double rainbow arcing across Yosemite Valley. Were we lucky? Absolutely. But it was no fluke that my clients and I were the only “lucky” ones out there that evening.

Captive Crescent, El Capitan and Half Dome, Yosemite
Before sunrise on a chilly May morning in 2011, my workshop group and I had the good fortune photograph a crescent moon splitting El Capitan and Half Dome before sunrise. Was this luck? I’ll give you one guess.
I suppose we were lucky that our alarms went off, and that the clouds stayed away that morning. But I knew at least a year in advance that a crescent moon would be rising at this less heralded Yosemite vista on this very morning, scheduled my spring workshop to include the date, then spent hours obsessively making sure I hadn’t made any mistakes.

Rainbow Bridge, Colorado River, Grand Canyon
I’d love to say that I sensed the potential for a rainbow over the Grand Canyon when I scheduled my 2016 Grand Canyon raft trip, then hustled my group down the river for three days to be in this very position to witness the moment. Sadly, I’m not quite that prescient. On the other hand, I did anticipate the potential for a rainbow at least an hour earlier, scouted our campsite to determine the best locations to photograph it, then called the rainbow’s arrival far enough in advance that everyone was able to grab their gear and be set up before its arrival.
Anticipating these special moments in nature doesn’t require any real gifts—just a basic understanding of the natural phenomena you’d like to photograph, and a little effort to match your anticipated natural event (a rainbow, a moonrise, the Milky Way, or whatever) with your location of choice.
But to decide that photographing nature’s most special moments is mostly about luck is to pretty much limit your rainbows to the Safeways and sewage treatment plants of your everyday world. I’ve lost track of the number of times I’ve prepared for a special moment in nature, changed plans, lost sleep, driven many miles, skipped meals, and suffered in miserable conditions, all with nothing to show for my sacrifice. But just one success like a rainbow above Yosemite Valley or the Grand Canyon is more than enough compensation for a thousand miserable failures. And here’s another secret: no matter how miserable I am getting to and waiting for my goal event, whether it happens or not, I absolutely love the anticipation, the just sitting out there marinating in the thought that it might happen.
About this image

Milky Way and the Southern Alps, Mt. Cook / Aoraki National Park, New Zealand
Don Smith and I didn’t choose New Zealand in June by accident. And it was no fluke that we were at this spot beneath the Southern Alps on a moonless night. June is when the Milky Way’s core rises highest in the night sky, and we knew exactly where to be when it came out this night. Well, we thought we knew exactly where to be…
Our New Zealand workshop group had had such a great Milky Way experience on the workshop’s first night, everyone wanted to do it again. But this year’s trip encounter more fog than we ever have, which brought us some nice daytime conditions but wasn’t particularly conducive to night photography. We finally got another chance on the workshop’s penultimate night, when the sky cleared at one of my favorite places for night photography. After a nice sunset shoot, we went to dinner (at a spectacular buffet) while waiting for the sky to darken, then headed back out.
But when we arrived at our predetermined location, a bridge over the Hooker River, we discovered that workers doing grading (I assume) on the riverbank just upstream had left a spotlight on outside their little shed, perhaps by mistake, or maybe to discourage thieves. Whatever the reason, it was so bright that it washed out the bottom half of everyone’s frame. No problem—we were familiar enough with the location that we were able to drive up the road a mile or so until we found a nice view where the light wasn’t a factor.
This far into the workshop everyone was fairly comfortable with their cameras, but the utter darkness out there added another layer of complication. Spreading out along the shoulder, we had to take care not to bump into tripods and each other, but once everyone established their positions and started finding compositions that worked, there wasn’t really any need to move around. At that point the job for Don and I is mostly to be a resource—help people with their compositions and focus (mostly just checking to ensure that it’s okay)—and just stay out of the way.
Since most of my compositions at the prior Milky Way shoot had been vertical, this night I opted for horizontal frames that included more mountains. With nothing special in the immediate foreground, I minimized it in my frame. I further deemphasized (darkened) the foreground with a faster shutter speed that had the added benefit of reducing star motion.
After we’d been out their for a while and I was pretty sure everyone had been successful, I pointed out the Large and Small Magellanic Clouds, satellite galaxies of our Milky Way that aren’t visible in the Northern Hemisphere. They’re not in this frame—they’d be quite a bit to the right of the Milky Way with a very wide lens—but I’ve seen several images from others in the group that included them. Altogether a very special evening.
Join Don and Me in New Zealand Next June
More Smart Luck


, Yosemite")


“Ordinary” Beauty
Posted on July 12, 2023
Trees and Reflection, Wairepo Arm, New Zealand
Sony a7R V
Sony 24-105 f/4 G
ISO 100
f/8
30 seconds
Many of the places I visit are known for their extraordinary beauty, striking features and eye-grabbing vistas that justifiably attract thousands of daily visitors and inspire millions of photographs. Stimulating scenes like these seem to be every nature photographer’s goal, but today I’d like to issue a shout-out to ordinary beauty—the simple scenes with the ability to soothe, by virtue of their subtle beauty, that we pass by every day.
Art of any form appeals on two seemingly contradictory planes: it must stimulate enough to attract, yet soothe enough to sustain. I call these art’s “oooh” and “ahhh” factors, and they’re often mutually exclusive. It saddens me that social media seems to have biased photographers toward the oooh images, compelling them to settle for the obvious beauty that encourages viewers to simply click Like and maybe comment “Stunning!” before moving on to the next image. Sadly, this phenomenon seems to have made social media Likes the ultimate arbiter of beauty for many, and I fear that we’re loosing sight of Nature’s ability to soothe.
Images that shout their beauty might get my attention, but they’re not usually the kind of images I’d mount on a wall to live with for an extended period. Music is a great analog that most people can relate to. When I’m running or need to work around the house, I love cranking up AC/DC, Foo Fighters, or The Afghan Whigs (I could go on) , but couldn’t live with it 24×7. On the other hand, while Pat Metheny, Michael Franks, or Azymuth (I could go on) might not stimulate me into an adrenalin frenzy, but I can have them playing in the background all day and my world’s a happier place.
Nature photography’s challenge is overcoming that urge to settle for the loudest beauty, or that impulse to drive right past any scene that doesn’t grab the eye instantly, and to instead take the time seek beauty hidden just beneath the surface. After doing this photography thing for many years, I realize that the scenes that at first glance appear “ordinary” are often the scenes where I find the soothing qualities that sustain an image for the long haul.
About this image

Trees and Reflection, Wairepo Arm, New Zealand
Living in the California puts me in relatively close proximity to some of the most diverse, spectacular natural beauty in the world. Rivaling (and arguably surpassing) California’s scenery, New Zealand offers its own vast assortment of extraordinary beauty. Festooned with snow-capped peaks, glacial lakes, plunging waterfalls, massive glaciers, lush rainforests, and dazzling fiords (the New Zealand spelling for fjord), New Zealand is a visual paradise by any standard.
In addition to this obvious beauty, one thing that strikes me on each visit to New Zealand’s breathtaking South Island is the ubiquity of the beauty present even in New Zealand’s “ordinary” (a relative term) landscapes. Unlike traveling between photo destinations in California, in New Zealand even the drives to and from gorgeous photo destinations are so beautiful that I enjoy the views along the way almost as much as I do the destinations themselves.
In the New Zealand workshops Don Smith and I do each June, one spot that has always grabbed my eye is a small, tree-lined lake near Twizel, the home of our hotel for the Aoraki / Mt. Cook National Park and Lake Tekapo portion of our workshop. Known as Wairepo Arm, it’s connected by a small culvert to larger (but still not large by New Zealand standards) Lake Ruataniwha, a manmade lake created for hydroelectric power purposes.

Fogbow, Wairepo Arm, New Zealand
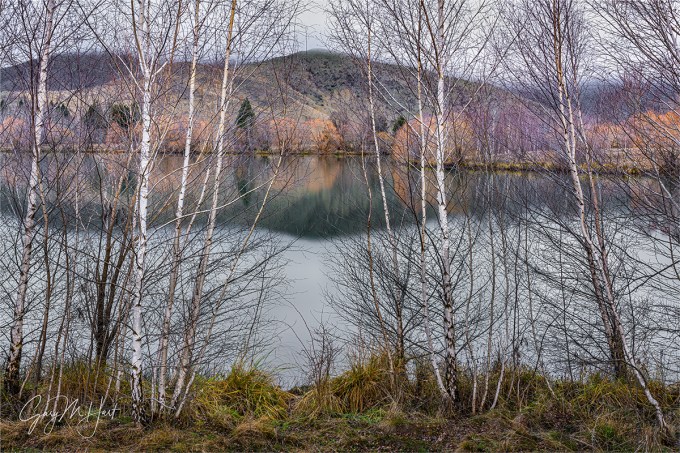
The first thing I notice here is the orange trees reflecting atop the usually calm lake. Since we’re always here in June, right around the Southern Hemisphere’s winter solstice, my first assumption was that the orange color was just late fall foliage hanging on into early winter. I didn’t realize until one particularly frigid morning in 2019 when we found the trees glazed with hoarfrost, pretty much demanding that we stop and photograph, that (despite the icy frosting) there are no leaves on these trees and the color is entirely in the trees’ bare branches. It turns out these are (non-native) flame willow trees that sport their vivid orange (it’s not subtle) all winter long.
This year, after a long drive from Mirror Lakes near Milford Sound, we decided this might be a good time to give our group a chance to photograph this scene at Wairepo Arm that we usually drive right by. We crossed our fingers and were thrilled to find the color strong, the lake calm, and the reflection everything we’d hoped for. As an added bonus, the entire scene was capped by a low fog that bathed everything in soft, shadowless light.
I’d never paid much attention to the birches before this visit, but for some reason this time my eyes went straight to their parallel trunks and papery white bark. While everyone in the group walked through gaps in these trees to stand on the lakeshore for an unobstructed view of the reflection, as I scanned the scene it occurred to me that I might be able to include the birches and still capture the reflection.
I walked down the lakeshore a couple of hundred yards and found a combination of evenly spaced parallel birches spaced enough to reveal the colorful trees and their reflection. The composition I thought worked best emphasized the horizontal bands complemented by the perpendicular trunks. Since the sky itself was pretty bland, and the grassy foreground was pretty disorganized, I included just enough of each to add to the horizontal layering. When a few ripples disturbed the lake surface, I added my Breakthrough 6-stop Dark Polarizer to smooth them.
I have no illusions that this image will be a social media viral sensation, but its soft light and soothing stillness provide the staying power I crave in an image.
See for yourself when Don and I return to New Zealand next year
Workshop Schedule || Purchase Prints || Instagram
“Ordinary” Beauty
Click any image to scroll through the gallery LARGE


, California")


