Eloquent Images by Gary Hart
Insight, information, and inspiration for the inquisitive nature photographer
Don’t believe your eyes
Posted on October 17, 2017

Sunstar, Horseshoe Bend, Arizona
Sony a7R II
Sony/Zeiss 16-35
1/4 second
F/18
ISO 100
One of the greatest benefits digital photography has over film is the ability it provides to check an image’s exposure at capture (when you can do something about it). But as photographers, we rely so much on our eyes that it’s sometimes difficult to accept that they’re not always right. We take a picture, look at it on the LCD, and decide whether or not it’s perfect without even considering that there might be a better way. But where exposure is concerned, there is indeed a better way.
That’s because every picture you click, whether raw or jpeg (but especially raw), contains more shadow and highlight information than the jpeg that appears on your camera’s LCD preview screen can reveal. Fortunately, our digital cameras give us a tool that tells us about that missing exposure info: the histogram.
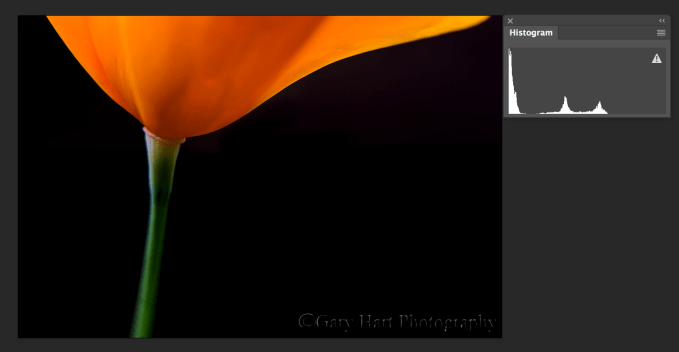
Histogram explained

Simple Histogram: The shadows are on the left and the highlights are on the right; the far left (0) is absolute black, and the far right (255) absolute white.
A histogram is a graph of the tones in an image. While I imagine that any graph has the potential to evoke high school science trauma flashbacks, a histogram is really quite simple, simple enough to be read and interpreted in the blink of an eye. And not only is your histogram easy to read, it’s really the most reliable source of exposure feedback.
When an image is captured on a digital sensor, your camera’s “brain” samples each photosite (the individual pixels in the megapixel number used to measure sensor resolution), determining a brightness value that ranges from 0 (black) to 255 (white). Every brightness value from 1 to 254 is a shade of gray—the higher a photosite’s number, the brighter its tone.
Armed with the brightness values for each photosite in the image, the camera is ready to build the image’s histogram. The horizontal axis of the histogram has 256 discrete columns (0-255), one for each possible brightness value, with the 0/black column on the far left, and the 255/white column on the far right (they don’t display as individual columns because they’re crammed so close together).
Despite millions of photosites to sample, your camera builds a new histogram for each image instantly, quickly adding each photosite’s brightness value to its corresponding column on the histogram, like stacking poker chips—the more photosites of a particular brightness value, the higher its corresponding column will spike.
Reading a histogram
The version of a picture that displays on your camera’s LCD is great for checking the composition, but the range of tones you can see in your LCD preview image varies with many factors, such as the camera’s LCD brightness setting and the amount of ambient light striking the LCD. Most important, because there’s more information in captured than the LCD preview can show even in the best conditions, you’ll never know how much recoverable data exists in the extreme shadows and highlights by relying on the LCD preview.
It’s human nature to try to expose a scene so the camera’s LCD image looks good, but an extreme dynamic range image that looks good on the LCD will likely have unusable highlights or shadows. As counterintuitive as that feels, exposing an image enough to reveal detail in the darkest shadows brightens the entire scene (not just the shadows), likely pushing the image’s highlights to unrecoverable levels. And making an image dark enough on the LCD to salvage bright highlights darkens the entire scene, all but ensuring that the darkest shadows to be too black. In fact, a properly exposed extreme dynamic range scene (a scene with both bright highlights and dark shadows, such as a sunrise or sunset) will look awful on the LCD (dark shadows and bright highlights). The histogram provides the only reliable representation of the tones you captured (or, in your live-view LCD display or mirrorless electronic viewfinder, of the tones you’re about to capture).
There’s no such thing as a “perfect” histogram shape. Rather, the histogram’s shape is determined by the distribution of light in the scene, while the left/right distribution (whether the graph is skewed to the left or right) is a function of the amount of exposure you’ve chosen to give your image. The histogram graph’s height is irrelevant—information that appears cut off at the top of the histogram just means the graph isn’t tall enough to display all the photosites possessing that tone (or range of tones).
When checking an image’s histogram for exposure, your primary concern should be to ensure that the none of the tone data is cut off on the left (lost shadows) or right (lost highlights). If your histogram appears cut-off on the left side, shadow detail is so dark that it registers as black. Conversely, if your histogram appears cut off on the right side, highlight detail is so bright that it registers as white.
Managing a histogram
In a perfect world, when you see your histogram cut off on the left (everything cut off on the left is detail-less black), you simply increase the exposure until the histogram shifts right (brighter) far enough that no shadow data is cut off. And if you see your histogram is cut off on the right, you decrease the exposure until the histogram shifts left (darker) enough that no highlight detail is cut off. Problem solved.
But many scenes contain a broader range of light, from the darkest shadows to the brightest highlights, than the camera can handle. In these scenes you can blend multiple exposures that cover the entire range of tones, apply a graduated neutral density filter (to moderate the sky). When those options aren’t available or practical, I usually save the highlights and sacrifice the shadows.
While the general goal is to ensure that none of the tone data is cut off on the left or right side of the histogram, the exposure you choose for a scene is ultimately a creative choice that isn’t bound to the way the scene looks to your eye. Though I often expose my scenes to match the amount of light my eyes see, sometimes I decide to make the scene darker or brighter than what I see.
-

- Evenly distributed histogram
-

- Intentionally bright histogram
-
- Intentionally dark histogram
A picture is worth a thousand words
Trusting a histogram over a picture you can actually see requires a leap of faith. I can explain the concept until I’m blue in the face, but in my workshops the point doesn’t usually hit home without a demonstration. For example, the two Horseshoe Bend sunstar images below are from the same file—on the left is the way the picture looked when I captured it, along with its histogram; on the right is the same picture with just a few minutes of very basic processing in Lightroom and Photoshop (no plugins, blending, or any other elaborate processing).
If I’d have exposed this scene bright enough for the shadows to look good on my LCD (more like my eyes saw them), the highlights would have been hopelessly overexposed (white); if I’d have darkened my highlights enough to look good on my LCD, the shadows would have darkened to an unrecoverable black. I knew my best chance for capturing this high dynamic range scene with a single click was to ignore the LCD and trust the histogram.
Despite an image that didn’t look good at all on my LCD, the histogram on my Sony a7R II showed me that I’d captured virtually all of the scene’s shadows and most of its highlights. And because I captured this image in raw mode, I was confident that I had even more shadow and highlight information than my histogram indicated, a fact instantly confirmed with a rightward tug of Lightroom’s Shadows slider. With minimal processing effort, I was able to achieve final result you see here. (This is why landscape photographers are always begging for cameras with more dynamic range, and also why I use the Sony a7RII.)


Workshop Schedule || Purchase Prints
Trusting My Histogram


Mastering the mayhem
Posted on March 31, 2015

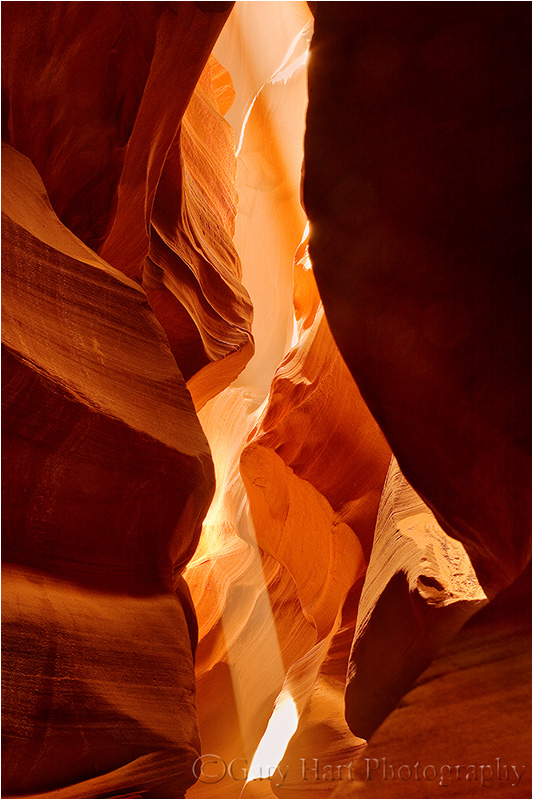
Divine Radiance, Upper Antelope Canyon
Sony a7R
Sony/Zeiss 24-70
1/3 second
F/11
ISO 400
Last week I joined (contributed to) the elbow-to-elbow fray in Upper Antelope Canyon. Helping Don Smith with his Northern Arizona workshop, I’ve done this every year for nearly ten years (I’ve lost exact count). While I never tire of the cathedral-like power of beaming, bouncing sunlight, I find that, like most beautiful, easily accessed locations, it’s difficult to separate Antelope Canyon’s beauty from its mayhem.
Upper Antelope’s mayhem is multiplied by narrow, twisting sandstone walls that contain, reflect, amplify, and spread every sound along the canyon’s entire length, and make it impossible to move without dodging, brushing, or jostling another human. It’s a claustrophobe’s worst nightmare—even people who’ve never experienced claustrophobia find the experience unnerving.
It’s in these environments that I most appreciate the limited perspective of a still camera, its ability to isolate the essence of a scene and separate it from all sensory distractions. As difficult as the Upper Antelope Canyon experience is, I can visit my images later and remember only the best things about being there. Gone is the noise and congestion, tripods and camera flashes, and all the concomitant distraction and anxiety. I’m left with graceful curves in layered sandstone polished smooth by water, wind, and time, and the heavenly glow of reflected sunlight.
About this image
Though the workshop group was ours, Don and I must defer to our Navajo guide when we’re in the canyon, which means we aren’t allowed to teach. Our job is mostly to not get in anyone’s way. While we do monitor the group to make sure no one’s missing an opportunity, much of our time is spent hanging in the back, waiting for the “prime” shots we’ll only get a chance to photograph if there’s time when everyone else is done. This has turned out to be a blessing for me, because it’s forced me to find my own stuff, especially stuff that’s on the walls above everyone’s head, or even straight up, at the ceiling.
The image here is a straight-up ceiling capture found while waiting for the group to finish photographing a shafting ray of sunlight further up the canyon. In the narrow confines of a crowded slot canyon, crouching to see through a viewfinder, or lying down to get beneath the camera, is not practical. It’s in these awkward situations that have given me a real appreciation for the Sony mirrorless bodies’ articulating LCD, which makes photographing these straight-up scenes about as difficult as glancing down at a cell phone.
Another advantage to the straight-up composition is that it has no top, bottom, left, or right. By rotating my camera on the tripod, I was able to turn the overhead opening into a diagonal, which I found more compelling orienting it horizontally or vertically. In fact, when I processed this image I decided to reverse the top and bottom of the image, resulting in an orientation that’s no different than if I’d have rotated my camera 180 degrees at capture (try doing that with conventional, straight-ahead image).
And finally, I just have to say something about the dynamic range of the a7R. The difference between the brightest highlights and darkest shadows in this scene was far beyond what I’d have attempted with my Canon 5D Mark III. And while my histogram told me I’d gotten the full range of tones, I didn’t completely believe it until I actually got it on my computer, pulled down the highlights, pulled up the shadows, and looked closely.
Read my tips for photographing Upper Antelope Canyon
Workshop Schedule || Purchase Prints || Instagram
An Antelope Canyon gallery
Click any image to scroll through the gallery LARGE


“Trophy” shots
Posted on December 18, 2012

Flowers and Red Rocks, Horseshoe Bend, Colorado River, Arizona
* * * *
In my recently completed Hawaii Big Island workshop, the topic of “trophy shots” came up. (My definition of a trophy shot is a prominently displayed photograph of a scene captured previously by someone else.) Often these are “iconic” tourist scenes, places like Tunnel View in Yosemite, Old Faithful in Yellowstone, Delicate Arch in Arches, or Niagara Falls (I could go on). But with the digital-fueled photography renaissance, it seems that the number of trophy destinations has grown proportionally. For example, long an anonymous waterfall on El Capitan’s southeast flank, Horsetail Fall now draws thousands of photographers to Yosemite each February. And if you’ve ever jostled for position in front of Canyonlands’ Mesa Arch at sunrise, or at Antelope Canyon’s dazzling midday heavenly beam (below), you’ve been an active participant in a trophy hunt.
This isn’t an indictment of trophy photography—heaven knows I have my share of trophy-qualifying images. It’s more about me puzzling why so many photographers pursue them with such passion, and display them with such pride. To me the joy of photography isn’t duplicating what others have already done, it’s looking for something new, especially at frequently photographed locations. Of course these famous shots draw many photographers to my workshops, and I do my best to help them bag their trophy. Nevertheless, my challenge to workshop students is always, rather than make the trophy your goal, make it your starting point.
If the standard view is horizontal, look for something vertical; if it’s wide, try a telephoto. Chances are, if this shot is so special, there’s lots of other special views and subjects nearby. Challenge yourself to find a unique foreground, a different angle, or simply turn around and see what’s behind you.
Regrettably, some of my very favorite images, the images that give me the most satisfaction, are met with shrugs, while my trophy shots like Horsetail Fall and Antelope Canyon, compositions that are a dime a dozen, are among my most popular. Sigh. But when I decided to do landscape photography for a living, I started with a personal promise to only photograph what I want to photograph. And frankly, if someone else has done it, I just don’t get that much pleasure from re-doing it. Sometimes I’ll use the trophy compositions to warm up, but it seems the longer I do this, the more inclined I am to simply leave my lens cap on unless I see something I’ve never seen before.
Among the trophy destinations that I frequent each year is Horseshoe Bend near Page, Arizona. On my first visit I got my trophy shot, and on subsequent visits I’ve sometimes tried to upgrade that composition if I think conditions are better than I’ve had before, but with each visit I spend less time repeating previous efforts and more time looking for something new. Which is how I ended up with the image at the top of this post.
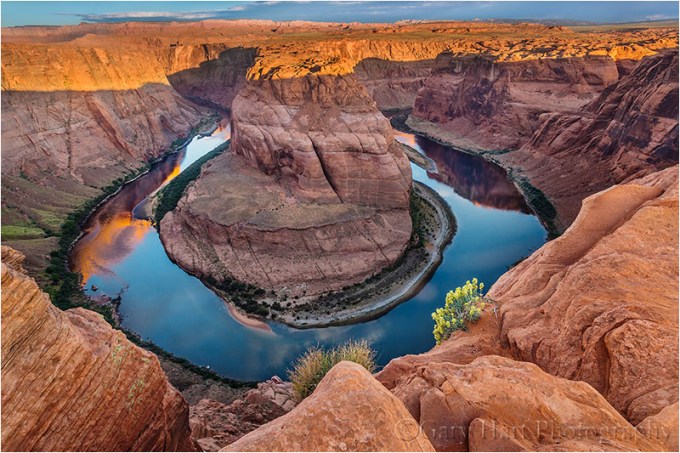
Spring Reflection, Horseshoe Bend, Arizona :: This is my Horseshoe Bend trophy shot. On this spring morning I did my best to use the broken clouds and sunlit cliffs reflecting in the Colorado River, and a solitary clump of wildflowers in the red rocks, to set my version apart from the thousands of similar compositions that preceded me.
Rather than limit myself to the “standard,” sweeping, (breathtaking) full horseshoe (Spring Reflection, above), I looked for something in the foreground to emphasize. I found a little clump of yellow flowers clinging to the cliff, 2,000 vertical feet above the Colorado River. Taking most of the bend out of the frame allowed me to use the foreground rocks to frame the flowers and guide your eye to the clouds building in the distance. Unfortunately (for sales), removing the horseshoe from Horseshoe Bend means this image won’t resonate with nearly as many people, but that’s okay.

Heavenly Beam, Antelope Canyon, Arizona :: Here’s my Antelope Canyon trophy shot. It really is an amazing scene that sells lots of prints, but there’s really nothing in it to set it apart from the thousands of others just like it.
Bathed in Light, Upper Antelope Canyon, Arizona :: While not dramatically different, at least this Antelope Canyon image is my own. I found it by looking up, over the heads of hundreds of other photographers lined up to get their trophy shot.
I’m not trying to portray myself as a creative genius (call me an aspirational creative genius)—I imagine that many of my “unique” images aren’t completely unique. But at least they’re my own (if others preceded me, they did so without my knowledge). We all take pictures for different reasons, and if the trophies give you the most pleasure, go for it. But honestly, does the world need another sunset from Tunnel View (guilty)? Or salmon-catching grizzly from Katmai National Park (not guilty)? If you’re trying to set yourself apart as a photographer (and maybe even make a few dollars doing it), look beyond the trophies to show the world something it hasn’t seen before. I may not be there yet, but that’s what keeps me shooting.

