Eloquent Images by Gary Hart
Insight, information, and inspiration for the inquisitive nature photographer
Beneath the stars
Posted on October 1, 2012

Bristlecone Star Trails, Schulman Grove, White Mountains, California
Canon 1Ds Mark II
36mm
22 minutes
F/4
ISO 200
October 2012
I lead photo workshops in lots of beautiful, exotic places, but I particularly look forward to the Eastern Sierra workshop for the variety we get to photograph. Mt. Whitney and the Alabama Hills, Mono Lake and Yosemite’s Tuolumne Meadows, lots of fall color in the mountains west of Bishop and Lone Pine, and the ancient bristlecones in the White Mountains, east of Bishop.
It’s the opportunities to photograph the mountains surrounding Bishop that most stimulate my creative juices. Each fall the small lakes, sparkling streams, and steep canyons west of Bishop are lined with aspen decked out in their vivid autumn yellow. Contrast that with the arid White Mountains east of Bishop, where virtually nothing thrives except the amazing bristlecone pines. The bristlecones are among the oldest living things on Earth, and they look it. The character they’ve earned by enduring up to 5,000 years of cold, wind, thin air, and water deprivation makes them ideal photographic subjects. There’s wonderful texture in the bristlecone’s twisting trunk and branches, but sometimes I like to turn off the texture with a silhouette that emphasizes the gnarled shape.
The bristlecone here clung to a steep hillside in the Schulman Grove of the Ancient Bristlecone Pine Forest. I was there with three friends on a moonless, late September night in 2007. They wanted to light-paint the tree, but I wanted something that just emphasized the tree’s shape against the stars. With our shots set up, I delayed my exposure for a few seconds while they hit the tree with a bright flashlight, clicking as soon the world went dark. Then we just sat and waited in the chilly air, enjoying the sky, laughing quite a bit, but sometimes just appreciating a silence that’s impossible to duplicate anywhere in our “normal” (flatland) lives.
As we waited we scanned the sky, thick with stars, for a rogue airplane that might threaten to soil our frames. Only one appeared, and when it did I held my hat in front of my lens, holding it there for about fifteen seconds, until the plane moved on. (If you look closely you can actually see a small gap in the same place on the otherwise continuous star trails.)
We had long exposure noise reduction turned on, so we couldn’t see our results until our cameras finished their processing. The pictures didn’t pop up on to our LCDs until we were halfway back to Bishop, but I was driving and had to wait until we got back to town. We pulled into Bishop, tired and hungry, so late that we had a hard time finding anything open, but everyone was so pleased with their images that even Denny’s tasted good.
An Eastern Sierra Gallery
(Click an image for a closer look, and to enjoy the slide show)


Glow in the dark
Posted on September 25, 2012

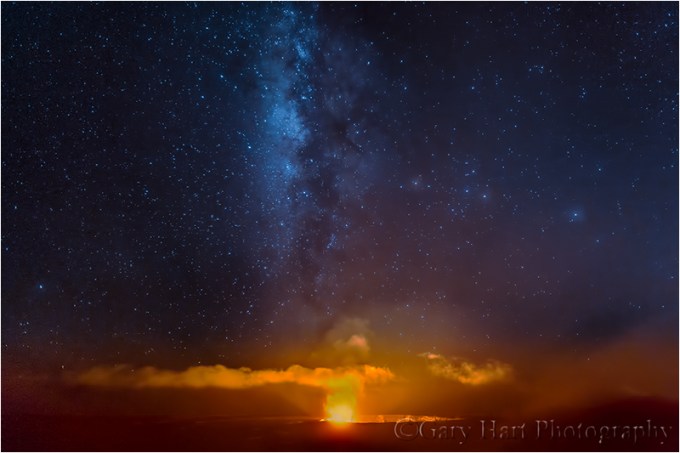
Kilauea Caldera, Hawaii
* * * *
An unfortunate reality of photographing the things I photograph, at the times I photograph them, is the doubt the results foster—“Is that real?” Sigh. That skepticism is compounded by the (understandable) ignorance of people who expect cameras to duplicate human reality, a fallacy no doubt perpetuated by photographers who proclaim each image to be, “Exactly the way the way my eyes saw it.” And then there are those unscrupulous photographers who alter images for personal or financial gain by adding or moving objects (the moon seems to be a popular subject), cranking up the color, and embellishing the hardship the capture required. It’s no wonder people don’t know what to believe.
So let’s take a look at this night shot of the Kilauea Caldera, captured during my recent Hawaii Big Island photo workshop. Is this the way I saw it? Absolutely not. First, my experience was three dimensional. It included wind motion in the caldera’s vapor plume, a dome of sky saturated with thousands of stars, the Milky Way stretching from horizon to horizon, and clouds wafting in and out, intermittently revealing and obscuring parts of the sky. The magic I experienced was far beyond my camera’s capability.
But my camera has reality of its own, and its own magic. By increasing my ISO (the sensor’s sensitivity to light), aperture (the size of the opening that allows light to reach the sensor), and exposure time, I was able to capture more light in one frame than my eyes could see at any instant. All this additional light on my sensor gave me a section of sky containing even more stars than my eyes saw, and clouds fully illuminated by the volcano’s glow.
This particular image was captured on the second of three nights on the rim. My first workshop group nailed it on the first attempt (see my September 9 post), but the second group’s first attempt was largely thwarted by the large cloud you see in this image. Nevertheless, as you can see, we had a small window of opportunity on this night as well, so while the group wrestled with their camera’s and tripods in the dark, I took a test exposure and gave everyone exposure values. As I moved around making sure they all had their settings dialed in and focus set, it was a blast listening to the gasps up and down the rim when the first image popped on each person’s LCD. But once that cloud settled in, the show was pretty much over. After waiting nearly two hours for more sky we packed it in, but by then everyone was hooked, so we returned a couple of nights later to smashing success.
The processing for this image was minimal. In fact, what you see here is pretty much we all saw on our LCDs, with mostly minor tweaks. In Lightroom I brushed a little color temperature reduction to cool the sky, made some slight exposure adjustments, and bumped the clarity to help the stars stand out. In Photoshop I did moderate noise reduction with Topaz DeNoise (love the high ISO performance of my new 5D III) and dodged the underside of the trailing vapor plume a little. And so intense was the color in the clouds that I desaturated the red channel somewhat. None of these adjustments were major, and in fact I was already mostly satisfied with the raw image and Adobe Standard processing (my Lightroom default) that I started with.
The one significant adjustment I did make in Photoshop was to fix the blown highlights at the caldera’s core, at the very center of the fire where it burned hottest, an area the width of the fire in length and about 2/3 of that width high (about 3/4 of the bright area you see beneath the smoke). That core area, while yellow to my eyes, was hopelessly blown (no color or detail) by the extreme exposure the rest of the scene required. To fix it I used Photoshop’s Eyedropper tool to select the yellow just beneath the cooler orange, and the Paint Bucket tool at about 20 percent opacity to replace the pure white with (very) pale yellow.
The objective of any art form is not to show us exactly what we can all see with our own eyes, but rather to expand our perception of reality and and help us see the world differently. While this is not they way my eyes saw it, it is the way my camera saw it (with the one exception noted above). As with a moonbow that’s not visible to the naked eye, streaking stars or blurred water recorded with a long exposure, and the enhanced contrast and shape of a black-and-white image, the camera gives us fresh insights into the natural world. That’s why I choose not to lament perceived “limitations” such as my camera’s inability to capture the range of light my eyes see, preferring instead to celebrate its ability to reveal things my eyes can’t see—in this case faint stars and the fiery, natural light illuminating the clouds and Kilauea’s plume. Nothing can compete with the experience of being there, but I’m thrilled to have images to remind me of that experience, and to show me what my eyes missed.
* * * *
Join me next September as I try to duplicate this shot in my Hawaii Big Island Volcanoes and Waterfalls photo workshop, September 2-6, 2013.
And now for something completely different…
Posted on September 17, 2012

Raindrops on Orchid, Lava Tree State Park, Hawaii
Canon EOS-5D Mark III
100 mm
1/50 second
F/16
ISO 800
I can’t photograph much farther from my subject than I did on the Milky Way image in my last post. And I can’t photograph much closer to my subject than I did these raindrops on an orchid in Lava Tree State Park on the Big Island of Hawaii.
Early in the week I took my workshop group to Lava Tree State Park after our sunrise shoot on the Puna coast. We didn’t have great light (too much sun), but everyone liked the location so much that I tried to figure out a way to get them back. When we finally made it on our final morning it was raining quite hard when we pulled into the parking lot. No problem: rain showers in Hawaii tend to fall straight down, so it’s simply a matter of keeping an umbrella over the camera to take advantage of the perfect light.
Lava Tree State Park is a lush, quiet 3/4 mile walk with a variety of exotic subjects along the entire loop. With a few other workshop participants I beelined past huge ferns, ghostlike lava-encrusted trees, and a host of colorful flowers to a field of wild orchids at the back of the park. By the time I arrived the rain had stopped, but not before decorating the entire landscape with sparkling jewels of water.
After two weeks on the Big Island, I had a great variety wide landscapes, so I was really looking forward to taking advantage of another of the Big Island’s great macro opportunities. I wandered a bit until I found this lone, bejeweled orchid, drooping beneath the raindrops’ weight. Positioning myself with the orchid juxtaposed against a wall of shaded ferns, I went to work.
Figuring if I’m going to go macro, I might as well go nuclear, I twisted on my 100 mm and all three extension tubes. My macro is a pretty fast 2.8, but adding 72 mm of extension really cut the light—I knew I’d need to bump my ISO. Nevertheless, the wind was light to non-existent, and I had no qualms about bumping the ISO on my 5DIII to whatever I felt was necessary.
For me the world looks a lot different through a macro lens, particularly when extension tubes shrink it even further. And every image is a process of capture, refine, capture, refine—this is particularly true of macro photography, when even the slightest shift of composition, focal length, or focus can completely change an image—so it was a few minutes before I landed on this little scene. But when I did, I knew I had what I wanted and worked it to within an inch of its life. For about forty-five minutes I clicked variations of this basic theme: a little wider, a little tighter, slightly different perspective, and a variety of f-stops and focus points. I usually limit my depth of field in my macro images to blur the subject’s inessential (less compelling) elements, but it this case I liked the way both the drops and the micro-reflection they contained were sharp at f16.
I’m still in Hawaii, and as with the Milky Way caldera image, working without a mouse on my thirteen inch laptop, so I have no idea whether I’ve chosen the best version of this shot. But since I’m pretty happy with it, and it required virtually no processing, here it is.
Join me for a Hawaii photo workshop
A close-up gallery


Wow, wow, wow…
Posted on September 7, 2012

Fire on High, Kilauea and Milky Way, Hawaii
Canon EOS-5D Mark III
15 seconds
F/2.0
ISO 3200
28 mm
In a life filled with special moments, a few in particular stand out for me. Near the top of that list would be my annual trip to Hawaii and more specifically, the opportunity to photograph the Milky Way above an active volcano. I do this enough that it’s no longer novel for me, but it’s always special, and each time I get vicarious joy seeing my group’s reaction. And no Kilauea shoot was more joyful than this night.
After photographing a nice sunset at the caldera, my workshop group hightailed it to the Kilauea Lodge in nearby Volcano for dinner and to wait for total darkness. The sky was mostly cloudy when we went inside, but I’ve done this enough now to know that the clouds surrounding Kilauea often clear once the sun goes down. Stepping outside after dinner, we were thrilled to see that the clouds had indeed departed, exposing a sky that some in the group said was filled with more stars than they’d ever seen. (Camera or not, I encourage each of you to get away from town late on a moonless night and spend some quality time with the sky.)
We started our night shoot at the Jaggar Museum overlook, which offers the closest view of the caldera. I got the group set up with their exposures and focus and we stayed until I knew everyone had at least one successful image. Its proximity to the caldera makes the Jaggar overlook the most crowded place to view Kilauea, so I quickly hustled the group to another spot a little farther back along the rim where I knew we could align the Milky Way with the glowing caldera. By that time a few clouds had started to move back in, but I reassured everyone that some clouds would add some character to the sky and reflect the color from the volcano. Little did we know….
Our second vantage point was completely empty, and the clouds couldn’t have been more perfect if I’d have commissioned them myself. For at least thirty minutes we photographed a jigsaw of cloud fragments drifting over the volcano, glowing like embers with the light of the churning lava but parting just enough to reveal the stars behind and frame the Milky Way.
Waiting fifteen to thirty seconds for an exposure to complete leaves lots of vacant time, which we managed to fill quite easily with laughter. Despite the hilarity, everyone managed to keep shooting until the cloud pieces assembled and the Milky Way rotated away from the volcano’s glow. But not before everyone in the group had an assortment of images like this (and memories to match). Besides the amazing images, I think my greatest pleasure came from the spontaneous exclamations of joy (“Oh my God!”, “Wow! Wow! Wow!”) I heard from each workshop student when the first image popped up on their LCD.
And for those dubious minds who don’t believe this image is “real,” I can assure you that this is pretty much the way the scene appeared on everyone’s LCD (and I have a dozen witnesses with their own images to prove it). To our eyes the scene was darker, not nearly bright enough for our eyes to discern this much color in the clouds (but no less beautiful). But boosting exposure to bring out more stars in the Milky Way had the added benefit of enhancing the caldera’s glow reflected by the clouds.
Join me on the Big Island each September as I help my workshop group duplicate this amazing shot
A Big Island Gallery
Click an image for a closer look and slide show. Refresh the window to reorder the display.


")


Heaven on Earth
Posted on September 4, 2012

Heaven on Earth, Lipan Point, Grand Canyon
* * * *
Let’s see, this day included an eight hour drive, a torrential downpour, lightning, and a rainbow, all sandwiched between breakfast in Barstow and this sunset. Just another day at the office….
Top to bottom landscapes
Many people spend a tremendous about of time pursuing beautiful images with little or no regard for the half of the scene. They end up with a beautiful scene beneath a bland sky, or a tremendous sky above whatever happens to be in front of them. Combining foreground and sky takes a little bit of preparation, a little bit of good fortune, and a fair degree of sacrifice.
But when sky and foreground do come together, your ability to share the beauty starts with appreciating it personally. Don’t get so caught up in photography that you neglect to take a deep breath and take in what you’re witnessing. Now, with the proper sense of awe in place, it’s time to figure out how to do the moment justice.
Did you Photoshop that?
I find that images from the most special moments are those that engender the most skepticism, that generate the looks, comments, and queries that really all ask the same question: “Did you Photoshop that?” Of course the obvious answer is, “Of course I Photoshopped it.” Photoshop is to digital photography as thunder is to lightning. But since the people asking this question have identified themselves as the people most likely not to understand that there hasn’t been an image captured in the history of photography that wasn’t subjected to processing of one form or another (many actually believe that a jpeg is an unprocessed image), acknowledging any processing at all usually just evokes a condescending (albeit ignorant) nod that says, “I knew it.” These skeptics’ real concern is that I’ve somehow deceived them, and to that I can plead emphatically, with a clear conscience, not guilty.
We all have our own rules for what is and isn’t an appropriate way to handle an image. And regrettably, there are photographers who have no qualms about deceptive processing. But there are many less justified reasons for skeptical scrutiny of dramatic images. One is that that many people simply forget how vivid color is in nature. Also, because the best conditions for photography are usually the worst conditions for being outside, relatively few people actually see the world at its most beautiful. And finally, many people (photographers included) hold a photograph to an impossible standard: to reproduce the world exactly as they experience it. Dynamic range, range of focus, motion, a scene’s depth and boundaries are all different to a camera than they are to you and me. Understanding and using these differences is the key to transcendent photography.
My personal standard is to remain true to my camera’s reality and to apply my creativity in my camera and not my computer. While I refuse to add things that weren’t present at capture (this doesn’t make me unique), I nevertheless love the control Photoshop gives me, control that I never had in my 25+ years of shooting color transparencies. Much as black and white photographers have done for years, I can now photograph a difficult scene, one that would have been impossible in my film days), in a way that anticipates the processing necessary to reproduce it. And even though I can’t see it in the small jpeg reproduction on my LCD, I know when my raw file contains everything I need to complete my vision, just waiting for Photoshop to finesse it out. Ansel Adams labeled this capture-to-print approach “visualization”; it was the cornerstone of his success.
For example: capture
When the setting sun fanned crepuscular rays that bathed the Grand Canyon in golden light, my first thought was that nobody will believe this. Sigh. But my more immediate concern was how to deal with the extreme difference between the brilliant sky and shadowed canyon (dynamic range). I knew that without assistance I’d have to choose between capturing the canyon’s layered detail beneath a white sky, or the sky’s rich color above a black canyon. Since I (stubbornly) refuse to use HDR (high dynamic range blending of multiple images), that left my graduated neutral density filters as the best option for neutralizing the scene’s extreme dynamic range.
The biggest problem with a GND is hiding the transition between the dark and light halves of the filter, but locations like the Grand Canyon, with its straight horizon lines, are ideal for GNDs. In this case I started with my 3-stop reverse GND and checked the exposure. Not enough. I added a 2-stop hard-transition GND and checked again, confirming that 5 stops of ND did indeed subdue the brilliant sunlight enough to capture its warm color while allowing a foreground exposure that revealed canyon detail. Unfortunately, this recipe rendered the clouds from dark gray to nearly black. Nevertheless, the histogram showed enough shadow detail that I was confident I’d be able to rescue the clouds in processing.
For example: processing
The difficult light and use of 5-stops of neutral density required far more processing than typical for me. I started with basic Lightroom processing of the raw file, tweaking the color temperature (warming slightly), adding a light touch of vibrance and clarity, and applying a little noise reduction and the standard lens correction. Then it was on to Photoshop, where I found the processing for the foreground remarkably simple—pretty much adding a little contrast and slightly dodging some of the darker shadows.
The sky was a different story, demanding probably 90 percent of this image’s processing. While I was able to bring up the exposure in the clouds, this introduced lots of noise. In general clouds lack fine detail and can stand quite a bit of noise reduction, and that was (fortunately) the case here. Not wanting to touch the canyon half of the frame, I created a layer for the clouds and applied a heavy dose of Topaz Denoise. This left the clouds a little more homogenized that I like, but it’s nothing I can’t live with.
With the noise out of the way, I went to work with my dodge/burn brush, working carefully (painstakingly?) to smooth out any evidence of GND use, and also to fine tune the clouds. I referred to the original, unprocessed raw file with the exposure cranked way up (to make the differences more obvious), doing my best to brush in the actual relative lightness/darkness of the numerous cloud layers.
Finally I went after the color, which, while not enhanced, was to me was too intense in its unprocessed state to make a credible image. (Sadly, I’m rarely present to defend nature’s color to dubious viewers). So I created several layers to desaturate and lighten the blue sky and gold sunlight. I also removed a slight blue cast from the canyon’s shadows.
The finished product is an image that pleases me greatly. While it lacks the depth and dynamic range of being there, it does convey to me the majesty of this moment that ended a memorable day, when the sky opened and heaven poured through.
Riding the celestial carousel
Posted on August 28, 2012

Star Trails, Desert View, Grand Canyon
Canon EOS-5D Mark III
28 mm
31 minutes
F/4
ISO 400
It’s pretty difficult to feel important while reclined beneath an infinite ocean of stars, peering into the depths of the Grand Canyon. Below you unfolds a cross-section of Earth’s last two billion years, chronological layers of landscape sliced by gravity’s inexorable tug on the Colorado River; overhead is a snapshot of the galaxy’s (perceived) pinwheel about the axis of our planet’s rotation.
From our narrow perspective, at any given time, the Universe appears fixed. But observe the night sky for a few hours and you soon realize more is at play. Those points of light overhead all follow the same east to west arc across the celestial sphere, ultimately disappearing beneath the horizon (or behind the glow of daylight). Most return to the same place twenty-four hours later, but a few shift relative to the stellar background. For millennia explaining these wanderers while maintaining our position at the center of the Universe required convoluted solutions that defied scientific scrutiny. Then Copernicus, in one elegantly simple paradigm shift, removed Earth from the center of the universe and set us spinning about the Sun, pouring the foundation for humankind’s understanding of our place in the Universe. The humbling truth is that we inhabit a small planet, orbiting an ordinary star, on the outskirts of an average galaxy.
Thanks to Copernicus, Galileo, and others who followed, we now take for granted that Earth revolves about the sun, secured by gravity’s invisible string. And while it appears that our star-scape spins above our heads, it’s actually you and me and our seven billion Earth-bound neighbors who are spinning. (It helps to imagine Earth skewered through our north and south poles and spinning around a pole of infinite length.)
For those of us in the Northern Hemisphere, the centerpiece of this nightly show is the North Star—Polaris. Conveniently (and coincidentally) positioned less than one degree from the northern axis of our spin, Polaris is a white-hot ball of ionized gas six times the size of our Sun. (It’s so distant that when the light we see tonight left Polaris’ surface, Copernicus was less than a generation dead and Galileo was a teenager.)
Locked into our terrestrial frame of reference, distracted by the problems of life, we stay generally oblivious to the celestial dance overhead. But I can think of no better way to get some perspective on our place in the universe than to look up on a moonless night, far from city lights. On these nights our planet’s rotation, too slow to be perceived at any given instant, is captured beautifully by a fixed, Earth-bound camera that rotates with us, blending multiple, sequential instants into a single frame. This long exposure stretches each star, a discrete point to our eye, into continuous arc of light, the length of which is determined by the duration of the shutter’s opening—one degree of arc for every four minutes of exposure.
From our perspective the northern sky appears to circle the north celestial pole (occupied by Polaris). Images that include celestial north are etched with concentric arcs—if there were some way to continue the exposure for twenty-four hours (say in the dead of winter at the North Pole), our image would show Polaris like a brilliant gem ringed by full, perfectly symmetrical circles. To a camera centered on the celestial equator (the halfway point between the north and south axes of rotation), a long exposure reveals divergent arc, with the stars north of the celestial equator bending around the north celestial pole and stars south of the celestial equator bending the other direction, around the south celestial pole.
A few words about this image
The above image was captured during my 2012 monsoon trip to the Grand Canyon. Don Smith and I had spent the day chasing (and dodging) lightning, but because we didn’t feel we’d taken enough risks, we thought it might be a good idea to stumble about with the mountain lions, in pitch dark, on the rim of a one mile deep chasm.
While photographing late afternoon and sunset from Desert View, we scouted potential starlight locations in daylight, and returned to the car to eat sandwiches and wait for darkness. And dark it was. Dark enough that I couldn’t really see the canyon’s edge, which was about two feet from my tripod.
Also dark enough that focus was a real challenge. Using my fastest lens, a 28mm Zeiss f2, I found the brightest star and centered it in my viewfinder, then switched to live-view, magnified the view 10 times, and manually focused on the star, which was faintly visible near the center of my LCD. (My Zeiss doesn’t have autofocus—if you try this with an autofocus lens, don’t forget to switch it to manual focus before shooting.)
With focus set, I tried some test frames to get the exposure and composition. It was too dark to compose the canyon through my viewfinder, so I bumped my ISO to 24600 and took a series of wide open (f2), 30-second exposures, tweaking the composition after each until I got it right. Knowing that increasing my exposure duration from 30-seconds to 30-minutes would add six stops of light, I subtracted six ISO stops (25600 to 400). (I’m still learning this lens’s capabilities—next time I’ll stay at f2 and go all the way down to ISO 100 for a 30-minute exposure.)
Waiting for our exposures to complete, Don and I just kicked back and admired the night sky. We saw several meteors cut the black, and several satellites drift by. The city of Page, sixty-five miles north, was a faint glow to our eyes (but much brighter to the camera). Sporadic lightning flashes illuminated clouds to the northwest, well beyond the North Rim and probably as far away as Utah. And the Milky Way, the community of billions of gravitationally connected stars to which our Sun belongs, spread from horizon to horizon.
Read more about after dark photography
Workshop Schedule || Purchase Prints
An After Dark Gallery
Click an image for a closer look, and a slide show. Refresh the screen to reorder the display.


")


More Grand Canyon lightning (no photographers were harmed in the making of this image)
Posted on August 20, 2012

Lightning Strikes Angel’s Gate, Bright Angel Point, Grand Canyon North Rim
* * * *
The bolt was so close that I saw its jagged collision in my rearview mirror, its deafening crack shaking the car less than a second later—three hundred yards, max. “Holy crap!” was our simultaneous (eloquent) response.
Don Smith and I had just negotiated fifteen minutes of natural pyrotechnics unprecedented in our benign, California-sky lifetimes. Obliterating our windshield, flooding the highway, firing warning shots on both sides of the car, Mother Nature was clearly angry at our trespass. This parting shot came just after the rain had eased from opaque sheets to large, individual pellets and we’d started to relax. To these two Californians, rain is a background phenomenon, faint static on the roof and hissing tires on wet blacktop. Earthquakes, which announce their arrival with a rumble and roll that builds slowly enough to allow quick retreat beneath a desk or door jam, are bland compared to the these random explosions that have done their damage and vanished before your brain can register what just happened.
We were in the final miles of a morning’s journey from the Grand Canyon’s popular South Rim to its more isolated North Rim. Safely stashed in the back of the car was the week’s bounty: memory cards, laptops, and backup drives brimming with the Grand Canyon monsoon images we’d come to photograph, including our holy grail, a dozen or so daylight lightning frames apiece. This four-hour detour to the North Rim was a last minute decision with no expectations—whatever we got here would be gravy.
A few minutes later we rolled into the North Rim parking area still buzzing with adrenaline. The thunderstorm we’d just survived had given way to blue skies, so we decided to leave the camera gear in the car and explore. While the lightning was gone, the storm’s rumbling vestiges reminded us not to get too comfortable.
After a quick peek into the Visitor Center to orient ourselves, we headed down to the Grand Canyon Lodge. The cornerstone feature of the lodge, which is perched precariously on the canyon’s north rim, is a large picture window overlooking an expansive deck with an IMAX view across the canyon to the South Rim, ten miles away.
Descending the stairs to the viewing area, we saw people lined up at the window, and stacked two-deep on the deck beyond, all gazing toward the South Rim. It didn’t take long to realize that what had everyone’s attention was a light show dancing across the rim’s entire length. While Don and I had spent the week photographing isolated lightning bolts separated by at least ten minutes, this storm was firing several times per minute. Time to get back to work.
In the short time since our arrival more clouds had organized overhead and Don and I found ourselves dodging juicy raindrops as we hustled back to the car. In less than ten minutes we were tiptoeing back out onto the rim, cameras and tripods in hand. Is this safe? Not only was the storm we were trying to photograph no more than eight miles distant, it was clearly advancing. And there seemed to be other strikes landing much closer somewhere behind us.
Atop a particularly exposed outcrop (with an awesome view!) just below the lodge, I tried to rationalize away all the lightning admonitions I’d read: “Avoid exposed, elevated areas”; “The next bolt can strike ten miles from its last strike”; “If you hear thunder, you’re too close”; “If you see it, flee it”; “If you hear it, clear it”; and so on. At first we set up our cameras as quickly as possible and rushed to (assumed) relative safety beneath a more sheltered ridge while our lightning triggers did the work. But soon, emboldened by the observation that other (presumably lightning-savvy) gawkers were unfazed by the storm’s proximity, we decided to remain with the cameras.
The show lasted about ninety minutes, though the lightning frequency dropped a bit after an hour or so. For variety we’d stay fifteen or twenty minutes at one spot, then move on to a different perspective, eventually making our way all the way out to Bright Angel Point, an elevated knife of limestone sediment protruding a hundred yards or so into the canyon. (In case Bright Angel Point’s elevation and isolation get didn’t get Mother Nature’s attention, the National Park Service has rimmed it with with an iron railing.) And there I stood, as happy as if I had a brain, until the show wrapped up and we went off in search of a sunset location before starting the long drive home.
The above image, taken from the trail to Bright Angel Point, came about twenty minutes into the shoot. The primary bolt is striking Angel’s Gate, about 7 1/2 miles from where I stood. That sounds like a pretty safe distance until you realize that the second fork of this bolt is striking the South Rim near Grandview, also about 7 1/2 miles from Angel’s Gate. The closest strike I recorded that afternoon was about 2 1/2 miles away. I’m sure those with more lightning experience than I will scoff at my hand wringing, and can no doubt share many harrowing tales of far closer encounters, but you gotta walk before you run (and I reserve the right to chuckle as I unpeel them from beneath their desk when that 5.0 tremor strikes.)
For those keeping score at home, here’s the final tally: Gary 51 (bolts), Lightning 0 (photographers).
The Grand Canyon, lightning, and lots (!) of people
Posted on August 17, 2012

Lightning Strike, Zoroaster Temple and Brahma Temple, Grand Canyon
Canon EOS 5D Mark III
1/15 second
Canon 24 – 105 f/4 L
ISO 50
F16
The thunderheads started blooming at around 11:00 a.m; by noon they were delivering rain and lightning at widely dispersed locations around the rim. It was Grand Canyon day two, the first full day of last week’s monsoon visit with Don Smith. Seeing black clouds to the east, we drove out to Lipan Point, but after an hour or so of nothing much, decided to shake things up and brave the crowds near Ground Zero for Grand Canyon tourist activity, Mather Point.
At Mather, Don and I split immediately—Don headed a little east toward an outcrop away from the crowds; having seen a couple of strikes already, I didn’t feel like exploring and headed to familiar territory right in the teeth of the tourists.
Sharing popular vistas with tourists can be trying, but it’s also lots of fun if I remember that my priorities are different from everyone else’s, and that my desire to get a good photograph in no way entitles me to special consideration. Additionally, because carrying a tripod labels me Photographer, I represent not just myself, but the entire community of photographers. In other words, in the minds of others, if I’m a jerk, it’s not just me who’s a jerk, it’s all photographers. If someone walks through (or stands in) my frame, I wait; if someone kicks my tripod, I simply smile and recheck my composition; if someone asks me questions (“Is that a real camera?”; “Are you a photographer?”; “What’s the best camera?”), I answer politely. And I’m always happy to snap pictures of the family, no matter how many cameras they hand me.
Because an extended tripod can occupy more space than I’m entitled to, and can be a real safety hazard for people gazing out rather than watching their step, I try to plant myself in as unobtrusive a location as possible. At the Grand Canyon, where everyone lines the rail, this isn’t always easy. In these situations I try to identify the ideal spot, then stand back and wait for the current occupant to move—fortunately, gawkers rarely stay long. Once at the rail, I put one or two tripod legs over or through the rail to minimize my footprint on the traffic side.
At the Grand Canyon in particular, where foot traffic seems to flow constantly, I avoid moving around much once I’m set up. This isn’t ideal for someone as concerned about foreground/background relationships as I am, but if I make the right choice to start, I can usually stay happy in one spot for twenty or thirty minutes by simply altering my focal length and orientation.
On this afternoon it wasn’t long before I was set up in a spot that made me happy. Having succeeded capturing lightning with a wide composition the prior day, I tried tighter compositions here at Mather. To maximize my odds for success with each composition, I stuck with a composition for two or three bolts (or until it was clear that nothing more was happening in that part of the sky), at least fifteen minutes in most cases. While waiting I’d just stand back, away from the rail, alternating my view between the target rain cell and the steady stream of tourists. With each bolt I’d quickly check the red light on the back of my camera to confirm that the shutter fired. After forty or fifty minutes in a spot, I’d shift to a different location.
Being fairly tight with the composition, I know I missed a few strikes just outside my frame. Of the four hits I got that day, the one at the top of this post was the best combination of position in the frame and brightness (I cropped it a little in Photoshop to tighten further). In a perfect world I’d have gotten a bolt striking either Brahma Temple (in the back), or Zoroaster Temple (the shorter tower just in front of Brahma), but I was pretty happy to get this one landing right behind Brahma, about six miles away.
In addition to all the quality time absorbing the Grand Canyon’s majesty and the novelty of an electrical storm to my California eyes, I had a blast meeting and talking with people. Lots and lots of people. Between flashes I answered many, many questions: “What are you waiting for?” (“Lightning.”); “What’s that thing on top of your camera?” (“It’s a lightning trigger.”); and, “How does it work?” (“It detects lightning and fires the shutter much faster than I can.”) These questions often led to great conversations with visitors from all over the world, many of whom stood and rooted for lightning right along with me. All in all, a really nice day.
(For a more technical discussion of lightning photography, click here.)
Workshop Schedule || Purchase Prints || Instagram
Lots of Lightning
Click any image to scroll through the gallery LARGE


Striking lightning (before it strikes you)
Posted on August 15, 2012

Lightning Strike Above the Colorado River, Lipan Point, Grand Canyon
Canon EOS-5D Mark III
32 mm
1/20 second
F/16
ISO 100
Let’s start with the given that lightning is dangerous, and the distinct possibility that photographers are stupid. Combining the two is a recipe for disaster. Add a shear, one-mile deep canyon with lots of exposed outcrops and…, well, you get the idea.
Okay, seriously, lightning is both dangerous and unpredictable. Before attempting anything that requires you to be outside during an electrical storm, it behooves you to do your homework: the more you understand lightning, and how to stay safe in its midst, the greater your odds of enjoying the fruits of any attempt to photograph it. Not only will understanding lightning improve your safety, it will also help you anticipate and capture lightning.
The shocking truth about lightning
Lightning is an electrostatic discharge that equalizes the negative/positive polarization between two objects. (When you get shocked touching a doorknob, you’ve been struck by lightning.) The cause of polarization during electrical storms isn’t completely understood, but it’s generally accepted that the key factor is the extreme vertical convective air motion within a thunderstorm (convection is up/down circular flow caused when less-dense warm air rises, becomes more dense as it cools, and falls; convection is also what causes the rising bubbles in boiling water). Convection carries positively charged molecules upward and negatively charged molecules downward. Because opposite charges attract each other, the extreme polarization (positive charge at the top of the cloud, negative charge near the ground) is quickly (and violently) equalized: lightning.
With lightning comes thunder, the sound of air expanding rapidly (exploding) when heated by a 50,000 degree by lightning bolt. The lightning that caused the thunder travels to you at the speed of light, over 186,000 miles per second (virtually instantaneous regardless of distance). But thunder, traveling at the speed of sound (a little more than 750 miles per hour—a million times slower than light), takes its time. Knowing that the thunder occurred with the lightning flash, and how fast it travels, we can compute the approximate distance of the lightning strike. At 750 miles per hour, thunder will travel a mile in about five seconds. Dividing the time between the lightning’s flash and the thunder’s crash by five gives you the lightning’s distance in miles; divide the interval by three for the distance in kilometers. If five seconds pass between the lightning and the thunder, the lightning struck about one mile away; fifteen seconds elapsed means it’s about three miles away.
Lightning safety
The 30 people killed by lightning in the United States each year had one thing in common: each didn’t believe he or she would be struck by lightning when they started whatever it was they were doing when they were struck. The only sure way to be safe in an electrical storm is to be in a fully enclosed structure or metal vehicle, away from open windows, plumbing, wiring, and electronic devices.
Unfortunately, photographing lightning requires being outside. While there’s no completely safe way to photograph lightning, it doesn’t hurt to improve your odds of surviving to enjoy the fruits of your labor. Most lightning strikes within a six mile radius of the previous strike. So, if less than thirty seconds elapses between the flash and bang, you’re too close. And since “most” doesn’t mean “all,” it’s even better to allow a little margin for error. Thunder isn’t usually audible beyond ten miles—if you can hear the thunder, it’s safe to assume that you’re in lightning range.
But if you absolutely, positively must be outside with the lightning crashing about you, or simply find yourself caught outside with no available shelter, there are few things you can do to reduce the chance you’ll be struck:
- Avoid water
- Avoid high ground
- Avoid exposed areas
- Avoid metal or electronic objects
- Avoid tall objects such as trees and open structures (and tripods)
- Stay at least fifteen feet from other people
- If you’re surrounded by trees, position yourself near shorter trees, as far from trunks as possible
- Crouch with your feet together and your hands covering your ears
- Do not lie down
- A lightning strike is often preceded by static electricity that makes your hair stand on end and an ozone smell (best described as the smell of electricity—I think of bumper cars at the amusement park or the smell of my electric slot cars when I was a kid)—if your hair starts to stand up and/or you notice a distinct odor that could be ozone, follow as many of the above steps as you can, as quickly as possible (often you’ll only have time to crouch)
Photographing daylight lightning with a lightning trigger
Photographing lightning at night is mostly a matter of pointing your camera in the right direction with a multi-second shutter speed and hoping the lightning fires while your shutter’s open—pretty straightforward. Photographing daylight lightning is a little more problematic. Without a lightning trigger to recognize lightning and click your shutter, success is largely dumb luck (few people are quick enough see it and click).
So just what is a lightning trigger? I thought you’d never ask. A lightning trigger is a device that attaches to your camera’s hot shoe and connects via a special cable to the camera’s remote release jack. When engaged, it fires the shutter immediately upon detecting lightning.
There are many lightning triggers from which to choose. I went with the one that was the consensus choice among photographers I know and trust: Lightning Trigger from Stepping Stone Products in Dolores, CO. At slightly less than $400, it’s far from the cheapest option, but from all I’ve read, heard, and now experienced, these aren’t generic products and the internal technology matters a lot. No regrets so far.
I won’t get into lots of specifics about how to set up the trigger because it’s quite simple and covered well in the included documentation. You should know that connecting it does disable the LCD replay, so you won’t be able to review your captures or histogram without disconnecting it (a simple but inconvenient task).
The Lightning Trigger documentation promises at least a 20 mile range, and I saw nothing that caused me to question that. It also says you can expect the trigger to fire at lightning that’s not necessarily in front of you—I can attest to that too. For every click with lightning in my camera’s field of view, I got at least five clicks with no visible lightning. For most of my Grand Canyon trip I was waiting for lightning that appeared in the direction my composition, perhaps 5 to 15 miles distant, about one bolt every 15 or 20 minutes. In other words, these weren’t particularly active storms with multiple flashes per minute. When lightning did fire in my composition, I estimate that the trigger clicked the shutter at least 95 percent of the time (that is, even though I got lots of false positives, the trigger missed very few actual strikes). Of these successful clicks, I actually captured lightning in about 2/3 of the frames. I suspect that the misses were more a function of the lightning itself that a problem with the trigger or camera—some flashes are single strokes that finish far too quickly for capture. In general, the more violent the storm, the greater the likelihood of bolts with long duration, multiple strokes that are easier to capture.
The Lightning Trigger documentation also recommends shutter speeds 1/20 second or longer—faster shutter speeds risk completing the exposure before some or all of the secondary strokes fire. To achieve daylight shutter speeds in the 1/20 to 1/4 second range, I shot in manual mode, using a polarizer, at ISO 50 and f16. The exposure will vary with the amount of light, so your settings will vary. You can also use a neutral density filter to slow the shutter speed.
Because shutter lag (the time elapsed between the click of the shutter button and the shutter opening) is death to lightning photography, you’ll need to turn off autofocus. Even though I use back-button focus, Canon says simply having autofocus on initiates a brief communication between the lens and camera that very slightly delays response (I can’t speak for Nikon). If you must autofocus, go ahead and do it each time you recompose, then turn autofocus off as soon as you’re focused. Similarly, despite what the Lightning Trigger documentation suggested, I used manual exposure mode to eliminate any camera-slowing metering when the shutter trips. And, also despite what the Lightning Trigger documentation suggests, I didn’t worry about my noise reduction settings. Canon assures (again, I can’t speak for Nikon) that noise reduction is a post-capture function that might slightly delay continuous frames, but it won’t increase shutter lag.
Other equipment
In addition to a lightning trigger, you’ll need a solid tripod and, ideally, a camera with a shutter lag faster than 60 milliseconds. Slower shutter lag won’t shut you out completely, but it will reduce your success rate. The Lightning Trigger website has a good, albeit somewhat dated, camera shutter-lag table.
I also recommend (in no particular order):
- Rain gear that will keep you dry from head-to-toe
- An umbrella for shielding your camera and lightning trigger (the trigger is not waterproof) while composing and shooting in the rain
- Lens hoods to reduce the raindrops that might mar the front element of your lenses
- Neutral density filter and/or polarizer to show shutter speed
- A garbage bag (my choice) or rainproof jacket for your camera
- Extra lightning trigger batteries
- An infrared remote to make sure the trigger is functioning (we borrowed the remote from our hotel)
- A towel (also borrowed from the hotel)
Getting the shot
I’m a Californian, which means lightning is a novelty for me. Nevertheless, a few months ago I purchased my Lightning Trigger, which has since been collecting dust. Because the lightning wouldn’t come to me, I decided to go to the lightning—in this case that meant a twelve hour drive to the Grand Canyon, in the heart of monsoon season, with my friend and fellow pro Don Smith.
Our plan was to find a location with an open view of the canyon and that allowed us to set up our cameras within sight of the car (so we could safely wait out the storms). Based on previous visits, we thought Lipan Point would be a good spot and started there, but we hadn’t anticipated the crowds we’d encounter. We also quickly realized that it’s pretty unrealistic to expect to photograph lightning in the midst of the storm—not only is it dangerous, the heavy rain risks damaging equipment, dots lens elements with raindrops, and pretty much obliterates any view. So in very short order we went to Plan B: Wait until the cell passes and photograph more distant storms.
The open views at the Grand Canyon are ideal for this and served us well. Don and I quickly learned that the lightning is most likely to strike within or near the gray curtains that are clearly recognizable as distant rain. The wider the composition, the greater your odds of capturing lightning, but the smaller it will appear in your image. My general approach was to identify the most likely lightning source (rain curtain) and find the best composition that included it. I tended to start wider to ensure success, then tighten my composition once I was fairly confident I had something. I also recommend that you don’t check your captures until you’re done (or better yet, until you upload your images to your computer). Since viewing the LCD requires disconnecting the trigger, doing so risks missing a shot; you’ll also find that many successful captures, especially wide compositions, just aren’t that visible on an LCD viewed in daylight.
Be aware that electrical storms can move quite quickly, so you need to monitor them closely. Sometimes this simply means adjusting your composition to account for shifting lightning; other times it means retreating to the car if the cell starts to threaten your location. Also be aware of the height from which the lightning originates and be sure to include enough cloud to get all of the stroke.
The above image of a single bolt striking the Painted Desert east and north of Desert View, as viewed from Lipan Point, was one of my first captures of the trip. I was composed quite wide to ensure capturing something (because I was so wide, I cropped it a little in Photoshop). Over a one hour period I actually got four strokes in some variation of this composition, but this was by far the brightest.
Helpful links
2012 Grand Canyon Monsoon Mayhem tour
Posted on August 12, 2012

Rainbow, Lipan Point, Grand Canyon
* * * *
The drive from Northern California to the Grand Canyon’s South Rim is about twelve hours. When Don Smith and I scheduled our (first annual) 2012 Grand Canyon Monsoon Mayhem tour, the plan was to leave dark-and-early Monday morning, which experience told us would get us to the canyon just in time to photograph sunset Monday night. But with the National Weather Service forecasting waning monsoon conditions as the week progressed, it looked like Monday afternoon might be the best time to capture our prime goal, lightning. So on Sunday morning we decided to leave that evening, drive as far as we could, then drive the rest of the way Monday. Doing it this way would allow us to arrive by mid-afternoon with a full night’s sleep. Fueled by Starbucks and a steady diet of classic rock, Don and I made it all the way to the acclaimed Route 66 hot-spot, Barstow, California (the gateway to the Mohave Desert).
Monday morning we escaped the desert before the heat kicked in, and by 2 p.m. were rolling up to the Grand Canyon South Rim. After surveying the skies, we pointed the car east, along the rim, toward Lipan Point, a favorite photo spot about forty minutes away. Somewhere near Grandview we encountered a cell that delivered lightning and sheets of rain, a harbinger of what was in store. Though the Grandview cell was behind us, Lipan Point greeted us with looming black clouds that spit occasional raindrops that sounded like ripe grapes striking the roof, a car-rocking wind, and thunder separated from its flash by mere seconds. Hell hadn’t broken loose yet, but it was sure rattling the cage.
We’d counted on a little time to recover from the drive, but there’s nothing like urgency to reveal how unprepared you are. As a Californian (at the sound of thunder, bewildered Californians rush outside), I’d never had an opportunity to use my lightning trigger (an electronic device that detects lightning and fires the shutter in milliseconds); Don had forgotten to pack most of his rain gear. And neither of us had given adequate thought to the impracticality of our plan to avoid electrocution by setting up our expensive tripods and cameras at a popular Grand Canyon vista (in the height of tourist season) while waiting out the danger and discomfort of a thunderstorm in the security of the car. With the storm bearing down on us, what followed was a Keystone Cops swirl of activity—out of driving clothes and into wet-weather gear; extract and attach (and figure out) lightning triggers; find a suitable view comfortably removed from teaming tourists; meter and compose a scene—that culminated in a frantic retreat, sans cameras, when a much-too-close lighting bolt ripped a Niagara-size hole in the sky.
For the next five minutes our cameras couldn’t have gotten more wet if we’d have put them in a shower. Warm and dry in the car, I was suddenly gripped by visions of my wind-tossed camera and tripod plummeting into the Colorado River (5,000 feet below), so when the lightning paused, I mustered the courage rush to the rescue. (I think Don did the same thing, but at that point it was every man for himself.)
As I toweled down my gear back in the car, the wind and rain slowed to a more manageable pace. Unsure of how long our window of lightning opportunity would last, Don and I headed back out, this time in different directions and (somewhat) more prepared. I opted for the best composition that offered the possibility of distant lightning, turning my lens toward a gray curtain of rain a fair distance up the canyon, toward Desert View; Don, who was having technical problems with his lightning trigger, headed a little west and pointed his camera toward a nearby cell that was already flashing behind us.
For the next hour or so I heard my shutter respond to a half-dozen or so bolts in the direction of my composition, a good sign, but since the lightning trigger disables the LCD replay, all I could do was cross my fingers for success. When the electrical activity quieted, Don and I reconnected and traded notes. Though he’d resolved his technical issue (I’ll let him elaborate), he was similarly unsure of his success.
Lightning or not, we agreed that the sky was far better than anything we see in California. As we chatted, the sun appeared and a vivid double rainbow arced above Desert View—back to work. Lightning trigger off, I was happy to be back more familiar territory—trying to work a rainbow into an already magnificent scene without dodging raindrops or lightning bolts.
Because the rainbow touched down south of the rim, finding a composition that featured both the canyon and the rainbow required a wide shot that included close foreground elements. I wasn’t crazy about the shrubs and rocks immediately beneath the rock outcrop I was on, so I stood back from the rim a bit and hid them behind the more interesting texture of my grooved and weathered limestone platform.
For the rainbow’s thirty-minute duration, I moved along the outcrop, capturing about sixty combinations of foreground and sky, horizontal and vertical, wide and tight. I finished with many, many images that make me happy, but chose this one because (right now) I think it offers the most balanced combination of all that made the scene special: the warm light on the Grand Canyon’s south wall, the rainbow (duh), the rugged character of the limestone supporting me, and the saturated, arcing raincloud responsible for the moment.
Epilogue
That great start to our adventure was made even more memorable when Don and I, at the risk of spurring an international incident, selflessly declined the advances of two young German women seeking a bed for the night (seriously).
Viewing on my laptop back at the hotel, I was thrilled to find four frames that included lightning. Given all that was in store the rest of the week, my excitement at four frames now seems a little overdone, as was Don’s frustration that his technical problems resulted in a day-one lightning shutout. By week’s end we each had more than fifty lightning captures, most coming at the North Rim on an action packed final day that shrunk the beauty of this first day to a distant memory. Stay tuned….

