Eloquent Images by Gary Hart
Insight, information, and inspiration for the inquisitive nature photographer
Ten Reasons to Take Up Nature Photography
Posted on January 16, 2025

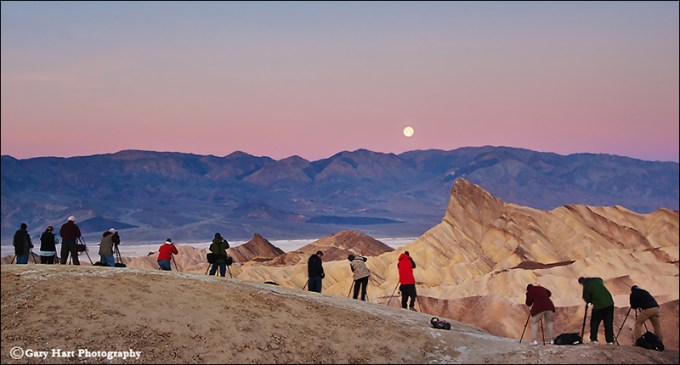
Lunar Peek, Zabriskie Point, Death Valley
Sony a7R V
Sony 24-105 f/4 G
ISO 125
f/11
1/4 second
Recently I was talking to a friend on the cusp of retirement, and while she was looking forward to her impending freedom, she wasn’t sure what she was going to do with all her free time. I instantly blurted, “Nature photography!,” then started listing reasons. I surprised even myself with everything I came up with, and how quickly it came, which got me thinking the subject would make a good blog post. So here are my (very biased) thoughts on why nature/landscape photography makes the ideal pastime. (After reviewing the list, it turns out that most of my points apply to many other kinds of photography as well.)
- Save experiences: Ours is a beautiful, dynamic world. Over my lifetime, I’ve been fortunate to have witnessed Nature at its very best, more times than I can count. Though he’s no longer here to thank, for this I’m most grateful to my father—a serious amateur photographer who wouldn’t dream of traveling without a camera—for modeling the importance of recording these moments. It’s no wonder that, almost as soon as I was old enough to make my own major financial decisions, I purchased a 35mm SLR system of my own—mostly because (thanks to my dad) I thought that’s just what adults do. Thanks to my camera, the knowledge that I can revisit Nature’s ephemeral moments any time I want to is a source of great comfort.
- Share experiences: I think my father got as much pleasure sharing his travel experiences as he did recording them. Back in Dad’s time, most non-professional photographers’ images only reached other eyes when (captive?) visitors were sequestered in front a projection screen in a darkened living room (because there was really only one answer to the dreaded question, “Hey, do you want to see the pictures from our vacation?”). And while I won’t pretend Dad never subjected our visitors to the occasional slide show, as a United Methodist minister, he had a whole congregation filled with potential viewers, not to mention access to a large space ideal for sharing. Given the number of people who attended his shows without being compelled or held hostage, I’d say his images were well received. Today, the thrill of taking pictures that please others is as great as it’s ever been, but the opportunities to share them in our digitally connected world have increased exponentially.
- Low start-up cost: Camera gear can be ridiculously expensive, but it doesn’t need to be. Your smartphone will take surprisingly good pictures—good enough to reap most of the benefits listed here long enough to determine whether a bigger investment is justified. And when you do decide you want more serious dedicated photo gear, you can find quality equipment at pretty much any price point. In other words, expense should not be a reason not to pursue photography.
- Flexible income potential: I encounter many people who would like to make a living with their photography. And while there is still excellent money to be made with a camera, nature photography is not among the more lucrative options—not by a long shot (sorry). Fortunately, earning money with a camera doesn’t require you to quit your day job. You can pursue photography as an avocation, reaping the many personal benefits while dipping your toes into selling images (for publication), prints, and services until it grows into something lucrative. That was my path: More than 20 years ago I started doing weekend art shows while keeping my adult job, then gradually segued into workshops, training, and photography-related writing, until I felt confident pursuing photography as a profession. For a while after going fulltime I continued with the art shows, which were both lucrative and fun, but doing art shows and workshops felt like working two different jobs, and the path to a fulltime income with workshops was much clearer, so I dropped the art shows. On the other hand, I know photographers who earn a good living through art and gallery shows. And today, social media has increased the money-making opportunities far beyond what was available when I started.
- See the world (large): Need an excuse, or maybe just a catalyst, to travel? Try photography. It’s easy to get so locked into a day-to-day comfort zone that our dreams of visiting yearned-for locations are never fulfilled. I’m afraid that would probably describe my life were it not for photography. But, going all the way back to when photography was just a hobby, my camera and I have visited remote corners of the globe, enjoyed river rafting adventures in Grand Canyon, and witnessed more celestial and meteorological sights than I ever imagined possible.
- See the world (small): More than just visiting exotic locations, viewing the world with a photographer’s eye enables me to see beauty everywhere, from the distant horizon to right at my feet. I can say with absolute certainty that my own photographer-eyes have become hyperaware of my surroundings, noticing colors, textures, relationships, and minute detail everywhere—not just when I’m actively taking pictures, but pretty much as long as I’m awake: driving, walking, running, or simply sitting still. Not only that, to this day, the more time I spend taking pictures, the more this heightened vision improves.
- Commune with Nature: For many people, myself included, few things are more soothing than quiet time with Nature. This enhanced relationship with the natural world can be active or passive. When I’m immersed in a natural environment, away from the din of “civilization,” all of my senses intensify and seem to work in synergy, providing peace I don’t feel at any other time. But there’s more—even when I’m stuck inside, my life as a photographer inspires me to pursue deeper understanding of my subjects that helps me appreciate them even more.
- Ideal solitary activity: Are you an introvert who recharges by being alone? Nature photography has you covered. I think most of us have times when we just need to dial down the pressures and sensory dissonance of daily life. I can think of no better way than full immersion in the serene sights and sounds of the natural world, completely absent the need to please, impress, or in any other way interact with the rest of the world. When I’m alone in Nature, time seems to stand still, my senses amplify, and my connection to my surrounding is never stronger.
- Ideal group activity: Are you an extrovert who recharges by being around others? Nature photography has you covered. Some of the most memorable experiences of my photography life were made that way because I was able to share them with other like-minded individuals. The joy of these moments is contagious, at times amplified enough by the presence of others to move me to tears.
- Cultivate your creative and analytical brains: I can think of few endeavors that more perfectly blend the right and left brain than photography. Some photographers are drawn by photography’s creative opportunities to view and express the world; others love the technical aspects of managing exposure and focus with their camera’s many controls. While it’s possible to take pictures with just one side of the brain or the other engaged, most people who take up photography are surprised to learn that there is indeed life on the other side of the brain.
About this image
Lunar Peek, Zabriskie Point, Death Valley
The Zabriskie Point moonset is always a highlight of my Death Valley Winter Moon photo workshop. Often we get no clouds, making this sunrise moonset a no-stress event for me. This time (January 2024), when clouds threatened to wash out the shoot entirely, was not one of those events.
The moon was visible above the clouds when we arrived, but the sky was much too dark to capture lunar and foreground detail with one click (my personal requirement). When the moon dropped into the clouds and disappeared completely, I tried to rationalize that at least we’d have nice clouds for our moonless sunrise, but I used all the positive energy I could muster to will the clouds into parting.
Though it lasted for only a couple of minutes, the moon did indeed slip into a small opening long enough for everyone in the group to get a few frames before being swallowed for good. Though only had time for a handful of frames with enough moon to be worthwhile, I think most photographers would take quality over quantity any time.
Workshop Schedule || Purchase Prints || Instagram
The Joy of Nature
Click any image to scroll through the gallery LARGE


")


, Yosemite")


Playing the Odds
Posted on November 21, 2023

Twilight Moon, Zabriskie Point, Death Valley
Sony a7R V
Sony 24-105 f/4 G
ISO 100
f/10
1/13 second
First and foremost, a good landscape image usually requires…, well…, a good landscape. But merely getting yourself to the good landscapes is only half the image success equation, because good landscape photography also requires good conditions: colorful sky, dramatic clouds, complementary light, a striking celestial object, or some other natural quality that elevates the scene to special.
One way to include these ephemeral variables is to monitor conditions closely enough to respond in time to photograph them. Which of course also requires being relatively nearby when the conditions become favorable. Not necessarily a problem when my desired subject is close to home and the only affected schedule is my own, but my photo workshops need be planned more than a year in advance, so the proximity and react quickly approach doesn’t really work. Instead, the best I can do is schedule workshops to maximize the odds for ideal light, interesting skies, and other photogenic conditions—then cross my fingers.
For example, visiting Iceland in January or February increases the odds for the northern lights and low angle all-day sunlight; June in New Zealand provides the best chance for snowy peaks, and it’s the month when the core of the Milky Way up all night; and early August (+/- a week or so) at the Grand Canyon is generally the peak of the Southwest monsoon’s spectacular lightning and rainbows. While each of these features can be thwarted by uncooperative weather, at least we’re close enough to be there when the good stuff happens.
My annual Death Valley / Mt. Whitney photo workshop is another example of playing the odds. I love clouds and Death Valley. But because Death Valley only gets about an inch of rain each year, it suffers from chronic blue skies. To maximize the possibility of clouds for my DV/Whitney workshop groups, I schedule the workshop from mid-January through early February, when temperatures are farthest from summer’s intolerable heat, and the (still remote) chance for rainfall and (more likely) clouds is highest.
While I always wish for clouds in my workshops, cloudless skies in Death Valley don’t mean lousy photography. Places like Mosaic Canyon and Artist’s Palette are nice in the soft shade of early morning and late afternoon. And few sights are more dramatic than the sun’s first or last rays on the curves and lines of the undulating Mesquite Flat Dunes. Another benefit of cloudless skies is the beautiful pink and blue pastels that hover above the horizon opposite the sun before sunrise and after sunset.
To further hedge my bets, in Death Valley I always give myself one more blank-sky card to play: the moon. Scheduling this workshop around a full moon opens moonlight opportunities, and gives my groups at least two mornings to photograph the setting moon in the pre-sunrise twilight pastels: first at Zabriskie Point, where it aligns beautifully with Manly Beacon, then in Alabama Hills, where we can photograph it slipping behind the alpenglow enriched Sierra Crest, bookended by 14,000 feet-plus Mt. Whitney and Mt. Williamson.
This year’s DV/Whitney workshop, last February, had more clouds than usual—great for our daytime photography, but a source of stress f0r the workshop leader as the Zabriskie Point sunrise moonset approached. But instead of thwarting my Zabriskie moonset plan, I woke this morning to find that most of the clouds had departed overnight, leaving behind just a handful of ideally placed cotton balls for the moon to play with.
Zabriskie Point is an extremely popular sunrise location, so I got my group out there nearly 45 minutes before sunrise. We ended up being the first ones out there (better to be 10 minutes early than 1 minute late)—too early, in the pre-dawn darkness, to capture detail in the daylight-bright moon and the rest of the scene in a single image, but since the moon was still fairly high, I suggested to everyone that they compose it out (shoot beneath the moon) and just concentrate on revealing the foreground in the sweet, shadowless light.
While waiting for the foreground to brighten, I enjoyed watching the clouds dance around the moon, alternating between obscuring, revealing, and framing. The darker the sky, the better the moon stands out, but when the sky is too dark, an exposure that captures detail in the moon also has an unrecoverably dark foreground (either its completely black, or there’s too much noise in the processing-recovered darkness). As the sun approaches the horizon behind us, the lighter the sky gets and the easier it becomes to get detail in both the moon and the landscape. But soon the sky becomes so bright, contrast between the moon (which isn’t getting any brighter) and sky is lost and the moon becomes less and less prominent.
My window for photographing a full moon is from 15 minutes before sunrise/sunset to 15 minutes after sunrise/sunset (maybe a few minutes earlier/later if I’m extremely careful with my exposure). At sunrise, the best moon photography is on the earliest side of this window, when the moon/sky contrast is highest; the easiest exposure (greatest margin for exposure error) is toward the end of the window. And of course this unfolds in reverse at sunset.
To ensure that I don’t miss any of the best photography when the moon exposure window opens, I always start a few minutes before my 15 minute window opens so I can identify later in Lightroom the earliest usable image. The image I’m sharing today wasn’t my very first usable click that morning, but it did come 14 minutes before sunrise, when the contrast was still high. I chose this one because it came shortly after the pink hues of the sun’s longest rays started pushing the Earth’s shadow toward the horizon, absolutely my favorite part of sunrise. For me, capturing the moon in this night/day transition is the Holy Grail of full moon photography.
Locations like Death Valley are always great to photograph, regardless of the conditions, so it always feels like I’m playing with house money there. But looking back at all the things I bet on when scheduling this workshop, I can see that this year most of them paid off. Thanks to the (long shot) clouds, we got beautiful sunset color at Dante’s View one evening, and on the dunes another. One morning the clouds cleared enough to paint the dunes in beautiful sunrise light (one reason we do sunrise and sunset there), and another morning just enough hung around to enhance, without obscuring, our beautiful moonset. We all felt like winners.
I actually have a couple of openings in my upcoming Death Valley workshop
Moons Over Death Valley and the Alabama Hills
Click any image to scroll through the gallery LARGE


Dynamic Juxtaposition
Posted on February 4, 2018

Moonset Eclipse, Zabriskie Point, Death Valley
Sony a7RII
Sony 100-400 GM
ISO 800
f/11
1/4 seconds
Much of my photography is about juxtaposition of elements with the landscape. Sometimes that’s simply combining static terrestrial features, but when possible I try to add something more dynamic, such as meteorological subjects like lightning or a rainbow, or celestial objects like the Milky Way or the Moon. The challenge with dynamic juxtapositions is timing—while the meteorological juxtapositions are usually a matter of playing the odds, celestial juxtapositions are gloriously precise.
Lunar choreography
Just as the Earth revolves around the Sun, the Moon revolves around Earth; at any point in this celestial dance, half of Earth is daylight and half is night, while half of the Moon is lit and half is dark. The amount of the Moon we see (its phase) depends on the relative position of the Sun, Moon, and Earth in this dance, and once each month all of the sunlit side of the Moon faces the dark side of Earth, and we Earthlings enjoy a full Moon.
This alignment of three or more orbiting celestial bodies necessary for a full (and new) Moon is called ‘syzygy.’ Due to the Moon’s orbit around Earth, the Sun, Earth, and Moon achieve syzygy twice each lunar month: once when the Moon is between the Sun and Earth (a new Moon), and again when Earth is between the Sun and Moon (a full Moon).
The Moon completes its trip around Earth every 27.3 days, but it takes 29.5 days to cycle through all its phases, from new to full and back to new again. The Moon’s phases need that extra 2+ days because as the Moon circles Earth, Earth also circles the Sun, taking the syzygy point with it—imagine a race with a moving finish line.
Viewed from Earth, the Sun and Moon are on opposite sides of the sky when the Moon is full, so a full Moon rises in the east at sunset and sets in the west at sunrise. We rarely see a full Moon rising exactly as the Sun sets (or setting as the Sun rises) because: 1) the point of maximum fullness (when the Sun, Earth, and Moon align perfectly) only happens at one instant on the full Moon day—at every other instant of each month’s full Moon day, the Moon is merely almost full (but still full enough to appear full); 2) published Sun/Moon rise/set times assume a flat horizon—if you have mountains between you and the horizon, your view of the true Sun/Moon rise/set is blocked; and 3) The more extreme your latitude (angular distance from the equator), the more skewed the Sun/Moon alignment appears.
Knowing this, it should make sense that the closer the Moon is to full, the longer it’s in the night sky, and a full Moon is in the sky all night long. Less intuitive but very important for lunar photographers to know, each day the Moon rises an average of 50 minutes later (between 30-70 minutes) than it rose the previous day—I usually mentally round to an hour for quick figuring.
Lunar Eclipse
If the Moon orbited Earth on the same plane Earth orbits the Sun, we’d have an eclipse with each syzygy: every new Moon, Earth would pass through the Moon’s shadow and somewhere on Earth would experience a solar eclipse; every full Moon the night side of Earth would witness a lunar eclipse as the Moon passes into Earth’s shadow. But the Moon’s orbit is tilted about 5 degrees from Earth’s orbit, making the perfect alignment an eclipse requires relatively rare.
It turns out that the alignment of the Sun, Earth, and Moon necessary for a lunar eclipse happens from two to four times each year. Of these, about one-third are total eclipses, when Earth’s shadow completely covers the Moon. At totality, most of the sunlight illuminating the Moon is blocked by Earth, and the only light to reach the Moon has passed through Earth’s atmosphere, which filters out all but the long, red wavelengths. For the same reason sunsets are red, during a total lunar eclipse we see a red or “blood” Moon.
Putting it all together
As frequent and familiar as the rise and set of the Moon is, the opportunity to witness the beauty of an eclipse is rare. But in the last six months, after being shut out by schedule or weather for many years, I’ve managed to photograph my first total solar and lunar eclipses. I wasn’t able to juxtapose the August solar eclipse with a favorite landscape, but I wasn’t going to let that happen again for last week’s lunar eclipse.
Viewed from Death Valley’s Zabriskie Point in winter, the setting full Moon’s azimuth aligns nicely with Manly Beacon, one of the park’s most recognizable features. Though this year’s alignment was particularly good, the morning of the eclipse was a day earlier than I’d normally photograph the Zabriskie Point moonset—the next day the Moon would be setting about 45 minutes later, providing ample time to photograph the landscape in the warm early light before the Moon descended behind the Panamints. Nevertheless, I decided that a total lunar eclipse trumps everything, and since Zabriskie was the best place for the eclipse, that’s where we were.
We started with telephoto compositions of the beautiful “blood Moon” phase because there wasn’t enough light to include the eclipsed Moon with the landscape without compositing two exposures. Composites are fine, but I prefer capturing scenes with one click. For wider images that included the landscape I waited until totality had passed, shortly before the Moon set, and switched to the Sony/Zeiss 24-70 with my Sony a7RIII, moving my Sony 100-400 GM to my Sony a7RII.
I captured this image about 25 minutes before sunrise, normally too early to capture landscape detail without over exposing the Moon. But this morning, following the total eclipse, the lit portion of the moon was still darkened by Earth’s penumbral shadow, which reduced the dynamic range to something my cameras could handle.
To enlarge the Moon and emphasize its juxtaposition with Manly Beacon, I went with the 100-400. With my composition and focus set, I slowly dialed up the shutter speed until I saw my a7RII’s pre-capture “zebra” highlight alert. After clicking I magnified my image preview and examined the moon to confirm that I did indeed still have detail. The foreground was quite dark on my LCD, but my histogram indicated the shadows were recoverable, something I later confirmed in Lightroom.
A Gallery of Dynamic Juxtapositions
Click an image for a closer look and slide show. Refresh the window to reorder the display.


Tips to improve your full moon photography
Posted on March 24, 2016

Winter Moon, Zabriskie Point, Death Valley
Sony a7R II
Sony/Zeiss 24-70 f4
1/6 second
F/8
ISO 100
Have you ever seen a glowing full moon suspended above a beautiful landscape and been moved enough to grab your camera? And how many times have those pictures actually matched your memory of the moment? Not too many, I’d guess. Either your landscape was completely black, or (more likely) the moon was an ugly white blob. You’ve just experienced an example of the human eye’s vastly superior dynamic range—while you could see detail in the landscape and the moon, your camera could only see one or the other.
Lot’s of scouting and plotting goes into aligning a full moon with a terrestrial subject, as close to the horizon as possible, when the light’s just right. For me, just right means a sky dark enough for the moon to stand out (the darker the better), but not so dark that I lose foreground detail in the twilight shadow. Since I don’t blend images, I need to get the landscape and lunar detail with a single click.
I’ve found that the “right-time” sweet spot for single-click full moon photography is a window about 10 minutes on either side of sunrise/sunset. Since the published sun/moon rise/set times assume a flat-horizon—unless you’re on a boat at sea, the sun and moon will probably be below the horizon when they’re advertised to be rising and setting.
It helps to know that as the moon goes through its 29-day cycle from new to full and back, it rises a little less than an hour later each day (that’s an average that varies with several factors, but it’s a good rule-of-thumb). This generally makes the moon visible in my 20-minute exposure sweet spot the day before it’s full for a sunset moonrise, and the day after it’s full for a sunrise moonset, because there’s more foreground light to work with. But even then the landscape will be bathed in shadow, while the moon remains daylight bright, so getting myself on location in this 20 minute window is only half the battle.
In general, digital cameras have made exposure easier. Shooting film, difficult exposures meant a lot of guessing, bracketing, and (especially) hoping. Shooting digitally, not only can we instantly eyeball each image, the histogram shows us exactly how our exposure worked. Unfortunately, the histogram isn’t much help when the moon’s involved, because the moon doesn’t usually occupy enough image real estate to register on the histogram. If you’re not careful, you might find yourself reveiwing an evening’s worth of images with beautiful histograms and a hopelessly blown moon. What’s a photographer to do?
The key to exposing any high dynamic range scene is pushing the highlights as far as you can without blowning them out. For most scenes the histogram is sufficient, but exposing for the moon requires help from your camera’s Highlight Alert (blinking highlights) feature. And since most cameras allow you to view images in multiple modes (e.g., with the luminosity histogram, RGB histogram, no histogram, full capture information, no capture information, and so on), it’s also important to determine which view or views actually show the blinking highlights (not all do)—if you’re not sure, I suggest intentionally overexposing a scene and reviewing the image in the camera’s various display modes.
Moonrise
When photographing a rising full moon at sunset, simply metering for the landscape works at the outset because there’s still plenty of light to capture foreground detail without overexposing the moon. At this point the histogram tells me everything I need to know. But as the sky darkens, so does the foreground, while the moon remains unchanged.
To keep my histogram in the ideal range as twilight deepens, I add light to my image by bumping the shutter speed in 1/3 stop increments. Each time I increase the shutter speed, I check the image to ensure that the moon’s not blinking. As soon as my exposure causes the moon to blink, I know I’ve reached my highlight threshold and I’m pretty much done adding light.
Once I’ve pushed the moon to my camera’s highlight threshold, I continue shooting until the shadows are so dark that no useable data can be recovered. Because highlight and shadow recovery varies with the camera, I strongly encourage you to familiarize yourself with your camera’s shadow and highlight threshold (how far to the left and right can push the histogram and still get usable detail).
If you’re shooting raw, you can probably push your exposure until part of the moon is blinking, but if the entire lunar disk blinks, you almost certainly will need to back down your exposure. Adding a graduated neutral density filter will hold back the moon enough to buy you five or ten minutes of shooting before the moon blows out.
Moonset (an example)
Photographing a setting full moon at sunrise is the sunset process in reverse—we start with the moon glowing above a landscape much too dark to get detail without hopelessly blowing out the moon, and finish when the moon sets, or when the sky brightens to the point that the moon starts to wash out.
In January, I got my Death Valley Winter Moon workshop group out to Zabriskie Point about 45 minutes before sunrise. The moon was indeed beautiful, but far too bright to photograph with the dark foreground. But it was high enough that I was able to do long exposures without the moon while I waited for the scene to brighten.
About 20 minutes before sunrise I pulled out a 3-stop hard-transition graduated neutral density filter and started including the moon, dialing my exposure down until the moon stopped blinking—the most light I could give the scene without losing the moon. At first the foreground was still far too dark to contain usable detail, but within 5 minutes I started to feel like the scene had brightened enough to allow usable detail (albeit with a fair amount of Lightroom Shadow/Highlight work later).
From that point on, I just worked on a variety of compositions that included the moon. Monitoring my histogram, I shortened my shutter speed to reduce the exposure as the foreground brightened. Eventually the foreground brightened enough that I didn’t need the GND filter.
In a perfect world the moon reaches the horizon while it’s in the sunrise/sunset 20(-ish) minute exposure sweet-spot (sky dark enough that the moon stands out, but not so dark that I can’t get landscape and lunar detail), but this morning the moon was high enough that the contrast flattened before it set.
The above image I captured early in the sweet spot—the foreground looked quite dark on my LCD, while the moon was mostly intact, with a couple of blinking specks. But I knew my Sony a7R II well enough to be confident that simple highlight and shadow adjustments in Lightroom would recover all the necessary detail.
Photo Workshop Schedule
A Full Moon Gallery (Large and Small)


Color, color everywhere
Posted on January 24, 2013

Magenta Sunrise, Zabriskie Point, Death Valley
* * * *
After three days of solid blue skies (Zzzzzzzzzzzz), yesterday morning my Death Valley workshop group was rewarded with a sunrise for the record books. I’ve seen color like this in Yosemite, Hawaii, and the Grand Canyon to name a few, but never at Death Valley.
As the group gathered at the hotel about an hour before sunrise, a deep ruby glow stained the eastern horizon. Hmmm. Second-guessing my tried and true policy of getting on location at least forty-five minutes before sunrise, I hustled everyone into the cars and we bolted for Zabriskie Point, just five (extremely long) minutes up the hill. At Zabriskie I gave a brief orientation with one eye on the expanding red that now stretched from the eastern horizon nearly to the zenith—in a matter of minutes it would reach all the way to the Panamint Mountains on the western horizon, filling the sky behind Death Valley’s most celebrated vista.
After explaining that the best place to photograph Zabriskie Point is on the dirt hilltop directly below the viewing platform, I set off with a “Follow me.” By the time I made it to the prescribed vantage point the red had indeed spilled all the way down to the Panamints. Thrilled with our good fortune I looked around—imagine my surprise to find that only two others had heeded my advice; the rest of the group had stopped well behind me to photograph in the opposite direction, lured by the electric show playing above the not-too-photogenic scene facing the sun.
Paradox alert: I spend a good deal of time teaching photographers that light trumps landscape—in other words, don’t get so locked in to the scene you came to photograph that you miss better light happening elsewhere. They had heeded my advice so well that they overlooked another truth I try to hammer home: See the world with your camera’s eye. In this case the most spectacular light was indeed behind the classic Zabriskie scene, where the eastern sky was infused with a magenta hue that was equal parts vivid and bright. On the other hand, the red sky to the west, above nearby Manly Beacon and the distant Panamints, was still quite dark to our human vision. What everyone had overlooked was that their camera’s ability to accumulate light would bring out color their eyes missed.
Fortunately, I was able to get everyone’s attention and to convince them where the real show was. We started with long exposures like the one here (30 seconds at f8 and ISO 400) that brightened the scene beyond what our eyes saw. Often sunrise color rises to a tantalizing level only to fade without warning. But this morning as the light increased, the color rose right along with it, faded briefly, then bounced back stronger than ever. At its peak the entire landscape glowed pink and the only sound was clicking shutters.
* * * *
A few words about color: I’m always amused when people question the credibility of sunrise and sunset color. I’ll grant that many people enhance their color in processing, but that doesn’t mean that every brilliant sunrise or sunset was manipulated. The truth is, there’s nothing subtle about color in nature, and when people question the color in a sunrise/sunset image, my first thought is to wonder how many sunrises/sunsets they’ve seen.
My group yesterday morning was chuckling about that problem as we packed up—we were all anticipating the inevitable doubts, some explicit, others implicit, but there was comfort in the knowledge that we all had witnesses. And for the record (I just checked), the only color work I did on this image was a slight desaturation of the blue in the sky and the magenta for the entire image.

