Shock and Awe
Posted on February 27, 2025
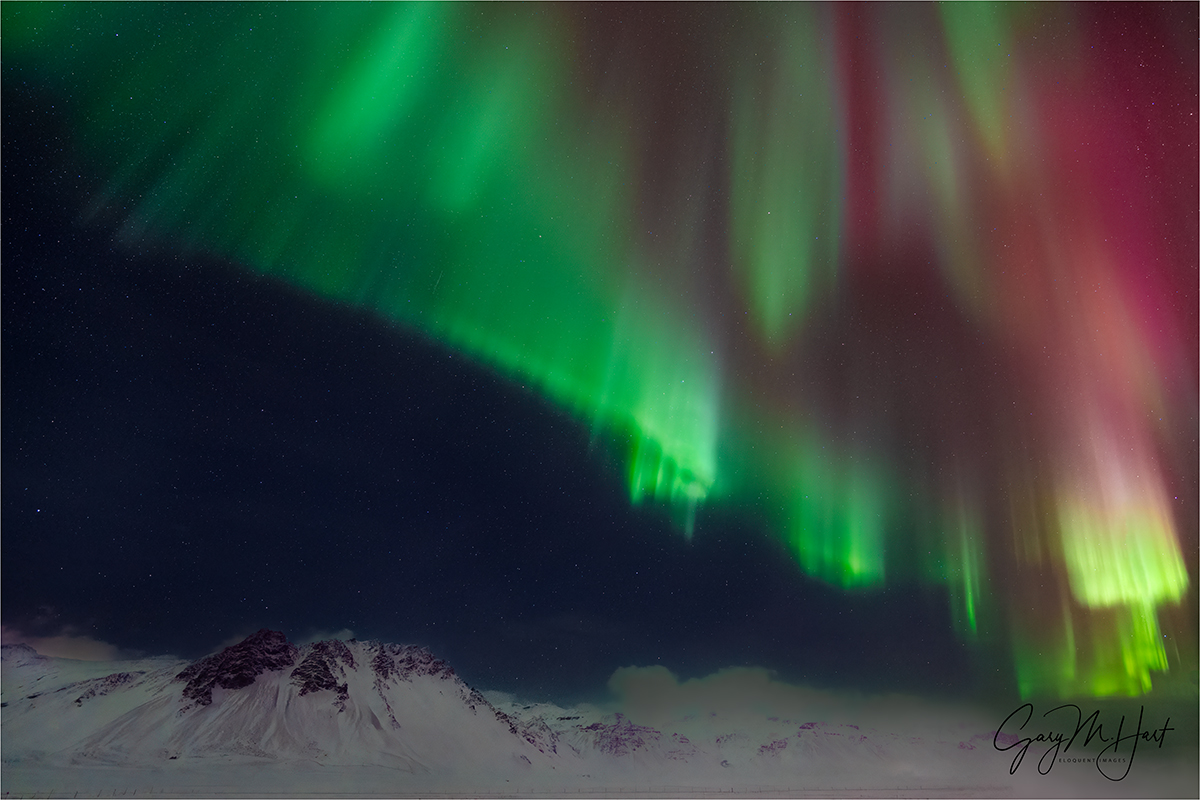
Night Lights, Snaefellsnes Peninsula, Iceland
Sony α1
Sony 14mm f/1.8 GM
ISO 3200
f/1.8
5 seconds
That night at dinner, one person in the workshop group asked if there was a chance we’d see the northern lights, or if he could safely have another beer. I laughed and told him, while I can’t predict the future, I’d be shocked if the northern lights happened this night and to just go ahead and have that beer. I’ve never been happier to be wrong (and that my advice didn’t ruin his evening).
Each winter Don Smith and I do a winter workshop in Iceland. There are many reasons to visit Iceland in winter, but for most of our workshop students, at the top of the list is the northern lights. Because northern lights success doesn’t just happen, each day Don and I powwow with our Iceland guide to assess our odds for aurora success that night, and to plan our strategy to be there when it happens. We base these decisions on forecast aurora activity, expected cloud coverage, dark sky (no light pollution) views of the northern sky, and the experience we’ve gained from prior northern lights shoots.
Our second night on Snaefellsnes Peninsula (the workshop’s third night), the expected KP-index (the universally accepted 0 to 9 scale of aurora activity) was a very disappointing 1—about as low as we ever see in Iceland. Worse still, an incoming storm had already started to spread clouds, further reducing the night’s aurora expectations.
But regardless of the target (aurora, lightning, Milky Way, and so on), past surprises have taught us to never not have a plan in the event of the unexpected, so at dinner this evening we laid out the bad news to the group, but promised to keep an eye on the sky and notify them if anything changes. Though the incoming storm meant we wouldn’t be able to drive to another location if the aurora surprised us, we told the group that just across the road from our remote hotel was an unobstructed, dark-sky view of the northern sky above snowy peaks—perfect for the northern lights.
With a plan in place, everyone retreated to their rooms for the night with the lowest of expectations. At about 9:30 I was still up, answering e-mails and doing other boring business stuff, when I glanced at my phone and saw at least a dozen notifications from the WhatsAp Iceland group thread. Well that’s interesting…
It seems that Siggi, our exceptional Icelandic guide, had gone outside at around 9:15 and discovered clear skies and aurora. Without bothering to read all the other exclamations from the group, I bundled up, grabbed my gear, and rushed out as fast as I could. I expected something similar to the aurora display we had over Kirkjufell the prior night—enough to show up in the camera, but not bright enough for our eyes to register—but as soon as I stepped out into the cold and looked up, I spotted a soaring shaft of light that told me tonight would be different. Much different.
I hurried to the outline of photographers assembled across the road and quickly trudged through two feet of snow to set up at barbed wire fence. Out here, away from the hotel’s lights, it was even more apparent that something special was underway.
Don, Siggi, and I had prepared the group for photographing the northern lights, but with any type of night photography, there’s no substitute for experience. Since this was the first aurora experience for many in the group, I spent my first few minutes out there moving around, helping get people up to speed. While focus is always tricky at night, aurora focus is no different than any other night scene. The greatest challenge for aurora first timers, even those with lots of night experience, is the need to constantly monitor the rapidly changing exposure. An exposure bright enough to reveal foreground detail and aurora color one minute, might completely blow out the aurora the next. And a 15 second exposure might be fine when the aurora is changing slowly, but it blurs intricate detail when the aurora’s activity ramps up. Fortunately, it didn’t take long for everyone to settle in, and soon my instructions were down to occasional shouts reminding everyone that the brightness had changed, or to point out a different area of the sky that had ramped up.
The WhatsAp notice had gone out to everyone, but I soon realized it had only been a fluke that I’d noticed, so after a few minutes I decided to take attendance. Easier said than done in the extreme darkness, especially since there were a few people out there who weren’t in our group, and everyone was bundled head-to-toe. But I did determine that Don wasn’t out there, and one other person in the group (turns out there was a second person missing, but we didn’t realize it until the next morning). I called the missing workshop participant first, but that call went straight to voicemail—then another person in the group said she’d called him and he’d decided to pass (apparently he’d been asleep and regrettably wasn’t thinking rationally when he got that call). Don, on the other hand, was especially grateful for the call and made it out in record time.
An aurora show is special anytime, but it wouldn’t be an understatement to say this one truly shocked me by its unexpected splendor that ranks right up there with the very best I’ve seen in my half dozen years of photographing Iceland in winter. It was very bright, covered most of the sky, and was infused with lots of red, but what stood out most for me this evening was the dancing waves and shafts that twisted and fold right before our awestruck eyes.
Join Don and me for a very special Iceland photo workshop in 2026
Iceland Aurora Collection, 2019 – 2025
Click any image to scroll through the gallery LARGE


2025 Horsetail Fall: Success—and a Surprise
Posted on February 23, 2025

Molten Stripe, Horsetail Fall, Yosemite (5:43 p.m., February 20, 2025)
Sony a7R V
Sony 100-400 GM
ISO 100
f/10
1/6 second
I just returned from Yosemite, where I basked in another year of Horsetail Fall mayhem. But before I get into this year’s experience, let me just sing the praises of the Horsetail Fall experience in general. Horsetail Fall (don’t call it the Firefall) is a narrow, unassuming waterfall that, for a couple of weeks each February, gets thrust into the spotlight when a fortuitous confluence of location and light sets it ablaze with sunset color.
So what’s going on? With no clouds blocking the sun’s rays, in mid-afternoon a vertical shadow appears on El Capitan’s south-facing wall and commences an eastward march across the sheer granite. As this shadow marches eastward with the descending sun, the sunlit section of El Capitan shrinks and its light warms. Though the sun is no longer visible from the valley floor, towering El Capitan remains lit past sunset—when the unseen (to Horsetail gawkers) sun reaches the horizon, the only part of El Capitan not in shadow is the narrow strip of granite that includes Horsetail Fall. For a few glorious minutes, this normally anonymous waterfall is bathed in orange that resembles flowing lava, framed by dark shadow. Occasionally, when all the stars align, this thin stripe of orange turns a seemingly impossible shade of red that rivals the best sunset color you’ve ever seen.
I know it’s fashionable for some photographers to look down on any subject so popular and heavily photographed, and Horsetail Fall seems to be the poster child for these feelings. But I believe that, first and foremost, true nature photographers pursue their craft as much to marvel at, and honor, Nature’s gifts as they do for the images they capture. Camera or not, the Horsetail Fall spectacle should be experienced by all who find joy in natural beauty (which should be ALL nature photographers).
I’ve been photographing Horsetail Fall long enough to remember the days when I could arrive 30 minutes before sunset and join a small handful of other photographers in on the secret. But the photography renaissance spurred by digital capture, combined with social media saturation, has made the phenomenon a must-see (and must-photograph) event for the masses. I used to lament the crowds, but since the National Park Service implemented management and control measures that (slightly) limits the crowds, and (more importantly) the viewing locations, I’ve come to enjoy the tailgate-party atmosphere the phenomenon engenders.
Having witnessed the range of Horsetail Fall’s annual display at least 50 times, from disappointing flops (no water of sunset light) to absolute euphoric splendor, today it’s the vicarious thrill I pull from the crowds that keeps me coming back. Last week was no different, and I’ll be back next year.
Success
The amount of water in Horsetail varies from year to year, ranging from bone dry, to wet stain, to rainfall run-off infused gush. And while I wouldn’t say it was gushing this year, the flow was at least average, and definitely photographable.
The Horsetail crowds this year, at least for the four sunsets I was in Yosemite (February 18-21), were by far the most I’ve ever encountered. Since I usually do my Horsetail Fall workshop a week earlier, largely to avoid the crowds of February’s third week (because that’s when the light has been labeled “best”), it’s hard to know how much this year’s crowds were just a function of my timing, or whether there really were more people than previous years. I suspect it was some of both.
Consensus says that the best Horsetail Fall light, when it’s most tightly focused on the fall, comes 2 or 3 days either side of February 20 (where we are in the leap year cycle matters too). The reason I usually schedule my Horsetail Fall workshop for weekdays a week earlier is that contenting with significantly fewer people more than makes up for any minor difference in the perceived quality of the light. In fact, some of my best Horsetail Fall experiences have come around February 10. But this year, knowing I’d have just returned from Iceland, I pushed the Horsetail Fall workshop back a week.
I also wonder if this year’s extra people were a byproduct of the new NPS reservation system that’s designed to keep weekend crowds more manageable. It’s possible that those who would ordinarily go on a weekend but couldn’t score a reservation, or maybe they just decided not to hassle with the reservation system, just took advantage of the unrestricted entrance weekdays offer.
Whatever the reason, the crowds are only a problem where parking is concerned—once you park and get yourself to the viewing area, there’s plenty of room for everyone. Back when Southside Drive was in play (closed now due to riverbank damage and unruly photographers), people who opted for that (arguably much better) vantage point had to contend with an order of magnitude more photographers than there was space to accommodate them—not to mention all the tension (and hostility) that comes with that. Not only are there many more viewing sites on NPS-approved and mediated Northside Drive, the view there (being closer to El Capitan) is more up and over the heads of the throngs of gawkers. Since it’s primarily a telephoto shot, even when stacked multiple people deep, no one is in anyone’s way. The result is a genuine tailgate party vibe that I’ve grown to love: frisbees, barbecues, and actual socialization among friends and strangers alike.
After monitoring last week’s weather forecast, I decided to pass on Horsetail for my workshop’s first two days, targeting Thursday, with Friday as a backup. And though Wednesday turned out to be an absolutely epic Horsetail Fall event for all who stuck it out through the clouds that delivered rain right up until sunset (we weren’t in the Horsetail Fall viewing area, but did have a good view of the fall), my group got something better Wednesday evening (if you like rainbows), and still experienced the coveted Horsetail Fall red light the next evening. Win-win! The rainbow is a story for a different day, but waiting until Thursday freed us to take advantage of all my other favorite Yosemite locations in relative peace (because most of the photographers were congregated beneath Horsetail Fall) the rest of the week.
And even though we photographed Horsetail Fall just once, we did drive through the viewing area each evening, sometimes multiple times, which gave us a firsthand view of the bedlam. How crowded was it? I have no idea when the Yosemite Valley Lodge parking area—the closest dedicated Horsetail parking, an easy 1 1/2 mile walk—filled each evening, but I know we saw it barricaded with “Full” signs as early as 2:30 p.m. Not only that, all of the ADA parking within the viewing area was full and closed as well. This concerned me because I’ve never seen ADA parking fill so early, and I had a participant with an ADA placard, plus a couple of others who weren’t crazy about a 2 or 3 mile roundtrip walk.
I have a few parking tricks up my sleeve, so on Thursday evening we were able to deposit limited carload just slightly more than 1/2 mile from the viewing area (less than ideal but manageable), while the rest of us found parking about 1 1/4 mile away. By 4:30—more than an hour before the 5:43 sunset—we were all set up beneath El Capitan with fingers crossed, ready for the show.
The morning had been cloudless, but by mid-afternoon patches of thin clouds had drifted in, never completely extinguishing the direct sunlight, but intermittently dulling it significantly as the sun dropped. Every time the sunlit granite brightened, I advised my group to start clicking, because we never know when the light will disappear for good.
The light teased us like this all the way up until go-time, about 5 minutes before sunset. Then, as if a magic hand was keeping the clouds at bay, the sun brightened and held steady all the way until sunset (the picture at the top of this post). When the light started to fade slightly, we heard applause and cheering in the distance as other groups of viewers assumed the show was over, but I told my group (and, it turns out, a number of other people eavesdropping nearby), that we’re not leaving until at least 5 minutes after sunset because the fading we were seeing now was caused by clouds, not the sun dropping below the horizon. Turns out, the show had just begun….

Last Light, Horsetail Fall, Yosemite (5:48 p.m., February 20, 2025)
Sony a7R V
Sony 100-400 GM
ISO 100
f/10
1/5 second
A minute or so later, Nature dialed its rheostat back up and the light returned—but this time it was red. As the red intensified, a shadow crept up from the bottom of the fall, extinguishing the lowest light. The image below was captured 5 minutes after sunset, and you can see the bottom third of the fall isn’t lit. Shortly after this, the light faded uniformly and the show was over. The red we got this evening was as red, and as brilliant, as I’ve ever seen on Horsetail Fall. I’ve seen it get this red a handful of other times, but never any redder than this.
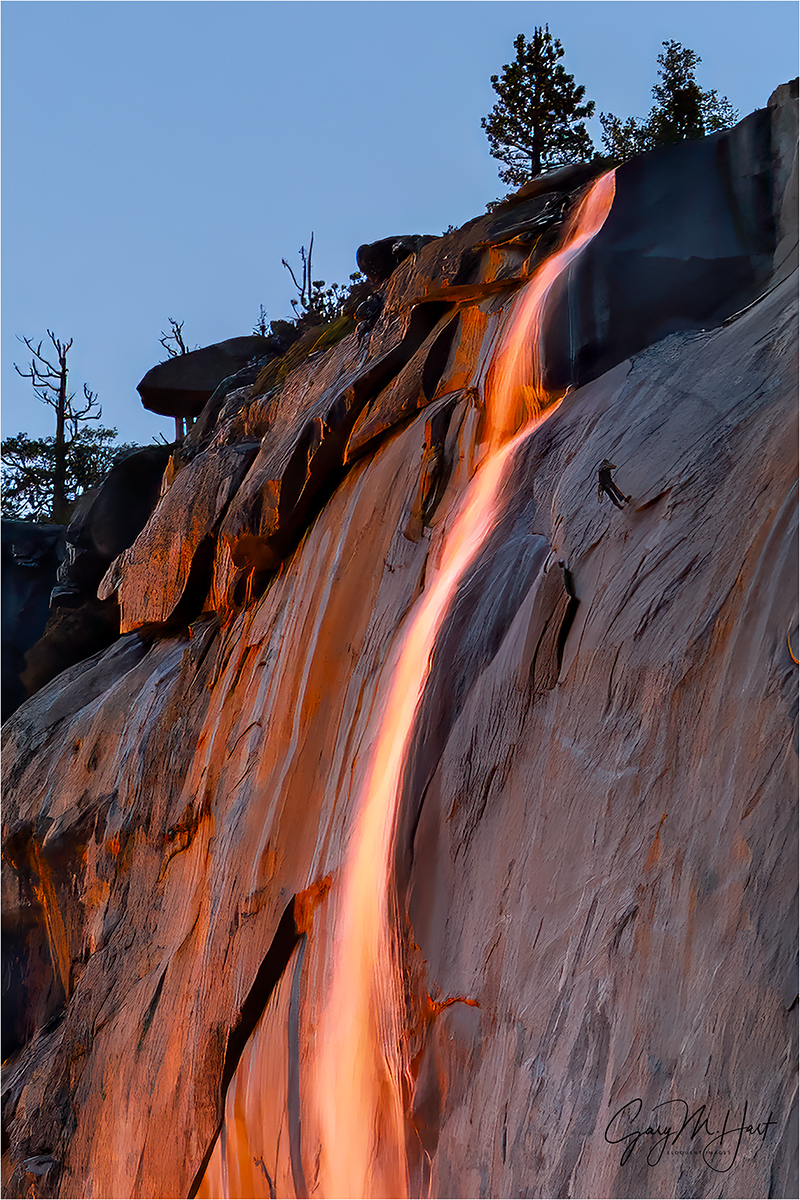
Horsetail Fall Climber, El Capitan, Yosemite (February 20, 2025)
Surprise
The evening’s biggest surprise wasn’t pointed out to me until our image review session the next day. Apparently, unbeknownst to us at the time, we’d been photobombed by 3 climbers on El Capitan, including one dangling right next to the fall. You can see him (or her?) in both of the top-to-bottom fall images above, but immediately above is a tighter crop of the first image, showing the climber more clearly.
Here’s my article on getting the most from the Horsetail Fall experience
Join me in a Yosemite Photo workshop
Workshop Schedule || Purchase Prints || Instagram
Horsetail Fall Through the Years
Click any image to scroll through the gallery LARGE


Iceland, Weather or Not
Posted on February 14, 2025

The Green Night, Aurora Above Kirkjufell, Iceland
Sony α1
Sony 16-35 GM
10 seconds
f/2.8
ISO 3200
As I’ve probably said a million times before, and likely will say a million more times, the best weather for photography is the worst weather to be outside. I mean, why else would Don Smith and I schedule a workshop for Iceland in January?
Of course our number one reason for an Iceland winter trip is the northern lights, which means winter clouds aren’t always our friend. But when I’m not waiting for the aurora to fire up, I love the way Iceland’s storm clouds are illuminated (all day) by beautiful low-angle sunlight (the sun never rises above 10 degrees during our visits). There are Iceland’s 2-hour winter sunrises and sunsets, its storm-churned surf, and ocean to mountaintop snow-covered landscape. And a surprising truth I’ve come to appreciate over the years is that, while Iceland in January is indeed quite cold, it really isn’t as cold as most people expect. (I swear.)
In this year’s workshop, that “not as cold as you expect” claim was challenged on our very first day of shooting, when we piled out of the bus at our first stop into 5°F air. Fortunately, that’s the coldest we experienced all workshop, and great photography creates an inexplicable warming factor that seems to make even the harshest conditions more tolerable. And regardless of the quality of the photography, even temperatures as low as 5°, (especially without wind) are quite tolerable with the right clothing.
My first year I attacked Iceland’s cold with copious layers of conventional California cold-weather gear. That worked well enough, but following each subsequent visit, I refined my non-California winter-wear (warmest) to the point where I’m now armed with an entire Iceland ensemble that rarely comes out for my domestic trips.
For example, a few years ago I decided that I was tired of having to layer a rain-shell on top of my (extremely warm but not waterproof) puffy down jacket, not to mention having to deal with a chronically cold butt exposed by a jacket that barely hung below my belt (yes, I was still wearing pants). So I sprung for LL Bean’s warmest waterproof down parka that covers me all the way down to mid-thigh. I still travel to Iceland with a lightweight, waterproof down jacket that’s compact enough to stuff in my camera bag and is ideal for milder days and short jaunts from the bus to a restaurant or hotel.
This two-way system—one heavy-duty option for the coldest, windiest conditions; another that’s lightweight but still warm enough for normal daily activity—works really well for me in Iceland. In addition to two jackets, I also have a couple of hats, pairs of gloves, and boots, that I can choose between, depending on the conditions. And, unlike many in this year’s group, I managd to pack everything into one (large) suitcase that I (barely) keep below Icelandair’s 23 kg (50-ish pounds) weight limit.
This year’s difference-maker upgrade was my new warm boots. I’m a cold feet (and fingers) kind of person, cursed with digits that never seem to be warm enough. Where my boots are concerned, it’s not so much the walking that’s a problem, but photography requires a lot of standing around in frigid cold (especially at night, when the aurora is dancing). In previous years I’ve gone more conventional, trying an assortment of insulated hiking boots and thick wool socks, upgrading to something warmer after almost every trip, vowing that next year will be better. The result has been persistently cold toes, and a boot-graveyard in my garage that rivals Imelda Marcos’ closet.
This year I tried something different, switching to super-warm, waterproof, lined Sorel work boots. But that was just the start. In New Zealand last July, I stocked up on (wait for it) possum fur socks. Possum fur (it’s actually a possum/merino blend) is absolutely the warmest material I’ve ever worn (also soft and lightweight), and it’s everywhere in New Zealand. But before you start visualizing acres of bred possums, caged and awaiting slaughter, and imagine that I’m supporting the heartless New Zealand possum-breeding industry, you need to know New Zealand’s possums (which are quite different from American possums) are a non-native scourge that’s decimating the country’s native bird population (among other things). A massive effort is underway throughout the country to eliminate possums by 2050—the only possum fur apparel I purchase in New Zealand is a byproduct of possums trapped for eradication (they were doomed anyway). But anyway…
And as if new boots and socks weren’t enough, I also sprung for a few thin merino wool liner socks from REI, to wear under my possum socks (no, possum don’t wear socks—you know what I mean). After returning last week following nearly two weeks in Iceland’s winter cold. After that first morning, I exited the 5° chill confident that my popsicle toes days were behind me.
Though the temperature warmed slightly throughout the day, by afternoon the wind had picked up and we started to see a few clouds heralding the approach of the storm that would batter us the following day. Nevertheless, after dinner we drove out to Kirkjufell hoping for some northern lights because in Iceland in winter, you always have a northern lights plan.
Seeing clouds from the Kirkjufell parking area, it would have been easy to pack it in and return to our warm hotel. But a few breaks were enough to give us pause, and when quick test snaps revealed green sky behind the broken clouds, we decided to stay and shoot for a while. We shot from the parking area, using our bus as a windbreak.
What started as a low expectation, “What the heck, we’re here anyway” shoot, turned into a very productive evening of photography, and a harbinger of the great stuff in store. It also gave us an opportunity to get the group up to speed with night photography—some had never done it before, while others were pretty rusty.
It’s especially fun when a group gets to witnesses something exciting. Many in this group had never seen an aurora, and though the color wasn’t bright enough to see with our eyes, everyone was pretty thrilled to capture images that featured Iceland’s most iconic mountain. But the real star this evening was the clouds, which built and raced behind Kirkjufell, but never completely filled in the window to the sky and aurora behind the peak.
After we’d finished, Don and I talked about the relief we felt getting at least enough aurora to please people, but agreed that more would be better, because those who’d never seen a good display didn’t really understand what they were missing. It turns out we didn’t need to wait long, but I’ll get to that in a future post.
Join Don Smith and Me in Iceland
Weather or Not
Click any image to scroll through the gallery LARGE


Grand Finale
Posted on February 6, 2025

Lunar Lift Off, El Capitan, Yosemite
Sony α1
Sony 200-600 G
Sony 1.4x teleconverter
ISO 800
f/13
1/25 second
For most of my full moon workshops, I try to schedule the moonrise main event for the workshop’s final sunset. Sometimes other factors prevent this (for example, in Yosemite I try to avoid weekends), but when the schedule works, a nice moonrise gives the group something exciting to anticipate throughout the workshop. This becomes especially important when some or all of the workshop’s hoped-for conditions fail to materialize.
Last month’s Yosemite Winter Moon workshop lacked to winter snow and cloudy skies we hope for in a Yosemite winter workshop, but the moon (among other things) saved the day for us by not only giving us something to look forward to, but also by photobombing an earlier sunset. The true star of that prior sunset was the clouds and color, and as nice as it was to accent the scene with the moon, it was the final night moonrise that I most looked forward to.
As I’ve written before, despite all the unjustified “supermoon” hype, the key to photographing a big moon is focal length—the longer the better. Period. If you don’t care about what’s in the foreground, or for that matter choose not to include any foreground at all, any location where the moon is visible will do. But if you want to complement your legitimate big moon (a moon image that happens in one click) with a striking landscape feature, the farther you position yourself from your landscape subject, the longer the focal length you can use, and the bigger the moon will be. Of course if you make the moon bigger with a longer focal length, the less of your foreground you can include, and the more precise the moon/foreground alignment must be.
In Yosemite, the best place to set up for a telephoto moonrise that also includes photo-worthy foreground features, is Tunnel View. At Tunnel View, the prime moonrise subjects are El Capitan and Half Dome, three and eight miles distant. From there, I can include all of Half Dome with a focal length up to 400mm; with a longer lens, I can enlarge the moon further, while still including some of Half Dome—if the alignment is right.
The most important part of photographing a moonrise from Tunnel View is to align it with a desirable foreground subject. Most of the year, the moon rises much too far south to include in a Tunnel View scene, but for 2 or 3 months each winter, the full moon rises far enough north to align beautifully with Tunnel View’s magnificent monoliths.
But success is not simply a matter of showing up at Tunnel View the night of the full moon. Each winter the solar/lunar choreography is different, which is why the moon is all over the place in my many Tunnel View moonrise images in the gallery below: left of Half Dome, right of Half Dome, directly aligned with Half Dome, and occasionally closer to El Capitan than Half Dome.
This winter’s geometry was especially exciting to me when I realized the January moon would rise farther north, and therefore closer to El Capitan, than I’d ever photographed it. I have photographed the moon arriving from behind El Capitan’s vertical face, but I’d never seen it come up from behind the top of El Capitan. Always up for photographing something new (especially in Yosemite), I scheduled a workshop for it.
Which is how my workshop group and I ended up at my favorite Tunnel View vantage point on a Sunday evening last month. Sunset that evening was 5:05, and my calculations said the moon would at just about the same time—pretty much perfect timing for a moonrise, because you want the sky dark enough for the moon to stand out in contrast, while still bright enough that the landscape has enough light to reveal detail without blowing out the moon.
I’d set up with two tripods and cameras, one with my 200-600 lens, the other my 24-205 lens. The long telephoto was for the moon’s arrival; the wider lens was for when the moon elevated enough to separate from El Capitan. I’d planned to increase the magnification of the telephoto with my 2x teleconverter, but trying to attach the teleconverter to the lens, I fumbled it and helplessly watched it roll down the steep granite toward a vertical drop of several hundred feet. Fortunately, it lodged in small crack just before taking the plunge, but when I put it on the view was completely blurred, so I switched to my 1.4X teleconverter, giving me a focal range of 280-840.
As the sun dropped and the time approached, I became aware that a thin film of clouds had drifted across the eastern horizon above El Capitan—so thin that they weren’t visible at all in daylight brightness, but just substantial enough to reflect some color as sunset approached.
The moon arrived right on schedule, and we immediately started clicking. My earliest shots were almost entirely long telephotos, like this one at 840mm. It’s always shocking to see how fast the moon moves across a long telephoto frame, but I soon started mixing in a few wider frames (that required less frequent adjustments) as the moon started separating from El Capitan. By this time sky had pinked up beautifully, adding an element of color I hadn’t expected.
We all come to a workshop with expectations, students and leaders alike, but rarely are all of them met. And while the January group’s hopes for snowy winter scenes were dashed, I think that loss was more than made up for by other things we witnessed, some complete surprises, and some just a little better than our already high expectations—like this sunset moonrise to finish the workshop.
Join me in a Yosemite photo workshop
Workshop Schedule || Purchase Prints || Instagram
Yosemite Moonrise Collection
Click any image to scroll through the gallery LARGE


Surprise Sunset
Posted on January 31, 2025

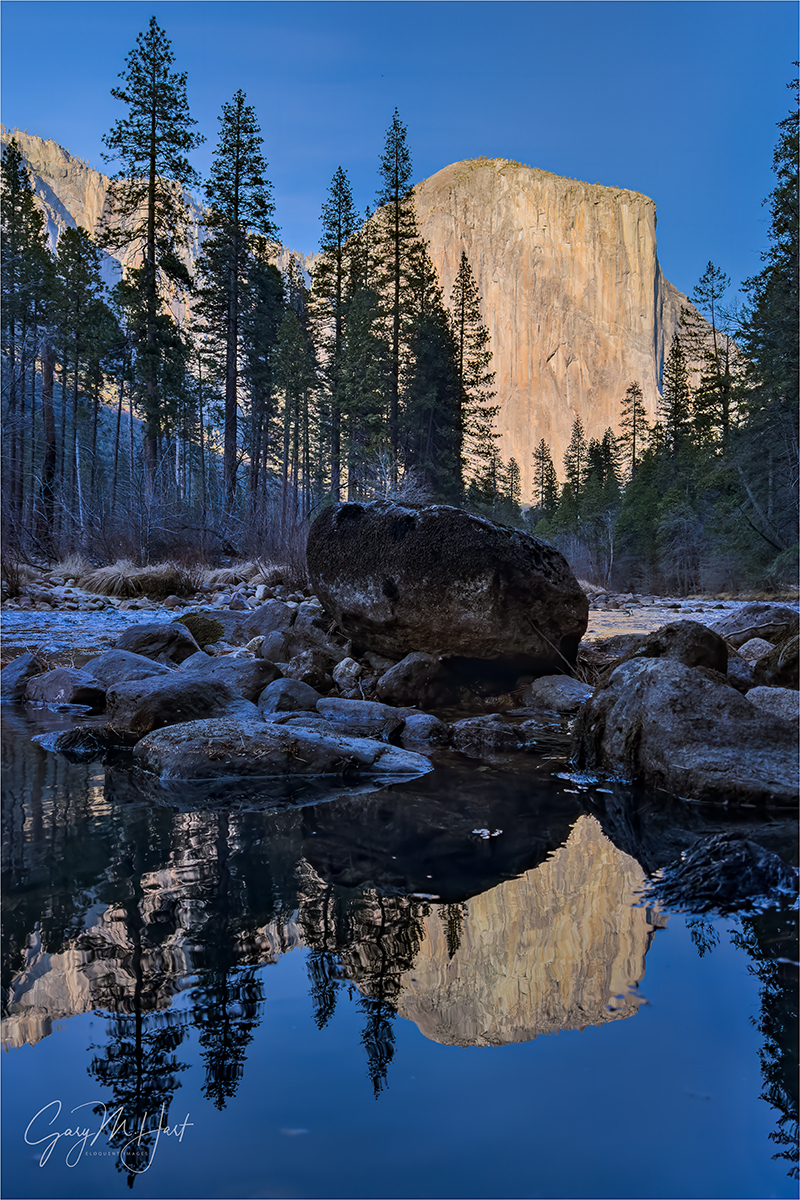
Moon and Clouds Reflection, Half Dome, Yosemite
Sony α1
Sony 16-35 GM
1/6 second
F/10
ISO 100
Greetings from Iceland. Running a workshop that starts before the sun and often goes deep into the night doesn’t leave a lot of time for blogging. But I want to share this image from earlier this month in Yosemite, along with a few paragraphs about its capture.
We all long for drama in our landscape images, and I try to time each of my workshops to maximize the chances of a special event. Case in point is my recent Yosemite Winter Moon workshop—winter to maximize the chances for snow and dramatic clouds; moon because photographing a moon rising above Yosemite Valley is a fantastic Plan B when the snow and clouds don’t come through.
Unfortunately, Central California has experienced an exceptionally dry winter so far, and what precipitation has reached Yosemite Valley so far has fallen as rain. Of course this is Yosemite, so it’s not as if my January group had nothing to photograph. And the clear skies forecast were great news for the workshop’s grand finale, a full moon rising full moon peeking up from behind El Capitan right at sunset. I photograph a lot of Yosemite moonrises, but this moonrise (that I’d specifically targeted when scheduling the workshop) was especially exciting to me because usually it rises somewhere south of El Capitan, and I’d never photographed it this far north and so close to El Capitan’s summit.
But that wasn’t until our very last shoot—in the meantime, I had a workshop to run. Even without snow and clouds, we enjoyed some really spectacular photography throughout: rainbows on both upper and lower Yosemite Fall (though spring is when Yosemite Falls gets the most water, winter is when it gets the best light). In addition to all that, several last-minute cancellations meant a smaller than usual group, allowing me to take them to a couple of spots that I feel are too small for larger groups.
Throughout the workshop I obsessively monitored the forecast, checking for the chance of even a few clouds to decorate our skies, each time finding absolutely no reason for optimism. But we persisted, concentrating on being in the best place for the warm early and late light, and the rest of the day on locations that don’t need a great (or any) sky.
Even though the prime moonrise wasn’t until our final night, throughout the workshop the moon would still be overhead at sunset as it approaches full (hanging a little lower each evening until the night it’s full), so I try to pick my sunset spots to provide an opportunity to add the moon as an accent to my chosen scene. Which is how we ended up at this bend in the Merced River near Leidig Meadow, two days before our target moonrise.
After a short walk, we arrived about 45 minutes before sunset, and I was shocked to see actual clouds overhead. Not just everyday, ordinary clouds, but an ordered formation of cumulus puffs marching left-to-right toward Half Dome as if divinely summoned, already reflecting the golden light of the low sun—a beautiful harbinger of even greater things to come. Far overhead floated the waxing gibbous moon, 90% of the way to full. And in front of us drifted the Merced River, wide and slow enough to paint a perfect reflection of the entire scene.
With low expectations for anything new at this scene I’ve photographed dozens (hundreds?) of times before, I’d arrived without my camera bag. Oops. Fortunately, the car was just a five minute walk back and I quickly decided this evening might just be worth fetching my camera.
I’m so glad I did, because the light on the clouds that evening hung in there all the way until sunset, gradually shifting from amber, to peach, to a brilliant pink, before finally deepening and fading.
We all photographed fast and furious, trying to keep up with the changing color, and to get as many versions of the scene as possible. I shot it horizontal and vertical, wide and tight, finally settling on this image to process (though I reserve the right to process more later), a vertical composition just wide enough to include a tiny dollop of moon and its reflection.
The clouds were moving fast, and by the time the light left and we’d walked back to the car, they were already exiting behind Half Dome. I saw no forecast for that day that even hinted at clouds anywhere in California. For all I know, they were the only clouds anywhere in the state this evening, but it’s experiences like this that remind me that forecasts are imperfect, and never a reason to completely shut the door on going out with my camera. In fact, the Iceland workshop group had just one of those experiences last night, but you’ll need to wait a couple of weeks to hear that story….
Join me in Yosemite
A Sunset Collection
Click any image to scroll through the gallery LARGE


, Death Valley")


, Yosemite")


The Best Camera Is…
Posted on January 22, 2025
Framed Reflection, El Capitan, Yosemite
Apple iPhone 16 Pro
24mm focal length equivalent
ISO 64
f/1.8
1/1150 second
… The one that’s with you
Yes, I know it’s a cliché, but like most clichés, this one is founded on truth. Even people like me, who pay the bills with our pictures, don’t carry our “real” cameras 24/7. In those instances, when I see beauty I deem worthy of recording, I’m happy that my iPhone (which is always with me) gives me serviceable images.

Mobile Dinosaur
In my prior post, I listed 10 reasons to become a nature photographer. Number one was saving memories; number three was low-cost start-up, and cited the very good cameras included in every smartphone.
I resort to iPhone photography not to save money, but for convenience in day-to-day living. Virtually all of my iPhone photos are quick snaps of transient life moments, from special family times that I want to save, to quirky observations worthy of sharing (like a dinosaur riding in the back of a pickup on Highway 99), to simply saving things I don’t want to forget (for example, a business card, or a humorous comment on my daily Starbucks drink).

Inner Beauty, Japanese Maple, Portland Japanese Garden
I’m definitely not one of those photographers who actively pursues creative smartphone photography, but I don’t hesitate to pull out my iPhone when natural beauty moves me and my adult equipment isn’t available. Though the resulting images rarely amount to anything, the simple ability to save the moment gives me comfort.
On the other hand, there was that time in May 2023, when my iPhone enabled me to capture the famous maple tree at the Portland Japanese Garden. I’d arrived just hoping to get a simple snap of the celebrity tree, but soon found myself in full photographer mode, switching my phone to raw capture, dropping down to grass level, and going ultra-wide to get an angle that emphasized the web-like canopy and its shadow on the grass. Even though there are already thousands of similar images of this beautiful little tree, my own version turned out to be one of my favorites of the year.
In that case, I was on vacation with my wife and had made the conscious decision before leaving not to take my camera gear, with zero regrets. The situation behind today’s image, that found me with my workshop group a mile or so downriver from El Capitan, was a little different.
It was earlier this month, and I’d taken my group to a view of El Capitan that I’ve photographed so many times, in far more photogenic conditions, that I didn’t expect to find anything new. Given the blank sky, I just left my camera bag in the car and I guided them on the short walk to my spot, fully intending to simply enjoy the view.
I actually have history with this location that goes way back to my earliest digital photography days. One night I was here with my Canon 10D for moonlight photography. Perched 15 vertical feet above the Merced River, I set up my tripod and reached for my 17-40 f/4 L lens, but somehow fumbled it into the dark void below. I couldn’t see a thing, but will never forget the sounds: thump (one bounce off the dirt wall), crack (another bounce off a rock), and splash. Without hesitation, I grabbed my tripod and camera bag and pivoted to the car. The next morning I returned, risking life and limb to scramble down to the river, where I eventually extracted my lens from about 18 inches of water. There was no sign of external damage, but the front lens element revealed water to above the mid-point—enough that if this had been a cartoon, I’d no doubt have seen small fish swimming by.
This spot has changed somewhat since then. Directly on the downstream side of a 90-degree bend in the river, 20 or so years of spring high water have eroded the riverbank, at some point taking a fairly large tree with it. Though the route down to the river is still quite steep, it’s no longer as treacherous as it was when I recovered my drowned lens all those years ago. When one of the people in my group found his way down to the river, a couple more followed, and soon I had to climb down to check out the view myself.
I’d never actually photographed from river level here, so it was cool to find a new perspective. As I can’t help doing, even when I don’t have my camera with me, I started composing shots in my head. My eyes went to a nearby pool, mostly walled-off by rocks from the Merced River’s main flow, reflecting nothing but blue sky. But when I got down on my knees and leaned out over the water as low and as far as my body would allow, I found a position that included a mirror reflection of El Capitan’s upper half—definitely photo-worthy. Because I didn’t have my gear, I hailed one of my workshop students and pointed the shot out to him. He came over to check it out, but decided getting his camera in position for the reflection would be a little too treacherous—both for him and his camera.
When he returned to what he’d been working on, I got the bright idea to whip out my iPhone and give it a try. Had I had my own camera and tripod, I might have tried the shot that way, come to the same conclusion my student did, and just forgotten about it. But with my phone, I was able to lie on my stomach, stretch my arm as far across the water as I could, and snap a one-handed picture.
Since I couldn’t actually see the screen while taking that picture, I retracted my arm and reviewed my result. Despite being not straight, and riddled with several other compositional flaws, it was instantly clear that there really was something photo-worthy there. I switched my Camera app to raw capture and tried again. And again, and again, reviewing and refining like this about a half dozen times, until I was satisfied that I’d gotten it right—the last shot I took is the one you see here.
I know people who claim that today’s smartphone cameras rival full frame cameras, and that there really is very little reason to invest in large-sensor mirrorless or DSLR camera systems anymore. And I’ll acknowledge that today’s smartphone cameras are indeed amazing, absolutely worthy of “best” camera status when no other cameras are available. Which is why I’m very happy to have had my iPhone when I came across a view of El Capitan that I didn’t have. For digital display, and even decent size prints, this iPhone image is fine. But at full resolution, when compared side-by-side with this iPhone 16 Pro image, the difference in detail and clarity captured by my full-frame Sony gear is not even close. (Other large-sensor cameras, versus other smartphone cameras, will yield similar differences.) So it should come as no surprise that, for the foreseeable future, I’ll be lugging my full frame cameras, bulky lenses, and sturdy tripod, any time quality is essential.
Join Me in Yosemite
Workshop Schedule || Purchase Prints || Instagram
Speaking of Seeking Different Views of El Capitan…

, Yosemite")


Ten Reasons to Take Up Nature Photography
Posted on January 16, 2025

Lunar Peek, Zabriskie Point, Death Valley
Sony a7R V
Sony 24-105 f/4 G
ISO 125
f/11
1/4 second
Recently I was talking to a friend on the cusp of retirement, and while she was looking forward to her impending freedom, she wasn’t sure what she was going to do with all her free time. I instantly blurted, “Nature photography!,” then started listing reasons. I surprised even myself with everything I came up with, and how quickly it came, which got me thinking the subject would make a good blog post. So here are my (very biased) thoughts on why nature/landscape photography makes the ideal pastime. (After reviewing the list, it turns out that most of my points apply to many other kinds of photography as well.)
- Save experiences: Ours is a beautiful, dynamic world. Over my lifetime, I’ve been fortunate to have witnessed Nature at its very best, more times than I can count. Though he’s no longer here to thank, for this I’m most grateful to my father—a serious amateur photographer who wouldn’t dream of traveling without a camera—for modeling the importance of recording these moments. It’s no wonder that, almost as soon as I was old enough to make my own major financial decisions, I purchased a 35mm SLR system of my own—mostly because (thanks to my dad) I thought that’s just what adults do. Thanks to my camera, the knowledge that I can revisit Nature’s ephemeral moments any time I want to is a source of great comfort.
- Share experiences: I think my father got as much pleasure sharing his travel experiences as he did recording them. Back in Dad’s time, most non-professional photographers’ images only reached other eyes when (captive?) visitors were sequestered in front a projection screen in a darkened living room (because there was really only one answer to the dreaded question, “Hey, do you want to see the pictures from our vacation?”). And while I won’t pretend Dad never subjected our visitors to the occasional slide show, as a United Methodist minister, he had a whole congregation filled with potential viewers, not to mention access to a large space ideal for sharing. Given the number of people who attended his shows without being compelled or held hostage, I’d say his images were well received. Today, the thrill of taking pictures that please others is as great as it’s ever been, but the opportunities to share them in our digitally connected world have increased exponentially.
- Low start-up cost: Camera gear can be ridiculously expensive, but it doesn’t need to be. Your smartphone will take surprisingly good pictures—good enough to reap most of the benefits listed here long enough to determine whether a bigger investment is justified. And when you do decide you want more serious dedicated photo gear, you can find quality equipment at pretty much any price point. In other words, expense should not be a reason not to pursue photography.
- Flexible income potential: I encounter many people who would like to make a living with their photography. And while there is still excellent money to be made with a camera, nature photography is not among the more lucrative options—not by a long shot (sorry). Fortunately, earning money with a camera doesn’t require you to quit your day job. You can pursue photography as an avocation, reaping the many personal benefits while dipping your toes into selling images (for publication), prints, and services until it grows into something lucrative. That was my path: More than 20 years ago I started doing weekend art shows while keeping my adult job, then gradually segued into workshops, training, and photography-related writing, until I felt confident pursuing photography as a profession. For a while after going fulltime I continued with the art shows, which were both lucrative and fun, but doing art shows and workshops felt like working two different jobs, and the path to a fulltime income with workshops was much clearer, so I dropped the art shows. On the other hand, I know photographers who earn a good living through art and gallery shows. And today, social media has increased the money-making opportunities far beyond what was available when I started.
- See the world (large): Need an excuse, or maybe just a catalyst, to travel? Try photography. It’s easy to get so locked into a day-to-day comfort zone that our dreams of visiting yearned-for locations are never fulfilled. I’m afraid that would probably describe my life were it not for photography. But, going all the way back to when photography was just a hobby, my camera and I have visited remote corners of the globe, enjoyed river rafting adventures in Grand Canyon, and witnessed more celestial and meteorological sights than I ever imagined possible.
- See the world (small): More than just visiting exotic locations, viewing the world with a photographer’s eye enables me to see beauty everywhere, from the distant horizon to right at my feet. I can say with absolute certainty that my own photographer-eyes have become hyperaware of my surroundings, noticing colors, textures, relationships, and minute detail everywhere—not just when I’m actively taking pictures, but pretty much as long as I’m awake: driving, walking, running, or simply sitting still. Not only that, to this day, the more time I spend taking pictures, the more this heightened vision improves.
- Commune with Nature: For many people, myself included, few things are more soothing than quiet time with Nature. This enhanced relationship with the natural world can be active or passive. When I’m immersed in a natural environment, away from the din of “civilization,” all of my senses intensify and seem to work in synergy, providing peace I don’t feel at any other time. But there’s more—even when I’m stuck inside, my life as a photographer inspires me to pursue deeper understanding of my subjects that helps me appreciate them even more.
- Ideal solitary activity: Are you an introvert who recharges by being alone? Nature photography has you covered. I think most of us have times when we just need to dial down the pressures and sensory dissonance of daily life. I can think of no better way than full immersion in the serene sights and sounds of the natural world, completely absent the need to please, impress, or in any other way interact with the rest of the world. When I’m alone in Nature, time seems to stand still, my senses amplify, and my connection to my surrounding is never stronger.
- Ideal group activity: Are you an extrovert who recharges by being around others? Nature photography has you covered. Some of the most memorable experiences of my photography life were made that way because I was able to share them with other like-minded individuals. The joy of these moments is contagious, at times amplified enough by the presence of others to move me to tears.
- Cultivate your creative and analytical brains: I can think of few endeavors that more perfectly blend the right and left brain than photography. Some photographers are drawn by photography’s creative opportunities to view and express the world; others love the technical aspects of managing exposure and focus with their camera’s many controls. While it’s possible to take pictures with just one side of the brain or the other engaged, most people who take up photography are surprised to learn that there is indeed life on the other side of the brain.
About this image
Lunar Peek, Zabriskie Point, Death Valley
The Zabriskie Point moonset is always a highlight of my Death Valley Winter Moon photo workshop. Often we get no clouds, making this sunrise moonset a no-stress event for me. This time (January 2024), when clouds threatened to wash out the shoot entirely, was not one of those events.
The moon was visible above the clouds when we arrived, but the sky was much too dark to capture lunar and foreground detail with one click (my personal requirement). When the moon dropped into the clouds and disappeared completely, I tried to rationalize that at least we’d have nice clouds for our moonless sunrise, but I used all the positive energy I could muster to will the clouds into parting.
Though it lasted for only a couple of minutes, the moon did indeed slip into a small opening long enough for everyone in the group to get a few frames before being swallowed for good. Though only had time for a handful of frames with enough moon to be worthwhile, I think most photographers would take quality over quantity any time.
Workshop Schedule || Purchase Prints || Instagram
The Joy of Nature
Click any image to scroll through the gallery LARGE


")


, Yosemite")


Happy 2025!
Posted on January 1, 2025


I’ve spent the last couple of weeks compiling my favorite images from 2024. It’s an exercise I always look forward to as the year winds down—of course for the opportunity to revisit special moments past, but just as much for the reminder that more special moments await me in the coming year.
As I assemble these highlights, I resist ranking them, or labeling any single image as “favorite.” There are just too many criteria I could use: should it be the one I like most today (always a moving target), the one everyone else likes most (rarely the same thing), or should it be the one that carries the best memories?
I hope you take the time to browse and enjoy my gallery of 2024 highlights below, and that you can see why I’m especially thrilled by the variety of scenes I found in 2024, from expansive landscapes to intimate portraits, from serene reflections to explosive lightning, from brilliant sunbursts to inky night. And even though I can’t choose a favorite, I love hearing the favorites others choose.
Workshop Schedule || Purchase Prints || Instagram
2024 Highlights (ordered randomly)
Click any image to scroll through the gallery LARGE


, Death Valley")

")


2024 In the Mirror: The Night Sky
Posted on December 30, 2024

Silent Night, Milky Way Above Lake Wakatipu, New Zealand
Sony a7R V
Sony 14mm f/1.8 GM
ISO 6400
f/1.8
13 seconds
This is my third and final post looking back at my 2024 photography experiences. Next up: 2024 Highlights—my favorite images of the year.
My relationship with the night sky predates my photography life. In fact, for most of my photography life, cameras weren’t even capable of capturing dark skies well enough to do them justice. That changed with the advent of digital capture, and the evolution of digital sensors that continues to this day.
My love for astronomy was powerful enough that I made it my major when I entered college—and also why I decided to change that major as soon as I found myself actually resenting the quantification of concepts that I simply wanted my mind to be boggled by (I’m fairly good at math, but not astrophysicist-good). Since then, I’ve been much happier simply gazing skyward and pondering the incomprehensible time and distance each pinpoint of starlight represents. Turns out, photography enhances the night sky experience. Not only do my cameras reveal detail and color my eyes can’t see, night photography’s multi-second exposures provide ample time to gaze and ponder.
Though every year includes many night sky experiences, 2024 was especially memorable for a couple of reasons. First, it included each my favorite night subjects: Milky Way, northern lights, the moon, and (especially) a comet (!). The other thing that made my 2024 night sky photography extra special was that my (non-photographer) wife joined me for my two favorite shoots: the Comet Tsuchinshan–ATLAS shoot above Mt. Whitney in October, and my Milky Way shoot at Tasman Lake in New Zealand in July.
Northern Lights

Northern Lights and Big Dipper, Vik, Iceland
The northern lights shoot happened in February, midway through this year’s Iceland workshop that Don Smith and I partner on. Even though the aurora is the top priority for this workshop, it’s also the least reliable of my night sky “big four.” While every night shoot requires clear skies, unlike the other celestial phenomena I target, an aurora is about as reliable as the weather—I can plan a workshop a year or more in advance knowing exactly where the moon, Milky Way, and sometimes even a noteworthy comet, will be, but with the northern lights we just have to schedule and hope. Hope that solar activity tickles the magnetosphere, and hope the skies are clear if it happens.
In the half dozen or so times Don and I have done this trip, we’ve only been shut out once, but for a while it looked like this year would be number two. The aurora forecast was decent—the weather? Not so much. But on the day of our longest drive, from Snaefellsnes Peninsula to Vik, both forecasts improved slightly. After three days of clouds and snow flurries that were about to transition into a major storm, the new forecast promised a small window of clear sky that might last into the beginning of the aurora window. Instead of going straight to dinner upon our arrival in Vik, we beelined up to a cemetery above town and waited, one eye on the northern horizon, the other on the clouds approaching from the south.
As you can see, the clouds held off just long enough. And while we didn’t get the dazzling full-sky display of some prior trips, the lights did dance enough to thrill.
Moonrise/Moonset

Moonrise, Half Dome, Yosemite
My two favorite moon shoots also happened early in the year, first with a moonset in Death Valley and the Alabama Hills in January, followed by a couple of February moonrises in Yosemite. Since I’m no stranger to photographing the moon in these locations, for me the highlight of these experiences was sharing the with my workshop groups.
That said, both the Alabama Hills and Tunnel View shoots were especially nice this year. In the Alabama Hills, my Death Valley workshop group watched a waning gibbous moon, still nearly full, slip behind Mt. Williamson (California’s second highest peak) just as the sun’s first rays pinked up a gauzy layer of clouds.
The Yosemite moonrise looked like it was going to be erased by clouds—especially disappointing as this moonrise aligned so perfectly with Half Dome. But much to the thrill of everyone, the offending clouds thinned and parted at just the right time.
Comet Tsuchinshan–ATLAS
I’ve written about this shoot already, both shortly after it happened, and again in the first post of this series.
Milky Way
Silent Night, Milky Way Above Lake Wakatipu, New Zealand
Usually I get a couple of Grand Canyon Milky Way experiences each year, first on my raft trip in May, then again in my monsoon workshop in summer. But this year clouds wiped both of those out. That loss was more than made up for on the Puna Coast in my Hawaii workshop, and (especially) in New Zealand. You can read about the Hawaii Milky Way experience here.
Of all my annual Milky Way shoots, the one that excites me most is New Zealand, my only opportunity to view the spectacular Southern Hemisphere sky. In addition to the unique sky, pristine air and minimal light pollution makes New Zealand an inherently great place for Milky Way photography, and this year was especially memorable. I’ve already written about the amazing night my wife and I spent with the Milky Way above Tasman Lake, so today I’m sharing a new image (above) from the last night of the New Zealand South Island workshop Don Smith and I do each year.
From the aurora in Iceland to the Milky Way in New Zealand, you have no idea how much Don and stress about delivering celestial phenomena completely out of our control. In New Zealand we have a number of go-to Milky Way spots throughout the workshop. Since it’s winter, clouds are fairly common, but we also nine nights, so when clouds rule one night, we just cross our fingers and hope the next night will deliver. But this year we struck out all the way up to our final night, so our stress level was peaking. (We go no push-back from the group—they understood that we have no control over the conditions and appreciated how hard we were trying to make it work. This was all self-induced stress.)
The workshop’s last full day had a lot of clouds and a little blue sky, but nothing if not optimistic, we were going to give the Milky Way a shot no matter what. After our sunset shoot, we drove straight to our Lake Wakatipu spot and waited for the sky to darken. By the time we arrived the clouds had cleared wonderfully, and I knew it was just a matter of time before our group would understand that all my raving about the New Zealand night sky isn’t just hyperbole.

New Zealand Night, Milky Way and Small Magellanic Cloud, Tasman Lake (2024)
These nights, when I know it’s just a matter of time before the sky delivers and there’s absolutely nothing to stress about, are some of my favorite times with my workshop groups. Waiting for the sky to darken, we just stand (or sit) around chatting and laughing—especially on the final evening of a 10-day workshop, when genuine friendships have formed—watching the landscape fade and the stars slowly pop out. The camera will “see” the Milky Way before we do, so every few minutes I click a frame to monitor its progress. At some point I’ll tell the group it’s time to start shooting, and not long after that it becomes dark enough for the Milky Way to be clearly visible to our eyes too.
For a while after we can see it, the Milky Way seems to get brighter and brighter against the still darkening sky. In New Zealand, I always keep a lookout for the Magellanic Clouds, two small satellite galaxies, bound by gravity to our Milky Way but not visible in the Northern Hemisphere. When they appear, I know the darkness is complete.
Since most of my time during these shoots will be occupied helping people, by the time everyone has started shooting, I have my composition in place, my camera focused, and my exposure set. That way I can just click a frame each time I pass my camera on my way to help the next person. This also frees me to just gaze and ponder, as I’ve always done when the sky is dark and stars are out, and as I will forever do.
Experience the New Zealand night sky for yourself
2024 After Dark
Click any image to scroll through the gallery LARGE

")


2024 in the Mirror: More Experiences
Posted on December 22, 2024

Evening Glory, Lake Wakatipu, New Zealand
Sony a7R V
Sony 24-105 f/4 G
ISO 50
f/18
15 seconds
I’ll be compiling my favorite 2024 images very soon, but before emphasizing my images, I’m trying to acknowledge the experience that went with their capture. In my previous blog post, I described three especially memorable 2024 photography experiences; today I’ll share two more. This time, instead of specific shoots, I want to celebrate my ability to visit two countries that are as beautiful as they are different, and distant, from one another.
New Zealand
My first experience of New Zealand came in 1995, when, while working for a company that sold a programming language, I traveled to Christchurch to train programmers how to code in our language. I was there in August (winter), staying in the rural countryside outside this beautiful city. My 7-mile run before traveling to meet my class each morning started in darkness and continued through sunrise. So beautiful was my route, I actually started carrying my camera to record it.
I interrupt this blog to bring you a funny story…
Approaching the Christchurch airport terminal to start my long trip home, I encountered a police roadblock. We were told in no uncertain terms to stay in our cars, and it soon became apparent that the parking lot was filling with people fleeing the terminal. This was pre-911, back when airport security measures were more of an afterthought for passengers, so I had no idea of what could be going on. Fire? Gas leak? Kiwi infestation?
My questions were answered when my car was rocked by a loud explosion that launched a swarm of brightly colored clothing that wafted like oversized confetti onto the pavement. Crisis averted, the road and terminal reopened and we all made our way inside. There we learned that a rogue suitcase had been discovered in the terminal; when authorities found no one to claim it, they decided the prudent thing would be to detonate it (because who wouldn’t pass on the opportunity to legally blow something up?). Only then did they learn that nothing nefarious was afoot—and some traveler’s wardrobe had been suddenly and significantly depleted.
I return you now to your regularly scheduled blog post…
After those two weeks, most of which were occupied with work more than sightseeing, I harbored dreams of someday returning to New Zealand, but never found the opportunity. That is, until Don Smith and I got the idea to partner on a New Zealand workshop. After a couple years of research and scouting, Don and I have done at least one, and sometimes two, New Zealand workshops every non-Covid year since 2018. To say I’ve fallen in love with this country would be an understatement—not just for its spectacular scenery, but also for its friendly people, surprisingly delicious food, pristine air and water (and cities!), and mesmerizing night sky.
Our New Zealand trip is always in June or early July—winter Down Under. In addition to avoiding tourists, winter offers the best potential for interesting weather. The potential for harsh conditions of course creates a real wildcard element, but photographers have more pressing priorities than comfort—like good pictures. Difficulties attributed to harsh weather are usually more than made up for by spectacular scenes only possible in the wildest conditions. For each shoot wiped out by rain, snow, or fog, we enjoy multiple shoots significantly enhanced by dramatic light, clouds, and weather phenomena.
For example, the snowy peaks and crimson sunset that blessed the first evening of this year’s New Zealand workshop. In July I shared one image from this sunset, but suffice to say, it wasn’t the only picture I took. (You can view that slightly tighter version in the gallery below.) Today’s image from that evening is similar, but composed wider to include more sky and foreground.
Scenes like this just demand to be composed wide, but I was inhibited by a few obstacles: specifically a railed vista to my right (where many in our group were set up), and a steep slope covered with dense shrubs to my left. After a little searching, I found a spot on the other side of the railing and a few feet down the slope that stayed out of everyone’s frame, kept me above the shrubs, and was as far as possible from the vista.
I couldn’t avoid a couple of nearby tripod legs, which allowed me to go just wide enough to include a small pool in the foreground rock that I noticed was reflecting the sky’s otherworldly color. Fortunately, the tripod legs were simple to remove in Photoshop without altering the scene in any visible way. With the mountain portion of the lake reflection disturbed by gentle undulations, and the reflection on the near shore beneath me even more wind-whipped, I added a Breakthrough 6-Stop Dark Polarizer to smooth the water with a long exposure.
This sunset was only the first of many off the charts scenes this year’s group enjoyed. Rain forests, snow-capped peaks, glaciers, fiords (the New Zealand spelling), glacial lakes, waterfalls—what’s not to love? Here’s a gallery with just a few of the sights we enjoyed this year.


Iceland
When Don Smith and I first considered offering an Iceland workshop, our primary goal was the northern lights. We had no idea that we’d make it an annual thing, and even though the northern lights turned out to be even more breathtaking than we’d imagined, it’s the scenery that keeps us coming back to Iceland. Given our new infatuation with New Zealand, it would be easy to mentally pit the two islands against each other. But much like picking a favorite child, doing so would be both unfair and impossible.
The things I love most about Iceland are also the things that differ most significantly from New Zealand. Though both islands are ribbed with snow-capped peaks, New Zealand’s beauty skews to lush and verdant, while Iceland’s beauty is stark and monochrome.
Iceland is a volcanic island that first emerged from the North Atlantic around 18 million years ago. Countless eruptions since have expanded the island with layers of hard black lava, building mountains that continue growing only slightly faster than the harsh conditions can wear them down. In winter, all that’s green on Iceland has died or been covered with snow and ice, creating a landscape that’s mostly white with black accents (or, in low-snow years, black with white accents).
But it’s the binary color palette of Iceland’s frosty, volcanic terrain that makes its (surprisingly frequent) ephemeral color especially stand out: The northern lights for sure, but also the glacial rivers and streams, sapphire ice caves, and, thanks to a winter sun that never rises higher than 10 degrees above the horizon, two-hour sunrises and sunsets. All this, plus the relentless pounding by violent surf, makes Iceland hands-down the most dramatic landscape I’ve ever photographed.
Check out this small gallery with an assortment of images from my 2024 Iceland visit.


Visiting these two contrasting islands, even once, is a gift. But doing it year-in and year-out has not only enabled me to appreciate their beauty more, my love for the people and their culture grows with each visit.
New Zealand and Iceland Through the Years
Click any image to scroll through the gallery LARGE


