Eloquent Images by Gary Hart
Insight, information, and inspiration for the inquisitive nature photographer
Let’s Get Vertical (Again)
Posted on November 16, 2025

New Day, Tunnel View, Yosemite
iPhone 17 Pro
(This seed of today’s blog is a post from many years ago—but the image and its story are brand new.)
What’s your orientation?
I’ve always questioned the reasoning behind labeling horizontally oriented images, “landscape,” and vertically oriented images, “portrait.” Despite my profession as a landscape (-only) photographer, nearly half of my images use “portrait” orientation. So it concerns me that this arbitrary naming bias might subconsciously encourage photographers to default to a horizontal orientation for their landscape images, even when a vertical orientation might be best.
The orientation of an image imparts implicit visual motion that’s independent of the eyes’ movement between an image’s visual elements. Photographers who understand that viewers’ eyes tend to move along the frame’s long side have an extra tool for guiding those eyes, and even to convey a mood.
For example, when orienting an image of a sunset on the coast, it’s easy to default without thinking to the same horizontal orientation that the distant horizon follows. And a waterfall image that’s oriented vertically certainly encourages the viewers’ eyes to move in the same direction as the water’s motion, so orienting the frame to match certainly seems reasonable. But, despite the natural instinct to match the frame’s orientation to the scene’s dominant flow, there is no absolute best way to orient an ocean, waterfall, or any other scene—there’s always a choice, and that choice matters. While matching the image’s orientation to the scene’s natural movement in this manner can instill a calmness to the image, a vertical ocean sunset, or horizontal waterfall, can create visual tension that can also be quite compelling.
Since I don’t need to convince most landscape photographers to take more horizontal pictures, I’m going to concentrate on the benefits of a vertical frame. One thing I especially like about orienting my landscape scenes vertically is the way it moves my viewer’s eyes through the scene from front to back, enhancing the illusion of depth that’s so important in a two-dimensional photo. And because of a vertical frame’s relative narrowness, a foreground element (that might get lost in a wider horizontal frame) instantly becomes the focal starting point that starts my viewer’s visual journey through the frame to whatever striking background I want to feature.
More than just guiding the eye through the frame, vertical orientation narrows the frame, enabling me to eliminate distractions or less compelling objects left and right of the scene’s prime subject(s). This makes vertical my preferred orientation when I want to emphasize an especially striking foreground from above (like Tunnel View), or a sky brimming with colorful clouds or a host of stars.
While a horizontally oriented scene is often the best way to convey the sweeping majesty of a broad landscape, I sometimes enjoy guiding my viewers’ eyes with vertical compositions of traditionally horizontal scenes. Tunnel View in Yosemite, where I think many photographers tend to compose too wide, is a great example. The scene to the left of El Capitan and the right of Cathedral Rocks just can’t compete with the El Capitan, Half Dome, Bridalveil Fall triumvirate, yet the world is full of Tunnel View images that shrink this trio to include (relatively) nondescript granite.
That’s why, when the foreground and sky aren’t particularly interesting, I often go for fairly tight horizontal compositions at Tunnel View. And while Tunnel View is among the most spectacular views on Earth, the foreground beneath the vista is usually quite bland, and overhead California’s chronic blue skies are frustratingly boring. So I’m afraid many of my Tunnel View images are horizontal, and rarely stray far left of El Capitan, or right of Cathedral Rocks.
Fortunately, there are exceptions. One of my favorite exceptions is those rare times when fresh snow smothers the evergreen valley floor. Another favorite is dramatic clouds, whether in the valley below or sky above. Faced with visual treats like this, vertical frames are wide enough to feature the foreground and/or sky without diluting the Tunnel View drama by including extraneous granite.
More specifically…
In Yosemite, one thing I never count on when there’s no weather in the forecast is a nice sunrise. That’s because Yosemite’s (default) blank skies, coupled with Tunnel View’s east-facing view, forces sunrise shooters to photograph fully shaded subjects (El Capitan, Half Dome, Cathedral Rocks, and Bridalveil Fall) against the brightest part of the sky. That’ why, without clouds, Tunnel View is much better late afternoon to sunset. For me, on a typical (empty sky) Yosemite morning, the real show is the first light on El Capitan, which arrives about 15 to 20 minutes after sunrise. On mornings with no clouds forecast, I usually start my groups with an El Capitan reflection of that first light—not only is this a reliably beautiful sight, everyone gets to sleep an hour longer (since going for the actual sunrise means being on location at least 30 minutes before sunrise instead of 20 minutes after).
But for whatever reason, and despite a promise of clear skies all morning (until a storm was forecast to start moving in that afternoon), I decided to hedge my bets on the final sunrise shoot of this month’s Yosemite Autumn Moon photo workshop. Normally we spend this final morning at Bridalveil Creek, arriving as soon as it’s light enough to start shooting in the dense shade there. Instead, I got everyone out about 30 minutes earlier and headed straight to Tunnel View. While this wouldn’t be early enough to shoot sunrise from start to finish, it would get us there in time for the best color in the remote chance the clouds arrived earlier than forecast. And that’s exactly what happened.
We were pulling in just as the cirrus precursors to the evening rain started lighting up. Since my group had already been up here twice, everyone was out of the cars and grabbing their gear before my seatbelt was off. Half the group beelined to the standard view with my brother (who was assisting me in this workshop), while the rest joined me on a granite ledge above the TV parking lot (a similar view, but with fewer people—also a little more physically challenging, and not the favorite spot of anyone bothered by heights).
As beautiful as the sky was, since I rarely photograph at Tunnel View anymore, my camera stayed in the car and I was content to just enjoy the show. Or so I believed. But as I stood there watching the color keep getting better and better, I started to second guess my decision to forego my camera. I knew I could be down to my car any back in less than 5 minutes, but the color was changing so rapidly, I also knew that would mean missing the best stuff. So I whipped out my iPhone 17 Pro, put it into RAW mode, and quickly framed up the scene.
With the great sky and bland foreground, I didn’t consider anything but vertical compositions. At first I went wide enough to include Bridalveil Fall, and though it was flowing nicely for autumn, it really wasn’t impressive enough to justify going that wide. So I quickly tightened my framing to include only El Capitan and Half Dome, putting in only the minimum amount of foreground so I could maximize the spectacular sky. I’d love to tell you what focal length, f-stop, and shutter speed I used, but my iPhone made all those decisions for me, and clearly did a pretty great job. What a time to be alive!
A few thoughts on iPhone image quality
Okay, seriously, as great as the iPhone (or any other current smartphone) camera is, let me remind you that smartphone image quality is nowhere near the quality of today’s full frame sensors and lenses. And I actually got a firsthand reminder of this fact while processing this image. Though I was truly blown away by the detail my iPhone captured, on the day I processed today’s image, I also prepared three large prints that had been ordered by an interior designer for the home of one of her customers. Though two of these images were captured more than 15 years ago with my Canon 1DS III (21 megapixels); the other was about 10 years old, from my Sony a7R II (42 megapixels), I was pretty confident the quality and detail this job required was all there.
-

- Stillness, South Tufa, Mono Lake
-

- First Light, Yosemite Valley
-

- Yosemite Sky, Tunnel View, Yosemite (2016)
And because maximizing this quality was the highest priority for her customer, she opted for custom prints rather than just going through my standard (much cheaper) SmugMug prints website (www.garyhartprints.com), where the images are pre-uploaded, medium resolution jpegs waiting for anyone to order (full disclosure: I’ve never had a single complaint about one of these prints). To prepare the images for printing, I returned to the original files and did extensive prep (using the latest processing technology) to ensure that the noise reduction, up-res, and sharpening got the most out of every single pixel.
I am absolutely certain I could print an iPhone image as large as these custom orders were (24×36) without apologizing. But getting up-close and personal with these three full-frame sensor prints at the same time I was processing an iPhone image, the detail captured left little doubt that, for anything much larger or more demanding than computer/web display, smartphone capture has a long way to go to catch “real” cameras. (But I’m still pretty thrilled to know that I can get useable quality any time Nature catches me without my real camera.)
Join me in Yosemite
Workshop Schedule || Purchase Prints || Instagram
Let’s Get Vertical
Click any image to scroll through the gallery LARGE
, Yosemite")


Super? Moon
Posted on November 8, 2025
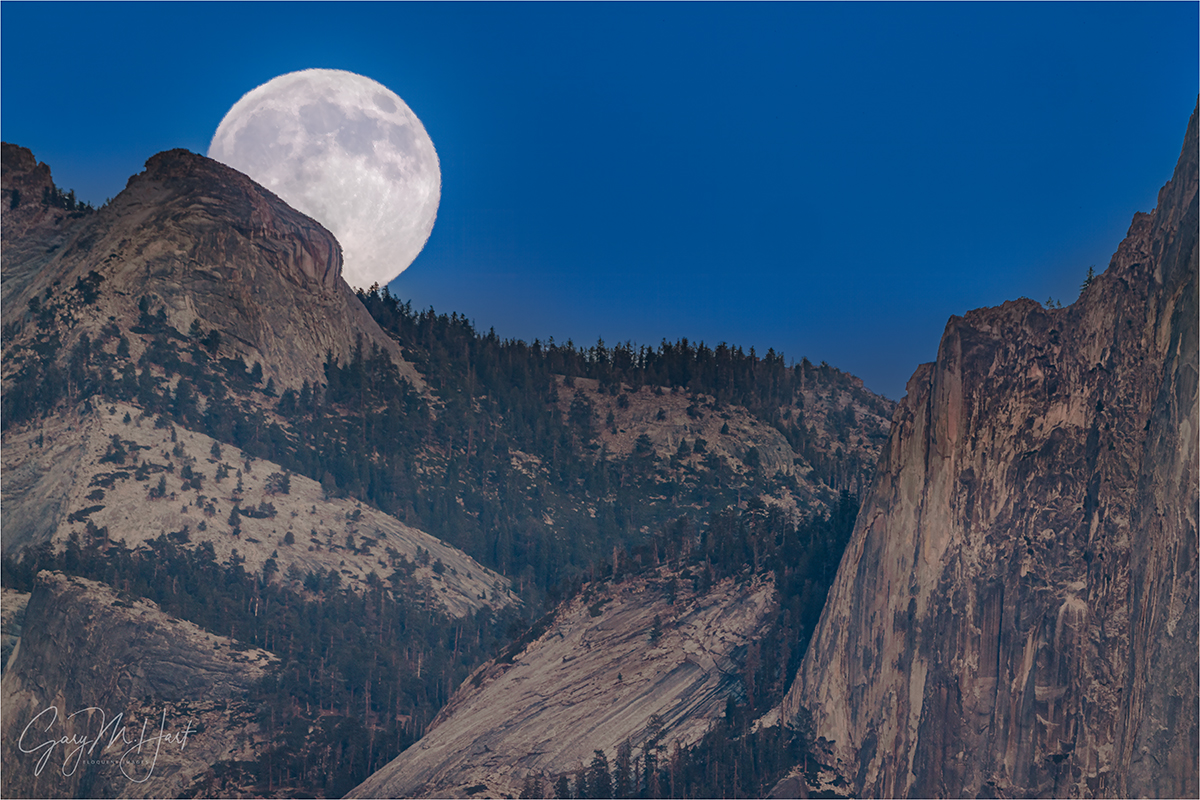
November Moon, Half Dome from Tunnel View, Yosemite
Sony a7R V
Sony 200-600 G
Sony 1.4x teleconverter
ISO 200
f/9
1/80 second
This week’s full moon was a “supermoon”—or, as the media frequently proclaimed, “The biggest moon of 2025!” And while that is technically true, the size difference between a super and average moon is barely perceptible.
So, as a public service, I’ve dusted off and updated a prior article explaining the supermoon phenomenon (any hyperbole)—and what better time to share it than just days after photographing the November supermoon?
What’s the big deal?
So what exactly is so “super” about a “supermoon?” Answer: Not much. Or, maybe a better way to answer the question would be: When presented with a random series of full moon images, would you in fact be able to identify the supermoon? Doubtful. So why the media frenzy? And why do we see so many huge moon images every time there’s a supermoon? So many questions….
Celestial choreography: Supermoon explained
To understand what a supermoon is, you first have to understand that all orbiting celestial bodies travel in an ellipse, not a circle. That’s because, for two (or more) objects to have the gravitational relationship an orbit requires, each must have mass. And if they have mass, each has a gravitational influence on the other. Without getting too deep into the gravitational weeds, let’s just say that the mutual influence the earth and moon have on each other causes the moon’s orbit to deviate ever so slightly from the circle it seems to be (without precise measurement): an ellipse. And because its orbit isn’t round, as the moon circles Earth, its distance varies with the position in its orbit.
An orbiting object’s closest approach to the center of its ellipse (and the object it orbits) is at perigee; its greatest distance from the ellipse’s center is apogee. And the time it takes an object to complete one revolution of its orbit is its period. For example, earth’s orbital period around the sun is one year (365.25-ish days), while the period of our moon’s orbit is slightly more than 27 days.
But if the moon reaches perigee every 27 days, why don’t we have a supermoon every month? That’s because we’ve also added “syzygy” to the supermoon definition. In addition to being a great Scrabble word, syzygy (though it would cost you 2 blank tiles) is the alignment of celestial bodies—in this case it’s the alignment of the sun, moon, and earth (not necessarily in that order). Not only does a supermoon need to be at perigee, it must also be syzygy.
Syzygy happens twice each month, once when the moon is new (moon between the sun and Earth), and again when it’s full (Earth between the sun and moon). While technically a supermoon can also be a new moon, the full moon that gets all the press because a new moon is lost in the sun’s brightness and never visible, so no one cares. Since Earth circles the sun while the moon revolves around Earth, to achieve syzygy, with each orbit the moon has to travel a couple extra days to catch up. That’s why the moon reaches perigee evey 27 days, but syzygy comes every 29.5 days—the moon’s distance from earth is different with each syzygy because it comes at different points in the orbit.
The view from earth: Supermoon observed
While lunar perigee, apogee, and period are precise terms that can be measured to the microsecond, a supermoon is a non-scientific, media-fueled phenomenon loosely defined as a moon that happens to be at or near perigee when it’s full. To you, the viewer, a full moon at perigee (the largest possible supermoon) will appear about 14% larger and 30% brighter than a full moon at the average distance. The rather arbitrary consensus definition of the distance that qualifies a moon as a supermoon is a full moon that is within 90 percent of its closest approach to earth.
I really doubt that the average viewer could look up at even the largest possible supermoon and be certain that it’s larger than an average moon. And all those mega-moon photos that confuse people into expecting a spectacular sight when there’s a supermoon? They’re either composites—a picture of a large moon inserted into a different scene—or long telephoto images. (I don’t do composites, but they’re a creative choice that I’m fine with others doing as long as they’re clearly identified as composites.)
For an image that’s not a composite, the moon’s size in the frame is almost entirely a function of the focal length used. I have no idea whether most of the moons in the full moon gallery below were super, average, or small.
Can you identify the supermoon?
, Yosemite")

Well, if you said the big moon is a supermoon, you’d be right. But it’s kind of a trick question, because these are both images of Tuesday’s supermoon. The size difference is entirely a function of the focal length I used: around 100 mm for the small moon, more than 800 mm for the large one. What these images also make clear is that what I gain in moon size, I lose in field of view—you can’t have both. So when you see a wide angle scene with a huge moon, don’t think supermoon, think composite: a big moon dropped into a wide scene. Or worse still: AI. (Yuck.)
Every full moon is super
As far as I’m concerned, a rising or setting full moon is one of the most beautiful things in nature. But because a full moon rises around sunset and sets around sunrise, when most people are eating dinner or sleeping, seeing it is often an accident—maybe the moon catches your eye as you walk out of the store, or you spot it in near the horizon when your car rounds a bend. But viewing a moonrise or moonset doesn’t need to be an accident. There’s loads of information available online that will tell you which night to look for a full moon, and the general time and direction to look. And for people like me, who try to photograph moonrises and moonsets around an alignment with a terrestrial feature, there is also slightly more technical info that enables more precise planning.
About this image
Which brings me to this week’s image (images), captured Tuesday evening from my very favorite location to view a moonrise: Tunnel View in Yosemite. Why is Tunnel View my favorite moonrise location? Because I can’t think of a better combination beautiful subjects and distant view (nearly 9 miles to Half Dome), that allows me to photography the moon large with with a long telephoto lens and include a striking foreground subject. And if I just want to use the moon to accent a broader scene, the wide angle view at Tunnel View is not too shabby either.
As with most of my moonrise images, this one had been on my radar for over a year. And like many of my moonrise opportunities, I scheduled a workshop so I could share it with other enthusiastic nature photographers. But, since I don’t care about supermoons, I had no idea this November full moon would be a supermoon—and as I grew tired of hearing in the preceding weeks, the largest full moon of 2025! (Yawn.)
The way this month’s full moon set up, I was able to get my group a couple of practice moonrises from other Yosemite locations leading up the Tuesday moonrise—one with a reflection of Half Dome, and another from Glacier Point. Not only did they lear exposure and processing techniques that allow the capture of lunar and landscape detail with a single click, they got beautiful (albeit wider, with a small moon) moon images. I also demonstrated in a training session how I plot the moonrise (without using celestial plotting apps like Photographer’s Ephemeris and Photo Pills).
There’s often drama surrounding an impending moonrise as I stress about forecasts that promise clouds, or a sky filled with more clouds than forecast. This year, despite the threat of rain the following day, the Tuesday evening forecast was clear skies. And true to expectations, the entire afternoon was cloud free.
I got my group up to Tunnel View about a half hour before the moon’s expected arrival, so we all had plenty of time to get set up and settled in. About half of the group joined me on a granite slab above the Tunnel View parking lot, with the rest of the group setting up with my brother Jay and the hoards of other photographers at the wall in front of the parking lot (the standard Tunnel View vista).
I had two tripods set up: one with my (big and sturdy) RRS TVC-24L, with my Sony a7R V and 1.4X teleconverter; one with my Sony a1 and 100-400. My plan was to switch between the two bodies, and to switch out the 200-600 for my 24-105 once the moon separated from the landscape. In other words, I’d be using the a1 with the 100-400 for the entire shoot, and the a7R V with the 200-600 (first) and 24-105 (after a few minutes).
As we waited, I reminded my group that the moon would appear just a little left of Half Dome at around 4:45 (about 15 minutes before sunset), plus/minus 5 minutes. I also told my group that, depending on their camera and metering skills, we’d be able to continue photographing up to 15 minutes after sunset before the foreground became too dark to capture both lunar and landscape detail with one click. The moon arrived right on schedule, right around 4:44 and we were in business….
So maybe the best thing to come of the recent supermoon hype is that it’s gotten people, cameras or not, to appreciate the beauty of a full moon. If you like what you see, mark your calendar for every full moon and make it a regular part of your life—you won’t be sorry.
Join me in a Yosemite workshop
Workshop Schedule || Purchase Prints || Instagram
Tunnel View Moonrise Collection (Super and Otherwise)
Click any image to scroll through the gallery LARGE


, Yosemite")


One Night, Two Moons
Posted on November 27, 2024

Through the Clouds, Tunnel View Moonrise, Yosemite
Sony a7R V
Sony 24-105 f/4 G
ISO 100
f/10
1/3 second
I wrapped up this year’s workshop schedule at the beginning of this month and am now enjoying a much anticipated Holiday breather before my schedule ramps up again in January. This isn’t exactly a vacation, because the end of the year is when all my permit reporting and next year’s permit applications are due, and my 2025 workshop prep starts to ramp up, but my schedule does get a bit less frenetic when the travel (and all its prep and recovery) is over.
As I often do when my travel schedule eases around the Holidays, I prioritize family over photography. That doesn’t mean no new pictures, but it does mean that most (all?) of the new pictures I share over the next couple of months will probably be pictures captured months, or even years, ago, but never got around to processing.
Going through my vast repository of unprocessed images is something I started doing while isolated during the early months of the pandemic (has it really been 4 1/2 years?!). I’d always been aware that I had lots of untapped gems languishing on my hard drive(s), but was nevertheless surprised by how much I enjoyed searching them out. Sometimes I’ll start by randomly picking a photo trip and scanning the Lightroom thumbnails for something that stops me, but the most productive approach has been going through my collection of already processed favorites to identify particularly special shoots, reasoning that there must certainly be more there. (I write more about this in my Back to the Future blog post.)
It always surprises me how much I enjoy revisiting past photo trips and workshops. Not only does the experience revive memories of special moments in Nature, lots of the best memories are of the people I was with. Sometimes that’s been other photo buddies, but since so much of my photography is centered around my workshops, the majority of those memories are actually my workshop groups.

Moonrise, Half Dome, Yosemite
Case in point: The seed for this “new” image was my “Moonrise, Half Dome, Yosemite” image from my February 2024 Yosemite Winter Moon workshop. Going through this workshop’s image folder, all the cloud-induced stress surrounding this particular moonrise came flooding back. And with it also came memories of the euphoria we all felt when the clouds opened just enough, at exactly the right time, to reveal the Half-Dome/moon/sunset alignment I’d been thinking about for more than a year. (Read the details here: Moon Swoon.)
Within minutes, the moon had climbed into the rapidly thickening clouds, and it looked like the show might be over—until, shortly before darkness was complete (or at least too dark to photograph the moon and foreground in one frame), it rose into a patch of slightly thinner clouds and briefly reappeared.
My strategy for moonrises is to go long until the moon separates from the landscape, then go progressively wider as it rises. This evening I’d set up two tripods, one with my Sony α1 and 200-600 lens, the other with my a7RV and 24-105 lens. So when the moon made its brief return, I was instantly ready to start clicking.
I chose a vertical composition to emphasize the foreground and minimize the lateral aspects of the scene. I also tried a few that were wide enough to include more of El Capitan, but ultimately decided to process this one to avoid shrinking the moon too much with a wider focal length.
Viewing these two images together provides a fantastic opportunity to make a point I’ve tried to make many times before: how to photograph a large moon. Thanks to the continued emphasis (and hype) focused on the largely irrelevant “supermoon” phenomenon, many people seem to believe the size of the moon in the sky is the most import part of a large moon image. It’s not.
The size of the moon in any image is almost entirely a function of the focal length used, not the relatively small difference between a “regular” size moon and a supermoon. Compare the size of the moon in these two images, noting that they were captured from the same location, on the same night, less than 10 minutes apart. For the big moon image, I used a 450mm focal length that magnified both Half Dome and the moon and eliminated everything else. For today’s smaller moon image, I chose a 50mm focal length that enabled me to fit far more of the surrounding beauty, but also shrunk the moon.
I should add that as far as I’m concerned, the absolutely best light for photography is the shadowless light that starts 10-15 minutes after sunset. I captured my (wide) image about 15 minutes after sunset. To my eyes, the scene appeared much darker than what you see in the image. I had to be careful with the exposure to avoid blowing out the moon, making the foreground in my raw original nearly black, but by monitoring my histogram and knowing my camera, I knew that the shadows would be recoverable. And I think the thin clouds helped subdue some of the lunar highlights, enabling to give the scene a little more exposure.
I still have a few openings in my 2025 Yosemite photo workshops
The Moon Large and Small, from Full to Crescent
Click any image to scroll through the gallery LARGE


")

")


Happy Earth Day
Posted on April 26, 2024

Valley Fog, Tunnel View, Yosemite
Sony a7R V
Sony 24-105 f/4 G
ISO 100
f/10
1/6 second
My commitment for this blog is one image/post per week. With a workshop that started Sunday and ended Wednesday, I’m a little behind this week, but I made it! Next week I have a workshop that goes from Monday through Thursday, and the following week I’ll be completely off the grid rafting the Grand Canyon. But one way or the other, I’ll continue with my once per week commitment, even if I’m a little late. And if I do have to skip a week, I’ll catch up eventually, I promise. I return you now to your regular programming…
Happy Earth Day to you
How did you celebrate Earth Day (April 22) this year? I was fortunate enough to celebrate up close and personal, guiding a workshop group around Yosemite. It’s easy to appreciate a planet when you’re surrounded by some of its most exquisite beauty, and with a group of people who appreciates it as much as you do, but every time I visit, I’m reminded that we may in fact be loving our wonders to death.
It’s impossible to have zero impact on the natural world. Every day, even if we never leave the house, we consume energy that, directly or indirectly, pollutes the atmosphere and contributes the greenhouse gases that warm our planet. The problem only worsens when we venture outdoors. Our vehicles belch exhaust, or consume electricity that was the product of invasive mining. At our destination, the clothing we wear introduces microscopic, non-indiginous flora and fauna, while the noise we create clashes with the natural sounds that comfort others and communicate information to animals. Even foot travel, the oldest, most fundamental mode of transportation, crushes rocks, plants, and small creatures with each footfall. And let’s not forget the artificial light that dilutes our once black night sky.
I’m not suggesting that we all hole up beneath a rock. If everyone just considered how their actions impact the environment and acted responsibly, our planet would be a better, more sustainable place.
Let’s get specific
The damage that’s an unavoidable consequence of keeping the natural world accessible to all is a tightrope our National Park Service does an excellent job navigating. With their EVs, organic, and recycling mindset, it’s even easy for individuals to believe that the problem is everyone else.
I mean, who’d have thought merely walking on “dirt” could impact the ecosystem for tens or hundreds of years? But before straying off the trail for that unique perspective of Delicate Arch, check out this admonition from Arches National Park. And Hawaii’s black sand beaches may appear unique and enduring, but the next time you consider scooping a sample to share with friends back on the mainland, know that Hawaii’s black sand is a finite, ephemeral phenomenon that will be replaced with “conventional” white sand as soon as its volcanic source is tapped–as evidenced by the direct correlation between the islands with the most black sands beaches and the islands with the most recent volcanic activity.
Sadly, it’s Earth’s most beautiful locations that suffer most. Yosemite’s beauty is no secret—to keep it beautiful, the National Park Service has been forced to implement a reservation system to keep the crowds (marginally) manageable. Similar crowd curtailment restrictions are in place, or being strongly considered, at other national parks. And while the reservations have helped in Yosemite and elsewhere, the shear volume of visitors who make it through guarantees too much traffic, garbage, noise, and too many boots on the ground.
While Yosemite’s durable granite may lull visitors into environmental complacency, it is now permanently scarred by decades of irresponsible climbing. And Yosemite’s fragile meadows and wetlands, home many plants and insects that are an integral part of the natural balance that makes Yosemite unique, suffer from each footstep to the point than some are now off-limits.
A few years ago, so many people crowded the elevated bank of the Merced River to photograph Horsetail Fall’s sunset show, the riverbank collapsed—that area is now off limits during Horsetail season. Despite all this, I can’t tell you how often I see people in Yosemite cavalierly trampling meadows to get in position for a shot, as a trail shortcut, or to stalk a frightened animal.
Don’t be this person
Despite the damage inflicted by the sheer volume of garden variety tourists, my biggest concern is the much smaller cohort doing a disproportionate amount of damage: photographers. Chasing the very subjects they put at risk, photographers have a vested interest and should know better. But as the urge to top the one another grows, more photographers seem to be abusing nature in ways that at best betrays their ignorance of the damage they’re doing, and at worst reveals their startling indifference to the fragility of the very subjects that inspire them to click their shutters in the first place.
If I can’t appeal to your environmental conscience, consider that simply wandering about with a camera and/or tripod labels you, “Photographer.” In that role you represent the entire photography community: when you do harm as Photographer, most observers (the general public and outdoor decision makers) simply apply the Photographer label and lump all of us, even the responsible majority, into the same offending group.
Like it or not, one photographer’s indiscretion affects the way every photographer is perceived, and potentially brings about restrictions that directly or indirectly impact all of us. So if you like fences, permits, and rules, just keep going wherever you want to go, whenever you want to go there.
It’s not that difficult
Environmental responsibility doesn’t require joining Greenpeace or dropping off the grid (not that there’s anything wrong with that). Simply taking a few minutes to understand natural concerns specific to whatever area you visit is a good place to start. Most public lands have websites with information they’d love you to read before visiting. And most park officials are more than happy to share literature on the topic (you might in fact find useful information right there in that stack of papers you jammed into your car’s center console as you drove away from the entrance station).
Most national parks have non-profit advocacy organizations that do much more than advocate, maintaining trails and underwriting park improvements that would otherwise be impossible. For example, the Yosemite Conservancy funded Bridalveil Fall’s recently completed (significant) upgrade that included new flush toilets (yay!), new trails and vistas, and enhanced handicapped access.
If you spend a lot of time at a national park, consider supporting its non-profit partner. The two I belong to are Yosemite Conservancy and Grand Canyon Conservancy.
Develop a “leave no trace” mindset
Whether or not you contribute with your wallet, you can still act responsibly in the field. Stay on established trails whenever possible, and always think before advancing by training yourself to anticipate each future step with the understanding of its impact. Believe it or not, this isn’t a particularly difficult habit to form. Whenever you see trash, please pick it up, even if it isn’t yours. And don’t be shy about gently reminding (educating) other photographers whose actions risk soiling the reputation for all of us.
A few years ago, as a condition of my national parks’ workshop permits, I was guided to The Center for Outdoor Ethics and their “Leave No Trace” initiative. There’s great information here–much of it is just plain common sense, but I guarantee you’ll learn things too.
Armed with this mindset, go forth and enjoy nature–but please save some for the rest of us.
About this image

Valley Fog, Tunnel View, Yosemite
When I started taking pictures, long before the dawn of digital, my emphasis was outdoor subjects ranging from natural landscapes to urban skylines and bridges. But as my eye and overall relationship with the world has evolved, I’ve gravitated naturally toward landscapes and away from the cityscapes.
I understand now that this evolution has much to do with my love (and concern) for the natural world, both the beauty that surrounds us and damage we’re doing, and a desire to honor it. In recent years I’ve very consciously striven to, as much as possible, create images that allow people to imagine our planet untouched by humans—perhaps hoping that they’ll understand what’s at risk somehow do their share to stem the tide.
Though only number six on the current list of most visited national parks, Yosemite needs to cram the vast majority of its nearly 4-million annual visitors into the less-than 10 square miles of Yosemite Valley. In fact, for more than half the year, almost all of the park outside of Yosemite Valley is smothered in snow and closed to vehicles. This creates congestion and other problems that are unique to Yosemite.
One of the most beloved vistas on Earth, Tunnel View attracts gawkers like cats to a can-opener—all I have to say about that is, “Meow.” Despite its popularity, and the fact that the vista has indeed been crafted by the NPS (paved parking, enclosed by a low stone wall, and many trees removed to maintain the view), Tunnel View remains one of my favorite places to imagine a world without human interference.
My history with Tunnel View in Yosemite dates back to long before I ever picked up a camera, but I never take it for granted. Each time I visit, I try picture Yosemite before paintings, photographs, and word of mouth eliminated the possibility for utter surprise and awe, and what it must have been like to round a corner or crest a rise to see Yosemite Valley unfolding before you (earlier views of Yosemite were not at the current location of Tunnel View, but the overall view and experience were similar).

Dance of the Veils, Tunnel View, Yosemite
Today, unless I’m there for a moonrise, I rarely take out my camera at Tunnel View, preferring instead to watch the reaction of other visitors—either my workshop students or just random tourists. But every once in a while, the scene is too beautiful to resist. That happened twice for me in February, when I added two more to my (arguably already too full) Tunnel View portfolio: today’s image and the one I shared last week.
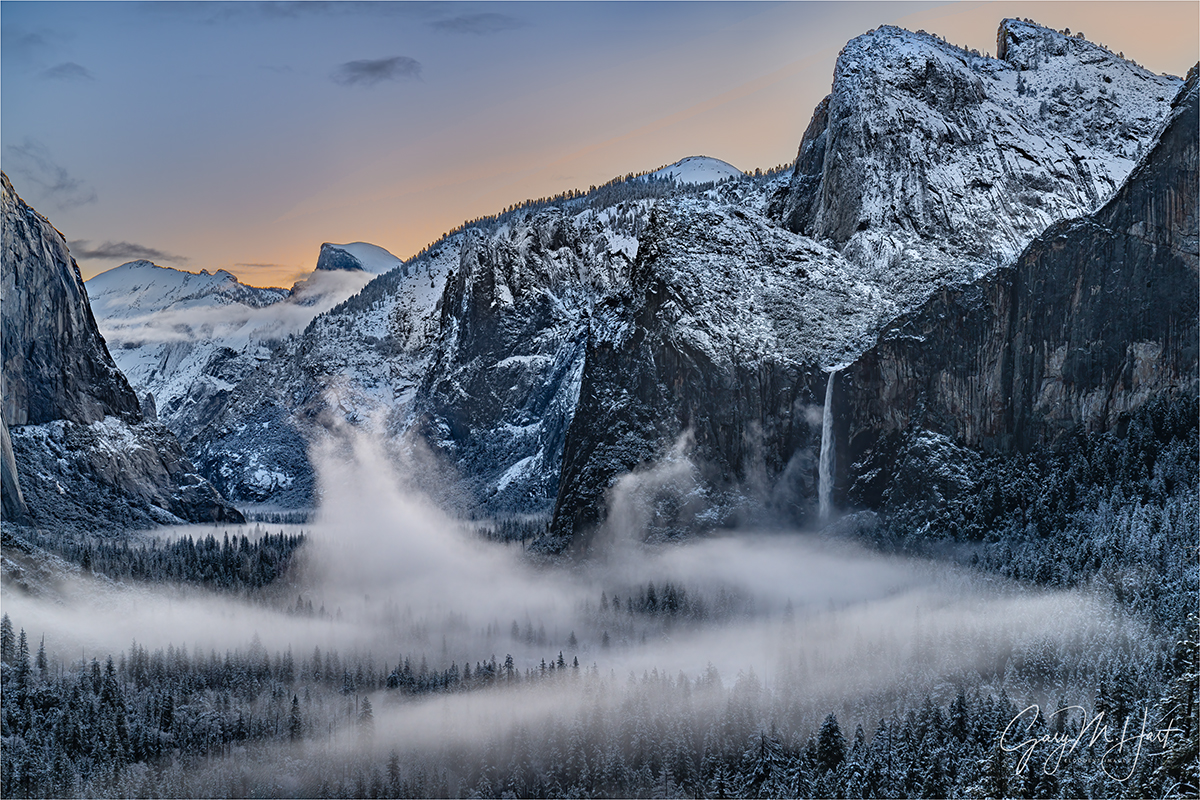
This week’s image came in the first workshop, before sunrise following an overnight rain. Though the compositions are similar, the moods of the two images are completely different. First, in last week’s image, the valley sported a thin glaze of snow, while the overnight temperatures for this week’s image weren’t quite cold enough to turn the rain to snow in Yosemite Valley (though we did find some had fallen on the east side of the valley).
But to me the biggest difference between the two images is the mood. In the snowy image I shared last week, the storm had moved on and the sky had cleared—most of the remaining clouds were local, radiating from the valley floor. The warm light of the approaching sun coloring the sky gives the scene a brighter, more uplifting feel.
The new image I share this week came during a break in the storm, but not at its end. With more rain to come, the moisture-laden sky darkened and cooled the scene, creating a brooding atmosphere. I especially like these scenes for the way they convey the timeless, prehistoric feel I seek.
Workshop Schedule || Purchase Prints || Instagram
Tunnel View Views


The Other AI
Posted on April 16, 2024
Dance of the Veils, Tunnel View, Yosemite
Sony a7R V
Sony 24-105 f/4 G
ISO 100
f/10
1/10 second
What’s wrong with ACTUAL intelligence (the other AI)?
I love all the genuine eclipse photos popping up on social media—almost as much as I DESPISE all the fake eclipse photos. Though we’ve had to deal with a glut of fabricated photos since the introduction of computers and digital capture to photography (all the way back before the turn of the 21st Century), the advent of artificial intelligence, combined with insatiable social media consumption, has put the bogus image problem on steroids. Despite being downright laughable, these AI frauds seem to fool a disturbing number of viewers. More concerning, many who claim they’re not fooled claim they don’t care because they still find these AI-generated fakes “beautiful.”
Acknowledging that beauty is in the eye of the beholder, all I can do is shrug and offer that my own definition of beauty is founded on truth. Not necessarily a perfect reproduction, or repetition of literal fact, but an overarching connection to some essential reality.
Whether it’s a painting, a work of fiction, a photograph, or any other artistic creation, I need to feel that essential truth connecting the scene, the artist, and me. The reality in a work of art—visual, musical, written, or whatever—doesn’t need to be, in fact usually isn’t, a literal reproduction of the world as I know it. Rather, I prefer artistic creations that reveal a previously unseen (by me) truth about the world. In other words, while paintings are rarely literal interpretations of the world (and in fact can be quite abstract), and novels by definition aren’t factual, the artistic creations I’m drawn to tap the creator’s unique take on reality to expand my own.
Even photographs, once relied on as flawless reproductions of reality, can’t possibly duplicate our 3-dimensional, unbounded, dynamic, multi-sensory reality. But they can, in the right hands, leverage the camera’s reality to expose hidden truths about the world. No matter how “stunning” an AI-generated or dishonest composite (two or more unassociated scenes in one image) image might be at first glance, they lack the artist’s perspective, or any connection to reality, sometimes both. Even worse, counterfeit images pretend to represent a reality that doesn’t exist. While it may be possible for an AI creation to require genuine human insight and creativity, so far all I see is people using AI as a shortcut around actual intelligence.
Of course photographic deception started long before digital capture, but like so many other things computers simplified, digital capture made it easy for people more interested in attention than connection to attract the strokes they covet. At least in the film days, manipulating a photo still required a bit of skill and effort—back then, when it was done honestly, you could at least admire the perpetrator’s skill.
Full disclosure (I digress)
I have to confess that I was actually party to blatant image manipulation at the age of 11, when my best friend Rob and I did a sixth grade Science Fair project on UFOs. In Rob’s backyard (and with help from Rob’s dad), we first photographed a homemade styrofoam “flying saucer” suspended on a wire against a plain tarp. Next, without advancing the film, we photographed our school, then sent the film off to be processed (who remembers those days?).
A few days later, we had a pretty convincing black-and-white print of our school beneath a hovering UFO. But, since our sole goal was to prove how easy it is to fake a UFO sighting, we did reveal the sleight-of-camera trick in our presentation (so no harm, no foul).
The digital dilemma
The introduction of computers to the world of photography, even before digital camera’s were anything more than a promising novelty, created an almost irresistible temptation for photographers who lacked the ethic or inspiration to create their own images. At the time, with no consensus on where to draw the line on digital manipulation, some photographers innocently stepped over the spot where most of us would draw it today.
For example, in the mid-90s, when Art Wolfe cloned extra zebras into his (already memorable) zebra herd image, many cried “Foul!” Wolfe, who had no intent to deceive, was taken aback by the intensity of the blowback, arguing that the resulting image was a work of art (no pun intended), not journalism.
In the long run, the discussion precipitated by Wolfe’s act probably brought more clarity to the broader digital manipulation issue by forcing photographers to consider the power and potential ramifications of the nascent technology, and to decide where they stood on the matter. Expressing his disapproval in a letter to his friend Wolfe, renowned landscape photographer Galen Rowell probably said it best: “Don’t do anything you wouldn’t feel comfortable having fully revealed in a caption.” Great advice that still applies.
Nevertheless, left up to each photographer, the “how much manipulation is too much” line remains rather fuzzy, but I think most credible photographers today agree that it excludes any form of deception. Which brings me back to the absolutely ridiculous eclipse fakes we’ve all been subjected to. I honestly don’t know what upsets me more—the fact that “photographers” are trying to pass these fakes off as real, or the number of people who they fool. (And I won’t even get into the fact that every image and word I’ve shared online has almost certainly been mined to perpetrate AI fabrication—that’s a blog for a different day.)
One risk of that mass gullibility, and people’s apathy about the distinction between real and artificial, is the dilution of photography’s perception in the public eye. As beautiful as Nature is without help, it’s pretty hard to compete with cartoonish captures when a connection to reality isn’t a criterion. I’m already seeing the effects—the volume of enthusiastic praise for obvious fakes is disturbing enough, but even more disturbing to me is the number of people responding to legitimate, creative, hard-earned images with skepticism.
So what can we do?
I’m not sure there is a complete solution to the AI problem, but I hope that enough people crying “Foul!,” on social media and elsewhere, will open eyes and force discussions that might help the public draw a line—just as the zebra debate did three decades ago. If the blowback is strong enough, perhaps even the potential stigma will be enough to discourage AI purveyors and consumers alike.
As much as I appreciate people calling out AI perpetrators in the comments of obviously fake social media posts—I’ll do this occasionally myself when I think I can contribute actual insight that might help some understand why an image is fake—I’m afraid these well-intended comments get so buried (by the “Stunning!” and “Breathtaking!” genuflections) that very few people actually see them. So one step I’ve started taking with every single fake image that soils my social media feeds is to permanently hide all future posts from that page/profile/poster. I’m probably fighting a losing battle, but at least this unforgiving, one-strike-and-you’re-out policy gives me a little satisfaction each time I do it.
About this image
Dance of the Veils, Tunnel View, Yosemite
One thing a still photo can do better than any other visual medium, better even than human vision, is freeze a moment in time. From explosive lightning, to crashing surf, to a crimson sunset, to swirling clouds, Nature’s most beautiful moments are also often its most ephemeral. No matter how much we believe at the time that we’ll never forget one of these special events, sadly, the memory does fade with time. But a camera and capable photographer, in addition to revealing hidden aspects of the natural world, records the actual photons illuminating those transient moments so they can be revisited and shared in perpetuity.
Which was the very last thing on my mind as this year’s February workshop group and I pulled into the Tunnel View parking lot in the predawn gloaming of this chilly morning. Instead, we were abuzz with excitement about the unexpected overnight snow that had glazed every tree and rock in Yosemite Valley with a thin veneer of white.
Our excitement compounded when we saw the scene unfolding in Yosemite Valley below. One of my most frequent Yosemite workshop questions is some version of, “Will we get some of that low fog in the valley when we’re at Tunnel View?” My standard answer is, “That’s only in the Deluxe Workshop,” but they rarely accept that. The real answer is, while this valley fog does happen from time-to-time, it’s impossible to predict the rare combination of temperature, atmospheric moisture, and still air it requires. (It’s much easier to predict the mornings when it absolutely won’t happen, which is most of them.)
But here it was, almost as if I’d ordered it up special for my group. (I tried to take credit but don’t think they were buying it.) Since I’ve seen this fog disappear as suddenly as it appears, or rise up from the valley floor to engulf the entire view in just a matter of seconds, as soon as we were parked I told the group to grab their gear and hustle to the vista as fast as they can. Then I did something I rarely do at Tunnel View anymore: I grabbed my gear and hustled to the vista as fast as I could.
While Tunnel View is one of the most beautiful views I’ve ever photographed, I’ve been here so many times that I usually don’t get my gear out here anymore—not because I no longer find it beautiful, but because it’s a rare visit that I get to see something I’ve not seen before. But since the view this morning, while not unprecedented, was truly special, I just couldn’t help myself. Another factor in my decision to photograph was that here we can all line up together, allowing me to check on and assist anyone who needs help, and still swing by my camera to click an occasional frame. This morning everyone seemed to be doing fine, so I was actually able to capture a couple of dozen frames as the fog danced below.
There were a lot of oohs and ahhs when a finger of fog rose from the valley floor and pirouetted toward Half Dome. There were many ways to photograph it, but I chose to frame it as tightly as possible, ending up with a series of a half-dozen of this particular fog feature before it morphed into something completely different. I included minimal sky because the sky above El Capitan, Half Dome, and Cathedral Rocks was relatively (compared to the rest of the scene) empty and uninteresting.
With the fog continuously shifting, to avoid cutting off any of the zigzag beneath Bridalveil Fall, I had to be extremely conscious of its spread. Depth of field wasn’t a concern because everything in my frame was at infinity. The most challenging aspect was exposure of the bright sky with the fully shaded valley. To get it all, I underexposed the foreground enough to spare the warmth of the approaching sun. The result was a virtually black foreground and colorless sky on my camera’s LCD, but I took special care to monitor my histogram and ensure that I’d be able to recover the shadows in Lightroom/Photoshop.
So, as you can see from my description, I did indeed leverage digital “manipulation” to create the finished product I share here. But my processing steps were designed to brighten the nearly black foreground my camera captured, because exposing it brighter would have resulted in a completely white sky. Since neither a white sky or a black foreground were anything close to our experience this morning, I applied actual intelligence to expose the scene and create an image that more closely reflects this actual (and unrepeatable) event in Nature.
My group rose in the frigid dark and stood bundled against the icy cold to witness this scene and capture permanent, shareable memories of our glorious morning. I imagine it might have be possible for us to have stayed in our cozy hotel rooms, open our computers, and input a few prompts in an AI image generator to come up with something similar (and why not throw in a rainbow, lightning bolts, and rising moon while we’re at it?). But where’s the joy in that?
Ephemeral Nature
Click any image to scroll through the gallery LARGE


")


, Yosemite")


The Third Time’s the Charm
Posted on December 12, 2022

Moonrise and Clouds, Tunnel View, Yosemite
Sony a7R IV
Sony 24-105 G
1/4 second
F/11
ISO 100
Large or small, crescent or full, I love photographing the moon rising above Yosemite. I truly believe it’s one of the most beautiful sights on Earth. The moon’s alignment with Yosemite Valley changes from month-to-month, with my favorite full moon alignment coming in the short-day months near the winter solstice when it rises between El Capitan and Half Dome (from Tunnel View), but I have a plan for each season. Some years the position and timing are better than others, but when everything clicks, I do my best to be there. And if I’m going to be there anyway, why not schedule a workshop? (He asked rhetorically.)
Strike one, strike two
For last week’s Yosemite Winter Moon photo workshop, I’d planned three moonrises, from three increasingly distant vantage points. On our first night, despite the cloudy vestiges of a departing storm, I got the group in position for a moonrise at a favorite Merced River sunset spot, hoping the promised clearing would arrive before the moon. The main feature here is Half Dome, but the clouds had other ideas. Though they eventually relented just enough to reveal Half Dome’s ethereal outline and prevent the shoot from being a complete loss, the moon never appeared. Strike one.
With a better forecast for the second evening, we headed into the park that afternoon with high hopes. But as the sun dropped, the clouds thickened to the point where not only did I fear we’d miss the moon again, I was pretty sure Half Dome would be a no-show as well. So I completely aborted the moonrise shoot and opted for sunset at Valley View, where El Capitan and freshly recharged Bridalveil Fall were on their best behavior. The result was a spectacular sunset that made me look like a genius (phew), but still no moon. Strike two.
Revisiting nature photography’s 3 P’s
Because the right mindset is such an important part of successful photography, many years ago I identified three essential qualities that I call the 3 P’s of Nature Photography:
- Preparation is (among many things) your foundation; it’s the research you do that gets you in the right place at the right time, the mastery of your camera and exposure variables that allow you to wring the most from the moment, and the creative vision, refined by years of experience, and conscious out-side-the-box thinking.
- Persistence is patience with a dash of stubbornness. It’s what keeps you going back when the first, second, or hundredth attempt has been thwarted by unexpected light, weather, or a host of other frustrations, and keeps you out there long after any sane person would have given up.
- Pain is the willingness to suffer for your craft. I’m not suggesting that you risk your life for the sake of a coveted capture, but you do need to be able to ignore the tug of a warm fire, full stomach, sound sleep, and dry clothes, because the unfortunate truth is that the best photographs almost always seem to happen when most of the world would rather be inside.
Most successful images require one or more of these three essential elements. Chasing the moon last week in frigid, sometimes wet, Yosemite got me thinking about the 3 P’s again, and how their application led to a (spoiler alert) success on our third and final moonrise opportunity.
Meanwhile…
As we drove into the Tunnel View parking lot, about 45 minutes before sunset, our chances for the moon looked excellent. There were a few clouds overhead, with more hanging low on the eastern horizon behind Half Dome, but nothing too ominous. My preparation (there’s one) had told me that the moon this evening would appear from behind El Capitan’s diagonal shoulder, about halfway up the face, and that area of the sky was perfectly clear. So far so good.
Organizing my group along the Tunnel View wall, I pointed out where the moon would appear, and reminded them of the previously covered exposure technique for capturing a daylight-bright moon above a darkening landscape. Eventually I set up my own tripod and Sony a7R IV, with my Sony 200 – 600 G lens with the 2X Teleconverter pointed at ground 0. In my pocket was my Sony 24 – 105 G lens, which I planned to switch to as soon as the moon separated from El Capitan. Then we all just bundled up against the elements and enjoyed the view, waiting for the real show…
But, as if summoned by some sinister force determined to frustrate me, the seemingly benign clouds hailed reinforcements that expanded and thickened right before our eyes. Their first victim was Half Dome, and it looked like they’d set their sights on El Capitan next. By the time sunset rolled around, my optimism had dropped from a solid 9 to a wavering 2. I knew the moon was up somewhere behind the curtain and tried to stay positive, but let everyone know that our chances for actually seeing it were no longer very good. I reminded them not to get so locked in on waiting for the moon that they miss out on the beauty happening right now. Ever the optimist, I switched to my 24-105, privately rationalizing that even without the moon, we’d had so much spectacular non-moon photography already, nobody could be unhappy. But still…
At that point it would have been easy to cut our losses, come in out of the cold (pain), and head to dinner. But I have enough experience with Yosemite to know that it’s full of surprises, and never to go all-in on it’s next move. So we stayed. And our persistence (we’ve checked all three now) was rewarded when, seemingly out of nowhere, a hole opened in the clouds and there was the moon. The next 10 minutes were a blur of frantic clicking and excited exclamation as my group enjoyed this gift we’d all just about given up on.
A few full moon photography tips
- Sun and moon rise/set times always assume a flat horizon, which means the sun usually disappears behind the local terrain before the “official” sunset, while the moon appears after moonrise. When that happens, there’s usually not enough light to capture landscape detail in the moon and landscape, always my goal. To capture the entire scene with a single click (no image blending), I usually try to photograph the rising full moon on the day before it’s full, when the nearly full (99% or so illuminated) moon rises before the landscape has darkened significantly.
- The moon’s size in an image is determined by the focal length—the longer the lens, the larger the moon appears. Photographing a large moon above a particular subject requires not only the correct alignment, it also requires distance from the subject—the farther back your position, the longer the lens you can use without cutting your landscape subject.
- To capture detail in a rising full moon and the landscape (in a single click), increase the exposure until the highlight alert appears on your LCD (any more exposure blows out the moon). At that point, you can’t increase the exposure any more, even though the landscape is darkening. You’ll be amazed by how much useable data you’ll be able to pull from the in nearly black shadows in Lightroom/Photoshop (or whatever your processing software). In the image I share above, my LCD looked nearly black except for the single white dot of moon. Eventually the scene will become too dark—exactly when that happens depends on your camera, but if you’re careful, you can keep shooting until at least 15 minutes after sunset.
Learn More
Moon Over Yosemite


Just a Dash of Rainbow
Posted on May 22, 2022

Bridalveil Rainbow, Tunnel View, Yosemite
Sony 𝛂1
Sony 24-105 G
1/60 second
F/10
ISO 100
I’ve spent the last week moving, and with my annual Grand Canyon Raft Trip for Photographers launching Tuesday, I haven’t had a lot of time for blogging (and much else). But I’m still committed to posting a new blog each week, so I’m sharing a new image from one of this spring’s Yosemite workshops, and a brief description of its capture. I also dusted off and polished up the Rainbow article from my Photo Tips tab. I’ll be off the grid until May 31, so next week’s post will likely be a little late.
It’s become a tradition to kick off my Yosemite spring workshops with a rainbow on Bridalveil Fall. Though the timing varies with the date, I’ve done it enough to narrow the rainbow’s start down to about a 2 minute window for whatever date I’m there. Not only is this little dash of rainbow a thrilling spectacle and beautiful introduction to Yosemite, it also creates an (unjustified) illusion of genius for the workshop leader.
With rain and maybe even a little snow, this year’s weather forecast for our first day looked great in many ways, but not so much for rainbows. But rainbow or not, Tunnel View is a great spot to start a workshop because it’s the most complete view of all things Yosemite. It’s also the first place Yosemite’s storms clear, so even without sunlight something special might be in store.
The storm was just starting to clear when we arrived and I almost got trampled as my group raced to set up. Between the swirling clouds and Half Dome’s appearance (not always a sure thing during a Yosemite clearing storm), things were already going pretty well when shafts of light broke through to illuminate random parts of the valley and surrounding granite.
I checked my watch and crossed my fingers when I realized that we’d be able to add a rainbow to Bridalveil if the light were to make it there. A couple of minutes later Leaning Tower (the diagonal just to the right of the fall) lit up, and a few seconds later a small patch of light hit the evergreens in front of the fall.
After telling everyone what was about to happen, I set up my composition and said a little prayer that the light would cooperate. The patches of light quickly expanded and merged and there it was. I often shoot this rainbow with a telephoto because the sky is so often blank blue, but the whole scene was so beautiful this afternoon that I went with my Sony 24-105 G lens on my (brand new!) Sony a1.
This was the very first time I’d used this camera, and while I thought I’d set it up to match my Sony a7RIV, I soon discovered that I’d missed a few things. For example, I usually shoot in single shot mode, but my a1 was in fast continuous mode, an oversight that became apparent when my first shutter press (slow and gentle, as always) fired off 6 identical frames before I released my finger. My goodness is this camera fast.
I have so many images of this rainbow that I only photographed it for a couple of minutes—just long enough to be confident that I’d captured something I didn’t have. When I finished shooting I just stood back to watch the rainbow move up the fall—and to listen to the exclamations of marvel from the group.
Fortunately none of my settings oversights were a major hindrance and were quickly corrected. Since that afternoon I’ve used my a1 enough to know that I’m going to love using it, and can’t wait to try it out in the Grand Canyon this week.
Read on to learn about rainbows, how to anticipate them, and how to photograph them…
All About Rainbows
Let there be light
Most people understand that a rainbow is light spread into various colors by airborne water drops. Though a rainbow can feel like a random, unpredictable phenomenon, the natural laws governing rainbow are actually quite specific and predictable, and understanding these laws can help photographers anticipate a rainbow and enhance its capture.
The sun’s visible wavelengths are captured by our eyes and interpreted by our brain. When our eyes take in light comprised of the full range of visible wavelengths, we perceive it as white (colorless) light. Color registers when some wavelengths are more prevalent than others. For example, when light strikes an opaque (solid) object such as a tree or rock, some of its wavelengths are absorbed; the wavelengths not absorbed are scattered (reflected). Our eyes capture this scattered light, send the information to our brains, which interprets it as a color. When light strikes water, some is absorbed, some passes through to reveal the submerged world, and some light is reflected by the surface as a reflection.

Light traveling from one medium to another (e.g., from air into water) refracts (bends). Different wavelengths refract different amounts, causing the light to split into its component colors.
To understand the interaction of water and light that creates a rainbow, it’s simplest to visualize what happens when sunlight strikes a single drop. Light entering a water drop slows and bends, with the shorter wavelengths bending more than the longer wavelengths: refraction. Refraction separates the originally homogeneous white light into the myriad colors of the spectrum: red, orange, yellow, green, blue, indigo, violet (in that order).
But simply separating the light into its component colors isn’t enough to create a rainbow. Actually seeing the rainbow spectrum caused by refracted light requires that the refracted light be reflected back to our eyes somehow.
A raindrop isn’t flat like a sheet of paper, it’s spherical, like a ball. Light that was refracted when it entered the front of the raindrop, continues through to the back of the raindrop, where some is reflected. To view a rainbow, our eyes must be in the correct position to catch this reflected spectrum of color—fortunately, this angle is very consistent and predictable.
Red light reflects at 42 degrees, violet light reflects at 40 degrees, while the other spectral colors reflect back between 42 and 40 degrees. That’s why the top color of the primary rainbow is always red, the longest visible wavelength; the bottom color is always violet, the shortest visible wavelength.
Follow your shadow
Every raindrop struck by sunlight creates a rainbow somewhere. But just as the reflection of a mountain peak on the surface of a lake is visible only when viewed from the angle the reflection bounces off the lake’s surface, a rainbow is visible only when you’re aligned with the 42 – 40 degree angle at which the raindrop reflects light’s refracted spectrum of rainbow colors.
Lucky for most of us, viewing a rainbow requires no knowledge of advanced geometry. To locate or anticipate a rainbow, put your back to the sun and picture an imaginary line originating at the sun, entering the back of your head, exiting between your eyes, and continuing into the landscape in front of you—this line points to the “anti-solar point,” an imaginary point exactly opposite the sun from your viewing position.
It helps to remember that your shadow always points toward the anti-solar point—and toward the center of the rainbow, which forms a 42 degree circle around the line connecting the sun and the anti-solar point. Unless we’re in an airplane or atop a mountain peak, we don’t usually see the entire circle because the horizon gets in the way. So when you find yourself in a mixture sunlight and rain, locating a rainbow is as simple as following your shadow and looking skyward—if there’s no rainbow, the sun’s probably too high.
High or low
Sometimes a rainbow appears as a majestic half-circle, arcing high above the distant terrain; other times it’s merely a small arc hugging the horizon. As with the direction of the rainbow, there’s nothing mysterious about its varying height. Remember, every rainbow would form a full circle if the horizon didn’t get in the way, so the amount of the rainbow’s circle you see (and therefore its height) depends on where the rainbow’s arc intersects the horizon.
While the center of the rainbow is always in the direction of the anti-solar point, the height of the rainbow is determined by the height of the anti-solar point, which will always be exactly the same number of degrees below the horizon as the sun is above the horizon. It helps to imagine the line connecting the sun and the anti-solar point as a fulcrum, with you as the pivot—picture yourself in the center of a teeter-totter: as one seat rises above you, the other drops below you. That means the lower the sun, the more of the rainbow’s circle you see and the higher it appears above the horizon; conversely, the higher the sun, the less of the rainbow’s circle is above the horizon and the flatter (and lower) the rainbow appears.

Assuming a flat, unobstructed scene (such as the ocean), when the sun is on the horizon, so is the anti-solar point (in the opposite direction), and half of the rainbow’s 360 degree circumference will be visible. But as the sun rises, the anti-solar point drops—when the sun is more than 42 degrees above the horizon, the anti-solar point is more than 42 degrees below the horizon, and the only way you’ll see a rainbow is from a perspective above the surrounding landscape (such as on a mountaintop or on a canyon rim).
Of course landscapes are rarely flat. Viewing a scene from above, such as from atop Mauna Kea in Hawaii or from the rim of the Grand Canyon, can reveal more than half of the rainbow’s circle. From an airplane, with the sun directly above you, all of the rainbow’s circle can be seen, with the plane’s shadow in the middle.
Double Your pleasure
Not all of the light careening about a raindrop goes into forming the primary rainbow. Some of the light slips out the back of the raindrop to illuminate the sky, and some is reflected inside the raindrop a second time. The refracted light that reflects a second time before exiting creates a secondary, fainter rainbow skewed 50 degrees from the anti-solar point. Since this is a reflection of a reflection, the colors of the secondary rainbow are reversed from the primary rainbow.
And if the sky between the primary and secondary rainbows appears darker than the surrounding sky, you’ve found “Alexander’s band.” It’s caused by all the light machinations I just described—instead of all the sunlight simply passing through the raindrops to illuminate the sky, some of the light was intercepted, refracted, and reflected by the raindrops to form our two rainbows, leaving less light for the sky between the rainbows.
Waterfalls are easy
Understanding the optics of a rainbow has practical applications for photographers. Not only does it help you anticipate a rainbow before it happens, it also enables you to find rainbows in waterfalls.
A rainbow caused by sunlight on rain can feel random because it’s difficult to know exactly where the rain will fall, when the sun will break through, and exactly where to position yourself to capture the incongruous convergence of rainfall and sunshine. A waterfall rainbow, on the other hand, can be predicted with clock-like precision because we know exactly where the waterfall and sun are at any give time—as long as clouds don’t get in the way, the waterfall rainbow appears with clock-like precision.


Yosemite is my location of choice for waterfall rainbows, but maybe there’s a waterfall or two near you that might deliver. Just figure out when the waterfall gets direct sunlight early or late in the day, then put yourself somewhere on the line connecting the sun and the waterfall. And if you have an elevated vantage point, you’ll find that the sun doesn’t even need to be that low in the sky.
Spring in Yosemite is waterfall rainbow season, and I know exactly where to be and when to be there for both of Yosemite Valley’s major waterfalls. In fact, given the variety of vantage points for viewing each of these falls, I can usually get two or three rainbows on each fall on any given day.
In addition to clouds, there are other variables to deal with. One is the date, because the path and timing of the sun’s arc across the sky changes with each passing week. Another thing that can throw the timing off slightly is the amount of water in the fall—following a wet winter the spring runoff increases, and with it the amount of mist. Generally, the more mist, the sooner the rainbow will appear and the longer it lasts. And finally there’s wind, which spreads the mist and usually improves the rainbow by increasing its size.
While all these variables make it difficult for me share the exact schedule of Yosemite’s waterfall rainbows from the variety of vantage points, I can give you some general guidance: look for a rainbow on Yosemite Falls in the morning, and Bridalveil Fall in the afternoon. And if you don’t mind a short but steep hike, you can also find a rainbow on Vernal Fall in the afternoon.
Moonbows
Understanding rainbow optics can even help you locate rainbows that aren’t visible to the naked eye. A “moonbow” (lunar rainbow) is a rarely witnessed and breathtaking phenomenon that follows all the natural rules of a daylight rainbow. But instead of resulting from direct sunlight, a moonbow is caused by sunlight reflected by the moon.
Moonlight isn’t bright enough to fully engage the cones in your eyes that reveal color, though in bright moonlight you can see the moonbow as an arcing monochrome band. But a camera on a sturdy tripod can use its virtually unlimited shutter duration to accumulate enough light to bring out a moonbow in full living color. Armed with this knowledge, all you need to do is put yourself in the right location at the right time.


Probably the best known moonbow is the one that appears on Yosemite Falls each spring. Usually viewed from the bridge at the base of Lower Yosemite Fall, the best months are April, May, and June, with May probably being the best combination of moonlight angle and ample water.
Unfortunately, this phenomenon isn’t a secret, and the bridge can be quite crowded on spring full moon nights—in high runoff springs, it can also be extremely wet (pack your rain gear). The base of Upper Yosemite Fall can also have a moonbow when viewed from the south side of Cook’s Meadow, especially in wet springs.
Workshop Schedule || Purchase Prints || Instagram
A Gallery of Rainbows
Click an image for a closer look, and to view a slide show.


Yosemite Moonrise
Posted on February 27, 2022

Twilight Moon, Tunnel View, Yosemite
Sony a7RIV
Sony 24-105 f/4 G
1/3 second
F/11
ISO 100
Though last week’s harrowing story of a sneaker wave that drenched members of the Iceland photo workshop group had a (relatively) happy ending (R.I.P., 3 cameras and lenses), it generated more responses than any blog post in recent memory. Exactly one week later, that sobering reminder of Nature’s power and ability to surprise was still on my mind when I was gifted a reminder of Nature’s ability to also soothe and inspire.
This epiphany struck me as I reclined on a granite slab above Tunnel View, waiting for the full moon to grace the most beautiful view on Earth. Just as in Iceland, I was with a workshop group. Unseen in Yosemite Valley below us, I knew thousands of photographers were assembled with eyes glued to a section of granite stained by Horsetail Fall’s trickle, praying to avoid a reminder of Nature’s ability to disappoint. If all went as hoped, the moon would appear at about the same time light from the setting sun colored the waterfall some shade of orange or (fingers crossed) red.
While clouds were a factor for both events, I wasn’t concerned about the moonrise because I could see there was only one cloud that might delay the moon’s appearance, but certainly wouldn’t wipe it out. On the other hand, I knew from experience that the people on the ground beneath Horsetail Fall would have no idea of the clouds poised to block the sun, and ultimate fate that evening’s light, until it actually happened (or didn’t). For me and my group, the light on Horsetail Fall would be tomorrow night’s anxiety; tonight was our opportunity to bask and marvel.
My general moonrise approach is to start with max telephoto until the moon gets some separation from the landscape, then go wider as the moon climbs. This evening my tripod was mounted with my Sony a7RIV and Sony 200-600 composed at full magnification on Cloud’s Rest, the peak between El Capitan and Half Dome, behind which the moon should appear about 25 minutes before sunset. Within arm’s reach was my other a7RIV with my Sony 24-105.
Once everyone was set up with lenses trained, we had time to sit and appreciate the view. From our perch not only could we see the spot behind which the moon would appear, we also could see the part of El Capitan where Horsetail flowed (though there wasn’t enough water to actually see the fall from this distance). As we waited for the moon, we watched the shadow cast by the setting sun move across the face of El Capitan, gradually warming the granite as it advanced.
My eyes were trained more on the cloud taking a breather atop Cloud’s Rest—more specifically, trying to figure out if the cloud was dense enough to completely block the moon. I got my answer when the time for moonrise came and passed, and adjusted my composition by widening my composition somewhat.
The moon came out from behind the cloud about 10 minutes before sunset, still close enough to Horsetail Fall to include both at 400mm. Meanwhile, the light on Horsetail Fall faded as the sun dropped into thin clouds near the horizon—faded just enough to subdue the color and disappoint the massed throngs below.
From our vantage point the light on El Capitan was good, but I could tell that the color wasn’t what people came for. As pretty as our scene was was, my favorite time to photograph a full moon isn’t until after the sun has set and the blue and pink pastels of Earth’s shadow starts to paint the sky. By this time the daylight-bright moon stands out strikingly against the darkening sky. Waiting for this to happen, I switched to my 24-105 and started playing with a variety of compositions that included some combination of El Capitan, Half Dome, and Bridalveil Fall.
Since I need to capture detail in both the moon and the foreground, and I never blend images (combine exposures to make a single image), the exposure margin for error shrinks significantly as the sky darkens around the moon. I captured this image more than 15 minutes after sunset, when the scene looked much better to my eyes than it did on my LCD. This is where I especially appreciate the dynamic range of my Sony sensors—I just monitor the moon, making it as bright possible without blowing it out, then rely on Lightroom and Photoshop to reveal the unbelievable amount of usable detail hidden in the shadows and highlights.
Large or small, crescent or full, I love photographing the moon rising above Yosemite as much as ever. I’m fully aware that I have far more than my share of these images, but it just makes me so happy, I have no plans to stop.
Workshop Schedule || Purchase Prints || Instagram
Yosemite Moonrise


Dare To Be Different
Posted on January 9, 2022
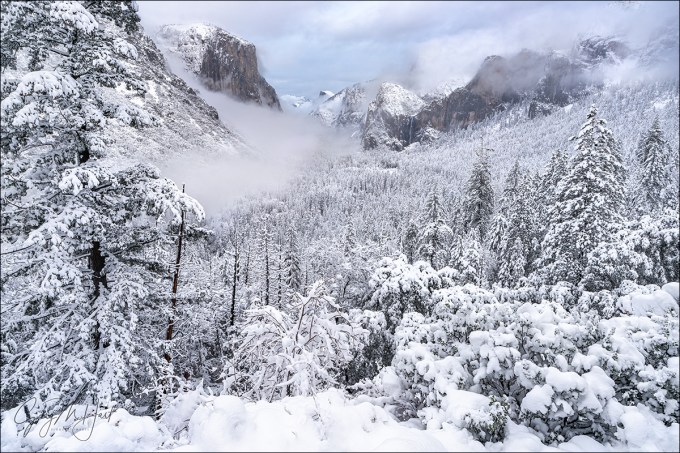
Snowfall, Tunnel View, Yosemite
Sony a7RIV
Sony 16-35 f/2.8 GM
1/15 second
F/9
ISO 100
What does it take to make a great landscape image? The answer to that question could fill volumes (so I hope you don’t expect the final word in one blog post), but for starters, it seems pretty obvious that a great landscape image should involve some combination of beautiful scene and compelling composition. Of course it’s possible for one side of that scale to tilt so strongly that it renders the other side all but irrelevant: I’m thinking about the masterful composition that manages to extract beauty from the most ordinary scene, or the scene that’s so spectacular that it would be virtually impossible to not return with a beautiful image.
But as much as photographers should strive for the former, I’m afraid ubiquitous cameras and information have given us too much of the latter—because it’s easier. Not only can today’s photographers learn where to be and when to be there with the tap of an app (or the click of a mouse), even when unexpected beauty suddenly materializes before our eyes, we’re almost certainly armed with a tool to capture it. Add to this the power of today’s computers and software to actually manufacture beauty (don’t get me started…), and I’m concerned that the world is becoming numbed to the appreciation of photography as a craft—the ability to see the less obvious beauty and convey it by deftly controlling the scene’s framing, motion, depth, and light.
This is especially relevant to me because I make my living serving people who dream of getting “the” shot at my workshop locations. Usually they’ve seen some other photographer’s version of their “dream” shot and simply want one of their own to display and share. Whether it’s sunset light on Horsetail Fall, a lightning strike at the Grand Canyon, or fresh snow at Tunnel View, I completely understand their motivation and I do everything in my power to make it happen (I love photographing these things too). But still…
In addition to helping my workshop student get their dream image, I also encourage them to make these shots their starting point, not their goal. Photograph the icons without shame, but don’t stop there, also find your own perspective on the scene’s beauty. That could be identifying a foreground element that complements a glorious background, going vertical when the obvious composition is horizontal, introducing motion or focus blur to part of the scene, or any number of large or small compositional twists.
My own approach when photographing a scene imbued with obvious inherent beauty—such as a spectacular sunset, vivid rainbow, or breathtaking vista—is to remind myself not to settle for something I’ve already done, no matter how beautiful it might be. While that’s a relatively small challenge at new or less familiar scenes, this approach makes familiar places like Tunnel View in Yosemite (arguably the most beautiful vista on Earth, and one that I’ve photographed more times than I can count) a much higher photographic bar to clear. So high, in fact, that I rarely take out my camera at Tunnel View anymore. (Well, at least that’s the mindset when I get there—I’m a sucker for this scene and sometimes can’t resist photographing a beautiful moment here because some scenes are too beautiful to ignore—but you get the point.) Even still, these days I pretty much only photograph Tunnel View when I can include some a scecial, transient element, like the moon or a rainbow. Or fresh snow.
Last month my Yosemite Winter Moon workshop group had the immense good fortune to start just as a cold winter storm finished dropping 8 inches of snow on Yosemite Valley. For a couple of reasons, we started at Tunnel View—first, because it’s the best place to introduce first-timers to Yosemite’s majesty; second, it’s probably the best place in Yosemite to view a clearing storm. The scene that greeted us was as spectacular as you might imagine—and as also you might imagine, it wasn’t something I hadn’t seen before.
My original plan was to keep my camera in the car, but once I got everyone settled into their spots and was confident they were content (and wanted to be left alone), I couldn’t resist the beauty, no matter how familiar. Oh—and before I go any farther, let me make clear that I am not trying to say, nor do I in any way believe, that this image is more special than thousands of other Tunnel View images that preceded it (or even that were captured that day). I just want to use it to illustrate my approach, and the decisions that got me to something that turned out to be a little different for me. But anyway…
The first thing I usually I preach about photographing Tunnel View is to not go too wide. As beautiful as the entire view is, the real (permanent) visual action is between El Capitan on the left, and Leaning Tower (the diagonal, flat granite face angling up from Bridalveil Fall) on the right. Another problem at Tunnel View is that the sky in Yosemite is usually boring (cloudless), and the foreground trees are nothing special. So not only does the real estate left of El Capitan and right of Leaning Tower pale in comparison to the primary scene it bookends, composing wide enough to include that extra granite also means shrinking the best stuff (from left to right: El Capitan, Cloud’s Rest, Half Dome, Cathedral Rocks, Bridalveil Fall, Leaning Tower) while including more bland sky and trees. Therefore, my go-to lens for Tunnel View is my Sony 24-105 f/4 G lens. And when I want to isolate one or two of the primary features, I’ll switch to my Sony 100-400 GM lens.
But this afternoon, with the entire landscape glazed white, those scruffy foreground trees were suddenly a feature worthy of inclusion. So, rather than starting with the 24-105 on my Sony a7RIV, I reached for my Sony 16-35 f/2.8 GM lens. Going wider created another problem: that large tree on the left is a usually an obstacle, a potential distraction always that must be dealt with. My standard approach is to move to the right to completely eliminate the tree from my composition, but this afternoon the vista was so packed with gawkers and photographers that moving around without encroaching on someone else’s space was difficult-to-impossible. Because I got my group setup before grabbing a spot for myself, I’d found myself stuck farther to the left than I like, making my plan to shoot the scene extra-wide while eliminating the tree even more problematic. So, grateful once again for the snowy glaze, I decided to use my arboreal nemesis to frame the left side of my composition (if you can’t beat ’em…). For the right side of my frame, I chose to go wide enough to include a couple of more prominent trees in the middle distance, as well as the interesting clouds swirling near the rim behind them.
In any composition, the decision between sky and foreground always comes down to which is more interesting—in this case, despite some fairly interesting clouds overhead, those clouds couldn’t compete with the snowy foreground. To maximize the snowy foreground, I put the bottom of my frame in the homogeneous white snowbank at the base of the shrub line just a few feet below me—just low enough to allow me to include only the most interesting clouds.
And finally, because I know someone will ask, even with so much detail from near-to-far, at 20mm and f/9, my focus point was pretty much irrelevant (hyperfocal distance was 5 feet). As something of a control freak in my photography life (understatement), I’ve always been a manual focus evangelist, but I’m getting lazy in my old age and in this case I just hit my back-button focus button to autofocus somewhere in the scene (wherever the focus point happened to be), then clicked with the knowledge I’d be sharp throughout.
More Tunnel View Magic: One Spot, Many Takes
Click an image for a closer look, and to view a slide show.


(Really) Big Moon
Posted on September 20, 2020

Lunar Arrival, El Capitan and Clouds Rest, Yosemite
Sony a7RIV
Sony 200-600 G (APS-C crop)
Sony 2x teleconverter
1800mm focal length equivalent
ISO 200
f/13
1/20 second
This is an updated version of the “Big Moon” article from my Photo Tips section,
plus the story of this image (below)
Nothing draws the eye quite like a large moon, bright and bold, above a striking foreground. But something happens when you try to photograph the moon—somehow, a moon that looks to the eye like you could reach out and pluck it from the sky shrinks to a small white speck in a photo. While a delicate accent of moon is great when properly framed above a nice landscape, most photographers like their moons BIG.
Some photographers resort to cheating, plopping a telephoto moon into a wide angle landscape. But armed with basic knowledge bolstered by a little planning, capturing a large moon isn’t hard.
Focal length
Every time there’s a “supermoon,” we’re bombarded with news stories implying that the moon will suddenly double or triple in size, followed by faked images intended to confirm the impossible. But crescent or full, super or not, the moon’s size in an image is almost entirely a function of the focal length the photographer used—photograph it at 16mm and the moon registers as a tiny dot; photograph it at 600mm and your moon dominates the frame.
But a landscape image with a large moon requires more than just a long focal length. If big was all that mattered, you could attach your camera to a telescope, point skyward, and capture a huge moon (not that there’s anything wrong with that). But without a landscape to go with your huge moon, no one would know whether you took the picture on a mountainside in Yosemite, atop a glacier in New Zealand, or beside the garbage cans in your driveway.
Equipment
“Big moon” is a subjective label, but I don’t usually use it unless my focal length was 200mm or longer. And while a 200mm lens is okay for the moon, for me the moon doesn’t really start to jump out of the frame until I approach 400mm.
Prime zooms are super sharp and fast, but for my moon photography I prefer a telephoto zoom for focal length flexibility that enables me to adjust my composition to include or exclude foreground elements. As a Sony Alpha shooter, my default big moon lens that’s almost always in my bag is my Sony 100-400 GM. The Sony 200-600 is sometimes too long, and it’s too big to live in my bag fulltime, but when I know I’ll be photographing the moon rising (or setting) above a location that’s several miles from my foreground subjects, I’ll replace the 100-400 in my bag with the 200-600. And when I want to go nuclear on the moon with either lens, I add the Sony 2X Teleconverter.
Not a Sony shooter? No problem, all the major camera manufacturers offer similar options.
The camera you use makes a difference too. The more resolution you have, the more you can crop (increase the size of the moon) without noticeable quality loss. And since an APS-C sensor has a 50% (-ish) crop built in, until I got my Sony a7RIV, I’d often use my APS-C Sony a6300 to maximize the size of the moon in my images. But now that I have the full frame Sony a7RIV, with 61 megapixels I actually have more resolution in APS-C mode than I had with my a6300.
My own rule for full moon photography is that I must capture both lunar and landscape detail. But a full moon rises at sunset and sets at sunrise, and a crescent moon is only visible shortly before sunrise or after sunset. So your camera’s dynamic range a very important consideration. The darker the sky, the better the moon looks, but the darker the sky, the darker the foreground too. For me it’s time to go home when the foreground becomes so dark that making it bright enough to capture usable detail means blowing out the moon. So the more dynamic range I have, the darker the sky can be. While I don’t know of a camera with as much dynamic range as my a7RIV, all of today’s cameras have pretty decent dynamic range.
And finally, given the extreme focal lengths you’ll be dealing with, don’t even think about trying to shoot a big moon without a sturdy tripod.
Distance yourself
Often the most difficult part of including a large moon with a specific landscape subject is finding a vantage point far enough back to fit the subject and the moon. But the farther back from your foreground subject you can position yourself, the longer the focal length you can use, and the bigger the moon will be.
For example, I love photographing a big moon rising behind Half Dome in Yosemite. But at Yosemite’s popular east-side locations, even 200mm is too close to get the moon and all of Half Dome in my frame. And while Yosemite’s most distant east-facing Half Dome vistas are up to 10 miles away, Half Dome is large so that even at that distance the longest focal length that will include the moon and all of Half Dome isn’t much more than 400mm.
A little easier for me is including a big moon with smaller foreground objects like a prominent tree. Near my home in Northern California are rolling hills topped by solitary oaks that make perfect moon foregrounds when I can shoot up so they’re against the sky. And since these trees are much smaller than Half Dome, even vantage points that are less than a mile away are doable.
Location, location, location
As your focal length increases, your compositional margin for error shrinks. You can’t expect to go out on the evening of a full or crescent moon, look to the horizon, and automatically put the moon in the frame with your planned foreground subject.
Even when the moon and your foreground do align, once the moon appears, you’ll only have a few minutes before it rises out of your telephoto frame. This means extreme telephoto images that include both the moon and a foreground subject are only possible when the moon is right on the horizon, making proper timing essential.
Like the sun, the moon traces a different path across the sky each day. This path changes with each lunar cycle (from full, to new, back to full)—whether the moon is full or crescent, a location that perfectly aligns the moon and foreground one month, will probably be nowhere close the next.
Coordinating all the moving parts (moon phase and position, foreground subject alignment, subject distance, and rise/set timing) requires some planning and plotting. When I started photographing the moon, in the days before smart phones and apps that do the heavy lifting, I had to refer to tables to get the moon’s phase and position in the sky, manually plot the alignment, then apply the Pythagorean theorem to figure the timing of the moon’s arrival above (or disappearance behind) the terrain.
Today there are countless apps that will do this for you. Apps like The Photographer’s Ephemeris and Photo Pills (to name just two of many) are fantastic tools that give photographers access to moonrise/set data for any location on Earth. There is a bit of a learning curve (so don’t wait until the last minute to plan your shoot), but they’re infinitely easier than the old fashioned way.
Depth of field
With subjects so far away, it’s easy to forget about depth of field. But extreme focal lengths mean extremely limited depth of field. Depth of field isn’t a concern when Half Dome is your closest subject and it’s ten miles distant, but when your foreground is an oak tree on a hill that’s a mile away, you absolutely need to consider the hyperfocal distance.
For example, at 800mm and f/11 (with a full frame sensor), the hyperfocal distance is about a mile-and-a-quarter (look it up)—focus on the tree and the moon will be soft; focus on the moon and the tree is soft. But if you can focus on something that’s a little beyond the tree, at maybe one-and-a-half miles away, the image will be sharp from front to back.
When I’m not sure of my subject distance, I estimate as best I can, focus on a point beyond my foreground subject, then review my image magnified to check sharpness. If my focus point is in my frame, great, but I won’t hesitate to remove my camera from the tripod to focus on something in another direction that’s the right distance (if you do this, to prevent refocusing, be sure you use back-button focus or are in manual focus mode when you click your shutter). It’s always best to get the focus sorted out before the moon arrives, a good reason to arrive at a new location well in advance of the moon’s arrival.
Plan ahead
When the moon is a small accent to a wide scene, it’s often enough to just show up on its full or crescent day and shoot it somewhere above your subject. But because the margin of error is so small, planning for a big moon image is best done months in advance.
I identify big-moon candidate locations near home and on the road, and am always on the lookout for more. My criteria are a prominent subject that stands out against the sky, with a distant east or west facing vantage point. Over the years I’ve assembled a mental database ranging from hilltop trees near home, to landscape icons like Half Dome, Mt. Whitney, and Zabriskie Point (Death Valley).
With my subjects identified, I do my plotting (I still do it the old fashioned way) and mark my calendar for the day I want to be there. That often means waiting close to a year for the alignment I want. And if the weather or schedule doesn’t cooperate, my wait can be longer than that.
About this image
On the penultimate evening of last February’s Yosemite Winter Moon photo workshop, I assembled my Yosemite Winter Moon photo workshop group on the granite above Tunnel View to wait for the moonrise we’d been thinking about all workshop. Sunset was 5:30, and I expected the moon to appear behind Cloud’s Rest between a little before 5:35, which meant the sky and landscape would already be starting to darken. The exposure for a post-sunset full moon is trickier than many people realize because capturing detail in both the daylight-bright moon and the rapidly fading landscape requires vigilant scrutiny of the camera’s histogram and highlight alert (blinking highlights). To get everyone up to speed, I used nearly full rising moons on the workshop’s first two nights to teach them to trust their camera’s exposure aids and ignore the image on the LCD (kind of like flying a plane on instruments). With two moonrises under their belts, by this evening I was confident everyone was ready.
I was ready too. In my never-ending quest to photograph the moon as large as possible, I went all-in—none of that wimpy-ass 200mm glass for me, for this moonrise I used every resource in my bag. I set up two tripods: mounted on one was my Sony a7RIII and 100-400 GM lens; on the other tripod was my Sony a7RIV and 200-600, doubled by the 2X teleconverter: 1200mm. But I wasn’t done. Normally I shoot full frame and crop later (for more compositional flexibility), but just for fun, on this night I decided to put my camera in APS-C mode so I could compose the scene at a truly ridiculous 1800mm—I just couldn’t resist seeing what 1800mm looked like in my viewfinder.
While waiting for the moon the group enjoyed experimenting with different compositions using the warm sunset light illuminating Half Dome and El Capitan. I used the time to test the focus at this unprecedented focal length. Waiting for an event like this with a group is one of my favorite things about photo workshops, and this evening was no exception. Between questions and clicks, we traded stories, laughed, and just enjoyed the spectacular view.
The brilliant sliver of the moon’s leading edge peaked above Cloud’s Rest at 5:33. It is truly startling to realize how quickly the moon moves through the frame at 1800mm, so everything after that was kind of a blur. Adjusting compositions and tweaking exposure and focus on two bodies, I felt like the percussionist in a jazz band, but I somehow managed to track the moon well enough to keep it framed in both cameras.
Though I just processed this image yesterday, it’s the earlier of the two big moon images I’ve processed from that shoot. Which one do you like best?
Big Moon


")


