America’s worst idea
Posted on August 13, 2014

Sunrise, Grandview Point, Grand Canyon
Canon EOS-5D Mark III
65 mm
1/4 second
F/11
ISO 100
Today’s homework assignment is “A Cathedral Under Siege,” from the August 9 edition of the “New York Times.”
I really don’t have a lot to add to the thoughts expressed in the article, except that if our National Park system is “America’s best idea,” then what is planned for the Grand Canyon may just be America’s worst idea. I only hope that common sense will prevail over the almighty dollar in time to spare this monumental boondoggle from establishing a precedent that threatens every National Park in America.
(Read a little about this image beneath the gallery.)
A National Park Gallery


About this image
Saturday evening Don Smith and I started the first of two, back-to-back Grand Canyon Monsoon photo workshops. Our first sunset shoot at Desert View was nice, but somewhat limited by haze from smoke caused by several managed fires burning near the canyon’s South Rim. Sunday morning we gathered the group at 4:30 and ushered them to Grandview Point, where we were thrilled to find the haze had cleared—in its place we found the Grand Canyon basking between a mix of clouds and clear sky that usually bodes well for a nice sunrise.
We did indeed enjoy beautiful sunrise reds and pinks that morning, but I think my favorite part of the morning came when the sun crested the horizon and in concert with low, broken clouds sent crepuscular rays skimming the canyon. I quickly pointed my camera upstream and worked on a composition to do the moment justice. The towers, bluffs, and buttes on the left were a must, but they carry a great deal of visual weight. To balance the frame I used the shafting sunlight and Colorado River snaking near the frame’s right side. The low hanging clouds provided a perfect ceiling for my frame. And because the combination of bright sky and canyon shadows created a highlight-to-shadow range that exceeded a camera’s ability to capture, I used a three-stop hard transition graduated neutral density filter from Singh-Ray to bring the difference into a manageable range.
(You might also be interested to know that the proposed tram referenced in the article would land just upriver from the segment of the river you see here.)
The yin and yang of nature photography
Posted on August 7, 2014
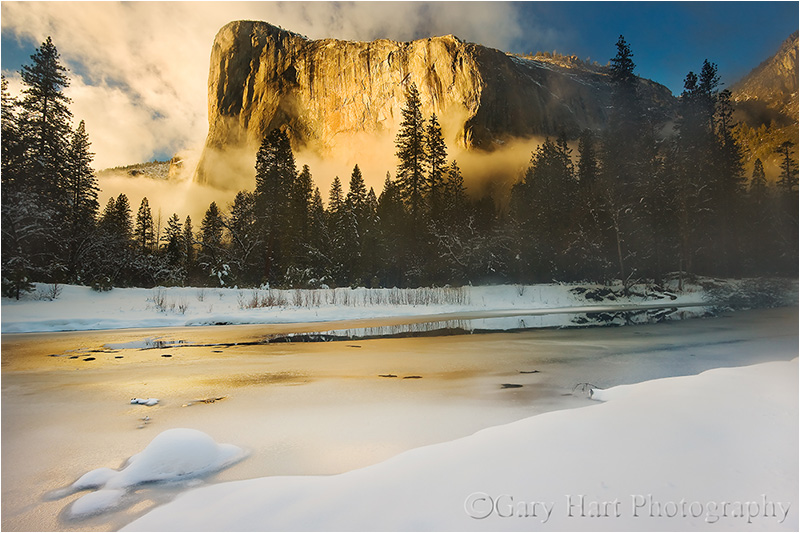
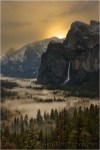
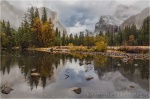
Clearing Storm, El Capitan and the Merced River, Yosemite
Canon 1Ds Mark III
17 mm
1/8 second
F/11
ISO 100
Conducting photo workshops gives me unique insight into what inhibits aspiring nature photographers, and what propels them. The vast majority of photographers I instruct, from beginners to professionals, approach their craft with either a strong analytical or strong intuitive bias—one side or the other is strong, but rarely both. And rather than simply getting out of the way, the underdeveloped (notice I didn’t say “weaker”) side of that mental continuum seems to be in active battle with its dominant counterpart.
On the other hand, the photographers who consistently amaze with their beautiful, creative images are those who have negotiated a balance between their conflicting mental camps. They’re able to analyze and execute the plan-and-setup stage of a shoot, control their camera, then seamlessly relinquish command to their aesthetic instincts as the time to click approaches. The product of this mental détente is a creative synergy that you see in the work of the most successful photograpers.
At the beginning of a workshop I try to identify where my photographers fall on the analytical/intuitive spectrum and nurture their undeveloped side. When I hear, “I have a good eye for composition, but…,” I know instantly that I’ll need to convince him he’s smarter than his camera (he is). Our time in the field will be spent demystifying and simplifying metering, exposure, and depth management until it’s an ally rather than a distracting source of frustration. Fortunately, while much of the available photography education is technical enough to intimidate Einstein, the foundation for mastering photography’s technical side is ridiculously simple.
Conversely, before the sentence that begins, “I know my camera inside and out, but…,” is out of her mouth, I know I’ll need to foster this photographer’s curiosity, encourage experimentation, and help her purge the rules that constrain her creativity. We’ll think in terms of whether the scene feels right, and work on what-if camera games (“What happens if I do this”) that break rules. Success won’t require a brain transplant, she’ll just need to learn to value and trust her instincts.
Technical proficiency provides the ability to control photography variables beyond mere composition: light, motion, and depth. Intuition is the key to breaking the rules that inhibit creativity. In conflict these qualities are mutual anchors; in concert they’re the yin and yang of photography.
About this image
With snow in the forecast for a December morning a few years ago, I drove to Yosemite and waited out the storm. When the snow finally stopped, I made the best of the three or so hours of daylight remaining.
Rather than return to some of the more popular photo locations, like Tunnel View or Valley View, I ended up at this spot along the Merced River. Not only his is a great place for a full view of El Capitan, it’s also just about the only place in Yosemite Valley with a clear view of the Three Brothers (just upriver and out the frame in this image). Downriver here are Cathedral Rocks and Cathedral Spires.
As I’d hoped, the snow was untouched and I had the place to myself. My decision to wrap up my day here was validated when the setting sun snuck through and painted the clouds gold.
Yosemite Winter
Click an image for a closer look and slide show. Refresh the window to reorder the display.


Staying out of the way
Posted on August 1, 2014
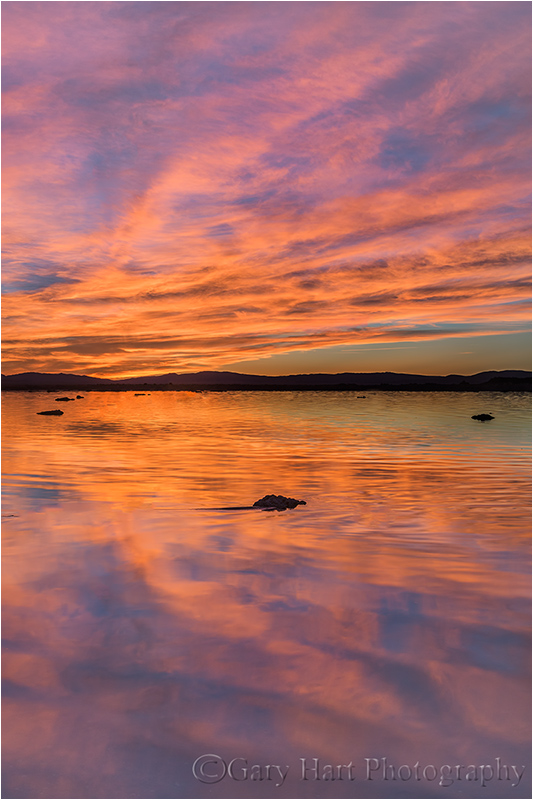
Sunrise Fire, Mono Lake
Canon EOS-5D Mark III
32 mm
1/4 second
F/11
ISO 200
Previously on Eloquent Nature: Road trip!
Sometimes when Mother Nature puts on a show, the best thing a photographer can do is just get out of the way. I’d driven to Mono Lake the previous afternoon to do some night photography and photograph the waning crescent moon before sunrise. After spending the night in the back of my Pilot, I woke at 4:30 and hiked down to the lake. The crescent moon arrived right on time, about an hour before the sun, but I didn’t get any moon images that thrilled me. I was, however, encouraged by the glassy calm of the lake (a distinct change from the previous night) and the promising spread of clouds and sky connecting the horizons.
Waiting in the morning’s utter stillness, it was easy to forget how sleep deprived I was. After fifteen minutes of slow but steady brightening, the color came quickly and for about 30 minutes I was the sole witness to a vivid display that transitioned seamlessly from deep crimson, to electric pink, and finally soft, pastel peach hues. The entire show was duplicated on the lake surface—I could have pointed my camera in any direction to capture something beautiful.
When I get in a situation like this, one that’s both spectacular and rapidly changing, I risk blowing the entire shoot by thinking to much. Thinking in dynamic conditions usually results in things like including foreground elements just because that’s what you’re supposed to do, or spending too much time searching for just the right composition. This problem is particularly vexing at a place like Mono Lake, which is chock full of great visual elements.
I’ve seen many Mono Lake images featuring spectacular color and sparkling reflections, only to be ruined by the inclusion of disorganized or incongruous tufa formations (limestone formations that are the prime compositional element of most Mono Lake images). If you can include the tufa in a way that serves the scene, by all means go for it. But in rapidly changing conditions like I had this morning at Mono Lake, unless I already have my compositions ready, I’m usually more productive when I simplify through subtraction.
This morning I had just enough time before the color arrived to find a spot that didn’t have too much happening in the foreground. Rather than a confusion of tufa formations, I was working with a glassy canvas of lake surface that stretched with little interference to the distant lakeshore. The visual interruptions were few enough, and distant enough, that assembling them into a cohesive foreground was a simple matter of shifting slightly left and right. Handling my shoot this way allowed me to emphasize the scene’s best feature—the vivid color painting the sky and reflecting on the lake. The small tufa mounds dotting the lake surface were relegated to visual resting places that add depth and create virtual lines leading into the scene.
If you look at the images in the Mono Lake Gallery below, you’ll see a variety of foreground treatments that range from simple to complex. The more complex foregrounds are generally the result of enough familiarity and time to anticipate the conditions and assemble a composition. But when I couldn’t find something that worked, I simply stopped trying and allowed the moment to speak for itself.
A Mono Lake Gallery


Road trip!
Posted on July 26, 2014

Summer Night, Mono Lake Beneath the Milky Way
Canon EOS-5D Mark III
28 mm
15 seconds
F/2
ISO 6400
Sacramento isn’t exactly known for its scenery, but as someone who makes his living photographing nature’s beauty, I haven’t found any place I’d rather live (okay, so maybe Hawaii is close). Just listen to this list of scenic locations I can drive to from home in four hours or less (clockwise from southwest to southeast): Pinnacles National Park, Big Sur, Monterey/Carmel, San Francisco, Point Reyes, Muir Woods (and countless other redwood groves), the Napa and Sonoma Valley Wine Country, the Mendocino Coast, Mt. Shasta, Mt. Lassen National Park, Lake Tahoe, Calaveras Big Trees (giant sequoias), Yosemite, and Mono Lake. Not only is each a destination that draws people from all over the world on its own merits, just check out the visual variety on that list.
With a crescent moon due to grace last Friday’s pre-sunrise twilight, Thursday morning I checked my schedule and saw nothing requiring my immediate attention. I clicked through my mental location checklist for sunrise spots that offer view of the eastern horizon—Lake Tahoe and Yosemite would work, but they’re both crowded (and I have enough Yosemite crescent moon images anyway). Mono Lake? Hmmmm…. Not only would Mono Lake work for the moon, it should be dark enough there to photograph the Milky Way above the lake. Road trip!
Within a couple of hours my Pilot was packed, and by early afternoon I was motoring up Highway 50. Aside from my photographic ambitions, another highlight of a Mono Lake trip is the drive itself, which takes me near Lake Tahoe, over Monitor Pass, into the Antelope Valley, and finally onto US 395 beneath the sheer east face of the Sierra crest all the way down to Mono Lake and Lee Vining. I pulled into town at about 6 p.m. and after a quick dinner at the Whoa Nellie Deli (not to be missed—look it up), I was off to the lake. Let the adventure begin.
By far Mono Lake’s most photographed location is South Tufa—with great views of the eastern horizon, it certainly would have qualified for my sunrise shoot, but the best views of the Milky Way would require a view toward the southern horizon. Another problem with South Tufa is the crowds, even at night. Not only have I had to contend with light-painters there (sorry, not my thing), one evening I went down there and found the Japanese Britney Spears shooting a video. (That label is my inference—one of the crew confirmed that she was Japanese, the music sounded just like American Top-40 pop of which Britney was the current queen, and judging by the motorhome, full-size bus, two big-rig trucks, and 1/4 mile long cables snaking all the way from the parking lot to the lake, it was pretty clear this girl was a huge star.) So anyway, Thursday evening I simply opted for the view, peace, and quiet of Mono Lake’s north shore.
Traversed only by a disorganized network of narrow, poorly maintained dirt roads, navigating here is difficult even with a high clearance vehicle. While my Pilot is all-wheel-drive, it’s not designed for off road and I need to take these roads with extra care. My strategy at each junction is to take the spur that trends in the direction of the lake, but over the years I’ve become fairly familiar with this side of the lake and had a general idea of where I wanted to be that night. So far I’ve not found a road that will get me much closer than a half mile from the lake, nor have I ever found an actual trail to the lake—when I think I’m close enough to something nice, I just park and walk toward the lake.
It was about a half hour before sunset when I parked my Pilot in a wide spot near the end of a long dirt road. On most visits I’m out there navigating in the dark before sunrise, so it was nice to actually be able see beyond my headlights while hunting for a spot to shoot. Exiting the car I was blasted by the less-than-pleasant but tolerable smell that is distinctly Mono Lake. It’s there year-round, but seems to be worse in summer.
With nothing to block my view, the lake was in clear sight. Lacking a trail, the route is pretty much a matter of picking a point on the shore making a beeline there. My first few steps dropped me down a short but fairly steep slope into the basin of the ancient Mono Lake. From there it flattens to a gentle slope, first through coarse volcanic sand, and then into a band of tall, soggy grass that eventually peters out into a soup of gray muck. Depending on the location I’ve chosen and the lake level at the time of my visit, the consistency of this muck ranges from damp sponge to shoe-sucking wet cement—this year’s muck fell closer to the wet cement side of the continuum, but my high-top Keens were up to the task. And thankfully, I found large areas where the mud had been baked solid enough to walk on without sinking.
The other feature of note out here is the calcium carbonate (limestone) rocks embedded in the lakeshore (they’re the same makeup as tufa, but a different shape than the more striking South Tufa formations). While these make a great platform for sitting and keeping a camera bag out of the mud, in summer they are literally covered with little black alkali flies. Yes, I said literally covered—the flies are so thick that some rocks are black and any shot that includes a rock starts with shoeing the flies if you want to capture it in its natural gray state. (These flies would be a much worse than a mere annoyance if they were capable of flying higher than one foot above the ground.)
My plan for this trip was to photograph sunset, hang out lakeside waiting for dark, do an hour or so of night photography, return to my Pilot and sleep in the back (air mattress and sleeping bag, thank-you-very-much), then rise at 4:30 and return to the lake in time for the moonrise and and sunrise. I made it down to the lake in time to photograph a sunset that was nice but nothing special by Mono Lake standards. As I waited for dark a warm wind whipped the lake surface into a froth, and I soon became concerned about the thin clouds converging overhead—rain was not a concern, but it started to look like my Milky Way aspirations might be thwarted. Nevertheless I hung out (where else was I to go?) and was eventually rewarded when most of the clouds moved on to mess with some other photographer’s plans.
While not nearly as spectacular as my recent Grand Canyon dark sky nights, there were far more stars than any city-dweller can ever hope to see. An occasional meteor darted into view (see the small one at the top of this picture?), and a few satellites drifted overhead, but the main event was the Milky Way, which poured a river of white that spanned the sky from Scorpio in the south to Cassiopeia in the north. While Lee Vining has not quite achieved sky-washing megalopolis status, it nevertheless created an annoying array of discrete light of varying intensity and color that were more than I wanted to try to deal with in Photoshop. But I found that the farther east along the lakeshore I moved, the less these lights aligned with my scene.
I was having so much fun that I stayed out there until the Earth’s rotation had spun the Milky Way into closer alignment with the Lee Vining “skyline,” sometime after 11:00. By then I really had no idea how far east I’d wandered, so as I trudged back to the car in the pitch black I was extremely thankful (and self congratulatory) for the foresight to have mentally registered my bearings in daylight. While my headlamp guided each next step and illuminated the ten-foot radius of my dark world, navigation was solely by the North Star, which I kept off my right shoulder. I had no illusions that this method would allow me to pinpoint the car in the dark, but my hope was to get close enough that clicking my key fob would activate my horn and lights. For quite a while the key was answered by nothing but crickets, and about the time I started worrying that I’d miscalculated my position and would be spending the night in the mud with the flies, my car flashed and beeped about 100 yards to my right. Hallelujah. Not exactly a bullseye, but close enough.
The next morning came much too early, and while I didn’t get any moon pictures that made me particularly happy, the sunrise was off-the-charts and (along with the Milky Way) more than enough justification for an eight hour roundtrip and less than four hours of sleep. But that’s a story for another day.
Photo Tip: Read more about starlight photography
A starlight gallery


Small steps and giant leaps
Posted on July 20, 2014

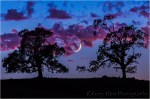
Oak and Crescent, Sierra Foothills, California
Canon EOS-5D Mark III
320 mm
1.6 seconds
F/11
ISO 400
July, 1969
I turned 14 that month. I was into baseball, chess, AM radio, astronomy, and girls—not necessarily in that order. Of particular interest to me in 1969 was the impending moon landing, a milestone I’d been anticipating since tales of American aerospace engineering ingenuity and our heroic astronauts started headlining the Weekly Reader, and my teachers began gathering the class around a portable TV to watch the latest Gemini or Apollo launch or splashdown. If you remember the Sixties, you understand that the unifying buzz surrounding each Apollo mission briefly trumped the divisive tension surrounding headlines detailing Vietnam battles and demonstrations, the Civil Rights movement, and Communist paranoia. Unfortunately, without checking NASA’s schedule or asking for my input, my parents and three couples they knew from college decided mid-July 1969 would be the ideal time for our four families to join forces on a camping trip in the remote, television-free redwoods of Northern California. (“What could we possibly need a television for?”)
Apollo 11 was halfway to the moon when the Locher and Hinshaw families pulled up to our home in Berkeley (the Hardings, coming down from Eastern Washington, would meet us at the campground a couple of days later). The warm greetings exchanged by the adults were balanced by the cool introductions forced on the unfamiliar children. We departed the next morning, caravan style, our cars connected by woefully inadequate walkie-talkies that we’d almost certainly have been better off without (it had seemed like such a good idea at the time). I remember my dad keeping a safe distance behind Hinshaws, as he was convinced that their borrowed trailer, that seemed to veer randomly and completely independently of their car, would surely go careening into the woods on the next curve. But somehow our three-car parade pulled safely into Richardson’s Grove State Park late that afternoon.
In true sixties style, the three dads went immediately to work setting up campsites while the moms donned aprons and combined forces on a community spaghetti dinner. Meanwhile, the younger kids scattered to explore, while the four teens, having only recently met and being far too cool for exploration or anything remotely resembling play, disappeared into the woods, ostensibly on a firewood hunt. Instead, we ended up wandering pretty much aimlessly, kicking pinecones and occasionally stooping for a small branch or twig, just far enough from camp to avoid being drafted into more productive (and closely supervised) labor by the adults.
But just about the time we teens ran out of things not to do, we were relieved to be distracted by my little brother Jim, who had just rushed back into camp breathless, sheet-white, and alone. We couldn’t quite decipher his animated message to the parents, but when we saw our dads drop their tarps and tent poles and rush off in Jim’s tracks toward the nearby Eel River, we were (mildly) curious (to be interested in anything involving parents was also very not cool). So, with feigned indifference, the four of us started wandering in the general direction of the river until we (somehow) found ourselves peering down from the edge of a 50 foot, nearly vertical cliff at the river toward what was clearly the vortex of all the excitement. It was that instant when I think we all ceased being strangers.
The scene before us could have been from a bad slasher movie: Flat on the ground and unconscious (at the very least) was 11 year-old Paul Locher; sitting on a rock, stunned, with a stream of blood cascading from his forehead, was Paul’s 10 year-old brother John. As disturbing as this sight was, nothing could compare to seeing father Don Locher orbiting his injured sons, dazed and covered in blood. The rest of this memory is a blur of hysterics, sirens, rangers, and paramedics.
It wasn’t until the father and sons were whisked away to the small hospital in Garberville, about 10 miles away, that we were able to piece together what had happened. Apparently Paul and John, trying to blaze a shortcut to the river, miscalculated risk and had tumbled down the cliff. My brother at first thought they were messing with him, but when John showed him a rock covered with blood, he sprinted back to fetch the parents. Arriving at the point where the kids had gone over, the fathers made a quick plan. My dad and Larry Hinshaw would rush back to to summon help, and see if they could find a safer path down to the accident scene. Don would stay put and keep an eye on his sons. But shortly after my dad and Larry left, John had looked down at his brother cried, “Daddy, I can see his brains!” Hearing those words, Don panicked and did what any father would do—attempt to reach his boys. Thinking that a small shrub a short distance would make a viable handhold, Don took a small step in its direction, reached for and briefly grasped a branch, lost his grip, and tumbled head-over-heals down to the river.
After what seemed like days but was probably only an hour or two, we were relieved to learn that John needed no more than a few stitches; he was back in camp with us that night. Paul had faired slightly worse, with a concussion and a nasty cut behind his ear—the “brains” his brother had seen was ear cartilage. Paul spent the night in the hospital and was back with us by the time the Harding clan arrived the following afternoon. Don, however, wasn’t quite so fortunate. In addition to a severe concussion, he had opened up his head so completely that over 150 stitches were required to zip things back together. Though Don spent several days in the hospital, needless to say, we were all relieved by the understanding that it could have been much worse.
By Sunday, Don was feeling much better but was still a day or two from release to the dirt and fish guts of our four family campsite. Most of us had visited at one time or another, going in small, brief waves and respecting the hospital’s visiting hours. Nevertheless, there was another priority that had gone unspoken in the first few days following the accident came to prominence with the realization that Don would be fine. I can’t say who first recognized the opportunity, but I’m guessing that Larry Hinshaw had something to do with convincing the nursing staff to look the other way when Don was suddenly host to 20 simultaneous visitors that night. Whatever magic was worked, I’ll never spending that Sunday evening, July 20, 1969, shoehorned into a tiny hospital room, sharing a tiny black-and-white television screen with 20 pairs of eyes, witnessing history.
Besides my parents and two brothers, the rest of the crew that night I’d only met just a few days earlier, but I can still name every single one of them. The relationships formed that week continue to this day. And so do the stories, which, like this story, are filled with some of the greatest joy I’ve ever experienced, and also with some of the greatest tragedy. But it’s this story in particular, the catalyst for all the stories that follow, that explains why the words, “One small step for man, one giant leap for mankind,” have a very personal significance for me.
Today it’s hard for me to look at the moon without remembering that hospital room and the emotional events that enabled me to witness Neil Armstrong’s historic first steps with those special people. As a child of the Sixties who very closely followed all of the milestones and tragedies leading up to that moment, I couldn’t help but wonder while assembling the images for the gallery below about that week’s role in shaping who I am and what I do today.
Workshop Schedule || Purchase Prints
A lunar gallery
Click an image for a closer look, and a slide show. Refresh the screen to reorder the display.


When it rains…
Posted on July 17, 2014

Night Shadow, Kauai, Hawaii
Canon EOS-5D Mark III
28 mm
30 seconds
F/2
ISO 3200
I suspect that nature photographers get themselves into more predicaments than the average person. Case in point:
Following a long day on Kauai that started with a 4:30 a.m. wakeup and continued pretty much nonstop through sunset, I’m not sure why I thought it would be a good idea to extend my day further, especially given that we had another 4:30 a.m. wakeup set for the next day. But there I was, picking my way alone across the wet sand in pitch dark.
I’d wanted to do some night photography on this Kauai visit but had been thwarted by clouds the previous nights. On this night, however, the clouds held back and when I hit the beach it felt like ten thousand stars rushed to welcome me. Living my entire life in areas of light pollution, camera or not I’m always moved by the sight of a truly dark sky. A few thin clouds mingled with the stars, but they were clearly no match for the legions of stars—what could possibly go wrong?
I made my way north along the beach searching something for my foreground. With no moon, the darkness was pretty complete, but once my eyes adjusted I found the easiest going right along the water line, where I could use contrast of the shifting line of lapping surf to keep me on course. Every once in a while a warm wave would wash up and clean the sand from my between my toes.
After a couple hundred yards I came upon a few chunks of wave-worn basalt protruding from the surf and decided I needed to go no further. Exposures between 15 and 30 seconds not only smoothed the waves, they also created a pleasing motion blur in the clouds. I tried a variety of compositions with no illusions I’d get anything special—I just welcomed the excuse to be alone with the stars on a warm Kauai beach. In fact, I was having so much fun that I wasn’t really paying attention to the fact that each frame contained a little less sky and a little more cloud.
The image you see here was one of my last captures. Shortly after clicking it the wind kicked up—spend any time in Hawaii and you learn that a sudden increase in the wind usually means rain isn’t far behind. I looked up. Hmmm. The stars were about gone—when did that happen?
While collapsing my tripod a large raindrop slapped my cheek, then another on my leg. Soon the drops were pelting me and the sand like bullets on Omaha Beach. Getting caught in the rain in Hawaii isn’t nearly as unpleasant as it is most other places (go figure), but Hawaii rain is just as wet as any other rain and I’d gone out with just my camera, one lens, and tripod—sans camera bag I was without rain gear for myself and had nothing to protect my camera (I never claimed to be smart).
I hustled a short distance further up the beach to what I thought would be a shortcut through the condo community situated just above the beach but was blocked by a creek emptying into the ocean—in daylight this wouldn’t have been much of an obstacle, but trying to negotiate rocks and water in the dark wouldn’t have been wise (having already lost one camera to a Hawaii creek this year). I considered scrambling up the hill, but separating me and the easiest route back was a twenty-foot wide, one-foot high groundcover of unknown composition. So I turned and sprinted back down the beach, mindful of the rocks I’d just photographed and suddenly aware that the tide and come in. Surprise number two (see “smart” comment above). My camera was getting a drenched, but to stumble in the dark would risk giving it a saltwater bath.
I considered shoving my camera inside my shirt, but my shirt was about as dry as a bucket of water. Desperate, I looked for a path up the slope and through the ground cover separating me from the manicured lawn (and a quick, illuminated route to safety). Spying a possible gap, I darted into the brush. Dead end. But propelled by momentum and concern for my camera I didn’t break stride, leaping into the brush like Peter Rabbit into a briar patch. (Peter Rabbit I’m not, and I have the scratches to prove it.) Once onto the lawn it was only about a three minute dash back to the resort.
It doesn’t rain like this in California—I’m pretty sure it would have taken a full day to accumulate the amount of rain I got in less than fifteen minutes that night on Kauai. Not only that, it usually takes about a day to build up to it, and then another day to decide it’s done. But of course my rain (it somehow felt personal) stopped right after I made it to the room, before I’d even stopped dripping and huffing.
The next day, while reviewing the images on my computer, I was pleased to find a couple that might have more value than merely the excuse I needed to get out to play with the stars that night. Because it had been so dark while I was out there, it took me a few seconds to sort out the layers in my images, but what you see here, from bottom to top, is the dark, wet sand on which I stood; the white surf washing up on the beach in front of me; an area of dark, calmer water; more waves where the surf hits a volcanic shelf less than 100 yards from shore; a thin stripe of open ocean; and finally sky, clouds, and stars.
The real treat in this image is the unexpected shadow of a tree painted on the nearby surf, cast I’m guessing by the faint light from the condos behind me. I’d love to say this shadow and its perfect position against the white surf was part of my plan, but it wasn’t. Not only did the motion in the surf, which shifted continuously between dark-calm and white-waves, create a constantly changing background, it was just too dark out there for my eyes to register the shadow anyway. But my camera, with its ability smooth motion and absorb more light than my eyes can, gave me something invisible to my eyes. And this ability to capture reality that my eyes miss really is my favorite thing about photography.
* * *

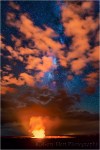
Milky Way and Halemaʻumaʻu Crater, Kilauea, Hawaii
We do night photography in almost all of my photo workshops, including Hawaii
Ode to joyful photography
Posted on July 9, 2014

Revelation, Kauai, Hawaii
Canon EOS-5D Mark III
19 mm
4 seconds
F/16
ISO 100
Photography is a source of joy, right? You know it and I know it. I mean, why else would we spend thousands of dollars on equipment, stagger out of bed hours before the sun, skip dinner, stand all afternoon in freezing rain, or hike three miles in the dark, just to take a picture? If you’ve experienced (or witnessed) the ecstasy evoked by an electric sunrise, rising moon, or vivid rainbow, you understand.
But if photography is such a joyful endeavor, what’s with all the miserable photographers? When that joyful photographer who stood in the rain or hiked in the dark shares the fruits of her labor online, she somehow incites a swarm of miserable photographers who believe that:
- Any photographer using a (Canon, Nikon, Sony, whatever) is a moron
- The horizon line never belongs in the center
- Nobody (else) knows how to process an image
- And a host of other photographic myths
To the miserable, insecure souls who believe they can “elevate” their stature by diminishing others, the next time you feel like criticizing a fellow photographer, fueling the fray on a photography forum, or pontificating at the local photo club, do yourself (and the world) a favor: Pick up your camera, go outside, and take a picture. Then walk around a little bit and take a few more. In fact, just stay outside until you feel better—it won’t take long.
About this image
There’s a direct relationship between the amount of discomfort (misery, sacrifice, or whatever you want to call it) endured to capture an image, and the amount of joy the image manifests. Case in point: This sunrise on Kauai.
It was the last morning of the photo workshop I was co-leading with Don Smith. The group rose dark and early and we drove in a constant rain to our sunrise location about 30 minutes away. On the drive we all had serious concerns that the rain would shut us down entirely, but there were no thoughts of turning back.
As we assembled our gear and prepared for our short hike, the rain eased and a gentle breeze separated the clouds to reveal a few stars and thin crescent moon. But during the ten minute trek out to the ocean view, our breeze stiffened to a gusting, face pummeling wind. We fanned out along the cliffs and waited for the morning to swell on the eastern horizon. The daylight revealed a wall of rain heading our direction, brightening as it advanced, pushed by a wind that was now gale strength, so strong that I hooked my camera bag to my tripod to keep it anchored. As the light of this rising sun filled the oncoming squall, the sky throbbed with color. But despite the ominous signs, we persisted, mesmerized by the fire that now stretched from horizon to zenith.
For about five minutes we were in photographer heaven, and then the weather was on us. As if dowsed by the flood, the light disappeared with the downpour’s arrival. Instantly soaked, we all immediately and independently turned and sprinted toward the cars in a mad panic—with my umbrella powerless against the horizontal raindrops and rain gear warm and dry back at the hotel, I heroically led the retreat (picture George Costanza at the sight of smoke).
No photographer, article of clothing, or piece of a equipment was dry on the drive back, but the mood was unanimous joy. We all knew we’d just shared five minutes of special—not really what you expect when you drive through the dark in a pouring rain, stand on a cliff in a gale, or subject yourself to a thorough soaking, but the reason we do it anyway.
A gallery of joyful captures
-
- Sunset Palette, Half Dome from Sentinel Dome, Yosemite National Park
-

- Moonlight Cathedral, Valley View, Yosemite
-
- Winter Reflection, El Capitan, Yosemite
-

- Autumn Moonrise, Half Dome and the Merced River, Yosemite
-
- Fire on High, Kilauea and Milky Way, Hawaii
-

- First Snow, El Capitan, Yosemite
-

- Bridalveil Dogwood, Valley View, Yosemite
-

- Moonlight, Whitney Arch, Alabama Hills, California
-
- Crescent and Oaks at Dusk, Sierra Foothills, California
-

- Three Strikes, Bright Angel Point, Grand Canyon
-
- Divine Spotlight, Upper Antelope Canyon, Arizona
-

- Champagne Glass Poppies, Merced River Canyon, California
-
- First Light, Yosemite Valley, Yosemite National Park
-
- Autumn Snow, Valley View, Yosemite
Eye on the sky
Posted on July 7, 2014

Infinite Sunrise, Kauai, Hawaii
Canon EOS-5D Mark III
16 mm
2 seconds
F/16
ISO 100
I returned couple of weeks ago from a week on Kauai where I assisted Don Smith with his workshop. Kauai used to have the reputation as Hawaii’s “quiet” island, and while it still may be a little more peaceful than Oahu or Maui, Kauai is certainly no longer a secret. But extensive and ongoing (painstaking) research has shown me that despite the crowds, it is possible to enjoy quiet on any of the Hawaiian Islands.
We were based near Kapaa, at a beachside resort teaming with people throughout the day and well into the night. Most of our Kauai sunrise locations had been a 30-45 minute drive to fairly remote spots, but following a fairly late night, Don and I gave the group a break and scheduled our sunrise shoot for the beach behind our resort—just hop out of bed, throw on some shorts, a tank top, and flip-flops, and we’d be in business.
As far as I know, this east-facing beach doesn’t have a name. While its pure white sand is dotted with volcanic rocks and lava shelves that wax and wane with the tide, this is not a destination that draws photographers on its own merits. But despite its lack of notoriety, this a pretty little beach was more than worthy of our attention. And concern about competing for turf with the crowds at our resort turned out to be completely unfounded. As I’ve learned in Yosemite, and verified at many other crowded locations, rise at sunrise and you can pretty much have the world to yourself. “Our” beach that morning was no exception.
Send in the clouds
I call what I do “landscape” photography, but “land” is really only half the picture (literally). It’s easy to focus so much on the scene we came to photograph that we completely overlook what’s going on overhead. While the physical qualities of most landscapes are pretty static, the sky can change, sometimes dramatically, from one frame to the next. Clouds, moon, stars, color—some or all of these dynamic features are often primary subjects in need of a foreground, no matter how prosaic. Put a rainbow over any tree, or a small moon over a small New Mexico town, and you might just end up with something special.
Our sky this morning was a tapestry of dark rainclouds overlain by a diaphanous veneer of thin clouds, broken by patches of blue. I walked up the beach looking for a foreground to complement the quickly changing sky, finally settling on a solitary lava pyramid protruding from the pristine, surf-wash beach. Setting up my shot I noticed that the receding waves left a glossy sheen that reflected the sky. The calm simplicity of the foreground juxtaposed against the complex beauty of the sky was more than just visually appealing, the quiet beach, warm air, cooling breeze, and elegant sky were personally soothing and I wanted an image that conveyed that.
Discard the “rule” of thirds
One of the creative decisions a landscape photographer needs to make with each image where to put the horizon. Near the top? Near the bottom? In the middle? Or maybe no horizon at all. Many photographers, especially those constrained by the shackles of camera club competitions, will automatically put the sky at the 1/3 or 2/3 line of their image’s vertical axis. This may be great for beginners who automatically bullseye every scene, but aspiring photographers need to graduate from prescribed formula to creative choice.
My feeling has aways been to favor the aspect of the scene with the most appeal. Great sky? Low horizon. Great foreground? High horizon. How low or high? That depends on the relative merits of the sky and foreground—80/20 or 90/10 splits (in either direction) create a dramatic emphasis to the right scene. And is it okay to put it in the middle? Absolutely! Which is what I did here. Not only do the two halves of the scene move me equally, balancing them in the frame subconsciously conveys the tranquil equilibrium I felt that morning.
I’d love to say that the small white rock in the lower right quadrant was a conscious part of my compositional strategy, but it wasn’t. I was aware it was there, but its inclusion was a subconscious choice. This tiny rock is a great illustration of the rule of thirds true value. While I don’t think it should dictate composition, the rule of thirds often does explain why things work. In this case, without really thinking about it, I stacked two very different scenes to make this image. Place rule of thirds grid atop the bottom scene and it’s immediately clear that my two rocks (one large, one tiny) occupy balancing intersections. The large rock has enough mass to provide significant visual weight pretty much anywhere in the scene, but by virtue of its strong position, the small rock is able to balance its much larger counterpart.
Rule of thirds or no rule of thirds? Am I contradicting myself here? I don’t think so. Photographic “rules” earned their status for a reason and are not without value—we just shouldn’t be slaves to them. When you turn off your internal rule monitor and allow your creative instincts to take over, the organic compositions that follow will more uniquely reflect your experience of the moment and your emotions of at capture.
Join me in Hawaii
Workshop Schedule || Purchase Prints ||Instagram
A Gallery of Horizons
Click any image to scroll through the gallery LARGE


Inside the Grand Canyon: A gallery of images
Posted on July 2, 2014
-

- Rocks and Creek, Matkatamiba Canyon, Inner Grand Canyon
-

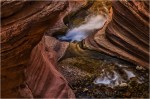
- Slot Cascade, Matkatamiba Canyon, Inner Grand Canyon
-

- Sky in Motion, Inner Grand Canyon
-
- Deer Creek Canyon, Grand Canyon
-

- Deer Creek Fall, Inner Grand Canyon
-
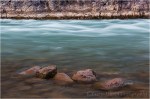
- River Rocks, Colorado River, Inner Grand Canyon
-

- Milky Way, Inner Grand Canyon
I do it all over again in 2015 (May 11-18)—contact me for the experience of a lifetime.
Inside the Grand Canyon: The Great Unconformity
Posted on June 28, 2014
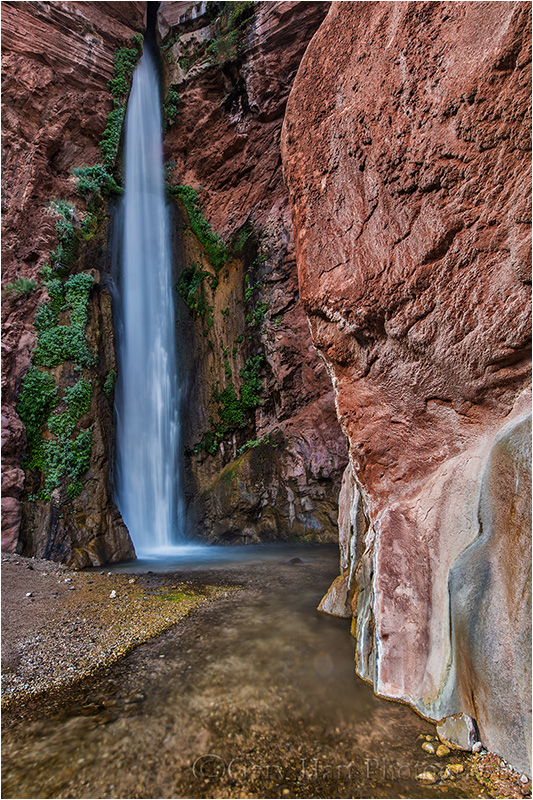
Deer Creek Fall, Grand Canyon
Canon EOS-5D Mark III
19 mm
1.6 seconds
F/16
ISO 100
When we think of the Grand Canyon we tend to visualize expansive vistas, but it takes getting down to the canyon’s foundation to see how incomplete those notions are. Every day on the river our raft group was treated to an assortment of layered rock, turquoise pools, polished slot canyons, and plunging waterfalls that reminded us of nature’s complexity. More than simply beauty, these little gems helped all of us appreciate the intricate, inexorable processes that formed the Grand Canyon, and that are constantly work across our planet.
Deer Creek Fall lands less than a stone’s throw from the Colorado River. Not only is it pleasing to the eye, Deer Creek Fall provides a great opportunity to understand the some to Grand Canyon’s extremely complex geology. Most of the red rock you see in this image is Tapeats Sandstone, deposited beneath an ancient sea over 500 million years ago. This rock wasn’t exposed until the region was uplifted and carved by the Colorado River, most likely in the last 5 million years (that timing is still subject to debate).
What’s most intriguing to me here is the red granite, an intrusive igneous rock injected beneath the Earth’s surface about 1.7 billion years ago. But near the top of the fall are the discernible layers of sandstone. When we see two types of rock immediately adjacent to each other, it’s easy to forget what that interface represents. In this case we have 1.7 billion year old granite underlying 550 million year-old sandstone. What’s missing is 1.2 billion years of geological history. Dubbed the “Great Unconformity” by early Grand Canyon explorer John Wesley Powell, over a billion years of Earth history was erased by processes we can only infer by observing other geological features nearby, or similar rock deposited elsewhere.
To comprehend how long 1.2 billion years is, and all that could have happened during those missing years, consider erosional (wind and water) and uplift (volcanoes and continental collisions) processes that add or subtract just one foot of elevation every thousand years—a little more than an inch every 100 years. (The San Andreas Fault races along 10 times that fast, at an average of about 12 feet every 100 years.) Do the math—at a foot every thousand years, 1.2 billion years would be long enough for a mountain range the elevation of the Sierra Nevada (14,000 feet) to rise and completely erode to sea level over 40 times.
Just a little perspective for the next time you think your barista is taking too long with your latte.
About this image
We pulled up here toward the end of our fourth day of careening through a seemingly endless series of intense rapids (with harmless sounding names like Ruby and Lower Tuna), making the opportunity to recharge in Deer Creek Fall’s cool-but-not-cold pool a welcome respite. Some in the group hiked to the top of the serpentine slot canyon feeding the fall (a story for another day), others danced in a rainbow beneath the fall.
Direct sunlight made photography difficult at first, but by the time I returned from the hike to the top the entire fall was in shade and I went to work. I started on the left side, looking straight up from as close as the spray allowed me. I soon crossed the creek and move a little farther back. When I was done I set down my gear and hopped in the pool beneath the fall for a most welcome shower. We were back on the river a few minutes later, refreshed and giddy about our good fortune to have witnessed this natural marvel up close.
I’m doing it all over again in 2015 (May 11-18)—contact me if you’d like to join me.

Deer Creek Canyon, Grand Canyon (above the fall)

