Eloquent Images by Gary Hart
Insight, information, and inspiration for the inquisitive nature photographer
Wait for it…
Posted on July 31, 2022

Electric Sunset, Hopi Point Lightning, Grand Canyon
Sony 𝛂1
Sony 24-105 G
.4 seconds
F/16
ISO 200
Landscape photographers have a couple of ways to make nice images. By far the most important is the ability to see the special but less obvious, then know how to compose and expose that special vision in ways that clarify and convey the previously unseen beauty. But sometimes we just need to know when to show up and where to point the camera, and the patience to wait for the special to come to us.
Pretty much any sunrise or sunset at a nice location qualifies for the show up and wait approach, as can popular classics such as Yosemite’s Horsetail Fall in February, or the midday shaft of light in Upper Antelope Canyon’s main room. But whether it’s a planned sunset that went even better than hoped, or a rainbow that seemed to materialize out of nowhere, in their own way these gifts from Nature that don’t require great vision are just as thrilling as the hidden discoveries we work so hard for.
-

- Horsetail Fall and El Capitan, Four Mile Trail, Yosemite
-
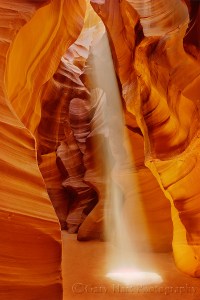
- Heavenly Beam, Upper Antelope Canyon, Arizona
Lightning photography requires a lot of the show up and wait approach, because all the compositional skill in the world can’t make a great lightning image if the lightning doesn’t happen. I can’t tell you how many times I’ve been photographing lightning and seen a beautiful composition—some perfect combination of landscape and conditions—in a different direction, and said to myself, “Wow, wouldn’t it be great if the lightning fired right there.” Unfortunately, lightning is a fickle phenomenon that rarely does what photographers want it to do. In fact, it sometimes feels like the lightning is consciously avoiding the composition I want, always in favor of something much less interesting. Sigh…
Right now I’m at Grand Canyon, trying to take advantage of its expansive vistas that frequently provide views of multiple rain cells with lightning potential. While the vast majority of these potential lightning sources never deliver, my original approach to photographing them was to maximize my chances by identifying and targeting the cell with the most potential, without concern for the composition. An alternate approach to photographing lightning is to target the rain cell with the nicest composition, regardless of the strength of its potential—then hope.
Because I’ve learned that lightning neophytes are usually thrilled to capture any lightning, I generally encourage my workshop students, most of whom have never captured great (or any) lightning images, to favor success over the best composition by simply pointing in whatever direction the lightning is most likely to fire.
I’ll never forget the first time I traveled to the Grand Canyon with the sole desire to photograph lightning, and those first few fruitless days on the rim, pointing my camera toward a promising cell only to see it fizzle. I’d have given anything to have just one frame with lightning, composition be damned. And I also never forget the thrill the first time my camera captured lightning.
Ten years later, I’ve reached the point in my lightning photography where I’ve had enough successful captures that I can afford to be a little more selective. In recent years I frequently find myself pointing at the potential lightning spot that has the composition I like most, shunning the one that appears most likely to produce lightning. It’s often a recipe for failure, but the infrequent successes more than compensate.
I got my most recent dose of compensation last Wednesday evening, in this year’s first (of two) Grand Canyon monsoon photo workshops. My group had already enjoyed several lightning shoots from various locations on the South Rim, but nothing spectacular so far. For sunset Wednesday evening, we took the shuttle out Hermit’s Rest Road (no cars allowed). There are many vistas on this route, so I gave my group enough time to visit as many stops as the wanted to, with the understanding that we’d all gather back at Hopi Point to shoot sunset together there.
Soon after arriving at Hopi Point about 45 minutes before sunset, I checked my My Lightning Tracker app and saw that all of the activity was at least 50 miles away and didn’t really align with anything interesting. While the view at Hopi Point is one of my favorites, I’ve photographed here so much that now I only bring out my camera when there’s potential for something spectacular—either lightning, or great color and/or clouds. So my camera stayed in the bag.
With almost 100 percent cloud cover, my decision seemed reasonable, but as the sun dropped, a small opening appeared on the western horizon, directly in the sun’s path. “Hmmmm,” I said, inching toward my bag. I looked again. A sky filled with clouds and a hole on the horizon is the ideal combination for a colorful sunset, so I pulled out my Sony α1, already loaded with my Sony 24-105 G lens, and set up shop along the rail to wait with the rest of my group.
As we chatted, it became pretty clear that the opening would persist through sunset, and that something nice was in store. A few minutes later, when a small rain curtain spread just to the right of the sun’s path, I said out loud, “All this scene needs is a lightning bolt.” I was half joking, but this thought prompted me to check my lightning app one more time. Still nothing really exciting, but there were hints of distant, minor lightning activity in the general direction of the sunset, so I pulled out my Lightning Trigger—just in case. I encouraged the rest of the group to get theirs out too, then quickly scanned the horizon for other rain curtains with potential for lightning—I saw a couple that might produce, but nothing promising enough to justify anyone diverting from the sunset.
Then we waited and clicked as the sun dropped and started to light the sky. It turned out that the opening wasn’t as open as we’d hoped, so not enough sunlight made it through to color the entire sky, and we never actually even saw the sun. But all was not lost, as the clouds near the horizon throbbed a brilliant reddish orange and I could tell by all the clicking that everyone was pretty thrilled.
When a few higher clouds lit, I oriented my camera vertically and angled farther upward for more sky than I usually include here (Pro tip: the Grand Canyon is usually more interesting than the sky.) Already pretty content with what I had so far, imagine my surprise when, just as the color reached its crescendo, a streak of light darted from the clouds and kissed the horizon. My first reaction was that it came from higher in the sky than I’d have expected, but it happened so fast and unexpectedly that I really wasn’t sure what I’d seen. In fact, if the rest of the group hadn’t exclaimed in unison, I might not have believed I’d seen it at all.
The unified exclamation quickly turned to joyful laughter from those who had taken the time to attach their Lightning Triggers, and regretful moans from those who hadn’t. When a couple of people defied my recommendation to not check to see if they’d captured the bolt (you have to turn off the Trigger to review images, and often lightning’s not as visible on the review screen as it is on a computer) and reported success, I couldn’t resist and checked mine too.
There it was. I instantly saw why it had appeared to originate so much higher: the bolt had emerged high, slid across the front of the thunderhead, and weaved through a window in the clouds before disappearing and emerging one last time. And perfectly aligned with the Colorado River, it couldn’t have struck in a more ideal place if I’d have drawn it in myself.
I’ll admit that this image isn’t a creative masterpiece (the composition isn’t much different from several of my other Hopi Point images), but I will take a little credit for being there, and also for the foresight to be ready for lightning when its possibility wasn’t obvious. And honestly, it was simply an honor to be there for something so magnificent—my only job was to wait, and not screw it up.
My Lightning Gallery || My Lightning Photo Tips Article
Worth Waiting For
Click an image for a closer look, and to view a slide show.


The Rest of the Story
Posted on July 5, 2021

Dark Night, Milky Way Reflection, Grand Canyon
Sony a7SIII
Sony 20mm f/1.8 G
ISO 12800
f/1.8
20 seconds
Last week I posted a Milky Way reflection image (and the story of its capture) from my recent Grand Canyon raft trip, and this week I’m sharing another one from the same night. What I didn’t share last week is the rather circuitous (and somewhat embarrassing) path to offering my images from that night. So here goes…
There’s a certain mystique that comes with being a professional photographer that I must say isn’t always completely deserved. I mean, sometimes it feels we’re viewed as creative savants who never make mistakes, when in reality we struggle to make things happen just like everyone else. Like you, I’ve checked my EXIF data and wondered what in the world I was thinking when I chose f/16 or ISO 800 (or whatever), left a shoot just a little early or arrived a little late, decided not to bring (or simply forgotten to pack) the right lens, not charged a battery (or brought a spare), clumsily dropped a valuable piece of precision electronics, deleted important images, or…, well, let’s just say I could go on.
Case in point: As I’ve said as recently as last week, the Milky Way may just be my favorite thing to photography on my Grand Canyon raft trip. So important in fact, that I always spend a significant amount of the trip’s precious (and strictly enforced) equipment-weight budget on a camera body and lens that will be used for nothing but the Milky Way. But one year unseasonal rain and clouds that provided spectacular photography also unfortunately completely wiped out the trip’s night shoots. Which is why I didn’t discover until returning home that instead of packing the 20mm f/1.4 dedicated night lens (at the time), I’d packed my 90mm macro (which was a similar size but didn’t really look anything like the 20mm).
In my defense, I try not to make the same mistake twice, and every subsequent trip I’ve double- and triple-checked my gear to make sure I have everything I’ll need. This year’s night setup was my brand new Sony a7SIII and relatively new Sony 20mm f/1.8 G lens, and I’m happy to report that both made it onboard and downstream, and were ready for action when we scored a prime Milky Way campsite on the trip’s third night. In fact, I managed to navigate the entire shoot that night with the right camera and lens, proper camera settings, everything in focus, plenty of space on the SD card, and without dropping a single thing. What could possibly go wrong?
The next day I was pretty excited about what I’d captured, and couldn’t wait to get home and look the images on my computer. That afternoon was hot, and we arrived at our campsite early. With the sun still quite high as we prepared to motor across the river for some quality photography, swimming, and hiking at Deer Creek Fall, out of an abundance of caution, I removed from my duffle the small case containing my a7SIII and 20mm, carefully setting it in the cool shade of a nearby rock. Do you see where this is going?
Like most mornings, the next morning was a blur of activity as we ate breakfast, packed up our campsite, and hit the river. At Havasu Creek, about 30 miles downstream, I had the sudden realization that I had no memory of returning the camera and lens to my duffle, a thought that I quickly attributed to what I call the “garage door axiom”: just because you don’t remember doing something, doesn’t mean you didn’t do it (how many times have you not remembered closing the garage door and u-turned home only to find it closed tight?). Which is why I wasn’t really that concerned at camp that night, but I figured I’d better check my duffle anyway, just in case.
I was instantly reminded that no matter how many times you check a spot for something that you know should be there but isn’t, doesn’t make it appear. My panic eventually turned to embarrassment as my mind processed the ramifications. Not only were my camera and lens gone, so were the SD cards containing the only copies of the previous night’s bounty. The Colorado River is a one-way juggernaut, so going back was not an option. And with no connectivity at the bottom of the Grand Canyon, there would be no getting the word out until we returned to civilization.
I tried consoling myself with the knowledge that the camera and lens were insured, but the rationalization the Milky Way images were the only irreplaceable loss was little comfort. And that certainly didn’t make me feel any less stupid. It gets worse…
The first thing I did upon returning to the land of connectivity was report the loss to Trent at Western River Expeditions, the director of operations who puts together my charter each year. The second thing I did was gather the information necessary to file an insurance claim. So imagine my surprise when I realized that I’d somehow forgotten to add my new a7SIII to my insurance policy. Oops.
At first Trent was hopeful that some Good Samaritan would find my gear and do the right thing, but when two weeks passed with no word, my faith in humankind started to wane. But just about the time I’d given up all hope, I got a text from Trent saying that someone had just exited the canyon and posted online that he’d found a camera across from Deer Creek Fall and was trying to find the rightful owner. The next few days were a blur of online searching, messaging, effusive gratitude, shipping, tracking, and finally more effusive gratitude when I actually had my camera, lens, and SD cards in my possession.
I don’t know if there’s a real moral to this story, other than it’s nice to be reminded that humans are generally good and most people will do the right thing when the opportunity presents itself. That, and I’m a pretty lucky guy.
Help Me Keep Track of my Gear on a Future Grand Canyon Trip
Workshop Schedule || Purchase Prints || Instagram
Grand Canyon from the Bottom Up
Click an image for a closer look, and to view a slide show.


Grand Canyon Milky Way Reflection
Posted on June 27, 2021

Milky Way Reflection, Colorado River, Grand Canyon
Sony a7SIII
Sony 20mm f/1.8 G
ISO 6400
f/1.8
30 seconds
It seems that photographing the Milky Way gets a little easier with every passing year. I’m not talking about the dazzling composite hybrids (one frame for the sky, combined with a second frame for the foreground) that have become so popular, I’m talking about the old fashioned (well, as old fashioned as a digital image can be) single-click captures that use only the photons that strike a sensor during a single exposure.
Whether it’s a new low-light camera body, the latest ultra-fast wide lens, or breakthrough noise reduction software, there’s always something to new to look forward to on any of my workshops that include the Milky Way. 2020 was a lost year, so not only was I especially looking forward to returning to my go-to dark sky spots, I was really looking forward to trying out two years of technology advancement: my new Sony a7SIII, (relatively) new Sony 20mm f/1.8 G (the 14mm f/1.8 GM lens didn’t make it in time), and applying my new Topaz DeNoise AI software to the results.
My first Milky Way opportunity of 2021 came on Grand Canyon raft trip in May. On moonless nights the Grand Canyon has some of the darkest skies possible, but towering walls and the general east-west trend of the Colorado River make it tricky to find views of the southern horizon where the Milky Way’s brilliant core is found. And since all Colorado River campsites are first come, first served, and campsites with a Milky Way view are rare, viewing the Milky Way at the bottom of the Grand Canyon is far from a sure thing.
This was the seventh time I’ve done this trip, so my lead river guide and I have become pretty good at maximizing our Milky Way opportunities. Nevertheless, on this trip we didn’t get a campsite that worked until our fourth night. It was actually our second choice for that night, but when we found the site we’d originally targeted occupied, we ended up at our Plan B spot about a mile downstream.
My first thought was that a less than ideal angle of view meant the Milky Way wouldn’t appear until after 1 a.m., and wouldn’t rotate into the prime viewing region above the canyon until after 2 a.m. But after I scoping out the view while waiting for dinner, I found a couple of reasons to like our location. First was the spacious beach that provided room for everyone to set up without jostling for position, a real luxury compared to most of the campsites. The second that gave me hope was that our beach was on a bend in the river that created a large pool of still, reflective water—if the wind held off (never a sure thing), we could have some pretty nice reflections.
After dinner I gave everyone in the group a little orientation, letting them know where to set up, and when and where the Milky Way would appear. I also encouraged them to pre-compose and pre-focus before it got dark. (One of the great things about night photography at the Grand Canyon is that you can set up your shot in advance and leave your camera set up on the tripod without worrying about it “walking away.”)
When I got up at 1 a.m. the Milky Way was cresting the canyon wall on the left, and a few others were already happily clicking away. The air was still, so the reflection was everything I’d hoped it would be.
My early frames were horizontal, but as the Milky Way rotated upward, I started to mix in more vertical frames. Night photography is all about compromise: choosing less than ideal exposure values to capture enough light to bring out the stars and even a little foreground detail. As I do with most of my Milky Way images, before moving on to my next composition I tried a variety of exposure settings, varying the ISO between 6400 to 12800, shutter speeds from 10 to 30 seconds, and f-stops from f/1.8 to f/2.8.
Milky Way nights are so dark that sometimes I go for silhouettes. Silhouettes require less light, but also need a distinctive outline against the sky. I didn’t think silhouettes here were very good, so I exposed for more light to pull out foreground detail. For this image I used ISO 6400, f/1.8, 30 seconds, deciding that ISO 6400 gave me the most manageable noise, and my Sony 20mm f/1.8 G lens is good enough wide open that I really don’t need to stop-down. And given the amount of foreground detail I wanted, I preferred the slight star motion of a 30-second exposure to the extra noise ISO 12800 and 15 seconds gave me. (But this is a personal choice—if even extremely slight star motion bothers you, you might be okay with a little more noise to reduce it.)
Join me at the Grand Canyon
Workshop Schedule || Purchase Prints || Instagram
Here’s an updated version of the Milky Way how-to article in my Photo Tips section

Bristlecone Night, Milky Way from the White Mountains, California
Sony a7S
Rokinon 24mm f1.4
15 seconds
F/2
ISO 6400
See the Milky Way
Look heavenward on a moonless summer night (in the Northern Hemisphere) far from city light. The first thing to strike you is the shear volume of stars, but as your eyes adjust, your gaze is drawn to a luminous band spanning the heavens. Ranging from magnificently brilliant to faintly visible, this is the Milky Way, home to our sun and nearly a half trillion other stars of varying age, size, and temperature.
Size and shape
Though every star you’ve ever seen is part of our Milky Way galaxy, stargazers use the Milky Way label more specifically to identify this luminous river of starlight, gas, and dust encircling the night sky. As you feast your eyes, appreciate that some of the Milky Way’s starlight has traveled 25,000 years to reach your eyes, and that light from a star on one edge of the Milky Way would take 100,000 years to reach the other side.

Milky Way look-alike spiral galaxy: This is what our galaxy would look like from the outside, looking in. (The individual stars visible here are “local” and not part of the spiral galaxy depicted here.) Earth would be between two of the spiral arms, about halfway out from the center.
The rest of the sky appears to be filled with far more discrete stars than the region containing the Milky Way, but don’t let this deceive you. Imagine that you’re out in the countryside where the individual lights of a distant city blend into a homogeneous glow—similarly, the stars in the Milky Way’s luminous band are simply too numerous and distant to resolve individually. On the other hand, much like the lights of nearby farmhouses, the distinct pinpoints of starlight that we name and mentally assemble into constellations are simply closer. The dark patches in the Milky Way aren’t empty space, they’re starlight-blocking interstellar dust and gas, remnants of exploded stars and the stuff of future stars—like the trees and mountains that block our view of the city,.
Just as it’s impossible to know what your house looks like by peering out a window, it’s impossible to know what the Milky Way looks like by simply looking up on a dark night. Fortunate for us, really smart people have been able to infer from painstaking observation, measurement, reconstruction, and comparison with other galaxies that our Milky Way is flat (much wider than it is tall) and spiral shaped, like a glowing pinwheel, with two major arms and several minor arms spiraling out from its center. Our solar system is in one of the Milky Way’s minor arms, a little past midway between the center and outer edge.
Blinded by the light
Sadly, artificial light and atmospheric pollution have erased the view of the Milky Way for nearly a third of the world’s population—eighty percent of Americans. Worse still, even though some part of the Milky Way is overhead on every clear night, many people have never seen it.
The good news is that advances in digital technology have spurred a night photography renaissance that has enabled the Milky Way challenged to enjoy images of its splendor from the comfort of their recliner. But there’s nothing quite like viewing it in person. Fortunately, with just a little knowledge and effort, you too can enjoy the Milky Way firsthand; add the right equipment and a little more knowledge, and you’ll be able to photograph it as well.
Horizon to Horizon
Understanding that our Solar System is inside the Milky Way’s disk makes it easier to understand why we can see some portion of the Milky Way on any night (assuming the sky is dark enough). In fact, from our perspective, the plane of the Milky Way forms a complete ring around Earth (but of course we can only see half the sky at any given time), with its brightness varying depending on whether we’re looking toward our galaxy’s dense center or sparse outer region.
Where the action is

The Milky Way’s brilliant center, its “galactic core,” radiates above Kilauea on Hawaii’s Big Island
Though the plane of the Milky Way stretches all the way across our sky, when photographers talk about photographing the Milky Way, they usually mean the galactic core—the Milky Way’s center and most densely packed, brightest region. Unfortunately, our night sky doesn’t always face the galactic core, and there are many months when this bright region is not visible at all.
To understand the Milky Way’s visibility in our night sky, it helps to remember that Earth both rotates on its axis (a day), and revolves around the sun (a year). When the side of the planet we’re on rotates away from the sun each day, the night sky we see is determined by our position on our annual trip around the sun—when Earth is between the sun and the galactic core, we’re in position to see the most brilliant part of the Milky Way; in the months when the sun is between earth and the galactic core, the bright part of the Milky Way can’t be seen.
Put in terrestrial terms, imagine you’re at the neighborhood playground, riding a merry-go-round beneath a towering oak tree. You face outward, with your back to the merry-go-round’s center post. As the merry-go-round spins, your view changes—about half of the time you’d rotate to face the oak’s trunk, and about half the time your back is to the tree. Our solar system is like that merry-go-round: the center post is the sun, the Milky Way is the tree, and in the year it takes our celestial merry-go-round to make a complete circle, we’ll face the Milky Way about half the time.
Finding the Milky Way
Just like every other celestial object outside our solar system, the Milky Way’s position in our sky changes with the season and time of night you view it, but it remains constant relative to the other stars and constellations. This means you can find the Milky Way by simply locating any of the constellations in the galactic plane. Here’s an alphabetical list of the constellations* through which the Milky Way passes (with brief notes by a few of the more notable constellations):
- Aquila
- Ara
- Auriga—faintest
- Canis Major—faint
- Carina
- Cassiopeia—faint; its easily recognized “w” (or “m”) shape makes Cassiopeia a good landmark for locating the Milky Way in the northern sky
- Cepheus
- Circinus
- Crux
- Cygnus—bright
- Gemini
- Lacerta
- Lupus
- Monoceros
- Musca
- Norma
- Ophiuchus
- Orion—faint; another easy to recognize constellation that’s good for finding the galactic plane
- Perseus—faint
- Puppis
- Pyxis
- Sagitta
- Sagittarius—brightest, galactic core
- Scorpius—bright
- Scutum
- Serpens
- Taurus—faint
- Triangulum
- Vela
- Vulpecula
* Constellations are comprised of stars that only appear connected by virtue of our Earth-bound perspective—a constellation is a direction in the sky, not a location in space.
If you can find any of these constellations, you’re looking in the direction of some part of the Milky Way (if you can’t see it, your sky isn’t dark enough). But most of us want to see the center of the Milky Way, where it’s brightest, most expansive, and most photogenic. The two most important things to understand about finding the Milky Way’s brilliant center are:
- From our perspective here on Earth, the galactic core is in Sagittarius (and a couple of other constellations near Sagittarius)—when Sagittarius is visible, so is the brightest part of the Milky Way (assuming you can find a dark enough sky)
- Earth’s night side most directly faces Sagittarius in the Northern Hemisphere’s summer months (plus part of spring and autumn)
Armed with this knowledge, locating the Milky Way’s core is as simple as opening one of my (too many) star apps to find out where Sagittarius is. Problem solved. Of course it helps to know that the months when the galactic core rises highest and is visible longest are June, July, and August, and to not even consider looking before mid-March, or after mid-October. If you can’t wait until summer and don’t mind missing a little sleep, starting in April, Northern Hemisphere residents with a dark enough sky can catch Sagittarius and the galactic core rising in the southeast shortly before sunrise. After its annual premier in April, the Milky Way’s core rises slightly earlier each night and is eventually well above the horizon by nightfall.
People who enjoy sleep prefer doing their Milky Way hunting in late summer and early autumn, when the galactic core has been above the horizon for most of the daylight hours, but remains high in the southwest sky as soon as the post-sunset sky darkens enough for the stars to appear. The farther into summer and autumn you get, the closer to setting beneath the western horizon the Milky Way will be at sunset, and the less time you’ll have before it disappears.
Into the darkness
The Milky Way is dim enough to be easily washed out by light pollution and moonlight, so the darker your sky, the more visible the Milky Way will be. To ensure sufficient darkness, I target moonless hours, from an hour or so after sunset to an hour before sunrise. New moon nights are easiest because the new moon rises and sets (more or less) with the sun and there’s no moon all night. But on any night, if you pick a time before the moon rises, or after it sets, you should be fine. Be aware that the closer the moon is to full, the greater the potential for its glow to leak into the scene from below the horizon.
Getting away from city lights can be surprisingly difficult (and frustrating). Taking a drive out into the countryside near home is better than nothing, and while it may seem dark enough to your eyes, a night exposure in an area that you expect to be dark enough reveals just how insidious light pollution is as soon as you realize all of your images are washed out by an unnatural glow on the horizon. Since the galactic core is in the southern sky in the Northern Hemisphere, you can mitigate urban glow in your Milky Way images by heading south of any nearby population area, putting the glow behind you as you face the Milky Way.
Better than a night drive out to the country, plan a trip to a location with a truly dark sky. For this, those in the less densely populated western US have an advantage. The best resource for finding world-class dark skies anywhere on Earth is the International Dark-Sky Association. More than just a resource, the IDA actively advocates for dark skies, so if the quality of our night skies matters to you, spend some time on their site, get involved, and share their website with others.
Photograph the Milky Way
Viewing the Milky Way requires nothing more than a clear, dark sky. (Assuming clean, clear skies) the Milky Way’s luminosity is fixed, so our ability to see it is largely a function of the darkness of the surrounding sky—the darker the sky, the better the Milky Way stands out. But because our eyes can only take in a fixed amount of light, there’s a ceiling on our ability to view the Milky Way with the unaided eye.
A camera, on the other hand, can accumulate light for a virtually unlimited duration. This, combined with technological advances that continue increasing the light sensitivity of digital sensors, means that when it comes to photographing the Milky Way, well…, the sky’s the limit. As glorious as it is to view the Milky Way with the unaided eye, a camera will show you detail and color your eyes can’t see.
Knowing when and where to view the Milky Way is a great start, but photographing the Milky Way requires a combination of equipment, skill, and experience that doesn’t just happen overnight (so to speak). But Milky Way photography doesn’t need to break the bank, and it’s not rocket science.
Equipment
Bottom line, photographing the Milky Way is all about maximizing your ability to collect light: long exposures, fast lenses, high ISO.
Camera
In general, the larger your camera’s sensor and photosites (the “pixels” that capture the light), the more efficiently it collects light. Because other technology is involved, there’s not an absolute correlation between sensor and pixel size and light gathering capability, but a small, densely packed sensor almost certainly rules out your smartphone and point-and-shoot cameras for anything more than a fuzzy snap of the Milky Way. At the very least you’ll want a mirrorless or DSLR camera with an APS-C (1.5/1.6 crop) size sensor. Better still is a full frame mirrorless or DSLR camera. (A 4/3 Olympus or Panasonic sensor might work, but as great as these cameras are for some things, high ISO photography isn’t their strength.
Another general rule is that the newer the technology, the better it will perform in low light. Even with their smaller, more densely packed sensors, many of today’s top APS-C bodies outperform in low light full frame bodies that have been out for a few years, so full frame or APS-C, if your camera is relatively new, it will probably do the job.
If you’re shopping for a new camera and think night photography might be in your future, compare your potential cameras’ high ISO capabilities—not their maximum ISO. Read reviews by credible sources like DP Review, Imaging Resource, or DxOMark (among many others) to see how your camera candidates fare in objective tests.
An often overlooked consideration is the camera’s ability to focus in extreme low light. Autofocusing on the stars or landscape will be difficult to impossible, and you’ll not be able to see well enough through a DSLR’s viewfinder to manually focus. Some bodies with a fast lens might autofocus on a bright star or planet, but it’s not something I’d count on (though I expect within a few years before this capability will become more common).
Having photographed for years with Sony and Canon, and working extensively with most other mirrorless and DSLR bodies in my workshops, I have lots of experience with cameras from many manufacturers. In my book, focus peaking makes mirrorless the clear winner for night focusing. Sony’s current mirrorless bodies (a7RII/RIII, a7S/SII) are by far the easiest I’ve ever used for focusing in the dark—what took a minute or more with my Canon, I can do in seconds using focus peaking with my Sony bodies (especially the S bodies). I use the Sony a7SII, but when I don’t want to travel with a body I only use for night photography, the Sony a7RIII does the job too. Of the major DSLR brands, I’ve found Canon’s superior LCD screen (as of 2019) makes it much easier to focus in extreme low light than Nikon. (More on focus later.)
Lens
Put simply, to photograph the Milky Way you want fast, wide glass—the faster the better. Fast to capture as much light as possible; wide to take in lots of sky. A faster lens also makes focus and composition easier because the larger aperture gathers more light. How fast? F/2.8 or faster—preferably faster. How wide? At least 28mm, and wider is better still. I do enough night photography that I have a dedicated, night-only lens—my original night lens was a Canon-mount Zeiss 28mm f/2; my current night lens is the Sony 24mm f/1.4.
Tripod
It goes without saying that at exposure times up to 30 seconds, you’ll need a sturdy tripod and head for Milky Way photography. You don’t need to spend a fortune, but the more you spend, the happier you’ll be in the long run (trust me). Carbon fiber provides the best combination of strength, vibration reduction, and light weight, but a sturdy (albeit heavy) aluminum tripod will do the job.
An extended centerpost is not terribly stable, and a non-extended centerpost limits your ability to spread the tripod’s legs and get low, so I avoid tripods with a centerpost. But if you have a sturdy tripod with a centerpost, don’t run out and purchase a new one—just don’t extend the centerpost when photographing at night.
Read my tips for purchasing a tripod here.
Other stuff
To eliminate the possibility of camera vibration I recommend a remote release; without a remote you’ll risk annoying all within earshot with your camera’s 2-second timer beep. You’ll want a flashlight or headlamp for the walk to and from the car, and your cell phone for light while shooting. And it’s never a bad idea to toss an extra battery in your pocket. And speaking of lights, never, never, NEVER use a red light for night photography (more on this later).
Getting the shot
Keep it simple
There are just so many things that can go wrong on a moonless night when there’s not enough light to see camera controls, the contents of your bag, and the tripod leg you’re about to trip over. After doing this for many years, both on my own and helping others in workshops, I’ve decided that simplicity is essential.
Simplicity starts with paring down to the absolute minimum camera gear: a sturdy tripod, one body, one lens, and a remote release (plus an extra battery in my pocket). Everything else stays at home, in the car, or if I’m staying out after a sunset shoot, in my bag.
Upon arrival at my night photography destination, I extract my tripod, camera, lens (don’t forget to remove the polarizer), and remote release. I connect the remote and mount my lens—if it’s a zoom I set the focal length at the lens’s widest—then set my exposure and focus (more on exposure and focus below). If I’m walking to my photo site, I carry the pre-exposed and focused camera on the tripod (I know this makes some people uncomfortable, but if you don’t trust your tripod head enough to hold onto your camera while you’re walking, it’s time for a new head), trying to keep the tripod as upright and stable as possible as I walk.
Flashlights/headlamps are essential for the walk/hike out to to and from my shooting location, but while I’m there and in shoot mode, it’s no flashlights, no exceptions. This is particularly important when I’m with a group. Not only does a flashlight inhibit your night vision, its light leaks into the frame of everyone who’s there. And while red lights may be better for your night vision and are great for telescope view, red light is especially insidious about leaking into everyone’s frame, so if you plan to take pictures, no red light! If you follow my no flashlight rule once the photography begins, you’ll be amazed at how well your eyes adjust. I can operate my camera’s controls in the dark—it’s not hard with a little practice, and well worth the effort to learn. If I ever do need to see my camera to adjust something, or if I need to see to move around, my cell phone screen (not the phone’s flashlight, just its illuminated screen) gives me all the light I need.
Composition
A good Milky Way image is distinguished from an ordinary Milky Way image by its foreground. Simply finding a location that’s dark enough to see the Milky Way is difficult enough; finding a dark location that also has a foreground worthy of pairing with the Milky Way usually takes a little planning.
Since the Milky Way’s center is in the southern sky (for Northern Hemisphere observers), I look for remote (away from light pollution) subjects that I can photograph while facing south (or southeast or southwest, depending on the month and time of night). Keep in mind that unless you have a ridiculous light gathering camera (like the Sony a7S or a7S II) and an extremely fast lens (f/2 or faster), your foreground will probably be more dark shape than detail. Water’s inherent reflectivity makes it a good foreground subject as well, especially if the water includes rocks or whitewater.
When I encounter a scene I deem photo worthy, not only do I try to determine its best light and moon rise/set possibilities, I also consider its potential as a Milky Way subject. Can I align it with the southern sky? Are there strong subjects that stand out against the sky? Is there water I can include in my frame?
I’ve found views of the Grand Canyon from the North Rim, the Kilauea Caldera, and the bristlecone pines in California’s White Mountains that work spectacularly. And its hard to beat the dark skies and breathtaking foreground possibilities at the bottom of the Grand Canyon. On the other hand, while Yosemite Valley has lots to love, you don’t see a lot of Milky Way images from Yosemite Valley because not only is there a lot of light pollution, and Yosemite’s towering, east/west trending granite walls give its south views an extremely high horizon that blocks much of the galactic core from the valley floor.
The last few years I’ve started photographing the Milky Way above the spectacular winter scenery of New Zealand’s South Island, where the skies are dark and the Milky Way is higher in the sky than it is in most of North America.
To maximize the amount of Milky Way in my frame, I generally (but not always) start with a vertical orientation that’s at least 2/3 sky. On the other hand, I do make sure to give myself more options with a few horizontal compositions as well. Given the near total darkness required of a Milky Way shoot, it’s often too dark to see well enough to compose that scene. If I can’t see well enough to compose I guess at a composition, take a short test exposure at an extreme (unusable) ISO to enable a relatively fast shutter speed (a few seconds), adjust the composition based on the image in the LCD, and repeat until I’m satisfied.
Focus
Needless to say, when it’s dark enough to view the Milky Way, there’s not enough light to autofocus (unless you have a rare camera/lens combo that can autofocus on a bright star and planet), or even to manually focus with confidence. And of all the things that can ruin a Milky Way image (not to mention an entire night), poor focus is number one. Not only is achieving focus difficult, it’s very easy to think you’re focused only to discover later that you just missed.
Because the Milky Way’s focus point is infinity, and you almost certainly won’t have enough light to stop down for more depth of field, your closest foreground subjects should be far enough away to be sharp when you’re wide open and focused at infinity. Before going out to shoot, find a hyperfocal app and plug in the values for your camera and lens at its widest aperture. Even though it’s technically possible to be sharp from half the hyperfocal distance to infinity, the kind of precise focus focusing on the hyperfocal point requires is difficult to impossible in the dark, so my rule of thumb is to make sure my closest subject is no closer than the hyperfocal distance.
For example, I know with my Sony 24mm f/1.4 wide open on my full frame Sony a7SII, the hyperfocal distance is about 50 feet. If I have a subject that’s closer (such as a bristlecone pine), I’ll pre-focus (before dark) on the hyperfocal distance, or shine a bright light on an object at the hyperfocal distance and focus there, but generally I make sure everything is at least 50 feet away. Read more about hyperfocal focus in my Depth of Field article.
By far the number one cause of night focus misses is the idea that you can just dial any lens to infinity; followed closely by the idea that focused at one focal length means focused at all focal lengths. Because when it comes to sharpness, almost isn’t good enough, if you have a zoom lens, don’t even think of trying to dial the focus ring to the end for infinity. And even for most prime lenses, the infinity point is a little short of all the way to the end, and can vary slightly with the temperature and f-stop. Of course if you know your lens well enough to be certain of its infinity point by feel (and are a risk taker), go for it. And that zoom lens that claims to be parfocal? While it’s possible that your zoom will hold focus throughout its entire focal range, regardless of what the manufacturer claims, I wouldn’t bet an entire shoot on it without testing first.
All this means that the only way to ensure night photography sharpness is to focus carefully on something before shooting, refocus every time your focal length changes, and check focus frequently by displaying and magnifying an image on your LCD. To simplify (there’s that word again), when using a zoom lens, I usually set the lens at its widest focal length, focus, verify sharpness, and (once I know I’m focused) never change the focal length again.
While the best way to ensure focus is to set your focal length and focus before it gets dark, sometimes pre-focusing isn’t possible, or for some reason you need to refocus after darkness falls. If I arrive at my destination in the dark, I autofocus on my headlights, a bright flashlight, or a laser 50 feet or more away. And again, never assume you’re sharp by looking at the image that pops up on the LCD when the exposure completes—always magnify your image and check it after you focus.
For more on focusing in the dark, including how to use stars to focus, read my Starlight Photo Tips article.
Exposure
Exposing a Milky Way image is wonderfully simple once you realize that you don’t have to meter—because you can’t (not enough light). Your goal is simply to capture as many photons as you can without damaging the image with noise, star motion, and lens flaws.
Basically, with today’s technology you can’t give a Milky Way image too much light—you’ll run into image quality problems before you overexpose a Milky Way image. In other words, capturing the amount of light required to overexpose a Milky Way image is only possible if you’ve chosen an ISO and/or shutter speed that significantly compromises the quality of the image with excessive noise and/or star motion.
In a perfect world, I’d take every image at ISO 100 and f/8—the best ISO and f-stop for my camera and lens. But that’s not possible when photographing in near total darkness—a usable Milky Way image requires exposure compromises. What kind of compromises? The key to getting a properly exposed Milky Way image is knowing how far you push your camera’s exposure settings before the light gained isn’t worth the diminished quality. Each exposure variable causes a different problem when pushed too far:
- ISO: Raising ISO to increase light sensitivity comes with a corresponding increase in noise that muddies detail. The noise at any particular ISO varies greatly with the camera, so it’s essential to know your camera’s low-light capability(!). Some of the noise can be cleaned up with noise reduction software (I use Topaz DeNoise 6)—the amount that cleans up will depend on the noise reduction software you use, your skill using that software, and where the noise is (is it marring empty voids or spoiling essential detail?).
- Shutter speed: The longer the shutter stays open, the more motion blur spreads the stars’ distinct pinpoints into streaks. I’m not a big fan of formulas that dictate star photography shutter speeds because I find them arbitrary and inflexible, and they fail to account for the fact that the amount of apparent stellar motion varies with the direction you’re composing (you’ll get less motion the closer to the north or south poles you’re aimed). My general shutter-speed rule of thumb is 30-seconds or less, preferably less—I won’t exceed 30 seconds, and do everything I can to get enough light with a faster shutter speed.
- F-stop: At their widest apertures, lenses tend to lose sharpness (especially on the edges) and display optical flaws like comatic aberration (also called coma) that distorts points of light (like stars) into comet shaped blurs. For many lenses, stopping down even one stop from wide open significantly improves image quality.
Again: My approach to metering for the Milky Way is to give my scene as much light as I can without pushing the exposure compromises to a point I can’t live with. Where exactly is that point? Not only does that question require a subjective answer that varies with each camera body, lens, and scene, as technology improves, I’m less forgiving of exposure compromises than I once was. For example, when I started photographing the Milky Way with my Canon 1DS Mark III, the Milky Way scenes I could shoot were limited because my fastest wide lens was f/4 and I got too much noise when I pushed my ISO beyond 1600. This forced me compromise by shooting wide open with a 30-second shutter speed to achieve even marginal results. In fact, given these limitations, despite trying to photograph the Milky Way from many locations, when I started the only Milky Way foreground that worked well enough was Kilauea Caldera, because it was its own light source (an erupting volcano).
Today (mid-2019) I photograph the Milky Way with a Sony a7S II and a Sony 24mm f/1.4 lens. I get much cleaner images from my Sony at ISO 6400 than got a ISO 1600 on my Canon 1DSIII, and the night light gathering capability of an f/1.4 lens revelatory. At ISO 6400 (or higher) I can stop down slightly to eliminate lens aberrations (though I don’t seem to need to with the Sony lens), drop my shutter speed to 20 or 15 seconds to reduce star motion 33-50 percent, and still get usable foreground detail by starlight.
I can’t emphasize enough how important it is to know your camera’s and lens’s capabilities in low light, and how for you’re comfortable pushing the ISO and f-stop. For each of the night photography equipment combos I’ve used, I’ve established a general exposure upper threshold, rule-of-thumb compromise points for each exposure setting that I won’t exceed until I’ve reached the compromise threshold of the other exposure settings. For example, with my Sony a7SII/24mm f/1.4 combo, I usually start at ISO 6400, f/1.4, and 20 seconds. Those settings will usually get me enough light for Milky Way color and pretty good foreground detail. But if I want more light (for example, if I’m shooting into the black pit of the Grand Canyon from the canyon rim), my first exposure compromise might be to increase to ISO 12800; if I decide I need even more light, my next compromise is to bump my shutter speed to 30 seconds. Or if I want a wider field of view than 24mm, I’ll put on my Sony 16-35 f/2.8 G lens and increase to ISO 12800 and 30 seconds.
These thresholds are guidelines rather than hard-and-fast rules, and they apply to my preferences only—your results may vary. And though I’m pretty secure with this workflow, for each Milky Way composition I try a variety of exposure combinations before moving to another composition. Not only does this give me a range of options to choose between when I’m at home and reviewing my images on a big monitor, it also gives me more insight into my camera/lens capabilities, allowing me to refine my exposure compromise threshold points.
One other option that I’ve started applying automatically is long exposure noise reduction, which delivers a noticeable reduction in noise for exposures that are several seconds and longer.
* In normal situations the Sony a7SII can handle ISO 12,800 without even breathing hard, but the long exposure time required of night photography generates a lot of heat on the sensor with a corresponding increase in noise.
It’s time to click that shutter
You’re in position with the right gear, composed, focused, and exposure values set. Before you actually click the shutter, let me remind you of a couple of things you can do to ensure the best results: First, lower that center post. A tripod center post’s inherent instability is magnified during long exposures, not just by wind, but even by nearby footsteps, the press of the shutter button, and slap of the mirror (and sometimes it seems, by ghosts). And speaking of shutter clicks, you should be using a remote cable or two-second timer to eliminate the vibration imparted when your finger presses the shutter button.
When that first Milky Way image pops up on the LCD, it’s pretty exciting. So exciting in fact that sometimes you risk being lulled into a “Wow, this isn’t as hard as I expected” complacency. Even though you think everything’s perfect, don’t forget to review your image sharpness every few frames by displaying and magnifying and image on your LCD. In theory nothing should change unless you changed it, but in practice I’ve noticed an occasional inclination for focus to shift mysteriously between shots. Whether it’s slight temperature changes or an inadvertent nudge of the focus ring as you fumble with controls in the dark, you can file periodically checking your sharpness falls under “an ounce of prevention….” Believe me, this will save a lot of angst later.
And finally, don’t forget to play with different exposure settings for each composition. Not only does this give you more options, it also gives you more insight into your camera/lens combo’s low light capabilities.
The bottom line
Though having top-of-the-line, low-light equipment helps a lot, it’s not essential. If you have a full frame mirrorless or DSLR camera that’s less than five years old, and a lens that’s f/2.8 or faster, you probably have all the equipment you need to get great the Milky Way images. Even with a cropped sensor, or an f/4 lens, you have a good chance of getting usable Milky Way images in the right circumstances. If you’ve never photographed the Milky Way before, don’t expect perfection the first time out. What you can expect is improvement each time you go out as you learn the limitations of your equipment and identify your own exposure compromise thresholds. And success or failure, at the very least you’ll have spent a magnificent night under the stars.
Workshop Schedule || Purchase Prints
A Milky Way Gallery
Click an image for a closer look and slide show. Refresh the window to reorder the display.


Return to Civilization
Posted on May 18, 2021

Rainbow Bridge, Colorado River, Grand Canyon (2016)
Sony a7R II
Sony/Zeiss 16-35 f4
1/80 second
F/11
ISO 100
Yesterday I returned from my annual Grand Canyon raft trip, a week of white water, waterfalls, slot canyons, hiking, and star gazing in some of the most spectacular scenery on our planet—with some of the most spectacular people on our planet. This was my seventh trip, and while each trip is different, each has been unforgettable in its own way.
With highs in the low hundreds and lows in the 60s, this year was probably my hottest trip. But 100 degrees is pretty tolerable when the humidity is low and you’re never far from a splash of 50-degree Colorado River water. And our clear skies, while not ideal for daytime photography, gave us nights-after-night of skies filled with more stars than you’ve ever seen.
I had visions of processing an image or two as soon as I returned to Las Vegas on Sunday afternoon, then whipping out a quick blog post to keep my self-imposed every Sunday blog post schedule. But I hadn’t taken into account the post-trip pizza party I was to host, the shear exhaustion that always follows this trip, and the fact that I’d be breaking my glasses on the trip’s final day (a funny story—more on that in a future post), a mishap that makes spending more than a few minutes at a time on my computer very difficult. So I’ve dusted off this image, and its corresponding blog post (with a few small edits), from 2016.
The Illusion of Genius (May 2016)
Perhaps you’ve noticed that many popular nature photographers have a “hook,” a persona they’ve created to distinguish themselves from the competition (it saddens me to think that photography can be viewed as a competition, but that’s a thought for another day). This hook can be as simple (and annoying) as flamboyant self-promotion, or an inherent gift that enables the photographer to get the shot no one else would have gotten, something like superhuman courage or endurance. Some photographers actually credit a divine connection or disembodied voices that guide them to the shot.
Clearly I’m going to need to come up with a hook of my own if I’m to succeed. Flamboyant self-promotion just isn’t my style, and my marathon days are in the distant past. Courage? I think my poor relationship with heights would rule that out. And the only disembodied voice I hear is my GPS telling me she’s “recalculating.”
Just when I thought I’d reached an impasse that threatened to keep me mired in photographic anonymity, a little word percolated up from my memory, a word that I’d heard uttered behind my back a few times after I’d successfully called a rainbow or moonrise: “Genius.” That’s it! I could position myself as the Sherlock of shutter speed, the Franklin of f-stops, the Einstein of ISO. That’s, well…, genius!
And just as the fact that none of these other photographers are quite as special as their press clippings imply, the fact that I’m not actually a genius will be of no concern.
But seriously
Okay, the truth is that photography is not rocket science, and nature photographers are rarely called to pave the road to scientific or spiritual truth. Not only is genius not a requirement for great photography, for the photographer who thinks too much, genius can be a hindrance. On the other hand, a little bit of thought doesn’t hurt.
It’s true that I’ve photographed more than my share of vivid rainbows and breathtaking celestial phenomena—moonrises and moonsets, moonbows, the Milky Way, and even a few comets—from many iconic locations, but that’s mostly due to just a little research and planning, combined with a basic understanding of the natural world. An understanding that’s basic enough for most people who apply themselves.
Take, for example, this rainbow. It was clearly the highlight of this year’s Grand Canyon raft trip, and while I did predict it about fifteen minutes before it appeared, that doesn’t make me a genius. Like most aspects of nature photography, photographing a rainbow is mostly a matter of being in the right place at the right time. Of course there are things you can do to increase your chances of being in the right place at the right time. Mostly it’s an understanding of the science of rainbows, and the patience to wait, that makes me appear more prescient than I really am.
The essentials for a rainbow are simple: airborne water droplets and sunlight (or moonlight, or any other source of bright, white light) at 42 degrees or lower. Combine these two elements with the correct angle of view and you’ll get a rainbow. The center of the rainbow will always be exactly opposite the sun—in other words, your shadow will always point toward the rainbow’s center. And the lower the sun, the higher (and more full) the rainbow. There are a few other complicating factors, but this is really all you need to know to become a rainbow “genius.”
In this case it had been raining on and off all day, and while rain is indeed half of the ingredients in our rainbow recipe, as is often the case, this afternoon the requisite sunlight was blocked by the very clouds delivering the rain. Not only do rain clouds block sunlight, so do towering canyon walls. Complicating things further, the window when the sun is low enough to create a rainbow is much smaller in the longer daylight months near the summer solstice (because the sun spends much of its day above 42 degrees). So, there at the bottom of the Grand Canyon on this May afternoon, the rainbow odds weren’t in our favor.
But despite the poor odds, because this afternoon’s rain fell from clouds ventilated by lots of blue holes, I gave my group a brief rainbow alert, telling them when (according to my Focalware iPhone app, the sun would drop below 42 degrees at 3:45) and where to look (follow your shadow), and encouraging them to be ready. Being ready means figuring out in advance where the rainbow will appear and finding a composition in that direction, then regularly checking the heavens—not just for what’s happening now, but especially for what might happen soon.
We arrived at our campsite across from Deer Creek Fall with a light rain falling. The sun was completely obscured by clouds, but seeing that the sun would eventually drop into a large patch of blue on the western horizon, I went scouting for possible rainbow views as soon as my campsite was set up. When the rain intensified an hour or so later, I reflexively looked skyward and realized that the sun was about to drop beneath the clouds into a patch of blue that reached all the way to the western horizon. I quickly sounded the alarm (“The rainbow is coming! The rainbow is coming!”), grabbed my gear, and beelined to the spot I’d found earlier.
A few followed my lead and set up with me, but the skeptics (who couldn’t see beyond the heavy rain and no sunlight at that moment) continued with whatever they were doing. After about fifteen minutes standing in the rain, a few splashes of sunlight lit the ridge above us on our side of the river; less than a minute later, a small fragment of rainbow balanced above the right riverbank just upstream. Then, right before our eyes, the color quickly spread across the river to connect with the other side. Soon we had a double rainbow, as vivid as any I’ve ever seen.
Fortunately for the skeptics, this rainbow lasted so long, everyone had a chance to photograph it. Our four guides (with an average of 15 years Grand Canyon guiding experience), agreed that this had been the most vivid and longest lasting rainbow they’d ever seen. (I actually toned it down a little in Photoshop.)
Genius? Hardly. Just a little knowledge and preparation mixed with a large dose of good fortune.
One more thing (May 31, 2016)
The vast majority of photographers whose work I enjoy viewing achieved their success the old fashioned way, by simply taking pictures and sharing them (rather than blatant self-promotion or exaggerated stories of personal sacrifice). In no particular order, here’s a short, incomplete list of photographers I admire for doing things the right way: Charles Cramer, Galen Rowell, David Muench, William Neill, and Michael Frye. In addition to great images, one thing these photographers have in common is an emphasis on sharing their wisdom and experience instead of hyperbolic tales of their photographic exploits.
Read more about the science of rainbows, and how to photograph them
A Gallery of Rainbows


Memory Lane
Posted on June 28, 2020
Milky Way, Grand Canyon (Tyndall Dome, Wallace Butte, Mt. Huethawali)
Canon EOS-5D Mark III
Zeiss 28mm f/2.0
30 seconds
F/2
ISO 6400
So, a few weeks ago I started moving all of my images to a 72 Terabyte Synology NAS system (configured as a RAID 6). This may very well be overkill, but it’s the kind of thing that happens when your son-in-law does IT. The image storage paradigm I’m replacing was a hash of hard drives that was long on redundancy and data security, but short on organization—I could find every image I had stored, but heaven help the person tasked with managing my estate in the event of my untimely demise.
An inevitable byproduct of this image management recalibration is opening random folders and running into long forgotten images from past trips. Which is how last week I somehow found myself sucked back into 2014, the year I switched to Sony, the first year of serious exploration of the spectacular Columbia River Gorge with Don Smith, and the year of my very first Grand Canyon raft trip.
Even now I remember that one of my prime motivations for rafting the Grand Canyon was the opportunity to go to sleep beneath impossibly dark skies brimming with more stars than I’d ever seen in my life. To ensure the darkest skies possible, I scheduled this trip (and every subsequent trip) for a new moon. And to avoid the summer heat and a muddy monsoon-season Colorado River, I chose May—when the Milky Way doesn’t rise above the canyon walls until well after midnight.
In 2014 I was still shooting Canon. Knowing that my 5DIII struggled at the extreme ISOs necessary to photograph in such darkness, the first couple of nights I stuck to star trails. Nevertheless, after a couple of nights of choosing sleep, I couldn’t resist giving the Milky Way a shot. This image from our third night was my first Milky Way attempt on that trip. When I processed it way back in 2014, I was pretty disappointed with the amount of noise. I reprocessed it this week, and between much better noise processing software (Topaz DeNoise AI) and a lot more experience processing Milky Way images, I’m much happier with my result—nowhere near what I get with my Sonys, but good enough.
I actually blogged about this image and the whole night photography experience of that first raft trip way back in 2014, so rather than try to reconstruct 6-year old memories from scratch, I’ve dusted off that original post and polished it up a bit to share here.
GCRT 2014 after dark, day one
We started at 4:30 a.m. when the group gathered in our Las Vegas hotel for the trip to the put-in point at Lee’s Ferry. So come dark, I was dead and ready for bed. (Foolishly) imagining that my home bedtime reading habit would transfer seamlessly to the Grand Canyon, I’d packed a couple of books to drift off to sleep to, but just five minutes into that first night I discarded that folly and simply basked in starlight, utterly mesmerized by the volume and variety of stars, constellations, planets, shooting stars, and satellites overhead. I fought sleep like a two-year-old at nap time—if I would have had access to duct tape I’d have considered taping my eyelids to my forehead.
GCRT 2014 after dark, day two
Topping off a long but relatively quiet day on the river, for our second night we’d tied up our two rafts at a fantastic campsite with a wide downriver view that opened to the southern sky. Immediately after dinner (before the darkness made composing and focusing extremely difficult) I had everyone line up along the river to set up their shots and focus. I gave a little orientation to everyone who was new to night photography, then we all just kicked back and waited for nightfall.
When the sky darkened and the stars popped out, we had a blast photographing star trails and pinpoint stars above the river. By 10:00 or so, long before the Milky Way rotated into view, everyone was ready for sleep. When I told the group that the best time to photograph the Milky Way would be between 2:00 and 4:00 a.m., there wasn’t a lot of enthusiasm—if I’d have known then what I know now, that open views of the southern sky are relatively rare at the bottom of the Grand Canyon, I’d have encouraged everyone with Milky Way aspirations not to pass this opportunity.
GCRT 2014 after dark, day three
Day three was all about the rapids, which seemed to come fast and furious all day, rarely allowing more than a few minutes of calm water before we had to hold on tight and “suck rubber” for the next one. Unkar, Hance, Crystal, Granite, the gem series, to name a few highlights, were simultaneously thrilling and chilling to us whitewater novices. And also physically draining.
At about 5:00 p.m., equal parts exhilarated and exhausted, we set up camp near the canyon’s 110-milestone. Despite my fatigue, I couldn’t help notice that there just might be enough southern sky for the Milky Way’s brilliant core to appear. Even so, not even another fantastic dinner could completely recharge the group, and for most the visions of a night photography marathon quickly succumbed to the gravitational pull of cot and sleeping bag. Nevertheless, I was one day smarter and had started to realize that this might be the best opportunity to try the Milky Way.
I’ll start by going back to the orientation delivered by lead river guide Wiley as it pertains to the evacuation of, uhhh, personal liquid waste: Peeing. Contrary to everything I’d learned from a lifetime of camping and backpacking, Wiley gave us very emphatic instructions to pee nowhere but in the river. That’s right. Apparently the Colorado River’s volume will sufficiently dilute the pee of the several hundred people enjoying the Grand Canyon from the river any given time; the alternative, we learned, would be all these visitors targeting the ubiquitous riverside sand to turn each campsite and trail into a giant litter-box. To achieve this goal the women were issued handy little buckets that allowed them to evacuate their bladders wherever they felt comfortable, then discreetly deposit the contents in the river; the guys, on the other hand, were expected to simply find a relatively private spot and apply the tried and true ready-aim-fire approach.
Before we first hit the river, even before the bathroom lecture, Wiley had also admonished the group about the hazards of dehydration, imploring us to consume copious amounts of water day and night. While this strategy achieved the desired effect (no one in the group succumbed to dehydration), an unfortunate byproduct was nature’s inevitable call in the, uh, “wee” hours of the morning. But what could all this possibly have to do with photographing the Milky Way?
Knowing that there was a pretty good chance nature would send me trekking down to the river at around two or three in the morning anyway, the last thing I did before crawling into my sleeping bag that night was mount my camera on my tripod, attach my 28mm Zeiss f2 (my night lens at the time), focus it at infinity, and dial in all the exposure settings necessary for a Milky Way shoot.
When I woke at around two o’clock the next morning, I hopped from my sleeping bag, grabbed my tripod/camera, and made my way down the river. (You’d be amazed at the amount of light cast by starlight in a deep canyon with no other light source.) At the river I quickly set up this shot, clicked my shutter, and went about the rest of my business. As a life-long Northern Californian, I’m accustomed to sharing delicious fresh water with parched and thirsty Los Angeles—standing there, I couldn’t help find comfort in the knowledge of the ultimate destination of my current contribution to the Colorado River.
As with all my images, this one was captured with one click. While this may not be the best way to technical perfection in a Milky Way image (blending one frame exposed for the sky and one frame exposed for the foreground yields more detail with less noise), I prefer exercising my creativity in my camera, not my computer. This isn’t a judgement of those who do otherwise, it’s simply the way I find my joy in photography. Shooting with the Canon 5DIII, this one-click goal was especially difficult, so I’m actually relatively happy with my results here.
Grand Canyon Top and Bottom
Click an image for a closer look, and to view a slide show.


")

One Fine Morning
Posted on August 11, 2019
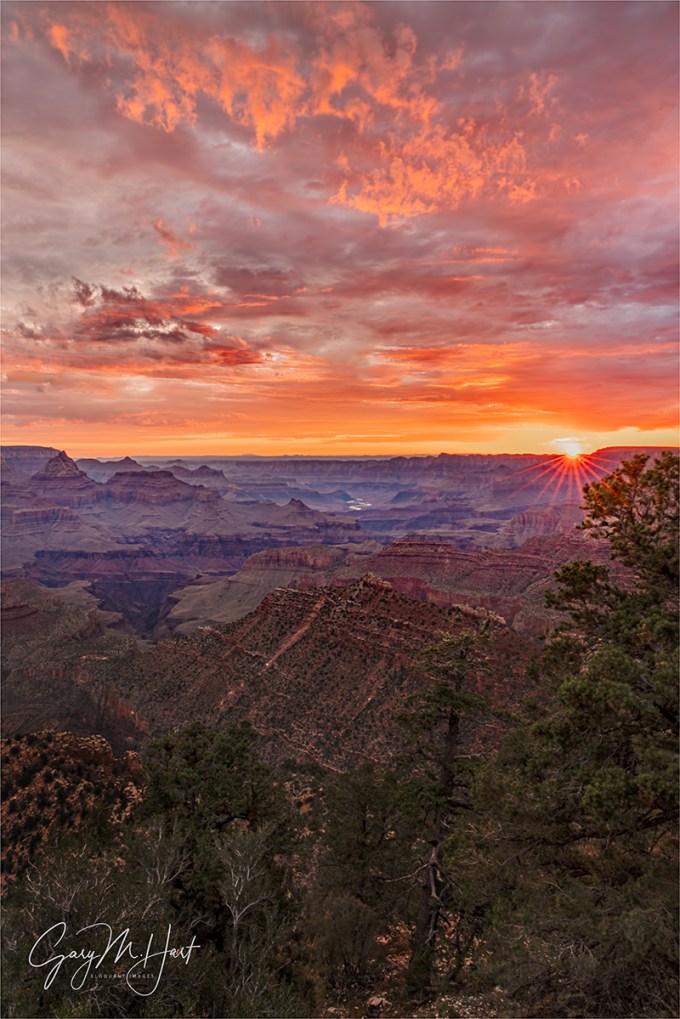
One Fine Morning, Grandview Point, Grand Canyon South Rim
Sony a7RIII
Sony 16-35 f/2.8 GM
1 second
F/18
ISO 100
Confession: 4:30 wake-ups aren’t my favorite part of being a landscape photographer. But honestly, the worst part of an early wake-up starts the instant the alarm goes off and lasts until I get out of bed, so I’ve trained myself to set my alarm with zero time to spare, which forces me to rip off the wake-up bandaid.
Though sunrise doesn’t always work out photographically, it rarely lets me down emotionally. There’s no better time of the day to be outside, when all nature’s sensory inputs are coming alive and the din of humankind is still asleep. Even in a crowded national park like Grand Canyon, it’s the best time of the day to hear the birds conversing and savor the whisper of water and wind. And with the atmosphere unfiltered by human pollutants, the spectacular sights never feel closer.
I just wrapped up two workshops at Grand Canyon. These workshops were built to maximize our lightning capture opportunities, and in that regard each workshop was a major success. But we had other memorable moments that had nothing to do with lightning, with probably most memorable being the second group’s first sunrise. (Or the first group’s first sunset, but that’s a story for a different day.)
On that morning’s eastward drive to Grandview Point, we’d passed through a couple of rain showers, but through the trees I caught a glimpse of an opening on the eastern horizon. Clouds overhead with a gap low in the east is the recipe for a colorful sunrise, but not wanting to jinx us, I kept my mouth shut until the pre-shoot orientation (a quick summary of the site—where to go and what to look for). I also suggested the possibility of a rainbow and where it would be, and gave everyone a quick refresher on how to capture a sunstar before setting them free to explore and create.
Our morning started with a deep red glow on the eastern horizon that slowly brightened and spread across the sky. With the brightening horizon behind Desert View signaling the sun’s approach, the clouds took on a shimmering pink hue. Anticipating a sunstar opportunity, I composed my scene and stopped my Sony 16-35 f/2.8 lens (my favorite sunstar lens) down to f/18. I had several minutes to spare and spent them taking in my surroundings, then snapped to action with the first brilliant rays of direct sunlight. Unlike many mornings, the color hung in there for a couple of minutes after the sun’s arrival, all the time I needed to capture this frame.
Right in the midst of my sunstar shoot someone in the group shouted “Rainbow!” and I whipped around to confirm. I’d already decided this was a pretty special sunrise, but thought the rainbow, though not complete or ideally positioned, would be the cherry on top. But the show wasn’t over—when the sun rose into the clouds and the light flattened, people started to pack up. But I noticed a few holes that would almost certainly soon send crepuscular rays (god rays) into the canyon, so we hung around long enough to add that to the morning’s checklist. Color, sunstar, rainbow, god-rays—not a bad way to start the day. (I haven’t processed the rainbow and crepuscular rays images yet—stay tuned.)
Join me for a Grand Canyon photo workshop
Memorable Sunrises


The Evolution of a Stargazer
Posted on May 19, 2019

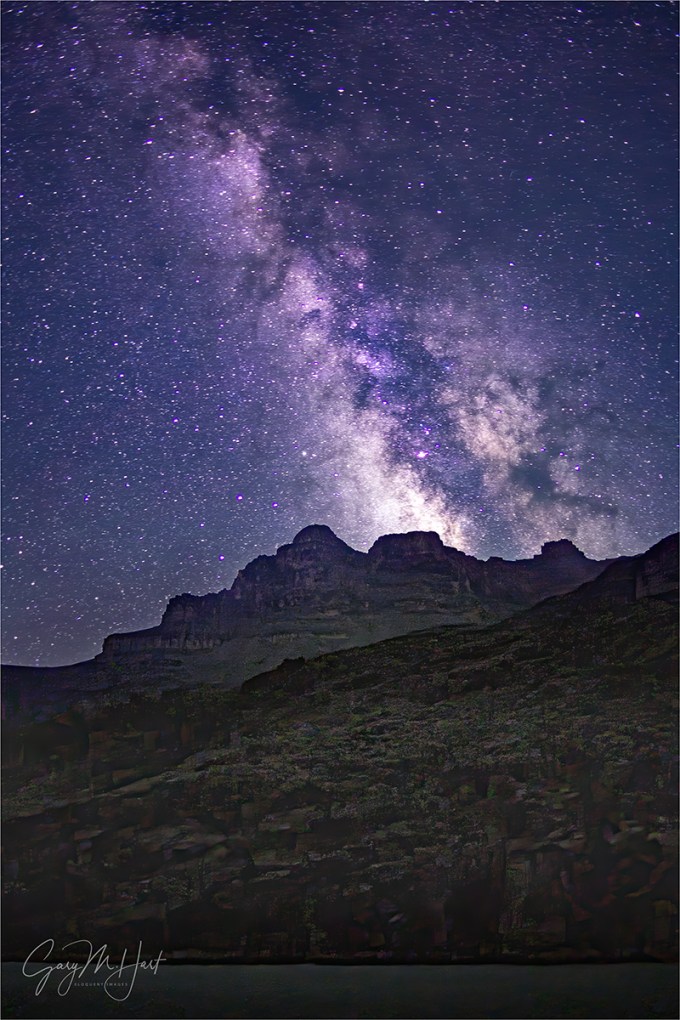
Dark Sky, Milky Way Above the Colorado River, Grand Canyon
Sony a7SII
Sony 24 f/1.4 GM
20 seconds
F/1.4
ISO 6400
In the Beginning
I grew up in a camping family. My dad was a minister, so pricey airline/hotel/restaurant vacations were out of the question for the five of us, as of course were weekend camping trips. But for as far back as I can remember, each summer my family went camping somewhere. Usually it was a week or two in Yosemite, Sequoia/Kings Canyon, the California coast, or some other relatively close scenic destination, but every few years we’d hook up the tent trailer, pile into the station wagon, and take a road trip.
The one constant in this numbing succession of summer campsites was the dark sky far from city lights, and the vast sprinkle of stars that mesmerized me. I soon learned that stargazing is the one thing a child can do for as long as he wants after bedtime without getting in trouble. I enjoyed playing connect-the-dots with the stars, identifying named constellations, or making up my own. It turned out all this scanning was a great way to catch shooting stars, and soon my goal was to stay awake until one flashed across my vision. And satellites were still something of a novelty back then, so another camping bedtime exercise was to slowly scan the sky looking for a “star” that moved; when I found one, I’d track it across the until it disappeared behind the horizon—or my eyelids.
At some point I became aware of a hazy band of light stretching across my night sky. On the darkest nights, when my vantage point faced the right direction, the widest and brightest part of this band reminded me of sugar spilled on pooled ink. But the Milky Way wasn’t as dramatic some of the other stuff in my night skies, so the childhood Me was oblivious to its inherent coolness for many years.
On these nightly scans I was more interested in the apparent randomness in the patterns overhead—the consistency of certain stellar arrangements, while a few bright “stars” would be in different positions each night relative to these recognizable patterns. Someone explained to me the difference between stars and planets, that stars were far and planets were close, and that was good enough for me. For a while.
Then, when I was about ten, my best friend and I did a science project on comets, which ignited a sudden and intense interest in all things astronomical. I was gifted a second-hand telescope by a friend of my dad, which we’d set up in my best friend’s front yard on summer nights. Through the telescope the stars remained (boring) points of light, no matter how much I magnified them, but the planets became fascinating disks, each with its own personality. I learned that Venus and Mercury were actually crescents of varying size, just like a mini moon. After searching in vain for the canals on Mars, I was thrilled to (barely) see Saturn’s rings, and to watch the nightly dance of the four pin-prick Galilean moons.
All this stargazing helped me develop a rudimentary understanding of celestial relationships, the vastness of space, the sun’s dominant role in our solar system, and its utter insignificance in the Universe. And the more I learned about astronomy, the more fascinating our home galaxy became. Rather than just passively observing it, the Milky Way became a catalyst for pondering the mysteries of the Universe and my favorite night sky feature.
Fast forward…
Then came college, marriage, family, jobs, cameras (lots of cameras) until I found myself at the bottom of the Grand Canyon on this moonless night in May. It was the second night of my annual Grand Canyon Raft Trip for Photographers, a highlight in a year full of highlights, and my first opportunity each year to reconnect with my favorite celestial feature. After night one hadn’t worked out, I told myself that we still had four more chances, but at bedtime on night two I was a little more pessimistic.
The prescription for a successful Milky Way photograph includes a clear view of the southern sky with a nice foreground. There’s no shortage of foreground in the Grand Canyon, but southern sky views are not quite so plentiful. The first night had been spectacularly clear, but our otherwise spectacular campsite was on an east/west trending section of river (I try to select each campsite for its astrophotography potential, but the sites can’t be reserved, and sometime there are other factors to consider), which placed the rising galactic core behind a towering canyon wall. On our second day we’d scored prime real estate on a north/south section of river a few miles upstream from Desert View, but now thin clouds threatened to spoil the show.
In May the Milky Way doesn’t usually crest the canyon walls until 2:00 or 3:00 a.m. (depending on the location), but as we prepared for bed that second day, only a handful of stars smoldered in the gauzy veil above. But with six hours for conditions to improve, I prepared anyway, identifying my foreground, setting up my tripod next to my cot, and mounting my Sony a7SII body and Sony 24mm f/1.4 lens with ISO, f-stop, and shutter speed set.
Waking a little before 3:00, I instantly saw far more stars than had been visible at bedtime. But more importantly, there was the Milky Way, directly overhead. I sat up and peered toward the river—the soft glow of several LCD screens told me others were already shooting, so I grabbed my tripod and stumbled down to the river’s edge in the dark (to avoid illuminating the others’ scene). It’s quite amazing how well you can see by the light of the Milky Way once your eyes adjust.
After a few frames I saw that a few thin clouds remained, creating interesting patterns against the starry background. By about 4 a.m., an hour-and-a-half before sunrise, loss of contrast in my images that wasn’t visible to my eyes told me the approaching sun was already starting to brighten the sky. I photographed for about an hour that morning, then managed to catch another 45 minutes of contented sleep before the guides’ coffee call got me up for good.
Workshop Schedule || Purchase Prints
I continue updating my Photo Tips articles—here’s my just-updated Milky Way article,
with all you need to know to locate and photograph our home galaxy
How to photograph the Milky Way
See the Milky Way
Look heavenward on a moonless (Northern Hemisphere) summer night far from city light. The first thing to strike you is the shear volume of stars, but as your eyes adjust, your gaze is drawn to a luminous band spanning the sky. Ranging from magnificently brilliant to faintly visible, this is the Milky Way, home to our sun and nearly a half trillion other stars of varying age, size, and temperature.
Size and shape
Though every star you’ve ever seen is part of our Milky Way galaxy, stargazers use the Milky Way label more specifically to identify this river of starlight, gas, and dust spanning the night sky. As you feast your eyes, appreciate that some of the Milky Way’s starlight has traveled 25,000 years to reach your eyes, and light from a star on one edge of the Milky Way would take 100,000 years to reach the other side.
Milky Way look-alike spiral galaxy: This is what our galaxy would look like from the outside, looking in. (The individual stars visible here are “local” and not part of the spiral galaxy depicted here.) Earth would be between two of the spiral arms, about halfway out from the center.
The rest of the sky appears to be filled with far more discrete stars than the region containing the Milky Way, but don’t let this deceive you. Imagine that you’re out in the countryside where the lights of a distant city blend into a homogeneous glow—similarly, the stars in the Milky Way’s luminous band are simply too numerous and distant to resolve individually. On the other hand, the individual pinpoints of starlight that we name and mentally assemble into constellations are just closer, much like the lights of nearby farmhouses. And the dark patches in the Milky Way aren’t empty space—like the trees and mountains that block our view of the city, they’re starlight-blocking interstellar dust and gas, remnants of exploded stars and the stuff of future stars.
Just as it’s impossible to know what your house looks like by peering out a window, it’s impossible to know what the Milky Way looks like by simply looking up on a dark night. Fortunate for us, really smart people have been able to infer from painstaking observation, measurement, reconstruction, and comparison with other galaxies that our Milky Way is flat (much wider than it is tall) and spiral shaped, like a glowing pinwheel, with two major arms and several minor arms spiraling out from its center. Our solar system is in one of the Milky Way’s minor arms, a little past midway between the center and outer edge.
Blinded by the light
Sadly, artificial light and atmospheric pollution have erased the view of the Milky Way for nearly a third of the world’s population, and eighty percent of Americans. Worse still, even though some part of the Milky Way is overhead on every clear night, many people have never seen it.
Advances in digital technology have spurred a night photography renaissance that has enabled the Milky Way challenged to enjoy images of its splendor from the comfort of their recliner, but there’s nothing quite like viewing it in person. With just a little knowledge and effort, you too can enjoy the Milky Way firsthand; add the right equipment and a little more knowledge, and you’ll be able to photograph it as well.
Horizon to Horizon
Understanding that our Solar System is inside the Milky Way’s disk makes it easier to understand why we can see some portion of the Milky Way on any night (assuming the sky is dark enough). In fact, from our perspective, the plane of the Milky Way forms a complete ring around Earth (but of course we can only see half the sky at any given time), with its brightness varying depending on whether we’re looking toward our galaxy’s dense center or sparse outer region.
Where the action is
The Milky Way’s brilliant center, its “galactic core,” radiates above Kilauea on Hawaii’s Big Island
Though the plane of the Milky Way stretches all the way across our sky, when photographers talk about photographing the Milky Way, they usually mean the galactic core—the Milky Way’s center and most densely packed, brightest region. Unfortunately, our night sky doesn’t always face the galactic core, and there are many months when this bright region is not visible at all.
To understand the Milky Way’s visibility in our night sky, it helps to remember that Earth both rotates on its axis (a day), and revolves around the sun (a year). When the side of the planet we’re on rotates away from the sun each day, the night sky we see is determined by our position on our annual trip around the sun—when Earth is between the sun and the galactic core, we’re in position to see the most brilliant part of the Milky Way; in the months when the sun is between earth and the galactic core, the bright part of the Milky Way can’t be seen.
Put in terrestrial terms, imagine you’re at the neighborhood playground, riding a merry-go-round beneath a towering oak tree. You face outward, with your back to the merry-go-round’s center post. As the merry-go-round spins, your view changes—about half of the time you’d rotate to face the oak’s trunk, and about half the time your back is to the tree. Our solar system is like that merry-go-round: the center post is the sun, the Milky Way is the tree, and in the year it takes our celestial merry-go-round to make a complete circle, we’ll face the Milky Way about half the time.
Finding the Milky Way
Just like every other celestial object outside our solar system, the Milky Way’s position in our sky changes with the season and time of night you view it, but it remains constant relative to the other stars and constellations. This means you can find the Milky Way by simply locating any of the constellations in the galactic plane. Here’s an alphabetical list of the constellations* through which the Milky Way passes (with brief notes by a few of the more notable constellations):
- Aquila
- Ara
- Auriga—faintest
- Canis Major—faint
- Carina
- Cassiopeia—faint; its easily recognized “w” (or “m”) shape makes Cassiopeia a good landmark for locating the Milky Way in the northern sky
- Cepheus
- Circinus
- Crux
- Cygnus—bright
- Gemini
- Lacerta
- Lupus
- Monoceros
- Musca
- Norma
- Ophiuchus
- Orion—faint; another easy to recognize constellation that’s good for finding the galactic plane
- Perseus—faint
- Puppis
- Pyxis
- Sagitta
- Sagittarius—brightest, galactic core
- Scorpius—bright
- Scutum
- Serpens
- Taurus—faint
- Triangulum
- Vela
- Vulpecula
* Constellations are comprised of stars that only appear connected by virtue of our Earth-bound perspective—a constellation is a direction in the sky, not a location in space.
If you can find any of these constellations, you’re looking in the direction of some part of the Milky Way (if you can’t see it, your sky isn’t dark enough). But most of us want to see the center of the Milky Way, where it’s brightest, most expansive, and most photogenic. The two most important things to understand about finding the Milky Way’s brilliant center are:
- From our perspective here on Earth, the galactic core is in Sagittarius (and a couple of other constellations near Sagittarius)—when Sagittarius is visible, so is the brightest part of the Milky Way (assuming you can find a dark enough sky)
- Earth’s night side most directly faces Sagittarius in the Northern Hemisphere’s summer months (plus part of spring and autumn)
Armed with this knowledge, locating the Milky Way’s core is as simple as opening one of my (too many) star apps to find out where Sagittarius is. Problem solved. Of course it helps to know that the months when the galactic core rises highest and is visible longest are June, July, and August, and to not even consider looking before mid-March, or after mid-October. If you can’t wait until summer and don’t mind missing a little sleep, starting in April, Northern Hemisphere residents with a dark enough sky can catch Sagittarius and the galactic core rising in the southeast shortly before sunrise. After its annual premier in April, the Milky Way’s core rises slightly earlier each night and is eventually well above the horizon by nightfall.
People who enjoy sleep prefer doing their Milky Way hunting in late summer and early autumn, when the galactic core has been above the horizon for most of the daylight hours, but remains high in the southwest sky as soon as the post-sunset sky darkens enough for the stars to appear. The farther into summer and autumn you get, the closer to setting beneath the western horizon the Milky Way will be at sunset, and the less time you’ll have before it disappears.
Into the darkness
The Milky Way is dim enough to be easily washed out by light pollution and moonlight, so the darker your sky, the more visible the Milky Way will be. To ensure sufficient darkness, I target moonless hours, from an hour or so after sunset to an hour before sunrise. New moon nights are easiest because the new moon rises and sets (more or less) with the sun and there’s no moon all night. But on any night, if you pick a time before the moon rises, or after it sets, you should be fine. Be aware that the closer the moon is to full, the greater the potential for its glow to leak into the scene from below the horizon.
Getting away from city lights can be surprisingly difficult (and frustrating). Taking a drive out into the countryside near home is better than nothing, and while it may seem dark enough to your eyes, a night exposure in an area that you expect to be dark enough reveals just how insidious light pollution is as soon as you realize all of your images are washed out by an unnatural glow on the horizon. Since the galactic core is in the southern sky in the Northern Hemisphere, you can mitigate urban glow in your Milky Way images by heading south of any nearby population area, putting the glow behind you as you face the Milky Way.
Better than a night drive out to the country, plan a trip to a location with a truly dark sky. For this, those in the less densely populated western US have an advantage. The best resource for finding world-class dark skies anywhere on Earth is the International Dark-Sky Association. More than just a resource, the IDA actively advocates for dark skies, so if the quality of our night skies matters to you, spend some time on their site, get involved, and share their website with others.
Photograph the Milky Way
Viewing the Milky Way requires nothing more than a clear, dark sky. (Assuming clean, clear skies) the Milky Way’s luminosity is fixed, so our ability to see it is largely a function of the darkness of the surrounding sky—the darker the sky, the better the Milky Way stands out. But because our eyes can only take in a fixed amount of light, there’s a ceiling on our ability to view the Milky Way with the unaided eye.
A camera, on the other hand, can accumulate light for a virtually unlimited duration. This, combined with technological advances that continue increasing the light sensitivity of digital sensors, means that when it comes to photographing the Milky Way, well…, the sky’s the limit. As glorious as it is to view the Milky Way with the unaided eye, a camera will show you detail and color your eyes can’t see.
Knowing when and where to view the Milky Way is a great start, but photographing the Milky Way requires a combination of equipment, skill, and experience that doesn’t just happen overnight (so to speak). But Milky Way photography doesn’t need to break the bank, and it’s not rocket science.
Equipment
Bottom line, photographing the Milky Way is all about maximizing your ability to collect light: long exposures, fast lenses, high ISO.
Camera
In general, the larger your camera’s sensor and photosites (the “pixels” that capture the light), the more efficiently it collects light. Because other technology is involved, there’s not an absolute correlation between sensor and pixel size and light gathering capability, but a small, densely packed sensor almost certainly rules out your smartphone and point-and-shoot cameras for anything more than a fuzzy snap of the Milky Way. At the very least you’ll want a mirrorless or DSLR camera with an APS-C (1.5/1.6 crop) size sensor. Better still is a full frame mirrorless or DSLR camera. (A 4/3 Olympus or Panasonic sensor might work, but as great as these cameras are for some things, high ISO photography isn’t their strength.
Another general rule is that the newer the technology, the better it will perform in low light. Even with their smaller, more densely packed sensors, many of today’s top APS-C bodies outperform in low light full frame bodies that have been out for a few years, so full frame or APS-C, if your camera is relatively new, it will probably do the job.
If you’re shopping for a new camera and think night photography might be in your future, compare your potential cameras’ high ISO capabilities—not their maximum ISO. Read reviews by credible sources like DP Review, Imaging Resource, or DxOMark (among many others) to see how your camera candidates fare in objective tests.
An often overlooked consideration is the camera’s ability to focus in extreme low light. Autofocusing on the stars or landscape will be difficult to impossible, and you’ll not be able to see well enough through a DSLR’s viewfinder to manually focus. Some bodies with a fast lens might autofocus on a bright star or planet, but it’s not something I’d count on (though I expect within a few years before this capability will become more common).
Having photographed for years with Sony and Canon, and working extensively with most other mirrorless and DSLR bodies in my workshops, I have lots of experience with cameras from many manufacturers. In my book, focus peaking makes mirrorless the clear winner for night focusing. Sony’s current mirrorless bodies (a7RII/RIII, a7S/SII) are by far the easiest I’ve ever used for focusing in the dark—what took a minute or more with my Canon, I can do in seconds using focus peaking with my Sony bodies (especially the S bodies). I use the Sony a7SII, but when I don’t want to travel with a body I only use for night photography, the Sony a7RIII does the job too. Of the major DSLR brands, I’ve found Canon’s superior LCD screen (as of 2019) makes it much easier to focus in extreme low light than Nikon. (More on focus later.)
Lens
Put simply, to photograph the Milky Way you want fast, wide glass—the faster the better. Fast to capture as much light as possible; wide to take in lots of sky. A faster lens also makes focus and composition easier because the larger aperture gathers more light. How fast? F/2.8 or faster—preferably faster. How wide? At least 28mm, and wider is better still. I do enough night photography that I have a dedicated, night-only lens—my original night lens was a Canon-mount Zeiss 28mm f/2; my current night lens is the Sony 24mm f/1.4.
Tripod
It goes without saying that at exposure times up to 30 seconds, you’ll need a sturdy tripod and head for Milky Way photography. You don’t need to spend a fortune, but the more you spend, the happier you’ll be in the long run (trust me). Carbon fiber provides the best combination of strength, vibration reduction, and light weight, but a sturdy (albeit heavy) aluminum tripod will do the job.
An extended centerpost is not terribly stable, and a non-extended centerpost limits your ability to spread the tripod’s legs and get low, so I avoid tripods with a centerpost. But if you have a sturdy tripod with a centerpost, don’t run out and purchase a new one—just don’t extend the centerpost when photographing at night.
Read my tips for purchasing a tripod here.
Other stuff
To eliminate the possibility of camera vibration I recommend a remote release; without a remote you’ll risk annoying all within earshot with your camera’s 2-second timer beep. You’ll want a flashlight or headlamp for the walk to and from the car, and your cell phone for light while shooting. And it’s never a bad idea to toss an extra battery in your pocket. And speaking of lights, never, never, NEVER use a red light for night photography (more on this later).
Getting the shot
Keep it simple
There are just so many things that can go wrong on a moonless night when there’s not enough light to see camera controls, the contents of your bag, and the tripod leg you’re about to trip over. After doing this for many years, both on my own and helping others in workshops, I’ve decided that simplicity is essential.
Simplicity starts with paring down to the absolute minimum camera gear: a sturdy tripod, one body, one lens, and a remote release (plus an extra battery in my pocket). Everything else stays at home, in the car, or if I’m staying out after a sunset shoot, in my bag.
Upon arrival at my night photography destination, I extract my tripod, camera, lens (don’t forget to remove the polarizer), and remote release. I connect the remote and mount my lens—if it’s a zoom I set the focal length at the lens’s widest—then set my exposure and focus (more on exposure and focus below). If I’m walking to my photo site, I carry the pre-exposed and focused camera on the tripod (I know this makes some people uncomfortable, but if you don’t trust your tripod head enough to hold onto your camera while you’re walking, it’s time for a new head), trying to keep the tripod as upright and stable as possible as I walk.
Flashlights/headlamps are essential for the walk/hike out to to and from my shooting location, but while I’m there and in shoot mode, it’s no flashlights, no exceptions. This is particularly important when I’m with a group. Not only does a flashlight inhibit your night vision, its light leaks into the frame of everyone who’s there. And while red lights may be better for your night vision and are great for telescope view, red light is especially insidious about leaking into everyone’s frame, so if you plan to take pictures, no red light! If you follow my no flashlight rule once the photography begins, you’ll be amazed at how well your eyes adjust. I can operate my camera’s controls in the dark—it’s not hard with a little practice, and well worth the effort to learn. If I ever do need to see my camera to adjust something, or if I need to see to move around, my cell phone screen (not the phone’s flashlight, just its illuminated screen) gives me all the light I need.
Composition
A good Milky Way image is distinguished from an ordinary Milky Way image by its foreground. Simply finding a location that’s dark enough to see the Milky Way is difficult enough; finding a dark location that also has a foreground worthy of pairing with the Milky Way usually takes a little planning.
Since the Milky Way’s center is in the southern sky (for Northern Hemisphere observers), I look for remote (away from light pollution) subjects that I can photograph while facing south (or southeast or southwest, depending on the month and time of night). Keep in mind that unless you have a ridiculous light gathering camera (like the Sony a7S or a7S II) and an extremely fast lens (f/2 or faster), your foreground will probably be more dark shape than detail. Water’s inherent reflectivity makes it a good foreground subject as well, especially if the water includes rocks or whitewater.
When I encounter a scene I deem photo worthy, not only do I try to determine its best light and moon rise/set possibilities, I also consider its potential as a Milky Way subject. Can I align it with the southern sky? Are there strong subjects that stand out against the sky? Is there water I can include in my frame?
I’ve found views of the Grand Canyon from the North Rim, the Kilauea Caldera, and the bristlecone pines in California’s White Mountains that work spectacularly. And its hard to beat the dark skies and breathtaking foreground possibilities at the bottom of the Grand Canyon. On the other hand, while Yosemite Valley has lots to love, you don’t see a lot of Milky Way images from Yosemite Valley because not only is there a lot of light pollution, and Yosemite’s towering, east/west trending granite walls give its south views an extremely high horizon that blocks much of the galactic core from the valley floor.
The last few years I’ve started photographing the Milky Way above the spectacular winter scenery of New Zealand’s South Island, where the skies are dark and the Milky Way is higher in the sky than it is in most of North America.
To maximize the amount of Milky Way in my frame, I generally (but not always) start with a vertical orientation that’s at least 2/3 sky. On the other hand, I do make sure to give myself more options with a few horizontal compositions as well. Given the near total darkness required of a Milky Way shoot, it’s often too dark to see well enough to compose that scene. If I can’t see well enough to compose I guess at a composition, take a short test exposure at an extreme (unusable) ISO to enable a relatively fast shutter speed (a few seconds), adjust the composition based on the image in the LCD, and repeat until I’m satisfied.
Focus
Needless to say, when it’s dark enough to view the Milky Way, there’s not enough light to autofocus (unless you have a rare camera/lens combo that can autofocus on a bright star and planet), or even to manually focus with confidence. And of all the things that can ruin a Milky Way image (not to mention an entire night), poor focus is number one. Not only is achieving focus difficult, it’s very easy to think you’re focused only to discover later that you just missed.
Because the Milky Way’s focus point is infinity, and you almost certainly won’t have enough light to stop down for more depth of field, your closest foreground subjects should be far enough away to be sharp when you’re wide open and focused at infinity. Before going out to shoot, find a hyperfocal app and plug in the values for your camera and lens at its widest aperture. Even though it’s technically possible to be sharp from half the hyperfocal distance to infinity, the kind of precise focus focusing on the hyperfocal point requires is difficult to impossible in the dark, so my rule of thumb is to make sure my closest subject is no closer than the hyperfocal distance.
For example, I know with my Sony 24mm f/1.4 wide open on my full frame Sony a7SII, the hyperfocal distance is about 50 feet. If I have a subject that’s closer (such as a bristlecone pine), I’ll pre-focus (before dark) on the hyperfocal distance, or shine a bright light on an object at the hyperfocal distance and focus there, but generally I make sure everything is at least 50 feet away. Read more about hyperfocal focus in my Depth of Field article.
By far the number one cause of night focus misses is the idea that you can just dial any lens to infinity; followed closely by the idea that focused at one focal length means focused at all focal lengths. Because when it comes to sharpness, almost isn’t good enough, if you have a zoom lens, don’t even think of trying to dial the focus ring to the end for infinity. And even for most prime lenses, the infinity point is a little short of all the way to the end, and can vary slightly with the temperature and f-stop. Of course if you know your lens well enough to be certain of its infinity point by feel (and are a risk taker), go for it. And that zoom lens that claims to be parfocal? While it’s possible that your zoom will hold focus throughout its entire focal range, regardless of what the manufacturer claims, I wouldn’t bet an entire shoot on it without testing first.
All this means that the only way to ensure night photography sharpness is to focus carefully on something before shooting, refocus every time your focal length changes, and check focus frequently by displaying and magnifying an image on your LCD. To simplify (there’s that word again), when using a zoom lens, I usually set the lens at its widest focal length, focus, verify sharpness, and (once I know I’m focused) never change the focal length again.
While the best way to ensure focus is to set your focal length and focus before it gets dark, sometimes pre-focusing isn’t possible, or for some reason you need to refocus after darkness falls. If I arrive at my destination in the dark, I autofocus on my headlights, a bright flashlight, or a laser 50 feet or more away. And again, never assume you’re sharp by looking at the image that pops up on the LCD when the exposure completes—always magnify your image and check it after you focus.
For more on focusing in the dark, including how to use stars to focus, read my Starlight Photo Tips article.
Exposure
Exposing a Milky Way image is wonderfully simple once you realize that you don’t have to meter—because you can’t (not enough light). Your goal is simply to capture as many photons as you can without damaging the image with noise, star motion, and lens flaws.
Basically, with today’s technology you can’t give a Milky Way image too much light—you’ll run into image quality problems before you overexpose a Milky Way image. In other words, capturing the amount of light required to overexpose a Milky Way image is only possible if you’ve chosen an ISO and/or shutter speed that significantly compromises the quality of the image with excessive noise and/or star motion.
In a perfect world, I’d take every image at ISO 100 and f/8—the best ISO and f-stop for my camera and lens. But that’s not possible when photographing in near total darkness—a usable Milky Way image requires exposure compromises. What kind of compromises? The key to getting a properly exposed Milky Way image is knowing how far you push your camera’s exposure settings before the light gained isn’t worth the diminished quality. Each exposure variable causes a different problem when pushed too far:
- ISO: Raising ISO to increase light sensitivity comes with a corresponding increase in noise that muddies detail. The noise at any particular ISO varies greatly with the camera, so it’s essential to know your camera’s low-light capability(!). Some of the noise can be cleaned up with noise reduction software (I use Topaz DeNoise 6)—the amount that cleans up will depend on the noise reduction software you use, your skill using that software, and where the noise is (is it marring empty voids or spoiling essential detail?).
- Shutter speed: The longer the shutter stays open, the more motion blur spreads the stars’ distinct pinpoints into streaks. I’m not a big fan of formulas that dictate star photography shutter speeds because I find them arbitrary and inflexible, and they fail to account for the fact that the amount of apparent stellar motion varies with the direction you’re composing (you’ll get less motion the closer to the north or south poles you’re aimed). My general shutter-speed rule of thumb is 30-seconds or less, preferably less—I won’t exceed 30 seconds, and do everything I can to get enough light with a faster shutter speed.
- F-stop: At their widest apertures, lenses tend to lose sharpness (especially on the edges) and display optical flaws like comatic aberration (also called coma) that distorts points of light (like stars) into comet shaped blurs. For many lenses, stopping down even one stop from wide open significantly improves image quality.
Again: My approach to metering for the Milky Way is to give my scene as much light as I can without pushing the exposure compromises to a point I can’t live with. Where exactly is that point? Not only does that question require a subjective answer that varies with each camera body, lens, and scene, as technology improves, I’m less forgiving of exposure compromises than I once was. For example, when I started photographing the Milky Way with my Canon 1DS Mark III, the Milky Way scenes I could shoot were limited because my fastest wide lens was f/4 and I got too much noise when I pushed my ISO beyond 1600. This forced me compromise by shooting wide open with a 30-second shutter speed to achieve even marginal results. In fact, given these limitations, despite trying to photograph the Milky Way from many locations, when I started the only Milky Way foreground that worked well enough was Kilauea Caldera, because it was its own light source (an erupting volcano).
Today (mid-2019) I photograph the Milky Way with a Sony a7S II and a Sony 24mm f/1.4 lens. I get much cleaner images from my Sony at ISO 6400 than got a ISO 1600 on my Canon 1DSIII, and the night light gathering capability of an f/1.4 lens revelatory. At ISO 6400 (or higher) I can stop down slightly to eliminate lens aberrations (though I don’t seem to need to with the Sony lens), drop my shutter speed to 20 or 15 seconds to reduce star motion 33-50 percent, and still get usable foreground detail by starlight.
I can’t emphasize enough how important it is to know your camera’s and lens’s capabilities in low light, and how for you’re comfortable pushing the ISO and f-stop. For each of the night photography equipment combos I’ve used, I’ve established a general exposure upper threshold, rule-of-thumb compromise points for each exposure setting that I won’t exceed until I’ve reached the compromise threshold of the other exposure settings. For example, with my Sony a7SII/24mm f/1.4 combo, I usually start at ISO 6400, f/1.4, and 20 seconds. Those settings will usually get me enough light for Milky Way color and pretty good foreground detail. But if I want more light (for example, if I’m shooting into the black pit of the Grand Canyon from the canyon rim), my first exposure compromise might be to increase to ISO 12800; if I decide I need even more light, my next compromise is to bump my shutter speed to 30 seconds. Or if I want a wider field of view than 24mm, I’ll put on my Sony 16-35 f/2.8 G lens and increase to ISO 12800 and 30 seconds.
These thresholds are guidelines rather than hard-and-fast rules, and they apply to my preferences only—your results may vary. And though I’m pretty secure with this workflow, for each Milky Way composition I try a variety of exposure combinations before moving to another composition. Not only does this give me a range of options to choose between when I’m at home and reviewing my images on a big monitor, it also gives me more insight into my camera/lens capabilities, allowing me to refine my exposure compromise threshold points.
One other option that I’ve started applying automatically is long exposure noise reduction, which delivers a noticeable reduction in noise for exposures that are several seconds and longer.
* In normal situations the Sony a7SII can handle ISO 12,800 without even breathing hard, but the long exposure time required of night photography generates a lot of heat on the sensor with a corresponding increase in noise.
It’s time to click that shutter
You’re in position with the right gear, composed, focused, and exposure values set. Before you actually click the shutter, let me remind you of a couple of things you can do to ensure the best results: First, lower that center post. A tripod center post’s inherent instability is magnified during long exposures, not just by wind, but even by nearby footsteps, the press of the shutter button, and slap of the mirror (and sometimes it seems, by ghosts). And speaking of shutter clicks, you should be using a remote cable or two-second timer to eliminate the vibration imparted when your finger presses the shutter button.
When that first Milky Way image pops up on the LCD, it’s pretty exciting. So exciting in fact that sometimes you risk being lulled into a “Wow, this isn’t as hard as I expected” complacency. Even though you think everything’s perfect, don’t forget to review your image sharpness every few frames by displaying and magnifying and image on your LCD. In theory nothing should change unless you changed it, but in practice I’ve noticed an occasional inclination for focus to shift mysteriously between shots. Whether it’s slight temperature changes or an inadvertent nudge of the focus ring as you fumble with controls in the dark, you can file periodically checking your sharpness falls under “an ounce of prevention….” Believe me, this will save a lot of angst later.
And finally, don’t forget to play with different exposure settings for each composition. Not only does this give you more options, it also gives you more insight into your camera/lens combo’s low light capabilities.
The bottom line
Though having top-of-the-line, low-light equipment helps a lot, it’s not essential. If you have a full frame mirrorless or DSLR camera that’s less than five years old, and a lens that’s f/2.8 or faster, you probably have all the equipment you need to get great the Milky Way images. Even with a cropped sensor, or an f/4 lens, you have a good chance of getting usable Milky Way images in the right circumstances. If you’ve never photographed the Milky Way before, don’t expect perfection the first time out. What you can expect is improvement each time you go out as you learn the limitations of your equipment and identify your own exposure compromise thresholds. And success or failure, at the very least you’ll have spent a magnificent night under the stars.
Workshop Schedule || Purchase Prints
A Milky Way Gallery
Click an image for a closer look and slide show. Refresh the window to reorder the display.


(Sometimes) I’d Rather Be Lucky Than Good
Posted on June 3, 2018

Big Dipper Reflection, Colorado River, Grand Canyon
Sony a7S II
Sony 16-35 f/2.8 GM
20 seconds
F/2.8
ISO 12800

Grand Night, Milky Way Above the Colorado River, Grand Canyon Sony a7S II Rokinon 24mm f/1.4 20 seconds F/1.4 ISO 6400
It was 4:00 a.m. and I’d spent the last two hours photographing the Milky Way’s brilliant core above the Colorado River. In about 75 minutes the guides would be ringing the “coffee’s ready” gong, signaling the start of another day at the bottom of the Grand Canyon. Collapsing my tripod, I performed a little mental math and found slight relief in the knowledge that I might be able to squeeze in one more hour of sleep. That relief vanished in the time it took to turn and glance toward the northern sky and see the Big Dipper, suspended like a celestial mobile in the notch separating the canyon walls.
My Milky Way position had been chosen for its unobstructed view of the southern sky; the best view of the Big Dipper was clear across the campsite, at a sheltered pool just beyond our rafts. The moonless night sky at the bottom of the Grand Canyon is so dark that the Milky Way casts a slight shadow, but once your eyes adjust, it’s surprisingly easy to navigate without adding light. Trudging across through the sand, I passed a handful of other solitary photographers, anonymous shapes enjoying the darkness as much as I was. I stopped few times to answer questions and point out the Big Dipper, then moved on.
Setting up on the steep, sandy slope above the river, I gazed at the Big Dipper and privately chuckled at my good fortune—this prime photo opportunity hadn’t manifest because I proactively made myself seek a scene away from my original subject (as I encourage my students to do), it was a chance glance after I’d mentally put myself to bed. When we landed at that spot the prior afternoon, I’d been so focused on the southern exposure and the Milky Way opportunity in that direction that I hadn’t even considered that there might be something facing north too. Shame on me, but sometimes it’s better to be lucky than good.
Checking my first Big Dipper frame, a couple of things became instantly obvious: though sunrise was still an hour away, and my eyes could detect no sign of its approach, with the same exposure I’d been using for most of the night, the sky was noticeably brighter on my LCD; more significantly, the Big Dipper was reflecting in the river. I realized that pool below me, while not flowing, was sloshing enough that the reflection didn’t stand out to my eyes, but it was smoothed enough by a multi-second exposure that the water mirrored a blurred but clearly visible reflection of the bright Dipper stars.
From my elevated vantage point, part of the handle’s reflection was lost to the sandy beach—I needed to move closer to the river to include the entire reflection. Remember when I said it’s surprisingly easy to navigate in the moonless darkness? On my first step toward the river I learned that functional night vision applies to avoiding objects, not to depth perception. So, as that first step dropped earthward and I waited for it to touch down, where I expected sand I found only air. The rest of me followed quickly and I was in free-fall. Fortunately the fall was not far, just a couple of feet, but it’s amazing how the disorientation of a blind fall slowed time enough for me to curse the darkness before my graceless splat onto the damp beach.
The beach was damp because the place I landed had been river when I went to bed. I popped up almost as quickly as I landed, the unwitting beneficiary of artificial tides induced by upstream releases from the Glen Canyon Dam, timed to meet the power needs of Las Vegas and the rest of the Southwest sprawl. Had I fallen a few hours earlier, I’d have splashed in chilly river water—not enough river to sweep me to my death, but definitely enough to soak me and my camera. So I found myself sandy but otherwise unscathed—glancing about to see if anyone had seen my fall, I instantly forgave the darkness that had made me more or less invisible. The Rokinon lens I’d had on my camera was caked with sand; since it was too dark to clean it, I switched to my Sony 16-35 f/2.8 GM.
The rest of the shoot was fairly uneventful, at least until my final frame. Over the next few minutes I inched even closer to the river, which I discovered had receded enough to add about six feet of soggy shore. With each frame I verified my focus, tweaked my composition, and experimented with different exposures.
On my final few frames I was comfortable enough with all of the photography variables that I wasn’t even thinking about the next shot, and instead simply stood and took in the night sky. As I waited for my last frame of the night to complete, a brilliant meteor sprung from the darkness and split the Dipper’s handle. It came and went in a heartbeat, and I held my breath until the image popped up on my LCD and I confirmed that I’d captured it. The perfect cap to a spectacular night.
Celestial Wonders


Star Struck
Posted on May 27, 2018
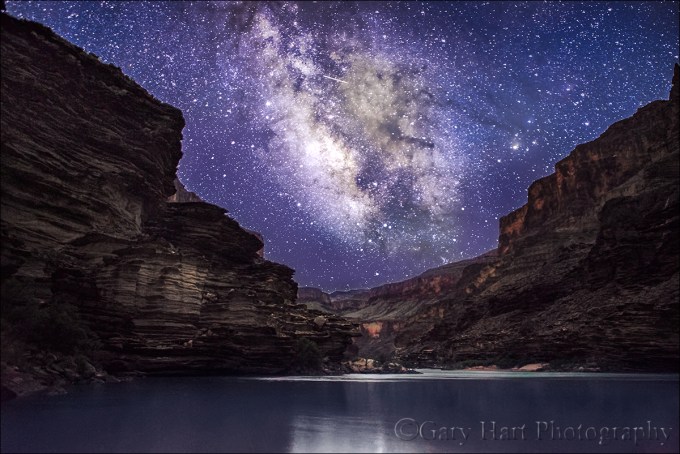
Grand Night, Milky Way Above the Colorado River, Grand Canyon
Sony a7S II
Rokinon 24mm f/1.4
20 seconds
F/1.4
ISO 6400
Nothing in my life delivers a more potent dose of perspective than viewing the world from the bottom of the Grand Canyon. Days are spent at the mercy of the Colorado River, alternately drifting and hurtling beneath mile-high rock layers that tell more than a billion years of Earth story. And when the sun goes down, the ceiling becomes a cosmological light show, each pinpoint representing a different instant in our galaxy’s past.
More than any of my five trips through the Grand Canyon, I’ll remember this year’s for its night skies. The wall-to-wall blue that dogged our daylight photography darkened to just what the night-photography doctor ordered, and we took full advantage. Excited about the potential for stars, each day I powwowed with our lead guide, the amazing Lindsay, to identify potential campsites with the best views of the night sky in general, and the best views of our Milky Way’s brilliant galactic core in particular.
But targeting a Milky Way campsite is easier in theory than execution. In the Northern Hemisphere, even when the galactic core reaches its highest point, it’s still fairly low in the southern sky. So given the Grand Canyon’s general east/west orientation, the best Milky Way views are usually blocked by the canyon’s towering walls. Even identifying a potential campsite on a north/south oriented stretch of the river doesn’t ensure success because Colorado River campsites in the Grand Canyon are first-come, first-served. So even though the other groups on the river don’t usually think strategically about photographing the night sky like I do, each campsite has its own appealing qualities and there’s never a guarantee that any given one will be free when we get there.
In general, my raft trips’ first night or (maybe) two usually provide our best Milky Way opportunities because the first 75 miles of the Colorado River downstream from our put-in at Lee’s Ferry runs pretty much north/south. With the river running north/south, the canyon walls are to the east and west and we usually get a pretty clear view of the north and south horizons. Just downstream from the confluence of the Colorado and Little Colorado Rivers, the canyon bends more or less permanently east/west and Milky Way core views are few and far between.
This year, our day-one campsite got us a decent but not quite perfect view of the southern sky. Nevertheless, many rafters rose and gave it a try, with varying degrees of success—at the very least, it was good practice, and much was learned. On day two we had a magnificently open sky, but the southern horizon was behind us as we faced the river, so the Milky Way’s center rose above lots of shrubs and rocks. That night I and a few others photographed the view across the river toward the Big Dipper, North Star, and fainter part of the Milky Way in Cassiopeia, but a handful had some success photographing the brighter Milky Way from a hill facing south.
I knew days four and five would be long shots for Milky Way photography because Lindsay and I had in mind an east/west trending day-4 site directly across the river from Deer Creek Fall (fingers crossed), one of the trip’s photographic highlights. And there were no good candidates for day 5 (we ended up camping beneath Toroweap). But Lindsay had an ace up her sleeve for day 3, our first day on the east/west portion of the river, if we could pull it off.
In addition to being the day we bend west, day three is the much anticipated “rapid day.” After warming up with a couple of days of fairly infrequent mild to medium rapids, the action on day three ramps up considerably, both in rapid frequency and intensity. Rapid day is always so much fun, for most of the rafters the thoughts of night photography take backseat thrills and laughter.
While everyone else’s attention was on the river, in the back of my mind I was crossing my virtual fingers for the prosaically named Camp 118 (for the number of miles downstream from our starting point at Lee’s Ferry). Camp 118 had been on my radar since Lindsay had told me about it on our first day, citing a bend in the river that gives the spot a view of the southern sky that’s very rare on this part of the river. But she warned me that Camp 118 has other benefits that make it popular among all the trips on the river, and gave us a no better than 50 percent chance of scoring it.
Equal parts exhausted and exhilarated, late in the afternoon of day three we rounded a bend and found Camp 118 free and clear. Phew. As soon as we landed I did a quick check with my compass app and confirmed that the river here pointed due south. Camp 118 also had a long south-facing sandy beach that would give everyone ample room to setup and move around in the dark without getting in anyone else’s way. Once the boat was off-loaded I gathered the troops and told them to prepare for some the best Milky Way photography of the trip.
One more Grand Canyon Milky Way obstacle I forgot to mention is that even in the most favorable locations, the galactic core doesn’t rotate into the slot between the canyon walls until 2:00 a.m. or later. Often rafters go to bed with every intention of rising to photograph it, but when the time comes, their resolve has burrowed deep into the cozy folds of their sleeping bag. The best antidote is to be as prepared as possible before going to bed. At the very least, I prescribe the following: identify your composition, set up your camera, lens, and tripod, set your exposure, focus at infinity, and have your camera ready atop the tripod beside your cot. Better still, if it can be done without risk of someone stumbling over it in the dark, leave the camera composed and focused at your predetermined shooting spot.
I woke at 2:00 a.m. and found many already at work on the Milky Way, which was just making its way into view above the canyon wall in the east. During the next two-and-a-quarter hours I worked the scene while the galactic core slid from left to right, first above the river and finally down toward the wall on the west side of the river. I used both my Sony a7SII and a7RIII bodies, and my Rokinon 24mm f/1.4, Sony 12-24 f/4 G, and Sony 16-35 f/2.8 GM lenses.
Since getting my 42 megapixel a7RIII, I’ve been happy enough with its night photography results that I’d almost forgotten about my 12 megapixel a7SII. In fact, I seriously considered leaving my a7SII at home for this trip. I’m so glad I didn’t. Using the two side-by-side like this, offered an instant reminder why the a7SII is the night photography king. Combined with the light gathering ability of an f/1.4 lens, with my a7SII I can look through my viewfinder and focus perfectly in about three seconds. I can also get crazy-bright images in crazy-dark conditions like this.
I usually feel like the “star” of night images is the sky; because vertical orientation gives me the most sky and least foreground, most of my night images are oriented vertically, especially when the more or less vertically oriented Milky Way is present. But one of my goals for this trip was more horizontal Milky Way images, so I made a point of setting aside my vertical bias and shooting a lot of horizontal frames. This image (like all of my images) is a single click (no composite of multiple frames) with no artificial light added (no light painting or any other light besides stars and skylight). I saw several meteors that night, but have no specific memories of the small one darting across the upper middle of this frame.
I wrapped up with this scene a little before 4:00 a.m., but heading back to bed I saw the Big Dipper cradled between the two canyon walls, just above the north horizon, too beautiful to resist. I ended up photographing another 20 minutes or so on the other side of camp, ending up with one of my favorite images of the trip, including a meteor I very much remember. But that’s a story for another day….
Join me on next year’s Grand Canyon Raft Trip for Photographers
A few tips for photographing the Milky Way
I have an entire article that spells out Milky Way photography, but here’s the CliffsNotes (is that still a thing?) version:
- The galactic core is in Sagittarius (a summer constellation), low in the Northern Hemisphere’s southern sky.
- Learn to control your camera in the dark. (!)
- I prefer a lens that’s 24mm (full frame) or wider, but speed trumps focal length as long as the faster lens is 28mm or wider.
- Red lights are death to night photography and should be banned from any night shoot (this my new crusade). Yes, they’re great for maintaining night vision, so if you want to use one to get to and from your location, fine. But once the shutters start opening, they should be off, off, off. I’ve seen so many images ruined by red lights that I’ve started banning them entirely at all night shoots I lead. I much prefer compromising night vision with a white light for a few minutes if it means no one will accidentally turn on a red light while we’re shooting. During a shoot, no flashlight of any kind or color. My preferred night-shoot light source is a cell phone screen (not the cell phone’s flashlight, just the illuminated screen), which is sufficient for seeing camera controls and about a 3-foot radius, but won’t leak into anyone’s frame.
- Night photography is about the sky, so you’ll want at least half, and usually more of your frame to be sky. Most of my night images are at least 2/3 sky.
- Focus will be your most difficult task. Never assume you can just dial your lens to “infinity”—zoom lenses don’t have a reliable fixed infinity point, and a prime’s infinity point is often not where you expect it to be. Instead, pre-focus before it gets dark whenever possible (then don’t touch anything!). If you need to focus in the dark, it will probably need to be manually.
- Center a bright star or planet in your viewfinder and magnify it on your LCD. Slowly dial the focus ring until the star/planet is the smallest possible point.
- Sony and other mirrorless shooters can use focus peaking (red works best) and dial the focus ring until the number of highlighted stars is maximized.
- Autofocus on a bright light at least 50 feet away.
- After you think you’ve achieved focus, regardless of the method, always (!) magnify the first image on your LCD to verify focus.
- Exposure is all about compromise. Basically, unless you’re satisfied with silhouettes, you want to give your scene as much light as you can without ruining the image: widest aperture, highest ISO, longest shutter speed you can get away with. This is where it’s essential to know your camera’s capabilities—how far can you push the ISO and get usable results. And just because you get relatively noise-free images at 6400 (or whatever) ISO when you’re shooting 1/5 second exposures at the Counting Crows concert (one of the few bands that actually allows anyone to bring in a camera and telephoto lens, I might add), doesn’t mean an image will be clean for a 30-second exposure (trust me on this). You’ll want at least an f/2.8 lens, but faster is better. And because light is so essential, if I really need the light, I usually prefer a little star motion from a 30-second exposure to the extra noise a higher ISO gives (but I don’t go longer than 30 seconds).
Read more about photographing the Milky Way
A Milky Way Gallery
Click an image for a closer look and slide show. Refresh the window to reorder the display.


Chance and the prepared mind
Posted on June 3, 2016

Under the Rainbow, Colorado River, Grand Canyon
Sony a7R II
Sony/Zeiss 16-35 f4
1/60 second
F/11
ISO 100
“Chance favors only the prepared mind.” ~ Louis Pasteur
A few days ago someone on Facebook commented on my previous Grand Canyon rainbow image that getting “the” shot is more about luck than anything else. I had a good chuckle, but once I fully comprehended that this person was in fact serious, I actually felt a little sad for him. Since we tend to make choices that validate our version of reality, imagine going through life with that philosophy.
No one can deny that photography involves a great deal of luck, but each of us chooses our relationship with the fickle whims of chance, and I choose to embrace Louis Pasteur’s belief that chance favors the prepared mind. Ansel Adams was quite fond of repeating Pasteur’s quote; later Galen Rowell, and I’m sure many other photographers, embraced it to great success.

Double Rainbow, Yosemite Valley
As nature photographers, we must acknowledge the tremendous role chance plays in the conditions that rule the scenes we photograph, then do our best to maximize our odds for witnessing, in the best possible circumstances, whatever special something Mother Nature might toss in our direction. A rainbow over Safeway or the sewage treatment plant is still beautiful, but a rainbow above Yosemite Valley or the Grand Canyon is a lifetime memory (not to mention a beautiful photograph).
A few years ago, on a drive to Yosemite to meet clients for dinner (and to plan the next day’s tour), I saw conditions that told me a rainbow was possible. When I met the clients at the cafeteria, I suggested that we forget dinner and take a shot at a rainbow instead. With no guarantee, we raced our empty stomachs across Yosemite Valley, scaled some rocks behind Tunnel View, and sat in a downpour for about twenty minutes. Our reward? A double rainbow arcing across Yosemite Valley. Were we lucky? Absolutely. But it was no fluke that my clients and I were the only “lucky” ones out there that evening.
Before sunrise on a chilly May morning in 2011, my workshop group and I had the good fortune photograph a crescent moon splitting El Capitan and Half Dome from an often overlooked vista on the north side of the Merced River. Luck? What do you think? Well, I guess you could say that we were lucky that our alarms went off, and that the clouds stayed away that morning. But I knew at least a year in advance that a crescent moon would be rising in this part of the sky on this very morning, scheduled my spring workshop to include this date, then spent hours plotting all the location and timing options to determine where we should be for the moonrise.

Rising Crescent, El Capitan and Half Dome, Yosemite
I’d love to say that I sensed the potential for a rainbow over the Grand Canyon when I scheduled last month’s raft trip over a year ago, then hustled my group down the river for three days to be in this very position for the event. But I’m not quite that prescient. On the other hand, I did anticipate the potential for a rainbow a few hours earlier, scouted and planned my composition as soon as we arrived at camp, then called the rainbow’s arrival far enough in advance to allow people to get their gear, find a scene of their own, and set up before it arrived.
As I tried to make it clear in my previous post, anticipating these special moments in nature doesn’t require any real gifts—just a basic understanding of the natural phenomena you’d like to photograph, and a little effort to match your anticipated natural event (a rainbow, a moonrise, the Milky Way, or whatever) with your location of choice.
But to decide that photographing nature’s most special moments is mostly about luck is to pretty much limit your rainbows to the Safeways and sewage treatment plants of your everyday world. I’ve lost track of the number of times I’ve prepared for a special moment in nature, changed plans, lost sleep, driven many miles, skipped meals, and suffered in miserable conditions, all with nothing to show for my sacrifice. But just one success like a rainbow above the Grand Canyon is more than enough compensation for a thousand miserable failures. And here’s another secret: no matter how miserable I am getting to and waiting for my goal event, whether it happens or not, I absolutely love the anticipation, the just sitting out there fueled by the thought that it just might happen.
I do photo workshops
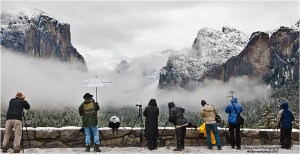
When chance meets preparation
(When the planning payed off)


