Eloquent Images by Gary Hart
Insight, information, and inspiration for the inquisitive nature photographer
Still Learning
Posted on March 31, 2026
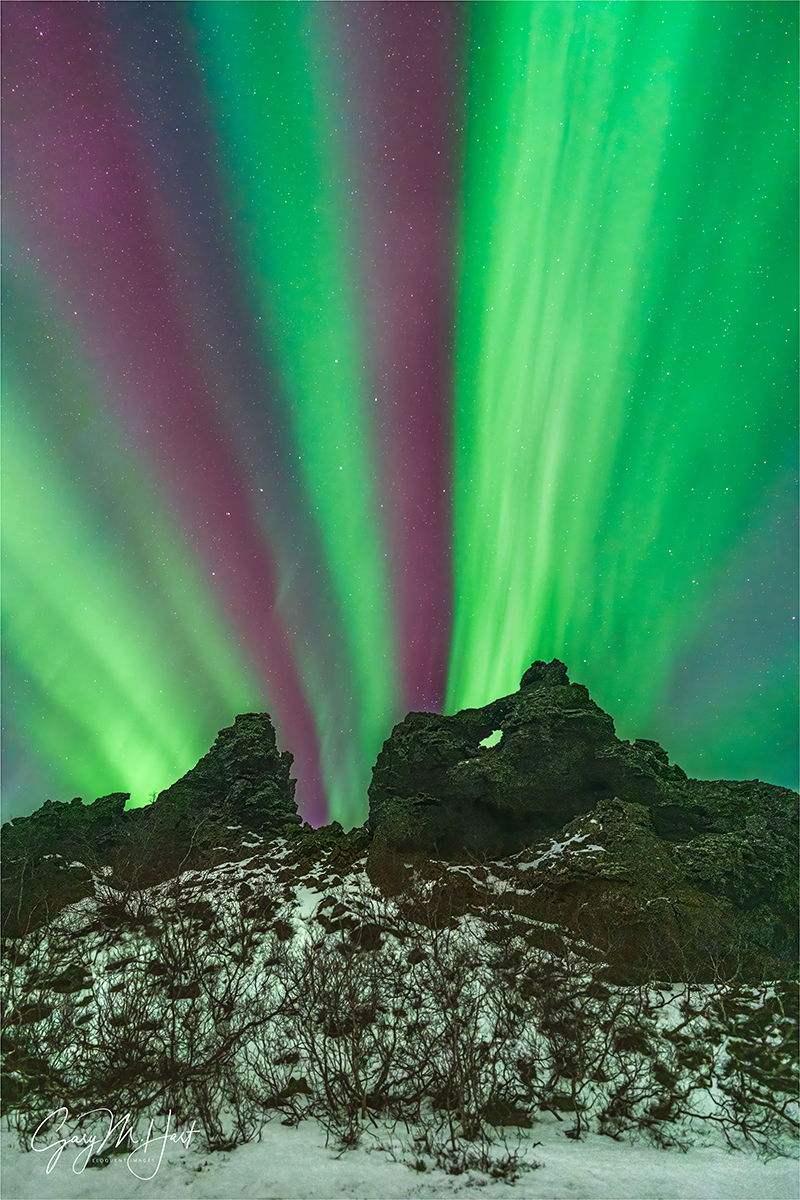
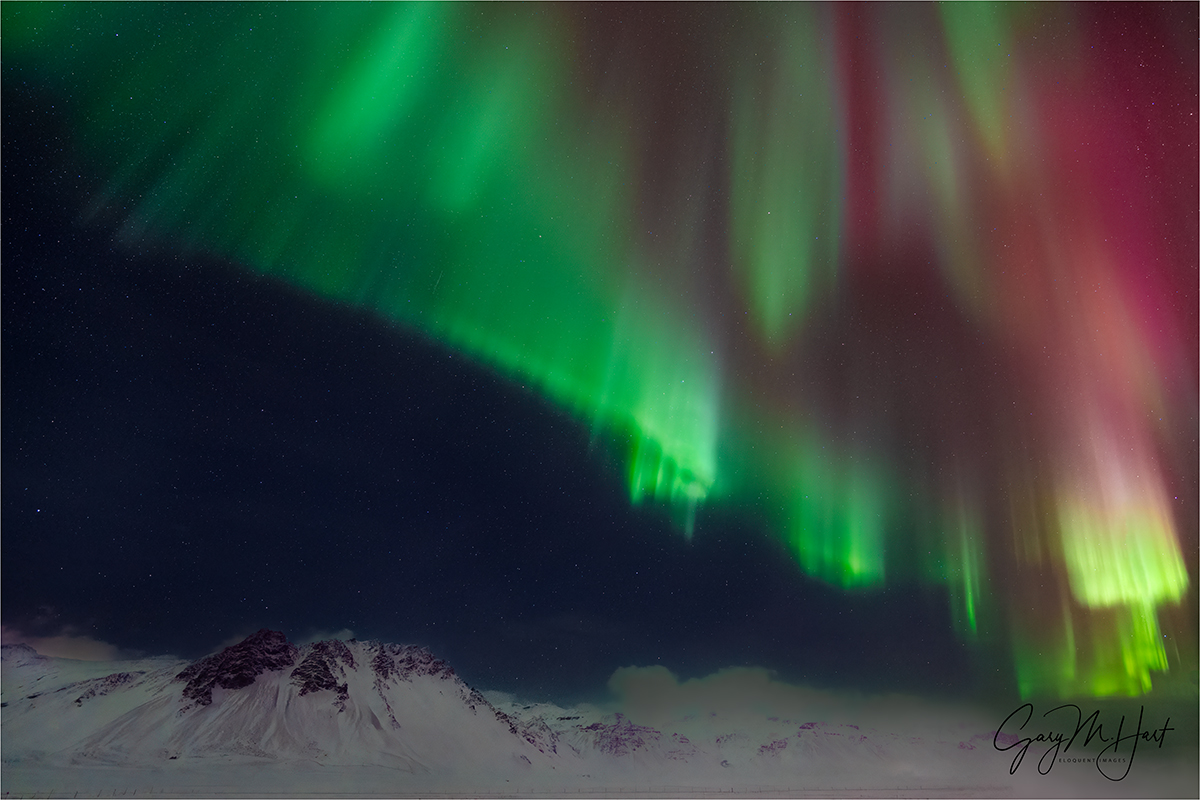
Aurora and Big Dipper, Dimmuborgir Lava Fields, Iceland
Sony α1
Sony 14mm f/1.8 GM
ISO 4000
f/1.8
4 seconds
Whether it’s rafting Grand Canyon, gaping at a comet, or chasing supercells and tornados across the Midwest, instead of scratching an itch and moving on (as I’d expected would happen), checking-off a bucket-list item only seems to fuel my desire for more.
Case in point
I saw my first aurora in 2019. As with all my prior bucket-list experiences, the aurora experience actually exceeded my lofty expectations. Puzzling over why sights I’ve dreamed of for so long so consistently exceed my expectations helped me appreciate the power of experience over simple observation. For me, the experience component—that feeling like I’m part of something—is what motivates me to learn as much as I can about my subjects. Speaking only for myself (your results may vary), simply photographing beauty without taking time to understand just feels superficial.
Though I’d done a little research on auroras before my first Iceland visit, that obsession to truly understand what was going on didn’t fully kick in until I actually stood beneath those multi-colored shafts and sheets and watched them twist and fold above my head. Game on.
I learned about solar cycles, solar storms, the solar wind, Earth’s polarity, the magnetosphere, the magnetotail, ionization of atmospheric molecules, and how all these elements conspire to put on this dazzling show. And since, for photographers, a significant aspect of aurora science centers on the ability to predict when and where it will appear, I paid special attention to the Kp index: the measure of aurora-causing electromagnetic activity in Earth’s magnetosphere that is the prime focus of most aurora prediction resources.
So, armed with just enough knowledge to be overconfident, and a Kp-based app that validated it, I enjoyed reasonable aurora success in subsequent Iceland visits. But despite this success, and access to Kp forecasts that stretched out 30 days, it didn’t take long to realize that predicting tonight’s aurora activity by Kp-tracking alone is not very reliable—less reliable even, than a weather forecast that says it’s going to rain in 7 days. While there was a clear correlation between high Kp values and an active aurora, I couldn’t figure out why so many high Kp nights disappointed, and low Kp nights dazzled.
What was I missing?
Digging deeper, I saw that my aurora app measured a lot of electromagnetic behavior besides Kp. I’d never really paid a lot of attention to these other cryptic values, but having become pretty comfortable with aurora-science basics, I thought my brain cells might be primed to dig a little deeper. The first thing I learned was that many of these measurements, while significant to solar scientists, aren’t terribly useful to aurora watchers. But I did identify one that is: Bz.
In the simplest terms possible, Bz measures the north/south orientation of the interplanetary magnetic field (IMF) that originates at the sun and propagates outward, eventually interacting with Earth’s magnetic field. Turns out, for predicting auroras, the Bz orientation might just be more important than the Kp index.
In fact, the Bz value can completely make or break an aurora show. Without getting too deep into the scientific weeds (by diving into knowledge that’s far beyond my pay grade), a south-oriented IMF, represented by a negative Bz value, stimulates Earth’s magnetosphere in way that greatly increases the chances for an active aurora; when the IMF is positive (north oriented), the IMF subdues magnetosphere activity and stifles the aurora.
The problem—and likely the reason aurora forecast apps focus mostly on Kp—is that while Kp can be (kind of) predicted days or (more dubiously) weeks ahead, Bz can only be measured, not predicted. The best we can do is park satellites at the gravitationally stable Lagrange Point 1 (L1)—where Earth/Sun gravity balance each other—to monitor the solar wind as far out in space as possible (about 932,000 miles from Earth). Depending on the speed of the solar wind, the IMF can take from 15 to 60 minutes from the time we measure it until affects the magnetosphere and delivers an aurora show (or not).
Though Bz can’t really be predicted, the 15 – 60 minute lag time between measurement and arrival does provide one extra benefit: the ability to see what’s coming in the next hour or so to decide whether or not this would be a good time to pack up and go home, or maybe stick around a little longer.
Applying my new knowledge firsthand
This year’s Iceland Aurora photo workshop was the first opportunity Don Smith and I had to put our Bz knowledge to the test. Regardless of the Kp forecast, we always go out unless the sky is completely covered by clouds, with no hope for clearing. This year we made it out 4 nights, at 3 different locations.

Winter Night, Aurora Over Vatnsnes Peninsula, Iceland
Our first attempt was at Kirkjufell, but the Kp was low and the Bz stayed positive and, as expected, the aurora was never more than a faint green, invisible to our eyes and barely visible in our images. We ended up having a beautiful moonlight shoot at one of the most photogenic mountains in the world, but no real aurora display.
The next night was on Vatnsnes Peninsula in far north Iceland. Despite a similarly low Kp forecast, when we finished dinner and saw stars overhead, we went out aurora chasing again. When we started the aurora was definitely better than the prior night, but nothing spectacular. Then the Bz turned moderately negative about half-way through our shoot—it was as if someone had flipped a switch to give us firsthand demonstration of what a negative Bz can do. The show this night far from the most dynamic that Don and I have seen, but it was very nice—especially for the first-time aurora viewers in our group.
The next night we had clear skies again, so our guide took us to Dimmuborgir Lava Fields. With a network of trails that wind beneath striking volcanic rocks (used in Game of Thrones), this turned out to be a fantastic spot for the northern lights—sadly, despite a pretty good Kp forecast, the Bz didn’t cooperate and the aurora that night, while better than the Kirkjufell show, didn’t come close to the prior night.
Which brings me to the workshop’s final northern lights shoot. With a forecast for clear skies, a decent Kp, and a Bz that had been mostly negative for several hours, we returned to Dimmuborgir with high hopes. From the second we exited our van and saw the lights dancing overhead, I knew we were in for a treat. Since the group had already been here twice—once for that earlier aurora shoot, and then again the next afternoon, Don and I just gave everyone a be-back time and set them free (then stood back to avoid being trampled).
I took a lot of pictures of this spectacle, but had almost as much fun watching everyone’s reaction to it. All the while, I monitored the Bz on my aurora app, further confirming its correlation with the brilliance and spread of the aurora above us.
The show this night might not have been the most spectacular northern lights display I’ve ever seen, but it was definitely in my personal top 5—made even better by a location that provided the best variety of striking foreground subjects I’ve ever had for an aurora. And being able to include the Big Dipper with this scene was an unexpected treat.
Join Don and me for next year’s Circle of Iceland Northern Lights photo workshop (a brand new itinerary)
Workshop Schedule || Purchase Prints || Instagram
The Lights Fantastic


Where in the World is Gary?
Posted on March 23, 2026
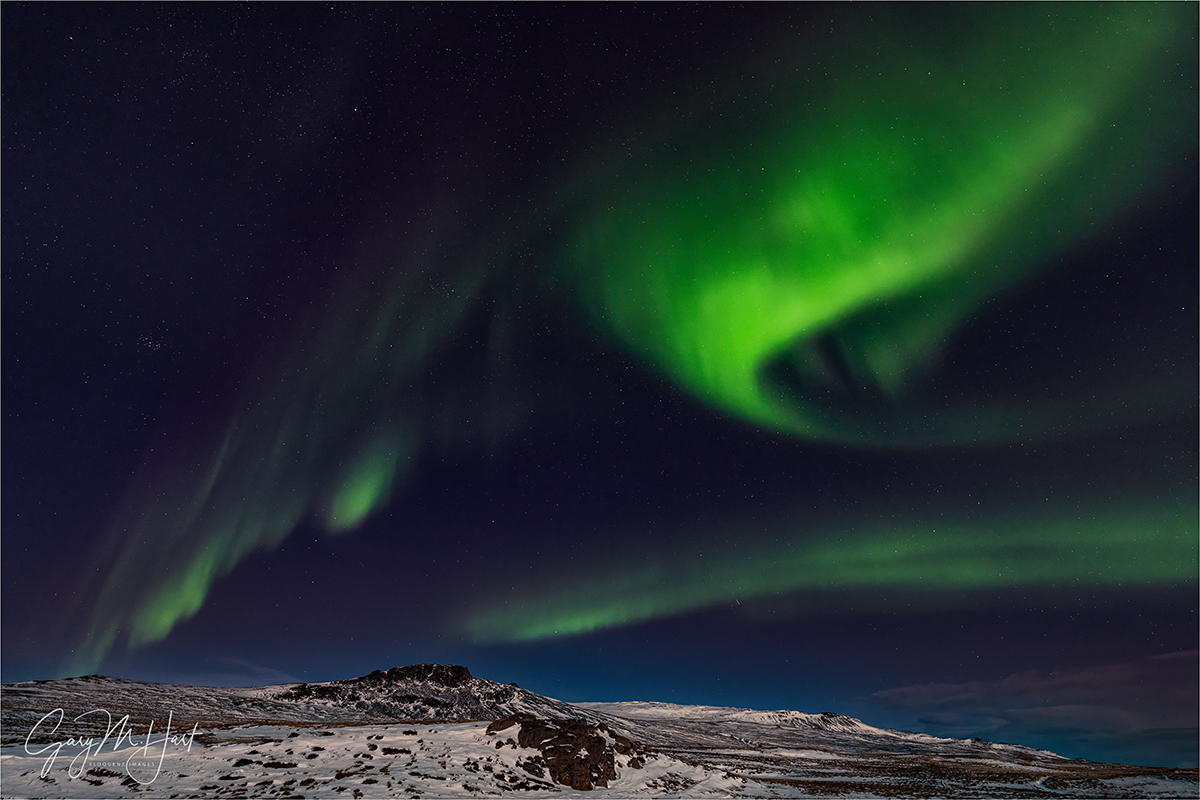
Winter Night, Aurora Over Vatnsnes Peninsula, Iceland
Sony α1
Sony 12-24 GM
3.2 seconds
F/2.8
ISO 3200
You may (or may not) have noticed that my “weekly” blog posts have slowed somewhat in the last month or two. I haven’t gone anywhere—or more precisely, I’m still going the same places and doing the same things I always have, I’m just prioritizing my time differently. After 15 years of stressing, staying up late, missing meals, and in many other ways pushing myself too hard to meet that once-a-week blog goal, I simply decided not to let myself be ruled by arbitrary, self-imposed commitments (I’m a slow learner). I still love writing this blog and have no plans to quit—I’m just going to adjust my time management a bit to emphasize other priorities, especially when my travel schedule starts to take its toll. But anyway…
So exactly where in the world have I been in the last two months? I thought you’d never ask. At the end of January and into early February, I was in Death Valley and the Alabama Hills for my (final) Death Valley workshop; a couple of weeks later I was off to (snowy!) Yosemite for my Horsetail Fall workshop. A storm that dropped record snowfall meant no Horsetail Fall, but seeing Yosemite smothered in white was more than sufficient compensation. A week after that, I jetted off to (snowy and icy) Iceland for Don Smith’s and my annual aurora workshop. Don and I have been doing this trip for many years now, but this year we mixed things up a bit by following a more northerly itinerary. I was home from Iceland for less than 36 hours before making a 13-hour drive to Phoenix for my annual MLB Spring Training trip (go Giants!). Phoenix had record-shattering (for March) highs in the 90s—going from multiple layers of wool and down to shorts, tank tops, and flip-flops was probably the most extreme weather whiplash I’ve ever experienced. And though my Spring Training trip isn’t for photography, I did pack my camera bag because on my drive home I added a day so I could detour through Death Valley to check out the super-bloom (nice, but nothing like the one I witnessed in 2005). I made it home to Sacramento (where our highs are only in the 80s) last Wednesday night, and am looking forward to a 5-week break from the travel.
Thanks to all this recent travel, the only thing in my life accumulating faster than unprocessed images seems to be the dull but essential tasks associated with running a business. Sigh. But I had to process something, so today I’m sharing a northern lights image from the first of two beautiful aurora shows this year’s group enjoyed. The aurora forecast for this night wasn’t great, but the sky was clear (-ish), so despite the late hour, temps in the low 20s (upper teens?), and no specific location in mind, we piled into our spacious Sprinter van decided to go aurora hunting. Why? Because that’s what photographers do.
We were in northern Iceland’s inherently remote Vatnsnes Peninsula, but somehow found an even more remote road and just drove until we liked the view. How remote? We were out there more than two hours and didn’t see a single other car. (I’m pretty sure our guide knew where we were, but no on else had a clue.)
For the first hour or so we had enough green glow to get the aurora newbies excited, but nothing exciting enough to make this grizzled aurora veteran take his camera out. Had I been by myself I might have clicked a frame or two, but I was content to spend my time making sure everyone was ready in the event the activity ramped up. It actually worked out nicely to have a dedicated practice session to get everyone up to speed with the challenges of night photography.
Not long after we told the group we’d give it another 20 or so minutes, a rising, nearly full moon poked through clouds behind us and bathed the snow and rock in moonlight. That was nice, but couple of minutes after the moon’s appearance, almost like magic a green shaft materialized on the northeast horizon and within seconds stretched above our heads to touch the opposite horizon—the real show was on. Soon we were all oooo-ing and ahhhh-ing, spinning around and trying to monitor the ever-changing overhead display—one minute the best show would be in the northeast, the next it would be due west. For the first-timers the priority was the best aurora, regardless of the foreground; those of us with prior aurora successes could afford to be more selective about our foregrounds. Though nothing on the ground out here was spectacular, I liked the view across the road, facing more west and northwest. Wanting to avoid including any road in my frame, I walked to the other side and framed up a small moonlit mountain.
My go-to night photography lens in my 14mm f/1.8—so imagine my surprise after arriving in Iceland to discover that its slot in my camera bag was empty—oh yeah, I took it out right before my Yosemite workshop because we wouldn’t be doing any night photography, then never thought about it again. Oops. If this had been a Milky Way shoot, where every photon counts, I’d have been pretty bummed (understatement). But for a good aurora display, especially one above a moonlight-augmented landscape, f/2.8 is plenty fast. And even though I don’t use my 12-24 f/2.8 a lot, when I do need it I really need it (especially in Yosemite), so it’s a fulltime resident of my camera bag. Which is how I ended up shooting this entire scene at 12mm and f/2.8. It didn’t take long to realize that I appreciated being able to include a little more sky much more than I missed that 1.3 stops of light.
This aurora show was memorable less for its spectacular nature—it was very nice, but didn’t compare to many other northern lights shows Don and I have shared with prior workshop groups—than it was for the fact that it enabled Don and me to breathe a collective sigh of relief, knowing that everyone in our group got to see and photograph the prime reason they signed up for an Iceland winter photo workshop: a legitimate northern lights display.
The next day we traveled to another region farther east, trying for the aurora again that night at a location with a much better foreground. That night we saw a little bit of green, but by then everyone had seen firsthand that it could be much better. What Don and I hadn’t told them after our first aurora success was how much better it could. But before we were done, they learned that for themselves. But that’s a story for a different blog post…
Workshop Schedule || Purchase Prints || Instagram
Celestial Wonders
Click any image to scroll through the gallery LARGE


")


")

, Yosemite")


")


")


A Diamond in the Surf
Posted on December 11, 2025
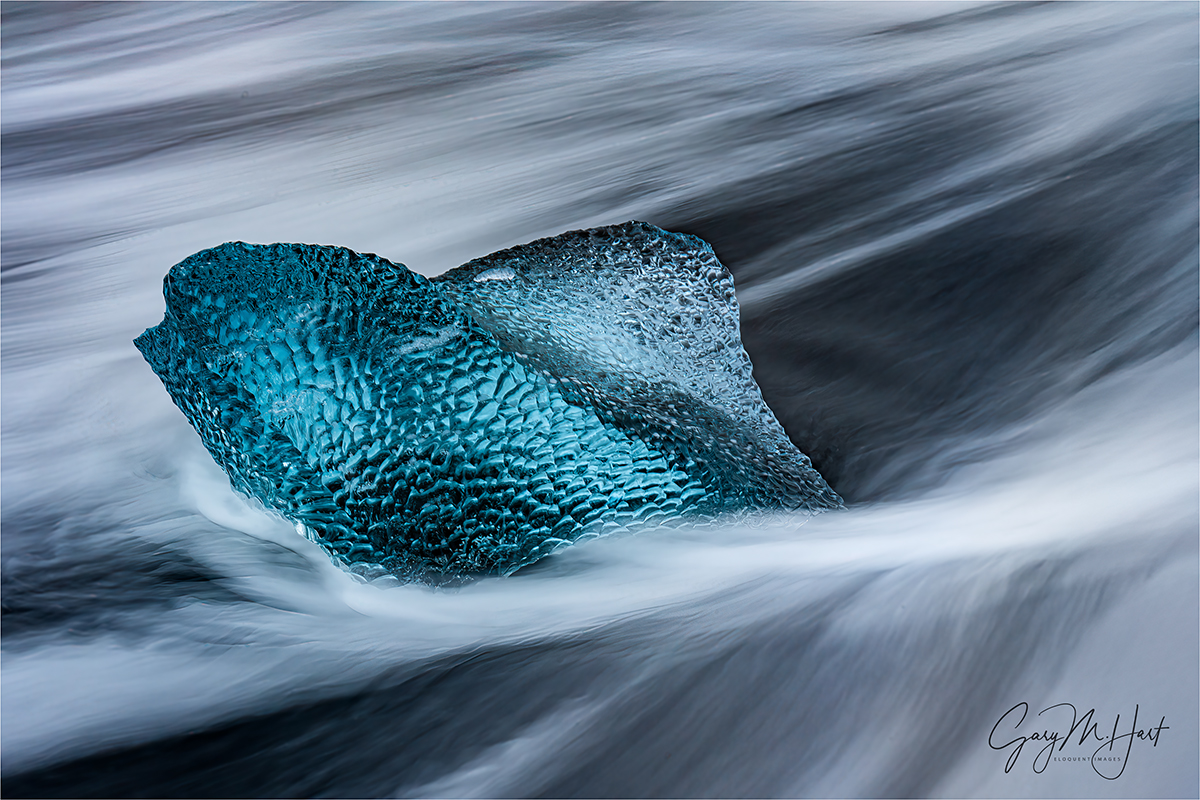
A Diamond in the Surf, Diamond Beach, Iceland
Sony a7R V
Sony 24-105 G
2 1/2 seconds
F/16
ISO 400
With a break in my workshop schedule (and to prepare for my upcoming 2025 Highlights post), I’m working hard to catch up on this year’s unprocessed images. Moving more or less chronologically, I’m really having a blast—such a blast that balancing this processing with family Holiday priorities and the endless demands of running a business, my weekly blog schedule has slipped a bit. But be patient, because I’m pretty excited about some of the images I have queued up to share, and am hoping I can crank out the blog posts to do them justice….
In addition to finding new images to get excited about, I never tire of revisiting locations (in general) and specific shoots (in particular) through my raw images. For example, returning to Iceland and remembering the sights and people Don Smith and I shared it all with really has me itching for our return in March. This year’s highlight was probably our exceptional and unexpected(!) Iceland northern lights experience on the workshop’s second night, a display that fostered a group-wide buzz that persisted throughout the workshop. So of course as soon as I returned home, I went straight to work processing those aurora images, then moved on to a handful of other new Iceland locations that had excited me, before my Yosemite winter workshop force me to focus on other priorities. After all that, Diamond Beach was just one of many Iceland locations that remained unprocessed, shrinking in my memory to the point where my first thought upon revisiting them was, Oh yeah…
Diamond beach is a long stretch of black sand spanning Glacier Lagoon’s narrow outlet to the Atlantic. As spectacular as all that black sand is, given the island’s volcanic origins, it’s simply standard equipment the Iceland coast. But garnish that black sand with large chunks of translucent blue ice, then stir it all up every few seconds with vigorous surf, and you have the recipe for a special visual treat.
The Diamond Beach ice you photograph today could very well be the Glacier Lagoon ice you photographed yesterday. Its origins are Jokulsarlon Glacier, which drains into Glacier Lagoon year-round. When conditions are right, in addition to continuous runoff, much larger ice chunks calve from the glacier and bob across the lagoon, slowly melting as they go. Eventually these icebergs have shrunk enough to fit into the channel that splits Diamond Beach as it drains into the ocean (each time we visit, we eyeball the beach from the highway and decide whether we want to be east or west of the channel). Once the ice makes it out to the sea, tides and active surf push it up onto the beach.
The prime goal at Diamond Beach is capturing motion blur in waving wash around the ice. I can tell you from experience that this is much easier said than done (and I have the images to prove it), because many variables need to align for success.
For starters, the light needs to be right. Ideal is the soft light beneath clouds or twilight, anabling the multi-second exposures these sweeping wave shots require (a neutral density filter can enable these shots in sunlight, but I’m not crazy about mixing harsh light with soft water). By arriving at Diamond Beach well before sunrise, even when the sky is clear we enjoy a half hour or more of gentle light before the sun arrives. (Another great thing about sunrise at Diamond Beach is that there aren’t a ton of tourists yet—it’s definitely far from empty, but once the tourists start swarming, photography becomes much more difficult.) When the sun comes out, I usually forgo the blurred water in favor of sunstar images that feature beautifully backlit ice. And if we’re lucky enough to get overcast, we can spend the entire morning making the intimate ice and flowing surf images everyone covets.
But even when the light is perfect, Diamond Beach can be a challenge. At the risk of stating the obvious, without ice, it’s just another beach (Diamond Beach without “diamonds” is just Beach), and the amount of ice varies a lot from year-to-year. Sometimes there’s hardly an ice cube to be seen. Other times, high tide and big waves have pushed all the ice to a high-and-dry, elevated flat platform just above the beach. One year we (the trip leaders) had to lug a few chunks from up there down to the surf just so our group had a chance to photograph ice with waves.
And ample ice on the beach by itself still isn’t enough when the tide’s and the waves don’t reach the ice. This is why I used to hope for high tide at Diamond Beach, the higher the better—that is, until one January morning when we arrived at high tide and found the surf so big and violent that we didn’t dare venture anywhere near the water. Instead, not wishing to be swept into the frigid North Atlantic, the group set up at an elevated “safe” vantage point and used moderate telephoto lenses (like a 24-105 or 70-200), only to be forced to completely reset our understanding of the term “rogue wave.”
And just when I believed I’d run out of obstacles to hinder the shot at Diamond Beach, our bus hit a reindeer on the way to our sunrise shoot, forcing us to turn around and limp back to the hotel (though we did make it for sunset that evening). So yeah, lots of stars need to align for Diamond Beach success.
But honestly, I’ve been shooting here long enough to know that there’s no substitute for just plain experience. Simply getting shots of ice and blurred water isn’t that hard, but finding the right ice subject, framing it perfectly, choosing the ideal shutter speed for the desired motion effect, timing the shutter-click for the best flow pattern around the ice, and avoiding wave-induced motion blur in the ice, is all a lot of balls to keep in the air simultaneously. Oh yeah—try keeping all those photography balls airborne while keeping one eye on aggressive and relentless surf that can soak you and your gear with little warning. Fortunately, as with most things, this all gets easier with each attempt.
This year, after more than a dozen Diamond Beach visits, reviewing my images, I remembered feelings of finally being in control and working proactively (instead of reacting and trying to adjust to continual failures) out there returned.
Because Diamond Beach stretches quite some distance, a workshop group becomes quite spread out almost immediately. So on the drive to the beach before each visit, Don and I share our own experience-based insights and answer questions while we’re all still together. While there’s no substitute for firsthand experience, this little jump-start does seem to increase the group’s success rate. This year’s mini training session continued as everyone bundled up and prepared for their assault on the beach, but pretty soon the bus was empty and I started getting myself ready (a rather time consuming process in Iceland in winter). I intentionally took my time so I could be the last one out there, slowly advancing along the beach and checking on everyone as I went. (Don and I don’t stick together out there, but I know he does the same thing.)
At the beach it was instantly clear that we had plenty of ice, the tide was high enough, and the surf just about right. For the first hour or so, between students I stopped to fire off a frame or two a handful of times, but my prime focus was making sure everyone was doing okay. Once satisfied that people we comfortable with what they were doing and content with what they’d found, I got a little more serious about finding subjects of my own. Even though I’d taken very few pictures to that point, the overcast sky gave me confidence that I had plenty of quality time remaining.
With ideal conditions like this, I look for ice that’s planted firmly in the sand, but close enough to the water for waves to reach it from time to time. Too far inland and there’s no water around the ice to blur; too far into the surf and the ice doesn’t stay put through an exposure.
In size terms we can all relate to, most of the ice we photograph tends to range from small microwave oven to full-size refrigerator—much smaller that and they move around too much; much larger and they can’t make it in close enough.
The mini-iceberg I share today was a little smaller than a small coffee table—not huge, but enough mass to resist shifting or rocking with the slightest wave pressure. After identifying it as a potential subject, I circled (not completely—I’d never put my back to the ocean) until I found the perspective I liked best, set up my tripod 20 or so feet away, trained my 24-105 lens on it, then framed up a composition. I found the exposure-setting combination that gave me a good histogram with ample depth of field at a shutter speed around 2 seconds (sometimes a little long, sometimes a little shorter). Then I stood and waited for the waves to arrive.
In the simplest possible terms, there are two opportunities when photographing waves sweeping around fixed ice: washing in, and washing back out. I usually prefer waiting until a wave is on its way out—not only does this provide a better (in my opinion) motion effect, the water has a little less force, making it less likely to introduce any motion blur in my subject. And after years of trying this, I’ve decided that exposures in the 1 – 3 second range seem to work best.
But anything with moving water is never a one-and-done thing. After each click I check the image on my LCD to identify motion effect and its timing, then do my best to avoid the effects I don’t like, and duplicate the effects I do like. I almost always, as I did with this subject, take at least a dozen shots (unless waves sweep my subject away, always a possibility). Every single frame is different, but it’s better to have too many choices than not enough. On the other hand (and this is a particular problem for me), unless I’m waiting for specific event (like a wave of a certain size or direction), I have to remind myself not to lock in on one subject so long that I miss out on opportunities elsewhere.
The image I chose to process and share today is of a wave on its way back out. And though almost a year later I have no specific memory of its capture, I can tell by the time of its capture (after sunrise) and my exposure settings that I used my Breakthrough 6-stop dark polarizer to enable the longer shutter speed necessary for wave effect I sought—in this case, 2 1/2 seconds.
As this image makes abundantly clear, perhaps the most striking feature of glacial ice is its not-so-subtle blue. Contrary to popular opinion, this blueness is not reflected color from the sky (the sky this morning was cloud-gray), it’s a quality of the ice’s glacial origins. If you paid attention during high school (or earlier?) science class, you know glaciers form from snow accumulated over hundreds or thousands of years. While air trapped in fallen snow makes it opaque, subjecting this snow to centuries of pressure from the accumulated weight above compresses it and forces out virtually all the air, leaving nothing but translucent ice crystals. This glacial ice is so dense, it absorbs all but the shortest wavelengths of visible light that enter. The only wavelengths not absorbed are the blue ones, which instead are scattered back to our eyes: blue ice. (Of course as you can see in some pictures in my Diamond Beach gallery below, ice infused with direct sunlight will take on the sun’s yellow/gold hue).
Diamonds in the Surf


Speaking of Highlights…
Posted on April 12, 2025
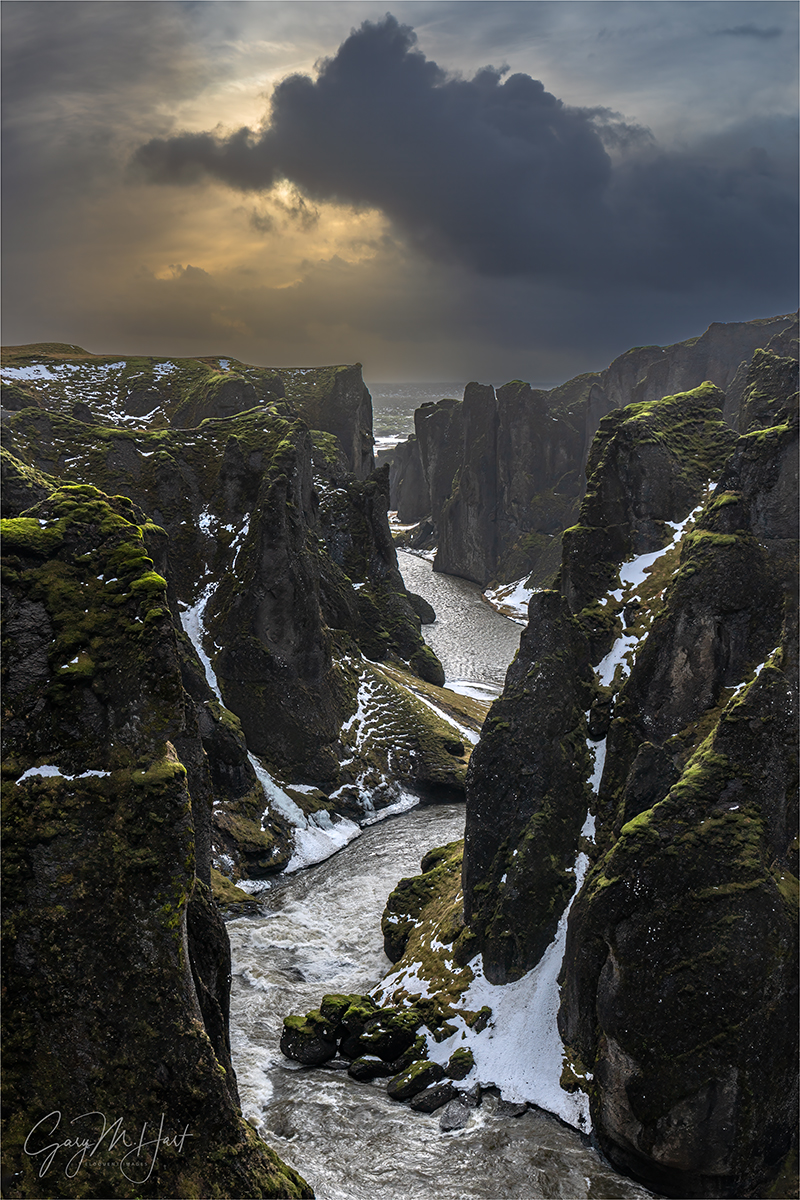
Frozen Canyon, Fjadrargljufur, Iceland
Sony a7R V
Sony 24-105 f/4 G
ISO 100
f/11
1/50 second
Fjadrargljufur, Iceland
In our annual Iceland photo workshop, Don Smith and I start with an assortment of must-see locations we’d be remiss to pass on: Kirkjufell, Glacier Lagoon, Diamond Beach, and Vestrahorn, to name a few. These Iceland highlights are well-known and photographed enough that they probably had much to do with the workshop students decision to sign-up for the workshop in the first place. But Iceland’s winter conditions, though not as cold as you might expect, can be quite harsh and unpredictable. So each, using the insights of our local guides, Don and I work to identify “new” (to us) highlights that enable us to pivot our original plan when conditions dictate. With several new waterfalls explored, this year had already been especially productive in the new options department when we explored Fjadrargljufur.
Fjadrargljufur is a short, narrow canyon carved into ancient lava flows by the Fjaðrá River. Just inland from Iceland’s rugged South Coast, access to Fjadrargljufur is via a steep (-ish), but well maintained, trail that offers several vantage points to catch your breath as you gaze up or down the canyon. After hiking a little less than a mile, you reach the trail’s end and are rewarded for your effort by two waterfalls and multiple vantage points from which to photograph them.
While not as well known as many Iceland natural icons, Fjadrargljufur is far from anonymous, so we weren’t the only ones there. But instead of the crowds that can clog some locations, the other visitors here were a complete non-factor. Last year, on our first visit to Fjadrargljufur, dense fog, snow flurries, and an icy trail prevented us from venturing far enough up the canyon to view the waterfalls. Nevertheless, we saw enough to know that this was a spot worth returning to and we were happy to make that happen this year.
On this visit we found a little snow and ice on the ground, but the trail was in much better condition. In locations like this, with well-defined trails and no forks to cause confusion (and especially when a lot physical exertion is required), we usually give everyone a be-back time and set them free to explore at their own pace. So, following a brief orientation, the group spread quickly—some didn’t venture beyond the closer (and less physically demanding) vistas, but about half of the group made it all the way to the waterfall reward at trail’s end.
I spent most of my time at Fjadrargljufur photographing the waterfalls, but as I started the walk back, I was stopped by the down-canyon view. The dense clouds that had been with us all morning had thinned, pouring sunlight into the canyon and illuminating rich green moss hugging the rocks. And the clouds that earlier had spread a homogenous, gray blanket overhead, were suddenly suffused with personality that shifted by the minute.
Surveying the scene for a composition, I knew that any camera would struggle to capture the extreme difference between the darkest shadows in the canyon and bright clouds. I also knew that my camera (Sony a7R V) would be up to the task, but only if I took extreme care with my exposure.
I digress…
In difficult exposure scenes, the single most important concern is sparing the highlights. First, since the human eye is always drawn to the brighter areas of an image (the brighter it is, the greater the attraction), blown highlights will be the first thing viewers see. If your subject is in shade surrounded by sunlight, you’re there at the wrong time. (Yes, I know that, like everything else in photography, there are exceptions, but they’re few and far between.) And second, dark shadows are usually easier to recover than bright highlights in post-processing.
This seems like a good time to mention the single biggest mistake I see workshop students make: Using the LCD preview image to make exposure decisions, instead of using the histogram. The LCD image is for composition; for exposure, you have to use the histogram. In fact, in a high dynamic range scene (a scene with dark shadows and bright highlights), if the image looks good on the back of your camera (the LCD image preview), you have almost certainly overexposed the highlights or underexposed the shadows beyond recovery.
Most common are already-bright sky scenes made impossibly bright by an inexperienced photographer exposing to make the shadows look good—the consequence is a completely white sky, or (at best) a sky with most of its color washed out. Another common rookie mistake is underexposing the sky to 0ver-saturate sunset color—the resulting sunset might look beautiful, but pulling up the shadows later will reveal mushy, detail-robbing noise.
In a properly exposed high dynamic range scene, on the camera the shadows will look a little too dark, and the highlights will look a little to bright, but neither will be too extreme to recover in post-processing (Lightroom/Photoshop for me). The best way to ensure the best possible exposure is to monitor and trust the histogram, regardless of what you see on your LCD. Want to learn more?
So anyway…

Fjadrargljufur Preview and Histogram: This is my original, unedited capture
As I always do in high dynamic range scenes like this, I started by working out my composition, taking extreme care to avoid cutting off the dark cloud that was soaring farther skyward by the second. Since motion and depth of field weren’t a factor in my composition, I just went with ISO 100 and f/11, and focused at infinity (somewhere down the canyon). That left my shutter speed to control my exposure.
With an eye on my live-view (pre-capture) histogram, I slowly lengthened the shutter time (slower shutter speed) until the histogram graph bumped up against the right side. My primary exposure concern was sparing the far more important, and more difficult to recover, highlights—even though the histogram showed my shadows were still slightly clipped, I knew my camera well enough to be confident that I could recover them later.
To illustrate why exposure decisions should never be based on the camera’s LCD preview image, I’ve shared the jpeg preview of the original raw file that appeared on my LCD, with the Lightroom version of the histogram. While the canyon looked quite dark, and the sky looked much too bright, my histogram told me everything was recoverable. Had I tried to make an image shadows or highlights that looked good, the other side of the exposure continuum would have been unusable.
Believe it or not, this file was extremely easy to process. With just two moves in Lightroom—pulling the Shadows slider to the right (+100), and the Highlights slider to the left (-100)—the scene instantly looked very close to finished result. After that, most of my processing work was minor refinements and some dodging and burning.
Speaking of Highlights…
When a workshop group spreads as far and wide as we did on this visit, it’s always fun to hear everyone’s report once we’re back on the bus. Even though people were photographing different things on our Fjadrargljufur visit, the enthusiasm seemed pretty unanimous. Of course we keep finding new locations (this year was especially productive), so it’s impossible to say we’ll be able to make it to all of the “keepers” every year, but given Iceland’s changeable and potentially extreme winter conditions, it’s always nice to be armed with more highlights than we can use.
Trusting My Histogram


Breaking My Own Rules
Posted on April 3, 2025

Follow the Lights, Snaefellsnes Peninsula, Iceland
Sony α1
Sony 14mm f/1.8 GM
ISO 3200
f/1.8
6 seconds
My goal is to create images that celebrate Nature, images that allow viewers to imagine a world untouched by humankind. So it makes sense that I avoid including anything manmade in my images. But I also rail against (most) camera clubs for their rule-bound creative constipation, and those strong feelings collided earlier this year on a chilly January night Iceland. I resolved the conflict by reminding myself that any time I’m following rules (even my own rules), I’m not being creative.
Earlier in my photographic life I was somewhat less discriminating with my subject choices. In fact, I’d actively seek any outdoor subject that I found beautiful, regardless of its origins. Though many of my bridge and skyline images from those days were on (or atop) my personal bestseller list ($$$), as my career evolved, I found myself resenting humankind’s intrusion on the natural world and became less inclined to validate that intrusion with a photograph. These subject choices eventually, and pretty organically (not consciously), evolved into my present style: photograph the world untouched by humans, which made the mere presence of a building, fence, path, or human being reason enough to put my camera down.
I don’t think it’s wrong to photograph manmade objects—in fact I enjoy others’ photos of a wide variety of subjects outside my wheelhouse—it’s just that I’m not personally drawn to photograph them. But since I am still a photographer at heart, it’s difficult to pass beauty of any sort. In recent years, I’ve scratched the itch to preserve “unnatural” beauty with my iPhone. Though I rarely do anything with these images spontaneous snaps, somehow knowing I’ve saved the scene makes me feel better.
Since becoming so hardcore about avoiding manmade objects, I have encountered a handful of scenes that tested my resolve. For example, there was that frigid night beneath the Milky Way atop Mauna Kea in Hawaii, when a giant telescope made too perfect a foreground to ignore. And the night, also beneath the Milky Way, at Cape Royal on the North Rim of the Grand Canyon, when a SpaceX Falcon 9 rocket photobombed my scene—that time I almost resisted photographing it, and am so glad I didn’t.


But whether it’s a streaking rocket, dilapidated fence, or photogenic bridge, some things are too beautiful not to preserve just because of some self-imposed rule. Most recently, on this January night in Iceland the northern lights outperformed our most unrealistic expectations, but for a little while the best display included a road and our hotel. (I already described that night in my recent Shock and Awe blog post, so I won’t bore you again with the story.)
Night Lights, Snaefellsnes Peninsula, Iceland
For most this night’s kaleidoscope display, the aurora danced beautifully above snowy peaks and pristine snowfields—dark sky and no human intrusion involved. But as usually happens in the most intense aurora shows, the lights weren’t limited to the northern sky, and this evening they seemed to be especially drawn westward, where the “highway” (in the sense that it’s the main route encircling Snaefellsnes—we didn’t see a single car while we were out there) and the lights of our small hotel intruded on any scene I could imagine.
Nevertheless, I regularly checked-in on the rest of the sky and at one point just couldn’t ignore what was happening in the west. Grabbing my tripod/camera, I hustled to the road to look for any composition that might work. It was immediately obvious that the road would be unavoidable, but I saw that by moving farther west, I could at least eliminate the hotel and a few other minor distractions.
Given that the road was a non-negotiable condition of photographing in this direction, I just decided to lean into it and make the gently curving blacktop into an actual subject that guided the eye skyward. Orienting my camera vertically maximized the aurora and highway, and minimized potential distractions on the periphery. I only took a couple of frames in this direction, and it wasn’t until I saw the results on my camera that I realized how much I like this “unnatural,” rule-breaking image.
Don Smith and I just added a 2026 Iceland Northern Lights workshop
Workshop Schedule || Purchase Prints || Instagram
Human Interference
Click any image to scroll through the gallery LARGE


If You Can’t Join Them, Beat Them
Posted on March 27, 2025

Frozen Sunset, Vatnajökull Glacier Ice Cave, Iceland
Sony a7R V
Sony 12-24 GM
1/20 second
F/5.6
ISO 100
If you’ve ever photographed the slot canyons of Northern Arizona, you have some idea of the Iceland ice cave experience. Beautiful for sure, but mixing herds of gawking tourists with tripod wielding photographers, in a confined space, is also a recipe for frustration. While I’d say that Upper and Lower Antelope Canyons (the most popular of the Arizona slots) are probably more crowded than the Iceland ice caves I’ve visited (but not by a lot), slot canyons are rarely dark enough to compel visitors to don headlamps in the middle of the day. And as most photographers would agree, the only thing more frustrating than waiting for someone to douse their headlamp so you can start your exposure, is being in the middle of an exposure when someone activates their headlamp.
With larger “rooms” connected by twisting passages that can be small enough to require squeezing through or ducking your head (sometimes both), slot canyons and ice caves have much in common. While these similar features are a big part of the appeal that draws tens of thousands of visitors each year, the similarities don’t translate to the light. In a slot canyon, sunlight pouring through one narrow overhead opening creates bouncing light and dramatic contrast. Conversely, an ice cave is evenly illuminated by translucent ceilings and walls that steep its narrow confines in soft, shadowless light.
The big attraction at the slot canyons (though in my opinion, a little overrated), is the shafts of light that spotlight the red sandstone on sunny days. The fact that these shafts are only possible midday is no secret, which means photographers have to choose between battling nearly incomprehensible crowds, or missing the main event (while enduring simply moderate crowds).
That’s different from the ice cave experience, where consistent light spreads the crowds more evenly across the day. Early in our Iceland experience, Don Smith and I learned that the best way to avoid joining the ice cave crowds is to beat them—no, (tempting as it may be) not with a tripod, with the clock. Since most of the non-photography public has an aversion to going out before the sun (even, experience has shown, when sun doesn’t appear until 10 a.m.), departing for the ice cave early enough to arrive on the front-end of Iceland’s long, gray dawn can provide up to an hour of relative peace before the large vans start unloading. Of course this strategy means sacrificing a sunrise shoot (since we’ll be in the ice cave when the sun comes up), but the trade-off is usually worth it.
We learned this year that beating the crowd doesn’t necessarily mean getting out there before them—it can also mean outlasting them. Turns out another thing tourists hate is being late for dinner. So this year (as I wrote in last week’s blog), when extreme wind threatened our planned Vestrahorn sunset shoot, Don and I flipped our usual beat-the-crowd strategy upside-down and did the ice cave at the end of the day, hopeful for quality time in the ice cave after the tourists cleared out.
As soon as we arrived, we were jolted by all the frustrations inherent in mixing tourists and photographers in a confined space—each time we were lucky enough to encounter an empty space, before the group could set up and start shooting, the next herd of bobbing headlamps would approach from one direction or the other to shuffle through our scene like a slow moving freight.
While deep shadows and brilliant walls make dynamic range the greatest photographic challenge in a slot canyon, in the darkest parts of an ice cave (deep in the glacier, or smothered beneath several feet of snow on the surface), the biggest obstacle is having enough light to compose and focus, as well as the extreme ISO and long exposures an ice cave’s darkness requires. That’s why many photographers augment their ice cave images with artificial light, which of course leaks into each nearby photographer’s frame whether they want it or not. Fortunately, most ice caves have enough bright areas to satisfy those of us who only use natural light.
Much of this year’s ice cave (the location and layout can vary from year-to-year) was large enough, and bright enough, that, while waiting for the crowds to clear, I had no problem identifying lots of natural light scenes to photograph later. In the meantime, I turned my camera and 24-105 lens toward scallops and ridges etched in the cerulean ice overhead. As I worked, groups ambled by in both directions, but after a while I noticed that all of the intruders were moving toward the exit—a very good sign. Before long, we had the entire place to ourselves, with nearly an hour of useable light remaining.
Remembering similar experiences, both in slot canyons and previous ice caves, I relished another opportunity to worship in the cathedral surroundings. By this time, most everyone in the group had dispersed to their own happy places, and I felt free to explore on my own, or with one or two others. At one point I found myself in a large chamber illuminated by a battery powered LED installed by the guides. When I asked our guide to extinguish the light, the room instantly became so dark that even 30-second exposures at 12800 ISO barely registered on my LCD.
With the clock ticking, I quickly returned to the relative brightness of the cave’s main halls and chambers, spending the rest of my time working the scenes I’d identified earlier. Time flew—when the cave started to darken and I saw fewer and fewer people from the group, I started backtracking to the exit (which had also been the entrance).
On my way back, suspecting everyone (myself included!) had memory cards brimming with beautiful images, I started congratulating our decision to forego sunset in favor of the ice cave’s calm confines—who needs a sunset anyway? But when I turned the final corner and saw sunset-gold framed by blue ice, I stopped in my tracks—all this, plus a sunset? It hardly seemed fair.
With the light fading and most of the group already outside, I had to work fast. (I wanted as much time as possible, but it’s never a good look when the leader is the person everyone is waiting for.) So I set up quickly, opting for my 12-24 lens to include as much of the sculpted blue chamber as possible. I dropped as low I could, dialed the lens all the way out to 12mm, and angled up to emphasize the icy blue ceiling over the rocky brown floor (duh).
The exposure was quite tricky, because the light outside was so much brighter than inside the cave. Once my scene was composed and focused, I adjusted my shutter speed with an eye on the histogram, pushing the highlights all the way to the right border. The LCD preview showed a bright (but not blown) sky and nearly black ice cave, but my confidence in my Sony sensor was validated when I processed the image in Lightroom/Photoshop. (As with all my images, this was a single click—no blending exposures.) On my LCD, the only thing visible inside the cave was the sunset reflection on the ceiling, a bonus I hadn’t counted on.
I only had time for a half-dozen or so frames before I heard the approaching voices of the group’s final stragglers and quickly collapsed my tripod to beat them out of cave.
Join Don and Me in Iceland
Workshop Schedule || Purchase Prints || Instagram
Ice Caves and Slot Canyons


Twin Peaks
Posted on March 7, 2025

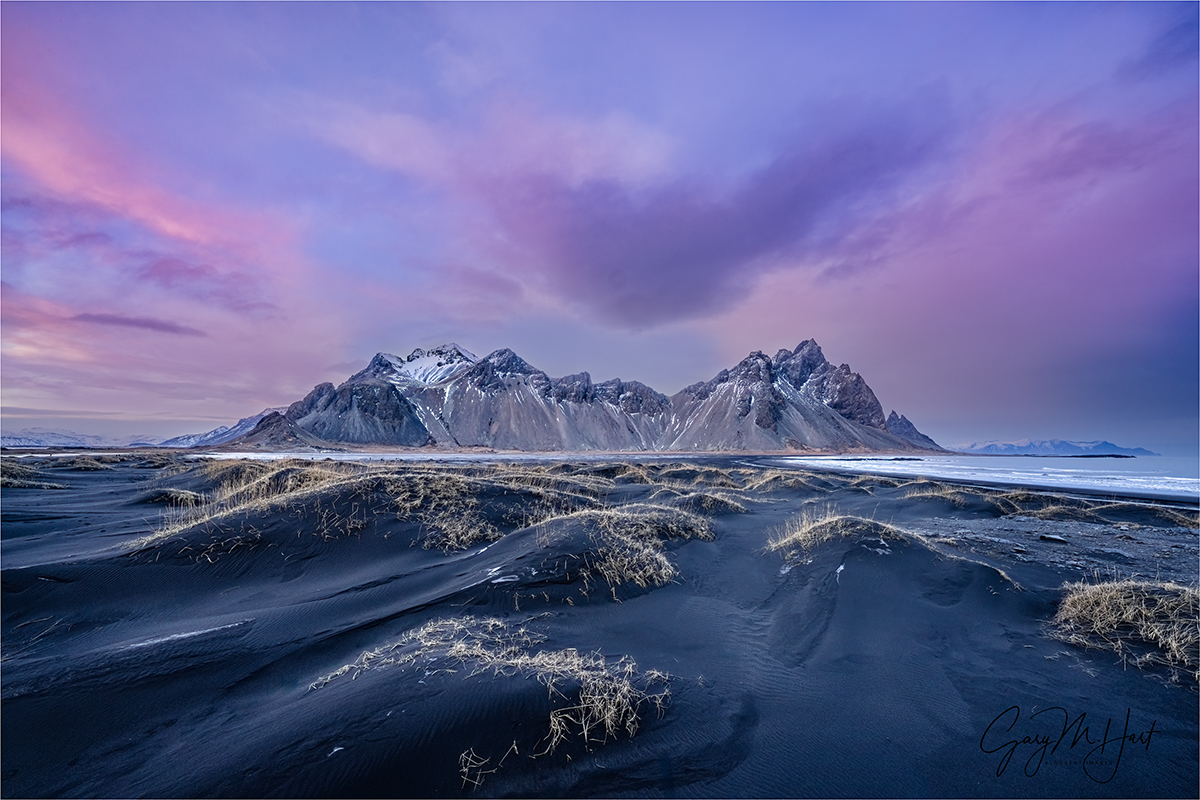
Blue Hour Reflection, Vestrahorn, Iceland
Sony a7R V
Sony 12-24 GM
1/6 second
F/10
ISO 125
In the canon of iconic Iceland mountains, Vestrahorn is rivaled only by Kirkjufell, the much-photographed wizard-hat on Snaefellsnes Peninsula. While Kirkjufell’s acclaim is much deserved, as a photographer, one thing in particular that distinguishes Vestrahorn from Kirkjufell for me is its variety of compositional options.

Winter Chill, Kirkjufell and Kirkjufellsfoss, Iceland
Kirkjufell is arguably Iceland’s most visually striking mountain, but the vantage points from which to photograph its distinctive outline are for the most part limited to the trail that starts at the parking lot, climbs briefly to a small bridge, then circles down a short but steep slope. I’ve never been there in summer, but in winter it’s pretty difficult to venture anywhere off this trail.
I can’t discount the fact that Kirkjufell also comes with its very own foreground waterfall, but Vestrahorn (despite lacking a waterfall of its own) has acres and acres of diverse terrain for a creative (and mobile) photographer to explore. So expansive and varied is the surrounding terrain, I’ve been coming here since 2019 and am still finding completely new foregrounds to add to my Vestrahorn images.
Exploring for new foregrounds is probably my favorite part of photographing popular subjects. The first two or three years I visited Vestrahorn, I’d do most of my photography at the beach, where the barely sloping sand stretches far into the distant surf, and the area separating the beach from open ocean is (I estimate) at least a half mile—distant enough that the swells (finally) break on the sand as the smallest, least aggressive waves imaginable.

Vestrahorn Reflection, Stokksnes Beach, Iceland
Once reaching the beach, what these waves lack in height, they more than make up for in length, gently washing up a hundred yards or more onto the black sand, before running out of gas and slowly sweeping back. In their wake is an ephemeral mirror that, when timed right (before the water percolates into the sand, or is overrun by the next wave), paints the bottom half of any image with an inverted duplicate of Vestrahorn and its surroundings. And because these waves are so low and slow, it’s possible to safely stand in the approaching surf wearing mid-calf waterproof boots, and keep your socks completely dry.
But the experience at the beach isn’t all about reflections. Each wave deposits, or repositions, an assortment of shells and smooth stones. After tiring of photographing reflections, I’ll often switch to these transient elements for my foreground. Other times, I’ll make my foreground all about the waves themselves, capturing the intersecting lines and arcs of waves arriving at different times and angles, or playing with long exposures to blur the leading or trailing edges advancing or receding water. And depending on how I time these shots, it’s also possible to create single frames that include reflection, shells/stones, and wave effects.
As much as I enjoy playing with all the visual elements at the beach, a couple of years ago I decided I should spend more time in the dunes. I’ve photographed the dunes of Death Valley and White Sands quite a bit, but these dunes are completely different. For starters, they’re black. They’re also much smaller, and capped with patches of grass like blonde toupees. But their small size, easy navigability, and distinctive curves are ideal for strategic juxtaposition, allowing me, with careful positioning, to assemble them into strong foreground elements that guide the eye elegantly to the mountain and sky beyond.
Winter Twilight, Vestrahorn and Dunes, Iceland
And then there are the components that vary with each Vestrahorn visit: clouds, light, snow, and ice. On last year’s visit, we didn’t have a lot of snow and ice, but the sunset light was off the charts, allowing me to capture one of my favorite Vestrahorn images that used an ultra-wide lens to fill my frame with the nearby dunes and colorful clouds, while shrinking the massive mountain to a small, distantive centerpiece.
Don Smith and I have been bringing our Iceland photo workshop groups to Vestrahorn for as long as we’ve been visiting Iceland. It’s always been a sunset spot, but one thing we’ve learned after many years photographing Iceland in winter is the need to constantly monitor the weather and stay flexible. Which is why we rely heavily on our Icelandic guides, and almost always follow their experience-based advice. This year’s Vestrahorn visit was a perfect example.
Our original plan was Vestrahorn for sunset, and the ice cave for the next morning. But this year the threat of extreme wind on our Vestrahorn afternoon caused us to flip-flop our sunset/sunrise locations so we’d be in the sheltered ice cave when the wind was strongest. This ice cave worked out great, and the next morning we traveled to Vestrahorn for our first-ever sunrise here.
Our group arrived in the blue hour and scattered almost instantly. Though Vestrahorn gets nice light at both sunrise and sunset, this time it wasn’t sunrise light or color that excited them, but rather, the spectacular clouds swirling about the peak, As I made my way around to check on everyone in the chilly twilight, I soon found myself beyond the dunes to an area of shallow pools I knew of, but had never photographed. Usually these pools are frozen, creating intricate patterns that make excellent foregrounds themselves, but this year, instead of ice we got blue-gray reflections of the mountain and clouds, framed by frozen sand.
Blue Hour Reflection, Vestrahorn, Iceland
Walking the perimeter of the largest pool while helping one of my workshop students identify a suitable foreground, I pointed out a mini-cove that seemed to cradle Vestrahorn. After my student finished with his shot, I stepped in to try a composition of my own. After working the scene for a couple of minutes, I was so excited by what I saw on the back of my camera, I walked around herding as many in my group as I could find over to this spot. Unfortunately, not everyone made it before the clouds descended and obscured much of the peak, but by that time it seemed that most of the group had found something that pleased them before the mountain went away.
My point is not that Vestrahorn is “better” than Kirkjufell (or vice-versa). But based on the photos shared by others, it does seem that Kirkjufell gets more attention than Vestrahorn. And I will say that if the joy you get from photography is found in creating unique images rather than collecting icons (not that there’s anything wrong with that), you might just be happier at Vestrahorn.
Join Don Smith and me in Iceland
Workshop Schedule || Purchase Prints || Instagram
Twin Peaks
Click any image to scroll through the gallery LARGE


Shock and Awe
Posted on February 27, 2025
Night Lights, Snaefellsnes Peninsula, Iceland
Sony α1
Sony 14mm f/1.8 GM
ISO 3200
f/1.8
5 seconds
That night at dinner, one person in the workshop group asked if there was a chance we’d see the northern lights, or if he could safely have another beer. I laughed and told him, while I can’t predict the future, I’d be shocked if the northern lights happened this night and to just go ahead and have that beer. I’ve never been happier to be wrong (and that my advice didn’t ruin his evening).
Each winter Don Smith and I do a winter workshop in Iceland. There are many reasons to visit Iceland in winter, but for most of our workshop students, at the top of the list is the northern lights. Because northern lights success doesn’t just happen, each day Don and I powwow with our Iceland guide to assess our odds for aurora success that night, and to plan our strategy to be there when it happens. We base these decisions on forecast aurora activity, expected cloud coverage, dark sky (no light pollution) views of the northern sky, and the experience we’ve gained from prior northern lights shoots.
Our second night on Snaefellsnes Peninsula (the workshop’s third night), the expected KP-index (the universally accepted 0 to 9 scale of aurora activity) was a very disappointing 1—about as low as we ever see in Iceland. Worse still, an incoming storm had already started to spread clouds, further reducing the night’s aurora expectations.
But regardless of the target (aurora, lightning, Milky Way, and so on), past surprises have taught us to never not have a plan in the event of the unexpected, so at dinner this evening we laid out the bad news to the group, but promised to keep an eye on the sky and notify them if anything changes. Though the incoming storm meant we wouldn’t be able to drive to another location if the aurora surprised us, we told the group that just across the road from our remote hotel was an unobstructed, dark-sky view of the northern sky above snowy peaks—perfect for the northern lights.
With a plan in place, everyone retreated to their rooms for the night with the lowest of expectations. At about 9:30 I was still up, answering e-mails and doing other boring business stuff, when I glanced at my phone and saw at least a dozen notifications from the WhatsAp Iceland group thread. Well that’s interesting…
It seems that Siggi, our exceptional Icelandic guide, had gone outside at around 9:15 and discovered clear skies and aurora. Without bothering to read all the other exclamations from the group, I bundled up, grabbed my gear, and rushed out as fast as I could. I expected something similar to the aurora display we had over Kirkjufell the prior night—enough to show up in the camera, but not bright enough for our eyes to register—but as soon as I stepped out into the cold and looked up, I spotted a soaring shaft of light that told me tonight would be different. Much different.
I hurried to the outline of photographers assembled across the road and quickly trudged through two feet of snow to set up at barbed wire fence. Out here, away from the hotel’s lights, it was even more apparent that something special was underway.
Don, Siggi, and I had prepared the group for photographing the northern lights, but with any type of night photography, there’s no substitute for experience. Since this was the first aurora experience for many in the group, I spent my first few minutes out there moving around, helping get people up to speed. While focus is always tricky at night, aurora focus is no different than any other night scene. The greatest challenge for aurora first timers, even those with lots of night experience, is the need to constantly monitor the rapidly changing exposure. An exposure bright enough to reveal foreground detail and aurora color one minute, might completely blow out the aurora the next. And a 15 second exposure might be fine when the aurora is changing slowly, but it blurs intricate detail when the aurora’s activity ramps up. Fortunately, it didn’t take long for everyone to settle in, and soon my instructions were down to occasional shouts reminding everyone that the brightness had changed, or to point out a different area of the sky that had ramped up.
The WhatsAp notice had gone out to everyone, but I soon realized it had only been a fluke that I’d noticed, so after a few minutes I decided to take attendance. Easier said than done in the extreme darkness, especially since there were a few people out there who weren’t in our group, and everyone was bundled head-to-toe. But I did determine that Don wasn’t out there, and one other person in the group (turns out there was a second person missing, but we didn’t realize it until the next morning). I called the missing workshop participant first, but that call went straight to voicemail—then another person in the group said she’d called him and he’d decided to pass (apparently he’d been asleep and regrettably wasn’t thinking rationally when he got that call). Don, on the other hand, was especially grateful for the call and made it out in record time.
An aurora show is special anytime, but it wouldn’t be an understatement to say this one truly shocked me by its unexpected splendor that ranks right up there with the very best I’ve seen in my half dozen years of photographing Iceland in winter. It was very bright, covered most of the sky, and was infused with lots of red, but what stood out most for me this evening was the dancing waves and shafts that twisted and fold right before our awestruck eyes.
Join Don and me for a very special Iceland photo workshop in 2026
Iceland Aurora Collection, 2019 – 2025
Click any image to scroll through the gallery LARGE


Iceland, Weather or Not
Posted on February 14, 2025

The Green Night, Aurora Above Kirkjufell, Iceland
Sony α1
Sony 16-35 GM
10 seconds
f/2.8
ISO 3200
As I’ve probably said a million times before, and likely will say a million more times, the best weather for photography is the worst weather to be outside. I mean, why else would Don Smith and I schedule a workshop for Iceland in January?
Of course our number one reason for an Iceland winter trip is the northern lights, which means winter clouds aren’t always our friend. But when I’m not waiting for the aurora to fire up, I love the way Iceland’s storm clouds are illuminated (all day) by beautiful low-angle sunlight (the sun never rises above 10 degrees during our visits). There are Iceland’s 2-hour winter sunrises and sunsets, its storm-churned surf, and ocean to mountaintop snow-covered landscape. And a surprising truth I’ve come to appreciate over the years is that, while Iceland in January is indeed quite cold, it really isn’t as cold as most people expect. (I swear.)
In this year’s workshop, that “not as cold as you expect” claim was challenged on our very first day of shooting, when we piled out of the bus at our first stop into 5°F air. Fortunately, that’s the coldest we experienced all workshop, and great photography creates an inexplicable warming factor that seems to make even the harshest conditions more tolerable. And regardless of the quality of the photography, even temperatures as low as 5°, (especially without wind) are quite tolerable with the right clothing.
My first year I attacked Iceland’s cold with copious layers of conventional California cold-weather gear. That worked well enough, but following each subsequent visit, I refined my non-California winter-wear (warmest) to the point where I’m now armed with an entire Iceland ensemble that rarely comes out for my domestic trips.
For example, a few years ago I decided that I was tired of having to layer a rain-shell on top of my (extremely warm but not waterproof) puffy down jacket, not to mention having to deal with a chronically cold butt exposed by a jacket that barely hung below my belt (yes, I was still wearing pants). So I sprung for LL Bean’s warmest waterproof down parka that covers me all the way down to mid-thigh. I still travel to Iceland with a lightweight, waterproof down jacket that’s compact enough to stuff in my camera bag and is ideal for milder days and short jaunts from the bus to a restaurant or hotel.
This two-way system—one heavy-duty option for the coldest, windiest conditions; another that’s lightweight but still warm enough for normal daily activity—works really well for me in Iceland. In addition to two jackets, I also have a couple of hats, pairs of gloves, and boots, that I can choose between, depending on the conditions. And, unlike many in this year’s group, I managd to pack everything into one (large) suitcase that I (barely) keep below Icelandair’s 23 kg (50-ish pounds) weight limit.
This year’s difference-maker upgrade was my new warm boots. I’m a cold feet (and fingers) kind of person, cursed with digits that never seem to be warm enough. Where my boots are concerned, it’s not so much the walking that’s a problem, but photography requires a lot of standing around in frigid cold (especially at night, when the aurora is dancing). In previous years I’ve gone more conventional, trying an assortment of insulated hiking boots and thick wool socks, upgrading to something warmer after almost every trip, vowing that next year will be better. The result has been persistently cold toes, and a boot-graveyard in my garage that rivals Imelda Marcos’ closet.
This year I tried something different, switching to super-warm, waterproof, lined Sorel work boots. But that was just the start. In New Zealand last July, I stocked up on (wait for it) possum fur socks. Possum fur (it’s actually a possum/merino blend) is absolutely the warmest material I’ve ever worn (also soft and lightweight), and it’s everywhere in New Zealand. But before you start visualizing acres of bred possums, caged and awaiting slaughter, and imagine that I’m supporting the heartless New Zealand possum-breeding industry, you need to know New Zealand’s possums (which are quite different from American possums) are a non-native scourge that’s decimating the country’s native bird population (among other things). A massive effort is underway throughout the country to eliminate possums by 2050—the only possum fur apparel I purchase in New Zealand is a byproduct of possums trapped for eradication (they were doomed anyway). But anyway…
And as if new boots and socks weren’t enough, I also sprung for a few thin merino wool liner socks from REI, to wear under my possum socks (no, possum don’t wear socks—you know what I mean). After returning last week following nearly two weeks in Iceland’s winter cold. After that first morning, I exited the 5° chill confident that my popsicle toes days were behind me.
Though the temperature warmed slightly throughout the day, by afternoon the wind had picked up and we started to see a few clouds heralding the approach of the storm that would batter us the following day. Nevertheless, after dinner we drove out to Kirkjufell hoping for some northern lights because in Iceland in winter, you always have a northern lights plan.
Seeing clouds from the Kirkjufell parking area, it would have been easy to pack it in and return to our warm hotel. But a few breaks were enough to give us pause, and when quick test snaps revealed green sky behind the broken clouds, we decided to stay and shoot for a while. We shot from the parking area, using our bus as a windbreak.
What started as a low expectation, “What the heck, we’re here anyway” shoot, turned into a very productive evening of photography, and a harbinger of the great stuff in store. It also gave us an opportunity to get the group up to speed with night photography—some had never done it before, while others were pretty rusty.
It’s especially fun when a group gets to witnesses something exciting. Many in this group had never seen an aurora, and though the color wasn’t bright enough to see with our eyes, everyone was pretty thrilled to capture images that featured Iceland’s most iconic mountain. But the real star this evening was the clouds, which built and raced behind Kirkjufell, but never completely filled in the window to the sky and aurora behind the peak.
After we’d finished, Don and I talked about the relief we felt getting at least enough aurora to please people, but agreed that more would be better, because those who’d never seen a good display didn’t really understand what they were missing. It turns out we didn’t need to wait long, but I’ll get to that in a future post.
Join Don Smith and Me in Iceland
Weather or Not
Click any image to scroll through the gallery LARGE


Organic Discovery
Posted on May 30, 2024

Sunbeams, Lóndrangar, Iceland
Sony a7R V
Sony 24-105 f/4 G
ISO 100
f/13
1/40 second
When I sit down each week to write a new blog post, I usually have a general idea of where I want to go, but little plan for how I’m going to get there. I’ll start with a couple of relevant sentences, then just see where that leads me. Depending on the topic, and my state of mind at the time, the effort that gets me from concept to completed blog can range from simple to Sisyphean. Regardless of the struggle, I’m always surprised by the insights the creation process itself uncovers—I learn so much about myself, photography, and the natural world in general, simply through exploring with words, that I realize writing this blog is as much for me as it is for my audience.
It occurs to me that this is very much the way I approach my photography—I’ll arrive at a location and identify something I like, but am usually not quite sure how I want to handle the scene until I frame it in my camera and start working. Or more accurately, I might think I know how I want to handle the scene from that initial spark of attraction, but usually discover much more as I work.
Whether I’m writing or taking pictures, beyond an overall general concept or theme (like coffee table books, or a moonrise), I prefer my creation to happen organically. That’s because, for me at least, I find going in with a predetermined mindset stifling. In life, the instant you think you know the answer is the instant you stop learning; in photography, the instant you think you have the shot is the instant you stop seeing.
I’m reminded of this every time I conduct a workshop image review and see the mind boggling variety of images shared. We’re all going to the same places, but everyone’s seeing something different. Even if the execution isn’t perfect, the vision that shines through can be downright inspiring.
Just as every writer starts with a blank page, when looking for photographs I try to challenge myself with the reminder that the shots are there, that my ability to see them is limited only by my own creativity. I’ve learned that my best view into a scene’s essence doesn’t come instantly—it happens organically, and can’t be rushed. Much like the first draft of whatever I’m writing, my first click is only the starting point that serves as a catalyst for the discovery process to follow.
Landscape photography in particular, with its primarily stationary subjects, lends itself to this organic discovery approach. Rather than anticipate and react, as sports and wildlife photographers must, as a photographer of mostly stationary landscape subjects, landscape photography (usually) provides all the time I need to identify a potential subject and evaluate it fully before pressing my shutter. I just feel more creative when I know that, no matter how long I take, my subject will still be there when I’m finally ready.
This need to spend time with my subjects, adjusting my compositions as they come to me, is a prime reason I feel so strongly about using a tripod. I’m old enough to remember writing longhand on paper with pen or pencil. And while it’s undeniable that some of the greatest writing in human history happened this way, largely because of my need to edit as I go, my own writing took a significant leap forward when I started using a computer and word processor.
I can say the same thing about the switch from the delayed results of film to the instant feedback of digital, and the tripod played a major part in that. I’ve always used a tripod with most of my photography because it allows me frame up my scene and study it as long as necessary. But since the arrival of digital capture and its instant feedback, my tripod plays an even bigger role. In addition to allowing me to spend time with my scene before clicking, with a digital camera I can immediately study my results and identify necessary adjustments secure in the knowledge that the composition that needs tweaking is patiently waiting in the viewfinder atop my tripod.
As happens with my writing, this edit on the fly approach almost always takes my images places I hadn’t imagined when I started. I can’t tell you the number of times I’ve ended up with something much different, and better, simply because I had quality, unhurried time with my scene.
The image I share above was from this year’s version of the Iceland photo workshop that Don Smith and I partner on each winter. Snaefellsnes Peninsula is filled with visual highlights, especially in winter, but Londrangar is a highlight among highlights. This image features several of the (many) reasons we choose winter for our Iceland workshop: brooding clouds, pounding surf, and fresh snow. And while the prime focal point here is the Londrangar sea stack, the volatile conditions always provide something new to consider with each visit.
So this year when the group arrived at Londrangar, I was initially drawn to the dramatic surf and clouds, starting pretty wide to include more of these features—including very large waves battering the rocks about 40 feet below me. But as I worked the scene, the dusting of white snow on the rugged basalt drew my eye, so I tightened my composition to emphasize it.
Given how much I dislike a disorganized foreground and messy borders, in a scene like this, with its jumble of rocks and ever-shifting surf, create a particular challenge. It took me awhile to find a composition that satisfied those instincts, but once I had a working composition fixed atop my tripod, I was free to play with different motion effects in the surf. With churning surf, I’ll often use multi-second exposures, with the help of my Breakthrough Filters 6-Stop Dark Polarizer, but this time I was so enamored of the white-water explosions with each wave, I also tried freezing the collision with a fast shutter speed.
As I grew familiar with the waves’ patterns—how to anticipate their arrival point and timing—I refined my composition further. Then, with little warning, the sun broke through to cast golden beams on the gray horizon, forcing me to jettison my casual pace and respond quickly to the sudden beauty. Fortunately, by this time I’d become so familiar with the scene and all its idiosyncrasies that I didn’t feel at all rushed. With only slight adjustments to my current composition to balance the sea stack with the shafting sunlight, I spent the next five or so minutes timing the surf and enjoying the view.
The Motion of the Ocean
Click any image to scroll through the gallery LARGE


