Eloquent Images by Gary Hart
Insight, information, and inspiration for the inquisitive nature photographer
Iceland, Weather or Not
Posted on February 14, 2025

The Green Night, Aurora Above Kirkjufell, Iceland
Sony α1
Sony 16-35 GM
10 seconds
f/2.8
ISO 3200
As I’ve probably said a million times before, and likely will say a million more times, the best weather for photography is the worst weather to be outside. I mean, why else would Don Smith and I schedule a workshop for Iceland in January?
Of course our number one reason for an Iceland winter trip is the northern lights, which means winter clouds aren’t always our friend. But when I’m not waiting for the aurora to fire up, I love the way Iceland’s storm clouds are illuminated (all day) by beautiful low-angle sunlight (the sun never rises above 10 degrees during our visits). There are Iceland’s 2-hour winter sunrises and sunsets, its storm-churned surf, and ocean to mountaintop snow-covered landscape. And a surprising truth I’ve come to appreciate over the years is that, while Iceland in January is indeed quite cold, it really isn’t as cold as most people expect. (I swear.)
In this year’s workshop, that “not as cold as you expect” claim was challenged on our very first day of shooting, when we piled out of the bus at our first stop into 5°F air. Fortunately, that’s the coldest we experienced all workshop, and great photography creates an inexplicable warming factor that seems to make even the harshest conditions more tolerable. And regardless of the quality of the photography, even temperatures as low as 5°, (especially without wind) are quite tolerable with the right clothing.
My first year I attacked Iceland’s cold with copious layers of conventional California cold-weather gear. That worked well enough, but following each subsequent visit, I refined my non-California winter-wear (warmest) to the point where I’m now armed with an entire Iceland ensemble that rarely comes out for my domestic trips.
For example, a few years ago I decided that I was tired of having to layer a rain-shell on top of my (extremely warm but not waterproof) puffy down jacket, not to mention having to deal with a chronically cold butt exposed by a jacket that barely hung below my belt (yes, I was still wearing pants). So I sprung for LL Bean’s warmest waterproof down parka that covers me all the way down to mid-thigh. I still travel to Iceland with a lightweight, waterproof down jacket that’s compact enough to stuff in my camera bag and is ideal for milder days and short jaunts from the bus to a restaurant or hotel.
This two-way system—one heavy-duty option for the coldest, windiest conditions; another that’s lightweight but still warm enough for normal daily activity—works really well for me in Iceland. In addition to two jackets, I also have a couple of hats, pairs of gloves, and boots, that I can choose between, depending on the conditions. And, unlike many in this year’s group, I managd to pack everything into one (large) suitcase that I (barely) keep below Icelandair’s 23 kg (50-ish pounds) weight limit.
This year’s difference-maker upgrade was my new warm boots. I’m a cold feet (and fingers) kind of person, cursed with digits that never seem to be warm enough. Where my boots are concerned, it’s not so much the walking that’s a problem, but photography requires a lot of standing around in frigid cold (especially at night, when the aurora is dancing). In previous years I’ve gone more conventional, trying an assortment of insulated hiking boots and thick wool socks, upgrading to something warmer after almost every trip, vowing that next year will be better. The result has been persistently cold toes, and a boot-graveyard in my garage that rivals Imelda Marcos’ closet.
This year I tried something different, switching to super-warm, waterproof, lined Sorel work boots. But that was just the start. In New Zealand last July, I stocked up on (wait for it) possum fur socks. Possum fur (it’s actually a possum/merino blend) is absolutely the warmest material I’ve ever worn (also soft and lightweight), and it’s everywhere in New Zealand. But before you start visualizing acres of bred possums, caged and awaiting slaughter, and imagine that I’m supporting the heartless New Zealand possum-breeding industry, you need to know New Zealand’s possums (which are quite different from American possums) are a non-native scourge that’s decimating the country’s native bird population (among other things). A massive effort is underway throughout the country to eliminate possums by 2050—the only possum fur apparel I purchase in New Zealand is a byproduct of possums trapped for eradication (they were doomed anyway). But anyway…
And as if new boots and socks weren’t enough, I also sprung for a few thin merino wool liner socks from REI, to wear under my possum socks (no, possum don’t wear socks—you know what I mean). After returning last week following nearly two weeks in Iceland’s winter cold. After that first morning, I exited the 5° chill confident that my popsicle toes days were behind me.
Though the temperature warmed slightly throughout the day, by afternoon the wind had picked up and we started to see a few clouds heralding the approach of the storm that would batter us the following day. Nevertheless, after dinner we drove out to Kirkjufell hoping for some northern lights because in Iceland in winter, you always have a northern lights plan.
Seeing clouds from the Kirkjufell parking area, it would have been easy to pack it in and return to our warm hotel. But a few breaks were enough to give us pause, and when quick test snaps revealed green sky behind the broken clouds, we decided to stay and shoot for a while. We shot from the parking area, using our bus as a windbreak.
What started as a low expectation, “What the heck, we’re here anyway” shoot, turned into a very productive evening of photography, and a harbinger of the great stuff in store. It also gave us an opportunity to get the group up to speed with night photography—some had never done it before, while others were pretty rusty.
It’s especially fun when a group gets to witnesses something exciting. Many in this group had never seen an aurora, and though the color wasn’t bright enough to see with our eyes, everyone was pretty thrilled to capture images that featured Iceland’s most iconic mountain. But the real star this evening was the clouds, which built and raced behind Kirkjufell, but never completely filled in the window to the sky and aurora behind the peak.
After we’d finished, Don and I talked about the relief we felt getting at least enough aurora to please people, but agreed that more would be better, because those who’d never seen a good display didn’t really understand what they were missing. It turns out we didn’t need to wait long, but I’ll get to that in a future post.
Join Don Smith and Me in Iceland
Weather or Not
Click any image to scroll through the gallery LARGE


Organic Discovery
Posted on May 30, 2024

Sunbeams, Lóndrangar, Iceland
Sony a7R V
Sony 24-105 f/4 G
ISO 100
f/13
1/40 second
When I sit down each week to write a new blog post, I usually have a general idea of where I want to go, but little plan for how I’m going to get there. I’ll start with a couple of relevant sentences, then just see where that leads me. Depending on the topic, and my state of mind at the time, the effort that gets me from concept to completed blog can range from simple to Sisyphean. Regardless of the struggle, I’m always surprised by the insights the creation process itself uncovers—I learn so much about myself, photography, and the natural world in general, simply through exploring with words, that I realize writing this blog is as much for me as it is for my audience.
It occurs to me that this is very much the way I approach my photography—I’ll arrive at a location and identify something I like, but am usually not quite sure how I want to handle the scene until I frame it in my camera and start working. Or more accurately, I might think I know how I want to handle the scene from that initial spark of attraction, but usually discover much more as I work.
Whether I’m writing or taking pictures, beyond an overall general concept or theme (like coffee table books, or a moonrise), I prefer my creation to happen organically. That’s because, for me at least, I find going in with a predetermined mindset stifling. In life, the instant you think you know the answer is the instant you stop learning; in photography, the instant you think you have the shot is the instant you stop seeing.
I’m reminded of this every time I conduct a workshop image review and see the mind boggling variety of images shared. We’re all going to the same places, but everyone’s seeing something different. Even if the execution isn’t perfect, the vision that shines through can be downright inspiring.
Just as every writer starts with a blank page, when looking for photographs I try to challenge myself with the reminder that the shots are there, that my ability to see them is limited only by my own creativity. I’ve learned that my best view into a scene’s essence doesn’t come instantly—it happens organically, and can’t be rushed. Much like the first draft of whatever I’m writing, my first click is only the starting point that serves as a catalyst for the discovery process to follow.
Landscape photography in particular, with its primarily stationary subjects, lends itself to this organic discovery approach. Rather than anticipate and react, as sports and wildlife photographers must, as a photographer of mostly stationary landscape subjects, landscape photography (usually) provides all the time I need to identify a potential subject and evaluate it fully before pressing my shutter. I just feel more creative when I know that, no matter how long I take, my subject will still be there when I’m finally ready.
This need to spend time with my subjects, adjusting my compositions as they come to me, is a prime reason I feel so strongly about using a tripod. I’m old enough to remember writing longhand on paper with pen or pencil. And while it’s undeniable that some of the greatest writing in human history happened this way, largely because of my need to edit as I go, my own writing took a significant leap forward when I started using a computer and word processor.
I can say the same thing about the switch from the delayed results of film to the instant feedback of digital, and the tripod played a major part in that. I’ve always used a tripod with most of my photography because it allows me frame up my scene and study it as long as necessary. But since the arrival of digital capture and its instant feedback, my tripod plays an even bigger role. In addition to allowing me to spend time with my scene before clicking, with a digital camera I can immediately study my results and identify necessary adjustments secure in the knowledge that the composition that needs tweaking is patiently waiting in the viewfinder atop my tripod.
As happens with my writing, this edit on the fly approach almost always takes my images places I hadn’t imagined when I started. I can’t tell you the number of times I’ve ended up with something much different, and better, simply because I had quality, unhurried time with my scene.
The image I share above was from this year’s version of the Iceland photo workshop that Don Smith and I partner on each winter. Snaefellsnes Peninsula is filled with visual highlights, especially in winter, but Londrangar is a highlight among highlights. This image features several of the (many) reasons we choose winter for our Iceland workshop: brooding clouds, pounding surf, and fresh snow. And while the prime focal point here is the Londrangar sea stack, the volatile conditions always provide something new to consider with each visit.
So this year when the group arrived at Londrangar, I was initially drawn to the dramatic surf and clouds, starting pretty wide to include more of these features—including very large waves battering the rocks about 40 feet below me. But as I worked the scene, the dusting of white snow on the rugged basalt drew my eye, so I tightened my composition to emphasize it.
Given how much I dislike a disorganized foreground and messy borders, in a scene like this, with its jumble of rocks and ever-shifting surf, create a particular challenge. It took me awhile to find a composition that satisfied those instincts, but once I had a working composition fixed atop my tripod, I was free to play with different motion effects in the surf. With churning surf, I’ll often use multi-second exposures, with the help of my Breakthrough Filters 6-Stop Dark Polarizer, but this time I was so enamored of the white-water explosions with each wave, I also tried freezing the collision with a fast shutter speed.
As I grew familiar with the waves’ patterns—how to anticipate their arrival point and timing—I refined my composition further. Then, with little warning, the sun broke through to cast golden beams on the gray horizon, forcing me to jettison my casual pace and respond quickly to the sudden beauty. Fortunately, by this time I’d become so familiar with the scene and all its idiosyncrasies that I didn’t feel at all rushed. With only slight adjustments to my current composition to balance the sea stack with the shafting sunlight, I spent the next five or so minutes timing the surf and enjoying the view.
The Motion of the Ocean
Click any image to scroll through the gallery LARGE


Go With the Flow
Posted on May 16, 2024
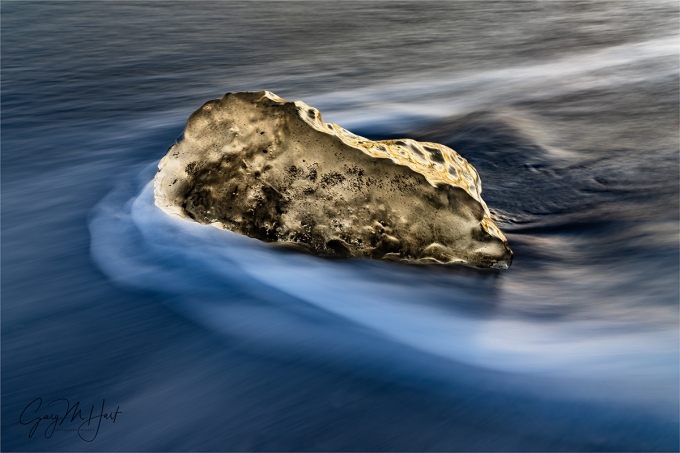
Blur, Diamond Beach, Iceland
Sony a7R V
Sony 24-105 f/4 G
ISO 50
f/11
1 second
Despite many visits to Diamond Beach over the last half-dozen or so years, I still don’t feel like I’ve mastered the iceberg blurred water shot to my complete satisfaction. But I keep working on it, and this year I was at least was able to capture something I like.
In previous visits, when my attempts to capture the perfect motion blur shot failed, I’d fall back on sunstar images—partly because I find them easier, but mostly because the backlit translucence of an iceberg is spectacularly beautiful. But as much as I like these sunstar images, I’ve seen other photographers’ Diamond Beach flowing surf images that I like even better, and can’t help going for my own.
The problem (aside from only getting one shot at it per year), is getting all the scene’s many moving parts working together. Blurring a waterfall, or the whitewater of a flowing river or creek, is relatively simple because, even though the water is moving, the surrounding scene, including the position of the water feature itself, is stationary. And while crashing surf is fairly random from one wave to the next, again the surrounding scene (the beach or rocks upon which the surf is crashing) is fixed. But nothing at Diamond Beach is still for long.
Foremost among the Diamond Beach moving parts the frigid North Atlantic’s unpredictable power, which requires unwavering attention—in 2022, a rogue wave swamped four workshop members who reasonably believed their position above the beach was safe. Trying to coordinate all the other variables with one eye constantly on the ocean is the photography equivalent of patting your head while rubbing your belly.
The first essential element to consider is the location of whatever mini iceberg I target, which needs to be planted in sand, yet close enough to the water for an occasional wave to wash up and around it. Too far from the surf and the waves never reach the ice; too close, and the subject will actually float away mid-exposure. Often it’s difficult to tell whether a potential subject is properly positioned until actually attempting to photograph it for awhile. And even the best ice subject doesn’t in one place for more than a wave or two.
Adding more frustration to these Diamond Beach iceberg scenes is the power of moving water, which, even when it doesn’t reposition the ice, can still impart micro-movement during the long exposure. I can’t tell you how often I’ve thought I’d nailed a Diamond Beach shot, only to zoom in on the ice afterward to find an imperceptible rotation or wobble had made it too soft to use.
Then there’s the timing of the click. I’ve found that the most appealing blur happens when the wave has swept past the ice and is actually washing back out. Equally important is the duration of the exposure, which needs to be long enough to blur the water, but not so long that all definition in the water is lost. Even if I’ve nailed all the above variables, since I focus on my chosen ice subject before the wave arrives, even if it stays perfectly stationary during my exposure, just the slightest shift in the ice’s position before my shutter click can invalidate my chosen focus point.
Of course all these machinations are irrelevant to the people don’t like the silky water effect in any image. And while I agree that at times blurring water verges on cliché, the truth is that fast water illuminated by anything less than full sunlight usually offers little choice. In those conditions the question isn’t whether to blur the water, it’s how much to blur it?
The argument against blurring moving water that always amuses me most is the one that says blurred water “isn’t natural.” The reasoning is that blurred-water images should be disqualified because we never see blurred water in nature. My question for these “purists” is, how many times have you seen the alternative to blurred water: individual water droplets suspended in midair?
This question just underscores a photographic truth I’ve been hammering on for years: The camera and human eye experience the world entirely differently. Discarding images simply because they aren’t “natural” would eliminate not only all black and white images, but also every image that’s not, uhhh, three-dimensional. Hmmm—let’s count how many images that leaves us with….
On the other hand, embracing your camera’s unique vision is empowering. It opens doors to many creative possibilities, of which blurred water is just a scratch on the surface. While there’s no magic formula to achieve it, blurring water isn’t hard once you learn to see the world as your camera does.
The prime determining factor in blurred water is the distance any individual water drop traverses your frame while the shutter is open: the more of the frame it spans, the greater the blur effect. The amount of blur you capture starts with the speed of the water, over which you have no control. But take heart, because there are several variables you can control:
- Focal length: The longer your focal length (more telephoto), the shorter the distance from one side the frame to the other (a wide angle vista can encompass many miles; a telephoto from the same vantage point can reduce the image’s width to a few hundred yards or less), so our imaginary water droplet will span a greater percentage of the frame’s width in a telephoto exposure.
- Subject distance: Moving closer achieves the same thing a telephoto lens does because the closer you are to the moving water, the shorter the distance our water droplet has to travel to span the frame.
- Shutter speed: The longer the shutter is open, the farther our droplet can travel during exposure. You can keep the shutter open by reducing your ISO, shrinking your aperture, and/or cutting the amount of light with a polarizer or neutral density filter.
Because long shutter speeds increase the amount of blur, blurring water is easier when you photograph in reduced light, such as overcast or shade, that requires a longer shutter speed. In full sunlight it’s pretty much impossible to blur water without a neutral density filter to cut the light illuminating the scene.
In a river or creek, whitewater generally works best because not only does it move fast, it also shows the blur effect much better than rapidly flowing green water. In other words, for any given combination of conditions and settings, while the amount of blur is the same for green water as it is for white water, the blur will be much more noticeable in the white water.
When the blur subject is ocean waves, there’s always an abundance of white water to work with. But rather than the relatively consistent flow pattern of river rapids, each ocean wave is significantly different from the others. I think this extreme variability from one wave to the next is what I most enjoy about ocean wave motion-blur images.
Approaching Diamond Beach this February morning, I scanned for ice in the narrow subject zone. I’ve had visits with more potential targets, but also some with less, so overall I was pleased with this year’s opportunities. I spent most of my time there strolling the black sand, working with workshop students, and occasionally targeting an ice chunk of my own for a few unsuccessful frames.
It wasn’t until I was confident everyone in the group was comfortable with the surroundings and happily at work on shots of their own that I got serious about my own photography.
I approached this little iceberg, maybe the size of a large microwave, and set up my tripod a couple of feet away. For the next 15 minutes or so, I worked carefully as up to 10 waves approached my subject, wrapped it, then flowed back out. Each wave nudged the ice slightly, forcing me to move my tripod and recompose before every frame.
Having an LCD and viewfinder to immediately scrutinize each capture was a huge advantage that allowed me to zero in on the shutter speed that worked for my focal length and distance, as well as verify the sharpness of my subject. Having waterproof boots that went up to within six inches of my knees was another advantage I quickly appreciated.
I still don’t think this Diamond Beach blurred wave image is as good as others I’ve seen, but I’m working on it…
Join Don Smith and me in Iceland next year
Workshop Schedule || Purchase Prints || Instagram
Water on the Move
Click any image to scroll through the gallery LARGE


Permission To Suck
Posted on March 27, 2024

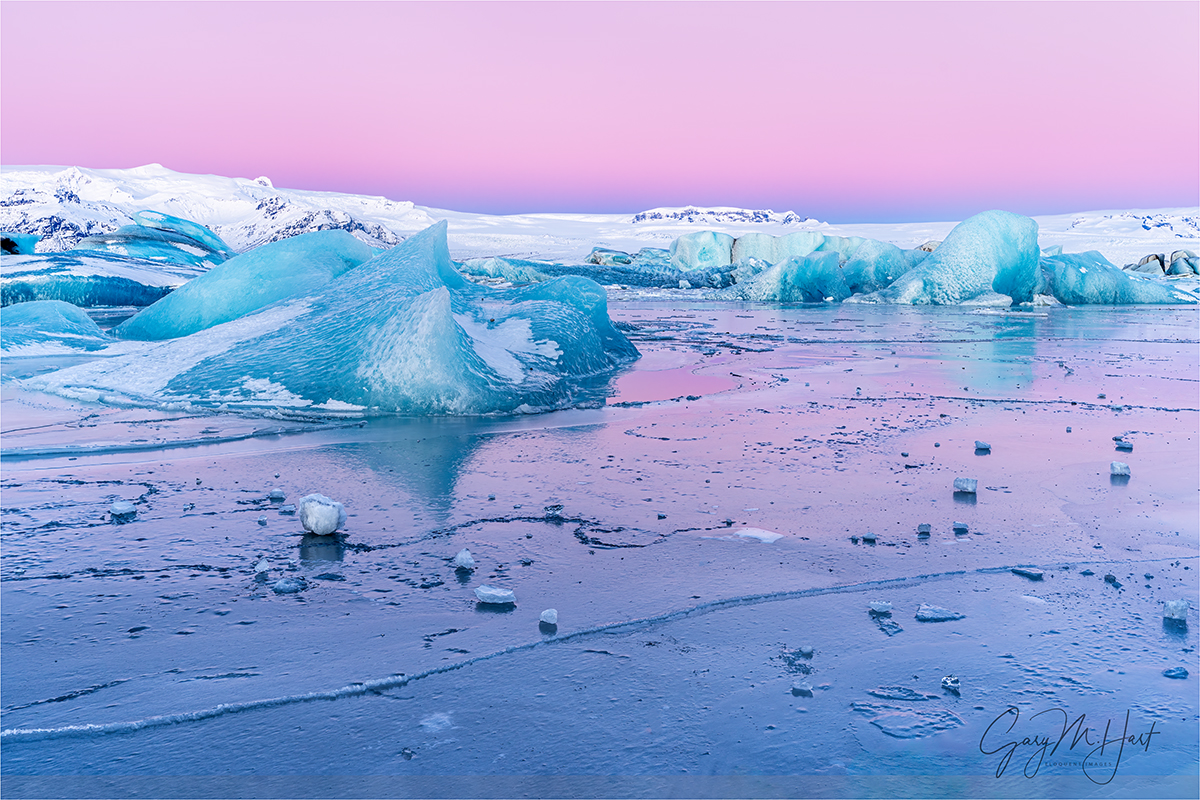
Twilight on Ice, Glacier Lagoon, Iceland
Sony α1
Sony 16-35 f/2.8 GM
ISO 100
f/11
1 second
True story: I once had a Yosemite workshop participant meter an El Capitan reflection scene, put her Nikon D4 in continuous-frame mode, then press the shutter and spray in a 180 degree (10 FPS) arc until the image buffer filled. Unable to contain my dismay, I asked her what she was doing and she just shrugged and said (with a smile), “It’s Yosemite—there’s sure to be something good in there.” While I couldn’t really argue, I’m guessing she wasn’t seeing a lot of growth as a landscape photographer.
Thanks to today’s digital cameras’ ridiculous frame rates, seemingly infinite buffers and memory cards, and the ease of deleting images in the field, I’m afraid this spray-and-pray approach has become all to common. A landscape photographer’s goal shouldn’t merely be an occasionally good (or even great) image, it should also be continuous improvement. So, while spray-and-pray might render nice images from time to time, clicks without consideration also inhibit growth.
I tend to fall on the opposite end of the photography continuum. Rather than taking a high volume of low-effort images (spray-and-pray), my approach carries over from my film days. Back then, a photographer who wasn’t careful might return from a photo trip to find that, between the film and its eventual processing, the photographs cost more than the trip. With my wallet forcing me to be more discriminating, I took my time with every scene, checking (and double-checking) every composition and exposure variable, and only clicked when I was confident of success. Because basically, I couldn’t afford to suck.
Times have changed. Though many digital shooters have indeed become far too casual with each frame, following the conservative film-centric approach leaves shots, and opportunities to grow, on the table. To get the most from digital photography tremendous advantages, we also need to jettison the inclination to obsessive prudence in favor of curiosity and exploration.
Because here’s the new (digital) reality: While each film click cost us money, each digital click increases the return on our investment. In other words, since we’ve already invested in the capture medium (our camera), the more times we click the shutter, the lower the cost per click becomes. Transitioning from film to digital, the realization the not being constrained by budget means that every click doesn’t need to be a winner felt like a true epiphany.
The best approach for digital landscape shooters is a hybrid of the cautious film and nonchalant digital extremes: Careful attention to detail, combined with a no-fear freedom to fail frequently. For this to work, it’s essential to have some kind of plan or objective for every frame, but that objective doesn’t have to be a good image—it can be just as valuable to fail and learn. Feel free to explore without knowing exactly where you’re going or how you might get there—some of my most successful images happened only because I wasn’t afraid to start with crappy images, just to see where they led.
There’s a draft in here
As someone who has been writing and taking pictures for a long (long) time, I’ve found true similarities between the creation process for each craft. Whether it’s an important e-mail, a magazine article, a blog, or an epic novel, few writers sit down and create a polished piece of writing in a single pass. Instead, they start with a rough draft of their idea, then review, revise, and repeat until they’re satisfied.
For most writers, success requires being okay with making “bad” before making good. In her (wonderfully insightful and entertaining) book “Bird by Bird,” Anne Lamott encourages writers to embrace the “shitty first draft.” As a writer long inhibited by a fear to ever be less than perfect at anything, I found this permission to start “bad” very empowering. Until embracing this concept, not only had my creative growth been waylaid by my own internal editor, I’d been comparing my own early attempts to everyone else’s finished work (of course it won’t compete), forgetting that those writers almost certainly started with something crappy too. Now, when writing anything, I’m far more comfortable simply starting with an idea and seeing where it leads me.
This mindset is ideal for landscape photographers as well. We deal with mostly stationary subjects, which gives us the time to create at our own speed—clicking, reviewing, adjusting to our heart’s content—confident that our subject will still be there when we’re ready for the next click. Because there’s no financial penalty for each digital shutter click, the mindset can be that each click is simply a step toward a finished image—no matter how poor the prior image, there’s always an opportunity to improve it with the next one.
When I approach a scene and think there might be a shot in there somewhere, I don’t care how many clicks it takes, I’ll just keep clicking and refining until I’ve found something, or decided there’s nothing there. I start by composing my first click mostly by feel, without a lot of analysis. This is my first draft, a proof of concept that creates a foundation to build an image on. When that draft pops up on my camera’s LCD, I stand back and evaluate it, make adjustments, and click again, repeating as many times as necessary. And even when I think I finally have it, I might try a few more tweaks to see if I can make the image even more “perfect.” Would it surprise you to know that virtually every picture I share was not my first click of that scene?
This click without remorse approach also applies when I’m not certain there’s anything there at all. In those situations I might just play “what-if” games with my camera: What if I do this? Or that? If it triggers something, great; if it doesn’t, I move on—but maybe I’ve learned something in the process. And every time I find myself asking, “Should I do it this way or that way?,” I just do it both ways and decide later.
This personal permission to be bad is probably the single most important factor in my growth as a photographer.
One more thing…
I hear a lot of landscape photographers claim that stabilized bodies and lenses, combined with clean high-ISO sensors, have made the tripod obsolete. Since photography has to make you happy, I won’t argue with anyone who says using a tripod saps their joy. But…. If the joy you receive from landscape photography requires getting the best possible images, you really should be using a tripod.
Applying my draft/revise approach without a tripod is like drawing with an Etch A Sketch (is that still a thing?), then erasing the screen after each click. That’s because after every hand-held click, what’s the first thing you do? If you’re like most photographers, to review your image you drop the camera from your eye and extend it out in front of you to better view the LCD. Before you can make the inevitable adjustments to that hand-held capture, you must return the camera to your eye and completely recreate the original composition you just evaluated before making any adjustments. Using a tripod, the image you just reviewed is just sitting there in your viewfinder, waiting for the next revision.
Much the way a computer allows writers to save, review, and incrementally improve what they’ve written, a tripod holds your composition while you decide how to make it better. Shooting this way, each frame becomes an incremental improvement of the preceding frame.
Now, go forth and suck…
About this image
Twilight on Ice, Glacier Lagoon, Iceland
When this year’s Iceland workshop group arrived at Glacier Lagoon, it was pretty clear that we were in store for something special. The shadowless light and sweet pink and blue pastels opposite the sun make early pre-sunrise (or late post-sunset) twilight my favorite time of day to photograph—in Iceland it’s even better thanks to the incredibly long high latitude twilight. With the sun rising behind us in a little more than an hour, the clear sky and pristine air meant we’d have a front row view of the day’s first pink rays pushing the steely blue Earth’s shadow below the horizon.
Since we’d already visited here a couple of days earlier, everyone in the group knew their way around and instantly scattered when they saw what was coming. I didn’t go far, setting up with several others in the group along the lagoon bank, just below the parking area. I chose this spot largely because it allowed me to stay fairly close to many in the group, while still providing all of the elements I knew would make the morning special: clear view of the soon-to-be colorful sky, striking icebergs to draw the eye, and a reflective and textured foreground dotted with smaller ice features.
With so much going on from foreground to sky, I went with my 16-35 f/2.8 lens, which was already mounted on my Sony α1 body. I had little time to waste and quickly framed up a wide shot that included everything. Scrutinizing the result, I decided that I’d use the two largest icebergs to anchor my frame and repositioned myself accordingly. Then I just started clicking and reviewing, making slight refinements to find the right balance of sky and ice, and tweaking my polarizer to maximize the reflection color while reducing the glare on the closest ice.
True to high latitude form, this morning’s show stretched on luxuriously, enabling me to work the scene without feeling rushed. If I hadn’t been with a group I might have taken advantage of the slow motion sunrise and roamed a bit, but I was pretty content just staying put.
Join Don Smith and me in Iceland next year.
Workshop Schedule || Purchase Prints || Instagram
Sweet Twilight
Click any image to scroll through the gallery LARGE


Aurora Dreams
Posted on March 19, 2024

Northern Lights and Big Dipper, Vik, Iceland
Sony a7R V
Sony 14mm f/1.8 GM
ISO 3200
f/2
8 seconds
Even without the northern lights, there’s enough stuff to photograph in Iceland to more than fill a 10-day winter workshop. But I’d be lying if I said the prime goal of every person who signs up for an Iceland winter photo workshop isn’t the northern lights. And Don Smith and I do our best to fulfill these aurora dreams, but that of course isn’t completely under our control. (Full disclosure: our motives aren’t entirely unselfish because we get as thrilled about the aurora as anyone, and would go chasing the lights by ourselves if everyone else wanted to stay in.)
To maximize our chances for success, we have aurora locations for each of our overnight towns (and multiple locations at most of them), monitor the weather and aurora activity obsessively, and use these forecasts to plan (and adjust) our schedule, sometimes days in advance.
But like most things in nature photography, nothing is guaranteed. For example, last year we had two Iceland workshops back-to-back—the first group enjoyed truly epic northern lights displays on consecutive nights, at two different locations; the second group was essentially shut out, only managing to see a faint green glow on the horizon, visible to the camera but not the eye. But that disappointment wasn’t for lack of trying.
Since knowledge is power, when chasing fickle natural phenomena like the aurora, it helps to have as complete an understanding as possible of the science involved. Not only does this understanding help me maximize my chances for success, it helps me appreciate my subjects and enjoy the experience even more.
Aurora basics
Our planet is continuously bombarded by solar energy. When this perpetual solar wind encounters Earth’s atmosphere, a narrow range of wavelengths (infrared and visible) passes through to warm us and light our way. But other energy wavelengths in the solar wind interact with the atmospheric molecules they encounter, creating a charge imbalance by stripping electrons.
Instead of penetrating our atmosphere to create havoc on Earth’s surface, most of these charged particles (ions) are intercepted by the magnetosphere, our planet’s protective magnetic shield. Continually buffeted by solar energy, the magnetosphere is teardrop shaped, with the battered side that faces the sun compressed, while the side shielded behind Earth thins and stretches much farther into space.
As Earth rotates, at any given moment the side toward the sun (the daylight side) faces the compressed side of our magnetosphere, while the night side of Earth looks out at the less dense, extended region of the magnetosphere. Just as the upwind face of a wall or building channels wind around it, the sunward side of the magnetosphere deflects the charged particles and channels them to upper regions of Earth’s leeward (night) side.
While many of these ionized molecules stream toward the back, extended part of the teardrop-shaped magnetosphere and eventually away from Earth and deeper into the solar system, some are drawn Earthward along magnetic field lines created by our planet’s north and south magnetic poles, creating an oval of charged particles lower into the atmosphere above the poles. It’s these energized particles that we see as an aurora.
The aurora’s color depends on the molecules involved, and the altitude of their activity. Green-emitting oxygen molecules at relatively low altitudes are the most plentiful, which is why green is the most common aurora color. Less common is red, which we see when charged particles strike oxygen at very high altitudes, as well as nitrogen, hydrogen, and helium at lower altitudes. Blue and purple are also possible, depending combinations of altitude and the molecules involved.
Aurora activity is measured by the Kp- (or K-) index, a 0-9 scale of atmospheric electromagnetic activity, with 0 being little or no activity (get some sleep), and 9 being the most extreme activity (don’t forget the sunglasses). Many governments and scientific organizations issue regular Kp forecasts that seem about as reliable as a weather forecast—decent, but far from perfect, and improving as the forecast day draws near. There are many websites and smartphone apps that will provide you with up-to-date Kp forecasts for your current location—some will even issue alerts.
The solar cycle
The size of the aurora oval, and therefore the extent of the area below where we’ll be able to view an aurora, is a function of the amount of activity on the sun. In times of extreme solar activity, not only will the aurora display be visible at lower latitudes, the intensity of the display at higher latitudes will be greater.
Through centuries of observation, solar scientists have identified an 11-year cycle of solar activity tied to the reversal of the sun’s magnetic poles: every 11 (or so) years, the sun’s north and south poles flip. With this solar reversal comes an increase in sunspots (storms on the solar surface) that spawn the solar flares and coronal mass ejections that hurtle energetic particles Earthward to ignite an aurora. And though strong aurora displays are possible at any time during the solar cycle, their occurrence is most frequent around the 11-year max, and least frequent around the 11-year minimum.
For anyone with aurora dreams of their own, all this is especially relevant right now because the sun is approaching its 11-year peak. It’s impossible to know exactly what month the absolute peak will occur, but the activity is still increasing and it’s safe to say that it will probably peak sometime in the next year or two. Whether you join me in an Iceland photo workshop, find some other workshop or tour, or just plan a trip on your own, the time for action is now.
This year’s aurora chase
Based on the aurora forecast, this year’s Iceland workshop group started out very hopeful. And while the aurora was indeed active during our visit, the weather didn’t fully cooperate. After a couple of nights of cloudy skies (and fantastic daytime photography) on Snaefellsnes Peninsula , we made the long drive to Vik beneath a sunny sky that gave us hope for that night’s chances. So, given the day’s horizon-to-horizon blue, it was difficult to believe when an early afternoon forecast suddenly promised clouds by nightfall. But sure enough, as we photographed sunset on the coast near Vik, we were discouraged to see clouds approaching from the south and west.
Despite our pessimism, we went to dinner with a plan to give the aurora a shot if the clouds held off. After dinner (pizza, at a small restaurant that has become an annual favorite) we were pleased to walk outside and see stars in the north. Let’s go!
One of last year’s great aurora shows happened on our night in Vik, a display so spectacular that we were able to photograph it in all directions from a location with the best views west, south, and east. But we knew that on this night, even if the clouds held off long enough, any visible aurora would likely be limited to the northern sky. And with clouds encroaching, we knew south-facing views would likely be fruitless anyway.
Unfortunately, of all the locations we visit in Iceland, Vik has the worst north-facing views. But not to be deterred, we pointed our bus up the steep hill behind the town’s beautiful little church (if you’ve been to Vik, you know what I’m talking about) until we could go no further. We found ourselves at a cemetery parking lot high above town, with an open view northward to nearby mountains and the sky beyond.
Don, Albert (our guide), and I piled out of the bus and could instantly see above the mountains the telltale greenish haze that indicates an aurora—nothing spectacular, but enough to get a group of aurora virgins out of the bus. It only took us about 60 or so seconds to return to the bus, rouse everyone, and grab our gear, but in that short time a distinct green shaft of aurora had shot along the northwest horizon. Since we didn’t know how long it would last, and we could clearly see clouds closing in from the south, we ramped up the urgency to something approaching a fire evacuation.
For the next 30 minutes, until the clouds arrived to shut down the view, the group enjoyed a beautiful aurora display. Though pretty much limited to this one region of the sky, it was quite bright—bright enough that the color was clearly visible—with visible definition and motion.
Since this was the first time photographing an aurora for most of the group, I spent most of my time making sure everyone else was doing alright and didn’t get to take a lot of pictures for myself. I just set up my camera, found a composition I liked, set my focus and exposure, then clicked an occasional frame as I passed my camera on my way to help someone else.
The aurora was more prominent on the left side of this view, but I wasn’t crazy about the foreground in that direction. I decided to put the aurora on the left side of my frame and go wider to balance it with the Big Dipper and nicer peaks. I was less than thrilled about the light from Vik painting mountains, but figured I could minimize that fairly easily in Lightroom/Photoshop.
So, did we have the spectacular aurora show of previous years? We did not. But on this one night, and this night only, we did enjoy a short-lived but beautiful aurora that fulfilled everyone’s aurora dreams.
Don Smith and I will be back in Iceland for more next year
Iceland’s Aurora


Watch Your Backup
Posted on March 12, 2024

Sunrise Gem, Diamond Beach, Iceland
Sony a7R V
Sony 12-24 GM
1/13 second
F/22
ISO 50
A funny thing happened to me on the way to this image. And when I say “on the way,” I don’t mean taking the picture, I mean after it was safely loaded onto my computer and fully processed, it seems that someone (who wishes to remain anonymous), accidentally overwrote it with a completely different image. Oops.
Establishing a backup mindset
Overwriting an image is an easy thing to do; without a backup, it’s lost forever. In this case, I still had the raw file, but I’d have lost all the time and effort I’d put into processing the image, with no guarantee that I’d ever perfectly duplicate my original processing. Not the end of the world, but a real pain. Instead, since I did have a backup, I was simply able to restore the image and go about my business.
Though whole experience was just a blip in my day, it made me think about the data management practices that made it a non-event. These data practices I acquired in my previous life in the tech industry (way back when megabytes were big), but practices that might not be quite so second nature to others (especially those who don’t yet know the devastation of lost irreplaceable data). Which led me to thinking that perhaps some would be interested knowing how I keep my data safe. So I’ll share my own image (and data) workflow as an example of good data practices—not to advocate for my specific approach, but simply as an example.
However you choose to implement your own backup scheme, you should be fine long as you follow a few basic principles:
- Backup everything that’s important: Duh.
- Backup regularly—Ideally that will be automatically and as instantly as possible: Your data is only as good as your most recent backup.
- Redundant backups: Relying on a single backup of important data is playing with fire, and I daresay even two backups might not be not enough.
- At least one offsite backup: You never know what catastrophe might befall your abode.
- Multiple storage types: There is no “perfect” storage technology, so whatever your preference—spinning drives (cheaper but prone to crashing without warning); SSD drives (faster, relatively crash-resistant, and extremely compact, but expensive and not forever); CDs/DVDs (cheap, but also not forever); or the cloud (convenient but slow to populate, and even slower to restore—especially if you need to restore a lot of data at once)—never put all your backup eggs in one basket.
I’m going to concentrate on my image storage and backup, but since photography is my livelihood, there’s lots of non-image data that’s just as important and treated with the same care.
To the extent that it’s possible, for me a regular backup means an immediate backup. Because all of my cameras have two card slots and I write each image I capture to both cards, my image backups start the second I click my shutter. Card failures are rare, and usually survivable with the help of recovery software, but usually isn’t good enough. Not only that, media failure isn’t the only threat to my images. Don’t forget user error. For example, I know a photographer (the same one who overwrote the image above) who one time pulled a card out of his camera intending to upload the images from a recent weekend in Yosemite, stuck it in a pocket for the short walk down to his nearby Starbucks, and somehow lost the card. Instead of freaking out about a lost weekend, he simply pulled the other card from his camera and used it to import the weekend’s images. The stray card never did turn up, so he was out the cost of its replacement—a temporary bummer, but far from the crushing letdown losing a weekend’s worth of irreplaceable photography would have been.
As much as I’d like to automate the step of importing my images from my camera to my computer, my own import workflow does require some intervention because I use Lightroom’s Import program to name and organize my images. Without getting too deep into the weeds, I let Lightroom rename each image—retaining the camera-assigned image number and adding descriptive info—before copying them into a trip-specific folder on a 4TB SSD drive that always travels with me. And because I use two computers, my Lightroom catalog also lives on this drive—I just plug the drive into whichever computer I’m working on and away I go.
Once this Lightroom upload is complete, I immediately copy that trip’s newly populated folder onto a 10TB spinning hard drive that lives on my desk, and also to a RAID 6 configured NAS array (a possibly overkill but much appreciated backup set-up by my IT professional son-in-law). Only when all this is done do I format the camera’s media cards.
That sounds pretty good—3 copies (computer, hard drive, NAS array)—but it’s not enough. Consider the plight of Francis Ford Coppola, who lost 15 years worth of writing and images when his computer and its backup were stolen. Then think about the unthinkable things that could happen to your home—theft, fire, flood, nuclear missile, etc.—that might jeopardize everything inside. You need an offsite backup.
Places to host an offsite backup(s) include the home of a friend or relative, a safe deposit box, a storage facility, the office, to name a few. All those options are better than nothing, but not only are these manually generated backups only as good as the most recent update, updating them frequently enough to be worthwhile requires more discipline than I can take credit for.
Which is why my offsite backup uses a cloud service: Backblaze. There are many cloud backup options, but I chose Backblaze because it’s computer-based (it backs up every hard drive attached to my computer for the same price), not size limited (they’ll backup as much data as I connect to my computer), and not expensive (around $100/year). Almost the instant I add images to the 10TB drive on my desk, Backblaze recognizes the new data and starts backing it up—I never have to think about it again. With so much redundancy in my local backups, I consider this Backblaze backup to be my backup of last resort—I’ll probably (fingers crossed) never use it, but the peace of mind I get from the knowledge of its existence is worth far more than the service’s relatively small cost.
A de facto backup (it does backup my data, but that’s not why use it) is Dropbox, which holds every piece of data I might want to access regularly—processed images (but not raw files), documents, presentations, etc.—and syncs it all between my various devices. This allows me to work on something at home, then relocate to my remote “office” (Starbucks) without skipping a beat. I can also access all this essential data on my iPhone and iPad if when I find myself separated from my computers. I actually sync all of my Dropbox data to each of my computers, so once its synced I can still access it when I’m off the grid (I’m looking at you, Grand Canyon North Rim); on my iPhone and iPad, I pull most of my Dropbox data from the cloud when I need it, but do have a few important folders and files permanently downloaded for offline access.
The final piece of my backup paradigm is Mac OS Time Machine, which comes installed on every Mac, stores history for each file (I can go back to any date and recover a copy of any given file on that date), and is so easy to set up and use, I don’t understand why any Mac user wouldn’t use it. My primary Time Machine backup is a dedicated (not used for anything else) 5TB spinning hard disk that lives on my desk and is always connected. Because spinning hard drives can fail without warning, I also have a duplicate Time Machine backup on my NAS array.
In this case, when I someone overwrote a this fully processed image file, I didn’t panic, I just went to my backup. I had multiple options, but my Time Machine backup was right there on my desktop, so in less than a minute I was back in business with a fully restored image file.
One more very specific case
No example illustrates how backup obsessed I am than my workflow on a trip that requires flying. Since I’ll be so far from my whole home office backup paradigm, when I fly I carry a second 4TB SSD drive. After uploading the images onto my regular image drive and into the Lightroom catalog, I copy that folder onto that second drive, and hide it deep in my suitcase. If, God forbid, someone breaks into my room and steals my (insured) camera and computer bags, it’s unlikely they’ll find the second backup drive.
When I fly home, I make sure my images are in three different places: the primary image drive is in my computer bag over my shoulder and then under the seat in front of me; the backup drive is safely tucked into my checked suitcase; the SD cards containing the original raw files are in my cameras, which are in my camera bag on my back, and then in the overhead bin. The only way I’ll lose all three is if the plane goes down, in which case I likely have bigger problems.
About this image

Sunrise Gem, Diamond Beach, Iceland
The day after our aborted visit to Diamond Beach, this year’s Iceland workshop group enjoyed a far more successful return visit. It seems every time Don Smith and I bring a group here, it’s a little different. Last year there was much less ice; the year before the surf was so rough that we didn’t dare get close to the water—and still ended up being too close. Some years the advancing and receding surf gently wraps each ice chunk, and other years most of the ice is high and dry.
This year the tide was out, so most (but not all) of the ice was up the beach and rarely touched by the surf. I started here trying to get the standard Diamond Beach motion blur shots on the few ice cubes the waves reached, but when the sun arrived turned my attention to the much larger ice slightly (20 feet) inland from the waves’ farthest approach.
I love the way the ice lights up with the warm hues of the sun’s first rays, so to fill the screen with this beautiful translucent natural ice sculpture, I went with my 12-24 lens, dropped low, and positioned my tripod no more than two feet away. Because I was going for a sunstar, I dialed to f/22, then spent the time waiting for the sun micro-positioning myself to get all the elements in place. I liked the smooth rocks embedded in the black sand, and though that distant block of ice in the upper left was quite tiny at 12mm, I knew as soon as the sun hit it, it would stand out enough to create a little visual interest in that corner of the frame. I put the top of my frame just above the clouds to minimize the amount of blank sky.
As soon as the sun popped out, I started shooting. On my camera’s LCD the foreground looked nearly black—not just the sand, but the shaded part of the ice as well. But I didn’t want to blow out the sky, and knew my Sony a7RV well enough to be confident I could pull up the shadows in Lightroom/Photoshop. I’d love to say that the feathery sun-kissed waves were intentional, but I didn’t even notice them until I started working on the image.
Don Smith and I return to Iceland in 2025
Here Comes the Sunstar
Click any image to scroll through the gallery LARGE


Get Centered
Posted on February 27, 2024
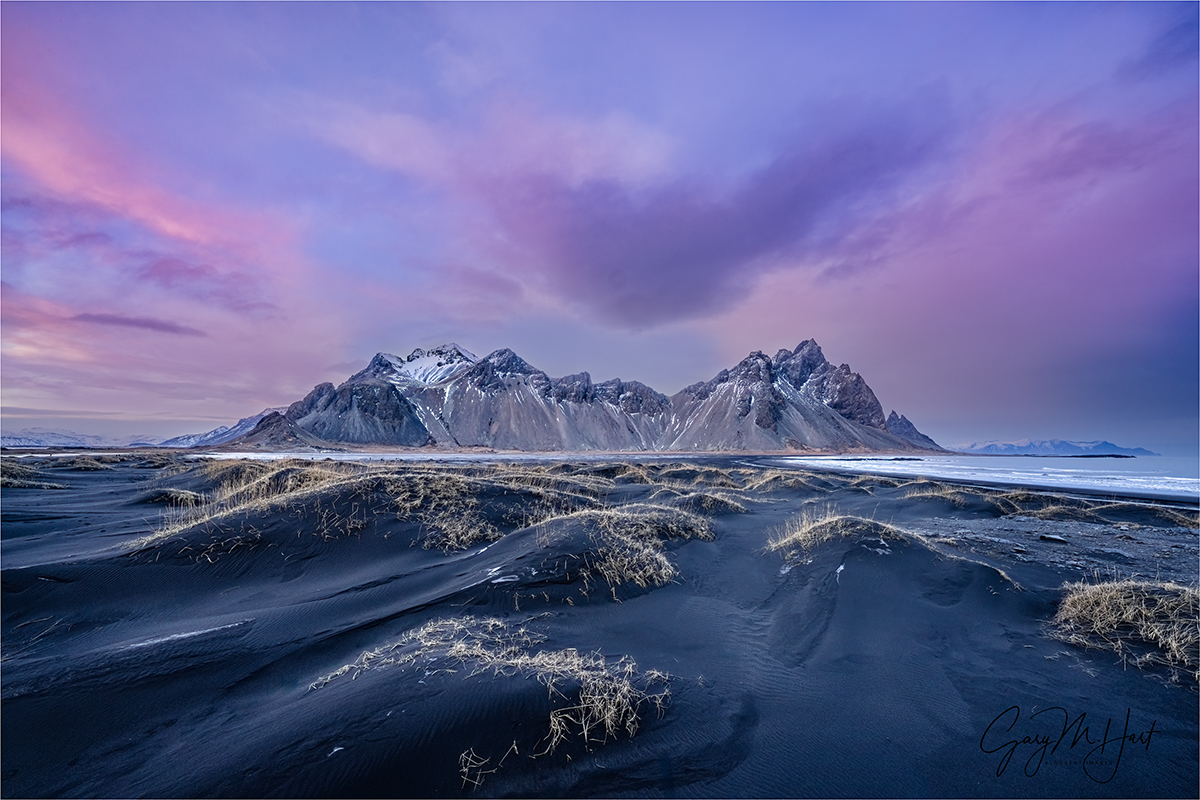
Winter Twilight, Vestrahorn, Iceland
Sony a7R V
Sony 12-24 GM
1/8 second
F/11
ISO 200
This day started with one of the most disturbing experiences of my photo workshop life, so finishing with a sunset like this was comforting relief for the entire group.
But before I get to the sunset, let me wind the clock all the way back to our short drive to Diamond Beach for this morning’s sunrise. In February Iceland’s sunrise arrives at around 10 a.m., but with the high latitude also comes extremely long twilight hours, so we were on the road for the 10-minute drive to the beach at 8:30, stomachs full of breakfast. The sky was still quite dark, but hints of a beautiful sunrise were already creeping up along the eastern horizon as we drove. In a workshop filled with special, Diamond Beach is extra special, so despite the darkness outside, everyone was pretty energized as we bounced along the highway.
Gazing through the windshield from my seat near the front of our (small—26 passengers) bus, I caught sight of a dark shadow approaching from the left. Simultaneously, someone in the back yelled, “Look out!”, and our driver Vincenzo braked hard. The shadow was just ambling, showing no sign of awareness of its immediate peril, neither slowing or speeding as it moved About the time my brain identified the shadow as a reindeer, it was directly in front of us and smack! From the first instant of the reindeer’s appearance to our bus’s direct hit, I’d guess less than a second elapsed.
We were traveling around 45 miles per hour, a pretty reasonable and safe speed in Iceland’s icy darkness. We’ve all been in accidents (right?)—almost without exception the situation changes from perfectly normal to dire before your brain has time to register what’s happening. Given that, I have to say that Vincenzo did an amazing job: Instead of following the normal human reflex to swerve (as I’m afraid I might have done), he simply braked quickly and continued forward into the reindeer. Textbook. While not the best result for the reindeer, Vincenzo’s response on that frozen highway almost certainly spared us a rollover and many injuries, perhaps worse.
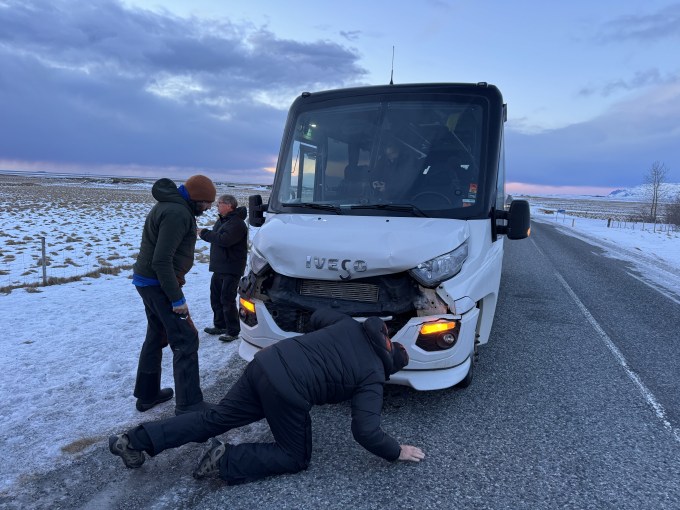
Bus reindeer damage. I took this picture quite a while after the accident, shortly before we tried to limp home.
We immediately pulled over, all pretty shaken, but no one more-so than Vincenzo. After a minute or two to recenter, the four group leaders (Iceland guide Albert Dros, driver and photographer Vincenzo Mazza, Don Smith, and me), exited to assess the damage. There was no doubt that the reindeer was down for the count on impact, a small comfort to know that it didn’t suffer. But when I saw our headlights still shining bright before exiting, I’d held out slight hope that damage to the bus would be cosmetic and not impact our trip. No such luck.
In addition to the obvious damage to the grill (which doesn’t really show up well in the picture), we were losing coolant. Only a few minutes from Diamond Beach, we briefly toyed with the thought of continuing on to sunrise and letting Vincenzo deal with the damage while we photographed, but ended up making the incredibly wise decision to cut our losses and turn around to attempt the 3 mile drive back to our hotel where we could regroup.
Even poking along at around 5 MPH, and despite the frigid outside temperature, the bus’s thermostat needle immediately started creeping northward, toward the red. I know Vincenzo was watching its climb as closely as he watched the road, and after about 10 minutes he pulled us to a stop to let the engine cool. After about a 15-minute respite, we (fingers crossed) fired up the engine and limped the rest of the way back—3 miles in 45 minutes.
Back at the hotel, immediate problem solved, we still needed to figure out how we were going to complete the second half of our workshop minus our trusty chariot. But within a couple of hours, Don and I got word that our tour company had pulled some strings and our replacement “bus” would be delivered by 1 p.m. We were back in business.
The arrival of this replacement van might be a good time to remind you that beggars can’t be choosers. Normally Don and I cap the Iceland workshop at 12 participants, but since this group would be led by 4 qualified photographers, and we knew our bus would be more than big enough for everyone, we went to 14 participants. With the 4 leaders, that meant 18 people in our 26-passenger bus—no problem, especially since the bus had ample storage. Sadly, that calculus didn’t account for an encounter with a reindeer, and the reality that our replacement vehicle would turn out to be more of a large van, with seats only for 21, and very limited storage space—more designed for day excursions than multi-day trips.
Having missed just the morning’s sunrise shoot, that afternoon we motored off to Vestrahorn in our new wheels, certainly cozy, but (more or less) comfortable. Since we were already using virtually every inch of available space for our bodies and camera bags, we all scratched our heads at how, when we checked out in a couple of days, we were going to squeeze all of our luggage in to our new ride. When questioned, Albert simply answered that we’d do it because we had no choice, and I chose not to stress about it. (Much.) And there was still photography to be done!
Vestrahorn is rivaled only by Kirkjufell on the list of recognizable Iceland peaks. Towering about 1500 feet above the North Atlantic, Vestrahorn’s intrusive origins distinguish it from many of its mostly extrusive Icelandic neighbors. The mountain’s rock formed about 10 million years ago, when subterranean volcanism injected iron- and magnesium-rich magma from Earth’s mantle into the crust above. Protected by this crust from exposure to the much cooler atmosphere on the surface, this magma cooled slowly to form Vestrahorn’s hard, crystal-infused core. Over time this hardened core was pushed upward by the region’s relentless geological forces. With this increasing elevation, the much softer crust entombing the mountain gradually eroded away, leaving only the peak we see today.

Vestrahorn Reflection, Stokksnes Beach, Iceland (2021)
On any day, Vestrahorn is a photographer’s delight. Though visually quite different, I liken the photography experience here to the Alabama Hills beneath California’s Sierra Crest, where an infinite variety of foreground composition possibilities stretch beneath the dramatic mountain peaks. At Vestrahorn, the foreground variety comes courtesy of black sand dunes, icy ponds, faceted ice patterns, and the mirror reflections left behind each time the surf retreats from gently sloping Stokksnes Beach.
I like to get around to everyone in the group before starting my own photography, but more than any other location in Iceland, here people seem to scatter like shotgun pellets. After about a half hour of wandering I finally gave up on finding everyone and started looking for my own foreground to put with the mountain. A sucker for reflections, I normally beeline to the beach, but with the tide out I decided this might be a good day to try the dunes. I’m so glad I did.
I poked around the dunes, searching for a grouping I could compose into something coherent and complementary, and that hadn’t been soiled by footprints. After about 20 minutes I landed at the spot you see in my image at the top of the post and didn’t move more than 20 feet for the rest of the evening.
As you can see from the image above, Vestrahorn this evening was a particular treat. One of the many reasons I like Iceland so much in winter is the snow decorating the peaks. And though I’ve seen Vestrahorn with much more snow, I found the peak’s snowy accents this evening especially appealing (compared to the barren slopes that dominate in Iceland’s warmer months). But the evening’s real show came courtesy of the interplay of clouds and light above the peak as the sun dropped.
Because the sun ascends and descends the sky at such a shallow angle at this high latitude, sunrise and sunset seem to unfold in slow motion. When the reds fired up this evening, much of the color above the mountain was obscured by clouds. But because the really nice color hung-in for at least 30 minutes, the clouds had more than enough time to thin and spread enough to allow the late light through, eventually blanketing much of the sky with persistent pink. By the time it reached this stage, I’d become so familiar with all the compositional opportunities in my little corner of the island that I had a pretty good idea of how I wanted to handle it.
I fell in love with the foreground dunes early on, and after it became pretty clear that the color would stretch far overhead, switched to my 12-24 lens to include as much of the entire scene as possible: dunes, mountain, sky. But how to handle a sky that rivals a classically beautiful landscape? There are very few absolutes in photography, but one of the most damaging “absolutes” is the admonition to never center the horizon, or your subject on the frame’s horizontal or vertical axes. This usually well-intended edict might have value to the raw novice who automatically centers every horizon and subject, but can actually be damaging to insecure neophytes not confident enough to trust their own creative vision. If centering feels right, go for it!
My own “rule” is to decide where most of the scene’s visual interest resides, foreground or background, and allocate a proportional percentage when I set my horizon. Sky better than the foreground? The sky gets most of my frame. Foreground better than the sky? The foreground gets most of my frame. Both sky and foreground too beautiful to decide? I have no problem splitting my scene right down the middle.
Reflections are probably the most frequent example of scenes that can be split down the middle, but this choice isn’t limited to reflections. And as far as centering a subject is concerned, I don’t hesitate when I want it to dominate my scene, or when there’s nothing else in the frame to balance a dominant subject. If you’re not sure, or simply don’t trust your own instincts, just do it both ways and decide later.
Epilogue
Striking an animal leaves a persistent knot in the pit of your stomach. We all felt it, but no one more than Vincenzo, who told us later that he’s never struck anything with a vehicle—person, animal, or other vehicle. He was pretty shaken, but I think having a job to do, plus the interaction with, and support of, the rest of the group distracted him enough to make it through the trip. For the rest of us, knowing we’re all dealing with this shared trauma helped a lot, as of course did being the distraction of wonderful photography.
Another unexpected bonding opportunity came from the impossible solution Albert and Vincenzo devised to get us back to Reykjavik with all of our stuff. Without going into great detail (lest we get them into trouble for violating some kind of Iceland vehicular safety code), no person or gear was left behind or strapped to the outside of the vehicle, and we each had our own seat (and seatbelt). Hardly a square-inch of space, horizontal or vertical, went unused, and even after getting the group choreography polished, entering exiting the van still took at least five minutes. But we made it, and I think everyone would agree that the tight quarters became a catalyst for much fun and laughter that proved just the necessary medicine.
Join Don Smith and Me in Iceland Next Year
Sublimely Centered Subjects
Click any image to scroll through the gallery LARGE


A Shot in the Dark
Posted on December 19, 2023

Nature’s Light Show, Aurora Over Dyrhólaey Coast, Iceland
Sony α1
Sony 12-24 GM
6 seconds
F/2.8
ISO 6400
At its best, still photography reveals aspects of the world invisible to, or overlooked by, human vision. In nature photography, we create these visual revelations when we use an extremely fast exposure to freeze the intricate detail of a lightning bolt that’s a memory before our brain registers it. Or when we dial up a long exposure to turn pinpoint stars into symmetrical arcs that reveal Earth’s rotation.
As a lifelong admirer of the night sky, I’m a huge fan of the camera’s ability to see in the dark far better than I can, extracting stars and celestial color too faint for my eyes. This is possible because cameras can accumulate light over an extended period, and because the camera’s ability to “see” color is less dependent on the amount of light it captures than the human eye is.
No subject more clearly demonstrates the camera’s light gathering ability better than the Milky Way. A relatively faint ribbon of light in even the darkest sky, a high ISO (extremely light sensitive), large aperture, multi-second exposure (30 seconds or less to minimize star streaking) brings to life the exquisite color and detail of starlight infused with interstellar dust and gas.
This ability to accumulate light also helps the camera extract color from apparent darkness. But just as important to the camera’s light gathering advantage over the human eye is the way it does it. The human eye uses a collaboration of rods and cones to collect light, with the rods doing the heavy lifting in low light, pulling enough monochrome information for us to discern shapes, while providing little help with color and depth. The cones that complete the scene with color and depth information require much more light to do their job. But a digital sensor, though blind to depth, captures photons using tiny photosites specifically designed to discern color.
With the first DSLRs, way back in the early 2000s, successful night photography required help from external light, like light painting with artificial light (which I never do) or moonlight (which I did all the time). But sensor technology has improved steadily over the years, not just the sensors’ resolution, but their light capturing ability too. Today I don’t hesitate photographing dark sky, the darker the better. Nevertheless, despite many years photographing the night sky, it wasn’t until 5 years ago that I got to photograph an aurora.
In January of 2019 Don Smith and I had traveled to Iceland to scout for a future photo workshop. We chose winter to ensure the longest, darkest nights for the best chance to view an aurora. Having seen thousand of pictures of the northern (and southern) lights, I believed I had an idea of what to expect, but I had no idea. No. Idea.
Before I start raving about the camera’s ability to photograph an aurora’s unseen color, let me just say that no picture can do justice to the experience of witnessing an aurora in person. I’m not talking about the green, horizon-hugging glow that lucky high-latitude Lower-48 residents enjoy from time to time (that’s still worth staying up and freezing for, BTW), but an actual sky-spanning dance of light beams, waves, and swirls. Rivaled only (in my book) by a total solar eclipse and a brilliant comet, a brilliant aurora display might possibly be the most beautiful thing you’ll ever witness in Nature.
But, despite lacking the dynamics of personal aurora experience, a camera does do better than the eye in one important aurora aspect: color. That’s because to the naked eye, many aurora displays aren’t bright enough to engage the cones and appear monochrome to our eyes. A camera, on the other hand, reveals auroras in all their kaleidoscopic glory. And though color in an extremely strong aurora is indeed plainly visible to the unaided eye, no matter how strong the aurora, the camera will always “see” more color than we will.
Since that first visit, I’ve returned to Iceland most winters, and have viewed many beautiful northern lights shows. Each was unique and beautiful in its own way, but hold a gun to my head and ask me to pick a favorite, and I think it would be a tie between back-to-back nights early this year (January)—first at Kirkjufell, then at Dyrhólaey on the South Coast. The Kirkjufell night was special because it featured a spectacular display above an Iceland icon. The Dyrhólaey show, while lacking the instantly recognizable foreground of the previous night, was even brighter and more expansive, at times spanning the entire sky.


I blogged about both nights earlier this year:
- Kirkjufell: It’s All About the People
- Dyrhólaey 1: Lights, Camera, Action!
- Dyrhólaey 2: Blessings
The image I’m sharing today is another one from the Dyrhólaey night. With our eyes we could actually see a little of the green, but not the red. And as beautiful as this image is, even with my 12 – 24 lens at its widest, it didn’t come close to capturing the entire horizon-spanning display.
One more thing
When there’s not enough light for visible color, colors in the night sky become the photographer’s processing choice. For my Milky Way images, that’s mostly a matter of adjusting my white balance in Lightroom until sky color feels right. I find a lot of other photographers’ night images too cyan for my taste, and if you look at my older night images, you’ll see that I used to skew them fairly blue. But in my recent night images, I’ve gone for something closer to black with just a hint of blue/violet, which is what I’ve done with the background sky in this image.
The color of the northern lights is similarly subjective, and starts with the color temperature my camera’s auto white balance chooses. Since I don’t have as much experience photographing auroras as I do the Milky Way, I’ve started identifying northern lights images that I like, taken by other photographers, then try to adjust my own images’ white balance in Lightroom to something that comes close to that. But looking at the gallery below, with greens that skew toward yellow (warmer), and some that skew toward blue (cooler), it’s clear that this is still a work in progress. But it does appear that I’m moving a toward cooler aurora images. And believe it or not, none of my northern lights images have any saturation added because they don’t need it—just giving the scene a little more light than my eyes see is all that’s necessary to bring out this eye-popping color.
The Lights Fantastic
Click any image to scroll through the gallery LARGE


Image Building (the old fashioned way)
Posted on May 1, 2023
Sun and Surf, Dyrhólaey, Iceland
Sony a7R V
Sony 24-105 f/4 G
ISO 100
f/20
1/20 second
Today it’s possible to open an app on your computer, type in a few descriptive terms, and faster than you can take a sip of coffee your very own beautiful image will appear. No frozen extremities, missed meals, or sleep deprivation required. What could possibly be better than that?
I’ll tell you what’s better: the frozen extremities, missed meals, and sleep deprivation necessary to witness Nature at its best, and to remind me that the best things in life are even better when a little sacrifice is involved. There’s simply no substitute for the multi-sensory opportunity to worship with nature—coming away with a beautiful image is just icing on the cake of the experience of simply being there.
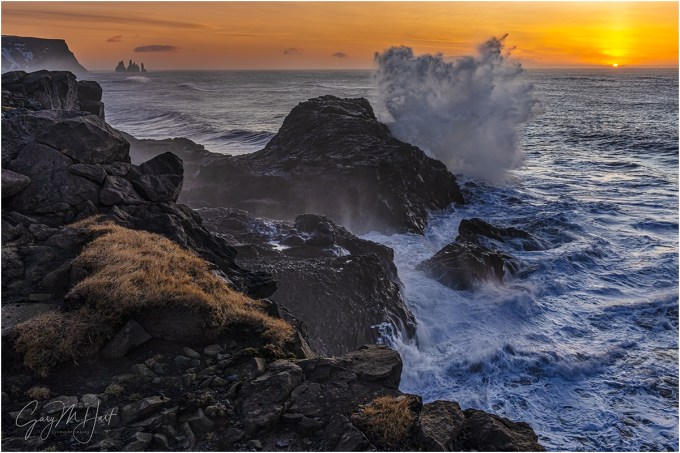
Icing this winter morning’s cake involved more than a little effort, as well as a good degree of physical discomfort. Dyrhólaey, on Iceland’s South Coast, has a network of short but steep trails leading to broad vistas of rugged lava cliffs, a long black sand beach, several sea stacks (including distant Reynisdrangar), and lots of open sea. (It’s also the location of a truly epic aurora show about 10 days earlier, but that’s a different story.)
Since this was a week or so into a workshop (the second of two Iceland workshops Don Smith and I did this past January), and Dyrhólaey is so spread out, after the brief location orientation everyone had scattered quickly to search out their own scene, leaving me to my own devices. Iceland’s interminable gray winter twilight was already underway when we arrived, but actual sunrise was still an hour away, so there was no real rush.
This morning’s temperature (F) and wind (MPH) were both in the teens, but I was bolstered by multiple layers covering virtually every square inch of delicate California skin. Not immediately drawn to any one scene, I was quite content to wander the trails, taking in the view. On my travels I connected with as many in the group as possible, keeping my eyes open for potential images along the way. Eventually I found myself atop the highest point, enjoying a bird’s eye view of the violent surf’s relentless pounding. I stood there at least 15 minutes, completely mesmerized by waves arriving from all possible directions, each one reacting to the rocks a little differently than the waves preceding it.
This surf was on a different scale than anything I’d seen in California or Hawaii—more violent, and clearly more determined to punish anything in its path. Each wave exploded impressively onto the rocks, but occasionally just the right combination of size and direction resulted in a nuclear explosion that mushroomed far enough skyward to obscure some of the sky.
While the sky lacked clouds to add visual interest and catch sunrise color, I recognized the potential for a sunstar when the sun finally crested the horizon. With this thought in mind, I managed to pull myself away from my perch and move along the cliff’s edge, identifying and organizing the various elements for a possible composition.
I knew the sun would be the strongest background element, and decided that putting it on the right of my frame would provide the best foreground. Widening my frame to 27mm allowed me to balance the sun with Reynisdrangar (the 3 sea stacks in the distance). With that framework in place, I moved around looking for the best combination of close foreground that would also allow me to include the large rock with the greatest potential for a big wave. Since the sky wasn’t especially compelling, and I really liked the surf and rocks below me, I minimized the sky in favor of the much more interesting foreground.
Hoping for a sunstar, I stopped down to f/20, which had the added benefit of extra depth of field cushion. I focused on the large grassy patch. With my composition in place, I just stood back and waited for big waves, clicking each time one reached its apex. The biggest waves were few and far between, but I crossed my fingers for one to land while the sun was still on the horizon.
Turns out I got one really big wave—not the biggest I’d seen, but big enough. And as you can see, haze on the horizon meant the sunstar never materialized, but it also kept the sun from washing out the sky’s rich gold sunrise hues. (I actually think I like it better without the sunstar, which might have overpowered the rest of the scene.)
This is probably not a picture that will make me rich, but I like it not only for whatever aesthetic value it might possess, but also for the reminder of this beautiful Iceland morning, the sacrifices we nature photographers make in pursuit of our passion, and for the way my effort to assemble the scene’s disparate elements into a coherent scene actually came together (never a sure thing).
Assembly Required
Click any image to scroll through the gallery LARGE


Distilling the Essence
Posted on April 2, 2023

Frozen, Skógafoss, Iceland
Sony a7R V
Sony 100-400 GM
ISO 100
f/10
1/13 second
The art of subtraction
Presented with a complex world, the nature photographer’s job is to identify a scene’s visually interesting elements and figure out how to use them in an image. While most photographers have no problem seeing what to include in their images, many struggle with what to leave out. But the best pictures usually work at least as much for what’s not in them as for what’s in them.
That’s because, as much as we seek beauty to add to our images, photography is ultimately an art of subtraction. Our ability to ruthlessly subtract elements that, despite their inherent visual appeal, don’t serve the image is an important skill that’s worth cultivating.
When I look back at old images that somehow ended up pleasing me less than the scene excited me when I photographed it (we’ve all been there, right?), I see now that often the problem was that I included too much. The product of my failure was an image with visual busyness that distracted from the main point, or that completely lacked a point, and confused viewers: “What am I supposed to be looking at here?”
As my photography evolved, I started identifying ways to distill complex scenes. One approach is through careful use of exposure variables to manage what I call photography’s “creative triad”: motion, depth, and light—motion blur to smooth turbulent or choppy water; focus blur to soften background and foreground distractions; and silhouette or high key exposure to erase unwanted elements and simplify the scene to just color and shape.
But even before working the creative triad, distilling a scene to its essence requires ruthless (there’s that word again) cropping—simply knowing what to put in, what to leave out, and the confidence (courage) to do it. Start by identifying the elements in the scene that draw the eye. Think in terms of implicit connecting lines that define their relationship to each other. Move around—forward/backward, left/right, up/down—until your prime elements feel organized.
If you’re still not feeling a connection between all of your prime elements, it’s time to start eliminating things—you can always return to that beautiful subject you composed out and feature it in another composition. And if you’re still not finding visual coherence, don’t be afraid to just click an image, stand back and evaluate it on your camera’s LCD screen, and adjust. Then repeat as necessary.
Try this
One simple way to exercise this skill is with the Crop tool in Photoshop or Lightroom. Start with any image (your own or someone else’s—the goal is to train your eye, not to create an image you’ll use), open it in your image processing software of choice (I use Photoshop for this exercise), set the Crop tool to 2/3 aspect ratio (or whatever your camera uses), and see how many new images you can find in the original. Whether the source image was horizontal or vertical, use both orientations of the Crop tool. Again, this is an exercise to train your eye, not to create a usable image, but I’m confident that you’ll find this new vision translates to your viewfinder when you’re in the field.
You can do the same thing on location with a telephoto lens. After you feel like you’ve exhausted all of a scene’s wide options, remove the camera from the tripod, increase your focal length by zooming tighter or switching to a longer lens, and slowly pan with your eye to the viewfinder. Closely monitor your reaction to what you see and honor any urge to stop. The goal isn’t to forgo wide angle compositions, it’s to help identify the scene’s essence, those visual aspects of the scene that matter most. I think you’ll be surprised by what you find (what your eyes originally missed).
For example

Winter Rainbow, Skógafoss, Iceland
Too often we get so caught up in a scene’s grandeur and miss the details that make it special. Most nature photographers when presented with a grand scene go straight to a wide angle lens—a perfectly valid way to start. The problem is, once we feel like we’ve nailed the wide shot, we move on—even if not physically, then at least mentally.
After a long drive from Iceland’s Snæfellsnes Peninsula, still basking in the thrill of the previous night’s aurora show (and oblivious to the show we’d enjoy that night), the Iceland workshop group wasn’t really thinking about much but getting comfortable at our hotel in Vik. But anyone arriving at Skógafoss near Iceland’s South Coast on this January afternoon couldn’t help being excited by the scene’s beauty.
Always an impressive waterfall for the massive amounts of water it dispenses, recent extreme cold (even for Iceland) had turned the abundant mist saturating the surrounding rocks into an icicle convention. But the real eye candy that grabbed everyone’s instant attention was the rainbow ebbing and flowing with the wind above the fall—one second it was there, the next it was gone.
Reinvigorated, we all charged from the bus and “rushed” as fast as our crampons could navigate the frozen path. Wanting to capture all this scene’s beauty, I instantly reached for my Sony α1 which was preloaded with my Sony 16 – 35 f/2.8 GM lens. Each time the rainbow appeared I clicked like crazy, trying a variety of wide compositions and continuing until shadow overtook the fall and the rainbow disappeared for good.
It would have been so easy to be satisfied with my bounty and retreat to the comfortable warmth of the bus. But before leaving I took a few seconds to scrutinize the surrounding ice more closely. And the longer I looked, the more I realized that I was seeing something truly special. I grabbed my Sony a7R V, attached my Sony 100-400 GM lens, and started panning the scene, finally stopping on this beautiful natural ice sculpture.
After attaching my camera to my tripod, I spent the next 20 minutes repositioning, then deliberately clicking and refining, until I was satisfied that I’d found the right location and framing. In the wider image with the rainbow, this section of ice was still illuminated by low, warm sunlight that created deep shadows and bright highlights. But by the time I landed on this composition, the sunlight was gone and all the ice was bathed in cool, soft shadow with minimal contrast.
This is another one of those simple images that probably won’t generate a swarm of social media attention, but it makes me happy because it taps one of the prime reasons I’m a photographer: to reveal Nature’s exquisite intricacies that are often overlooked in favor of more in-your-face beauty.
Workshop Schedule || Purchase Prints || Instagram
Essence Distilled
Click any image to scroll through the gallery LARGE


