Eloquent Images by Gary Hart
Insight, information, and inspiration for the inquisitive nature photographer
Iceland, Weather or Not
Posted on February 14, 2025

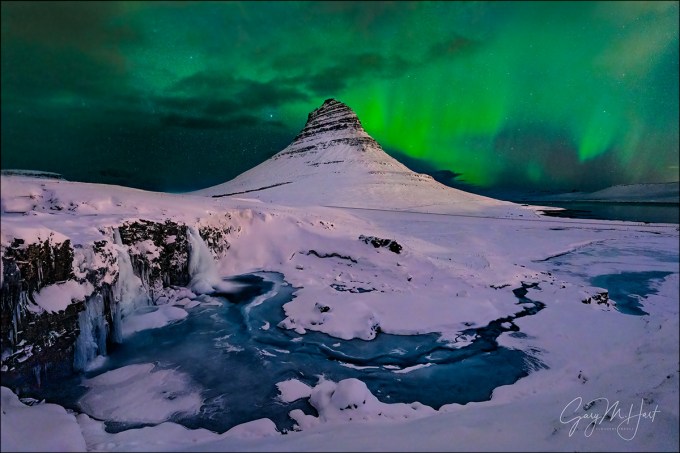
The Green Night, Aurora Above Kirkjufell, Iceland
Sony α1
Sony 16-35 GM
10 seconds
f/2.8
ISO 3200
As I’ve probably said a million times before, and likely will say a million more times, the best weather for photography is the worst weather to be outside. I mean, why else would Don Smith and I schedule a workshop for Iceland in January?
Of course our number one reason for an Iceland winter trip is the northern lights, which means winter clouds aren’t always our friend. But when I’m not waiting for the aurora to fire up, I love the way Iceland’s storm clouds are illuminated (all day) by beautiful low-angle sunlight (the sun never rises above 10 degrees during our visits). There are Iceland’s 2-hour winter sunrises and sunsets, its storm-churned surf, and ocean to mountaintop snow-covered landscape. And a surprising truth I’ve come to appreciate over the years is that, while Iceland in January is indeed quite cold, it really isn’t as cold as most people expect. (I swear.)
In this year’s workshop, that “not as cold as you expect” claim was challenged on our very first day of shooting, when we piled out of the bus at our first stop into 5°F air. Fortunately, that’s the coldest we experienced all workshop, and great photography creates an inexplicable warming factor that seems to make even the harshest conditions more tolerable. And regardless of the quality of the photography, even temperatures as low as 5°, (especially without wind) are quite tolerable with the right clothing.
My first year I attacked Iceland’s cold with copious layers of conventional California cold-weather gear. That worked well enough, but following each subsequent visit, I refined my non-California winter-wear (warmest) to the point where I’m now armed with an entire Iceland ensemble that rarely comes out for my domestic trips.
For example, a few years ago I decided that I was tired of having to layer a rain-shell on top of my (extremely warm but not waterproof) puffy down jacket, not to mention having to deal with a chronically cold butt exposed by a jacket that barely hung below my belt (yes, I was still wearing pants). So I sprung for LL Bean’s warmest waterproof down parka that covers me all the way down to mid-thigh. I still travel to Iceland with a lightweight, waterproof down jacket that’s compact enough to stuff in my camera bag and is ideal for milder days and short jaunts from the bus to a restaurant or hotel.
This two-way system—one heavy-duty option for the coldest, windiest conditions; another that’s lightweight but still warm enough for normal daily activity—works really well for me in Iceland. In addition to two jackets, I also have a couple of hats, pairs of gloves, and boots, that I can choose between, depending on the conditions. And, unlike many in this year’s group, I managd to pack everything into one (large) suitcase that I (barely) keep below Icelandair’s 23 kg (50-ish pounds) weight limit.
This year’s difference-maker upgrade was my new warm boots. I’m a cold feet (and fingers) kind of person, cursed with digits that never seem to be warm enough. Where my boots are concerned, it’s not so much the walking that’s a problem, but photography requires a lot of standing around in frigid cold (especially at night, when the aurora is dancing). In previous years I’ve gone more conventional, trying an assortment of insulated hiking boots and thick wool socks, upgrading to something warmer after almost every trip, vowing that next year will be better. The result has been persistently cold toes, and a boot-graveyard in my garage that rivals Imelda Marcos’ closet.
This year I tried something different, switching to super-warm, waterproof, lined Sorel work boots. But that was just the start. In New Zealand last July, I stocked up on (wait for it) possum fur socks. Possum fur (it’s actually a possum/merino blend) is absolutely the warmest material I’ve ever worn (also soft and lightweight), and it’s everywhere in New Zealand. But before you start visualizing acres of bred possums, caged and awaiting slaughter, and imagine that I’m supporting the heartless New Zealand possum-breeding industry, you need to know New Zealand’s possums (which are quite different from American possums) are a non-native scourge that’s decimating the country’s native bird population (among other things). A massive effort is underway throughout the country to eliminate possums by 2050—the only possum fur apparel I purchase in New Zealand is a byproduct of possums trapped for eradication (they were doomed anyway). But anyway…
And as if new boots and socks weren’t enough, I also sprung for a few thin merino wool liner socks from REI, to wear under my possum socks (no, possum don’t wear socks—you know what I mean). After returning last week following nearly two weeks in Iceland’s winter cold. After that first morning, I exited the 5° chill confident that my popsicle toes days were behind me.
Though the temperature warmed slightly throughout the day, by afternoon the wind had picked up and we started to see a few clouds heralding the approach of the storm that would batter us the following day. Nevertheless, after dinner we drove out to Kirkjufell hoping for some northern lights because in Iceland in winter, you always have a northern lights plan.
Seeing clouds from the Kirkjufell parking area, it would have been easy to pack it in and return to our warm hotel. But a few breaks were enough to give us pause, and when quick test snaps revealed green sky behind the broken clouds, we decided to stay and shoot for a while. We shot from the parking area, using our bus as a windbreak.
What started as a low expectation, “What the heck, we’re here anyway” shoot, turned into a very productive evening of photography, and a harbinger of the great stuff in store. It also gave us an opportunity to get the group up to speed with night photography—some had never done it before, while others were pretty rusty.
It’s especially fun when a group gets to witnesses something exciting. Many in this group had never seen an aurora, and though the color wasn’t bright enough to see with our eyes, everyone was pretty thrilled to capture images that featured Iceland’s most iconic mountain. But the real star this evening was the clouds, which built and raced behind Kirkjufell, but never completely filled in the window to the sky and aurora behind the peak.
After we’d finished, Don and I talked about the relief we felt getting at least enough aurora to please people, but agreed that more would be better, because those who’d never seen a good display didn’t really understand what they were missing. It turns out we didn’t need to wait long, but I’ll get to that in a future post.
Join Don Smith and Me in Iceland
Weather or Not
Click any image to scroll through the gallery LARGE


It’s All About the People
Posted on March 6, 2023

Swoosh, Northern Lights Over Kirkjufell, Iceland
Sony a7R V
Sony 12-24 GM
5 seconds
F/2.8
ISO 6400
As I’ve made abundantly clear in earlier blog posts, 2023 started with my busiest ever workshop stretch. But I’ve finally reached enough of a lull in my schedule to start processing the fruits of all this labor—not nonstop, but maybe one or two images a day if I’m lucky. Part of me feels a little overwhelmed by how how long it could take at that rate, especially since I’m just two months into the year with many more trips ahead. But another part of me looks at the things I’ve seen and photographed and remembers how uncertain I was when I turned my stable life upside-down to start leading photo workshops. If you’d have told me that in 17 years I’d have more images than I have time to process, I’d have taken it with no questions asked, so no complaints.
To say that leading photo workshops has exceeded my expectations would be a vast understatement. I came into it with 20 years of technical communications experience (teaching a programming language, tech writing, and tech support), and thirty years as a serious amateur photographer. And as a California native who grew up camping, backpacking, and (later) photographing all of my initial workshop locations (Yosemite, Eastern Sierra, Death Valley), I was intimately familiar with my subjects. Piece of cake, right?
That said, since photo workshops weren’t really much of a thing 17 years ago, I was totally winging it when I started. Having never actually taken a photo workshop myself, I didn’t even have a template for how it should be done, so I just structured mine the way I thought I’d like a workshop to be run if I were to attend one. Since then I’ve learned so much—and of course much of what I’ve learned is stuff I didn’t even know that I didn’t know. (For example, walkie-talkies seemed like a good idea, so I invested in 15 of them and now have a box of 15 once-used walkie-talkies somewhere in my garage.)
A big unknown for me was the people part of the equation—I like people, but (perhaps you’ve noticed) people can be difficult. Would every group have a difficult person (or two, or three, or…), and how would I handle them? I mean, no longer would I be lecturing programmers and IT geeks in an air conditioned training room, delivering a canned presentation I’d offered countless times before. Leading photo workshops would mean herding a group of individuals with a broad range of fitness, skill, equipment, expectations, and needs, through remote areas in extreme, unpredictable conditions. What could possibly go wrong?
It turns out, not too much. First, I’ve always felt that my best photography memories often come in the most extreme conditions. And guess what—it turns out most other photographers feel the same way, and will gladly endure extreme conditions in exchange for great photography. They’ll also forgive difficult conditions that prevent potentially great photography: a downpour that makes photography impossible, clear skies that bathe beautiful scenery in harsh light, clouds that block a much anticipated moonrise, and so on.
But what about basic human diversity? Surely attempting to integrate a bunch of people with so many differences would be a recipe for disaster. Concerned about mixing struggling beginners with impatient experts, I originally toyed with the idea of minimum equipment and experience requirements. What a mistake that would have been. While most of my workshops include photography skills ranging from enthusiastic beginner to experienced pro or semi-pro, rather than generating tension, these differences have created a synergy, as it turns out most experts love sharing their knowledge and experience with those who need it.
Of course diversity encompasses more than photography skill. I’ve had workshop participants from nearly every continent (no penguins so far), and (I’m pretty sure) every state in the U.S. My workshop participants have been, in no particular order, musicians, computer professionals, artists, physicians, writers, lawyers, corporate executives, electricians, accountants, bond traders, active and retired military, other professional photographers, real estate agents, clergy, stay-at-home dads and moms, a classical composer, a Hollywood graphic artist, and a Hooters girl (a very sweet young lady who would completely dash any preconceived impression of what that might mean). In one workshop I had a rocket scientist and a brain surgeon. I’ve gotten to know a woman who biked across America, and a man who hiked the entire Pacific Crest trail. I’ve had (many) gay and lesbian couples, outspoken liberals and conservatives, a couple of people in a wheelchair, a man in the final stages of cancer, the patriarch of a family that endured one of America’s most public (and irrational) scandals, and a 9/11 survivor. So it’s not hyperbole to say that I’ve learned as much from my students as they’ve learned from me.
The common denominator connecting all this disparity? A passion for photography that unites strangers long enough to overcome superficial differences and appreciate deeper similarities: a love of family, friendship, nature, sharing, and laughter.
Of course it hasn’t all been a Disney movie. One question that comes up from time to time is whether I’ve ever had anyone attend a workshop who I would not allow in a future workshop. For a long time my answer was an immediate and emphatic, No, everyone’s been great. About 8 years ago one person changed that answer, but fortunately that turned out to be a one-off situation that hasn’t been repeated. (And thankfully that person has not attempted to sign up for another workshop.)
The bottom line is that a successful photo workshop is more about its people than it is about the location and conditions. My job is to create an environment that fosters connection, guide them to the best photography possible, then step back and let the participants themselves enjoy each other.
About this image

Swoosh, Northern Lights Over Kirkjufell, Iceland
Of course great locations and conditions can certainly contribute to the happiness factor, and nothing makes a group happier than photographing the spectacular sights they signed up for in the first place.
I’ve already shared a couple of northern lights images from the first of the two Iceland workshops Don Smith and I did in January. Both of those images came from the workshop’s third night of photography, which I called the most spectacular aurora display I’ve ever witnessed. But after spending more time with my images from the previous night, I’m thinking maybe that proclamation was a little too hasty. But anyway, it’s not a competition, so who cares?
On our first night the group was completely shutout by an overcast sky. It didn’t help that later that night I got a text from an Icelandic friend congratulating me on getting the northern lights on the workshop’s first night, and I had to reply that unlike his vantage point in Reykjavik, we had wall-to-wall clouds up on the Snæfellsnes Peninsula.
While the aurora forecast was also good for our second night, the clouds persisted all day. But with clearing forecast that night, we ate dinner at a restaurant just a few minutes from Kirkjufell, then kept an eye on the sky. While waiting for the clouds to part after dinner, we got to watch Iceland’s handball team compete in the handball equivalent of the World Cup. I played a little handball in high school, this is a completely different sport (something like a soccer/basketball hybrid) that is clearly a huge deal in Iceland because half the town was crowded into this little pizza place to watch it. (It’s really a lot of fun to watch and many of us in the group got into it enough that we watched Iceland’s remaining tournament games as well.) But anyway…
The sky was just starting to clear when the game ended; by the time our bus parked at Kirkjufell the lights were dancing in all directions and we raced to the view as fast as our crampons would take us. Since this was most of the group’s first northern lights experience, I spent a few minutes getting people situated with exposure and focus. It was nice that we were the only ones out there (when we started), so everyone was free to spread out and make their own compositions.
Looking up at the variety of colors and ever-shifting forms felt like standing inside a celestial lava lamp. I started with my Sony a1 and Sony 20mm f/1.8 G lens, but the lights covered so much sky that I soon switched to my Sony a7R V, which I’d pre-loaded with my Sony 12 – 24 f/2.8 GM lens.
I moved around based on where the display was best at the moment, most of the time trying to align the aurora with Kirkjufell, but at one point I dropped down to the bottom of the slope and shot in the other direction to capture fanning shafts in the sky above Kirkjufellsfoss (the waterfall). When a magnificent arcing beam stretched across the northern sky, starting in the northeast and continuing out toward the western horizon, I was extremely grateful to have a wide enough focal length to capture the entire arc with Kirkjufell.
Though the temperature was about 10 degrees, with a 20+ MPH wind (and gusts closer to 40 MPH), I hardly noticed the cold. And I suspect no one else did either, because I didn’t hear a single complaint.
Join Don Smith and me for our next aurora chasing adventure
Workshop Schedule || Purchase Prints || Instagram
2023 So Far
Click any image to scroll through the gallery LARGE


Know Your Subjects
Posted on March 7, 2022

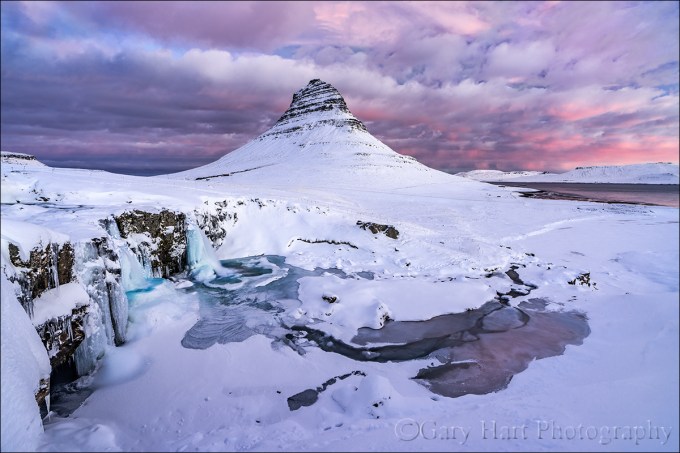
Alpenglow, Kirkjufell, Iceland
Sony a7RIV
Sony 16-35 f/2.8 GM
3 seconds
F/16
ISO 100
One of my personal rules for photography is knowledge of my subjects—I simply get more pleasure from an image when I know something about what I’ve captured. Of the many potential subjects available to a landscape photographer, mountains have always been a particular draw for me. Living my entire life in the shadow of the Sierra Nevada has certainly influenced that connection, as have fond memories of family camping trips in the mountains throughout my childhood, and Sierra backpack trips with friends in my teens and beyond. In college I even majored in geology for several semesters (after astronomy, but before eventually earning my bachelor’s degree in, yawn, economics), and was most interested in the processes responsible for mountain building: tectonics and volcanism.
Kirkjufell, Iceland
Given all this, I guess it makes sense that after returning from last month’s Iceland trip I found myself digging a little deeper into the origins of Kirkjufell, the prominent peak that is arguably Iceland’s most recognizable landmark. Game of Thrones fans who recognize Kirkjufell (Arrowhead Mountain) will be relieved to know that, after several visits over the last few years, I can confirm that the White Walkers appear to have moved on. (But come to think of it, maybe that shouldn’t be much of a relief….)
Kirkjufell rises slightly more than 1500 feet above Breiðafjörður Bay on the Snæfellsnes Peninsula. Given Iceland’s volcanic origins, it would be reasonable to assume that this cone-shaped peak is just one of of the island’s many volcanos. But that assumption would be incorrect. Skeptical? The mountain’s clearly visible parallel strata layers are a giveaway that Kirkjufell is not a volcano. (And viewing from other angles would reveal that Kirkjufell isn’t really cone-shaped either.)
Though many of Kirkjufell’s layers were indeed laid down by lava or explosive debris from nearby volcanos, these igneous layers are interspersed with layers of submarine sediment deposits, each layer a product of the environment at the time of its deposition. Kirkjufell’s base layer was a large lava flow that happened sometime in the last 5 to 10 million years (relatively recently in Earth’s grand geological picture). After that came millions of years of alternating sediment and volcanic deposits, separated by thousands or millions of years for which there’s no record.
This assortment of parallel layers created a horizontal layer cake of strata bearing no resemblance to the mountain we know today (or any mountain for that matter). Because all sedimentary layers are deposited horizontally, and Kirkjufell has a slight SE-NW tilt, it would also be reasonable to assume that at some point since the last layer went down, the entire area to the southeast rose relative to the area northwest.
Once all Kirkjufell’s layers were deposited and tilted, the area was squeezed between two glaciers that carved away most of the surrounding rock, leaving the remaining peak jutting above the glaciers like an island. When the glaciers retreated, the peak we see today remained.
Twilight colors
The other striking feature in this image is the pink that spreads in the shadowless pre-sunrise/post-sunset sky of civil twilight, when the sun is around six degrees or closer to the horizon. Sometimes called the “Belt of Venus,” we get this color because the only the longest, red wavelengths are able to traverse the atmosphere once the sun drops below the horizon.
The interface between the Belt of Venus and the blue-gray Earth’s shadow directly is called the “twilight wedge,” a designation earned because you can sometimes see the earth’s curve in the shadow, with its apex at the anti-solar point (directly opposite the sun). At sunset, the gradual upward motion of the shadow gives the appearance of a wedge being driven into the darkening sky.
About this image
I won’t pretend that there’s anything especially unique about my composition here (and I have the pictures to prove it)—it’s one of those scenes that improves more with conditions than composition, especially if you haven’t been here enough to get really familiar with it.
Because this was the first evening of photography for Don Smith’s and my 2022 Iceland photo workshop, Don and I stayed especially close to the group. From past visits I knew that to align Kirkjufell and Kirkjufellsfoss (the waterfall), you’re pretty limited for places to set up, but we managed to find prime tripod real estate for everyone. I encourage my groups to move around as much as possible, but the thick snow and steep drop to the river further limited our mobility, so we just lined up along the cable barrier between the trail and the drop. And because there were other people besides our group out there, once you landed a vantage point, you were pretty much stuck there until someone moved.
Given the mobility limitations and my desire to align the mountain and waterfall, my composition options were mostly focal length choices. Another, self imposed, compositional limitation was my desire to exclude the footbridge just out of my frame on the left. I like to believe that if I’d have been here by myself, with lots of time to explore, I’d have come up with something a little more creative. But I’m certainly not complaining—between the fresh snow and beautiful sky, the conditions for photography were off the charts and everyone was thrilled.
This image came late in the shoot, just as the twilight wedge reached peak color. By then I was pretty familiar with all my composition options and opted to go with my Sony 16-35 f/2.8 GM lens at 17mm (an my Sony a7RIV body). Turns out my resulting composition is remarkably similar to my northern lights image from later that night, and a sunrise image I captured here 3 years ago. Since I clearly have this composition nailed, I’ll need to challenge myself to find something different next year.


Workshop Schedule || Purchase Prints || Instagram
More Magnificent Mountains


Clicking the Lights Fantastic
Posted on February 7, 2022
Northern Lights, Kirkjufell, Iceland
Sony a7RIV
Sony 12-24 GM
10 seconds
F/2.8
ISO 3200
I woke in my hotel room this morning to find a 6-inch snow drift (I measured) on the floor beneath my window, and still more snow frosting the curtains and wall. An expanding glacial lake stretched almost to my bed. Honestly, the risk of turning my room into an ice cave is never a consideration when opening the window at bedtime back home—but this is not home, not even close.
So why would someone choose to leave scenic, mild California for frigid Iceland in early February? Believe it or not, there are many reasons, including snowy volcanic peaks, a mind-boggling assortment of waterfalls, shimmering ice caves, all-day low-angle light (the sun in early February never ascends higher than 10 degrees), and hour-long sunrises and sunsets. (I could go on.)
But the number one motivator, the thing that most inspired Don Smith and me to consider an Iceland photo workshop in the middle of winter, and that drove a dozen people to sign up for it, is the potential to witness nature’s mesmerizing celestial dance, the northern lights.
Let’s review
Our planet is continuously bombarded by solar energy. When this perpetual solar wind encounters Earth’s atmosphere, a narrow range of wavelengths (infrared and visible) passes through to warm us and light our way. But other energy wavelengths in the solar wind interact with the molecules they encounter, stripping electrons and creating an atmospheric charge imbalance.
Instead of penetrating our atmosphere to create havoc on Earth’s surface, most of these ions (charged particles) are intercepted by Earth’s magnetosphere, our protective magnetic shield. Under constant bombardment from the sun, the magnetosphere forms a teardrop-shaped shield around Earth, with the battered side that faces the sun compressed, and the shielded side behind Earth stretching much farther into space.
As Earth rotates, the daylight side at any given moment faces the thinner, compressed region of the magnetosphere, while Earth’s night side looks out toward the extended region of the magnetosphere. Particles ionized by the sun are pushed by the solar wind from the daylight side of the magnetosphere to the upper regions of the polar latitudes on Earth’s leeward (night) side.
The result of these atmospheric machinations is an accumulation of ionized molecules dancing high in the night sky, creating an atmospheric oval of geomagnetic activity that increases with the intensity of the solar wind. The greater the solar activity, the greater the oval’s size and the intensity and range of the aurora display.
The aurora’s color depends on the molecules involved, as well as their altitude. The most plentiful and frequently activated molecules vibrate in the green wavelengths, but reds and blues are possible as well, depending on the intensity and altitude of the activity.
To view the northern lights, you need all of the above: the right location, activity in the magnetosphere, and clear skies. As with terrestrial weather, there’s no such thing as an aurora “sure thing”—the best we can do is put ourselves in position to be as close to the auroral oval on nights with the greatest chance for activity. Planning a winter trip to the high latitudes (the higher the better), like Iceland, is a good start—then just pray for clear skies.
Essential to aurora chasing is access to and comprehension of the Kp- (or K-) index. The Kp-index is a 0-9 scale of atmospheric electromagnetic activity, with 0 being little or no activity (get some sleep), and 9 being the most extreme activity (don’t forget the sunglasses). Many governments and scientific organizations issue regular Kp forecasts that seem about as reliable as a weather forecast—pretty good, but far from perfect. There are many websites and smartphone apps that will provide you with up-to-date Kp forecasts for your current location—some will even issue alerts.
Meanwhile, back in Iceland
This is my third trip to Iceland in winter, all with my friend and fellow pro photographer Don Smith: in 2019 to scout for our planned workshop, then in 2020 and 2022 for our workshops. On all three trips we’ve been guided, chauffeured, and entertained by our Icelandic guide, (the unforgettable) Óli Haukur.
On our previous two winter Iceland visits, it seemed the aurora was toying with us, tantalizing us each evening with clear skies (yay!) and just enough aurora potential to drive us out to wait in the cold dark night (meh), before ultimately disappointing (boo!). But on both trips, after a week of torture, the aurora finally came through with a dazzling display on the trip’s penultimate night (phew).
This year, the aurora gods played a different game. On our first night we were based near Kirkjufell (English translation: Church Mountain), arguably Iceland’s most iconic landmark—not to mention the north-facing vantage point that makes Kirkjufell a perfect foreground for photographing the northern lights. But, in a stunning plot twist, instead of the clear skies and KP-1 or 2 we’d been accustomed to, this year’s opening night’s aurora forecast was KP-6—the highest KP rating I’d had for any of my Iceland visits (even the big display nights). However…
Remember the aurora big 3: location, activity, and sky? We had location and activity, but even two out of three isn’t enough. So my ecstasy was quenched the instant I checked the Kirkjufell weather forecast: cloudy, with a chance of snow. But, because photographers will endure all kinds of abuse when a good shot is even remotely possible, our group bundled up and went out anyway. One small benefit: Though we certainly weren’t the only ones out there, the weather forecast and overall COVID-reduced tourist numbers made Kirkjufell’s crowd much more manageable than it would have been.
But crowds aren’t the only limiting factor at Kirkjufell. Night photographers there also need to deal with light leaks from the nearby village of Grundarfjörður (just as easy to pronounce at it is to spell), a couple of lights on the mountain, random headlights from the parking area, and a highway that runs along the base of the mountain and right through any composition that includes it. (Fortunately there weren’t a lot of cars, because each one lights the mountain for at least two minutes before its arrival.)
When we arrived at the Kirkjufell parking lot, there was no visible sign of the northern lights, but there were a few stars visible above the mountain, giving me a slight surge of hope. A couple of us tried test frames and our cameras picked up a slight green glow, nothing to write home about, but enough to justify making the short hike out to the prime viewing area. Though there was space for everyone in our group to set up with a good composition, it was crowded enough to make it difficult to move around a lot.
For the first hour or so we stood around waiting for the aurora to improve, clicking occasional frames to check its status. Most of this time the aurora was a benign glow, just bright enough to make out with the naked eye as a faint, colorless glow on the horizon. Our cameras, on the other hand, with their ability to accumulate light and brighten the darkness, easily pulled out some color. Nothing spectacular, but at least everyone was getting nice, albeit unspectacular, images.
Eventually a few in our group reached their chill threshold and began packing up. When I saw more clouds moving in from the west, I texted our guide that we were heading back to the bus (to call this beast a mere “bus” doesn’t really do it justice)—then joked that if that doesn’t start the light show, nothing will. (All photographers know that the best stuff doesn’t happen until at least one person packs up his or her gear.)
And sure enough, just as I collapsed my tripod and started zipping my bag, I took one last northward glance and saw actual, naked eye green. By the time I had my tripod re-extended and camera mounted, the color was really starting to kick in and stretch skyward. Soon we saw curtains of green waving in the solar wind, first a little right of the mountain, and soon directly behind it.
I can’t say that the composition I got here is much different from the composition everyone else got, but there were a few framing decisions that I was very particular about. I used my Sony a7RIV with my Sony 12-24 f/2.8 GM lens wide open, starting at ISO 1600 and 10 seconds before quickly bumping to ISO 3200.
As you may know, my goal is to photograph the world in a way that allows viewers to imagine it untouched by humans. So I took care to avoid including the footbridge that mars the left side of the scene. (I did have to clone out a small piece of bridge that snuck in under the cover of darkness to photo-bomb me.) Down the hill on the right side of the scene I had to contend with a pair of photographers (and their lights), plus the lights from Grundarfjörður, but I hid them behind the right side of the frame.
The top of the frame I set at the base of the thick clouds covering most of the sky. On the bottom, I took care to include enough of the riverbank to create a continuous white frame.
Given the clouds, it’s impossible to know the extent of the aurora’s spread, but I don’t think while we were there it ever reached the KP-6 we’d been promised. Nevertheless, it was a real treat for all of us—especially those who had never seen the northern lights. We finally left when the clouds closed in, but on the trip back we drove into clearer skies and actually stopped to photograph a little more along the side of the road. We didn’t get back to our hotel until midnight, but no one minded.
The last thing I want to mention here is my processing decisions. While everyone there that night got more or less the same version of this scene, I’ve seen several different processing approaches (from others in the group), resulting in noticeable differences in the finished products.
Because night images usually take in a lot more light than the human eye sees, there’s not really any way to say how it “really looked.” But I’m happy to share my own processing choices and why I made them, and try not to argue with anyone else’s night photography choices (within reason).
The unprocessed raw preview of this image looked very similar to this finished version, but there were a few important adjustments I wanted to add. I started in Lightroom by cooling the temperature of the entire scene to shift the yellow-ish daylight cast my camera’s auto white balance imposed, to a blue-ish, more night-like cast.
And very important to me during processing was minimizing signs of human influence on this naturally beautiful scene. In addition to cropping out that tiny section of bridge and a few rogue house lights, I cooled and subdued the town’s warm, artificial glow brightening Kirkjufell’s east (right) slope (many people liked this glow). And to bring out Kirkjufellsfoss (the waterfall), the turquoise water, and snow-cover shoreline, I brightened the foreground a little.
Epilogue
Several days have elapsed since I started this post. Since then we’ve had a couple more northern lights shoots—nothing spectacular, but very nice. We’ve also had lots of fun and a few adventures that I’ll share in future posts. Oh, and the snow drift in my hotel room was dealt with swiftly by the hotel staff—with no harm, financial or otherwise, on the perpetrator. (The hotel staff was very nice about the stupid American’s open window in a blizzard, and I got the distinct impression that this wasn’t their guest-room-snow-removal rodeo. And in my defense, it wasn’t snowing when I went to bed.)
My (Growing) Northern Lights Collection
Click an image for a closer look, and to view a slide show.


Border Patrol
Posted on January 10, 2021
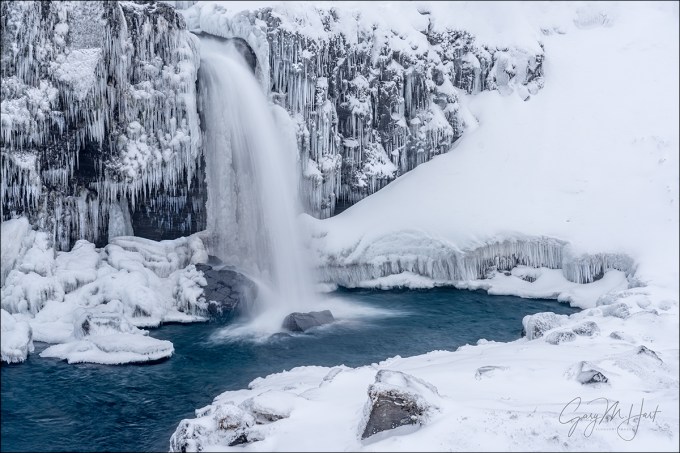
Frozen, Kirkjufellsfoss, Iceland (2020)
Sony a7RIV
Sony 24-105 G
1/2 second
F/9
ISO 200
A year ago Don Smith and I, with the aid of our Icelandic guide (the legendary Óli Haukur), had a blast sharing Iceland’s winter beauty with a great group of photographers. But our trip wasn’t without its challenges. One of our earliest locations was Kirkjufell, arguably Iceland’s most recognizable mountain. While proponents of Vestrahorn might debate this, no one will deny that everyone who visits Iceland wants a picture of Kirkjufell, just as everyone visiting Yosemite wants a picture of Half Dome. And even though Kirkjufellsfoss (the nearby waterfall) is gorgeous and the obvious foreground for Kirkjufell images, the mountain really is the main event here.

Frozen Sunrise, Kirkjufell, Iceland (2019)
So imagine our disappointment on the morning our workshop group visited Kirkjufell and found the mountain completely obscured by clouds. Not only that, the temperature was 25 degrees (F), and a 40 MPH wind made it feel like 5 degrees and turned the sleet into rocketing needles. In other words, it was stupid-cold. Nevertheless, our hardy group geared up, braved the short trudge out to the vista, and went to work without complaint.
While waiting for Kirkjufell to emerge (fingers crossed), I turned my attention to the tiered, multi-channel, ice-encrusted Kirkjufellsfoss. In normal conditions, while waiting for the Kirkjufell to appear it would have been natural to fire off a few oooh-that’s-pretty clicks of the waterfall. But without the distraction of Kirkjufell (or anything else more than 1/2 mile away), I set up my tripod and actually worked the scene like an actual photographer (go figure). And as often happens when I spend quality time with a scene, the longer I worked this one, the more I saw.
Border patrol
With so much going on, the trickiest part of making this image was managing all the scene’s visual elements while minding my frame’s borders. As much as we try be vigilant, sometimes the emotion of a scene overwhelms our compositional good sense—we see something that moves us, point our camera at it, and click without a lot of thought. While this approach may indeed capture the scene well enough to save memories and impress friends, it’s far from the best way to capture a scene’s full potential. So before every click, I do a little “border patrol,” a simple mnemonic that reminds me to deal with small distractions on the perimeter that can have a disproportionately large impact on the entire image. (I’d love to say that I coined the term in this context, but I think I got it from Brenda Tharp—not sure where Brenda picked it up.)
To understand the importance of securing your borders, it’s important to understand that our goal as photographers is to create an image that not only invites viewers to enter, but also persuades them to stay. And the surest way to keep viewers in your image is to help them forget the world outside the frame. Lots of factors go into crafting an inviting, persuasive image—things like compositional balance, visual motion, and relationships are all essential (and topics for another day), but nothing reminds a viewer of the world outside the frame more than an object jutting in or cut off at the edge.
When an object juts in on the edge of a frame, it often feels like part of a different scene is photobombing the image. Likewise, when an object is cut off on the edge of the frame, it can feel like part of the scene is missing. Either way, it’s a subconscious and often jarring reminder of the world beyond the frame.
And there are other potential problems on the edge of an image. Simply having something with lots of visual weight—an object with enough bulk, brightness, contrast, or anything else that pulls the eye—on the edge of the frame can throw off the balance and compete with the primary subject for the viewer’s attention.
To avoid these distractions, I remind myself of “border patrol” and slowly run my eyes around the perimeter of the frame. Sometimes border patrol is easy—a simple scene with just a small handful of objects to organize, all conveniently grouped toward the center, usually requires minimal border management. But more often than not we’re dealing with complex scenes containing multiple objects scattered throughout and beyond the frame.
In this Kirkjufellsfoss scene I had to contend with ice, rocks, snow, and flowing water. The biggest problem was an assortment of randomly dispersed rocks jutting from the snow at bottom of the frame, and a railed pathway visible just above the fall. It wasn’t too hard to eliminate the path with careful placement of the top of my frame, but if my entire focus had been on the waterfall the rocks might have been overlooked. Border patrol. Placing the bottom of my frame a little higher would have cut off the large rock near the bottom-center, an important compositional element that combines with the fall to create a virtual diagonal; placing the bottom lower would have introduced more rocks that I’d have had to cut off somewhere. Instead, I was able find a clean line of snow that traversed the entire bottom of my frame: perfect! (And lucky.)
One other important compositional element that would have been easily easy to overlook is the switchback snow-line that enters the frame at the bottom and exits at the top (or vice-versa). Diagonals like this are strong compositional elements that I love including whenever possible, so I chose a horizontal composition to allow room for each switchback to complete. The eye subconsciously follows lines like this, so cutting them off on the edge of the frame is an tacit invitation to exit the scene, something I try to check for when I execute my border patrol.
Of course nature doesn’t often cooperate and I’m usually forced to chop off parts of visual elements. When I do this, I always want it to be a conscious decision that doesn’t make my viewer think that I’ve cut off something that belongs in the scene, or that something jutting in is part of a different scene. Usually when I have to cut something on the edge (often impossible to avoid), I try to do it boldly, somewhere near the middle of the object, to signal that was my intent and not just an oversight.
I realize because these things are often only noticed on a subconscious level they may seem trivial, but every image is house of cards comprised mostly of small decisions, and you never know which one might send it crashing down.
Epilogue
I did end up photographing Kirkjufell this morning, but didn’t get anything that thrilled me.
Minding the Border
Click an image for a closer look and slide show. Refresh the window to reorder the display.


Let There Be Light
Posted on March 27, 2019
Frozen Sunrise, Kirkjufell, Iceland
Sony a7R III
Sony 16-35 f/2.8 GM
1 second
F/11
ISO 100
In January I made my first visit to Iceland in preparation for the winter workshop I’ll be doing there with Don Smith next January. And after a lifetime spent in the middle latitudes, one thing that was impossible to ignore was the quality of the winter light at 65º (-ish) latitude. Not only do sunrises and sunset last forever, but during our entire visit the sun never rose higher than 8º above the horizon. This got me thinking about light in general, and how we sometimes take it for granted. Or, if we don’t exactly take light for granted, how we often don’t take the time understand this thing that makes or breaks us. So I dusted off an article I wrote several years ago, updated the information there, and added some new images.
You’ll find the story of this Iceland sunrise toward the bottom, just above the gallery.
Photograph: “Photo” comes from phos, the Greek word for light; “graph” is from graphos, the Greek word for write. And that’s pretty much what photographers do: Write with light.
Good light, bad light
Because we have no control over the sun, nature photographers spend a lot of time hoping for “good” light and cursing “bad” light—despite the fact that there is no universal definition of “good” and “bad” light. Before embracing someone else’s good/bad light labels, let me offer that I (and most other serious photographers) could probably show you an image that defies any label you’ve heard. The best definition of good light is light that allows us to do what we want to do; bad light is light that prevents us from doing what we want to do.
Studio photographers’ complete control of the light that illuminates their subjects is a true art that allows them to create their own “good” light. Nature photographers, on the other hand, rely on sunlight and don’t have that control. But knowledge is power: The better we understand light—what it is, what it does, and why/how it does it—the better we can anticipate the light we seek, and deal with the light we encounter.
The qualities of light
Energy generated by the sun bathes Earth in continuous electromagnetic radiation, its wavelengths ranging from extremely short to extremely long (how’s that for specific?). Among the broad spectrum of electromagnetic solar energy we receive are ultraviolet rays that burn our skin (10-400 nanometers), infrared waves that warm our atmosphere (700 nanometers to 1 millimeter), and the visible spectrum—the very narrow range of wavelengths between ultraviolet and infrared that the human eye sees, in the wavelength range between 400 and 700 nanometers.
When all visible wavelengths are present, we perceive the light as white (colorless). But when light interacts with an object, the object absorbs or scatters the light’s wavelengths. The amount and wavelengths of light that’s scattered or absorbed is determined by properties of the object. For example, when light strikes a tree, characteristics of the tree determine which of its wavelengths are absorbed, and the wavelengths not absorbed are scattered. Our eyes capture these scattered wavelengths and send that information to our brains, which translates it into a color.
When light strikes a mountain lake, some is absorbed by the water, allowing us to see the water. Some light bounces back to the atmosphere to create a reflection. The light that isn’t absorbed or reflected by the water light passes through to the lakebed and we see whatever is on the lake’s bottom.
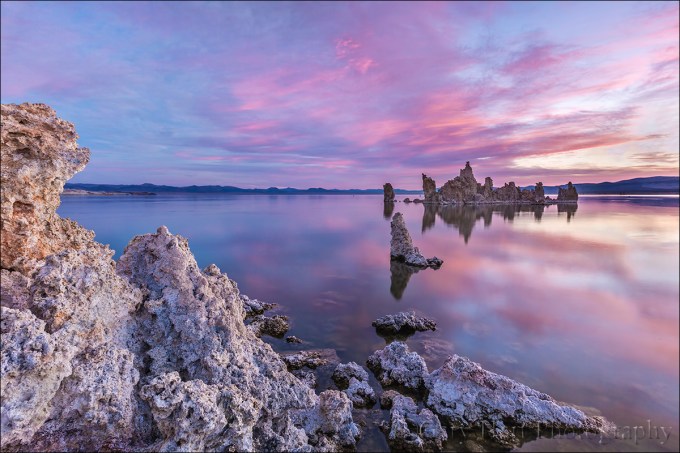
This vivid sunrise was reflected by the glassy surface of Mono Lake, but just enough light made it through to reveal the outline of submerged tufa fragments on the lake bed.
Let’s get specific
Rainbows
For evidence of light’s colors, look no farther than the rainbow. Because light slows when it passes through water, but shorter wavelengths slow more than longer wavelengths, water refracts (bends) light. A single beam of white light (light with an evenly distributed array of the entire visible spectrum) entering a raindrop separates and spreads into its component colors. When this separated light strikes the back of the raindrop, some of it reflects: A rainbow!

Under the Rainbow, Colorado River, Grand Canyon
Blue sky
When sunlight reaches Earth, the relatively small nitrogen and oxygen molecules that are most prevalent in our atmosphere scatter its shorter wavelengths (violet and blue) first, turning the sky overhead (the most direct path to our eyes) blue. The longer wavelengths (orange and red) don’t scatter as easily and travel through more atmosphere—while our midday sky is blue, these long wavelengths are coloring the sunset sky of someone to the east.
In the mountains sunlight has passed through even less atmosphere and the sky appears even more blue than it does at sea level. On the other hand, when relatively large pollution and dust molecules are present, all the wavelengths (colors) scatter, resulting in a murky, less colorful sky (picture what happens when your toddler mixes all the paints in her watercolor set).
Most photographers (myself included) find homogeneous blue sky boring. Additionally, when the sun is overhead, bright highlights and deep shadows create contrast that cameras struggle to handle.
Sunrise, sunset
Remember the blue light that scattered to color our midday sky? The longer orange and red wavelengths that didn’t scatter overhead, continued on. As the Earth rotates, eventually our location reaches the point where the sun is low and the sunlight that reaches us has had to fight its way through so much atmosphere that it’s been stripped of all blueness, leaving only its longest wavelengths to paint our sunrise/sunset sky shades of orange and red.
When I evaluate a scene for sunrise/sunset color potential, I look for an opening on the horizon for the sunlight to pass through, pristine air (such as the clean air immediately after a rain) that won’t muddy the color, and clouds overhead and opposite the sun, to catch the color.
Overcast and shade
Sunny days are generally no fun for nature photographers. In full sunlight, direct light mixed with dark shadows often forces nature photographers to choose between exposing for the highlights or the shadows (or to resort to multi-image blending). So when the sun is high, I generally hope for clouds or look for shade.
Clouds diffuse the omni-directional sunlight—instead of originating from a single point, overcast light is spread evenly across the sky, filling shadows and painting the entire landscape in diffuse light. Similarly, whether caused by a single tree or a towering mountain, all shadow light is indirect. While the entire scene may be darker, the contrast range in shade is easily handled by a camera.
Flat gray sky or deep shade may appear dull and boring, but it’s usually the best light for midday photography. When skies are overcast, I can photograph all day—rather than seeking sweeping landscapes, in this light I tend to look for more intimate scenes that don’t include the sky. And when the midday sun shines bright, I try to find subjects in full shade. Overcast and shade is also the best light for blurring water.
Another option for midday light is high-key photography that uses the overexposed sky as a brilliant background. Putting a backlit subject against the bright sky, I simply meter on my subject and blow out the sky.
Leveraging light
Whether I’m traveling to a photo shoot, or looking for something near home, my decisions are always based on getting myself there when the conditions are best. For example, in Yosemite I generally prefer sunset because that’s when Yosemite Valley’s most photogenic features get late, warm light; Mt. Whitney, on the other side of the Sierra, gets its best light at sunrise; and I’ll only the lush redwood forests along the California coast in rain or fog.
Though I plan obsessively to get myself in the right place at the right time, sometimes Nature throws a curve, just to remind me (it seems) not to get so locked in on my subject and the general tendencies of its light that I fail to recognize the best light at that moment. If I drive to Yosemite for sunset light on Half Dome and am met with thick overcast, I don’t insist on photographing Half Dome. Instead, I detour some of my favorite deep forest spots, like Fern Spring or Bridalveil Creek.
Other times finding the best light is simply a matter of turning around and looking the other direction. Mono Lake is one of those places that reminds me to keep my head on a constant swivel, or risk getting so caught up on the sunrise in front of me that I miss the rainbow behind me.
About this image
Frozen Sunrise, Kirkjufell, Iceland
This view of Kirkjufell and Kirkjufellsfoss on Snæfellsnes Peninsula is the Tunnel View of Iceland—even though you’ve already seen a million pictures from this very location, every photographer who visits Iceland wants their own version. (Not that there’s anything wrong with that.)
Don Smith and I were here in January, scouting for our 2020 Iceland Winter Sights and Northern Lights photo workshop. Hiring a local guide to show us around, we gave him complete autonomy over our schedule (and even if we did know enough about Iceland to tell him what we wanted to see, we couldn’t have pronounced it anyway). We’d spent the prior day driving to the peninsula, dodging snowflakes, and helping dig stranded Canadians (who should know better!) out of roadside ditches. But the weather gods smiled on us this morning, and I would say that our first sunrise was a harbinger of good fortune ahead.
On this first morning I was still trying to wrap my head around a 10:30 a.m. sunrise (a brilliant idea that should be adapted worldwide) when we pulled up to Kirkjufellsfoss. (And just so we’re clear, the mountain is Kirkjufell, the waterfall is Kirkjufellsfoss.) I immediately recognized the scene, though in most of the images I’ve seen of Kirkjufellsfoss, the water was liquid and the surrounding landscape was green.
Snow and ice dominated this morning, which I thought was pretty cool because it gave us the opportunity to capture the scene at least somewhat differently from the way it’s typically done. The biggest problem I had to deal with was working around the dozen or so other photographers, and waiting for selfie-wielding tourists to vacate the scene (thank you Content Aware Fill).
Sometime during this sunrise show an Iceland sunrise fact that dawned on me (see what I did there) is how long twilight lasts at 65º latitude. I’m talking quality light that starts at least an hour before sunrise and just keeps going and going and going. When we finally packed up our gear, nearly an hour after sunrise, there was still color in the sky. We left not because the shooting was poor, but because we had other sights to see. In fact, the pink you see here lasted so long, I pretty much ran out of ways to photograph it. I guess another way of putting this would be that an Iceland sunrise is over faster than you can say Kirkjufellsfoss on Snæfellsnes Peninsula. (But of course, so was the Mueller investigation.)
Light at its finest
Click an image for a closer look, and to view a slide show


