Eloquent Images by Gary Hart
Insight, information, and inspiration for the inquisitive nature photographer
Greetings from Down Under
Posted on June 19, 2023
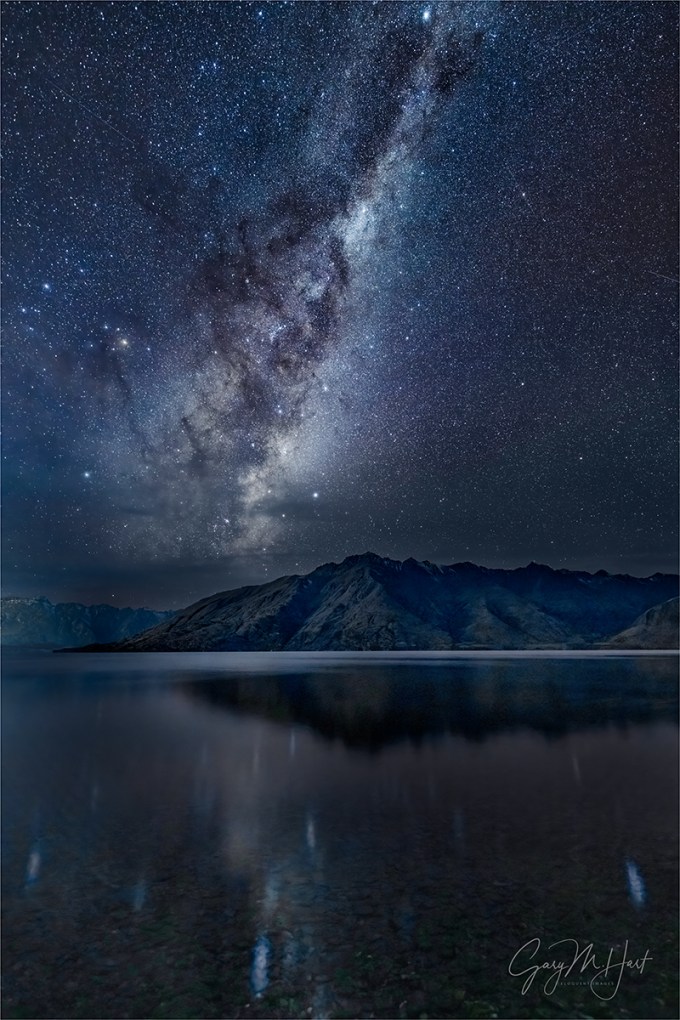
Milky Way Reflection, Lake Wakatipu, New Zealand
Sony a7R V
Sony 14mm f/1.8 GM
ISO 6400
f/1.8
15 seconds
It’s hard enough sticking to my (self-imposed) weekly blog schedule when I’m home and just doing the daily stuff necessary to keep my business running. But for the last week Don Smith and I have been cavorting about the New Zealand countryside with a dozen awestruck photographers. So I’ve dusted off a still relevant blog post from 4 years ago, updated it, and added a brand new image (from this trip) and description.
What’s my problem?
I share a lot of Milky Way images (and when I say Milky Way, I’m referring to the brilliant core of our home galaxy). But then it seems does everyone else. And when I look at some of the other visually dazzling Milky Way images posted online, I realize I’m working at something of a disadvantage—not because of deficient equipment (not even close), a physical or mental handicap (though as the years spin by…), or even because I think the world is unfair (maybe it is, but it’s been pretty good to me). No, my disadvantage is solely the result of self-imposed “rules” that prevent me from photographing anything that can’t be captured with a single click.
Single-click shooting means no focus stacking, no HDR, no blending separately captured foreground and sky. In other words, if I can’t get what I want in one frame, I don’t get it. It’s not that I think there’s anything wrong with combining images—image blending is a tremendous tool that allows digital photographers to transcend the limitations of film photography. And it’s not because blending is “too technical” for me—having spent 20 years working in the tech industry, I know my way around a computer and have actually played a fair amount with blending images (it’s not rocket science). No, I don’t blend images simply because, as beautiful as they might be, I get no personal satisfaction from results that feel artificial to me. And if photography doesn’t make you happy, what’s the point?
Every time I bring this up, someone gets defensive, feeling like I’m saying that there’s something wrong with blending images. There isn’t!* I enjoy viewing the work of photographers who blend images to elevate their art. So if you blend and enjoy it, please go forth and blend to your heart’s content (and keep those defensive comments to yourself). This is about me, and what makes me happy.
*As long as it’s not used to deceive.
Milky Way capture
I’m frequently asked about my processing for Milky Way images, and I’ve always been a little reluctant to share a lot because I’m not an expert, I don’t blend, and my Milky Way workflow is always a work in process. Nevertheless, I’m asked enough that I’ve decided it might nevertheless help for me to share my overall processing mindset and approach. (Plus, it might help others to understand why my images aren’t as “stunning” as the images of those who blend.)
In many ways I still consider myself a film shooter, albeit with an upgrade to a digital camera. Processing, though not my favorite part of photography, is an essential digital windfall that enables me to extract results from the photons I capture, results that were never possible with film (especially for those of us who shot only color film/transparencies). Like most digital photographers, I couldn’t succeed without processing—the alternative is to let the camera or computer make processing decisions, and that’s control I don’t want to relinquish. And given the challenges of minimal light photography, processing is doubly important for Milky Way images.
Given that I don’t blend images (for Milky Way photography that’s usually one exposure for the foreground and another for the sky), I start with a raw file that needs help. A lot of help. I like foreground detail in my night images, which requires me to compromise with a less than ideal f-stop, shutter speed, and (especially) ISO to gather enough light. And even with these compromises, the image straight from the camera is still far darker and noisier than ideal.
The right gear
First, even with all the skill and processing software you can muster, if you’re going to photograph the Milky Way with one click, you need to have the camera and lens to do it. On a moonless night light capture is king, which means using a camera able to return relatively clean results at extreme ISOs (up to 12,800) with a very fast, wide lens—24mm and f/2.8 is okay, but wider and faster is better.
For years my Milky Way body has been some version of the Sony a7S series (a7S, a7S II, a7S III)—most recently the Sony a7S III (a truly remarkable low light camera), while my night lens has been one of the following: Sony 24mm f/1.4 GM, Sony 20mm f/1.8 G, or Sony 14mm f/1.8 GM. But an equipment change may be afoot—details below.
Exposure compromise
My processing choices depend a lot on my exposure choices, which as I said earlier, are all compromises. For example, with my 14mm at f/1.8 wide open, I can usually keep the ISO in the 3200 to 6400, and my shutter speed to 15 seconds—quality compromises for sure (high ISO means high noise, longer shutter speeds mean star motion), but the results are certainly acceptable. It might help to know that when I photograph the Milky Way, I usually give each composition a variety of exposure settings and choice the best one later, when I can see the images on my computer.
It starts with noise reduction
For all of my images, my standard noise processing is Topaz DeNoise AI Photoshop plugin. I used to run my Milky Way images through DxO PhotoLab 2, but later versions of DeNoise have been so good that I now skip the DXO step.
In Topaz I magnify the view to 100% (and sometimes 200%) and play with the Noise Reduction and Recover Detail sliders until I’m confident I’ve found the combination that maximizes noise reduction without muddying the detail. I’ve had the most success with the Low Light, Standard, and Severe Noise panels (in that order), but your results may vary so experiment with all the options to find the panels that work for you.
The method behind my madness
Processing is where things start to get more vague because my approach is less an explicit series of steps than it is searching for the best way to achieve the results I want, steps that can vary a lot from image to image. Sometimes I can achieve most of what I want in Lightroom, other times I lean more heavily on Photoshop—usually it’s a fairly even balance of the two.
Given my hit-and-miss approach, it’s probably most important to explain what makes a successful Milky Way image. Here’s what I’m going for:
- Minimal noise: Asked and answered (Topaz DeNoise AI)
- The right sky color: As far as I’m concerned, the color of the sky in a Milky Way image the photographer’s creative choice because at night the human eye doesn’t capture enough light to discern color. If you look at my recent Milky Way images, you’ll see that I tend to avoid a blue/cyan sky in favor of something more blue/purple. It just feels more night-like to me. But that’s just my opinion and I empower you to go with whatever color makes you happy (more on that below). And lately I’ve been skewing away from blue and toward black with just a hint of blue—and no cyan.
- Foreground detail: The amount varies with the foreground, and how much light I can give it without too much noise.
- Uniform sky tone and hue (as much as possible): I don’t like a huge difference between the sky near the horizon and up toward the top of the frame
- The stars should pop: I want the sky to be fairly dark, but the stars to stand out.
- No part of the Milky Way should be blown out: While I want the stars bright, I don’t want them too bright.
- And the final result still needs to look like night (even though it will be brighter than the human eye sees).
I make extensive use of Lightroom and Photoshop’s History panels. There’s no single best way to do anything in Lightroom and Photoshop, so I make a lot of what-if?, trial-and-error adjustments that I only keep if I’m satisfied. So you’re not going to get specific steps from me as much as you’ll get things to try and accept/reject. The other thing I want to emphasize is to magnify the image to 100% (1:1) when you’re trying to decide whether or not to accept an adjustment.
I always play with the Highlights/Whites/Shadows/Blacks sliders—lots of up/down trial-and-error adjustments to find the right balance (gotta love that History panel). The Lightroom Clarity and Texture sliders will make the stars pop (and sometimes the foreground), but be especially gentle with these to avoid exaggerating the noise and making the stars look crispy). And Dehaze will add contrast to the sky that really enhances the Milky Way, but it also might darken parts of the scene too much. As with Clarity and Texture, Dehaze moderation is key.
I use lots of techniques to get the color I want—often just one or two adjustments are enough, and sometimes it requires a lot of adjustments. In Lightroom, I play with Color Temperature and Tint. That usually means cooling the temperature to somewhere in the 3000-4000 range, and nudging the Tint slider slightly to the right—less cyan, more red (which creates a blue with hints of purple). When those things don’t do the job, I’ll play with Lightroom’s HSL sliders. And now that Lightroom’s masking capability makes separating sky and foreground a snap, I usually process each independently of the other.
To tweak the color in Photoshop, I usually select the area I want to adjust, Feather it fairly loosely (large Feather Radius), and create a Color Balance and/or Saturation layer, doing lots of trial-and-error moves with each. And when using Saturation, I almost always work on specific colors, adjusting some combination of Hue, Saturation, and Lightness until I’m satisfied. Also, I find that some of the other adjustments I make in Lightroom and Photoshop tend to pump up the color too much, so I usually desaturate the sky a fair amount in Photoshop.
To make the Milky Way more prominent, a few passes with the Dodge brush set to Highlights can do wonders by brightening the stars without affecting the sky. But don’t overdo it—I prefer multiple passes at low Opacity (less than 20).
Probably the trickiest thing to contend with is a different hue near the horizon than I get in the rest of the sky. I can usually mitigate this somewhat with a feather selection and a Color Balance or Saturation layer, described above. And sometimes, if I’m really brave, I’ll select the offending area, Feather it, use the Eyedropper tool to pick the color I want, and the Paint Bucket tool to apply the color to the selected area. I usually get better results with Tolerance set fairly high (>50) and Opacity fairly low (<30). If you do this, don’t expect it to work every time, and always examine the results at 100% because it can introduce some pretty nasty blotchiness that doesn’t jump right out at you on first glance at lower magnification.
With most of my images, the last thing I do before saving is sharpen. But since night images are rarely about fine detail, and sharpening exacerbates noise and creates crispy-looking stars, I usually don’t sharpen my Milky Way images.
These tips are not intended to be the final word on Milky Way processing—I just wanted to give you some insight into my approach, both my goals and the steps I take to achieve them. I’ve been using Photoshop for a long time, but don’t consider myself a Photoshop expert, not even close. There may be (probably are) better ways to do many of these things. But I’ve always been a simple-first photographer: Do things the simplest possible way until you find some way that’s better, or until you encounter something you just can’t do without upping the complexity. And if you take nothing else away from this, I hope you at least feel empowered to experiment until you achieve results that make you happy.
About this image

Milky Way Reflection, Lake Wakatipu, New Zealand
New Zealand is hands down my favorite place to photograph the Milky Way. Better even than my previous favorite, the ultra-dark Colorado River at the bottom of the Grand Canyon, because: 1) the skies in New Zealand are almost as dark as the bottom of the Grand Canyon 2) the New Zealand air is usually cleaner (less dust and pollution) 3) New Zealand’s winter matches the Milky Way core’s prime months, so in June (when we do our workshop) the galactic center is photographable from about 7 p.m. until 7 a.m. 4) the Milky Way is higher in the sky down here.
Milky Way photography is a priority in the New Zealand workshop—not just for the people who sign up, but for Don and me as well. But since it’s winter, we often battle clouds, so the Milky Way on any given night is never a sure thing. To maximize our chances, over the years we’ve been doing this workshop Don and I have identified a handful of prime Milky Way locations at various points along the workshop’s 10-day journey.
A Milky Way location needs a good view of the sky in the direction of the Milky Way (in the first hours after sunset, that would be southeast), a compelling foreground, and minimal light pollution. It took us a couple of years, but we finally found a nice Milky Way spot on beautiful (and large) Lake Wakatipu near Queenstown. Since the workshop begins and ends in Queenstown, this spot allows us to check off the Milky Way box at the start of the trip (fingers crossed), and also gives us one last resort shot at it at the end of the trip.
This year we lucked out with clear skies on our very first night. So after a nice sunset farther up the lake toward Glenorchy, we drove back toward town and pulled into “our” spot. After waiting about 30 minutes for the sky to darken, we went to work. At first Don and I concentrated on getting everyone up to speed with Milky Way photography, but eventually we were able to get to work on a few images of our own.
On this New Zealand trip I’d decided to try my Sony a7R V at night—but because I’ve never tried this camera at night, to hedge my bets I also packed the trusty a7S III. The lens I chose for this trip was my Sony 14mm f/1.8 GM—almost as fast as the 24mm f/1.4, the Milky Way’s elevation in the New Zealand sky makes opting for the extra width of the 14mm a no brainer.
I started with the a7S III, but after a half dozen or so images switched to the a7R V. I haven’t looked at the a7S III images yet, but I have to say that I’m blown away by the results I got with my a7R V. Blown away enough that my days of packing a body just for night photography might very well be over. To get an image as clean as this one with 61 megapixel everyday camera truly is a (cliché warning) game changer.
I’ve photographed here several times before, each in slightly different conditions. This year the fact that there wasn’t as much snow on the peaks as previous years was more than compensated by the still, reflective lake surface.
We still have three more workshop nights, and I have cautious hopes for our planned Milky Way shoot at Tasman Lake in Mt. Cook / Aoraki National Park in a couple of nights. But if the clouds take us down, there’s no stress because we already have a great Milky Way shoot in the bank. Add that to our very special day cruising on Doubtful Sound, yesterday’s excellent Wanaka Tree shoot, and today’s spectacular Fox Glacier helicopter ride and hike, not to mention lots of fun with a bunch of great people, and I’m already declaring this trip an unforgettable success.
A Milky Way Gallery
Click any image to scroll through the gallery LARGE


")


Looking Up Down Under
Posted on July 17, 2022

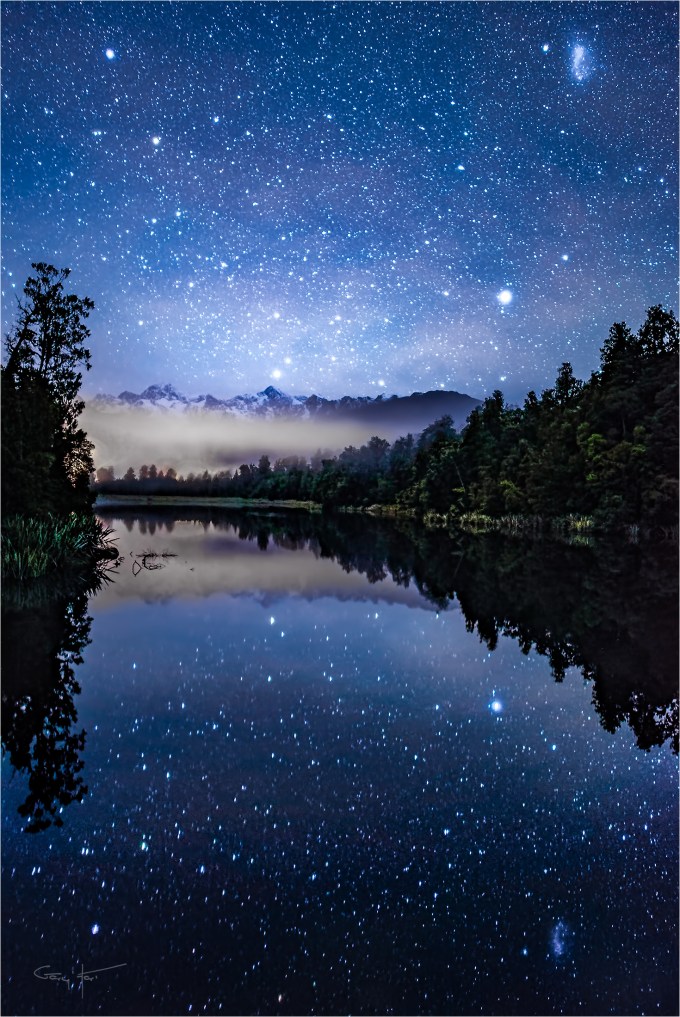
Milky Way and Small Magellanic Cloud, Lake Wakatipu, New Zealand
Sony a7SIII
Sony 14mm f/1.8 GM
ISO 1600
f/1.8
20 seconds

James Webb Space Telescope’s First Deep Field image
Are you as thrilled as I am by the mesmerizing images we’re seeing from the James Webb Space Telescope? There’s nothing like a heaping dose of perspective to remind humans of our insignificance in the grand scheme things, and these images deliver perspective in spades.
I think my favorite Webb image is the view deep into a seemingly tiny black region of sky that reveals thousands of galaxies. How tiny? According to the NASA website, “This slice of the vast universe covers a patch of sky approximately the size of a grain of sand held at arm’s length by someone on the ground.”) The light from these galaxies traveled as far as 13.1 billion years to reach us, which means we’re getting a view of our nascent Universe as it was less than a billion years after the Big Bang.
I get another dose of perspective, albeit on a much smaller scale, each time I visit the Southern Hemisphere. After a lifetime living north of the equator, I pretty much take for granted the Northern Hemisphere night sky. When I’m outside after dark, I reflexively look up and locate the Big Dipper. Using the Dipper’s pointer stars, my eyes slide to Polaris (the North Star) to locate north, then slowly scan the surrounding sky for other familiar features: bright stars Arcturus and Spica, constellations Cassiopeia and Corona Borealis, among many. If it’s dark enough, I try to pick out the Little Dipper and the Andromeda Galaxy.
Looking up at night in the Southern Hemisphere is downright disorienting. Most of the stars and constellations are completely unfamiliar (but no less beautiful), and those that are familiar (like Orion), appear “upside down.” (There’s no true up and down in space because up/down, left/right is always relative to the viewer’s frame of reference.) The Milky Way down here is reversed, and I’ll never forget the first time I watched a Southern Hemisphere moonrise and realized that it moved left (north) as it rose—duh.
A personal Southern Hemisphere highlight is the opportunity to see the Large and Small Magellanic Clouds. Like the first (only) time I saw the Taj Mahal and Stonehenge, my first view of the Magellanic Clouds was like spotting a celebrity I’d heard about my entire life but never imagined I’d see in person.
The Magellanic Clouds are satellite galaxies of our Milky Way. The Large Magellanic Cloud is about 160 light years from Earth and estimated to contain 30 billion or so stars; the Small Magellanic Cloud is about 200 light years distant and weighs in at around 3 billion stars. It also appears the the SMC orbits the LMC, making it a satellite of a satellite.
In a dark Southern Hemisphere sky, both Magellanic Clouds appear as smudges of light, faint but clearly visible. The diameter of the LMC is about 5 degrees, while the SMC spans less than 2 degrees (for reference, the Sun and Moon are each about 1/2 degree across when viewed from Earth). None of Magellanic Clouds’ individual stars are bright enough to be resolved with the human eye.
About this image
In an earlier post I detailed the night I photographed the Milky Way over Cecil Peak and Lake Wakatipu. It was the first night of the New Zealand winter photo workshop Don Smith and I do each year, and we were pretty pleased that the conditions cooperated so nicely.
We came straight here from our sunset shoot, then waited for the sky to darken enough for the Milky Way to appear. Toward the end of the shoot, once everyone was locked in and feeling good about their results, I started to look for ways to do something a little different and my eyes landed on the Magellanic Clouds. But there were a couple of problems: first, there’s a lot of sky between them and the Milky Way, which was still going to be my primary subject; second, they were both above a blob of large shrubs (or small trees) on the lakeshore.
It’s times like this that I especially love the wide field of view of my Sony 14 f/1.8 GM lens. This lens is always great in New Zealand because the Milky Way’s core here is so high in the sky, the wide field of view enables me to get lots of Milky Way and foreground. This evening I found that by going horizontal at 14mm, I could in fact get the Milky Way and Small Magellanic Cloud in my frame without crowding either too close to the border.
But now the ugly shrubs were in my frame too. The solution for that problem was simply to walk about 50 yards up the lake. Engaging the Bright Monitoring feature on my Sony a7SIII (Sony shooters need to look up this underused feature that’s fantastic for night photography—mine’s assigned to a custom button on all of my bodies), I saw in my viewfinder that the shrubs were no longer a problem.
I only shot here for about 5 minutes, but by the time I made it back to the group, the group was ready to head back to the hotel for dinner—always a good sign that everyone was happy with their results.
Here’s my Photo Tips article on Milky Way photography
New Zealand Photo Workshops
Looking Up
Click an image for a closer look, and to view a slide show.


")


")


New Zealand Beauty
Posted on June 30, 2019

Water Like Glass, Lake Wakatipu, New Zealand
Sony a7RIII
Sony 16-35 f/2.8 GM
Breakthrough neutral polarizer
5 seconds
F/16
ISO 50
I just returned from New Zealand, that remarkable upside-down world where water is clear, summer is winter, and today is yesterday (or maybe it’s the other way around). I’ve been visiting there for a few years, ostensibly to lead photo workshops, but at least as much for my own joy. Each visit focuses on the same region of the South Island, all within 100 kilometers of Queenstown, the area that Don Smith and I determined would give us the most bang for our (and our customers’) photography bucks.
New Zealand’s South Island is a land of rain forests and glaciers, where snow-capped peaks reflect in water clear enough to drink from. Lake Wakatipu is one of these lakes, narrow and S-shaped, with about the same surface area as Lake Tahoe. Wakatipu’s north and east sides are skirted by a road; the south and west sides are accessible only by boat or off-road vehicle.
This image is from the final shoot of this year’s first workshop, just before the fleeting vestiges of a spectacular sunrise disappeared above Lake Wakatipu. I have lots of pictures with more dramatic color, but as I scanned through my thumbnails in Lightroom, the serenity of this one stopped me.
While this scene is from Bob’s Cove, about a 15-minute drive west of Queenstown on the Glenorchy Road, it could be pretty much anywhere along Lake Wakatipu—or for that matter, from any of the dozens of other large and glacial lakes decorating the South Island. For this one I stood in a few inches of water and dropped to just a couple of feet above lake level. With my eye on the viewfinder, I dialed my polarizer just enough to reveal the nearby submerged lakebed without erasing the reflection of the distant peaks.
New Zealand Photo Workshop
Here is a (partial) list of favorite New Zealand features in alphabetical order, plus a brief description of each.
Aoraki (Mt. Cook)

First Light, Aoraki, New Zealand || Rising 12,349 feet above sea level, Aoraki dominates views on both sides of the Southern Alps. Paired with Mt. Tasman, Aoraki forms the cornerstone of the Lake Matheson reflection near Fox Glacier on the island’s east coast, but it makes an even more prominent anchor above many Aoraki / Mt. Cook National Park lake and glacier views.
Doubtful Sound

Reflection, Doubtful Sound, New Zealand || The most spectacular of New Zealand’s many fiords, Doubtful Sound is a narrow, 31-mile, mountain-framed passage that opens to the Tasman Sea. Accessible only by boat, the sound and its many sheltered arms reward visitors with crisp reflections, waterfalls that plunge hundreds of feet into pristine water, and (if you’re lucky) an escort by leaping dolphins.
Glenorchy/Paradise Road
Lake Light, Lake Wakatipu from the Glenorchy Road, New Zealand || Skirting the shore Lake Wakatipu north of Queenstown, the Glenorchy road winds to a quaint village of the same name at the very top of the lake. But the road’s payoff is as much the journey as the destination. On the way to Glenorchy you’ll enjoy views of scenic coves beneath rugged peaks, and expansive panoramas of the Southern Alps that doubled as the Misty Mountains in the Lord of the Rings and Hobbit movies. Beyond Glenorchy, an unpaved but navigable road continues into Paradise and the remote, dense forests of Middle Earth beyond.
Haast Pass
Blue Pools, Haast Pass, New Zealand || Connecting the glacial lakes and rolling hills on east side of the South Island to the wet and rugged west coast, the road through Haast Pass is a scenic treat by itself. Despite an array of waterfalls to choose from, my favorite stop on this route is the Blue Pools, where glacial runoff has colored the water otherworldly shades of blue and green.
Hooker Valley

Sunset, Hooker Valley, New Zealand || The Hooker Valley climbs gradually to iceberg-studded Hooker Lake beneath Aoraki (Mt. Cook), New Zealand’s highest peak. As spectacular as the destination is, this entire hike is a visual feast of turquoise glacial lakes and streams framed by towering mountain peaks.
Lake Matheson
Dark Sky Dreams, Lake Matheson, New Zealand || A reflective jewell set in a emerald rainforest, Lake Matheson provides the perfect foreground for Mt. Cook and Mt. Tasman, New Zealand’s two highest peaks.
Milky Way views

Moonlight and Milky Way, Lake Wakatipu, New Zealand || In the Northern Hemisphere prime time for the Milky Way’s brilliant core is limited by the short nights of summer. But summer solstice in the north is winter solstice on New Zealand’s South Island, and the Milky Way is visible for nearly all of the 14 hours separating dusk and dawn. Combine that with New Zealand’s spectacular scenery and inherently clean air and dark night skies, and it’s easy to understand why New Zealand features some of the best Milky Way photography in the world.
Mirror Lakes
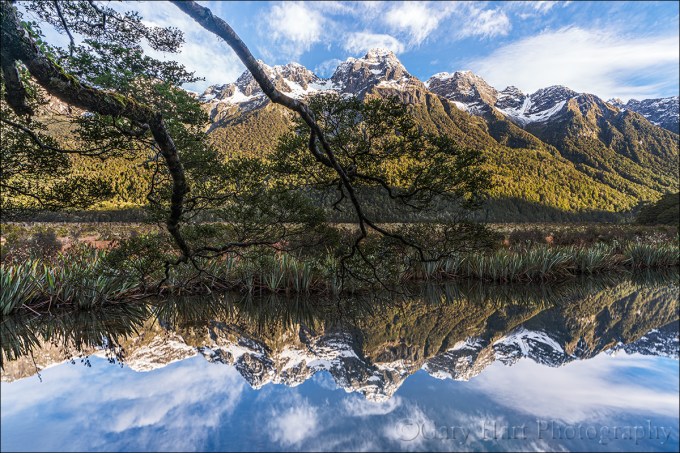
Reflection, Mirror Lakes, New Zealand || Nestled in the shadow of statuesque Mt. Eglinton, aptly named Mirror Lakes provide mountain reflections perfect enough to make you believe the world has turned upside down. The best time to visit these tiny gems is in the quiet air of early morning, before the warm sunlight bathing the mountain has reached the lake.
Lake Wanaka

Wanaka Reflection, New Zealand || The lone willow tree on the shore of Lake Wanaka is one of the most photographed trees in the world. When the lake fills with snowmelt, it encircles the willow with reflections against a backdrop of snowy peaks.
Tasman Lake
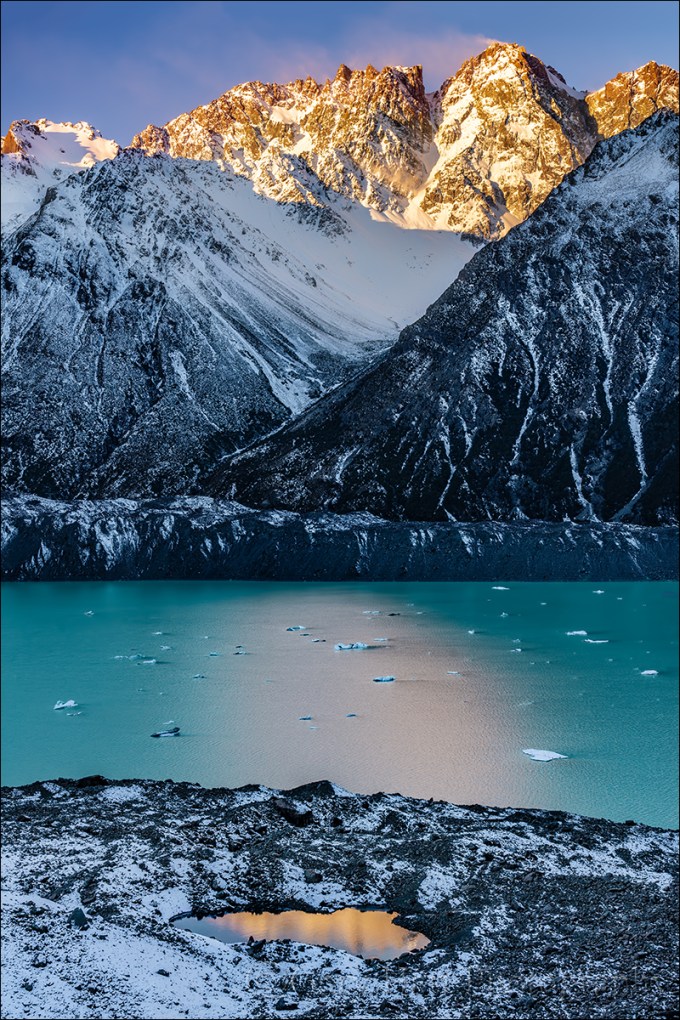
Reflection on the Rocks, Nun’s Veil and Tasman Lake, New Zealand || Short and steep, the half-mile hike to the Tasman Lake vista includes 335 stairs, but the view will help you completely forget the leg-burn. At trail’s end you’ll be treated to turquoise water dotted with chunks of ice calved from Tasman Glacier. Look up-lake to see the glacier itself. And directly below the vista is a small lakeside pool that perfectly reflects the serrated summit of 9,000-foot Nun’s Veil peak. And if you don’t want to climb the stairs, you can take the longer but much less steep trail to the shore at the end of the lake.
A New Zealand Gallery
Click an image for a closer look and to view a slide show.


A Milky Way Success Story (Phew)
Posted on June 23, 2019
Moonlight and Milky Way, Lake Wakatipu, New Zealand
Sony a7SII
Sony 16-35 f/2.8 GM
30 seconds
F/2.8
ISO 8000
Several people in this month’s New Zealand workshop had stated pretty emphatically that the Milky Way was a prime reason for attending—one guy even said his wife had told him not to come home without a Milky Way picture (we think she was joking). So no pressure. I reassured everyone in the orientation that I had multiple Milky Way shoots planned, but as the workshop’s nights ticked off, each Milky Way plan was doused—first by clouds, later by moonlight. And with the moon brightening and closer in the sky to the Milky Way each night, the we’d about run out of time.
I’d known all along that a waxing moon meant that our best Milky Way chances would come in the first half of the workshop. And I’d decided long before the workshop started that our final night would be especially problematic for the Milky Way not just because of the moon, but because of our location. But desperate times call for desperate measures, so with just a couple of days to go, I decided to recheck my calculations for about the millionth time (maybe a slight exaggeration, but you get the point). The two nights in Twizel were out of the question—the moon would be pretty much in the Milky Way. But our last night, in Queenstown…. Hmmm, maybe, just maybe, we’d have a 30-45 minute window between sunset and moonrise when the sky might be dark enough for the Milky Way to shine.
But the moon wasn’t the only obstacle. The forecast called for “high clouds,” a frustratingly vague forecast. And even if the sky darkened enough and the clouds cleared, we were in Queenstown, where I’d long ago decided that city lights and the orientation of Lake Wakatipu made finding Milky Way vantage point with a dark enough sky (no light pollution) and a nice enough foreground (lake and mountains) impossible. The moonlight and clouds risk were irrelevant if I couldn’t find a Milky Way location. But I had to give it a shot. Zooming in on the map, my eyes landed on one small tiny of lakeshore with enough of a twist that might work, though I’d never photographed there or even considered its Milky Way potential. But that was enough for me to circle the date and location and tell the group that we were going to give the Milky Way one more shot. All that was left to do was monitor the forecast and wait.
Wanting to be certain (and to avoid hunting blindly in the dark), on the way to our final sunset shoot I asked the driver to swing by my potential spot. I was relieved to confirm that the angle was good, and that there was an open, easily accessible stretch of beach. Yay. Down the road at our sunset location I just watched the clouds and hoped. The sky seemed clear enough there, but looked a little less promising back in the direction of my Milky Way location.
Arriving in twilight I hopped out of the van and checked the twilight sky—In addition to the promised high clouds, an accumulation of thicker clouds sat on the horizon more or less where the brightest part of the galactic center would be. And there were indeed a few high clouds, but Jupiter’s appearance was a relief because I knew Jupiter was on the leading edge of the Milky Way that night. Waiting for darkness, I prepared the group and just tried to stay positive. Every few minutes I’d return to my camera and fire a test frame to see if the sky was dark enough and look for any hint of moonlight.
You can’t imagine my excitement the first time my LCD displayed the faint glow of the Milky Way angling above 6000 foot Cecil Peak—we were in business. As the sky darkened, the Milky Way unfurled overhead in all its Southern Hemisphere glory, flanked by Jupiter and thousands of other stars in completely unfamiliar arrangements.
I started with my dedicated night photography setup, my Sony a7SII body and Sony 24 f/1.4 GM lens, trying a variety of horizontal and vertical compositions. After about 15 minutes I switched to my Sony 16-35 f/2.8 GM, sacrificing two stops of light for a wider field of view (more Milky Way). I liked the extra sky and stuck with that lens for the rest of the shoot.
After about 30 minutes of happy shooting we started to detect a brightening that signaled the moon’s approach behind The Remarkables (my hands-down favorite mountain range name). But rather than being a show stopper, the moonlight added a diaphanous sheen to the previously dark clouds and we kept going. As we wound down, the entire group was giddy with excitement, and I was giddy with relief. Just as we were started to pack up, I detected the faint reflection of Cecil Peak on the lake’s surface and adjusted my composition to include it.
To say that this night exceeded my expectations would be an understatement. In fact, my expectations almost dashed the entire shoot. It was a good a reminder not to get too locked in to preconceived notions. Had I stuck with my original belief that our final night in Queenstown wouldn’t work, I’d never have found a great Milky Way location—and one of the best shoots of an already great workshop would never have happened.
My tutorial on photographing the Milky Way
A Gallery of Stars
Click an image for a closer look and to view a slide show.


Off to a great start
Posted on July 10, 2018
Last Light, Lake Wakatipu, New Zealand
Sony a7R III
Sony 24-105 f/4 G
.8 seconds
F/18
ISO 50
It’s a little ironic that on my first day back from New Zealand, I’m (finally) starting a blog post about the start of my winter workshops there. When I departed for New Zealand about a month ago, I had the best intentions to post several times per week, but soon realized there was going to be precious little time for that. I’ve processed a few images from the trip, but have only just scratched the surface of what I’m certain will turn out to be the most photographically rewarding four weeks of my life. But the rewards of this trip turned out to be so much more than photographic, and I have some great stories to share.
First, a little background
I’ve been leading photo workshops for a dozen years. From the outset my friend and fellow pro photographer Don Smith and I have had a reciprocal workshop relationship: he assists a few of my workshops, and I assist a like number of his workshops. In 2013 Don and I added a collaborative workshop at the Grand Canyon during the monsoon season (lightning photography)—instead of the workshop being owned by one and assisted by the other, we share the planning, marketing, and leading responsibilities 50/50. The Grand Canyon workshop became so successful (and enjoyable for both of us) that we’ve since added collaborative workshops at the Columbia River Gorge and on the Oregon Coast.
The next frontier
The New Zealand workshops take our collaborative workshop model to a new level. Not only are they our first international workshops, they’re much longer and more immersive. We’ve always provided lodging, but for New Zealand we added transportation (including a driver) and many meals.
Organizing a 10-day, 5 town workshop half-way around the world adds unprecedented layers of complications. Not just finding the best photo locations with good backups for weather closures, but also arranging lodging, meals, and permits. Though we’d scouted our locations thoroughly, had the permits, lodging, meals, and transportation arranged, we had no idea what it would be like photographing, eating, and traveling with a group for many consecutive hours, every day for 10 days. It turns out that our anxiety was completely unfounded.
It’s a sign
After the workshop orientation we hit Glenorchy Road on the shores of Lake Wakatipu for our first sunset shoot. Following a preliminary stop at Wilson Bay, where we were treated to beautiful light on the peaks across the lake, we headed farther down the road to our sunset destination—a spectacular view of the Humboldt Mountains (among others) above the lake. The sky looked especially promising for something special, so as we drove I gave everyone a quick primer on photographing a sunstar.
We pulled up to the vista just before the sun dropped out of the clouds. With just a few minutes until it disappeared behind the mountains, everyone scrambled out of the Sprinter (the 16-passenger Mercedes van that would be our chariot for the next 10 days) and set up. The sunstar window opened and closed quickly, but it was followed by a show of color and light that turned out to be a harbinger of upcoming good fortune.
I haven’t processed those images yet, so I’m sharing this one from the previous sunset, when I photographed a sunstar from the same location. (Honestly, the group got a much better sunset than this one.)
Why winter?
Ever since Don and I scheduled this workshop, I’ve had to answer the “Why winter?” question. Most photographers get it—not only does the lower sun angle make the light better, the mountains are covered with snow, and I’ve always felt that winter weather makes great skies. And a New Zealand South Island winter isn’t much different from the kinds of winters we get in Northern California and Oregon. During the four weeks we were in New Zealand, we dealt with lows in the 20s and 30s, and highs in the 40s and 50s—cold, but unlike the summer heat most of you endured while I was in New Zealand, nothing that couldn’t be easily handled with the right clothing.
Over the next few weeks I hope to share enough New Zealand winter images that I hope will further prove my point. Until then, below you’ll find a collection of winter images, from a variety of locations, for a little vicarious cooling on a hot summer day.
New Zealand 2019
A Winter Gallery
Click an image for a closer look and slide show. Refresh the window to reorder the display.


Escaping Summer
Posted on July 2, 2018

Dawn on the Rocks, Lake Wakatipu, New Zealand
Sony a7R III
Sony 16-35 f/2.8 GM
Breakthrough 6-stop ND filter
15 seconds
F/16
ISO 50
(If you subscribe to my Image of the Month e-mail and this post seems familiar, it’s because I borrowed the text from my June message.)
I just checked the date of my last post, I couldn’t believe how long it’s been. But I have a good excuse, I swear: I’ve been busy. Busy taking pictures, busy leading workshops, busy checking in and out of hotels, busy staying warm (really)….
But I’m not complaining—not even close. For the last three weeks I’ve been in New Zealand. The day I left home, the high temperature in Sacramento was 100 degrees. Less than twenty-four hours later I deplaned in Queenstown, New Zealand to a refreshing 40 degrees (or, as we say Down Under, 5 degrees). While this winter chill is a nice bonus, I’m here on New Zealand’s South Island mostly because winter is hands-down the best time to photograph this spectacular country. Last Thursday (or, as you say Up Over, Wednesday) Don Smith and I wrapped up our first ever New Zealand Winter workshop, but after two weeks of down jackets and wool hats, I’m not ready to return to summer, not even close.
It’s impossible to pick my favorite thing about this trip. I could cite the all-day cruises on Doubtful Sound (though we learned it should really be named Doubtful Fjord), plowing through glassy water framed by towering cliffs and plunging waterfalls, and shadowed by leaping dolphins. Or the breathtaking helicopter ride onto Fox Glacier, where we explored blue ice-caves, climbed through gaping crevices, and observed firsthand that a glacier is so much more than a featureless sheet of ice.
But it’s not just about the big stuff here in “Lord of the Rings” land. Something else that’s starting to sink in about New Zealand is the routine beauty that’s pretty much everywhere I look. Snow-capped peaks in all directions, daily sunrises and sunsets that become almost monotonous in their beauty, and pristine glacial lakes and streams with blues and greens that rival anything in the Canadian Rockies.
This image is from last Thursday’s sunrise, our first workshop’s final shoot. Carved thousands of years ago by massive glaciers, Lake Wakatipu is one of New Zealand’s largest lakes. Arriving just as the first hints of dawn touched the clouds, we watched the scene slowly materialize out of the darkness like a developing Polaroid. The snowy peaks appeared first, followed soon by textured clouds above the turquoise lake. As the sky brightened further, the opaque lakebed transformed into an intricate mosaic of colorful stones.
I moved along the lakeshore until I found a group of protruding rocks to anchor my frame. To emphasize the foreground, I dropped low and framed the scene with a wide lens. I used a neutral density filter to enable an exposure long enough to smooth the gentle waves rippling the lake surface. The long exposure also gave me the opportunity to savor the sublime scene and say a small prayer of gratitude that my trip is not over yet…
Join Don Smith and Me in New Zealand in 2019
New Zealand So Far (believe me, I’m just scratching the surface)
Click an image for a closer look and slide show. Refresh the window to reorder the display.


Greetings from Tomorrowland
Posted on July 3, 2017

Overcast, Lake Wakatipu, New Zealand
Sony a7R II
Sony/Zeiss 16-35
1/15 second
F/13
ISO 200
One of my favorite childhood books was “Upside-Down Town,” about a little town where everything was opposite the rest of the world. People walked backward so they could see where they’d been, stores paid people to take their goods, and (my personal favorite at the time) schools were only in session on holidays.
That’s kind of the way it feels visiting New Zealand in July. When I left Sacramento it was 110 degrees. After a week on Kauai (I was working the whole time, I swear), where it was tank tops and flip-flops 24/7, I arrived in the teeth of a Queenstown, New Zealand winter. Every day has been some variation of gray and drizzly, with high temperatures around 40 (that’s Fahrenheit—still haven’t embraced the Celsius thing) and lows in the 20s. Overnight my summer-wear was replaced by fleece, wool, and down full body armor. But I’m not here for comfort, and New Zealand has reminded me why winter is my favorite season for photography.
Of course this Southern Hemisphere winter in July wasn’t a surprise, but it definitely was a shock. Other adjustments (driving on the left; to leave a building, we don’t look for the Exit, we have to find the “Way Out”; and what’s with these power outlets?) have been relatively minor. And I’m still not used to the fact that as far as my wife and family back home are concerned, it’s pretty much always tomorrow here.
But one thing that’s universal is beauty, which is simply off-the-charts here. I was last in New Zealand in 1995, and though I wasn’t here as a photographer (in my previous life I traveled to train programmers), I found New Zealand so beautiful that I carried a camera on my seven-mile sunrise run each morning. Now I’m back with my good friend, frequent partner in crime, and fellow professional photographer, Don Smith. We’re here to scout for a New Zealand photo workshop that will debut in June (winter!) of 2018.
Our first couple of days were in the Queenstown area, where we explored the shores of the spectacular Lake Wakatipu. We could probably do an entire workshop in the Queenstown area, but that would only just scratch the surface down here. Today (tomorrow to you) we’re in Te Anau, having just returned from an all-day cruise on even more spectacular Doubtful Sound. Other locations on this week’s itinerary include Wanaka, Milford Sound, and Fox Glacier.
I’m sharing here my first of what will be many New Zealand images. On the road from Queenstown to Te Anau, we skirted the shore of the south arm of Lake Wakatipu. It had been raining on and off all day, a light rain with no wind, ideal conditions for photography. The snow-capped mountains that flank the entire west side of the lake were shrouded in clouds, but the light was great and we stopped at several locations to photograph.
Rain felt imminent as we pulled off at an unmarked roadside vista, hopped out for a quick reconnaissance, and rushed back to the car for our gear. Taking different routes to the lake, we each found scenes that excited us. Don concentrated on a creek flowing into the lake near the car, while I walked a hundred yards or so up the shore toward a tree topping a dark rock that sloped into the lake, pausing to click a frame or two along the way.
The crescent-shaped beach was naturally sheltered, especially down in my direction. With no wind or waves to disturb the surface, the lake surface here was like turquoise glass that clearly revealed the small, smooth beach rocks continuing beneath the water, and returning crisp reflections of the cloud-shrouded mountains across the lake.
Using the tree and sloping rock to frame the right side of my scene, I played with a variety of compositions. I started with a foreground that included two or three microwave-size rocks lodged in the beach and protruding from the water, gradually moving closer to the tree until my scene was simplified to what you see here. I could have stayed and worked this spot for hours, but soon the wind kicked up and a light rain started and it was time to move on. Later today we’ll drive back by this spot and my fingers will be crossed that the mountains will be out and I’ll get an opportunity to capture it differently.
After four days in New Zealand I’ve completely adjusted to the weather, can now quickly navigate my way out of any building, and am pretty confident I’ll be okay with the left-hand drive thing by the time I fly home. But I’m still trying to wrap my head around the fact that according to my airline itinerary, I’ll actually arrive home before I left. Tomorrowland indeed.
Workshop Schedule || Purchase Prints
A Cloudy Day Gallery
Click an image for a closer look and slide show. Refresh the window to reorder the display.


