Eloquent Images by Gary Hart
Insight, information, and inspiration for the inquisitive nature photographer
The Evolution of a Stargazer
Posted on May 19, 2019

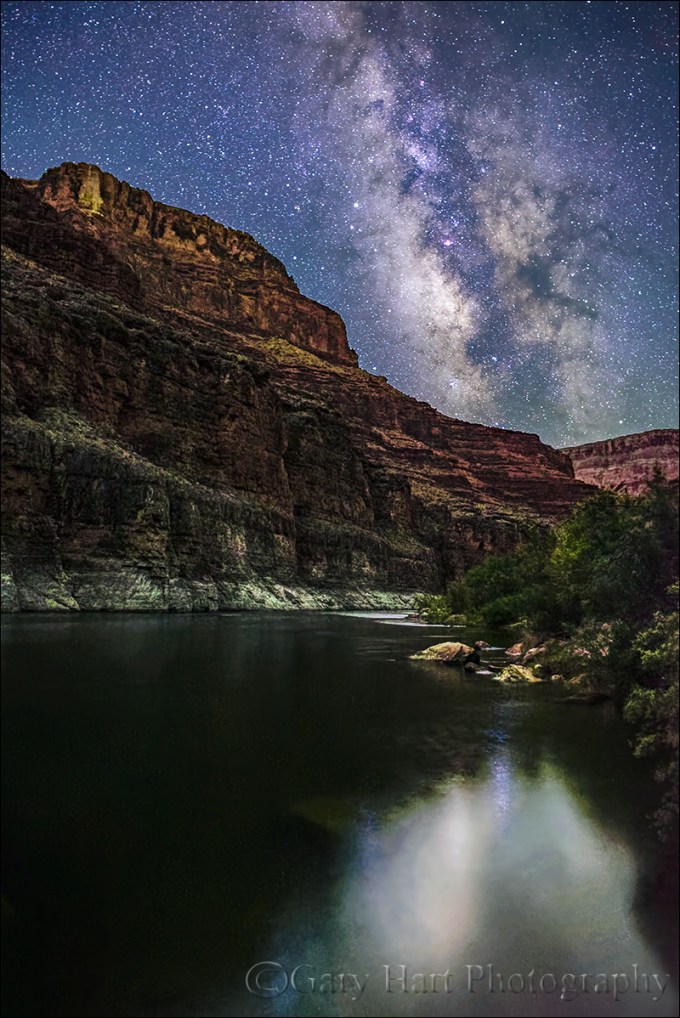
Dark Sky, Milky Way Above the Colorado River, Grand Canyon
Sony a7SII
Sony 24 f/1.4 GM
20 seconds
F/1.4
ISO 6400
In the Beginning
I grew up in a camping family. My dad was a minister, so pricey airline/hotel/restaurant vacations were out of the question for the five of us, as of course were weekend camping trips. But for as far back as I can remember, each summer my family went camping somewhere. Usually it was a week or two in Yosemite, Sequoia/Kings Canyon, the California coast, or some other relatively close scenic destination, but every few years we’d hook up the tent trailer, pile into the station wagon, and take a road trip.
The one constant in this numbing succession of summer campsites was the dark sky far from city lights, and the vast sprinkle of stars that mesmerized me. I soon learned that stargazing is the one thing a child can do for as long as he wants after bedtime without getting in trouble. I enjoyed playing connect-the-dots with the stars, identifying named constellations, or making up my own. It turned out all this scanning was a great way to catch shooting stars, and soon my goal was to stay awake until one flashed across my vision. And satellites were still something of a novelty back then, so another camping bedtime exercise was to slowly scan the sky looking for a “star” that moved; when I found one, I’d track it across the until it disappeared behind the horizon—or my eyelids.
At some point I became aware of a hazy band of light stretching across my night sky. On the darkest nights, when my vantage point faced the right direction, the widest and brightest part of this band reminded me of sugar spilled on pooled ink. But the Milky Way wasn’t as dramatic some of the other stuff in my night skies, so the childhood Me was oblivious to its inherent coolness for many years.
On these nightly scans I was more interested in the apparent randomness in the patterns overhead—the consistency of certain stellar arrangements, while a few bright “stars” would be in different positions each night relative to these recognizable patterns. Someone explained to me the difference between stars and planets, that stars were far and planets were close, and that was good enough for me. For a while.
Then, when I was about ten, my best friend and I did a science project on comets, which ignited a sudden and intense interest in all things astronomical. I was gifted a second-hand telescope by a friend of my dad, which we’d set up in my best friend’s front yard on summer nights. Through the telescope the stars remained (boring) points of light, no matter how much I magnified them, but the planets became fascinating disks, each with its own personality. I learned that Venus and Mercury were actually crescents of varying size, just like a mini moon. After searching in vain for the canals on Mars, I was thrilled to (barely) see Saturn’s rings, and to watch the nightly dance of the four pin-prick Galilean moons.
All this stargazing helped me develop a rudimentary understanding of celestial relationships, the vastness of space, the sun’s dominant role in our solar system, and its utter insignificance in the Universe. And the more I learned about astronomy, the more fascinating our home galaxy became. Rather than just passively observing it, the Milky Way became a catalyst for pondering the mysteries of the Universe and my favorite night sky feature.
Fast forward…
Then came college, marriage, family, jobs, cameras (lots of cameras) until I found myself at the bottom of the Grand Canyon on this moonless night in May. It was the second night of my annual Grand Canyon Raft Trip for Photographers, a highlight in a year full of highlights, and my first opportunity each year to reconnect with my favorite celestial feature. After night one hadn’t worked out, I told myself that we still had four more chances, but at bedtime on night two I was a little more pessimistic.
The prescription for a successful Milky Way photograph includes a clear view of the southern sky with a nice foreground. There’s no shortage of foreground in the Grand Canyon, but southern sky views are not quite so plentiful. The first night had been spectacularly clear, but our otherwise spectacular campsite was on an east/west trending section of river (I try to select each campsite for its astrophotography potential, but the sites can’t be reserved, and sometime there are other factors to consider), which placed the rising galactic core behind a towering canyon wall. On our second day we’d scored prime real estate on a north/south section of river a few miles upstream from Desert View, but now thin clouds threatened to spoil the show.
In May the Milky Way doesn’t usually crest the canyon walls until 2:00 or 3:00 a.m. (depending on the location), but as we prepared for bed that second day, only a handful of stars smoldered in the gauzy veil above. But with six hours for conditions to improve, I prepared anyway, identifying my foreground, setting up my tripod next to my cot, and mounting my Sony a7SII body and Sony 24mm f/1.4 lens with ISO, f-stop, and shutter speed set.
Waking a little before 3:00, I instantly saw far more stars than had been visible at bedtime. But more importantly, there was the Milky Way, directly overhead. I sat up and peered toward the river—the soft glow of several LCD screens told me others were already shooting, so I grabbed my tripod and stumbled down to the river’s edge in the dark (to avoid illuminating the others’ scene). It’s quite amazing how well you can see by the light of the Milky Way once your eyes adjust.
After a few frames I saw that a few thin clouds remained, creating interesting patterns against the starry background. By about 4 a.m., an hour-and-a-half before sunrise, loss of contrast in my images that wasn’t visible to my eyes told me the approaching sun was already starting to brighten the sky. I photographed for about an hour that morning, then managed to catch another 45 minutes of contented sleep before the guides’ coffee call got me up for good.
Workshop Schedule || Purchase Prints
I continue updating my Photo Tips articles—here’s my just-updated Milky Way article,
with all you need to know to locate and photograph our home galaxy
How to photograph the Milky Way
See the Milky Way
Look heavenward on a moonless (Northern Hemisphere) summer night far from city light. The first thing to strike you is the shear volume of stars, but as your eyes adjust, your gaze is drawn to a luminous band spanning the sky. Ranging from magnificently brilliant to faintly visible, this is the Milky Way, home to our sun and nearly a half trillion other stars of varying age, size, and temperature.
Size and shape
Though every star you’ve ever seen is part of our Milky Way galaxy, stargazers use the Milky Way label more specifically to identify this river of starlight, gas, and dust spanning the night sky. As you feast your eyes, appreciate that some of the Milky Way’s starlight has traveled 25,000 years to reach your eyes, and light from a star on one edge of the Milky Way would take 100,000 years to reach the other side.

Milky Way look-alike spiral galaxy: This is what our galaxy would look like from the outside, looking in. (The individual stars visible here are “local” and not part of the spiral galaxy depicted here.) Earth would be between two of the spiral arms, about halfway out from the center.
The rest of the sky appears to be filled with far more discrete stars than the region containing the Milky Way, but don’t let this deceive you. Imagine that you’re out in the countryside where the lights of a distant city blend into a homogeneous glow—similarly, the stars in the Milky Way’s luminous band are simply too numerous and distant to resolve individually. On the other hand, the individual pinpoints of starlight that we name and mentally assemble into constellations are just closer, much like the lights of nearby farmhouses. And the dark patches in the Milky Way aren’t empty space—like the trees and mountains that block our view of the city, they’re starlight-blocking interstellar dust and gas, remnants of exploded stars and the stuff of future stars.
Just as it’s impossible to know what your house looks like by peering out a window, it’s impossible to know what the Milky Way looks like by simply looking up on a dark night. Fortunate for us, really smart people have been able to infer from painstaking observation, measurement, reconstruction, and comparison with other galaxies that our Milky Way is flat (much wider than it is tall) and spiral shaped, like a glowing pinwheel, with two major arms and several minor arms spiraling out from its center. Our solar system is in one of the Milky Way’s minor arms, a little past midway between the center and outer edge.
Blinded by the light
Sadly, artificial light and atmospheric pollution have erased the view of the Milky Way for nearly a third of the world’s population, and eighty percent of Americans. Worse still, even though some part of the Milky Way is overhead on every clear night, many people have never seen it.
Advances in digital technology have spurred a night photography renaissance that has enabled the Milky Way challenged to enjoy images of its splendor from the comfort of their recliner, but there’s nothing quite like viewing it in person. With just a little knowledge and effort, you too can enjoy the Milky Way firsthand; add the right equipment and a little more knowledge, and you’ll be able to photograph it as well.
Horizon to Horizon
Understanding that our Solar System is inside the Milky Way’s disk makes it easier to understand why we can see some portion of the Milky Way on any night (assuming the sky is dark enough). In fact, from our perspective, the plane of the Milky Way forms a complete ring around Earth (but of course we can only see half the sky at any given time), with its brightness varying depending on whether we’re looking toward our galaxy’s dense center or sparse outer region.
Where the action is

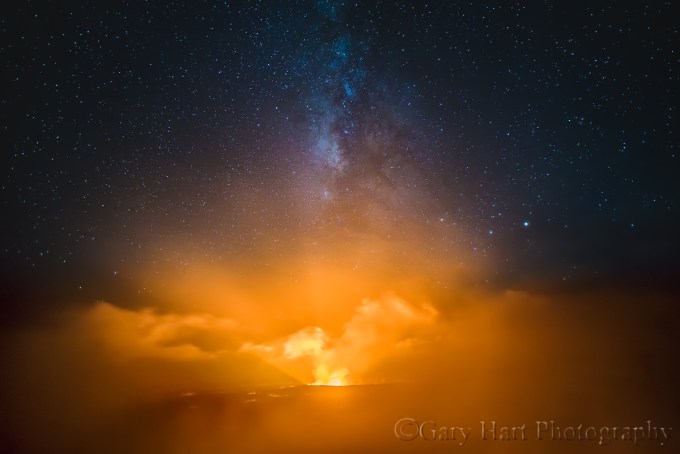
The Milky Way’s brilliant center, its “galactic core,” radiates above Kilauea on Hawaii’s Big Island
Though the plane of the Milky Way stretches all the way across our sky, when photographers talk about photographing the Milky Way, they usually mean the galactic core—the Milky Way’s center and most densely packed, brightest region. Unfortunately, our night sky doesn’t always face the galactic core, and there are many months when this bright region is not visible at all.
To understand the Milky Way’s visibility in our night sky, it helps to remember that Earth both rotates on its axis (a day), and revolves around the sun (a year). When the side of the planet we’re on rotates away from the sun each day, the night sky we see is determined by our position on our annual trip around the sun—when Earth is between the sun and the galactic core, we’re in position to see the most brilliant part of the Milky Way; in the months when the sun is between earth and the galactic core, the bright part of the Milky Way can’t be seen.
Put in terrestrial terms, imagine you’re at the neighborhood playground, riding a merry-go-round beneath a towering oak tree. You face outward, with your back to the merry-go-round’s center post. As the merry-go-round spins, your view changes—about half of the time you’d rotate to face the oak’s trunk, and about half the time your back is to the tree. Our solar system is like that merry-go-round: the center post is the sun, the Milky Way is the tree, and in the year it takes our celestial merry-go-round to make a complete circle, we’ll face the Milky Way about half the time.
Finding the Milky Way
Just like every other celestial object outside our solar system, the Milky Way’s position in our sky changes with the season and time of night you view it, but it remains constant relative to the other stars and constellations. This means you can find the Milky Way by simply locating any of the constellations in the galactic plane. Here’s an alphabetical list of the constellations* through which the Milky Way passes (with brief notes by a few of the more notable constellations):
- Aquila
- Ara
- Auriga—faintest
- Canis Major—faint
- Carina
- Cassiopeia—faint; its easily recognized “w” (or “m”) shape makes Cassiopeia a good landmark for locating the Milky Way in the northern sky
- Cepheus
- Circinus
- Crux
- Cygnus—bright
- Gemini
- Lacerta
- Lupus
- Monoceros
- Musca
- Norma
- Ophiuchus
- Orion—faint; another easy to recognize constellation that’s good for finding the galactic plane
- Perseus—faint
- Puppis
- Pyxis
- Sagitta
- Sagittarius—brightest, galactic core
- Scorpius—bright
- Scutum
- Serpens
- Taurus—faint
- Triangulum
- Vela
- Vulpecula
* Constellations are comprised of stars that only appear connected by virtue of our Earth-bound perspective—a constellation is a direction in the sky, not a location in space.
If you can find any of these constellations, you’re looking in the direction of some part of the Milky Way (if you can’t see it, your sky isn’t dark enough). But most of us want to see the center of the Milky Way, where it’s brightest, most expansive, and most photogenic. The two most important things to understand about finding the Milky Way’s brilliant center are:
- From our perspective here on Earth, the galactic core is in Sagittarius (and a couple of other constellations near Sagittarius)—when Sagittarius is visible, so is the brightest part of the Milky Way (assuming you can find a dark enough sky)
- Earth’s night side most directly faces Sagittarius in the Northern Hemisphere’s summer months (plus part of spring and autumn)
Armed with this knowledge, locating the Milky Way’s core is as simple as opening one of my (too many) star apps to find out where Sagittarius is. Problem solved. Of course it helps to know that the months when the galactic core rises highest and is visible longest are June, July, and August, and to not even consider looking before mid-March, or after mid-October. If you can’t wait until summer and don’t mind missing a little sleep, starting in April, Northern Hemisphere residents with a dark enough sky can catch Sagittarius and the galactic core rising in the southeast shortly before sunrise. After its annual premier in April, the Milky Way’s core rises slightly earlier each night and is eventually well above the horizon by nightfall.
People who enjoy sleep prefer doing their Milky Way hunting in late summer and early autumn, when the galactic core has been above the horizon for most of the daylight hours, but remains high in the southwest sky as soon as the post-sunset sky darkens enough for the stars to appear. The farther into summer and autumn you get, the closer to setting beneath the western horizon the Milky Way will be at sunset, and the less time you’ll have before it disappears.
Into the darkness
The Milky Way is dim enough to be easily washed out by light pollution and moonlight, so the darker your sky, the more visible the Milky Way will be. To ensure sufficient darkness, I target moonless hours, from an hour or so after sunset to an hour before sunrise. New moon nights are easiest because the new moon rises and sets (more or less) with the sun and there’s no moon all night. But on any night, if you pick a time before the moon rises, or after it sets, you should be fine. Be aware that the closer the moon is to full, the greater the potential for its glow to leak into the scene from below the horizon.
Getting away from city lights can be surprisingly difficult (and frustrating). Taking a drive out into the countryside near home is better than nothing, and while it may seem dark enough to your eyes, a night exposure in an area that you expect to be dark enough reveals just how insidious light pollution is as soon as you realize all of your images are washed out by an unnatural glow on the horizon. Since the galactic core is in the southern sky in the Northern Hemisphere, you can mitigate urban glow in your Milky Way images by heading south of any nearby population area, putting the glow behind you as you face the Milky Way.
Better than a night drive out to the country, plan a trip to a location with a truly dark sky. For this, those in the less densely populated western US have an advantage. The best resource for finding world-class dark skies anywhere on Earth is the International Dark-Sky Association. More than just a resource, the IDA actively advocates for dark skies, so if the quality of our night skies matters to you, spend some time on their site, get involved, and share their website with others.
Photograph the Milky Way
Viewing the Milky Way requires nothing more than a clear, dark sky. (Assuming clean, clear skies) the Milky Way’s luminosity is fixed, so our ability to see it is largely a function of the darkness of the surrounding sky—the darker the sky, the better the Milky Way stands out. But because our eyes can only take in a fixed amount of light, there’s a ceiling on our ability to view the Milky Way with the unaided eye.
A camera, on the other hand, can accumulate light for a virtually unlimited duration. This, combined with technological advances that continue increasing the light sensitivity of digital sensors, means that when it comes to photographing the Milky Way, well…, the sky’s the limit. As glorious as it is to view the Milky Way with the unaided eye, a camera will show you detail and color your eyes can’t see.
Knowing when and where to view the Milky Way is a great start, but photographing the Milky Way requires a combination of equipment, skill, and experience that doesn’t just happen overnight (so to speak). But Milky Way photography doesn’t need to break the bank, and it’s not rocket science.
Equipment
Bottom line, photographing the Milky Way is all about maximizing your ability to collect light: long exposures, fast lenses, high ISO.
Camera
In general, the larger your camera’s sensor and photosites (the “pixels” that capture the light), the more efficiently it collects light. Because other technology is involved, there’s not an absolute correlation between sensor and pixel size and light gathering capability, but a small, densely packed sensor almost certainly rules out your smartphone and point-and-shoot cameras for anything more than a fuzzy snap of the Milky Way. At the very least you’ll want a mirrorless or DSLR camera with an APS-C (1.5/1.6 crop) size sensor. Better still is a full frame mirrorless or DSLR camera. (A 4/3 Olympus or Panasonic sensor might work, but as great as these cameras are for some things, high ISO photography isn’t their strength.
Another general rule is that the newer the technology, the better it will perform in low light. Even with their smaller, more densely packed sensors, many of today’s top APS-C bodies outperform in low light full frame bodies that have been out for a few years, so full frame or APS-C, if your camera is relatively new, it will probably do the job.
If you’re shopping for a new camera and think night photography might be in your future, compare your potential cameras’ high ISO capabilities—not their maximum ISO. Read reviews by credible sources like DP Review, Imaging Resource, or DxOMark (among many others) to see how your camera candidates fare in objective tests.
An often overlooked consideration is the camera’s ability to focus in extreme low light. Autofocusing on the stars or landscape will be difficult to impossible, and you’ll not be able to see well enough through a DSLR’s viewfinder to manually focus. Some bodies with a fast lens might autofocus on a bright star or planet, but it’s not something I’d count on (though I expect within a few years before this capability will become more common).
Having photographed for years with Sony and Canon, and working extensively with most other mirrorless and DSLR bodies in my workshops, I have lots of experience with cameras from many manufacturers. In my book, focus peaking makes mirrorless the clear winner for night focusing. Sony’s current mirrorless bodies (a7RII/RIII, a7S/SII) are by far the easiest I’ve ever used for focusing in the dark—what took a minute or more with my Canon, I can do in seconds using focus peaking with my Sony bodies (especially the S bodies). I use the Sony a7SII, but when I don’t want to travel with a body I only use for night photography, the Sony a7RIII does the job too. Of the major DSLR brands, I’ve found Canon’s superior LCD screen (as of 2019) makes it much easier to focus in extreme low light than Nikon. (More on focus later.)
Lens
Put simply, to photograph the Milky Way you want fast, wide glass—the faster the better. Fast to capture as much light as possible; wide to take in lots of sky. A faster lens also makes focus and composition easier because the larger aperture gathers more light. How fast? F/2.8 or faster—preferably faster. How wide? At least 28mm, and wider is better still. I do enough night photography that I have a dedicated, night-only lens—my original night lens was a Canon-mount Zeiss 28mm f/2; my current night lens is the Sony 24mm f/1.4.
Tripod
It goes without saying that at exposure times up to 30 seconds, you’ll need a sturdy tripod and head for Milky Way photography. You don’t need to spend a fortune, but the more you spend, the happier you’ll be in the long run (trust me). Carbon fiber provides the best combination of strength, vibration reduction, and light weight, but a sturdy (albeit heavy) aluminum tripod will do the job.
An extended centerpost is not terribly stable, and a non-extended centerpost limits your ability to spread the tripod’s legs and get low, so I avoid tripods with a centerpost. But if you have a sturdy tripod with a centerpost, don’t run out and purchase a new one—just don’t extend the centerpost when photographing at night.
Read my tips for purchasing a tripod here.
Other stuff
To eliminate the possibility of camera vibration I recommend a remote release; without a remote you’ll risk annoying all within earshot with your camera’s 2-second timer beep. You’ll want a flashlight or headlamp for the walk to and from the car, and your cell phone for light while shooting. And it’s never a bad idea to toss an extra battery in your pocket. And speaking of lights, never, never, NEVER use a red light for night photography (more on this later).
Getting the shot
Keep it simple
There are just so many things that can go wrong on a moonless night when there’s not enough light to see camera controls, the contents of your bag, and the tripod leg you’re about to trip over. After doing this for many years, both on my own and helping others in workshops, I’ve decided that simplicity is essential.
Simplicity starts with paring down to the absolute minimum camera gear: a sturdy tripod, one body, one lens, and a remote release (plus an extra battery in my pocket). Everything else stays at home, in the car, or if I’m staying out after a sunset shoot, in my bag.
Upon arrival at my night photography destination, I extract my tripod, camera, lens (don’t forget to remove the polarizer), and remote release. I connect the remote and mount my lens—if it’s a zoom I set the focal length at the lens’s widest—then set my exposure and focus (more on exposure and focus below). If I’m walking to my photo site, I carry the pre-exposed and focused camera on the tripod (I know this makes some people uncomfortable, but if you don’t trust your tripod head enough to hold onto your camera while you’re walking, it’s time for a new head), trying to keep the tripod as upright and stable as possible as I walk.
Flashlights/headlamps are essential for the walk/hike out to to and from my shooting location, but while I’m there and in shoot mode, it’s no flashlights, no exceptions. This is particularly important when I’m with a group. Not only does a flashlight inhibit your night vision, its light leaks into the frame of everyone who’s there. And while red lights may be better for your night vision and are great for telescope view, red light is especially insidious about leaking into everyone’s frame, so if you plan to take pictures, no red light! If you follow my no flashlight rule once the photography begins, you’ll be amazed at how well your eyes adjust. I can operate my camera’s controls in the dark—it’s not hard with a little practice, and well worth the effort to learn. If I ever do need to see my camera to adjust something, or if I need to see to move around, my cell phone screen (not the phone’s flashlight, just its illuminated screen) gives me all the light I need.
Composition
A good Milky Way image is distinguished from an ordinary Milky Way image by its foreground. Simply finding a location that’s dark enough to see the Milky Way is difficult enough; finding a dark location that also has a foreground worthy of pairing with the Milky Way usually takes a little planning.
Since the Milky Way’s center is in the southern sky (for Northern Hemisphere observers), I look for remote (away from light pollution) subjects that I can photograph while facing south (or southeast or southwest, depending on the month and time of night). Keep in mind that unless you have a ridiculous light gathering camera (like the Sony a7S or a7S II) and an extremely fast lens (f/2 or faster), your foreground will probably be more dark shape than detail. Water’s inherent reflectivity makes it a good foreground subject as well, especially if the water includes rocks or whitewater.
When I encounter a scene I deem photo worthy, not only do I try to determine its best light and moon rise/set possibilities, I also consider its potential as a Milky Way subject. Can I align it with the southern sky? Are there strong subjects that stand out against the sky? Is there water I can include in my frame?
I’ve found views of the Grand Canyon from the North Rim, the Kilauea Caldera, and the bristlecone pines in California’s White Mountains that work spectacularly. And its hard to beat the dark skies and breathtaking foreground possibilities at the bottom of the Grand Canyon. On the other hand, while Yosemite Valley has lots to love, you don’t see a lot of Milky Way images from Yosemite Valley because not only is there a lot of light pollution, and Yosemite’s towering, east/west trending granite walls give its south views an extremely high horizon that blocks much of the galactic core from the valley floor.
The last few years I’ve started photographing the Milky Way above the spectacular winter scenery of New Zealand’s South Island, where the skies are dark and the Milky Way is higher in the sky than it is in most of North America.
To maximize the amount of Milky Way in my frame, I generally (but not always) start with a vertical orientation that’s at least 2/3 sky. On the other hand, I do make sure to give myself more options with a few horizontal compositions as well. Given the near total darkness required of a Milky Way shoot, it’s often too dark to see well enough to compose that scene. If I can’t see well enough to compose I guess at a composition, take a short test exposure at an extreme (unusable) ISO to enable a relatively fast shutter speed (a few seconds), adjust the composition based on the image in the LCD, and repeat until I’m satisfied.
Focus
Needless to say, when it’s dark enough to view the Milky Way, there’s not enough light to autofocus (unless you have a rare camera/lens combo that can autofocus on a bright star and planet), or even to manually focus with confidence. And of all the things that can ruin a Milky Way image (not to mention an entire night), poor focus is number one. Not only is achieving focus difficult, it’s very easy to think you’re focused only to discover later that you just missed.
Because the Milky Way’s focus point is infinity, and you almost certainly won’t have enough light to stop down for more depth of field, your closest foreground subjects should be far enough away to be sharp when you’re wide open and focused at infinity. Before going out to shoot, find a hyperfocal app and plug in the values for your camera and lens at its widest aperture. Even though it’s technically possible to be sharp from half the hyperfocal distance to infinity, the kind of precise focus focusing on the hyperfocal point requires is difficult to impossible in the dark, so my rule of thumb is to make sure my closest subject is no closer than the hyperfocal distance.
For example, I know with my Sony 24mm f/1.4 wide open on my full frame Sony a7SII, the hyperfocal distance is about 50 feet. If I have a subject that’s closer (such as a bristlecone pine), I’ll pre-focus (before dark) on the hyperfocal distance, or shine a bright light on an object at the hyperfocal distance and focus there, but generally I make sure everything is at least 50 feet away. Read more about hyperfocal focus in my Depth of Field article.
By far the number one cause of night focus misses is the idea that you can just dial any lens to infinity; followed closely by the idea that focused at one focal length means focused at all focal lengths. Because when it comes to sharpness, almost isn’t good enough, if you have a zoom lens, don’t even think of trying to dial the focus ring to the end for infinity. And even for most prime lenses, the infinity point is a little short of all the way to the end, and can vary slightly with the temperature and f-stop. Of course if you know your lens well enough to be certain of its infinity point by feel (and are a risk taker), go for it. And that zoom lens that claims to be parfocal? While it’s possible that your zoom will hold focus throughout its entire focal range, regardless of what the manufacturer claims, I wouldn’t bet an entire shoot on it without testing first.
All this means that the only way to ensure night photography sharpness is to focus carefully on something before shooting, refocus every time your focal length changes, and check focus frequently by displaying and magnifying an image on your LCD. To simplify (there’s that word again), when using a zoom lens, I usually set the lens at its widest focal length, focus, verify sharpness, and (once I know I’m focused) never change the focal length again.
While the best way to ensure focus is to set your focal length and focus before it gets dark, sometimes pre-focusing isn’t possible, or for some reason you need to refocus after darkness falls. If I arrive at my destination in the dark, I autofocus on my headlights, a bright flashlight, or a laser 50 feet or more away. And again, never assume you’re sharp by looking at the image that pops up on the LCD when the exposure completes—always magnify your image and check it after you focus.
For more on focusing in the dark, including how to use stars to focus, read my Starlight Photo Tips article.
Exposure
Exposing a Milky Way image is wonderfully simple once you realize that you don’t have to meter—because you can’t (not enough light). Your goal is simply to capture as many photons as you can without damaging the image with noise, star motion, and lens flaws.
Basically, with today’s technology you can’t give a Milky Way image too much light—you’ll run into image quality problems before you overexpose a Milky Way image. In other words, capturing the amount of light required to overexpose a Milky Way image is only possible if you’ve chosen an ISO and/or shutter speed that significantly compromises the quality of the image with excessive noise and/or star motion.
In a perfect world, I’d take every image at ISO 100 and f/8—the best ISO and f-stop for my camera and lens. But that’s not possible when photographing in near total darkness—a usable Milky Way image requires exposure compromises. What kind of compromises? The key to getting a properly exposed Milky Way image is knowing how far you push your camera’s exposure settings before the light gained isn’t worth the diminished quality. Each exposure variable causes a different problem when pushed too far:
- ISO: Raising ISO to increase light sensitivity comes with a corresponding increase in noise that muddies detail. The noise at any particular ISO varies greatly with the camera, so it’s essential to know your camera’s low-light capability(!). Some of the noise can be cleaned up with noise reduction software (I use Topaz DeNoise 6)—the amount that cleans up will depend on the noise reduction software you use, your skill using that software, and where the noise is (is it marring empty voids or spoiling essential detail?).
- Shutter speed: The longer the shutter stays open, the more motion blur spreads the stars’ distinct pinpoints into streaks. I’m not a big fan of formulas that dictate star photography shutter speeds because I find them arbitrary and inflexible, and they fail to account for the fact that the amount of apparent stellar motion varies with the direction you’re composing (you’ll get less motion the closer to the north or south poles you’re aimed). My general shutter-speed rule of thumb is 30-seconds or less, preferably less—I won’t exceed 30 seconds, and do everything I can to get enough light with a faster shutter speed.
- F-stop: At their widest apertures, lenses tend to lose sharpness (especially on the edges) and display optical flaws like comatic aberration (also called coma) that distorts points of light (like stars) into comet shaped blurs. For many lenses, stopping down even one stop from wide open significantly improves image quality.
Again: My approach to metering for the Milky Way is to give my scene as much light as I can without pushing the exposure compromises to a point I can’t live with. Where exactly is that point? Not only does that question require a subjective answer that varies with each camera body, lens, and scene, as technology improves, I’m less forgiving of exposure compromises than I once was. For example, when I started photographing the Milky Way with my Canon 1DS Mark III, the Milky Way scenes I could shoot were limited because my fastest wide lens was f/4 and I got too much noise when I pushed my ISO beyond 1600. This forced me compromise by shooting wide open with a 30-second shutter speed to achieve even marginal results. In fact, given these limitations, despite trying to photograph the Milky Way from many locations, when I started the only Milky Way foreground that worked well enough was Kilauea Caldera, because it was its own light source (an erupting volcano).
Today (mid-2019) I photograph the Milky Way with a Sony a7S II and a Sony 24mm f/1.4 lens. I get much cleaner images from my Sony at ISO 6400 than got a ISO 1600 on my Canon 1DSIII, and the night light gathering capability of an f/1.4 lens revelatory. At ISO 6400 (or higher) I can stop down slightly to eliminate lens aberrations (though I don’t seem to need to with the Sony lens), drop my shutter speed to 20 or 15 seconds to reduce star motion 33-50 percent, and still get usable foreground detail by starlight.
I can’t emphasize enough how important it is to know your camera’s and lens’s capabilities in low light, and how for you’re comfortable pushing the ISO and f-stop. For each of the night photography equipment combos I’ve used, I’ve established a general exposure upper threshold, rule-of-thumb compromise points for each exposure setting that I won’t exceed until I’ve reached the compromise threshold of the other exposure settings. For example, with my Sony a7SII/24mm f/1.4 combo, I usually start at ISO 6400, f/1.4, and 20 seconds. Those settings will usually get me enough light for Milky Way color and pretty good foreground detail. But if I want more light (for example, if I’m shooting into the black pit of the Grand Canyon from the canyon rim), my first exposure compromise might be to increase to ISO 12800; if I decide I need even more light, my next compromise is to bump my shutter speed to 30 seconds. Or if I want a wider field of view than 24mm, I’ll put on my Sony 16-35 f/2.8 G lens and increase to ISO 12800 and 30 seconds.
These thresholds are guidelines rather than hard-and-fast rules, and they apply to my preferences only—your results may vary. And though I’m pretty secure with this workflow, for each Milky Way composition I try a variety of exposure combinations before moving to another composition. Not only does this give me a range of options to choose between when I’m at home and reviewing my images on a big monitor, it also gives me more insight into my camera/lens capabilities, allowing me to refine my exposure compromise threshold points.
One other option that I’ve started applying automatically is long exposure noise reduction, which delivers a noticeable reduction in noise for exposures that are several seconds and longer.
* In normal situations the Sony a7SII can handle ISO 12,800 without even breathing hard, but the long exposure time required of night photography generates a lot of heat on the sensor with a corresponding increase in noise.
It’s time to click that shutter
You’re in position with the right gear, composed, focused, and exposure values set. Before you actually click the shutter, let me remind you of a couple of things you can do to ensure the best results: First, lower that center post. A tripod center post’s inherent instability is magnified during long exposures, not just by wind, but even by nearby footsteps, the press of the shutter button, and slap of the mirror (and sometimes it seems, by ghosts). And speaking of shutter clicks, you should be using a remote cable or two-second timer to eliminate the vibration imparted when your finger presses the shutter button.
When that first Milky Way image pops up on the LCD, it’s pretty exciting. So exciting in fact that sometimes you risk being lulled into a “Wow, this isn’t as hard as I expected” complacency. Even though you think everything’s perfect, don’t forget to review your image sharpness every few frames by displaying and magnifying and image on your LCD. In theory nothing should change unless you changed it, but in practice I’ve noticed an occasional inclination for focus to shift mysteriously between shots. Whether it’s slight temperature changes or an inadvertent nudge of the focus ring as you fumble with controls in the dark, you can file periodically checking your sharpness falls under “an ounce of prevention….” Believe me, this will save a lot of angst later.
And finally, don’t forget to play with different exposure settings for each composition. Not only does this give you more options, it also gives you more insight into your camera/lens combo’s low light capabilities.
The bottom line
Though having top-of-the-line, low-light equipment helps a lot, it’s not essential. If you have a full frame mirrorless or DSLR camera that’s less than five years old, and a lens that’s f/2.8 or faster, you probably have all the equipment you need to get great the Milky Way images. Even with a cropped sensor, or an f/4 lens, you have a good chance of getting usable Milky Way images in the right circumstances. If you’ve never photographed the Milky Way before, don’t expect perfection the first time out. What you can expect is improvement each time you go out as you learn the limitations of your equipment and identify your own exposure compromise thresholds. And success or failure, at the very least you’ll have spent a magnificent night under the stars.
Workshop Schedule || Purchase Prints
A Milky Way Gallery
Click an image for a closer look and slide show. Refresh the window to reorder the display.


2018 Highlights
Posted on December 30, 2018
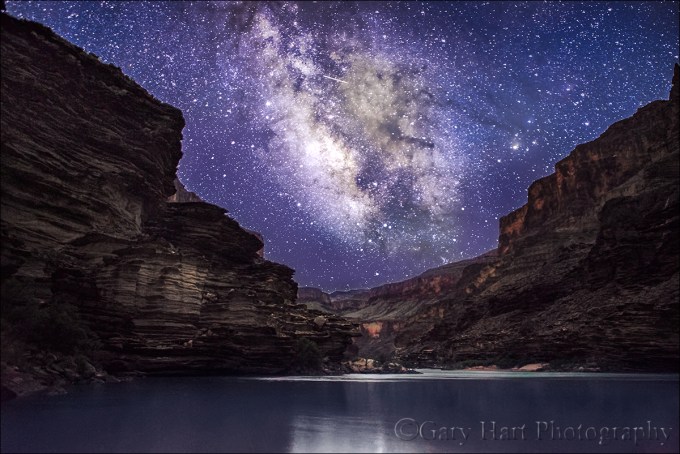
Milky Way Reflection, Colorado River, Grand Canyon
Sony a7S II
Rokinon 24mm f/1.4
20 seconds
f/1.4
ISO 12,800
I’ve always struggled with the “top-whatever” end-of-year countdown of my favorite images because the choices are so subjective and mood dependent, and so many images are favorites as much for their memories as they are for their aesthetic value. And coming up with a predetermined number is arbitrary, and inevitably requires choices I don’t want to make and will almost certainly regret later. One year I may have only seven or eight images that thrill me; the next year I might have two dozen. This year I chose 27, and I still have some left to process.
So rather than attempt to rate and rank my images at year’s end, I prefer using them as a catalyst for reflection. Each December I go through everything I’ve processed from the waning year (this year I know of several that would certainly qualify as a highlight but they’re as yet unprocessed) think about the circumstances of their capture.
I remember
I remember the New Year’s Eve solo drive to Yosemite to photograph the full moon rising behind, followed by a night drive to the other side of the Sierra (a six hour drive in winter) where I hoped to capture the full moon setting behind Mt. Whitney. The Yosemite part of that trip was spectacular, the Mt. Whitney half was a photography flop, but I enjoyed the entire journey.
I remember nearly a month in New Zealand, photographing the South Island’s unmatched beauty in its most beautiful season (hint: brrrrrrr). In New Zealand I hiked on a glacier, photographed the (far superior) Southern Hemisphere version of Milky Way, was chased through a fjord by leaping dolphins, witnessed one of the most vivid crimson sunrises I’ve ever seen, and logged hundreds of quality kilometers with a group of wonderful people.
I remember a solo drive to Yosemite to photograph fresh snow, never a sure thing regardless of the forecast. I approached Yosemite on the evening prior, I felt like a lone spawning salmon fighting up current against the continuous stream of headlights evacuating Yosemite in advance of the storm. I settled into my room in dark and dry Yosemite Valley, and woke to so much snow that I couldn’t find my car. I’m convinced there is nothing, nothing on Earth more beautiful than Yosemite Valley with fresh snow, and with the park mostly vacant and the noise-damping quality of powdery snow, for a few hours I felt like I had heaven all to myself.
I remember chasing lightning on the Grand Canyon’s North Rim, the thrill (and relief) when everyone in both workshop groups captured lightning, and an especially spectacular lightning storm that started in the telephoto distances and chased us to the cars. This year’s Grand Canyon workshops were altered by fires burning in and near the park and I feared that they’d spoil the photography—instead, in addition to all the lightning, we ended up with spectacular red-rubber-ball sunrises and sunsets that allowed genuinely unique images in this heavily photographed destination.


I remember arriving on the Big Island shortly after Kilauea had shut down after 35 years of continuous eruption, and discovering that between the just-concluded Kilauea eruption and the recently depart remnants of Hurricane Lane, I’d lost nearly half of my locations. Instead I ended up finding alternate photo spots that I like even better than the ones I lost. The high point (literally and figuratively) of that trip turned out to be a chilly, first-ever sunset and Milky Way shoot from atop 13,800 foot Mauna Kea.
I remember my Yosemite Fall Color workshop group finding Yosemite Valley at peak fall color, and three beautiful moonrises in my just concluded winter moon workshop. And while thousand of photographers jockeyed for position beneath bone dry Horsetail Fall in February, my workshop group set up elsewhere and photographed one of the most beautiful sunsets of the year.
I remember way back in January, along with my Death Valley workshop group, photographing my first-ever lunar eclipse (on the heals of my first-ever solar eclipse in August of 2017).
And I remember trudging through Grand Canyon sand by starlight to a spot that I’d decided before nightfall was probably not a good Milky Way candidate, and discovering that I was wrong. It turned out the level of the Colorado River level had changed in the night, replacing mushy sand with a swirling pool that rendered the Milky Way’s reflection as a luminous abstract.

Milky Way Reflection, Colorado River, Grand Canyon
I could go on and on about my memories of 2018, but all these great memories also remind me of the unknown highlights in store for 2019. Certainly the planned trips, which include my first-ever Iceland visit (with Don Smith in preparation for our 2020 workshop), my first-ever Oregon Coast workshop (with Don Smith), another raft trip through the Grand Canyon, a return visit to New Zealand, and on and on. But what excites me more than anything is the inevitable surprises, those special moments that dazzle when dazzling is the last thing you expect. Bring it on!
2018 Highlights
(Click an image for a bigger view, and to see a slide show)


New Zealand Night
Posted on September 9, 2018

Mars Rising, Milky Way and Lake Hawea, New Zealand
Sony a7S II
Sony 16-35 f/2.8 GM
15 seconds
F/2.8
ISO 12800
One of the questions I get the most about the New Zealand workshop Don Smith and I do is, “Why winter?” The simple answer is that it’s the best time to photograph there. This answer is usually followed with, “But isn’t it cold?” Not really—it’s more like a Northern California or Oregon winter, with highs in the 40s and 50s, and lows in the 20s and 30s. Also like Northern California and Oregon, New Zealand’s South Island gets some rain and fog in the lowlands, and snow in the mountains—so much better for photography than the persistent blue skies of the California summer I left behind.
While the conditions are certainly tolerable, and winter storms whiten the many peaks and fill the skies with interesting clouds, when pressed for more specifics on my preference for a New Zealand winter, it’s usually not long before I get to the night sky. With clean air and minimal light pollution, New Zealand is an astrophotographer’s paradise any season. But winter is when the Milky Way’s brilliant center shines prominently all night, rising much higher above the horizon than my Northern Hemisphere eyes are accustomed to.
One night in Wanaka Don and I took the group for short drive out to a vista overlooking Lake Hawea, one of many large glacial lakes decorating the South Island. I knew we’d get the Milky Way, but had forgotten about Mars, near opposition and shining brighter than it has in 15 years. We found it rising across the lake, so bright that it cast a sparkling reflection on the water. I started with vertical compositions, but soon switched to horizontal to include both Mars and the snow-capped peaks rising above the north shore.
Here are a couple of links to help with your night photography:
A New Zealand Winter Gallery
Click an image for a closer look and slide show. Refresh the window to reorder the display.


Star Struck
Posted on May 27, 2018
Grand Night, Milky Way Above the Colorado River, Grand Canyon
Sony a7S II
Rokinon 24mm f/1.4
20 seconds
F/1.4
ISO 6400
Nothing in my life delivers a more potent dose of perspective than viewing the world from the bottom of the Grand Canyon. Days are spent at the mercy of the Colorado River, alternately drifting and hurtling beneath mile-high rock layers that tell more than a billion years of Earth story. And when the sun goes down, the ceiling becomes a cosmological light show, each pinpoint representing a different instant in our galaxy’s past.
More than any of my five trips through the Grand Canyon, I’ll remember this year’s for its night skies. The wall-to-wall blue that dogged our daylight photography darkened to just what the night-photography doctor ordered, and we took full advantage. Excited about the potential for stars, each day I powwowed with our lead guide, the amazing Lindsay, to identify potential campsites with the best views of the night sky in general, and the best views of our Milky Way’s brilliant galactic core in particular.
But targeting a Milky Way campsite is easier in theory than execution. In the Northern Hemisphere, even when the galactic core reaches its highest point, it’s still fairly low in the southern sky. So given the Grand Canyon’s general east/west orientation, the best Milky Way views are usually blocked by the canyon’s towering walls. Even identifying a potential campsite on a north/south oriented stretch of the river doesn’t ensure success because Colorado River campsites in the Grand Canyon are first-come, first-served. So even though the other groups on the river don’t usually think strategically about photographing the night sky like I do, each campsite has its own appealing qualities and there’s never a guarantee that any given one will be free when we get there.
In general, my raft trips’ first night or (maybe) two usually provide our best Milky Way opportunities because the first 75 miles of the Colorado River downstream from our put-in at Lee’s Ferry runs pretty much north/south. With the river running north/south, the canyon walls are to the east and west and we usually get a pretty clear view of the north and south horizons. Just downstream from the confluence of the Colorado and Little Colorado Rivers, the canyon bends more or less permanently east/west and Milky Way core views are few and far between.
This year, our day-one campsite got us a decent but not quite perfect view of the southern sky. Nevertheless, many rafters rose and gave it a try, with varying degrees of success—at the very least, it was good practice, and much was learned. On day two we had a magnificently open sky, but the southern horizon was behind us as we faced the river, so the Milky Way’s center rose above lots of shrubs and rocks. That night I and a few others photographed the view across the river toward the Big Dipper, North Star, and fainter part of the Milky Way in Cassiopeia, but a handful had some success photographing the brighter Milky Way from a hill facing south.
I knew days four and five would be long shots for Milky Way photography because Lindsay and I had in mind an east/west trending day-4 site directly across the river from Deer Creek Fall (fingers crossed), one of the trip’s photographic highlights. And there were no good candidates for day 5 (we ended up camping beneath Toroweap). But Lindsay had an ace up her sleeve for day 3, our first day on the east/west portion of the river, if we could pull it off.
In addition to being the day we bend west, day three is the much anticipated “rapid day.” After warming up with a couple of days of fairly infrequent mild to medium rapids, the action on day three ramps up considerably, both in rapid frequency and intensity. Rapid day is always so much fun, for most of the rafters the thoughts of night photography take backseat thrills and laughter.
While everyone else’s attention was on the river, in the back of my mind I was crossing my virtual fingers for the prosaically named Camp 118 (for the number of miles downstream from our starting point at Lee’s Ferry). Camp 118 had been on my radar since Lindsay had told me about it on our first day, citing a bend in the river that gives the spot a view of the southern sky that’s very rare on this part of the river. But she warned me that Camp 118 has other benefits that make it popular among all the trips on the river, and gave us a no better than 50 percent chance of scoring it.
Equal parts exhausted and exhilarated, late in the afternoon of day three we rounded a bend and found Camp 118 free and clear. Phew. As soon as we landed I did a quick check with my compass app and confirmed that the river here pointed due south. Camp 118 also had a long south-facing sandy beach that would give everyone ample room to setup and move around in the dark without getting in anyone else’s way. Once the boat was off-loaded I gathered the troops and told them to prepare for some the best Milky Way photography of the trip.
One more Grand Canyon Milky Way obstacle I forgot to mention is that even in the most favorable locations, the galactic core doesn’t rotate into the slot between the canyon walls until 2:00 a.m. or later. Often rafters go to bed with every intention of rising to photograph it, but when the time comes, their resolve has burrowed deep into the cozy folds of their sleeping bag. The best antidote is to be as prepared as possible before going to bed. At the very least, I prescribe the following: identify your composition, set up your camera, lens, and tripod, set your exposure, focus at infinity, and have your camera ready atop the tripod beside your cot. Better still, if it can be done without risk of someone stumbling over it in the dark, leave the camera composed and focused at your predetermined shooting spot.
I woke at 2:00 a.m. and found many already at work on the Milky Way, which was just making its way into view above the canyon wall in the east. During the next two-and-a-quarter hours I worked the scene while the galactic core slid from left to right, first above the river and finally down toward the wall on the west side of the river. I used both my Sony a7SII and a7RIII bodies, and my Rokinon 24mm f/1.4, Sony 12-24 f/4 G, and Sony 16-35 f/2.8 GM lenses.
Since getting my 42 megapixel a7RIII, I’ve been happy enough with its night photography results that I’d almost forgotten about my 12 megapixel a7SII. In fact, I seriously considered leaving my a7SII at home for this trip. I’m so glad I didn’t. Using the two side-by-side like this, offered an instant reminder why the a7SII is the night photography king. Combined with the light gathering ability of an f/1.4 lens, with my a7SII I can look through my viewfinder and focus perfectly in about three seconds. I can also get crazy-bright images in crazy-dark conditions like this.
I usually feel like the “star” of night images is the sky; because vertical orientation gives me the most sky and least foreground, most of my night images are oriented vertically, especially when the more or less vertically oriented Milky Way is present. But one of my goals for this trip was more horizontal Milky Way images, so I made a point of setting aside my vertical bias and shooting a lot of horizontal frames. This image (like all of my images) is a single click (no composite of multiple frames) with no artificial light added (no light painting or any other light besides stars and skylight). I saw several meteors that night, but have no specific memories of the small one darting across the upper middle of this frame.
I wrapped up with this scene a little before 4:00 a.m., but heading back to bed I saw the Big Dipper cradled between the two canyon walls, just above the north horizon, too beautiful to resist. I ended up photographing another 20 minutes or so on the other side of camp, ending up with one of my favorite images of the trip, including a meteor I very much remember. But that’s a story for another day….
Join me on next year’s Grand Canyon Raft Trip for Photographers
A few tips for photographing the Milky Way
I have an entire article that spells out Milky Way photography, but here’s the CliffsNotes (is that still a thing?) version:
- The galactic core is in Sagittarius (a summer constellation), low in the Northern Hemisphere’s southern sky.
- Learn to control your camera in the dark. (!)
- I prefer a lens that’s 24mm (full frame) or wider, but speed trumps focal length as long as the faster lens is 28mm or wider.
- Red lights are death to night photography and should be banned from any night shoot (this my new crusade). Yes, they’re great for maintaining night vision, so if you want to use one to get to and from your location, fine. But once the shutters start opening, they should be off, off, off. I’ve seen so many images ruined by red lights that I’ve started banning them entirely at all night shoots I lead. I much prefer compromising night vision with a white light for a few minutes if it means no one will accidentally turn on a red light while we’re shooting. During a shoot, no flashlight of any kind or color. My preferred night-shoot light source is a cell phone screen (not the cell phone’s flashlight, just the illuminated screen), which is sufficient for seeing camera controls and about a 3-foot radius, but won’t leak into anyone’s frame.
- Night photography is about the sky, so you’ll want at least half, and usually more of your frame to be sky. Most of my night images are at least 2/3 sky.
- Focus will be your most difficult task. Never assume you can just dial your lens to “infinity”—zoom lenses don’t have a reliable fixed infinity point, and a prime’s infinity point is often not where you expect it to be. Instead, pre-focus before it gets dark whenever possible (then don’t touch anything!). If you need to focus in the dark, it will probably need to be manually.
- Center a bright star or planet in your viewfinder and magnify it on your LCD. Slowly dial the focus ring until the star/planet is the smallest possible point.
- Sony and other mirrorless shooters can use focus peaking (red works best) and dial the focus ring until the number of highlighted stars is maximized.
- Autofocus on a bright light at least 50 feet away.
- After you think you’ve achieved focus, regardless of the method, always (!) magnify the first image on your LCD to verify focus.
- Exposure is all about compromise. Basically, unless you’re satisfied with silhouettes, you want to give your scene as much light as you can without ruining the image: widest aperture, highest ISO, longest shutter speed you can get away with. This is where it’s essential to know your camera’s capabilities—how far can you push the ISO and get usable results. And just because you get relatively noise-free images at 6400 (or whatever) ISO when you’re shooting 1/5 second exposures at the Counting Crows concert (one of the few bands that actually allows anyone to bring in a camera and telephoto lens, I might add), doesn’t mean an image will be clean for a 30-second exposure (trust me on this). You’ll want at least an f/2.8 lens, but faster is better. And because light is so essential, if I really need the light, I usually prefer a little star motion from a 30-second exposure to the extra noise a higher ISO gives (but I don’t go longer than 30 seconds).
Read more about photographing the Milky Way
A Milky Way Gallery
Click an image for a closer look and slide show. Refresh the window to reorder the display.


Compromise less, smile more
Posted on November 28, 2017

Night Fire, Milky Way Above Kilauea Caldera, Hawaii
Sony a7S II
Sony 16-35 f/2.8 GM
10 seconds
F/2.8
ISO 3200
Night photography always requires some level of compromise: extra equipment, ISOs a little too noisy, shutter speeds a little too long, f-stops a little too soft. For years the quality threshold beyond which I wouldn’t cross came far too early and I’d often find myself having to decide between an image that was too dark and noisy, or simply not shooting at all.
Because the almost total darkness of night photography requires a fast lens, the faster the better, one of the first compromises night photography forced on me was adding a night-only lens—a prime lens that was both ultra-fast and wide. Ultra-fast to maximize light capture, wide enough to give me lots of sky and to reduce the star streaking that occurs with the long shutter speeds night photography requires (the wider the focal length, the less visible any motion in the frame).
I started doing night photography as a Canon shooter, so my first night lens was a Canon-mount Zeiss 28mm f/2.0—it did the job but wasn’t quite as fast or wide as I’d have liked. After switching to Sony I added a Sony-mount Rokinon 24mm f/1.4—I loved shooting at f/1.4, and 24mm was a definite improvement over 28mm, but I still found myself wishing for something wider. And the Rokinon had other shortcomings as well: because the camera doesn’t even know the lens is mounted (f-stop set on the lens, not in the camera), I always had to guess the f-stop I used to capture an image. Worse than that, at f/1.4 the Rokinon had pretty significant comatic aberration that made my stars look like little comets.
Since switching to Sony, one compromise I’ve happily made is carrying an extra body that’s dedicated to night photography. Because the Sony a7S and (later) a7SII are just ridiculously good at high ISO, I was able to compensate for the Rokinon’s distortion by stopping down to f/2 or f/2.8 at a higher ISO. The a7SII is worth the extra weight, but I’ve longed for the day when I could replace the Rokinon lens with something wider, and something that had a better relationship with my camera.
That day came earlier this year, when Sony released the 16-35 f/2.8 GM lens. I got to sample this lens before it was released and was surprised by its compactness despite being so wide and fast—it wasn’t long before the 16-35 f/2.8 GM occupied a full-time spot in my camera bag. And in the back of my mind I couldn’t help thinking that the 16-35 GM might just work as a night lens.
I don’t have the time or temperament to be a pixel-peeper, but I had a sense that this lens was pretty sharp wide open, and few things reveal comatic aberration more than stars. I finally got my chance to test the 16-35 GM lens at night on the Hawaii Big Island workshop in September. When this year’s Milky Way images revealed that the 16-35 GM is sharp and pretty much aberration free at f/2.8, I couldn’t have been happier.
As with every night shoot, this night at the caldera I tried a variety of exposure settings to maximize my processing options later. I was pretty pleased to get a clean exposure at 10 seconds (minimal star motion) and f/2.8 (maximum light). While the a7SII doesn’t even breathe hard at the ISO 3200 I used for this image, I know if I were shooting someplace without its own light source (for example, at the Grand Canyon, the bristlecone pine forest, or pretty much any other location lacking an active volcano), I’d probably need to be at ISO 6400 or even 12800 to make a 10 second exposure work. But it’s nice to know that the a7SII and 16-35 f/2.8 GM will do the job even in darkness that extreme.
One more thing
A couple of weeks ago while in Sedona for Sony I got the opportunity to use the new a7RIII. One highlight of that trip was two night shoots with the new camera. I haven’t had a chance to spend any quality time with those images, but I got the sense that its high ISO performance is nearly as good as the a7SII. If that’s true, that will be one less compromise and a lighter camera bag—at least until Sony releases the a7SIII.
Hawaii Photo Workshops
The Milky Way
Click an image for a closer look and slide show. Refresh the window to reorder the display.


Starry, starry night
Posted on June 9, 2017

Starry Night, Colorado River and Evans Butte, Grand Canyon
Sony a7S II
Rokinon 24mm f1.4
20 seconds
F/2
ISO 12800
Few experiences in nature surpass a dark sky brimming with an impossible number of stars. The darker the sky the better, and the sky doesn’t get much darker, or more impossible, than a moonless night at the bottom of the Grand Canyon. I schedule my annual Grand Canyon raft trip for the week of the new moon to ensure the darkest skies and the most stars; I prefer May because canyon temperatures are comfortably warm but not yet hot, and the Colorado River runs clear, unmuddied by sediment stirred by the summer monsoon.
As darkness seeps into the mile-deep gorge, the first pinpoints overhead are the planets, some combination of Venus, Jupiter, Mars, Mercury, and Saturn. Soon the darkness is as complete as we ever see it at home, and the planets are joined by the brightest stars in recognizable constellations. But unlike home, the darkening continues, and with every passing minute comes more stars, until it seems the sky can’t possibly hold any more.
Pausing to take it all in, the first thing to catch your eye in the unprecedented dark might be the Big Dipper—in May it’s high overhead as darkness falls, a comforting sight to disoriented observers still not convinced that this sky is real. Perhaps you’ll be temporarily distracted by the blinking lights of a distant jetliner, a silent reminder of the world left behind. A keen eye may discern a faint “star” moving among its neighbors—a satellite, possibly monitoring the weather, or sending GPS coordinates, or maybe even a foreign country secretly observing (smile!). And if you’re patient you might see a streaking meteor (or two, or three…), as if a hidden star has sprinted across the darkness and into a new hiding place.
But this visual feast is only the appetizer, because the main course, the Milky Way’s glowing band, isn’t served until close to midnight (or later, depending on the part of the sky that’s visible from the chosen vantage point). The Milky Way rises in the east, a band of light running north and south, ascending until it eventually spans the sky. Fainter in the north, the Milky Way brightens as your eyes follow it south, toward the glowing galactic core. The photogenic galactic core rises highest in the southern sky, so we hope for campsites with an open view in that direction. Since the Grand Canyon sky is crowded by tight, towering walls, the best views of the sky are usually up- or down-canyon.
Our best south-sky opportunities come on the trip’s first two nights, when we’re in Marble Canyon, the north/south trending section of the Grand Canyon that ends at the Little Colorado River confluence. At the confluence the canyon walls open to offer the trip’s best view of the sky, but just downriver the Colorado turns westward and the walls rise and squeeze closer. Fortunately, rather than beeline to Lake Mead, the Colorado River meanders a bit, bending north here and south there, providing an occasional view of the southern sky throughout the Grand Canyon.
Pulling into camp after a long day on the river, the first thing I do is find a spot for my cot that will ensure the best possible view of the night sky as I fall asleep. With my claim staked, I survey the surroundings for potential night photography scenes. Campsites on the Colorado River are first-come, first-served, and we have to hope we find one that’s oriented properly and has photogenic vantage points. Usually that means down by the river, but sometimes it’s an elevated location with the river in the distance. But if the campsite doesn’t have a photogenic vantage point, I’m not disappointed because nothing can take away my bedtime canopy.
If I find a scene I like, I compose, dial in my night exposure settings, and focus my camera well before dark. Sometimes I’ll compose and leave the camera poised on the tripod, ready for my return in the wee hours of the morning. If I’m afraid someone might stumble on my tripod in the dark, I leave it beside my cot, camera loaded and ready for action when I wake later.
On the trip’s third evening we pulled into camp exhausted but exhilarated after the trip’s most intense day of rapids. I found a view I liked near camp—getting there required a little rock scrambling that was no big deal with the sun out, but would require a bit more care. The Milky Way in May reaches its zenith in the south at around 3 a.m., but since we didn’t have a good view of the southern sky from this site, I decided the best views of the Milky Way would come earlier, when I could photograph it downstream, in the eastern sky. I woke at 1 a.m., grabbed my camera, and stumbled by the screen of my iPhone (the less artificial light my eyes are exposed to, the better they function when I try to photograph in the dark) to the spot I’d chosen. I could tell by a handful of glowing LCDs scattered downstream that I wasn’t the only one shooting. (On the first night I’d given the group instruction and guidance on photographing the Milky Way, but after that everyone was free to pick their spot and time, or stay in bed.)
I shot exclusively with my Sony a7SII and Rokinon 24mm f/1.4 lens. Once I’d perfected the composition and verified the sharpness, sticking with a 20 second shutter speed, I varied my ISO and aperture for more processing options later: ISO 3200, 6400, and 12,800; f1.4 and f2. At these settings I capture more light than my eyes take in—not only does this reveal more of the canyon than I can see, it also reveals even more stars.
I only photographed for about 20 minutes, but was so wired when I returned to my cot that I lay awake for another hour, mesmerized by my glittering ceiling.
Workshop Schedule || Purchase Prints
A Starry, Starry Gallery
Click an image for a closer look and slide show. Refresh the window to reorder the display.


Photograph the Milky Way: Part Two
Posted on March 9, 2017
Fire and Mist, Halemaumau Crater, Kilauea, Hawaii
Sony a7S
Sony/Zeiss 16-35 f4
10 seconds
F/4
ISO 3200
Previously on the Eloquent Nature blog: Photograph the Milky Way: Part One
Viewing the Milky Way requires nothing more than a clear, dark sky. The Milky Way’s luminosity is fixed, so our ability to see it is largely a function of the darkness of the surrounding sky—the darker the sky, the better the Milky Way stands out. But because our eyes can only take in a fixed amount of light, there’s a ceiling on our ability to view the Milky Way with the unaided eye.
A camera, on the other hand, can accumulate light for a virtually unlimited duration. This, combined with technological advances that continue increasing the light sensitivity of digital sensors, means that when it comes to photographing the Milky Way, well…, the sky’s the limit. As glorious as it is to view the Milky Way with the unaided eye, a camera will show you things your eyes can’t see. In fact, not only does the right camera in the right hands resolve far more Milky Way detail than we can see, it also reveals color too faint for the human eye.
Knowing when and where to view the Milky Way is a great start, but photographing the Milky Way requires a combination of equipment, skill, and experience that doesn’t just happen overnight (so to speak). But Milky Way photography doesn’t need to break the bank, and it’s not rocket science.
Equipment
Bottom line, photographing the Milky Way is all about maximizing your ability to collect light: long exposures, fast lenses, high ISO.
Camera
In general, the larger your camera’s sensor and photosites (the “pixels” that capture the light), the more efficiently it collects light. Because other technology is involved, there’s not an absolute correlation between sensor and pixel size and light gathering capability, but a small, densely packed sensor almost certainly rules out your smartphone and point-and-shoot cameras anything more than a fuzzy snap of the Milky Way. At the very least you’ll want a mirrorless or DSLR camera with an APS-C (1.5/1.6 crop) size sensor. Better still is a full frame mirrorless or DSLR camera. (A 4/3 Olympus or Panasonic sensor might work, but I’ve not been overly impressed with the high ISO images I’ve seen from these smaller sensors.)
Another general rule is that the newer the technology, the better it will perform in low light. Even with their smaller, more densely packed sensors, many of today’s top APS-C bodies outperform in low light full frame bodies that have been out for a few years, so full frame or APS-C, if your camera is relatively new, it will probably do the job.
If you’re shopping for a new camera and think night photography might be in your future, compare your potential cameras’ high ISO capabilities—not their maximum ISO, but read some reviews to see how your camera candidates fare in objective tests by credible sources like DP Review or Imaging Resource (there are many others).
An often overlooked consideration is the camera’s ability to focus in extreme low light. Autofocusing on the stars or landscape will be difficult to impossible, and you’ll not be able to see well enough through a DSLR’s viewfinder to manually focus. Some bodies with a fast lens will autofocus on a bright star or planet, but it’s not something I’d count on (though I expect within a few years before this capability becomes more common).
Having photographed for years with Sony and Canon, and working extensively with most other mirrorless and DSLR bodies in my workshops, I have lots of experience with cameras from many manufacturers. In my book, focus peaking makes mirrorless the clear winner for night focusing. Sony’s current mirrorless bodies (a7R II, a7S, and a7S II) are by far the easiest I’ve ever used for focusing in the dark—what took a minute or more with my Canon, I can do in seconds using focus peaking with my Sony bodies. That said, of the major DSLR brands, I’ve found Canon’s superior LCD screen makes it much easier to focus in extreme low light than Nikon. (More on focus later.)
Lens
Put simply, to photograph the Milky Way you want fast, wide glass—the faster the better. Fast to capture as much light as possible; wide to take in lots of sky. A faster lens also makes focus and composition easier because its larger aperture gathers more light. How fast? F/2.8 or faster—preferably faster. How wide? At least 28mm, and 24mm or wider is better still. I do enough night photography that I have a dedicated, night-only lens—my original night lens was a Canon-mount Zeiss 28mm f/2; my current night lens is a Rokinon 24mm f/1.4.
Tripod
It goes without saying that at exposure times up to 30 seconds, you’ll need a sturdy tripod and head for Milky Way photography. You don’t need to spend a fortune, but the more you spend, the happier you’ll be in the long run (trust me). Carbon fiber provides the best combination of strength, vibration reduction, and light weight, but a sturdy (heavy) aluminum tripod will do the job.
An extended centerpost is not terribly stable, and a non-extended centerpost limits your ability to spread the tripod’s legs and get low, so I avoid tripods with a centerpost. But if you have a sturdy tripod with a centerpost, don’t run out and purchase a new one—just don’t extend the centerpost when photographing at night.
Read my tips for purchasing a tripod here.
Other stuff
To eliminate the possibility of camera vibration I recommend a remote release; without a remote you’ll risk annoying all within earshot with your camera’s 2-second timer beep. Don’t forget a flashlight or headlamp for the walk to and from the car. And it’s never a bad idea to toss an extra battery in your pocket.
Getting the shot
Keep it simple
There are just so many things that can go wrong on a moonless night when there’s not enough light to see camera controls, the contents of your bag, and the tripod leg you’re about to trip over. After doing this for many years, both on my own and helping others in workshops, I’ve decided that simplicity is essential.
Simplicity starts with paring down to the absolute minimum gear: a sturdy tripod, one body, one lens, and a remote release (plus an extra battery in my pocket). Everything else stays at home, in the car, or if I’m staying out after a sunset shoot, in my bag.
Upon arrival at my night photography destination, I extract my tripod, camera, lens (don’t forget to remove the polarizer), and remote release. I connect the remote and mount my lens—if it’s a zoom I set the focal length at the lens’s widest—then set my exposure and focus (more on exposure and focus below). If I’m walking to my photo site, I carry the pre-exposed and focused camera on the tripod (I know this makes some people uncomfortable, but if you don’t trust your head enough to hold onto your camera while you’re walking, it’s time for a new head), trying to keep the tripod as upright and stable as possible as I walk.
Flashlights/headlamps are essential for the walk/hike out to to and from my shooting location, but while I’m there and in shoot mode, it’s no flashlights, no exceptions. This is particularly important when I’m with a group. Not only does a flashlight inhibit your night vision, its light leaks into the frame of everyone who’s there. And while red lights may be better for your night vision, they’re particularly insidious about leaking into everyone’s frame (so before you ask, no red light!). If you follow my no flashlight rule, you’ll be amazed at how well your eyes adjust. I can operate my camera’s controls in the dark—it’s not hard with a little practice, and well worth the effort to learn. If I ever do need to see my camera to adjust something, or if I need to see to move around, my cell phone screen (not the phone’s flashlight, just its screen) gives me all the light I need.
Composition
A good Milky Way image is distinguished from an ordinary Milky Way image by its foreground. Simply finding a location that’s dark enough to see the Milky Way is difficult enough; finding a dark location that also has a foreground worthy of pairing with the Milky Way usually takes a little planning.
Since the Milky Way’s center is in the southern sky (for Northern Hemisphere observers), I look for remote (away from light pollution) subjects that I can photograph while facing south. Keep in mind that unless you have a ridiculous light gathering camera (like the Sony a7S or a7S II) and an extremely fast lens (f/2 or faster), your foreground will probably be more dark shape than detail. Water’s inherent reflectivity makes it a good foreground subject as well, especially if the water includes rocks or other features to add a little visual weight.
When I encounter a scene I deem photo worthy, not only do I try to determine its best light and moon rise/set possibilities, I also consider its potential as a Milky Way subject. Can I align it with the southern sky? Are there strong subjects that stand out against the sky? Is there any water I can include in my frame?
I’ve found views of the Grand Canyon from the North Rim, the Kilauea Caldera, and the bristlecone pines in California’s White Mountains that work spectacularly. On the other hand, while Yosemite Valley has lots to love, you don’t see a lot of Milky Way images from Yosemite Valley because there just aren’t that many south views there, and Yosemite’s towering, east/west trending granite walls give its south views an extremely high horizon that blocks much of the galactic core from the valley floor.
To maximize the amount of Milky Way in my frame, I generally (but not always) start with a vertical orientation that’s at least 2/3 sky. On the other hand, I do make sure to give myself more options with a few horizontal compositions as well. Given the near total darkness required of a Milky Way shoot, it’s often too dark to see well enough to compose that scene. If I can’t see well enough to compose I guess at a composition, take a short test exposure at an extreme (unusable) ISO to enable a relatively fast shutter speed (a few seconds), adjust the composition based on the image in the LCD, and repeat until I’m satisfied.
Focus
Needless to say, when it’s dark enough to view the Milky Way, there’s not enough light to autofocus (unless you have a rare camera/lens combo that can autofocus on a bright star and planet), or even to manually focus with confidence. And of all the things that can ruin a Milky Way image (not to mention an entire night), poor focus is number one. Not only is achieving focus difficult, it’s very easy to think you’re focused only to discover later that you just missed.
Because the Milky Way’s focus point is infinity, and you almost certainly won’t have enough light to stop down for more depth of field, your closest foreground subjects should be far enough away to be sharp when you’re wide open and focused at infinity. Before going out to shoot, find a hyperfocal app and plug in the values for your camera and lens at its widest aperture. Even though it’s technically possible to be sharp from half the hyperfocal distance to infinity, the kind of precise focus this requires is difficult to impossible in the dark, so my rule of thumb is to make sure my closest subject is no closer than the hyperfocal distance.
For example, I know with my Rokinon 24mm f/1.4 wide open on my full frame Sony a7S II, the hyperfocal distance is about 50 feet. If I have a subject that’s closer (such as a bristlecone pine), I’ll pre-focus (before dark) on the hyperfocal distance, or shine a bright light on an object at the hyperfocal distance and focus there, but generally I make sure everything is at least 50 feet away. Read more about hyperfocal focus in my Depth of Field article.
By far the number one cause of night focus misses is the idea that you can just dial any lens to infinity; followed closely by the idea that focused at one focal length means focused at all focal lengths. Because when it comes to sharpness, almost isn’t good enough, if you have a zoom lens, don’t even think of trying to dial the focus ring to the end for infinity. And even for most prime lenses, the infinity point is a little short of all the way to the end, and can vary slightly with the temperature and f-stop. If you know your lens well enough to be certain of its infinity point by feel (and are a risk taker), go for it. And that zoom lens that claims to be parfocal? While it’s possible that your zoom will hold focus throughout its entire focal range, regardless of what the manufacturer claims, I wouldn’t bet an entire shoot on it without testing first.
All this means that the only way to ensure night photography sharpness is to focus carefully on something before shooting, refocus every time your focal length changes, and check focus frequently by displaying and magnifying an image on your LCD. To simplify (there’s that word again), when using a zoom lens, I usually set the lens at its widest focal length, focus, verify, then never change the focal length again once I know I’m focused. And remember, the best way to ensure focus is to set your focal length and focus before it gets dark.
But sometimes pre-focusing isn’t possible, or for some reason you need to refocus after darkness falls. If I arrive at my destination in the dark, I autofocus on my headlights, a bright flashlight, or a laser 50 feet or more away. And again, never assume you’re sharp—always magnify your image and check it after you focus.
For more on focusing in the dark, including how to use stars to focus, read my Starlight Photo Tips article.
Exposure
Exposing a Milky Way image is wonderfully simple once you realize that you don’t have to meter because you can’t (not enough light)—your goal is simply to capture as many photons as you can without damaging the image with noise, star motion, and lens flaws.
Basically, you can’t give a Milky Way image too much light. What I mean by that is, capturing the amount of light required to overexpose a Milky Way image is only possible if you’ve chosen an ISO and/or shutter speed that significantly compromises the quality of the image with excessive noise and/or star motion.
In a perfect world, I’d take every image at ISO 100 and f/8—the best ISO and f-stop for my camera and lens. But that’s not possible when photographing in near total darkness—a usable Milky Way image requires exposure compromises. What kind of compromises? Each exposure variable causes a different problem when pushed too far:
- ISO: Raising ISO to increase light sensitivity comes with a corresponding increase in noise that muddies detail. The noise at any particular ISO varies greatly with the camera, so it’s essential to know your camera’s low-light capability(!). Some of the noise can be cleaned up with noise reduction software (I use Topaz DeNoise 6)—the amount that cleans up will depend on the noise reduction software you use, your skill using that software, and where the noise is (is it marring empty voids or spoiling essential detail?).
- Shutter speed: The longer the shutter stays open, the more motion blur spreads the stars’ distinct pinpoints into streaks. I’m not a big fan of formulas that dictate star photography shutter speeds because I find them arbitrary and inflexible, and they fail to account for the fact that the amount of apparent stellar motion varies with the direction you’re composing (you’ll get less motion the closer to the north or south poles you’re aimed). My general shutter-speed rule of thumb is 30-seconds or less, preferably less—I won’t exceed 30 seconds, and do everything I can to get enough light with a faster shutter speed.
- F-stop: At their widest apertures, lenses tend to lose sharpness (especially on the edges) and display optical flaws like comatic aberration (also called coma) that distorts points of light (like stars) into comet shaped blurs. For many lenses, stopping down even one stop from wide open significantly improves image quality.
Again: My approach to metering for the Milky Way is to give my scene as much light as I can without pushing the exposure compromises to a point I can’t live with. Where exactly is that point? Not only is that a subjective question that varies with each camera body, lens, and scene, as technology improves, I’m less forgiving of exposure compromises than I once was. For example, when I started photographing the Milky Way with my Canon 1DS Mark III, the Milky Way scenes I could shoot were limited because my fastest wide lens was f/4 and I got too much noise when I pushed my ISO beyond 1600. This forced me compromise by shooting wide open with a 30-second shutter speed to achieve even marginal results. In fact, given these limitations, despite trying to photograph the Milky Way from many locations, the only foreground that worked well enough was Kilauea Caldera, because it was its own light source.
Today (early 2017) I photograph the Milky Way with a Sony a7S II and a Rokinon 24mm f/1.4 lens. I get cleaner images from my Sony at ISO 6400 than got a ISO 1600 on my Canon 1DSIII, and the light gathering capability of an f/1.4 lens revelatory. Now I can stop down slightly to reduce lens aberrations, drop my shutter speed to 20 or 15 seconds to cut star motion 33-50 percent, and still get usable foreground detail by starlight.
I can’t emphasize enough how important it is to know your camera’s and lens’s capabilities in low light, and how for you’re comfortable pushing them. For each of the night photography equipment combos I’ve used, I’ve established a general exposure upper threshold, rule-of-thumb compromise points for each exposure setting that I won’t exceed until I’ve reached the compromise threshold of the other exposure settings. For example, with my a7SII/Rokinon combo, I usually start at ISO 3200, f/2, 20 seconds. Those settings will usually get me enough light for Milky Way color and a little foreground detail. But if I want more light (for example, if I’m shooting into the black pit of the Grand Canyon from the North Rim), my first exposure compromise is to increase to ISO 6400; if I decide I need even more light, my next compromise is to open up to f/1.4; if that still isn’t enough light, my next compromise is to bump my shutter speed to 30 seconds. Finally, if I want more light that ISO 6400, f/1.4, 30 seconds delivers, I’ll try ISO 12,800 (and cross my fingers)*. If that’s not enough, I go home (or just sit and enjoy the view).
These thresholds are guidelines rather than hard-and-fast rules, and they apply to my setup only—your results may vary. And even though I’m pretty secure with this workflow, for every Milky Way composition I try a variety of exposure combinations before moving to another composition. Not only does this give me a range of options to choose between when I’m at home and reviewing my images on a big monitor, it also gives me more insight into my camera/lens capabilities, allowing me to refine my exposure compromise threshold points.
* In normal situations the Sony a7SII can handle ISO 12,800 without even breathing hard, but the long exposure time required of night photography generates a lot of heat on the sensor with a corresponding increase in noise.
It’s time to click that shutter
You’re in position with the right gear, composed, focused, and exposure values set. Before you actually click the shutter, let me remind you of a couple of things you can do to ensure the best results: First, lower that center post. A tripod center post’s inherent instability is magnified during long exposures, not just by wind, but even by nearby footsteps, the press of the shutter button, and slap of the mirror (and sometimes it seems, by ghosts). And speaking of shutter clicks, you should be using a remote cable or two-second timer to eliminate the vibration imparted when your finger presses the shutter button.
When that first Milky Way image pops up on the LCD, it’s pretty exciting. So exciting in fact that sometimes you risk being lulled into a “Wow, this isn’t as hard as I expected” complacency. Even though you think everything’s perfect, don’t forget to review your image sharpness every few frames by displaying and magnifying and image on your LCD. In theory nothing should change unless you changed it, but in practice I’ve noticed a distinct inclination for focus to shift mysteriously between shots. Whether it’s slight temperature changes or an inadvertent nudge of the focus ring as you fumble with controls in the dark, you can file periodically checking your sharpness falls under “an ounce of prevention….” Believe me, this will save a lot of angst later.
And finally, don’t forget to play with different exposure settings for each composition. Not only does this give you more options, it also gives you more insight into your camera/lens combo’s low light capabilities.
The bottom line
Though having top-of-the-line low-light equipment helps a lot, it’s not essential. If you have a full frame DSLR that’s less than five years old, and a lens that’s f/2.8 or faster, you probably have all the equipment you need to get great the Milky Way images. Even with a cropped sensor, or an f/4 lens, you have a good chance of getting usable Milky Way images. If you’ve never done it before, don’t expect perfection the first time out. What you can expect is improvement each time you go out as you learn the limitations of your equipment and identify your own exposure compromise thresholds. And success or failure, at the very least you’ll have spent a magnificent night under the stars.
Workshop Schedule || Purchase Prints
A Milky Way Gallery
Click an image for a closer look and slide show. Refresh the window to reorder the display.


My 2016
Posted on December 31, 2016
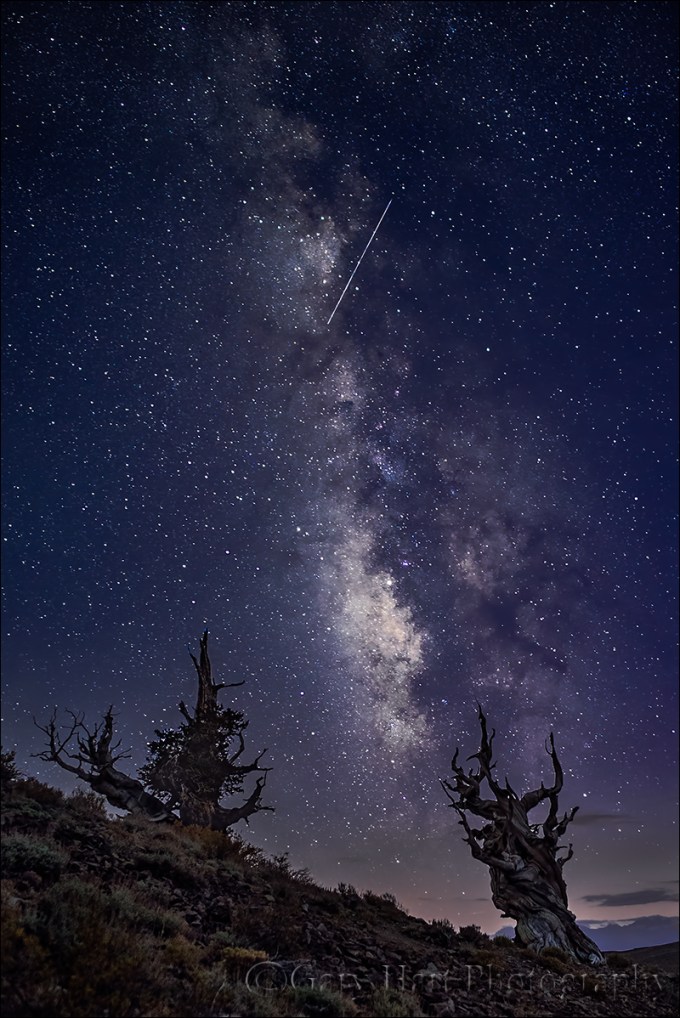
Milky Way and Meteor, Bristlecone Pine Forest, White Mountains, California
Bristlecone Night, White Mountains, California
Sony a7SII
Rokinon 24mm f1.4
20 seconds
F/2.0
ISO 6400
Tonight the calendar clicks over to a new year, ready or not. Most are ready. The general consensus is that 2016 has been a difficult year. Our warming planet lost too many creative souls, and was rubbed raw by contentious elections in every hemisphere. But here we are knocking on the door of 2017.
I’m lucky to have photography and the dose of perspective it provides. Whether it’s a double rainbow above the Grand Canyon, fountains of lava on Kilauea, or a meteor slicing the Milky Way above 4000-year-old trees, our terrestrial problems just seem a little less significant when I’m behind my camera.
As I review 2016’s contributions to my portfolio, I have to admit that the year wasn’t a complete loss. To me these images are so much more than photographs, they’re a reminder that I was there to witness each of these gifts from Nature.
So, without further adieu, here’s a selection of personal highlights from this emotional, transformative, contentious, unforgettable year.
2016 Highlights
Click an image for a closer look and slide show. Refresh the window to reorder the display.


Happy New Year, everyone. Here’s to a great 2017.
– Gary
Workshop Schedule || Purchase Prints
I love you, goodbye…
Posted on November 18, 2015

Fire and Mist, Halemaumau Crater, Kilauea, Hawaii
Sony a7S
Sony/Zeiss 16-35 f4
10 seconds
F/4
ISO 3200
Last week I said goodbye to my Sony a7S. More than any camera I’ve owned, this is the camera that overcame photography’s physical boundaries that most frustrated me.
I’ve been interested in astronomy since I was ten, ten years longer than I’ve a been photographer. But until recently I’ve been thwarted in my attempts to fully convey the majesty of the night sky above a grand landscape.
What was missing was light. Or more accurately, the camera’s ability to capture light. Light is what enables cameras to “see,” and while there’s still a little light after the sun goes down, cameras struggle mightily to find a usable amount.
When faced with limited light, photographers’ solutions are limited, and each solution is a compromise. In no particular order, we can increase:
- Shutter speed: We can increase the time the light strikes the sensor. While we can usually keep our shutter open for as long as the battery lasts, the longer it’s open, the more motion we capture.
- Aperture (a ratio measure in f-stops): Larger apertures (the f-stop number shrinks as the aperture opens) allow more light, with a loss of depth of field. While the DOF loss is usually insignificant in most night photography scenes (because all subjects are usually at infinity), the laws of optics limit the size of of a lens’s aperture.
- ISO: We can increase the sensor’s sensitivity to light by increasing the ISO, but not without significant image quality degradation (noise).
Most night photography attempts bump into the limits of each solution before complete success is achieved. For me, the first barrier is usually the f-stop, which is soon maxed. With my f-stop maxed, I’m left with a dance between ISO and shutter speed as I attempt to balance acceptable amounts of motion and noise.
So why not just add more light? Duh. But, while adding light solves some problems, it introduces others. Anything bright enough to illuminate a large landscape (sunlight or moonlight) washes out the stars, and artificial local light (such as light painting or a flash) violates my own natural-light-only objective. Another option some resort to is image blending (one frame for the foreground, one for the sky), but that too violates my personal single-frame-only goal.
My first shot at the night photography conundrum came about ten years ago, when I started doing moonlight photography. I immediately found that the reflected sunlight cast by a full moon beautifully illuminated my landscapes, while preserving enough celestial darkness that the brighter, most recognizable constellations still shined through. But walking outside on a clear, moonless night far from city lights was all the reminder I needed that my favorite qualities of the night sky—the Milky Way and the the seemingly infinite quantity of stars—remained beyond my photographic reach.
To photograph a moonless sky brimming with stars, my next step was star trail photography—long exposures that accumulated enough light to reveal my terrestrial subjects at manageable ISO (not too much noise). Star trails have the added benefit of stretching stellar pinpoints into concentric arcs of light that beautifully depict Earth’s rotation.
While both enjoyable and beautiful, moonlight and star trail photography were not completely satisfying. But the laws of physics dictated that lenses weren’t going to get any faster, and Earth wasn’t going to rotate any slower, so the solution would need to be in sensor efficiency.
Unfortunately, camera manufactures remained resolute in their belief that megapixels sold cameras. So as sensor technology evolved, and photographers saw slow but steady high ISO improvement, we were force-fed a mind-boggling increase in megapixel count.
But cramming more megapixels onto a 35mm sensor requires: 1) smaller photosites that are less efficient at capturing light, and 2) more tightly packed photosites that increase (noise inducing) heat.
The megapixel race changed overnight when Sony, in a risky, game-changing move, decided to offer a high-end, full-frame camera with “only” a 12 megapixel sensor. What were they thinking!?
Acknowledging what serious photographers have known for years, that 12 megapixels is enough for most uses (just 12 years ago, pros paid $8,000 for a Canon 1Ds with only 11 megapixels), Sony bucked the megapixel trend to embrace the benefits of fewer, larger, less densely packed photosites. The result was a light-sucking monster that can see in the dark: the Sony a7S.
Since purchasing my a7S less than a year ago, I’m able to photograph the dark night sky above the landscapes I love. Additionally, I found that its fast shutter lag (since matched by the a7R II) made the a7S ideal for lightning photography. It was love at first click.
And now it’s gone. Last month Sony released the a7S II, and given my satisfaction with the upgrade from the a7R to the a7R II, it was only a matter of time before I upgraded to the a7S II. I’m happy to say that I found a good home for my a7S and in fact may even get to visit it in future workshops.
I haven’t had a chance to use the a7S II, but I assure you it won’t be long, and you’ll be the first to know.
About this image
The image at the top of this post was captured in September (2015) during my Hawaii Big Island Volcanos and Waterfalls photo workshop. Each time I visit here I hold my breath until I see what the sky is doing. I’ve encountered everything from completely cloudless to pea soup fog. I’ve come to hope for a mix of clouds and sky—enough sky for the Milky Way to shine through clearly, but enough clouds to reflect the orange light of the churning volcano.
On this evening we got a combination I hadn’t seen before—clear sky overhead, a few low clouds, and a heavy mist hanging in the caldera. Not only did the mist frame the scene with a translucent orange glow, it subdued the volcano’s fire enough for me to use a long exposure to bring out the Milky Way without blowing my highlights.
We’ll do it again in my next Hawaii Volcanos and Waterfalls workshop
An a7S homage
Click an image for a closer look, and a slide show. Refresh the screen to reorder the display.


The dark night
Posted on August 20, 2015

Angel’s View, Milky Way from Angel’s Window, Grand Canyon
Sony a7S
Rokinon 24 f1.4
20 seconds
F/1.4
ISO 6400
How to offend a photographer
Gallery browser: “Did you take that picture?”
Photographer: “Yes.”
Gallery browser: “Wow, you must have a good camera.”
Few things irritate a photographer more than the implication that it’s the equipment that makes the image, not the photographer. We work very hard honing our craft, have spent years refining our vision, and endure extreme discomfort to get the shot. So while the observer usually means no offense, comments discounting a photographer’s skill and effort are seldom appreciated.
But…
As much as we’d like to believe that our great images are 100 percent photographic skill, artistic vision, and hard work, a good camera sure does allow us to squeeze the most out of our skill, vision, and effort.
As a one-click shooter (no HDR or image blending of any kind), I’m constantly longing for more dynamic range and high ISO capability. So, after hearing raves about Sony sensors for several years, late last year (October 2014) I switched to Sony. My plan was a gradual transition, shooting Sony for some uses and Canon for others, but given the dynamic range and overall image quality I saw from my Sony a7R starting day one, I haven’t touched my Canon bodies since picking up the Sony.
While I don’t think my Sony cameras have made me a better photographer, I do think ten months is long enough to appreciate that I’ve captured images that would have been impossible in my Canon days. I instantly fell in love with the resolution and 2- to 3-stop dynamic range improvement of my Sony a7R (and now the a7R II) over the Canon 5D III, the compactness and extra reach of my 1.5-crop a6000 (with little loss of image quality), and my a7S’s ability to pretty much see in the dark.
But what will Sony do for my night photography?
I need more light
I visit Grand Canyon two or three times each year, and it’s a rare trip that I don’t attempt to photograph its inky dark skies. But when the sun goes down and the stars come out, Grand Canyon’s breathtaking beauty disappears into a deep, black hole. Simply put, I needed more light.
Moonlight was my first Grand Canyon night solution—I’ve enjoyed many nice moonlight shoots here, and will surely enjoy many more. But photographing Grand Canyon by the light of a full moon is a compromise that sacrifices all but the brightest stars to achieve a night scene with enough light to reveal the canyon’s towering spires, receding ridges, and layered red walls.
What about the truly dark skies? For years (with my Canon bodies) the only way to satisfactorily reveal Grand Canyon’s dark depths with one click was to leave my shutter open for 30 minutes or longer. But the cost of a long exposure is the way Earth’s rotation stretches those sparkling pinpoints into parallel arcs.
As with moonlight, I’m sure I’ll continue to enjoy star trail photography. But my ultimate goal was to cut through the opaque stillness of a clear, moonless Grand Canyon night to reveal the contents of the black abyss at my feet, the multitude of stars overhead, and the glowing heart the Milky Way.
So, ever the optimist, on each moonless visit to Grand Canyon, I’d shiver in the dark on the canyon’s rim trying to extract detail from the obscure depths without excessive digital noise or streaking stars. And each time I’d come away disappointed, thinking, I need more light.
The dynamic duo
Early this year, with night photography in mind, I added a 12 megapixel Sony a7S to my bag. Twelve megapixels is downright pedestrian in this day of 50+ megapixel sensors, but despite popular belief to the contrary, image quality has very little to do with megapixel count (in fact, for any given technology, the lower the megapixel count, the better the image quality). By subtracting photosites, Sony was able to enlarge the remaining a7S photosites into light-capturing monsters, and to give each photosite enough space that it’s not warmed by the (noise-generating) heat of its neighbors.
With the a7S, I was suddenly able to shoot at ridiculously high ISOs, extracting light from the darkest shadows with very manageable noise. Stars popped, the Milky Way throbbed, and the landscape glowed with exquisite detail. I couldn’t wait to try it at Grand Canyon.
My first attempt was from river level during this year’s Grand Canyon raft trip in May. Using my a7S and Canon-mount Zeiss 28mm f2 (after switching to Sony, I was able to continue using my Zeiss lens with the help of a Metabones IV adapter), I was immediately blown away by what I saw on my LCD, and just as excited when I viewed my captures on my monitor at home.
But I wasn’t done. Though I’d been quite pleased with my go-to dark night Zeiss lens, I wanted more. So, in my never-ending quest for more light, just before departing for the August Grand Canyon monsoon workshop, I purchased a Rokinon 24mm f1.4 to suck one more stop’s worth of photons from the opaque sky. The new lens debuted last Friday night, and I share the results here.
About this image
Don Smith and I were at Grand Canyon for our annual back-to-back monsoon workshops. On the night between workshops, Don and I photographed sunset at Cape Royal, then walked over to Angel’s Window where we ate sandwiches and waited for the Milky Way to emerge. The sky was about 80 percent clouds when the sun went down and we debated packing it in, but knowing these monsoon clouds often wane when the sun drops, we decided to stick it out.
Trying to familiarize myself with the capabilities of my new dark night lens, I photographed a handful of compositions at varying settings. To maximize the amount of Milky Way in my frame, everything oriented vertically. As with all my images, the image I share here is a single click.
Despite the moonless darkness, exposing the a7S at ISO 6400 for 20 seconds at f1.4 enabled me to fill my entire histogram from left to right (shadows through highlights) without clipping. Bringing the shadows up a little more in Lightroom revealed lots of detail with just a moderate amount of very manageable noise.
This is an exciting time indeed for photographers, as technology advances continue to push the boundaries of possibilities. Just a few years ago an image like this would have been unthinkable in a single click—I can’t wait to see what Sony comes up with yet.
Some comments on processing night images
Processing these dark sky images underscores the quandary of photography beyond the threshold of human vision—no one is really sure how it’s supposed to look. We’re starting to see lots of night sky images from other photographers, including many featuring the Milky Way, and the color is all over the map. Our eyes simply can’t see color with such little light, but a long exposure and/or fast lens and high ISO shows that it’s still there—it’s up to the photographer to infer a hue.
So what color should a night scene be? It’s important to understand that an object’s color is more than just a fixed function of an inherent characteristic of that object, it varies with the light illuminating it. I can’t speak for other photographers, but I try to imagine how the scene would look if my eyes could capture as much light as my camera does.
To me a scene with blue cast is more night-like than the warmer tones I see in many night images (they look like daylight with stars), so I start by cooling the color temperature below 4,000 degrees in Lightroom. The purplish canyon and blue sky in this image is simply the result of the amount of light I captured, Grand Canyon’s naturally red walls, and me cooling the image’s overall color temperature in Lightroom. For credibility, I actually decided to desaturate the result slightly. (The yellow glow on the horizon is the lights of Flagstaff and Williams, burned and desaturated in Photoshop.)
Learn more about starlight photography
A dark night gallery
Click an image for a closer look, and a slide show. Refresh the screen to reorder the display.


