Eloquent Images by Gary Hart
Insight, information, and inspiration for the inquisitive nature photographer
Where to Draw the Line
Posted on August 7, 2023

Beams of Gold, Desert View, Grand Canyon
Sony α1
Sony 16-35 f/2.8 GM
ISO 100
f/16
1/25 second
I’m in the midst of 11 days and two workshops chasing lightning at Grand Canyon. Despite daily 4:15 a.m. wake-ups, very late dinners, and lots of waiting for something to happen punctuated by bursts of extremely intense activity, I am in fact (to quote Cosmo Kramer) lovin’ every minute of it.
The first workshop group photographed an assortment of monsoon thrills that included lightning, dramatic clouds, and vivid sunrises and sunsets. We also enjoyed skies as clean (haze-free) as I’ve ever seen at the Grand Canyon, which made for a spectacular Milky Way shoot on the North Rim. The second group started yesterday afternoon, and while the lightning spigot has briefly turned, starting this afternoon it’s forecast to return for the rest of the workshop. (Fingers crossed.)
One mantra I find myself frequently repeating to all Grand Canyon workshop groups is, “Less sky, more canyon.” That’s because, even though a landscape photographer’s objective is to maximize beauty (right?), and it’s a rare sky that rivals with the beauty of Grand Canyon, I frequently see photographers here giving too much of their frame to a sky that simply can’t compete with the canyon below.
This doesn’t mean Grand Canyon images should never include lots of sky, but it does mean that the sky you give your Grand Canyon (and other scenic locations) image should be earned. A towering rainbow? Shimmering Milky Way? Horizon-to-horizon sunrise or sunset color? By all means, widen your lens and tilt the camera skyward. But don’t forget that even when the sky is spectacular, it’s the canyon below that makes your image special.
For example, below are a couple of images captured from Hopi Point at different sunsets. The first one was a blank sky day, so I used the absolute least amount of sky possible, and augmented it with a sunstar. The second one was an electric sunset that filled the sky with red. To include even more sky without sacrificing the best part of the canyon, I even went with a vertical composition.


I suspect people’s too much sky choice happens for a few reasons. Many photographers, so focused on their prime subject, tend to forget about the rest of their frame. Less experienced photographers often reflexively split their frame with the horizon, while other photographers, victims of bad advice, have become slaves to rigid rules. These photographers avoid putting the the horizon in the middle with biblical fervor, instead putting it 1/3 of the way down from the top, or 1/3 up from the bottom. But despite what you might have heard from the “expert” judging images at your neighborhood camera club, or viewed from that YouTube photography pro your brother-in-law swears by, there is no rule for where to place the horizon line.
In other words, I’ll put my horizon wherever I want to, thankyouverymuch. If I think the horizon belongs 1/3 of the way down from the top, 1/5 of the way up from the bottom, or straight across the middle of the frame, that’s exactly where it will go.
How do I determine where the horizon belongs? Put simply, that’s entirely dependent on the relative merits of the sky versus the landscape in the scene I’m photographing.
Without doing actual math (heaven forbid), I mentally weigh the landscape versus the sky and arrive at some kind of virtual score: if I like the landscape 4-times more than the sky, the landscape gets 4-times more frame than the sky; if I like the sky twice as much as the landscape, the sky gets twice as much frame as the landscape.
As I said, I don’t actually do this math in my head, I just end up here by feel. You can too, by trusting your instincts. And if you don’t trust your initial instincts, try popping the camera off the tripod (you are using a tripod, right?), pointing it in the direction of your scene, then slowly moving horizon line up and down the scene until a position feels right. Over time you’ll grow to recognize and trust the subtle signals your instincts send.
The image I’m sharing today was captured last Tuesday, on the first sunset of the first workshop. Because I’d started the shoot with my 100-400 lens, the foreground wasn’t a factor in my decision where to set up—I just chose an opening amidst the rest of my group. But as sunset approached, it started to look like something special was possible. Not only had a narrow gap appeared in the clouds near the horizon, the clouds were riddled with small openings with potential to allow sunlight to stream through as the sun dropped.
Because I was with my group and this was our first day, I didn’t do my usual anticipatory exploration for the best foreground, I just worked with the scene right there among my group. After replacing the 100-400 with my 16-35 f/2.8 lens, I started by trying to figure out the best way to handle the dead tree jutting up from below the canyon wall.
By shifting a couple of feet to my left to stand atop a light-color rock platform, I was able to block the less appealing middle foreground hill with the dense green shrub on the right, and to frame the dead tree (which had now become an important foreground element) between the two nearby shrubs. After determining that I wanted as little of the rocky dirt on the left as possible, I went to work on establishing the top of my frame.
The sky above the contiguous cloud bank blocking the sun was a lot of blue with a scattering of individual clouds. It was pretty in an ordinary way, but nowhere near as beautiful as the sunlit clouds and canyon below. That left me with two options for the top of my frame: directly above the clouds to include no more than a thin stripe of blue sky, or somewhere in the clouds with no blue sky.
I photographed it both ways for multiple options to choose between when I review my images on my computer. As you can see, I chose the former because I couldn’t find a good place to cut the clouds without putting a bright spot at the top of the frame and/or cutting off part of the sunstar.
This sunset display continued for about 15 minutes, continually changing as the sun dropped. I’ve actually processed another, very similar, image captured a few minutes later, without beams but with a better sunstar and have added it to the gallery below.
Of course all this advice applies pretty universally to whatever location you’re photographing, but few places provide examples as dramatic as Grand Canyon. Check out the gallery below for proof.
Join me at Grand Canyon
More Grand Canyon Skies
Click any image to scroll through the gallery LARGE


Smart Luck
Posted on July 30, 2023

Milky Way and the Southern Alps, Mt. Cook / Aoraki National Park, New Zealand
Sony a7R V
Sony 14mm f/1.8 GM
ISO 12800
f/1.8
10 seconds
Once upon a time I posted a rainbow image on Facebook and someone commented that getting a shot like that is simply dumb luck. After having a good chuckle, I actually felt a little sad for the commenter. Since we all tend to make choices that validate our version of reality, imagine going through life with that philosophy.
No one can deny that photography has a significant luck component, but each of us chooses our relationship with the fickle whims of chance—I prefer to look for smart luck. Smart luck embraces Louis Pasteur’s conviction that chance favors the prepared mind. Ansel Adams was quite fond of repeating Pasteur’s quote, and later Galen Rowell as well as many other photographers have jumped on board. So while many may indeed feel lucky to have witnessed special moments in Nature, let’s not lose sight of our opportunities to create our own “luck.” Smart luck.
Some examples

Double Rainbow, Tunnel View, Yosemite
As nature photographers, we must acknowledge the tremendous role chance plays in the conditions that rule the scenes we photograph, then do our best to maximize our odds for witnessing whatever special something Mother Nature might toss in our direction. A rainbow over the Safeway parking lot or the sewage treatment plant is still beautiful, but a rainbow above Yosemite Valley can ascend to a lifelong memory (not to mention a beautiful photograph).
I’ll never forget the time, while driving to Yosemite to meet new clients to plan the next day’s tour over dinner, I saw conditions that told me a rainbow was possible. When I met the clients at the cafeteria, I “suggested” (pleaded?) that we forget dinner and take a shot at a rainbow instead. Despite no guarantee of success, we raced our empty stomachs across Yosemite Valley, scaled some rocks behind Tunnel View, and sat in a downpour for about twenty minutes. Our reward? A double rainbow arcing across Yosemite Valley. Were we lucky? Absolutely. But it was no fluke that my clients and I were the only “lucky” ones out there that evening.

Captive Crescent, El Capitan and Half Dome, Yosemite
Before sunrise on a chilly May morning in 2011, my workshop group and I had the good fortune photograph a crescent moon splitting El Capitan and Half Dome before sunrise. Was this luck? I’ll give you one guess.
I suppose we were lucky that our alarms went off, and that the clouds stayed away that morning. But I knew at least a year in advance that a crescent moon would be rising at this less heralded Yosemite vista on this very morning, scheduled my spring workshop to include the date, then spent hours obsessively making sure I hadn’t made any mistakes.

Rainbow Bridge, Colorado River, Grand Canyon
I’d love to say that I sensed the potential for a rainbow over the Grand Canyon when I scheduled my 2016 Grand Canyon raft trip, then hustled my group down the river for three days to be in this very position to witness the moment. Sadly, I’m not quite that prescient. On the other hand, I did anticipate the potential for a rainbow at least an hour earlier, scouted our campsite to determine the best locations to photograph it, then called the rainbow’s arrival far enough in advance that everyone was able to grab their gear and be set up before its arrival.
Anticipating these special moments in nature doesn’t require any real gifts—just a basic understanding of the natural phenomena you’d like to photograph, and a little effort to match your anticipated natural event (a rainbow, a moonrise, the Milky Way, or whatever) with your location of choice.
But to decide that photographing nature’s most special moments is mostly about luck is to pretty much limit your rainbows to the Safeways and sewage treatment plants of your everyday world. I’ve lost track of the number of times I’ve prepared for a special moment in nature, changed plans, lost sleep, driven many miles, skipped meals, and suffered in miserable conditions, all with nothing to show for my sacrifice. But just one success like a rainbow above Yosemite Valley or the Grand Canyon is more than enough compensation for a thousand miserable failures. And here’s another secret: no matter how miserable I am getting to and waiting for my goal event, whether it happens or not, I absolutely love the anticipation, the just sitting out there marinating in the thought that it might happen.
About this image

Milky Way and the Southern Alps, Mt. Cook / Aoraki National Park, New Zealand
Don Smith and I didn’t choose New Zealand in June by accident. And it was no fluke that we were at this spot beneath the Southern Alps on a moonless night. June is when the Milky Way’s core rises highest in the night sky, and we knew exactly where to be when it came out this night. Well, we thought we knew exactly where to be…
Our New Zealand workshop group had had such a great Milky Way experience on the workshop’s first night, everyone wanted to do it again. But this year’s trip encounter more fog than we ever have, which brought us some nice daytime conditions but wasn’t particularly conducive to night photography. We finally got another chance on the workshop’s penultimate night, when the sky cleared at one of my favorite places for night photography. After a nice sunset shoot, we went to dinner (at a spectacular buffet) while waiting for the sky to darken, then headed back out.
But when we arrived at our predetermined location, a bridge over the Hooker River, we discovered that workers doing grading (I assume) on the riverbank just upstream had left a spotlight on outside their little shed, perhaps by mistake, or maybe to discourage thieves. Whatever the reason, it was so bright that it washed out the bottom half of everyone’s frame. No problem—we were familiar enough with the location that we were able to drive up the road a mile or so until we found a nice view where the light wasn’t a factor.
This far into the workshop everyone was fairly comfortable with their cameras, but the utter darkness out there added another layer of complication. Spreading out along the shoulder, we had to take care not to bump into tripods and each other, but once everyone established their positions and started finding compositions that worked, there wasn’t really any need to move around. At that point the job for Don and I is mostly to be a resource—help people with their compositions and focus (mostly just checking to ensure that it’s okay)—and just stay out of the way.
Since most of my compositions at the prior Milky Way shoot had been vertical, this night I opted for horizontal frames that included more mountains. With nothing special in the immediate foreground, I minimized it in my frame. I further deemphasized (darkened) the foreground with a faster shutter speed that had the added benefit of reducing star motion.
After we’d been out their for a while and I was pretty sure everyone had been successful, I pointed out the Large and Small Magellanic Clouds, satellite galaxies of our Milky Way that aren’t visible in the Northern Hemisphere. They’re not in this frame—they’d be quite a bit to the right of the Milky Way with a very wide lens—but I’ve seen several images from others in the group that included them. Altogether a very special evening.
Join Don and Me in New Zealand Next June
More Smart Luck


, Yosemite")


Natural Synergy: Building Relationships In Nature
Posted on July 24, 2023

Spring Bloom, Dogwood and Bridalveil Fall, Yosemite
Sony a7R V
Sony 100-400 GM
2 extension tubes (26mm total)
ISO 1600
f/8
1/60 second
After several weeks working through my New Zealand images, I’m giving myself (and you) a break from the land Down Under and returning to Yosemite. Because I absolutely refuse to visit Yosemite in summer, I returned to images from my trip in early May to photograph the dogwood, two subjects on my short-list of favorites.
Looking at these Yosemite images, combined with my still fresh New Zealand memories, reminds me of the extreme good fortune of my life. When I decided to make photography my career nearly 18 years ago, I promised myself I’d only photograph what I love. Not because I believed that’s where I thought I’d have the most success (I wasn’t that calculating), but simply because the only good reason I could come up with for leaving an excellent job with a great company was to do something that gave me joy. Lucky me—today most of my time behind a camera is spent pursuing subjects that touch a special place in my heart, subjects I’m naturally drawn to, camera or not. (And the bills are still getting paid.)
The first emotional magnets that come to mind are the fixed locations, like Yosemite, Grand Canyon, and New Zealand (to name just three) that draw and never cease to inspire me. More transient favorites include things like lightning, rainbows, and reflections, and seasonal subjects like fall color, winter snow, and spring flowers. And of course pretty much anything celestial excites me.
Relationships
As much as I enjoy these subjects individually, I especially love the natural synergy that happens when I can combine two or more in an image. While the Grand Canyon, an erupting volcano, or Yosemite Valley, are special by any standard, pairing the Grand Canyon with a lightning bolt, Kilauea Caldera with the Milky Way, or Yosemite with blooming dogwood always feels better to me than the sum of those individual parts.
This juxtaposition of subjects is so essential to photography that we often do it without thinking. For example, when we happen upon a scene and see El Capitan reflecting in the Merced River—click. Or look at that vivid sunset over the Sierra Crest—click. Nice pictures, but most successful photographers are more strategic and tactical about Nature’s juxtapositions. We find a subject we want to photograph, then figure out other natural elements that might pair well with it. Sometimes that’s simply a matter of walking around until we find an alignment that works; other times it means researching and returning months or years later to photograph the relationship we seek (with no guarantee it will happen).
When planning these shots, it helps me to think in terms of static and dynamic juxtapositions: static being relationships between permanent landscape features (mountains, waterfalls, etc.); dynamic juxtapositions always include at least one ephemeral phenomenon that we can never count on (a rainbow or lightning bolt). I know the places where I can put El Capitan and Bridalveil Fall in the same frame, or Mt. Whitney framed by Mobius Arch (static juxtapositions), timing dynamic elements like Yosemite’s annual dogwood bloom or the full moon setting behind Mt. Whitney require planning and execution.
Visual Motion
But just because an object is static, doesn’t mean an image of it should be; and a dynamic doesn’t automatically translate to motion in a still image. It’s my job to create motion in my still images by encouraging my viewers’ eyes to move through the frame, providing a path for their eyes to follow and/or a place for them to land. Accomplishing this isn’t necessarily difficult, but it does usually require some foresight and physical effort.
Once I’ve arrived at a location and identified my primary subject, I challenge myself to find at least one other element on a different visual plane. Sometimes that’s easy, other times…, not so much. Nevertheless, when my prime subject is in the distance, I look for something closer to balance it; likewise, if my subject is nearby, I want something in the background to complement it.
Foreground or background, sometimes my secondary subject has almost as much visual appeal as the primary subject; other times it’s there simply to balance my frame. Regardless of its aesthetic appeal, my secondary subject’s placement, both relative to the scene’s other visual elements and to the frame’s boundary, can make or break an image. And don’t forget that (lacking explosives) pretty much the only way to change the relative position of two static objects in a photographic frame is conscious positioning of the camera (and the photographer behind it!)—in other words, move!
Visual motion happens in a still image when elements in the frame create actual or virtual lines for the eye to (subconsciously) follow. Tangible lines might be a horizontal horizon, vertical waterfall, or diagonal river. But often it’s up to me to create virtual lines—an implicit, connect-the-dots path between visual elements. Objects in a scene have what I call “visual weight”: some quality like mass, brightness, or color that pulls the eye. After identifying these elements, we can move around until their relative positions in the frame (again subconsciously) move the viewers’ eyes.
The last important relationship consideration is depth. Photography is a futile attempt to render a 3-dimensional world in a 2-dimensional world. Lacking actual depth, we can create the illusion of depth by ensuring that objects with visual weight exist throughout the front-to-back plane. As a general rule I avoid merging these essential visual elements to avoid conflating them on the same plane and defeating the illusion of depth that’s so essential in a two-dimensional image.
Of course every situation is different, so to paraphrase Hector Barbossa (Geoffrey Rush) in The Pirates of the Caribbean, my suggestions here are more guidelines than rules. But they should never be buried so deep in your memory that they’re not available to access and apply as situations arise.
About this image
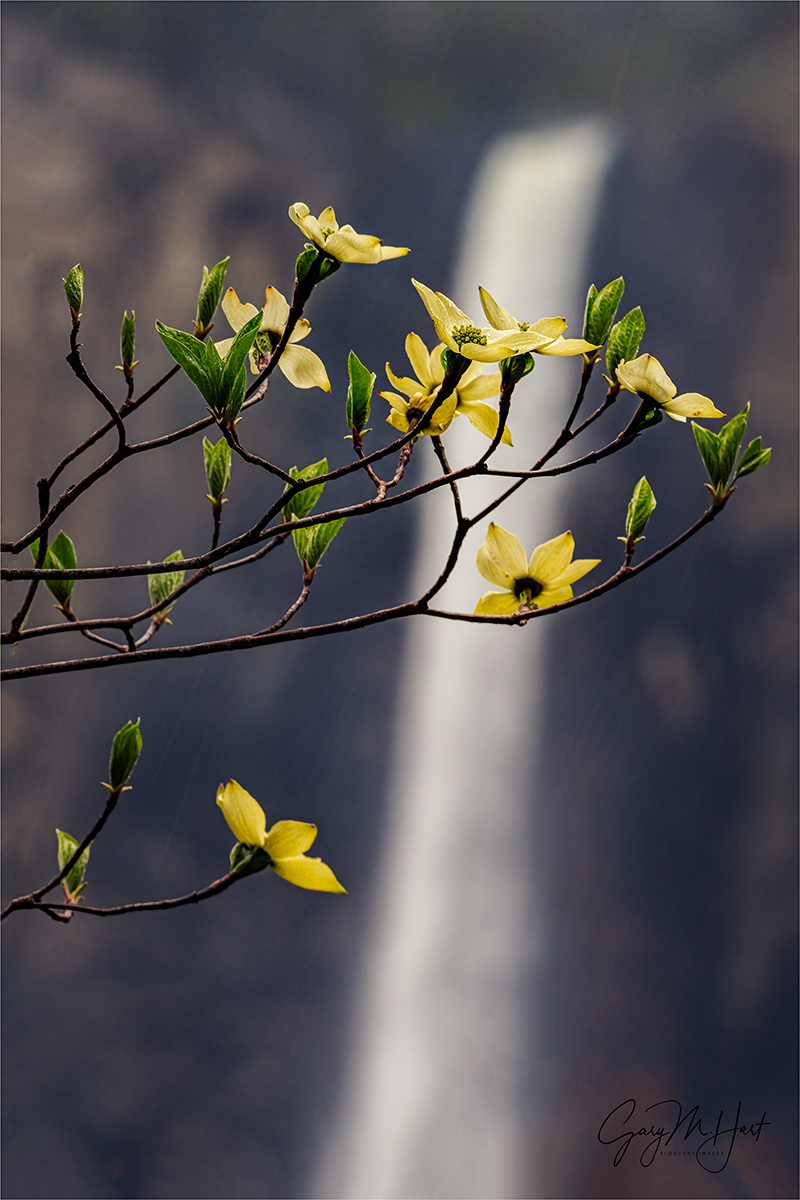
Spring Bloom, Dogwood and Bridalveil Fall, Yosemite
A week or so before capturing the dogwood image I’m sharing today, my brother Jay and I drove to Yosemite hoping to photograph the peaking dogwood bloom with Yosemite’s waterfalls at historic flows. There was indeed lots of water, but a cool spring had slowed the dogwood and they weren’t quite ready.
No problem—based on the dogwood’s premature state I observed in that first visit, I figured they needed another week or so to reach their full spring potential, so a week later Jay and I returned. Finding the dogwood in excellent shape, we spent pretty much the entire day photographing it.

Bridalveil Dogwood, Yosemite
With a light rain falling most of the day, one of the things in the back of my mind was attempting to reprise some version of a dogwood image I’d captured nearly 20 years earlier, one I consider a milestone in my aggressive relationship-seeking approach to photography. On the drive to Yosemite on that wet morning nearly 20 years ago, I decided I wanted to photograph a dogwood with a Yosemite icon in the background. That was the extent of my vision, but I pursued it relentlessly until I found a dogwood bloom I could pair with Bridalveil Fall. The rest, as they say, is history.
My goal on this year’s spring visit wasn’t to duplicate the old image, just my approach: blooming dogwood with Bridalveil Fall in the background. I returned to Valley View and found that original view of Bridalveil Fall blocked by other trees. So I traipsed about the forest looking for blooming dogwood with a clear sightline to Bridalveil Fall. That’s not as easy as you might think, but as you can see, I finally found a relationship that worked.
Instead of the close, wide angle shot I’d chosen all those years ago, this time I set up farther back, using a telephoto to enlarge Bridalveil and compress the distance between the two subjects. Because it was impossible for the dogwood and Bridalveil to be sharp (without focus-stacking, a personal no-no), I just embraced the softness in the fall, which helps the dogwood bracts stand out and makes it the primary subject.
It actually took about ten minutes before I was satisfied with the juxtaposition of dogwood and Bridalveil. Because there was a slight breeze, I bumped my ISO to 1600 for a faster shutter speed. I also played with different f-stops to find the right balance softness and clarity in Bridalveil. I think I like the old image better than the new one, but this one pleases me too, and it was a fun experience.
Natural Synergy
Click any image to scroll through the gallery LARGE


, Yosemite")


“Ordinary” Beauty
Posted on July 12, 2023
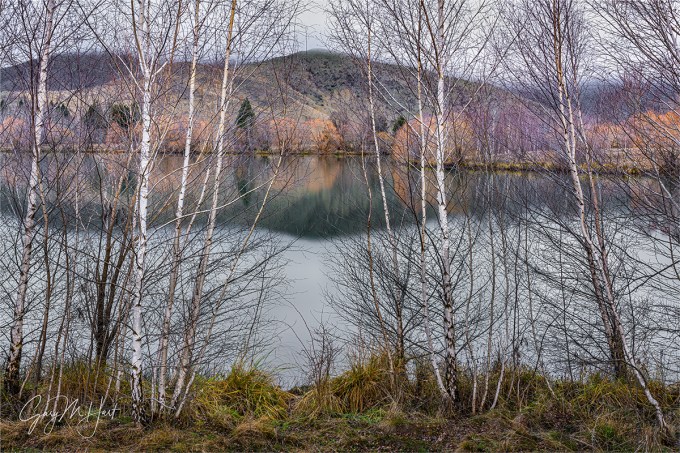
Trees and Reflection, Wairepo Arm, New Zealand
Sony a7R V
Sony 24-105 f/4 G
ISO 100
f/8
30 seconds
Many of the places I visit are known for their extraordinary beauty, striking features and eye-grabbing vistas that justifiably attract thousands of daily visitors and inspire millions of photographs. Stimulating scenes like these seem to be every nature photographer’s goal, but today I’d like to issue a shout-out to ordinary beauty—the simple scenes with the ability to soothe, by virtue of their subtle beauty, that we pass by every day.
Art of any form appeals on two seemingly contradictory planes: it must stimulate enough to attract, yet soothe enough to sustain. I call these art’s “oooh” and “ahhh” factors, and they’re often mutually exclusive. It saddens me that social media seems to have biased photographers toward the oooh images, compelling them to settle for the obvious beauty that encourages viewers to simply click Like and maybe comment “Stunning!” before moving on to the next image. Sadly, this phenomenon seems to have made social media Likes the ultimate arbiter of beauty for many, and I fear that we’re loosing sight of Nature’s ability to soothe.
Images that shout their beauty might get my attention, but they’re not usually the kind of images I’d mount on a wall to live with for an extended period. Music is a great analog that most people can relate to. When I’m running or need to work around the house, I love cranking up AC/DC, Foo Fighters, or The Afghan Whigs (I could go on) , but couldn’t live with it 24×7. On the other hand, while Pat Metheny, Michael Franks, or Azymuth (I could go on) might not stimulate me into an adrenalin frenzy, but I can have them playing in the background all day and my world’s a happier place.
Nature photography’s challenge is overcoming that urge to settle for the loudest beauty, or that impulse to drive right past any scene that doesn’t grab the eye instantly, and to instead take the time seek beauty hidden just beneath the surface. After doing this photography thing for many years, I realize that the scenes that at first glance appear “ordinary” are often the scenes where I find the soothing qualities that sustain an image for the long haul.
About this image

Trees and Reflection, Wairepo Arm, New Zealand
Living in the California puts me in relatively close proximity to some of the most diverse, spectacular natural beauty in the world. Rivaling (and arguably surpassing) California’s scenery, New Zealand offers its own vast assortment of extraordinary beauty. Festooned with snow-capped peaks, glacial lakes, plunging waterfalls, massive glaciers, lush rainforests, and dazzling fiords (the New Zealand spelling for fjord), New Zealand is a visual paradise by any standard.
In addition to this obvious beauty, one thing that strikes me on each visit to New Zealand’s breathtaking South Island is the ubiquity of the beauty present even in New Zealand’s “ordinary” (a relative term) landscapes. Unlike traveling between photo destinations in California, in New Zealand even the drives to and from gorgeous photo destinations are so beautiful that I enjoy the views along the way almost as much as I do the destinations themselves.
In the New Zealand workshops Don Smith and I do each June, one spot that has always grabbed my eye is a small, tree-lined lake near Twizel, the home of our hotel for the Aoraki / Mt. Cook National Park and Lake Tekapo portion of our workshop. Known as Wairepo Arm, it’s connected by a small culvert to larger (but still not large by New Zealand standards) Lake Ruataniwha, a manmade lake created for hydroelectric power purposes.

Fogbow, Wairepo Arm, New Zealand
The first thing I notice here is the orange trees reflecting atop the usually calm lake. Since we’re always here in June, right around the Southern Hemisphere’s winter solstice, my first assumption was that the orange color was just late fall foliage hanging on into early winter. I didn’t realize until one particularly frigid morning in 2019 when we found the trees glazed with hoarfrost, pretty much demanding that we stop and photograph, that (despite the icy frosting) there are no leaves on these trees and the color is entirely in the trees’ bare branches. It turns out these are (non-native) flame willow trees that sport their vivid orange (it’s not subtle) all winter long.
This year, after a long drive from Mirror Lakes near Milford Sound, we decided this might be a good time to give our group a chance to photograph this scene at Wairepo Arm that we usually drive right by. We crossed our fingers and were thrilled to find the color strong, the lake calm, and the reflection everything we’d hoped for. As an added bonus, the entire scene was capped by a low fog that bathed everything in soft, shadowless light.
I’d never paid much attention to the birches before this visit, but for some reason this time my eyes went straight to their parallel trunks and papery white bark. While everyone in the group walked through gaps in these trees to stand on the lakeshore for an unobstructed view of the reflection, as I scanned the scene it occurred to me that I might be able to include the birches and still capture the reflection.
I walked down the lakeshore a couple of hundred yards and found a combination of evenly spaced parallel birches spaced enough to reveal the colorful trees and their reflection. The composition I thought worked best emphasized the horizontal bands complemented by the perpendicular trunks. Since the sky itself was pretty bland, and the grassy foreground was pretty disorganized, I included just enough of each to add to the horizontal layering. When a few ripples disturbed the lake surface, I added my Breakthrough 6-stop Dark Polarizer to smooth them.
I have no illusions that this image will be a social media viral sensation, but its soft light and soothing stillness provide the staying power I crave in an image.
See for yourself when Don and I return to New Zealand next year
Workshop Schedule || Purchase Prints || Instagram
“Ordinary” Beauty
Click any image to scroll through the gallery LARGE


, California")


Dinner Can Wait
Posted on July 3, 2023

Glacial Twilight, Tasman Lake Reflection, New Zealand
Sony a7R V
Sony 24-105 f/4 G
ISO 100
f/16
13 seconds
Among the (many) highlights of the New Zealand workshop Don Smith and I do each year is the short but steep hike to the Tasman Lake vista. Somehow the people at Aoraki / Mt. Cook National Park have managed to cram the .4 mile trail (I measured) with 334 stairs (I counted), but once you’ve caught your breath at the top of the trail, the reward for your effort is a 270 degree view that includes 12,200 foot Mt. Cook (New Zealand’s tallest peak), Tasman Glacier (covered in black rock in this image), turquoise Tasman Lake dotted with icebergs, the Tasman Valley, and a host of snowcapped Southern Alps peaks.
Because free-soloing this Tasman view climb isn’t for everyone, Don and I have an alternate spot for those who don’t feel like mountain climbers. This year, after dropping me and my Tasman Lake crew at the trailhead, Don and our driver Steve took the (larger) remaining group to a nearby bridge across the Hooker River, where they could photograph many of the same peaks with the river in the foreground. The plan was for both groups to photograph sunset at our respective locations, then reconnect for dinner while waiting for the sky to darken enough for (another) Milky Way shoot.
Normally I’m not crazy about setting rigid meet-up times following a shoot because it’s always impossible predict what conditions we’ll have and exactly when the show will be over. In this case we had enough cell service at both locations to allow us to include a little “We’ll let you know if we need more time,” flexibility in the plans. That turned out to be a good thing.
I’ve probably been up to this view at least a dozen times now, and each time it’s different. And much like approaching Tunnel View in Yosemite, you have no idea what’s in store until the view is upon you. The typical variables are the clouds, the amount snow at lake level, the number of icebergs and their location on the lake, and the color of the lake (always some shade of glacial green/blue).
Also like the Tunnel View experience, the reaction of people seeing this view for the first time is a true personal treat. This year’s experience was no exception, especially since the view this evening was among the best I’ve ever seen here. It checked most variables mentioned above: thin clouds swirled beneath the peaks; there was more ice on the lake than I’ve ever seen, most of it floating in the best part of the scene; and the lake’s color was off the charts. The only thing missing was snow at lake level.
Though sunset was still 45 minutes away, the light on the swirling clouds kicked us into gear instantly. As I worked on compositions ranging from extremely wide to moderate telephoto, it seemed the departing sun was taking the clouds with it—by the time the last sunlight kissed the tips of the peaks, the only clouds remaining were distant cirrus.
At that point it seemed like the show was over and a couple in my group started to pack up their gear and head back down to wait for the van. But I suggested that since we were already up here, and there was potential for some nice post-sunset twilight light, we may as well hang out to see what happens. A couple of minutes later I got a text from the other group saying they were wrapping up, but I responded that we’d need at least 20 more minutes—10 to see what the sky does, and 10 to make it back down to the trailhead.
About that time I took my eyes off the sky to glance at the lake and did an actual double-take. In all the years I’ve come here, I’ve never seen the lake surface still enough for a true reflection, but that’s exactly what was forming. I pointed it out to the others and we all snapped back into action. By this time it was fairly dark—dark enough that while waiting for one exposure to complete I was able to fire off a text to Don and Steve saying that we need more time, to just go to dinner without us.
This composition is a version of one I’d settled on earlier, before the reflection started. I’d quickly realized that biggest problem with this otherwise perfect scene was that a wide shot would require including either too much fairly empty sky, or too much of the jumbled and very bland rock surrounding the lake (which is why I always hope for snow at lake level). It’s difficult to tell from this image, but the slope down to the lake is quite steep—not vertical, but steep enough that it would require a little skill and great care by anyone trying to pick their way down to lake level. But this steepness allowed me to step about 5 feet back from the edge and use nearby (much more interesting) boulders to block most of the ugly lakeside.
Since these foreground rocks were between 5 and 10 feet from my camera, I had to be careful about depth of field. But because nothing in my frame was moving, after stopping down to f/16 I didn’t need to make any ISO compromises to speed my shutter—I just kept my ISO at 100, focused on a spot about 10 feet away, and dialed in the shutter speed that gave me the exposure I wanted. In this case that was 13 seconds (which should give you an idea how dark it had become). This long shutter speed had the added benefit of smoothing very slight motion disturbing lake surface, helping the reflection stand out even better.
Another thing I didn’t fully appreciate until I compared this image to previous images from this view was how much more blue there was in this lake that normally tends toward green. I attribute the color to the fact that by this time there was no direct sunlight anywhere, so the only source of light was the deep blue sky, which was still reflecting from the lake.
We made it back down the hill in near darkness, arriving at the trailhead at about the same time Steve returned from dropping the rest of the group at the restaurant. That night’s buffet was a little pricey but almost as spectacular as the view we’d just photographed and worth every penny, especially given the appetites we’d worked up. We finished the night with a fantastic Milky Way shoot just up the road from where the rest of the group had photographed sunset, then slept quite well back at our hotel in Twizel.
Join Don and Me in New Zealand next year
Workshop Schedule || Purchase Prints || Instagram
Big Reflections


, Yosemite")


Variations on a Tree
Posted on June 26, 2023

Winter Chill, Lake Wanaka, New Zealand
Sony a7R V
Sony 100 – 400 GM
ISO 100
f/18
30 seconds
I returned from New Zealand Saturday evening, a bit battered and bruised by jet lag and a brief but quite unpleasant battle with food poisoning (or norovirus), but nevertheless already missing this beautiful country that feels more like my home away from home each time I visit. I love everything about New Zealand—its unparalleled scenery, its friendly people, its tasty food, its pristine environment (the air, lakes, rivers, streets, and even the public restrooms), its meticulously maintained hiking trails, and even its (almost but not quite) ubiquitous sheep. Oh wait a minute—not the bacon. I definitely do not love New Zealand’s flaccid bacon (bacon should snap, not tear like soggy tissue).
Because I’m still in recovery mode, as I did last week, this week’s blog will be a new image attached to a revived and (significantly) updated prior post. I hope to forego the self-plagiarism and resume my regular schedule next week. In the meantime…
I’m incredibly blessed to make my living guiding enthusiastic photographers to many of our planet’s most beautiful locations: New Zealand, Iceland, Yosemite, and Grand Canyon, among many. While this makes my life far too rich for complaint, let me say (without complaining) that a particular challenge imposed by frequent return visits to the same locations is finding unique ways to photograph them.
My usual approach at these familiar locations is to identify appealing relationships and framing, then use my camera’s exposure variables to play with the scene’s “creative triad”: motion, light, and depth. Whether it’s blurring or freezing water, emphasizing shape by going dark for a silhouette or bright for a high-key effect, or depth-of-field from narrow to extreme to emphasize depth, I love playing with these variables to create something unique.
One particularly challenging subject is the solitary willow tree near the south shore of Lake Wanaka in New Zealand. This striking tree just stands by itself in a lake (most of the time), with little motion, silhouette, or depth of field opportunities. But each time I visit Wanaka, I challenge myself to find a version of the scene that’s different from anything I’ve captured, a challenge that grows harder with each visit. And just because I don’t have my full arsenal of creativity weapons doesn’t mean I’ve arrived completely disarmed.
With a compromised (but not quite eliminated) creative triad, my creative options at Lake Wanaka rely more heavily on some combination of weather and water conditions, juxtaposition of visual elements, focal length, and framing. And as you can see in the gallery at the bottom of this post, the conditions at the time of my visit play the largest role in the way I approach this scene. The weather conditions for sure, but also the color and light, the quality of the reflection, and whether it’s day or night.
Because a picture is worth a thousand words, I’ll spare you long explanations and share some examples with a few words of explanation
(Click the image for the blog post describing its capture)
First, a little bit about this beautiful tree. It grew from, of all things, a fence post placed near the lake around 1940, at a time when the water was lower than it is in most of these images. Spend much time in New Zealand and it’s not hard to recognize that New Zealanders are especially proud and protective of their indigenous flora and fauna. Which might explain why most New Zealanders view the attention this non-native willow tree receives with emotion that ranges from bewilderment to downright irritation. These feelings seem to intensify with proximity to Wanaka.
In March 2020 (clearly not a great month) the tree was vandalized by person/persons unknown (though I’ve been told that local authorities have a good idea who it is) who sawed off several branches, including the distinctive lowest branch that arced downward and nearly grazed the lake surface. And while this branchectomy (I made that word up) did cost the tree some of its aesthetic appeal, its beautiful spirit persists, and the Wanaka Willow remains a striking feature to view and photograph. (It won’t be difficult for anyone browsing the gallery images below to distinguish the before and after images.)

Wanaka Reflection, New Zealand
New Zealand’s winter clouds are a frequent source of delight. This image was captured late-morning (not usually great light), but the clouds and reflection were so nice that I couldn’t resist shooting. I chose a horizontal composition because it allowed me to include more clouds and reflection, while filling the frame top-to-bottom with the tree and its reflection, than a vertical composition would.

Red Sunset, Lake Wanaka, New Zealand
Juxtaposition is almost always a prime consideration. I especially love the snow-capped Southern Alps across the lake, so all things equal, I’ll usually position myself with the mountains in the background (the other options are trees and shoreline, or the town of Wanaka itself). In this scene the main event was the spectacular tangerine sunset, perhaps the most vivid color I’ve ever witnessed in New Zealand.
With the most intense color in the direction of the peaks, I set up facing that direction, taking care not to merge the tree with tiny Ruby Island. The reflection was slightly disturbed by gentle undulations on the lake’s surface, so I added a 6-stop neutral density filter to smooth the water. The resulting 30-second exposure glazed the lake surface and softened the distant fast-moving clouds just enough.

Gray Dawn, Lake Wanaka, New Zealand
But it’s not always about background juxtaposition. For example, on the morning following the sunset image above, the morning fog was so thick it rendered the background completely irrelevant. I chose a spot that best emphasized the tree’s shape, and that allowed me to fill my foreground with a mosaic of barely submerged stones. I played with my polarizer until I found an orientation that revealed the nearby stones while sparing the tree’s reflection. (Hold a gun to my head and ask me to name a favorite Wanaka Tree image and I might just choose this one.)

Starry Night, Lake Wanaka, New Zealand

Sky Light,The Milky Way and City Lights, Lake Wanaka, New Zealand
One aspect of the conditions I have some control over is whether it’s day or night. By going out after dark on a clear night, I can include stars—depending on the timing and my position, I can also juxtapose the tree with the Milky Way and a background feature.
In June, when I’m usually in New Zealand, for the first half of the night including the tree with the Milky Way also means including the lights of Wanaka. While that’s not necessarily a bad thing, I generally prefer avoiding city lights. I made an exception on this chilly night when a low fog bank obscured most of the direct artificial light, absorbing and reflecting Wanaka’s glow to paint the lower half of the frame gold.

Milky Way and Reflection, Lake Wanaka, New Zealand
If I wait until the night hours closer to sunrise, the Milky Way has rotated westward, away from the city lights. On the morning I captured the image on the right, the Milky Way was well on its way to setting. Rather than staying up all night for this image, I simply rose a couple of hours before sunrise to make this image (the beauty of having a hotel within walking distance of the tree). Unfortunately, by the time I made it out to the tree, the sky was just starting to brighten and lose contrast, and the Milky Way had rotated so far west that including it with the tree meant also including nearby shoreline and trees too. I have visions of making it out there a couple of hours earlier, but so far haven’t had a clear enough night on any subsequent visit.
For the image at the top of this frame, captured the same night as the image that includes the city glow, I decide to forego the Milky Way entirely and just concentrate on the tree and its reflection. The result was another of my favorite, and most successful, images.

Lone Willow Reflection, Lake Wanaka, New Zealand
I wasn’t really crazy about the sky when I captured this image, but I liked the background peaks and low-hanging clouds. So I retreated down the lakeshore, away from the tree, and then climbed a gentle slope to distance myself even further, then used a telephoto to enlarge the tree and shrink the distance between it and the mountains and clouds. (If I had it to do over again, I’d have moved slightly right to avoid merging the tree with the island.)

Reflection on the Rocks, Wanaka Willow Tree, New Zealand
The beautiful clouds that had started the evening over the Southern Alps had move quickly across the scene were exiting southeast and out of my frame. It wasn’t long before my options were to hold my position and photograph the tree with the mountains and no clouds, or reposition myself to feature the best of the clouds against the town of Wanaka. I went with the clouds.
Because I saw the potential for a beautiful sunset, I went went wide to maximize the sky, choosing my 12 – 24 lens. Instead of filling most of the frame with colorful clouds, I positioned myself so the reflection mirrored the arc caused by the last of the retreating clouds, creating a frame for the tree. I was aware that I was picking up a few structures on the opposite lakeshore, but felt that was justifiable compromise to ensure the best clouds and sunset color potential combined with snowy peaks.
The light was beautiful when I started, but it just kept improving as the color ramped up. Every few minutes I repositioned myself to keep the tree framed beneath the shifting clouds. To feature the flat, multi-toned rocks visible beneath a thin veneer of reflective water, I dropped my tripod and moved it a foot or so into the water. And finally, I shifted just enough for the trunk to split the gap between two distant peaks. Going vertical allowed me to get the full arc of clouds and their reflection above the rocks, with less far lakeshore than a horizontal composition would have.

Winter Chill, Lake Wanaka, New Zealand
This year’s (2023) Wanaka visit featured persistent dense, high fog. Perhaps not the dazzling conditions we’d all hoped for, but the longer I spent with the scene, the more I started to appreciate the opportunities. With fairly bland clouds overhead, my goal this morning was to isolate the tree, its reflection, and distant Ruby Island. To do this, I used my my 100-400 lens, positioned myself as far back as I could, and aligned the tree and island so they were close but not merged.
The reflection this morning was visible but slightly disturbed by gentle waves rolling across the lake surface. With a focal length of 166mm, I was a little concerned about keeping both the tree and the background sharp, so I stopped down to f/18, temporarily removing my camera from the tripod to focus on trees behind me that were slightly farther away the the willow (read about hyperfocal focusing). To create a more ethereal effect in the reflection, I returned the pre-focused camera to the tripod and added my Breakthrough 6-stop Dark Polarizer for a 30-second exposure that gave the lake a beautiful gauzy sheen.
Workshop Schedule || Purchase Prints || Instagram
Variations on a Tree
Click any image to scroll through the gallery LARGE


Greetings from Down Under
Posted on June 19, 2023
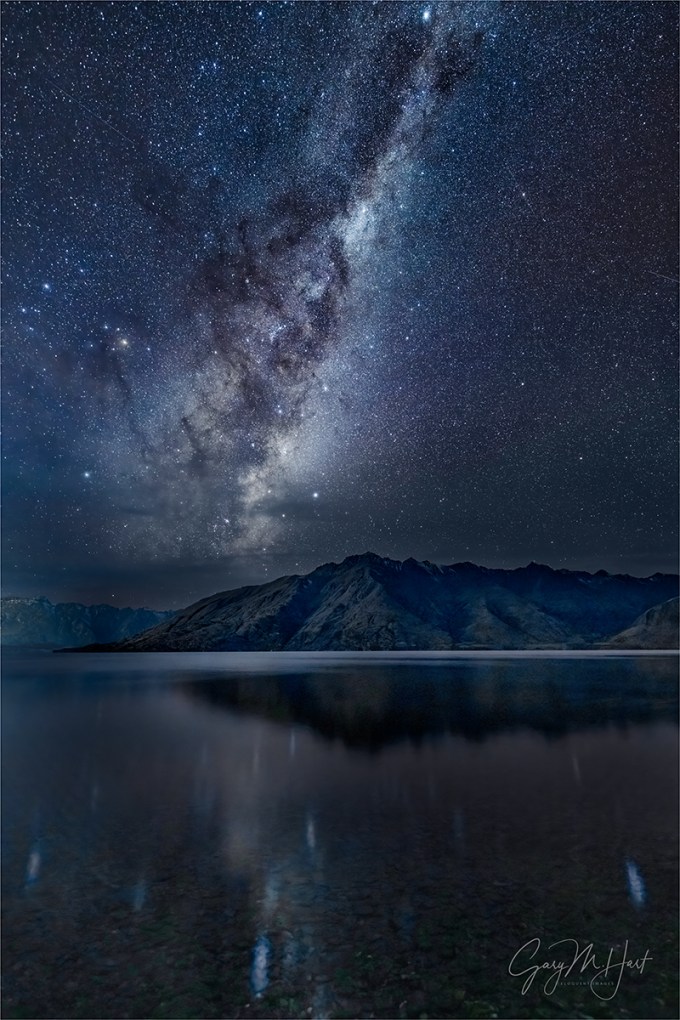
Milky Way Reflection, Lake Wakatipu, New Zealand
Sony a7R V
Sony 14mm f/1.8 GM
ISO 6400
f/1.8
15 seconds
It’s hard enough sticking to my (self-imposed) weekly blog schedule when I’m home and just doing the daily stuff necessary to keep my business running. But for the last week Don Smith and I have been cavorting about the New Zealand countryside with a dozen awestruck photographers. So I’ve dusted off a still relevant blog post from 4 years ago, updated it, and added a brand new image (from this trip) and description.
What’s my problem?
I share a lot of Milky Way images (and when I say Milky Way, I’m referring to the brilliant core of our home galaxy). But then it seems does everyone else. And when I look at some of the other visually dazzling Milky Way images posted online, I realize I’m working at something of a disadvantage—not because of deficient equipment (not even close), a physical or mental handicap (though as the years spin by…), or even because I think the world is unfair (maybe it is, but it’s been pretty good to me). No, my disadvantage is solely the result of self-imposed “rules” that prevent me from photographing anything that can’t be captured with a single click.
Single-click shooting means no focus stacking, no HDR, no blending separately captured foreground and sky. In other words, if I can’t get what I want in one frame, I don’t get it. It’s not that I think there’s anything wrong with combining images—image blending is a tremendous tool that allows digital photographers to transcend the limitations of film photography. And it’s not because blending is “too technical” for me—having spent 20 years working in the tech industry, I know my way around a computer and have actually played a fair amount with blending images (it’s not rocket science). No, I don’t blend images simply because, as beautiful as they might be, I get no personal satisfaction from results that feel artificial to me. And if photography doesn’t make you happy, what’s the point?
Every time I bring this up, someone gets defensive, feeling like I’m saying that there’s something wrong with blending images. There isn’t!* I enjoy viewing the work of photographers who blend images to elevate their art. So if you blend and enjoy it, please go forth and blend to your heart’s content (and keep those defensive comments to yourself). This is about me, and what makes me happy.
*As long as it’s not used to deceive.
Milky Way capture
I’m frequently asked about my processing for Milky Way images, and I’ve always been a little reluctant to share a lot because I’m not an expert, I don’t blend, and my Milky Way workflow is always a work in process. Nevertheless, I’m asked enough that I’ve decided it might nevertheless help for me to share my overall processing mindset and approach. (Plus, it might help others to understand why my images aren’t as “stunning” as the images of those who blend.)
In many ways I still consider myself a film shooter, albeit with an upgrade to a digital camera. Processing, though not my favorite part of photography, is an essential digital windfall that enables me to extract results from the photons I capture, results that were never possible with film (especially for those of us who shot only color film/transparencies). Like most digital photographers, I couldn’t succeed without processing—the alternative is to let the camera or computer make processing decisions, and that’s control I don’t want to relinquish. And given the challenges of minimal light photography, processing is doubly important for Milky Way images.
Given that I don’t blend images (for Milky Way photography that’s usually one exposure for the foreground and another for the sky), I start with a raw file that needs help. A lot of help. I like foreground detail in my night images, which requires me to compromise with a less than ideal f-stop, shutter speed, and (especially) ISO to gather enough light. And even with these compromises, the image straight from the camera is still far darker and noisier than ideal.
The right gear
First, even with all the skill and processing software you can muster, if you’re going to photograph the Milky Way with one click, you need to have the camera and lens to do it. On a moonless night light capture is king, which means using a camera able to return relatively clean results at extreme ISOs (up to 12,800) with a very fast, wide lens—24mm and f/2.8 is okay, but wider and faster is better.
For years my Milky Way body has been some version of the Sony a7S series (a7S, a7S II, a7S III)—most recently the Sony a7S III (a truly remarkable low light camera), while my night lens has been one of the following: Sony 24mm f/1.4 GM, Sony 20mm f/1.8 G, or Sony 14mm f/1.8 GM. But an equipment change may be afoot—details below.
Exposure compromise
My processing choices depend a lot on my exposure choices, which as I said earlier, are all compromises. For example, with my 14mm at f/1.8 wide open, I can usually keep the ISO in the 3200 to 6400, and my shutter speed to 15 seconds—quality compromises for sure (high ISO means high noise, longer shutter speeds mean star motion), but the results are certainly acceptable. It might help to know that when I photograph the Milky Way, I usually give each composition a variety of exposure settings and choice the best one later, when I can see the images on my computer.
It starts with noise reduction
For all of my images, my standard noise processing is Topaz DeNoise AI Photoshop plugin. I used to run my Milky Way images through DxO PhotoLab 2, but later versions of DeNoise have been so good that I now skip the DXO step.
In Topaz I magnify the view to 100% (and sometimes 200%) and play with the Noise Reduction and Recover Detail sliders until I’m confident I’ve found the combination that maximizes noise reduction without muddying the detail. I’ve had the most success with the Low Light, Standard, and Severe Noise panels (in that order), but your results may vary so experiment with all the options to find the panels that work for you.
The method behind my madness
Processing is where things start to get more vague because my approach is less an explicit series of steps than it is searching for the best way to achieve the results I want, steps that can vary a lot from image to image. Sometimes I can achieve most of what I want in Lightroom, other times I lean more heavily on Photoshop—usually it’s a fairly even balance of the two.
Given my hit-and-miss approach, it’s probably most important to explain what makes a successful Milky Way image. Here’s what I’m going for:
- Minimal noise: Asked and answered (Topaz DeNoise AI)
- The right sky color: As far as I’m concerned, the color of the sky in a Milky Way image the photographer’s creative choice because at night the human eye doesn’t capture enough light to discern color. If you look at my recent Milky Way images, you’ll see that I tend to avoid a blue/cyan sky in favor of something more blue/purple. It just feels more night-like to me. But that’s just my opinion and I empower you to go with whatever color makes you happy (more on that below). And lately I’ve been skewing away from blue and toward black with just a hint of blue—and no cyan.
- Foreground detail: The amount varies with the foreground, and how much light I can give it without too much noise.
- Uniform sky tone and hue (as much as possible): I don’t like a huge difference between the sky near the horizon and up toward the top of the frame
- The stars should pop: I want the sky to be fairly dark, but the stars to stand out.
- No part of the Milky Way should be blown out: While I want the stars bright, I don’t want them too bright.
- And the final result still needs to look like night (even though it will be brighter than the human eye sees).
I make extensive use of Lightroom and Photoshop’s History panels. There’s no single best way to do anything in Lightroom and Photoshop, so I make a lot of what-if?, trial-and-error adjustments that I only keep if I’m satisfied. So you’re not going to get specific steps from me as much as you’ll get things to try and accept/reject. The other thing I want to emphasize is to magnify the image to 100% (1:1) when you’re trying to decide whether or not to accept an adjustment.
I always play with the Highlights/Whites/Shadows/Blacks sliders—lots of up/down trial-and-error adjustments to find the right balance (gotta love that History panel). The Lightroom Clarity and Texture sliders will make the stars pop (and sometimes the foreground), but be especially gentle with these to avoid exaggerating the noise and making the stars look crispy). And Dehaze will add contrast to the sky that really enhances the Milky Way, but it also might darken parts of the scene too much. As with Clarity and Texture, Dehaze moderation is key.
I use lots of techniques to get the color I want—often just one or two adjustments are enough, and sometimes it requires a lot of adjustments. In Lightroom, I play with Color Temperature and Tint. That usually means cooling the temperature to somewhere in the 3000-4000 range, and nudging the Tint slider slightly to the right—less cyan, more red (which creates a blue with hints of purple). When those things don’t do the job, I’ll play with Lightroom’s HSL sliders. And now that Lightroom’s masking capability makes separating sky and foreground a snap, I usually process each independently of the other.
To tweak the color in Photoshop, I usually select the area I want to adjust, Feather it fairly loosely (large Feather Radius), and create a Color Balance and/or Saturation layer, doing lots of trial-and-error moves with each. And when using Saturation, I almost always work on specific colors, adjusting some combination of Hue, Saturation, and Lightness until I’m satisfied. Also, I find that some of the other adjustments I make in Lightroom and Photoshop tend to pump up the color too much, so I usually desaturate the sky a fair amount in Photoshop.
To make the Milky Way more prominent, a few passes with the Dodge brush set to Highlights can do wonders by brightening the stars without affecting the sky. But don’t overdo it—I prefer multiple passes at low Opacity (less than 20).
Probably the trickiest thing to contend with is a different hue near the horizon than I get in the rest of the sky. I can usually mitigate this somewhat with a feather selection and a Color Balance or Saturation layer, described above. And sometimes, if I’m really brave, I’ll select the offending area, Feather it, use the Eyedropper tool to pick the color I want, and the Paint Bucket tool to apply the color to the selected area. I usually get better results with Tolerance set fairly high (>50) and Opacity fairly low (<30). If you do this, don’t expect it to work every time, and always examine the results at 100% because it can introduce some pretty nasty blotchiness that doesn’t jump right out at you on first glance at lower magnification.
With most of my images, the last thing I do before saving is sharpen. But since night images are rarely about fine detail, and sharpening exacerbates noise and creates crispy-looking stars, I usually don’t sharpen my Milky Way images.
These tips are not intended to be the final word on Milky Way processing—I just wanted to give you some insight into my approach, both my goals and the steps I take to achieve them. I’ve been using Photoshop for a long time, but don’t consider myself a Photoshop expert, not even close. There may be (probably are) better ways to do many of these things. But I’ve always been a simple-first photographer: Do things the simplest possible way until you find some way that’s better, or until you encounter something you just can’t do without upping the complexity. And if you take nothing else away from this, I hope you at least feel empowered to experiment until you achieve results that make you happy.
About this image

Milky Way Reflection, Lake Wakatipu, New Zealand
New Zealand is hands down my favorite place to photograph the Milky Way. Better even than my previous favorite, the ultra-dark Colorado River at the bottom of the Grand Canyon, because: 1) the skies in New Zealand are almost as dark as the bottom of the Grand Canyon 2) the New Zealand air is usually cleaner (less dust and pollution) 3) New Zealand’s winter matches the Milky Way core’s prime months, so in June (when we do our workshop) the galactic center is photographable from about 7 p.m. until 7 a.m. 4) the Milky Way is higher in the sky down here.
Milky Way photography is a priority in the New Zealand workshop—not just for the people who sign up, but for Don and me as well. But since it’s winter, we often battle clouds, so the Milky Way on any given night is never a sure thing. To maximize our chances, over the years we’ve been doing this workshop Don and I have identified a handful of prime Milky Way locations at various points along the workshop’s 10-day journey.
A Milky Way location needs a good view of the sky in the direction of the Milky Way (in the first hours after sunset, that would be southeast), a compelling foreground, and minimal light pollution. It took us a couple of years, but we finally found a nice Milky Way spot on beautiful (and large) Lake Wakatipu near Queenstown. Since the workshop begins and ends in Queenstown, this spot allows us to check off the Milky Way box at the start of the trip (fingers crossed), and also gives us one last resort shot at it at the end of the trip.
This year we lucked out with clear skies on our very first night. So after a nice sunset farther up the lake toward Glenorchy, we drove back toward town and pulled into “our” spot. After waiting about 30 minutes for the sky to darken, we went to work. At first Don and I concentrated on getting everyone up to speed with Milky Way photography, but eventually we were able to get to work on a few images of our own.
On this New Zealand trip I’d decided to try my Sony a7R V at night—but because I’ve never tried this camera at night, to hedge my bets I also packed the trusty a7S III. The lens I chose for this trip was my Sony 14mm f/1.8 GM—almost as fast as the 24mm f/1.4, the Milky Way’s elevation in the New Zealand sky makes opting for the extra width of the 14mm a no brainer.
I started with the a7S III, but after a half dozen or so images switched to the a7R V. I haven’t looked at the a7S III images yet, but I have to say that I’m blown away by the results I got with my a7R V. Blown away enough that my days of packing a body just for night photography might very well be over. To get an image as clean as this one with 61 megapixel everyday camera truly is a (cliché warning) game changer.
I’ve photographed here several times before, each in slightly different conditions. This year the fact that there wasn’t as much snow on the peaks as previous years was more than compensated by the still, reflective lake surface.
We still have three more workshop nights, and I have cautious hopes for our planned Milky Way shoot at Tasman Lake in Mt. Cook / Aoraki National Park in a couple of nights. But if the clouds take us down, there’s no stress because we already have a great Milky Way shoot in the bank. Add that to our very special day cruising on Doubtful Sound, yesterday’s excellent Wanaka Tree shoot, and today’s spectacular Fox Glacier helicopter ride and hike, not to mention lots of fun with a bunch of great people, and I’m already declaring this trip an unforgettable success.
A Milky Way Gallery
Click any image to scroll through the gallery LARGE


")


Connections (It’s Personal)
Posted on June 6, 2023
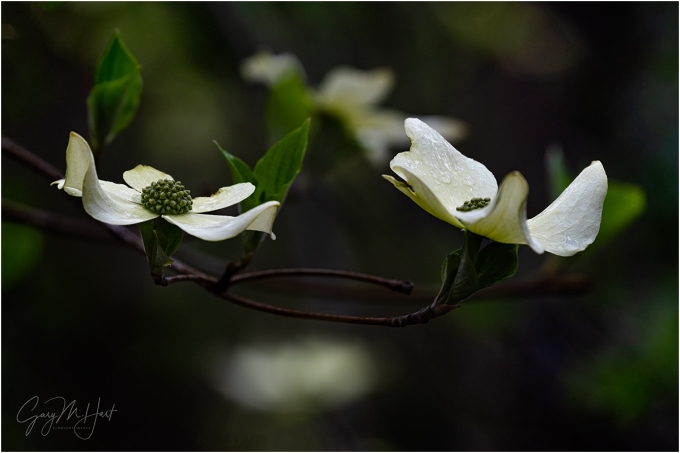
Afloat, Raindrops on Dogwood, Yosemite
Sony a7R V
Sony 100-400 GM
2 extension tubes (26mm total)
ISO 800
f/8
1/200 second
Once upon a time, whenever I heard a photographer say, “That’s exactly what I saw when I was there,” I’d cringe (because that’s impossible). Today, given the proliferation of AI generated and enhanced images, maybe I should rethink my perspective and just be glad that the photographer was there at all.
There’s a lot of buzz in the photography world about AI and its ability to manufacture images. I can’t deny AI’s benefits for many legitimate uses, but creating a landscape image from the comfort of your office chair with just a few words of description? Count me out.
Of course we’ve all seen landscape and nature images that were clearly faked, either through Photoshop manipulation (jumbo moon anyone?) or more recently with the help of AI. Somehow these images manage to fool enough people to generate a host of social media Likes, comments (“stunning!”), and shares, which tells me there’s a subset of photographers whose prime motivation is acclaim. Photography needs to make you happy, so if this makes them happy, I can’t begrudge these photographers the attention they need—my concern is the damage this inclination to solicit attention at any cost does to the credibility of the real photographers.
This is not a rant against image processing. In fact, in today’s world of digital capture, effective processing is an essential part of the creative process (as it has always been for B&W photography). But while the computer is important to digital capture, it’s there to serve the image, not generate it. Because I always want my creativity to happen in my camera, not my computer, I have to start thinking about processing long before I click the shutter. (The digital-capture equivalent of Ansel Adams’ “visualization” approach.)
Of course photography appeals to different people for different reasons. As much as I appreciate the processing power digital capture has brought to photography (especially to color photography—processing wasn’t a practical option for color film/transparency shooters), processing is probably my least favorite part of photography. And I know many excellent photographers who love processing and are far more masterful at it than I am.
Speaking only for myself as a creator and consumer, my photography is motivated by connection. When I create an image, I need to feel a personal connection with my subject before moving on the seeking to convey that connection in an image. This desire for connection also drives my need to write about my images—I pretty much never share a new image until I’ve written about its capture and what the image means to me (hence this blog).
When I view the photography of others, I want to feel like they’re conveying their own connection with the scene, not just trying to show me something pretty—and in so doing, they’re offering me a connection to their world. While every image from every photographer is processed (either by the photographer, by the camera, or both), the best processing is done in a way that allows me to ignore the processing so I can simply connect with the scene.
I realize that “connection” in this context is rather nebulous, but I do think connection helps explain why different images resonate more or less with different people. If you’re a photographer who hasn’t identified your own connections to the world, a good place to start would be to consider the things in your world that ignite that unsuppressible (reflexive?) urge to nudge a friend or loved one, point, and excitedly exclaim, “Look at that!”
“That” could be a dazzling city skyline, a happy dog stretching its head out the window of a passing car, a small child devouring an ice cream cone, a crisp mountain reflection, or an infinite number of other scenes you might encounter in your daily life. My own nudge-and-point (and raise my camera) triggers are almost always something in Nature—anyone spending time with my images (I hope) has a pretty good idea what they are. (Spoiler alert: rainbows, reflections, poppies, dogwood, anything celestial, and much more.) And speaking only for myself, writing about an image is as important as the capture and processing—not only does writing help me distill the feelings the scene provoked, it helps me understand my overall relationships with my subjects.
Even more important to me than the image I create is the in-Nature creation process where the connection actually starts. I’m not saying that I wander the woods with a camera consciously thinking about connections—it’s more a state I naturally fall into while in Nature that compels me to stop and make an image, or to patiently wait for the image to happen.
I know the subjects that resonate with me, and being as active on social media (as I have to be) gives me pretty good insight into the images that do and don’t resonate with others. So before posting a new image, I have a pretty good idea how many Likes, shares, and comments it will generate, but I never let that dictate the subjects I choose, or the images I share.
Just as I don’t share images that don’t thrill me, even when I know they’d be received enthusiastically, I also don’t hesitate to share personal favorites that will most likely generate crickets from the masses. But that’s okay—even though those personal favorites don’t elicit the volume of enthusiasm I’d like, the intensity of the enthusiasm I do receive from these images tells me connections were indeed made.
Today’s dogwood image is one of my potential “cricket” shares. It likely won’t thrill as many people as some of my more colorful, in-your-face-beauty landscapes do, but I also suspect there will be a few people with whom it connects intensely. It’s one of several I captured and processed on last month’s quick Yosemite overnighter with my brother (click the link for the full story).
Speaking of connection, few things in photography make me happier than exploring a forest like this, searching for intimate scenes that can only be revealed by a camera. When I get into a scene like this, with no one else requiring my attention and knowing I can be there as long as I need to be, time loses all meaning.
What I enjoy most about working these scenes is how different the world looks through my viewfinder than it looks to my eye. For example, the backgrounds in all of these forest dogwood images are almost always busier than what the image conveys. Through careful positioning, framing, depth management, and exposure, I’ve learned how to eliminate, simplify, complement, and disguise busy backgrounds.
My process starts with identifying a dogwood (or whatever the scene’s subject is) that I can isolate from its nearby surroundings, then moving around until I find a complementary background to be rendered as detail-less color and shape. This is almost always achieved by focusing close on a carefully chosen spot, usually using a telephoto zoomed to near the maximum focal length (or occasionally with my 90 macro), often with extension tubes to focus even closer (further limiting depth of field). I usually shoot these wide open (widest aperture for minimal DOF), but in this case I stopped down slightly to get a little more definition in the background dogwood.
Could I have stayed home and done something like this on my computer? Perhaps, but why rob myself of all that joy?
Workshop Schedule || Purchase Prints || Instagram
Personal Connections
Click any image to scroll through the gallery LARGE


Eulogy for an Icon
Posted on May 29, 2023

Solitary Tree, McGee Creek, Eastern Sierra
Canon EOS-1Ds Mark II
Canon 70 – 200 f/4 L
1/40 second
F/7.1
ISO 400
This week I’m mourning the demise of “Outdoor Photographer” magazine. While the patient may still have a faint pulse (the website remains up, and I’ve seen no official announcement), it appears to be on life support, with no sign of brain activity, just waiting for the plug to be pulled: The OP staff has been let go, there has been no social media activity in a week, and visitors to the website are greeted with a solicitation to purchase the assets of the magazine and its sister photo publications. (Tip: Don’t.)
Starting as a fairly niche publication in 1985, OP built slowly through the end of the 20th century, then rode the digital wave that began swelling in the early 2000s—until it smashed into the rocks of digital content in the 2010s.
For the boomers who cut their teeth photographing nature with film and transparencies (slides), only to closet their cameras in favor of family and work priorities, digital photography caught fire at exactly the right time: just as nests emptied and careers had either run their course or at least stabilized enough to permit outside distractions. This confluence made digital photography the catalyst for a wave of maturing boomers with time on their hands and a longing for the great outdoors. Conveniently, “Outdoor Photographer” magazine, the best of many landscape/nature photo magazine offerings at the time, became the rejuvenated boomers’ goto photography info source.
While I’d never completely mothballed my beloved Olympus OM-2, the transition to digital did breathe new life into my own photography as well. So not long after replacing my Olympus SLR film system with a Canon 10D DSLR and an assortment of compatible lenses, I re-subscribed to OP.
Each month I devoured OP’s articles, columns, reviews, and even ads to get up to speed on the new world of digital landscape photography. My photography forays into Nature increased, and I soon started considering leaving my life in technical communications (tech writing, training, and support) to pursue landscape photography.
Keeping my day job at first, I focused on galleries and weekend art shows with enough success to consider the next step—an actual career change. Based partially on info gleaned from OP, I honed in on photo workshops as the best path to fulltime income with my camera, and Yosemite seemed the best place to start (intimate familiarity and relatively near home). Soon I had a workshop format in mind and a couple of workshops scheduled.
As I tried to identify the best path to filling these nascent workshops, I recognized that OP’s subscribers were a perfect match for my workshop demographic. And even though I couldn’t afford to advertise, I couldn’t afford not to advertise even more, so in 2006 I closed my eyes and jumped with both feet. I can now say absolutely that without those monthly ads in the (still small) Workshops and Classes section at the back of OP, I’d have been back in the 9-5 tech world grind in less than a year.
Within a couple of years I was submitting articles to OP—difficult to be noticed at first, but once the first one was published, subsequent articles came fairly regularly. My first “Outdoor Photographer” cover came in 2015, and while it wasn’t my first ever cover image, it was the cover I was most proud of. Three more OP covers followed.
My Outdoor Photographer Covers


Once it started, OP’s decline was steep and relentless. I can’t say that I’m surprised, or even particularly saddened by the loss of this version of a magazine that had shrunk to a shell of its former self. Frustrated by dwindling content and (what I perceived as) lower quality paper stock and image resolution, I actually cancelled my subscription at least 5 years ago, and stopped advertising my workshops on OP at the start of last year (with no noticeable decline in interest in my workshops). But either by circulation error or simply to keep their circulation numbers up, OP still kept sending me an issue each month, so I’ve been able to monitor the magazine’s downfall.
Nevertheless, though I continued providing content, in recent years payment came slower and slower. At one point I actually refused to pay for my advertising until I received a many-month overdue payment for an article (that got their attention). I’m still waiting to be paid for my March cover and article, but am not holding my breath (despite a recent promise that it would only be late, and perhaps come in increments).
I’m not even sure how much we should blame OP’s original management for the magazine’s shrinking content and diminished printing quality—faced with an exodus of readers to digital content, and an aging demographic exacerbated by younger audiences more drawn to mobile phone snaps and video, I imagine each decision to deliver less was motivated by the imperative to cut costs enough to stay above water for one more issue. Maybe different decisions would have saved it, or at least slowed the decline, but I suspect these changes would ultimately prove to be insurmountable.
Given the amount of online resources available, it’s likely that most OP readers will have no problem replacing the information they were getting from OP. Unfortunately, Internet information is not always reliable (perhaps you noticed?). While there’s lots of great stuff out there, there’s also a lot of (mostly well-intentioned) garbage that ranges from fairly harmless to just plain wrong. (At least with a magazine as credible and respected as “Outdoor Photographer,” you could read it fairly confident that the info is reliable.)
If you’ll permit a shameless plug, let me suggest myself as an alternate source of reliable landscape photography insight. Posting weekly blogs here for more than 12 years (!), I’ve created (many) hundreds of articles designed to aid photographers and Nature enthusiasts, ranging from stories of image captures, photography how-to, and the natural science underlying my subjects. And the vast majority of images I share are paired with a blog post describing their capture, as well as a few thoughts they inspire. Because I don’t allow advertising on my blog, I don’t make a penny from all this content—my goal is simply to raise my own exposure by providing value to other photographers. So if you like what you read, please return often, and tell your friends.
About this image
I fired up the Wayback Machine for this image that dates all the way back to my early digital days and OP’s heyday. This was before I left my job at Intel, but after I’d made the wholehearted plunge into digital that would lead me to now. Having recently acquired the new Canon 1DS Mark II (an “impossible” 16 megapixels!), an absolute brick of a camera that was state-of-the-art at the time (with a price-tag to prove it), I was quite anxious to start getting a little return on my investment. But since I had a regular job that expected me to show up and produce, roadtrips back then weren’t quite as easy as they are today. But my brother Jay and I managed to set aside enough time to travel over to the Eastern Sierra for a fall color weekend.
This tree is on the unpaved road to McGee Creek, a favorite hiking and fall color spot between Bishop and Lee Vining. It had been on my radar for several years, but I’d never found the conditions suitable to photograph it. But following an afternoon fall color shoot at the creek, the late sunlight lit these tilde-shaped clouds and I could see that conditions were right for even more color as the sun dropped. Jay and I had been photographing a little down the road—I knew exactly where I wanted to be, but wasn’t sure we had time to get there. We quickly loaded into my truck and bounced over rocks and ruts for about a mile, pulling up to the spot with just seconds to spare.
Bolting from my truck, I raced to a spot that enabled me to juxtapose the tree with the just peaking sunset pink, setting up with barely enough time to fire off a small handful of frames before the color faded.
Workshop Schedule || Purchase Prints || Instagram
Eastern Sierra Magic


No Camera, No Regrets (and No Problem)
Posted on May 23, 2023

Inner Beauty, Japanese Maple, Portland Japanese Garden
Apple iPhone 14 Pro
14mm full frame focal length equivalent
ISO 40
f/2.2
1/180 second
I’m not going to pretend that my version of this beautiful Japanese maple tree is unique. Just Google Portland Japanese Garden and you’ll see dozens of similar images of this very tree. And a search for “most photographed tree in the world” will surely include this tree somewhere on the list. But the story of its capture—which includes elements of discovery, insight, surprise, awe, and even a little resourcefulness—is different than the story of any of my other images, making it one of my favorite images of the year despite its lack of uniqueness.
As anyone who has tried to combine a family vacation with a photography trip can tell you, the best time for photography is pretty much the worst time to be outside: sunrise happens when most people would rather be asleep; sunset almost always interferes with dinner; night photography is cold and keeps you up too late; and wild weather (snow, rain, fog) can make pretty much everyone cranky. Conversely, a warm and sunny afternoon, when everyone (without a camera) is awake, fed, and longing to enjoy the outdoors, is just about the worst time to take (good) pictures.
I’ve learned (and observed) that trying to mix serious photography with a family/friend vacation leaves everyone dissatisfied. That’s why, before departing on any trip, I decide whether I’m going to be a photographer or a tourist—one or the other, never both. On trips when I’m a tourist, with the prime goal to relax and and enjoy the sights with the people I love, I just leave my camera home and simply bask in Nature’s splendor. My lights-out and rise times are determined by comfort and enjoyment—my own and those with me—while my forays into Nature consider only convenience, and are timed for the most pleasant conditions to be outside. Following this approach keeps my body and mind fresh, my loved ones happy, and gives me a relaxed perspective that ultimately benefits my photography.
Last week my wife and I drove to Portland to visit friends, taking the long way to enjoy a three-day scenic drive up the California and Oregon coasts. Despite the undeniable beauty I knew we’d find on our route, my camera bag stayed home, and we enjoyed a truly great trip—relaxing, rejuvenating, absolutely gorgeous, and lots of fun. I think I can add enlightening as well, because whatever I lost in images was more than made up for in insight and perspective that’s only possible with no camera between me and Nature. (Photographers: try this sometime.)
One of the many highlights of our trip was Friday’s visit to the Portland Japanese Garden, a location I’ve long known of but never visited. The entire garden is beautiful and worthy of photographing, but its Japanese maple is probably the most recognizable specimen there. This beautiful tree has been featured in National Geographic magazine, and, as a classic “trophy shot” in every sense of the word, graces the portfolios, walls, books, and galleries of many (many) nature photographers.
Like most landscape icons, this maple’s beauty completely justifies the attention it receives, so even without my camera I was anxious to put my own eyes on it. Fully embracing vacation mode, before our visit I did zero research on the tree, and knew only that it was in the Portland Japanese Garden. Strolling the garden late Friday morning, I scanned for what I imagined, from the many photos I’d seen, what the tree must look like: maybe 20 feet tall with a symmetrical 25-foot spread, alone and dominating a grassy hill, and likely surrounded by gawking, selfie-seeking tourists.
When I found nothing of the sort, I was mildly disappointed, but simply shrugged and prepared to exit the garden for lunch and the rest of the day’s activities elsewhere in this beautiful city. But when my wife detoured into the garden’s gift shop before our departure, I opted to take one more shot at finding the tree. And for the first time all week, I set aside my tourist perspective and allowed myself to start thinking like a photographer, trying to see each tree the way a camera might see it. That’s when it occurred to me (duh) that a wide angle lens positioned low could create an illusion of size that doesn’t exist, and the object of my quest may in fact not look anything like I’d imagined it. Armed with that mental reset, I retraced my steps through the garden, reevaluating the trees I’d previously walked right past.
I’d only made it a couple hundred yards (on a trail I’d already traveled a couple of times) when I came across a smallish red maple on a grassy slope, protected by a (very) short wood fence, sharing its space with a few nondescript shrubs, and sporting a dense canopy that dropped to just a couple of feet above the ground. At first glance there was nothing to distinguish this tree from any other maple in the garden, a fact underscored by the scores of tourists walking right past it without so much as a glance.
But something about this tree tweaked my photographic Spidey-sense, so I approached the fence and ducked under the leafy canopy. Instantly I experienced something akin to what Harry Potter must have felt when he slipped into the Weasley’s tent in “Harry Potter and the Goblet of Fire.”
Quite simply, this was a different world. And even though at first glance it didn’t look at all like the pictures of the tree I’d seen, as soon as I saw it through the wide angle lens in my brain, everything fit into place. At this point, now hopelessly in my photographer-mind, I registered the tiny leaves, illuminated by sunlight gently filtered by thin clouds, and the way they radiated a diaphanous glow that emphasized their rich red. Next my eyes landed on the spiderweb shadow pattern cast on the lawn by the tree’s twisted branches.
Some things are just so beautiful they must be preserved, but instead of being frustrated that I didn’t have my “professional” camera, I whipped out my iPhone (14 Pro), switched its camera to the widest lens, dropped to ground level, and clicked one frame. At that point I had no plan to do anything more with my image than share it with my wife and save it as a keepsake of our trip. But when I showed the picture to my wife, she was especially excited and wanted to see the tree with her own eyes. So back we went.
In the 2 minutes it took us to return to the tree, I mentally critiqued my original capture and identified a few things I’d like to do differently. Then it occurred to me that this might be a great time to try out my iPhone’s raw capture feature for the first time (a raw image is unprocessed image data that requires a little more processing, but offers more flexibility and creates a better quality image). Back at the tree I took 6 more pictures, each in raw mode, each from a slightly different perspective. In the process, I used a variety of canopy/shadows ratios (lots of canopy, lots of shadow, and equal amounts canopy and shadow).
Importing and processing the Apple ProRAW images was no more difficult than with my regular cameras’ raw images—I simply AirDropped the files onto my computer, imported them into Lightroom, then processed them as I would any other image. And I’ve got to say that I was blown away by the image quality—both the detail (some of which is lost in the jpeg and web upload compression of the image I share here), and the dynamic range.
My final thought on this experience goes to something I write about a lot: the differences between human vision and the camera’s vision, and how to leverage those differences to create an image. Often my thoughts emphasize framing, subject relationships, and what I call photography’s “Creative Triad”—motion, light, and depth—that can be controlled with the exposure variables. But one more creative tool that can enable photographers to create something vastly different than the human experience is focal length.
A long focal length can compress the distance separating near and far objects, while a wide focal length can open up a small space to make it look much larger than it is (a feature used without shame by just about every real estate photographer). To illustrate how much the 13mm full-frame equivalent focal length of my iPhone exaggerated the size of this tree, I commissioned a lovely 5′ 3″ model (aka, my wife) to stand in front of the tree and allow me to photograph her using the phone’s 24mm full frame equivalent focal length. Hard to believe they’re the same tree, but I promise they are.


This trip was an excellent reminder that you don’t need a camera to be happy on vacation. I’m not saying I’m ready to throw away my professional cameras, but there’s peace of mind knowing that I can go out sans camera and tripod and still capture something I can share and print without apology.
The World of Trees
Click any image to scroll through the gallery LARGE


