Eloquent Images by Gary Hart
Insight, information, and inspiration for the inquisitive nature photographer
Monsoon Madness
Posted on September 22, 2019

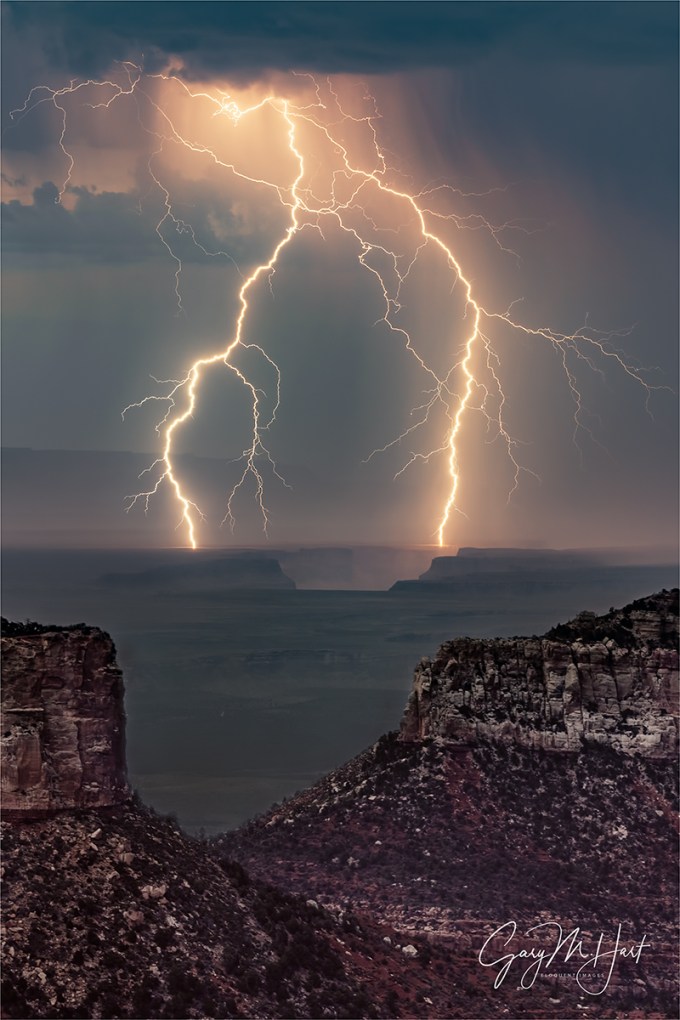
Serpentine Lightning, Mather Point, Grand Canyon South Rim
Sony a7RIII
Sony 24-105 f/4 G
1/6 second
F/10
ISO 100
Every August for the last seven years, good friend and fellow pro photographer Don Smith and I have done a Grand Canyon Monsoon photo workshop where we attempt to, among many other things, photograph lightning. I say “many other things” because Grand Canyon doesn’t need lightning to be spectacular. And even without lightning, the monsoon storms that build above the canyon most afternoons add beautiful clouds, rainbows, and sunsets to the magnificent vistas. (We also try to include a Milky Way shoot.) But as nice as all that other stuff is, most people come for the lightning. Don and I do our best to establish realistic expectations, because as reliable as the summer monsoon is in the American Southwest, nothing weather related is a sure thing.
This year I got a reminder of that fact by watching the weather forecasts leading up to our workshops. Each year in the weeks before first workshop’s start date, I regularly (obsessively) monitor the Grand Canyon weather forecast. This is a futile exercise that does nothing but add stress because no matter what the forecast is, I get anxious. No lightning? Oh no! This year’s monsoon is a dud (a “nonsoon”). Lots of lightning? Oh no! All the good stuff will be over before we get there. Sigh.
Coming into this year’s workshops, Don and I had done 12 (two per year for six years). For the first few years, I’d estimate that in about half, everyone in the group captured multiple lightning strikes (in some groups the number of successes approached or exceeded 100). In many of the less successful workshop, a few people got lighting and a few didn’t. And a few were a complete shutout. But the last two years had been great, with everyone in both groups getting multiple strikes.
Part of this recent success I attribute to just plain good luck, and part I attribute to experience—Don and I have gotten better at preparing the groups, teaching lightning photography, troubleshooting Lightning Trigger and camera problems, reading and responding to the conditions, and simply knowing where to be and when to be there.
This year’s first workshop would start on July 31, but as July wound down, each day’s forecast called for blue sky. Blank. Blue. Sky. Maybe our run of good luck was about to end. Fire up the anxiety engines. Compounding my stress was the realization that this would be our 13th monsoon workshop. And we had 13 participants—I’m not a particularly superstitious person, but still…. (We normally cap our groups at 12, but a small administrative hiccup resulted in an extra enrollee.)
But, to make a long story just a little shorter, we needn’t have worried. On the day our first workshop started, Mother Nature flipped the lightning switch and by the end of the third day (of five), everyone in Group 1 had their lightning. Phew. As it turned out, that group ended up with multiple lightning opportunities. Halfway there….

Lightning Explosion, Oza Butte, Grand Canyon North Rim
The second group had to wait until the fourth day, and only got one good shot at it, but theirs was one of the most spectacular lightning storms I’ve ever witnessed (Lightning Explosion, Oza Butte)—both for its intensity and its proximity.
Don and I usually use the day between workshops to “recharge” (pun unavoidable), but at dinner that evening we’d been monitoring our (fantastic) lightning app, My Lightning Tracker Pro, we saw that lightning was firing nearby and just couldn’t resist going out on our own.
Picking the lowest hanging fruit, we ended up at easily accessible Mather Point. The show was well underway when we arrived, but didn’t need to wait long before our Lightning Triggers started firing. I captured a dozen or so frames with lightning that evening, some with multiple bolts, but the unique, circuitous path followed by one I share above was my favorite.
I recently rewrote the lightning explanation portion of my Lightning Photo Tips article. As you’ll read below, lightning always follows the easiest path to resolve its polarity discrepancy, so I wonder what atmospheric machinations caused this serpentine bolt.
Lightning Explained
A lightning bolt is the atmospheric manifestation of the truism that opposites attract. In nature, we get a spark when two oppositely charged objects come in close proximity. For example, when you get shocked touching a doorknob, on a very small scale, you’ve been struck by lightning.
The primary process at work in an electrical storm is convection, the circular, up/down flow that happens when heat is applied to a fluid. As air warms, it becomes less dense and rises. The rising air cools with altitude and becomes more dense, causing it to sink. But the sinking air warms as it loses altitude, eventually rising again, and the cycle continues…. (Convection is also the process behind the bubbling of boiling water.)
Convection’s up/down flow creates turbulence knocks together airborne molecules, striping their (negatively charged) electrons. Lighter, positively charged molecules are carried upward in the convection’s updrafts, while the heavier negatively charged molecules remain near the bottom of the cloud. Soon the cloud is electrically polarized, more positively charged at the top than it is at the base.
Extreme polarity can also happen when a negatively charged cloud base hovers above the positively charged ground. Either way, nature resist this charge disparity and tries to resolve it as fast as possible: a lightning bolt.
Nature always finds the easiest path. If the easiest path to electrical equilibrium is between the cloud top and bottom, we get intracloud lightning; if it’s between two different clouds, we get intercloud lightning. A cloud-to-ground strike occurs when the easiest path to equilibrium is between the cloud and ground.
With lightning comes thunder, the sound of air expanding explosively when heated by a 50,000 degree jolt of electricity. The visual component of the lightning bolt that caused the thunder travels at the speed of light, over 186,000 miles per second (from the human perspective, that’s virtually instantaneous, regardless of your distance on Earth). But lightning’s aural component, thunder, only travels at the speed of sound, a little more than 750 miles per hour—a million times slower than light.
Knowing that the thunder occurred at the same time as the lightning flash, and the speed both travel, we can estimate distance of the lightning strike. At 750 miles per hour, thunder will travel about a mile in about five seconds: Dividing the number of seconds between the lightning’s flash and the thunder’s crash by five gives you the lightning’s distance in miles; divide the interval by three for the distance in kilometers. If five seconds pass between the lightning and the thunder, the lightning struck about one mile away; fifteen seconds elapsed means it’s about three miles away.
One of the things I love most about photographing lightning at Grand Canyon is the ability to do it in relative safety. With a few notable exceptions (see Lightning Explosion above), most of the lightning we photograph is at least 10 miles away, distant enough that we rarely hear thunder. I won’t pretend that any lightning photography is completely safe because the safest place to be in an electrical storm is always inside. But standing on one Grand Canyon rim while waiting for lightning to fire on the other rim, as we did this evening, feels more like magic than madness.
Join me at Grand Canyon
Workshop Schedule || Purchase Prints
Monsoon Madness
Click an image for a closer look and to view a slide show.


I Just Have To Share This
Posted on August 8, 2019
Lightning Explosion, Oza Butte, Grand Canyon North Rim
Sony a7RIII
Sony 24-105 f/4 G
Breakthrough neutral polarizer
Lightning Trigger LT-IV
.4 seconds
F/11
ISO 100
I don’t usually write a brand new blog in the middle of a workshop, but I have to share last night’s experience
August 7, 2019
Scanning the southern horizon from the view deck of Grand Canyon Lodge on the North Rim, I saw no sign of lightning. Far to the south was a somewhat promising curtain of rain, maybe 30 miles beyond the South Rim. With nothing to do until I met the group for our sunset departure, I found a composition I liked and pointed my camera (with Lightning Trigger engaged) in that direction.
Soon others joined me—with my lightning app showing activity 50 miles distant in the general direction my camera pointed, I made the call to bag the sunset shoot and put all our eggs in the lightning basket. (A decision I might not have made had this second workshop group already had the lightning success the first had). Turns out that was a good call.
About an hour later, when lightning started firing to the west, I stubbornly stuck with my composition, but instructed the rest of the group to point their cameras toward the more sure thing. My reasoning was that since I had over 100 lightning strikes from the first workshop, I could afford to be selective and take a chance on the composition I preferred, but everyone who hadn’t had a success should play the odds.
My storm completely fizzled, but the storm cell to the west was very active and appeared to be moving closer. I finally admitted defeat and gave up on my cell, turning my attention to the active cell just about the time we started hearing thunder. Within minutes the storm was on top of us and suddenly we couldn’t tell which thunder went with which bolt.
Huddled in relative safety beneath the lodge’s lightning rods, the next 20 minutes provided the most jaw-dropping electrical this California boy has ever seen—maybe all lightning storms are this spectacular, but I’ve never been that close. We gave everyone the option of retreating to the lodge’s enclosed viewing deck, but everyone steadfastly stuck to their tripods. The lightning was firing two or three times per minute, each strike so close that we couldn’t couldn’t fit the entire bolt in our frame. Then the wind kicked up and soon thereafter the sky opened, so we grabbed our cameras and headed inside.
As the lightning flashed in the pictures windows, we reviewed our captures on our LCDs and shared our bounty with each other. Everyone had multiple lightning captures, and it seemed like virtually all in the group had some version of this bolt striking Oza Butte, about one mile away. It was interesting to compare the differences between each person’s capture—not only did they vary with the composition, they also varied with the exposure time (more or fewer strokes and filaments) and camera type (some cameras trigger their shutters faster than others).
This image is a perfect example of what I love about still photography: It freezes an instant in time that is already memory by the time my brain registers it, allowing me to spend as much time as I want scrutinizing detail I’d never see otherwise. I can’t tell you how long I’ve studied this image already, and I’m still find new things.
Join me in a Grand Canyon photo workshop
Workshop Schedule || Purchase Prints
2019 Grand Canyon Monsoon Highlights (processed so far)


The Shocking Truth About Lightning
Posted on April 7, 2019
Forked Lightning, Point Imperial, Grand Canyon
Sony a7RIII
Sony 100-400 GM
Lightning Trigger LT-IV
ISO 400
f/7.1
.4 seconds
Every year for the last 10 (or so) years I’ve traveled to the Grand Canyon during the Southwest summer monsoon to photograph lightning. Not only have I captured hundreds of lightning strikes and lived to tell about it (yay), I’ve learned a lot. A couple of years ago I added an article sharing my insights on photographing lightning to my photo tips section. With lightning season upon (or almost upon) us here in the United States, I’ve updated my article with new images and additional info. You can still find the article (with updates) in my Photo Tips section, but I’m re-posting it here in my regular blog feed as well.
Read the story of this image at the bottom of this post, just above the gallery of lightning images.
How to Photograph Daylight Lightning Without Getting Killed (Probably)
Let’s start with the given that lightning is dangerous, and if “safety first” is a criterion for intelligence, photographers are stupid. So combining photographers and lightning is a recipe for disaster.
Okay, seriously, because lightning is both dangerous and unpredictable, before attempting anything that requires you to be outside during an electrical storm, it behooves you to do your homework. And the more you understand lightning, how to avoid it and stay safe in its presence, the greater your odds of living to take more pictures. Not only will understanding lightning improve your safety, a healthy respect for lightning’s fickle power will also help you anticipate and photograph lightning.
Lightning enlightenment
Lightning is an electrostatic discharge that equalizes the negative/positive polarization between two objects. In fact, when you get shocked touching a doorknob, you’ve been struck by lightning. The cause of polarization during electrical storms isn’t completely understood, but it’s generally accepted that the extreme vertical convective air motion (convection is up/down circular flow caused when less-dense warm air rises, becomes more dense as it cools with elevation, and ultimately becomes cool/dense enough to fall. Convection is also what causes bubbling in boiling water. Convection in a thunderstorm carries positively charged molecules upward and negatively charged molecules downward. Because opposite charges attract each other, the extreme polarization (positive charge at the top of the cloud, negative charge near the ground) is quickly (and violently) equalized: lightning.
With lightning comes thunder, the sound of air expanding explosively when heated by a 50,000 degree jolt of electricy. The visual component of the lightning bolt that caused the thunder travels to you at the speed of light, over 186,000 miles per second (virtually instantaneous regardless of your distance on Earth). But lightning’s aural component, thunder, only travels at the speed of sound, a little more than 750 miles per hour—a million times slower than light. Knowing that the thunder occurred at the same time as the lightning flash, and how fast both travel, we can compute the approximate distance of the lightning strike. At 750 miles per hour, thunder will travel about a mile in about five seconds: Dividing the time between the lightning’s flash and the thunder’s crash by five gives you the lightning’s distance in miles; divide the interval by three for the distance in kilometers. If five seconds pass between the lightning and the thunder, the lightning struck about one mile away; fifteen seconds elapsed means it’s about three miles away.
Lightning safety
The 30 (or so) people killed by lightning in the United States each year had one thing in common with the rest of us: they didn’t believe they’d be struck by lightning when they started whatever it was they were doing when they were struck. The only sure way to be safe in an electrical storm is to be in a fully enclosed structure or metal-framed vehicle, away from open windows, plumbing, wiring, and electronics.
While there’s no completely safe way to photograph lightning, it doesn’t hurt to improve your odds of surviving to enjoy the fruits of your labor. (Unfortunately, photographing lightning usually requires being outside.) Most lightning strikes within a six mile radius of the previous strike. So, if less than thirty seconds elapses between the flash and bang, you’re too close. And since “most” doesn’t mean “all,” it’s even better to allow a little margin for error. Thunder isn’t usually audible beyond ten miles—if you can hear the thunder, it’s safe to assume that you’re in lightning range.
But if you absolutely, positively must be outside with the lightning crashing about you, or you simply find yourself caught outside with no available shelter, there are few things you can do to reduce the chance you’ll be struck:
- Avoid water
- Avoid high ground
- Avoid exposed areas
- Avoid metal or electronic objects
- Avoid tall objects such as trees and open structures (and tripods)
- Stay at least fifteen feet from other people
- Do not lie down
- If you’re surrounded by trees, position yourself near shorter trees, as far from trunks as possible
- Crouch with your feet together and your hands covering your ears
- A lightning strike is often preceded by static electricity that makes your hair stand on end and an ozone smell (best described as the smell of electricity—I think of bumper cars at the amusement park, or the smell of my electric slot cars when I was a kid)—if your hair starts to stand up and/or you notice a distinct odor that could be ozone, follow as many of the above steps as you can, as quickly as possible (often you’ll only have time to crouch)
 Three Strikes, Bright Angel Point, North Rim, Grand Canyon
Lightning How-to
Photographing lightning at night is mostly a matter of pointing your camera in the right direction with a multi-second shutter speed and hoping the lightning fires while your shutter’s open—pretty straightforward. Photographing daylight lightning is a little more problematic. It’s usually over before you can react, so without a lightning sensor to recognize lightning and click your shutter, success is largely dumb luck (few people are quick enough see it and click). And using a neutral density filter to stretch the exposure time out to 20 or 30 seconds sounds great in theory, but a lightning bolt with a life measured in milliseconds, captured in an exposure measured in multiple seconds, will almost certainly lack the contrast necessary to be be even slightly visible.
Lightning Trigger: The best tool for the job
Most lightning sensors (all?) attach to your camera’s hot shoe and connect via a special cable to the camera’s remote-release port. When engaged, the sensor fires the shutter (virtually) immediately upon detecting lightning, whether or not the lightning is visible to the eye or camera. With many lightning sensors from which to choose, before I bought my first one I did lots of research. I ended up choosing the sensor that was the consensus choice among photographers I know and trust: Lightning Trigger from Stepping Stone Products in Dolores, CO. At around $350 (including the cable), the Lightning Trigger is not the cheapest option, but after many leading lightning-oriented photo workshops, I can say with lots of confidence that lightning sensors are not generic products, and the internal technology matters a lot. Base on my own results and observations, the Lightning Trigger is the only one I’d use and recommend (I get no kickback for this). On the other hand, if you already have a lightning sensor you’re happy with, there’s no reason to switch.
I won’t get into lots of specifics about how to set up the Lightning Trigger because it’s simple and covered fairly well in the included documentation. But you should know that of the things that sets the Lightning Trigger apart from many others is its ability to put your camera in the “shutter half pressed” mode, which greatly reduces shutter lag (see below). But that also means that connecting the Trigger will probably disable your LCD replay, so you won’t be able to review your captures without disconnecting—a simple but sometimes inconvenient task. You also probably won’t be able to adjust your exposure with the Lightning Trigger connected.
The Lightning Trigger documentation promises at least a 20 mile range, and after many years using mine at the Grand Canyon, I’ve seen nothing that causes me to question that. It also says you can expect the sensor to fire at lightning that’s not necessarily in front of you, or lightning you can’t see at all, which I will definitely confirm. For every click with lightning in my camera’s field of view, I get many clicks caused by lightning I didn’t see, or that were outside my camera’s field of view. But when visible lightning does fire somewhere in my composition, I estimate that the Lightning Trigger clicked the shutter at least 95 percent of the time (that is, even though I got lots of false positives, the Lightning Trigger missed very few bolts it should have detected). Of these successful clicks, I actually captured lightning in at least 2/3 of the frames.
The misses are a function of the timing between lightning and camera—sometimes the lightning is just too fast for the camera’s shutter lag. In general, the more violent the storm, the greater the likelihood of bolts of longer duration, and multiple strokes that are easier to capture. And my success rate has increased significantly beyond 2/3 since switching from a Canon 5DIII to Sony mirrorless (more on this in the Shutter Lag section).
The Lightning Trigger documentation recommends shutter speeds between 1/4 and 1/20 second—shutter speeds faster than 1/20 second risk completing the exposure before all of the secondary strokes fire; slower shutter speeds tend to wash out the lightning. To achieve daylight shutter speeds between 1/4 and 1/20 second, I use a polarizer, with my camera at ISO 50 and aperture at f/16 (and sometimes smaller). Of course exposure values will vary with the amount of light available, and you may not need such extreme settings when shooting into an extremely dark sky. The two stops of light lost to a polarizer helps a lot, and 4- or 6-stop neutral density filter is even better with fairly bright skies (but if you’re using a neutral density filter, try to avoid shutter speeds longer than 1/4 second).
Shutter lag
Lightning is fast, really, really fast, so the faster your camera’s shutter responds after getting the command from the trigger device, the more success you’ll have. The delay between the click instruction (whether from your finger pressing the shutter button, a remote release, or a lightning sensor) and the shutter firing is called “shutter lag.”
The less shutter lag you have, the better your results will be. The two most important shutter lag factors are:
- Camera model: It’s surprising how much shutter lag can vary from manufacturer to manufacturer and model to model. In a perfect world, for lightning photography your camera’s shutter lag will be 60 milliseconds (.006 seconds) or faster (the lower the number the better), but 120 milliseconds (.012 seconds) or faster can give you some success. The top cameras from Sony, Nikon, and Canon are all fast enough, but the latest Sonys are the definite shutter lag winner (fastest), with Nikon a not too distant second, and Canon third. And shutter lag can vary with the manufacturer’s model: While my Sony a7RII is one of the fastest cameras out there, my a7R was unusably slow, so you need to check your model. Since I don’t check every camera released, it’s possible this ranking will change well before I update this article, so I recommend that you research shutter lag for your camera model. Unfortunately, shutter lag isn’t usually in the manufacturers specifications, so it’s hard to find. The best source I’ve found is the “Pre-focused” time in the Performance tab of the camera reviews at Imaging Resource.
- Camera settings: Basically, to minimize the “thinking” the camera needs to before firing, you want to be in manual everything mode—metering and focus. If your camera offers an electronic front curtain option (as my Sonys do), use it. If you must autofocus, go ahead and do it each time you recompose, then turn autofocus off as soon as you’re focused. Though the Lightning Trigger documentation suggests Aperture Priority metering, I use and recommend Manual metering mode to eliminate any camera-slowing metering (but Aperture Priority is fine if you have a strong preference). And, also despite what the Lightning Trigger documentation suggests, noise reduction is a post-capture function that might slightly delay continuous frames, but it won’t increase shutter lag.
Other equipment
In addition to a lightning sensor and fast camera, you’ll need:
- A solid tripod and head: Don’t even think about trying to photograph lightning hand-held
- Rain gear that keeps you dry from head-to-toe
- Umbrella (a.k.a., Wile E. Coyote Lightning Rod) to shield your camera and lightning sensor (many sensors, including the Lightning Trigger, aren’t waterproof) while you compose and wait in the rain. The umbrella is for when you’re photographing storm cells at a great distance, such as on the rim of the Grand Canyon and the lighting is across the canyon. Obviously, when the lightning gets within 10 miles, put the umbrella down and run for cover.)
- Lens hood to shield some of the raindrops that could mar the front element of your lenses
- Neutral density filter and/or polarizer to slow shutter speed into the ideal range (1/4 – 1/20 second)
- A garbage bag (my choice) or rainproof camera jacket (haven’t found one) to keep your camera and sensor dry during a downpour
- Extra lightning sensor batteries (better safe than sorry)
- Extra memory cards: When a storm is very close or active, your lightning sensor could detect 20 or 30 strikes per minute (even when little or no lightning is visible to the eye)
- Infrared remote to test your Lightning Trigger; I sometimes borrow the remote from my hotel room, but the Apple TV remote works great and is extremely compact (fits nicely into the Lightning Trigger pouch)
- A towel
Getting the shot
Lightning is most likely to strike in or near the gray curtains (clearly recognizable as distant rain) that hang beneath dark clouds. In addition to visible rain curtains, the darkest and tallest clouds are usually the most likely to fire lightning. Here are a few more points to consider:
- The wider your composition, the greater your odds of capturing lightning, but the smaller the lightning will appear in your image.
- Identify the most likely lightning cell and find the best composition that includes it. I tend to start with wider compositions to ensure success, then tighten my composition once I’m fairly confident I captured something.
- Note the height from which the lightning originates and be sure to include enough cloud to get all of the stroke. On the other hand, don’t include too much room above the lightning—the most frequent rookie mistake I see is too much sky/clouds in the frame. The second most frequent is lightning cut off at the top. Unless the storm is too close for safety, for any given cell, most lightning will originate from about the same height above the ground.
- The best lens is usually a midrange zoom such as a 24-70 or 24-105—if you find yourself reaching for the 16-35 (or wider), you’re too close.
- On the other hand, once you’re sure you’ve captured some good strikes, try putting on a 70-200. The narrow field of view can significantly reduce the number of frames with lightning, but the ones you get will be much larger in the frame and therefore more spectacular.
- Don’t forget to try some vertical compositions. I usually wait until after I know I’ve captured some in a horizontal frame because vertical narrows the horizontal field of view and lowers the odds of success a little.
- Lightning stands out better in a slightly underexposed image. My target shutter speed is usually 1/8 second (slow enough to include multiple pulses, but not so slow that I risk washing out the lightning). When the sky is relatively bright, dropping to 1/15 or even 1/20 second can make the lightning stand out better than 1/8 (but risks losing secondary strikes). Conversely, when the sky is extremely dark and the lightning is firing like crazy, extending to 1/4 second might increase your chances for multiple pulses.
- Just because you’re standing around waiting for things to happen, doesn’t mean there’s nothing to do. Keep your eyes glued to the sky and adjust your composition as the lightning shifts, or as new activity starts elsewhere. If you wait until you hear your shutter click or someone else exclaim before looking up, you won’t see the lightning. And monitor the light—your exposure can change by several stops as the storm moves, intensifies, or winds down.
- Try not to check your captures on your LCD until you’re done (or better yet, until you upload your images to your computer). With the Lightning Trigger (and some other sensors), viewing the LCD requires turning off the sensor, which risks missing a shot (I’m pretty sure lightning waits for me to turn off my sensor), and you’ll also find that many successful captures, especially wide compositions with a relatively bright sky, just aren’t that visible on an LCD viewed in daylight anyway.
Do as I say (not as I do)
Be aware that electrical storms can move quite quickly, so you need to monitor them closely. Sometimes this simply means adjusting your composition to account for shifting lightning; other times it means retreating to the car if the cell threatens your location. No shot is worth your life.
About this image

Forked Lightning, Point Imperial, Grand Canyon
On the first evening of last year’s second Grand Canyon Monsoon photo workshop, Don Smith and I took the group to Point Imperial for a sunset shoot. Based on the forecast we had little hope for lightning, but one thing I’ve learned over the many years of photographing the monsoon here is that the forecast isn’t the final word. We got another reminder of this that evening.
The view from Point Imperial is both expansive and different from other Grand Canyon vistas, stretching east across the Painted Desert and north to the Vermillion Cliffs. As the group made their way down to the vista platform, in the corner of my I thought I a lighting strike far to the north. A second bolt confirmed my discovery and soon we had the entire group lined up with cameras pointed and triggers ready.
With everyone in business, I set up my tripod and attached my Lightning Trigger to my Sony a7RIII. Since this lightning was close to 30 miles away, maybe farther than any lightning I’ve tried to photograph, so I hauled out my Sony 100-400 GM lens and zoomed in as tight as I could. I didn’t have to wait long to confirm that my Lightning Trigger would catch strikes this distant—it didn’t hurt that these were massive bolts, many with multiple pulses and forks.
Everyone was thrilled, so thrilled that it didn’t immediately register that the storm was moving our direction. I started at 400mm, but by the time I captured this frame I was just a little more than 100mm. That’s still a pretty safe distance, but with night almost on us and another cell moving in from the east, we decided to take our winnings and go home.
One final note: If you check my exposure settings, you’ll see that my shutter speed here was .4 seconds, well outside the 1/20-1/4 second range I suggest. But if you look at the other settings, you’ll see that I’d opened up to f/7.1, and had cranked my ISO to 400, an indication that twilight was settling in. Successful lightning photograph is all about contrast, and the darker the sky, the better the bolt stands out, even in a longer exposure. Had we stayed past dark (and lived), we could have jettisoned the Lighting Triggers and used multi-second exposures.
Join Don Smith and me in our next Grand Canyon Monsoon Photo Workshop
Read my article in Outdoor Photographer magazine, Shooting the Monsoon
Workshop Schedule || Purchase Prints
A Lightning Gallery
Click an image for a closer look and slide show. Refresh the window to reorder the display.


(Another) Grand Canyon Lightning Show
Posted on September 1, 2017

Direct Hit, South Rim Lightning Strike, Grand Canyon Lodge (North Rim)
Sony a7R II
Sony/Zeiss 24-70 f4
1/8 second
F/16
ISO 50
Earlier this month Don Smith and I traveled to the Grand Canyon for our annual Grand Canyon Monsoon photo workshops. I enjoy every workshop, but as a true weather nerd, these monsoon workshops are particular highlights in my year, and in Northern California we just don’t get that much weather—that is, unless you consider homogenous blue (summer) or gray (winter) skies weather.
For this trip, I started monitoring the Grand Canyon forecast about a week before the first workshop (okay, maybe a little earlier than that), and ramped up my queries as the workshop approached. If hoping and handwringing could make lightning, I’d never have a bad day at the Grand Canyon, but after three days of fairly benign conditions, workshop group number one was still waiting for their lightning. Then, like a walk-off grand slam, on our final full day Mother Nature gifted us with a spectacular, two-hour lightning show. Phew. In fact, that afternoon we got an entire workshop worth of dramatic weather in about five very intense hours. The day’s highlights included lightning and two rainbows, and wrapped up a mammatus (google it) sunset at Cape Royal. All’s well that ends well.
Contrast group one’s eleventh hour salvation with workshop group two, which hit the ground running (quite literally) before we could even have an orientation. The second workshop was scheduled to start with a 1 p.m. orientation at Grand Canyon Lodge on the North Rim. As go most mornings in monsoon season, the day started quietly, but a little after noon lightning started up across the canyon and Don and I set up our tripods, cameras, and Lightning Triggers. With the designated gathering place in front of the lodge, but the viewing deck and lightning show in the back, Don and I took turns running up front and dragging folks down to our location. Those who had arrived with camera gear were put right to work, while the ones who had left their gear in their car or cabin and had to race back up the hill to fetch it.
By 1:15 we were seeing one or two strikes per minute, sometimes more, spread across a fairly broad area of the South Rim. Soon Don and I had a dozen photographers spread across two outside decks separated by an enclosed viewing room. Most of them had never used a Lightning Trigger, or even photographed lightning, so once we got everyone assembled, most of the next hour was spent running around setting up and testing Lightning Triggers, helping people achieve the right exposure, and suggesting compositions.
During that first hour our cameras, set up and primed for action, enthusiastically fired away unattended. When I’m with my camera during a storm, I’m constantly tweaking my composition, exposure, and Lightning Trigger sensitivity. Left to its own devices, my camera ended up with over 400 frames of the very same scene, most of which had no lightning (because the trigger was detecting lightning too faint to register). Fortunately, by the time everyone had settled into a comfort zone with their cameras and Lightning Triggers, not only was the lightning display still going strong, it had moved closer (but remained at a relatively safe distance) and was isolated to the most photogenic part of the view. Our second hour was pure joy, as each dramatic strike seemed designed to outdo the one that preceded it.
The image I share at the top of this post came when the storm was at its most intense, moving southwest to northeast across (right to left) the canyon, just a little east of our location. The brightest bolt you see is striking just below the South Rim, between Yaki and Shoshone Points, but ten miles away.
When all was said and done, I got about 50 strikes that afternoon, and everyone in the group got multiple strikes as well. We had another productive lightning day the next day, but this is the day I’ll remember.
Lightning Photography Revisited
This is an excerpted and updated section from the Lightning article in my Photo Tips section
Photographing lightning at night is mostly a matter of pointing your camera in the right direction with a multi-second shutter speed and hoping the lightning fires while your shutter’s open—pretty straightforward. Photographing daylight lightning is a little more problematic. It’s usually over before you can react, so without a lightning sensor to recognize lightning and click your shutter, success is largely dumb luck (few people are quick enough see it and click).
Lightning Trigger: The best tool for the job
A lightning sensor attaches to your camera’s hot shoe and connects via a special cable to the camera’s remote-release port. When engaged, the sensor fires the shutter (virtually) immediately upon detecting lightning—whether or not the lightning is visible to the eye or camera. With many lightning sensors from which to choose, before I bought my first one I did lots of research. I ended up choosing the sensor that was the consensus choice among photographers I know and trust: Lightning Trigger from Stepping Stone Products in Dolores, CO. At a little less than $400 (including the cable), the Lightning Trigger is not the cheapest option, but after leading lightning-oriented workshops for five years, I can say with lots of confidence that lightning sensors are not generic products, and the internal technology matters a lot. The Lightning Trigger is the only one I’d use and recommend (I get no kickback for this).
I won’t get into lots of specifics about how to set up the Lightning Trigger because it’s simple and covered fairly well in the included documentation. But you should know that connecting the Trigger will disable your LCD replay, which means you won’t be able to review your captures without disconnecting (a simple but sometimes inconvenient task). You also won’t be able to adjust your exposure with the Lightning Trigger operational.
The Lightning Trigger documentation promises at least a 20 mile range, and I’ve seen nothing that causes me to question that. It also says you can expect the sensor to fire at lightning that’s not necessarily in front of you, or lightning you can’t see at all. For every click with lightning in my camera’s field of view, I get many clicks caused by lightning I didn’t see, or that were outside my camera’s field of view. But when visible lightning does fire somewhere in my composition, I estimate that the Lightning Trigger clicked the shutter at least 95 percent of the time (that is, even though I got lots of false positives, the Lightning Trigger missed very few bolts it should have detected). Of these successful clicks, I actually captured lightning in about 2/3 of the frames.
The misses are a function of the timing between lightning and camera—sometimes the lightning is just too fast for the camera. In general, the more violent the storm, the greater the likelihood of bolts of longer duration, multiple strokes that are easier to capture. And my success rate has increased significantly beyond 2/3 since switching from a Canon 5DIII to a Sony a7RII (more on this in the Shutter Lag section).
The Lightning Trigger documentation recommends shutter speeds between 1/4 and 1/20 second—shutter speeds faster than 1/20 second risk completing the exposure before some or all of the secondary strokes fire; slower shutter speeds tend to wash out the lightning. To achieve daylight shutter speeds between 1/4 and 1/20 second, I use a polarizer, with my camera at ISO 50 and aperture at f/16 (and sometimes smaller). Of course exposure values will vary with the amount of light available, and you may not need such extreme settings when shooting into an extremely dark sky. The two stops of light lost to a polarizer helps a lot, and 4- or 6-stop neutral density filter is even better.
Shutter lag
Lightning is fast, really, really fast, so the faster your camera clicks the shutter after getting the command, the more success you’ll have. The delay between the click instruction (whether from your finger pressing the shutter button, a remote release, or a lightning sensor) and the shutter firing is called “shutter lag.” The less shutter lag you have, the better your results will be. The two most important shutter lag factors are:
- Camera model: It’s surprising how much shutter lag can vary from manufacturer to manufacturer and model to model. In a perfect world, for lightning photography your camera’s shutter lag will be 60 milliseconds (.06 seconds) or faster (the lower the number the better), but 120 milliseconds (.o12 seconds) or faster can give you some success. The top cameras from Sony, Nikon, and Canon are all fast enough, but the latest Sonys are the definite shutter lag winner (fastest), with Nikon second, and Canon third (slowest). And shutter lag can vary with the manufacturer’s model: While my Sony a7RII is one of the fastest cameras out there, my a7R was unusably slow, so you need to check your model. Unfortunately, shutter lag isn’t usually in the manufacturers specification, so it’s hard to find. The best source I’ve found is the “Pre-focused” time in the Performance tab of the camera reviews at Imaging Resource.
- Camera settings: Basically, to minimize the “thinking” the camera needs to before firing, you want to be in manual everything mode—metering and focus. If your camera offers an electronic front curtain option (as my Sonys do), use it. If you must autofocus, go ahead and do it each time you recompose, then turn autofocus off as soon as you’re focused. Though the Lightning Trigger documentation suggests Aperture Priority metering, I use and recommend Manual metering mode to eliminate any camera-slowing metering. And, also despite what the Lightning Trigger documentation suggests, noise reduction is a post-capture function that might slightly delay continuous frames, but it won’t increase shutter lag.
Other equipment
In addition to a lightning sensor and fast camera, you’ll need:
- A solid tripod and head: Don’t even think about trying to photograph lightning hand-held
- Rain gear that keeps you dry from head-to-toe
- Umbrella (a.k.a., Wile E. Coyote Lightning Rod) to shield your camera and lightning sensor (many sensors, including the Lightning Trigger, aren’t waterproof) while you compose and wait in the rain. (And obviously, when the lightning gets close, put the umbrella down and run for cover.)
- Lens hood to shield some of the raindrops that could mar the front element of your lenses
- Neutral density filter and/or polarizer to slow shutter speed into the ideal range (1/4 – 1/20 second)
- A garbage bag (my choice) or rainproof camera jacket (haven’t found one I like) to keep your camera and sensor dry during a downpour
- Extra lightning sensor batteries (better safe than sorry)
- Extra memory cards: When a storm is very close or active, your camera could click 20 or 30 frames per minute (even when no lightning is visible)
- Infrared remote to test your Lightning Trigger; I sometimes borrow the remote from my hotel room, but the Apple TV remote works great and is extremely compact (fits nicely into the Lightning Trigger pouch)
- A towel
Getting the shot
Lightning is most likely to strike in or near the gray curtains (clearly recognizable as distant rain) that hang beneath dark clouds. In addition to visible rain curtains, the darkest and tallest clouds are usually the most likely to fire lightning. Here are a few more points to consider:
- The wider your composition, the greater your odds of capturing lightning, but the smaller the lightning will appear in your image.
- Identify the most likely lightning cell and find the best composition that includes it. I tend to start with wider compositions to ensure success, then tighten my composition once I’m fairly confident I captured something.
- Note the height from which the lightning originates and be sure to include enough cloud to get all of the stroke. On the other hand, don’t include too much room above the lightning—one of the most frequent rookie mistakes I see is too much sky/clouds in the frame. Unless the storm is too close for safety, most lightning will originate from about the same height above the ground.
- The best is usually a midrange zoom such as a 24-70 or 24-105—if you find yourself reaching for the 16-35 (or wider), you’re too close.
- On the other hand, once you’re sure you’ve captured some good strikes, try putting on a 70-200. The narrow field of view can significantly reduce the number of frames with lightning, but the ones you get will be much larger in the frame and therefore more spectacular.
- Lightning stands out better in a slightly underexposed image. My target shutter speed is usually 1/8 second (slow enough to include multiple pulses, but not so slow that I risk washing out the lightning). When the sky is relatively bright, dropping to 1/15 or even 1/20 second can make the lightning stand out better than 1/8. Conversely, when the sky is extremely dark and the lightning is firing like crazy, extending to 1/4 second might increase your chances for multiple pulses.
- Just because you’re standing around waiting for things to happen, doesn’t mean there’s nothing to do. Keep your eyes glued to the sky and adjust your composition as the lightning shifts, or as new activity starts elsewhere. If you wait until you hear your shutter click or someone else exclaim before looking up, you won’t see the lightning. And monitor the light—your exposure can change by several stops as the storm moves, intensifies, or winds down.
- Try not to check your captures on your LCD until you’re done (or better yet, until you upload your images to your computer). Viewing the LCD requires turning off the sensor, which risks missing a shot (I’m pretty sure lightning waits for me to turn off my sensor), and you’ll also find that many successful captures, especially wide compositions, just aren’t that visible on an LCD viewed in daylight anyway.
Do as I say (not as I do)
Be aware that electrical storms can move quite quickly, so you need to monitor them closely. Sometimes this simply means adjusting your composition to account for shifting lightning; other times it means retreating to the car if the cell threatens your location.

Two Bolts, Grand Canyon
Join Don Smith and me in our next Grand Canyon Monsoon Photo Workshop
Read my article in Outdoor Photographer magazine, Shooting the Monsoon
Workshop Schedule || Purchase Prints
A Lightning Gallery
Click an image for a closer look and slide show. Refresh the window to reorder the display.


