Eloquent Images by Gary Hart
Insight, information, and inspiration for the inquisitive nature photographer
Moon over wherever
Posted on July 26, 2013
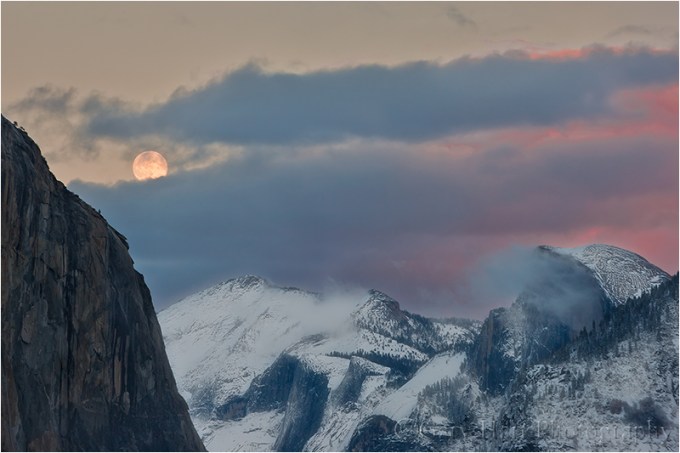
Winter Moonrise, Half Dome, Yosemite
Canon EOS-1Ds Mark III
1/6 second
F/11.0
ISO 100
188 mm
Often, including a rising or setting moon will turn an ordinary landscape into something special. Of course, like most things worth doing, moon photography adds a couple of layers of complication: First, there’s the matter of getting there at the right time, with the moon in the right place (it does little good to arrive as the moon rises if it’s skewed 90 degrees from the scene you came to photograph); and once you have everything lined up, you still have to contend with the almost always tricky exposure issues.
A little lunar geometry (you can skip this section of you’re more interested in “how” than “why”)
Many factors, some within our control, some completely beyond our control, determine the time, location, and phase of the moon at any time. The factors beyond our control are things like the earth’s rotation and the moon’s orbit, which determine the moon’s phase and its absolute position in the sky. On the other hand, we can control our location, and take the steps necessary to get us in the right place at the right time.
A full moon always rises and sets directly opposite the sun, rising in the east at sunset and setting in the west at sunrise. This actually makes perfect sense when you take a little time to understand the monthly choreography of the earth, moon, and sun. Just as the earth revolves around the sun, the moon revolves around the earth; at any point in this dance, half of the earth is lit (daytime) and half of the earth is dark (nighttime), half of the moon is lit and half of the moon is dark.
What we on earth see as a full moon is simply that one day each month that the moon’s entire lit side faces the earth’s dark side—that is, when the earth is directly between the sun and the moon (picture a beam of light that follows a straight line that starts at the sun, passes through earth, and ends on the moon). On that day only, as the point of your location on earth rotates from day to night, you’ll see the sun disappear in the west and the moon rise in the east. As the earth keeps rotating away from daylight and into night, the full moon rises higher and higher, reaching its highest point around midnight, then dropping as your location rotates back toward the sunlit side (and sunrise).
So then why do we rarely see a full moon rising exactly as the sun sets? That’s because: 1) the point of maximum fullness (when the sun, earth, and moon align perfectly) only happens at one instant each month—at every other instant of each month’s full moon day, the moon is only almost full (but still full enough to appear completely full); and 2) sun/moon rise/set times we see published always assume a flat horizon—if you have mountains between you and the horizon, your view of the actual sun/moon rise/set will be blocked.
Due to its monthly orbit about the earth, each day (or night) the moon rises a little later and gains or loses a little bit of its disk (the farther it has revolved from that sun->earth->moon line, the less of the moon’s lit side we see). So the night after the moon is full, it rises after sunset and is a little less full. The next night it rises a little later still, and is even less full, and so on. Eventually (in a little more than two weeks after it was full) the moon has revolved all the way around the earth until it lies between the earth and sun (now our imaginary line goes sun->moon->earth); all of its sunlit side faces away from the earth and we have a new (invisible) moon.
We call the moon “new” because the night before it disappears into the sun, all that was left of the shrinking moon (that was completely full about two weeks ago) was a small sliver that shined briefly on the eastern horizon just before sunrise, then disappeared as soon as the sky brightened (it’s still up there, but completely overpowered by the sun’s brightness). The next day the moon won’t appear at all because seeing it would require looking directly into the sun; but the following day, there it is, this time as a thin sliver on the western horizon immediately after sunset (again, it was up there most of the day, we just can’t see it until the sun sets and the sky darkens). This brand new crescent slips below the horizon shortly after it appears. And for the next two-plus weeks it will rise a little later, and grow a little larger, each night, until it’s full again and rising at sunset. Cycle complete.
If we do the math (this won’t be on the test), we can infer that if the moon takes 29.5 days to complete its cycle (from full to new and back to full), and there are 24 hours in a day, the moon must be rising about 50 minutes later each day (29.5/24=48.8). This rough approximation varies with many factors; for simplicity I usually round it to an hour when I do rough calculations in my head. And I always rely on much more precise software or astronomical charts for my critical calculations.
Locating the moon
Those who don’t do a lot of moon photography are amazed at how much the moon shifts above the landscape throughout the year—you can sight a full moon rising between Half Dome and El Capitan one month, and a few months later it’ll be rising above Leaning Tower (far to the south). Fortunately, like many things in nature that appear random to the uninformed, there is actually nothing random about the moon’s location once you take the time to figure it out.
If the idea of figuring anything saps the pleasure from your photography (or sends you into a panic), you’ll be happy to know that sometimes it’s enough to simply know that the moon will be rising in the east a little before sunset (this info is available in many places, in many forms, but the most complete source I’ve found is the US Naval Observatory website). Armed with that knowledge, you can go out to a location with a view of the western horizon, wait for the moon to appear, and start shooting.
On the other hand, juxtaposing the moon with a specific landmark requires more planning. And because its position is so not random, many others have done the heavy lifting for the rest of us. There are far too many moon phase/position resources to name even a small percentage of them, so rather than even try, I’ll just give you a couple of techniques, and the tools that enable them:
- My old fashioned way (old trick for an old dog): I figured out my technique for locating the moon long before computer software and smartphone apps took away most of the effort. Nevertheless, I continue to do it this way because I’ve already done all the hard work (figuring out how to do it), and I can do it in the field, with zero connectivity (no wifi or cell signal required). After relying for years on a the US Naval Observatory website for the info I need (moon phase and moon/sun rise, set, altitude, and azimuth), I now get all the pertinent data from my Focalware iPhone app (I never said I’m opposed to new technology), plugging it into my National Geographic Topo! (that’s NG’s exclamation point, not mine) mapping software (discontinued) to plot the direction of the moon’s rise/set. To determine when the moon will appear above (or disappear behind) the surrounding terrain, I plug distance and elevation information from Topo! into the trigonometric functions of my HP 11C scientific calculator (originally an actual calculator, but now also an iPhone 11C emulation app) to compute the elevation in of my horizon.
- Software (the better way for 99.999 percent of you): The Photographer’s Ephemeris (a free computer download or fairly inexpensive smartphone app) is the most complete solution that I know of (though I’m sure there are others I don’t know of)—I probably would have never taken the time to figure out my technique if TPE had been available. Not only does TPE give you the sun and moon’s location and elevation above the flat horizon, it also figures out the the actual (terrain included) horizon. The downside is that because it uses Google Maps, TPE requires connectivity and is better used in advance of your shoot (usually not a problem). Recent TPE versions also allow you to download the maps to your device for offline access—if I were a TPE user, I’d be doing this before every trip.
Exposure
My rule for photographing a rising/setting full moon is that I must capture detail in the landscape and the moon. If my landscape is black (or just too dark), or my moon is a white disk (or blob), my image has failed. But since the post-sunset landscape is in full shade, and the moon is as bright as a sunlit landscape (because it is a sunlit landscape), the dynamic range of a full moon scene is pretty extreme, often too extreme for a camera to handle with a single click (always my goal).
But here’s the great part—if you figure that the moon rises about an hour later each day, and the full moon rises at sunset, then it stands to reason that the day before it’s full the moon will rise about an hour before the sun sets. Factoring in the terrain on the horizon (and assuming you’re not at the base of a mountain), that means that the day before the moon is full is the best opportunity to photograph a nearly full (say 97%, give or take a percent or two) moon rising in the east above a landscape painted with the warm sunlight of the golden hour. Conversely, if your view is to the west, you can photograph a nearly full moon setting in warm sunrise light the day after it’s full. Either way, the day before or after the full moon gives you everything you need to capture your scene in nice, photographable light that’s still sufficient to hold the moon’s highlights at bay.
I’ve found that if I’m really careful with my exposure, I can usually capture enough foreground and lunar detail until five or ten minutes after sunset. Shooting after sunset usually requires raw capture, then massaging the dark foreground brighter, and bright moon darker, in the raw processor. A graduated neutral density filter can increase this threshold to maybe fifteen or twenty minutes after sunset—after that my foreground is unusably dark (or my moon is recoverably bright).
Another technique that works when the light gets too extreme is a composite—two images, one exposed for the landscape and the other exposed for the moon, combined in Photoshop. In the “Rules According to Gary,” this isn’t cheating if you don’t change the size or position of the moon. (Though it doesn’t break my rules, I no longer do composites because I have this weird compulsion to get everything with one click.)
The final piece of exposure advice I’ll add is to make sure your camera’s blinking highlights (also called highlight alert) are set (as far as I’m concerned, they should be set anyway because I see no downside to highlight alert). The moon is usually so small in your frame that it won’t register in the histogram, which means blinking highlights are usually the only way to know that you’re blowing out the moon. I monitor my highlights closely after each exposure and have found that, when shooting raw (jpeg shooters don’t have as much margin for error), I can usually recover enough detail with an exposure 2/3 to 1 stop brighter than the exposure that first showed blinking.
Just do it
Like most things photographic, don’t expect resounding success the first time you try adding a full moon to your landscape. But each time you go out, not only will you improve, you’ll probably come away with ideas for how to do it differently the next time.
Read more about moon photography


Everything’s up from here
Posted on July 25, 2012

Sunrise, Telescope Peak & Badwater, Death Valley
:: :: ::
At 282 feet below sea level, Badwater in Death Valley is the lowest point in North America. While that’s impressive by itself, consider that Telescope Peak, the sunlit mountain in center of this picture, is over 11,000 feet above sea level. But wait, there’s more…. Just 85 miles from where I stand here, Mt. Whitney towers 14,500 feet above sea level, the highest point in the lower 48 United States. And 5,400 feet vertical feet above me is Dante’s View; from there you can see both Badwater and Mt. Whitney. Pretty cool.
The Badwater playa is actually an ephemeral lake, filled only by unusually heavy rainfall and its runoff. With no outlet, and averaging less than two inches of replenishing rain each year, evaporation quickly empties Badwater Lake. Each evaporation cycle leaves behind a layer of salt. As the mud beneath the salt layer dries, polygonal cracks form openings that accumulate extra salt. Heat causes this salt to expand into corresponding polygonal shapes on the otherwise flat surface. Some winters I’ve found these shapes filled with water, like faceted jewels. And on my 2005 visit I watched a kayaker glide across the completely submerged basin.
Winter visitors have the best chance of catching the top salt layer before Death Valley’s ample airborne dust has had a chance to turn the playa from pure white to dirty brown. The north/south orientation of Death Valley means that the Panamint Range on the valley’s west side is bathed in the warm light of the rising sun. As with Mt. Whitney, the Panamint Range’s extreme elevation above the playa makes Badwater an ideal spot for early risers to photograph sunrise alpenglow. On this morning from early last February, the playa was pristine and a layer of thin cirrus clouds arrived at the same time as the sun, brushing the blue sky pink.
Photographic reality: Framing infinity
Posted on May 16, 2012

Snow and Autumn Leaves, Yosemite
“Photography’s gift isn’t the ability to reproduce reality, it’s the ability to expand it.”
(The second installment of my series on photographic reality.)
If you’ve ever tried to point out to someone a small detail in nature that pleases you, perhaps you’ve experienced a conversation like this:
You: “Look at that!”
Friend: “What?”
You: “Those leaves—look at the frost on those leaves.”
Friend: “What leaves?”
You: “There on the log—with the snow.”
Friend: “Those dead ones? Yeah, cool. Man, I can’t believe I ate all those fries at lunch.”
You: “Whatever.” Sigh.
It’s really great to enjoy nature, to take in all of its infinite, three dimensional, multi-sensory splendor: its smells, sounds, depth, and motion. But all this input is a lot to process, and because everybody interacts with the world a little differently, each person is drawn to different things—what moves you might be overlooked by others. If only there were some way to show others what you see. Hmmm….
Unlike us humans, a still camera experiences the world in single-sensory, discrete frames. Rather than being a disadvantage, a camera’s “limitations” provide an opportunity to isolate whatever aspects of a scene that moves you, and to remove extraneous elements that distract. In other words, the camera’s field of vision, determined by you, has finite boundaries that make a frame in which you can organize relationships and eliminate distractions through careful selection of your lens’s distance (or focal length) and direction.
The golden leaves in the above image were three among thousands dotting the forest floor on this November morning near Cathedral Beach in Yosemite. I wanted to juxtapose fall and winter, and reveal the leaves’ frosty fringe. A wide frame would have more closely represented the entirety of the scene as I experienced it, but without something to anchor the frame, I knew viewers’ eyes would wander and they’d be unsure of my intent.
So I put on my 100mm macro lens and moved closer, finding this trio of leaves on a log, surrounded by patches of snow. I started by positioning myself so none of the leaves merged—that each stood by itself, balanced in the frame. Framing the leaves tightly eliminated the rest of the world, giving you no choice but to only look at what I wanted you to see. F14 and careful focusing gave me enough depth of field to make the leaves and log sharp with the background distractions blurred to insignificance.
Up next: See the light
Autumn Leaves (and winter arrives)
Posted on March 17, 2012

Leaves and Snow, Yosemite
I’ve been in Maui since Monday (scouting for a new workshop), and despite the fact that there’s more to photograph here than there is time to photograph (seriously), I still find time to check the Yosemite webcams every day. In fact, even surrounded by all this tropical splendor, I’ll admit to a few pangs of homesickness when today’s webcams showed fresh snow, with more falling, in Yosemite Valley.
(I’ll get to my Maui pictures when I’m home, but until then here’s one from November.) At only 4,000 feet above sea level, Yosemite Valley is warm compared to most of the Sierra. It’s often raining here when it’s snowing just a little up the road. When it does snow in Yosemite Valley, for an hour or two scenes like this are quite common. But as soon as the sun comes out, the snow starts disappearing.
To see Yosemite Valley covered in white requires being there while it’s snowing–if you wait to leave until you hear it snowed in Yosemite, you’re too late. Photographing Yosemite while the snow is falling can be difficult, but the payoff is huge. Often the ceiling drops to the valley floor, obscuring everything that’s recognizable as Yosemite, but with the disappearing icons also vanishes the swarms of visitors and suddenly you feel like you’re alone in the world. Is there any silence more pure than the silence of falling snow?
The best nature photography often highlights the drama of change: the passing from day to night and back, the collision of ocean and land, an approaching or retreating storm. And, because it happens so gradually and only once each year, the movement from one season to the next is a rare photographic opportunity.
So that November morning my attention turned to shocked autumn leaves, lulled by weeks of benign fall weather, forced to cling to their colorful glory against winter’s sudden assault. After nearly a month as the main event, these leaves were lone survivors along a quiet bend in the Merced River. Within a couple days they no doubt fell to the forest floor, or were swept into the river, as inevitable winter prevailed.
Watch your step
Posted on February 24, 2012

Reflection, El Capitan winter morning, Yosemite
Trouble brewing
I have many “favorite” photo locations in Yosemite Valley–some, like Tunnel View, are known to all; others, like this location along the Merced River, aren’t exactly secrets, but they’re far enough off the beaten path to be overlooked by the vacationing masses. While I used to count on being alone here, as often as not lately I share this shoreline with other photographers. While it’s nice to have a location to myself (so far I can still find a few of those spots in Yosemite Valley), I’m usually happy to share prime photographic real estate with a kindred spirit.
But. In recent years I’ve noticed more photographers abusing nature in ways that at best betrays their ignorance, and at worst reveals their indifference to the fragility of the very subjects that inspire them to click their shutters in the first place. Of course it’s impossible to have zero impact on the natural world: Starting from the time we leave home we consume energy that directly or indirectly pollutes the atmosphere and contributes greenhouse gases. Once we arrive at our destination, every footfall alters the world in ways ranging from subtle to dramatic–not only do our shoes crush rocks, plants, and small creatures, our noise clashes with the natural sounds that comfort humans and communicate to animals, and our vehicles and clothing scatter microscopic, non-indiginous flora and fauna.
For example
A certain amount of damage is an unavoidable consequence of keeping the natural world accessible to all who would like to appreciate it, a tightrope our National Park Service does an excellent job navigating. It’s even easy to believe that we’re not the problem–I mean, who’d have thought merely walking on “dirt” could impact the ecosystem for tens or hundreds of years? But before straying off the trail for that unique perspective of Delicate Arch, check out this admonition from Arches National Park.
Hawaii’s black sand beaches may appear unique and enduring, but the next time you consider scooping a sample to share with friends back on the mainland, know that Hawaii’s black sand is a finite, ephemeral phenomenon that will be replaced with “conventional” white sand as soon as its volcanic source is tapped–as evidenced by the direct correlation between the islands with the most black sands beaches and the islands with the most recent volcanic activity.
While Yosemite’s durable granite may lull photographers into environmental complacency, its meadows and wetlands are quite fragile, hosting many plants and insects that are an integral part of the natural balance that makes Yosemite unique. Not only that, they’re also home to, and nesting places of, native mammals, birds, and reptiles that so many enjoy photographing. Despite all this, I can’t tell you how often I see people in Yosemite (photographers in particular) unnecessarily trampling meadows, either to get in position for a shot or as a shortcut.
Don’t be this person
Still not convinced? If I can’t appeal to your environmental conscience, consider that simply wandering about with a camera and/or tripod labels you, “Photographer.” In that role you represent the entire photography community: when you do harm as Photographer, most observers (the general public and decision makers) go no farther than applying the Photographer label and lumping all of us into the same offending group.
Like it or not, one photographer’s indiscretion affects the way every photographer is perceived, and potentially brings about restrictions that directly or indirectly impact all of us. If you like fences, permits, and rules, just keep going wherever you want to go, whenever you want to go there.
It’s not that difficult
Environmental responsibility doesn’t require joining Greenpeace or dropping off the grid (not that there’s anything wrong with that). Simply taking a few minutes to understand natural concerns specific to whatever area you visit is a good place to start. Most public lands have websites with information they’d love you to read before visiting. And most park officials are more than happy to share literature on the topic (you might in fact find useful information right there in that stack of papers you jammed into the center console as you drove away from the entrance station).
When you’re in the field, think before advancing. Train yourself to anticipate each future step with the understanding of its impact–believe it or not, this isn’t a particularly difficult habit to form. Whenever you see trash, please pick it up even if it isn’t yours. And don’t be shy about reminding other photographers whose actions risk soiling the reputation for all of us.
DEVELOP A “LEAVE NO TRACE” MINDSET
A few years ago, as a condition of my Death Valley workshop permit, I was guided to The Center for Outdoor Ethics and their “Leave No Trace” initiative. There’s great information here–much of it is just plain common sense, but I guarantee you’ll learn things too.
Now go out and enjoy nature–and please save it for the rest of us.
======================================
A few words about this image
I captured this image while guiding a customer on a private workshop the day before last week’s Yosemite winter workshop. After months of clear skies, the sun rose on two inches of fresh snow in Yosemite Valley. As I did two days later when my workshop group was greeted with another dose of overnight snow, I shifted into hurry-up mode to get to as many spots as possible in the couple of hours we had before the snow would be gone–once the sun hits the trees, the snow disappears like magic.
After watching the storm clear from Tunnel View, we arrived here just in time to watch the day’s first light descend the surrounding granite walls. Our timing was ideal, as reflections are never better than when the reflective subject is in sun and the reflective surface in shade.
Shooting on a tripod (always!) enabled me to be at my camera’s ideal ISO 100 and select the f-stop the scene called for, without worrying about the resulting shutter speed. In this case I opted for a wide composition to include all of El Capitan and its reflection, which gave me lots of depth of field. Since the focus point for a reflection is the focus point of the reflective subject, not the reflective surface (that doesn’t mean that you shouldn’t focus on the reflection, it just means you should take care not to focus on something floating on or resting beneath the reflection), at 20mm everything in my frame was at infinity. With depth of field not a concern, I dialed in f11, my lens’s sharpest f-stop (lenses tend to be sharper in their middle f-stops). F11 brought the added benefit of reducing image-softening diffraction that happens at smaller f-stops–I’ll go smaller than f11 only when the composition calls for it (or if I forget to change it from a previous shot).
The dynamic range (the range of light from darkest shadow to brightest highlight) was too much for my camera to handle, but a two-stop hard-transition graduated neutral density filter subdued the brilliant sunlight, enabling enough exposure to reveal detail in the foreground shadows. Hiding the GND transition in the linear band of shoreline trees was easy, and simple dodging and burning in Photoshop brought out shadow detail and ensured that the sunlit El Capitan was brighter than its reflection (as it should be). Also in Photoshop I applied a light touch with Topaz noise reduction, desaturated the sky slightly to prevent it from overpowering the scene, and did selective sharpening (selecting only the areas containing detail).
(While I do take my groups to this quiet spot beside the Merced River, the fragile riverside setting that requires crossing a small meadow makes me reluctant to share it with the general public.)
Familiarity breeds content
Posted on September 5, 2011
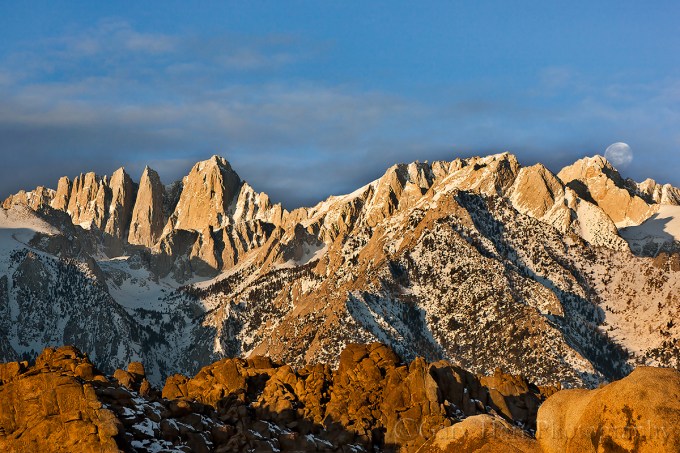
Goodbye Moon, Mt. Whitney and the Alabama Hills, California
Canon EOS-1Ds Mark III
145 mm
1/40 second
F/11
ISO 200
Content (con-tent‘): A state of peaceful happiness….
I’ve photographed Mt. Whitney from the Alabama Hills in sunlight and moonlight, in scorching heat and drifting snow. Sharing favorite spots here with a workshop group is as rewarding as a solitary night under the stars. I’ve never photographed in the Alabama Hills without feeling better afterward than I did when I started.
These feelings aren’t unique to the Alabama Hills; rather, they’re a benefit I’ve come to associate with all the locations I regularly photograph. While new locations are always a treat, visiting familiar terrain like the Alabama Hills, Yosemite, Mono Lake, Death Valley, the California coast, and the central Sierra foothills recharges me in a way not possible at a location that I’m trying to absorb for the first time. It’s like the difference between a quiet reunion with old friends and a raucous party with strangers: both have their place, but the reunion always elevates my spirits.
Content (con‘-tent): Substantive information or creative material….
With familiarity comes the knowledge that I’ll always be able to find something to photograph, regardless of the conditions. I can take my time, let my eyes search the terrain, probe every nook and cranny until something stops me. Everything at a familiar location settles comfortably into place, while at a new location my brain spins at it tries to process a seemingly infinite supply of unfamiliar elements while biased by a lifetime of viewing interpretations from other photographers. As stimulating as it might be, new input is a distraction to the creative process.
My goal, always, is to photograph a scene in a way that it’s never been photographed. That’s usually difficult (especially at many of the locations I photograph), but it seems impossible until I can process a scene and get comfortable with it, something that rarely happens in my first or second (or even third) visit. But each visit to familiar locations like the Alabama Hills seems to peel away additional layers of distraction, allowing me to see just a little deeper into whatever it is that makes that place special.
* * *
Sunrise light on Mt. Whitney, and a few minutes later on the Alabama Hills themselves, is a singular treat. The abrupt face of the Sierra towering over the terrain to its east creates rare opportunities witness the unfolding of a new day, as the sun’s first rays kiss the Sierra crest long before they reach observers below. The angle and quality of Mt. Whitney’s first light varies with season and conditions; as I’ve become more tuned to it, I’ve attempted to use this light to highlight the foreground for the larger scene.
Of course the prime show on this frigid morning last January was a full moon setting behind the snowcapped Sierra crest (Mt. Whitney, the highest point in the 48 contiguous United States, is the shark-tooth peak on the left). But rather than “settle” for that exquisite scene, I tried to complement the serrated peaks with the craggy and complementary contours of the nearby boulders. The warm sunrise light on the granite became my friend, creating extreme contrast that further emphasized rocks’ rugged character.
Workshop Schedule || Purchase Prints
A Mt. Whitney Gallery


