Eloquent Images by Gary Hart
Insight, information, and inspiration for the inquisitive nature photographer
Ripping Off the Band-Aid
Posted on April 3, 2024
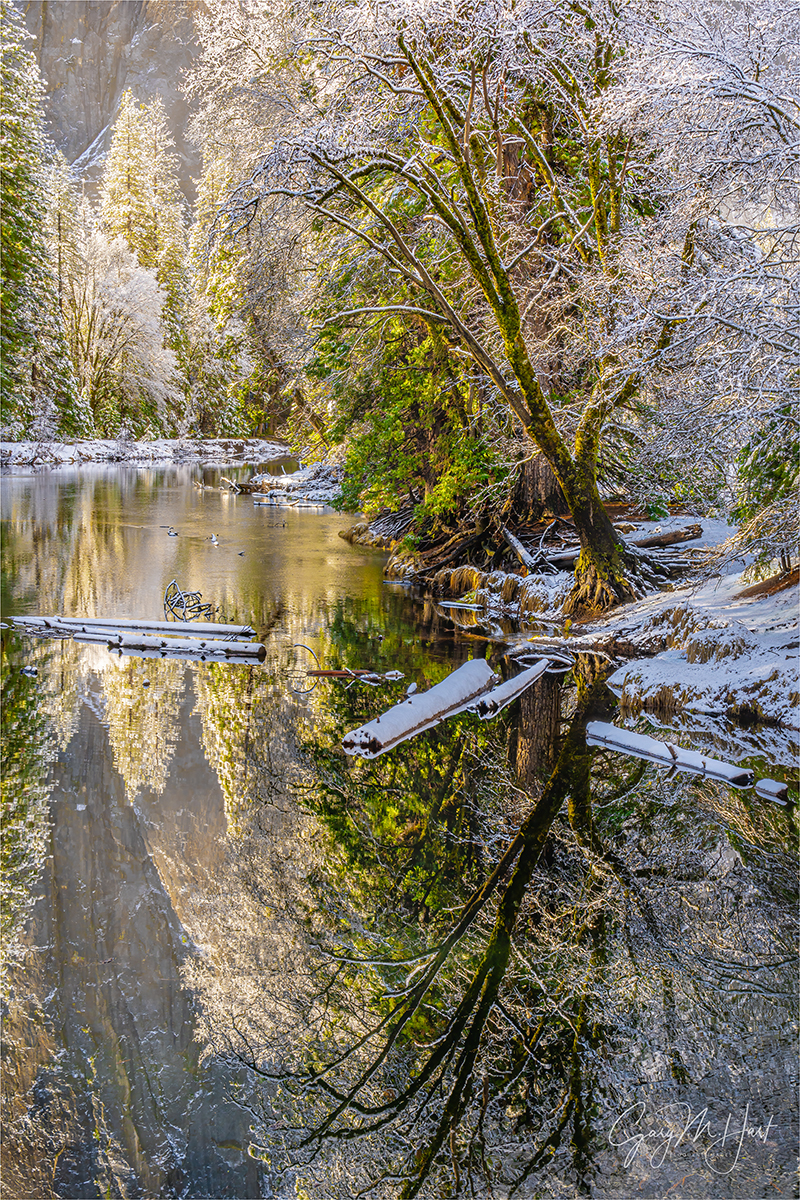
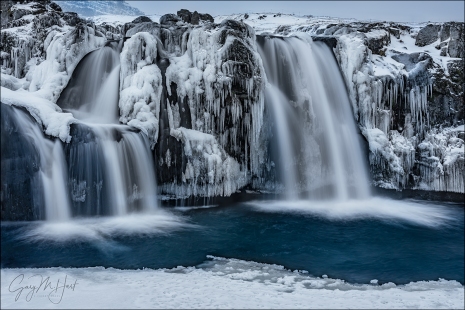
Frosted, Cathedral Rocks from El Capitan Bridge, Yosemite
Sony a7R V
Sony 24-105 f/4 G
ISO 100
f/13
1/10 second
We were in the midst of a beautiful Yosemite Tunnel View clearing storm when I told my group it was time to pull up stakes and move on. Some thought they’d misheard, others thought I was joking. Since we’d only started the previous afternoon, I hadn’t even really had a chance to gain the group’s trust. When one or two in the group hesitated, I assured everyone it’s like ripping off a Band-Aid, that it will only hurt for a minute and they’ll soon be glad they did it.
Many factors go into creating a good landscape image. Of course the actual in the field part is essential—things like photogenic conditions, a strong composition, and finding the ideal camera settings for exposure, focus, and depth of field. You could also cite processing that gets the most of the captured photons without taking them over the top. But an under-appreciated part of creating a good landscape image is the decision making that happens before the camera even comes out.
Some of this decision making is a simple matter of applying location knowledge. Other factors include the ability to read the weather and light, and doing the research to anticipate celestial and atmospheric phenomena (such as the sun, moon, stars, aurora, rainbows, and lightning). All of these decisions are intended to get to the right place at the right time.
A photo workshop group relies on me to do this heavy lifting in advance, and while I can’t guarantee the conditions we’ll find in a workshop scheduled at least a year in advance, my decisions should at least maximize their odds. These decisions don’t end when the workshop is scheduled—in fact, they’re much more visible (and subject to second guessing) after the workshop starts. Case in point: This morning in February.
Though the overnight forecast had promised a few rain showers followed by clearing that would last all day (yuck), before we’d even made the turn in the dark toward our Tunnel View sunrise, it was apparent the forecast had been wrong. Snow glazed all the trees, patches of fog swirled overhead, and I knew my plan to start at Tunnel View would give me the illusion of genius. At this point, my morning seemed easy.
For the next hour or so it was easy and my “genius” status remained intact as my group was treated to the Holy Grail of Yosemite photography: a continuously changing Tunnel View clearing storm, made even better by fresh snow. And if easy were my prime objective, I’d have just kept them there to blissfully bask in the morning’s beauty.
But the secret to photographing Yosemite in the snow is to keep moving, because when the conditions are beautiful in one spot, they’re just as beautiful at others. Since Yosemite’s snow, especially the relatively light dusting we enjoyed this morning, doesn’t last long once the sun hits the valley floor, our window for images of snowy Yosemite Valley was closing fast. I took comfort in the knowledge that it was virtually impossible that everyone in my group didn’t already have something truly spectacular. But, grumpy as they might have been about leaving (no one really showed it on the outside), I also knew I’d be doing them a disservice not giving them the opportunity for more great Yosemite images elsewhere in the park.
So I made the call: we’re leaving. Our next stop was El Capitan Bridge. The obvious view here is El Capitan and its reflection, visible from the bridge, but best just upstream along the south bank (actually, this bank is more east here, but since the Merced River, despite its many twists and turns, overall runs east/west through Yosemite Valley, that’s the way I’ll refer to it), but before everyone scattered I made sure they all knew about the Cathedral Rocks view and reflection from the downstream side of the bridge. Good thing.
As lovely as El Capitan was this morning, it was the downstream view that stole the show. By departing Tunnel View when we did, we were in place on the bridge when the sun broke through the diminishing clouds and poured into the valley, illuminating the recently glazed trees as if they’d been plugged in. I’d hoped that we’d make it here in time for this light, but I’d be lying if I said I expected it to be this spectacular. I hadn’t been shooting when the light hit, but when I saw what was happening I alerted everyone and rushed to capture the display before the sunlight reached the river and washed out the reflection. Some were already shooting it, but soon the rest of the group had positioned themselves somewhere along the rail to capture their own version.
Assessing the scene, I called out to no one in particular (everyone) that we shouldn’t just settle for the spot where we’d initially set up because the relationships between all the scene’s many elements—Cathedral Rocks, snow-covered trees, reflection, floating logs, etc.—was entirely a function of where they stood. With the entire bridge to ourselves, we all had ample space to move around and create our own shot.
I was especially drawn to the moss-covered tree tilting over the river on the bridge’s north (west) side. With a few quick stops on the way, I decided to go all-in on this striking tree and ended up on the far right end of the bridge. Being this far down meant losing some of the snowy trees and their reflection, but I decided I had enough of that great stuff and really liked the tree’s outline and color, not to mention the way this position emphasized the sideways “V” created by the tree and its reflection.
In general, I love the shear face of Cathedral Rocks from El Capitan Bridge (it’s a very popular Yosemite subject, especially among photographers looking for something that’s clearly Yosemite without resorting to its frequently photographed icons), but featuring the granite in this image would mean including blank sky that I felt would be a distraction. And I was also concerned that the sunlit rock just above the top of this frame would be too bright. So I composed as tightly as I could, eliminating the sky and sunlit rock, getting just enough of Cathedral Rocks to create a background for the illuminated evergreens. I was pleased that composing this way still allowed me to get more of the granite in my reflection.
At f/13 with my fairly wide focal length, getting front-to-back sharpness wasn’t a big problem, so I just focused on the featured tree. The greater concern was exposure. Sunlit snow is ridiculously bright, which meant that with much of my scene still in full shade, the dynamic range was off the charts. So I took great care not to blow-out the brightest trees, which of course resulted in the rest of my image looking extremely dark. But a quick check of my histogram told me I’d captured enough shadow info that brightening it later in Lightroom/Photoshop would be difficult.
By the time we were done here, I’m pretty sure everyone’s skepticism of my early exit had vanished, and that the brief sting from ripping off the Tunnel View band-aid was more than assuaged by the images we got after we left. By late morning, the snow was gone.
Yosemite in the Snow
Category: Cathedral Rocks, reflection, Sony 24-105 f/4 G, Sony a7R V, Yosemite Tagged: Cathedral Rocks, nature photography, reflection, snow, Yosemite
Perfect Timing
Posted on March 14, 2023

Big Moon, Mt. Williamson, California
Sony α1
Sony 200-600 G
Sony 2x teleconverter
ISO 800
f/13
1/500 second
In the Alabama Hills to photograph sunrise in neck-craning proximity to the Sierra Crest, I knew precisely what time, on this date, the sun’s first rays would color the towering granite, and exactly when a 98% moon would would disappear behind the left flank of Mt. Williamson, California’s second highest peak.
Clocks and calendars enable us to time some aspects of our lives, like sunrises and moonsets, to within microseconds. But when I scheduled this sunrise moonset more than a year ago, I had no idea whether the sky would be clear, perhaps feature a few clouds that would catch the sunrise hues, or be completely filled with overcast that would block sunlight and hide the moon. I didn’t know how much snow would drape the peaks, or whether the peaks even would be visible at all.
Clocks and calendars are essential, but as a self-employed landscape photographer, I’m beholden to far more fundamental constructs than the bustling majority is. I work when there’s work to be worked, and play when (fingers crossed) there’s play to be played. The business side of my life sometimes requires a clock and calendar, but the actual photography part is governed by fundamental laws of nature that transcend the rest of the world’s clocks and calendars.
The irrelevance of conventional time measurement is never more clear than immediately following a time change. On the second Sunday of each March, when “normal” people moan about lost sleep and having to rise an hour earlier, the sun thumbs its nose at Daylight Saving Time and rises a mere minute (or so) earlier than it did the day before. So do I. And on the first Sunday of November, as others bask in their extra hour of sleep, I’ll get to sleep an entire minute longer. Yippee.
The immutable natural laws that are the foundation of our clocks and calendars, that keep the world on schedule and enable us to precisely predict events like sunrise/sunset, the moon’s phase and position, as well as countless other celestial phenomena, are also solely responsible for the uncertainty that torments the lives of landscape photographers. While I can’t tell you what thrills me more, the impeccably punctual appearance (or disappearance) of a full moon, or the unpredictable explosion of a lightning bolt, I find it ironic that the precision of a moonset and the (apparent) randomness of a lightning strike are ultimately the product of the same celestial choreography.
Earth’s rotation on its inclined axis and revolution about the Sun, the Moon’s monthly journey around Earth, are are timed to microseconds. But this celestial dance also drives the atmospheric and tidal machinations that generate weather, stir oceans, and make every day unique and unpredictable.
This year the mercurial photography gods smiled on me and my Death Valley workshop group. For our 3 days in Death Valley, instead of the blank blue sky that often greets me here, we had a wonderful mix of clouds and sky—enough clouds to make the sky interesting, but enough sky to allow the sun to color the clouds at sunrise and sunset.
On the workshop’s penultimate day we drove to Lone Pine to wrap up with a sunset and sunrise shoot in the Alabama Hills. The highlight of this trip is always the Alabama Hills sunrise that I try to accent with the moon, just a day past full, setting behind the Sierra Crest. But this is winter, and these are the Sierra Mountains, so success is far from guaranteed.
A few years ago I drove to Yosemite on New Year’s Eve (because what else is there to do on New Year’s Eve?) to photograph a full moon rising between El Capitan and Half Dome. After a successful shoot (nearly thwarted by clouds), I hopped in my car and made the 6 1/2 hour drive to Lone Pine to photograph the moon setting behind Mt. Whitney.
I’d picked out a location along Highway 136 where I could align the moon and Mt. Whitney, and far enough back to allow an extreme telephoto big moon while still including all of Whitney. I went to bed really looking forward to this opportunity to get an image I’d thought about for years, and woke to clouds that completely obscured the moon and Sierra Crest. With nothing better to do, I still drove out to my spot, and even caught a very brief glimpse of the moon about 1/2 hour before zero-hour, but ended up not clicking a single frame. Such are the travails of anyone who pins their hopes on Nature’s fickle whims.
My plan this morning was far less grand. Since I was leading a workshop group, the goal was to get everyone in place for the best possible photography, not to assuage my own failed moonset wounds. And the good fortune that blessed us in Death Valley followed us to Lone Pine. (You can read more about this morning here.) In addition to a clear view of the moon and mountains, I was especially grateful to find the entire Sierra Crest frosted top-to-bottom with snow.
My photography day began in near darkness with my Sony a7R V and Sony 100-400 GM lens, photographing the descending moon throughout the morning’s many stages of advancing light. My starting focal length was 100mm, wide enough to include some of the Alabama Hills, then went progressively tighter as the moon dropped.
My favorite big moon images don’t usually happen until the moon is within a moon-width of the horizon, but I like to give myself a little wiggle room to get the composition balanced and focus just right. So when the moon got about 3 diameters from Mt. Williamson, I turned to my Sony α1, which was standing by with my Sony 200-600 G lens and Sony 2X Teleconverter already attached. And while 3 moon diameters might sound like a reasonable cushion, if you want to appreciate the speed at which the moon transits the sky, try pointing 1200mm at it and keeping it in your frame.
I love my Really Right Stuff Ascend tripod, but because the camera-shake margin of error is microscopic at 1200mm, I had the α1 pre-mounted on my (much more robust) RRS 24L Tripod with the RRS BH-55 ball head (carrying 2 tripods is a luxury I allow myself when I don’t have to fly to my location). I bumped to ISO 800 for a 1/500 second shutter speed, and switched from my standard 2-second timer (beep, beep, beep, BEEEEEEP—the Sony mating call) to a 5-second timer (I’m not crazy about any of Sony’s remote options, wired or wireless), to give the whole setup plenty of time to settle down—probably overkill, but I was taking no chances.
With my composition ready and focused, I just let the moon slide through my frame and started clicking. The alpenglow on Mt. Williamson was just about peaking when to moon first touched it. Perfect timing.
Workshop Schedule || Purchase Prints|| Instagram
More Massive Moons
Click any image to scroll through the gallery LARGE
Category: full moon, Moon, Mt. Williamson, snow, Sony 100-400 GM, Sony 2X teleconverter, Sony a7R V, winter Tagged: Eastern Sierra, full moon, moon, moonset, Mt. Williamson, nature photography, snow, winter
Transcending the Trophy
Posted on February 7, 2023
 Wonderland, Golden Circle, Iceland
Sony a7R V
Sony 12-24 GM
1/40 second
F/11
ISO 200
With the digital-fueled photography renaissance, it seems that the number of trophy destinations has grown proportionally. For example, once no more than an anonymous trickle on El Capitan’s southeast flank, Horsetail Fall now draws thousands of photographers to Yosemite at sunset each February. And long gone are the days of a peaceful midday walk in the quiet coolness of Antelope Canyon.
Because I’ve photographed all of these scenes, and no doubt will continue doing so, I completely understand the urge to bag the trophy shot. They’re trophies because they’re beautiful, and (usually) relatively easy to access. But what puzzles me is why so many photographers pursue trophies to the exclusion of opportunities to create something uniquely their own. To me, the greatest joy of photography isn’t duplicating what others have already done, it’s the search for something new—especially at frequently photographed locations.
That said, I can’t deny that the opportunity to capture a trophy draws many photographers to my workshops. But while I do love helping my workshop students land their trophy, my job doesn’t end there—a significant part of my responsibility is challenging them to not make the trophy shot their goal, make it their starting point. Chances are, I tell them, if a shot is special enough to achieve trophy status, there are lots of other special views and subjects nearby.
Transcending the trophy is a mindset. Once you’ve bagged your trophy, see if you can identify a unique foreground or background, or approach the scene from a different angle. And if the standard view is horizontal, look for something vertical; if it’s wide, try a telephoto—and vice-versa.
And don’t forget that there might be great stuff happening behind you—you’ll never know if you don’t turn around. I try to make a point of checking behind me, but sometimes I need a reminder. For example…
Don Smith and I wrapped up the last day of this year’s back-to-back Iceland photo workshops with an afternoon in the Golden Circle. A recent storm had dumped loads of fresh snow everywhere, a great way to wrap up two fantastic workshops. After spending a couple of hours at massive Gullfoss waterfall, we took the group to Strokkur geyser for our final sunset.
Strokkur is a towering geyser in a beautiful setting. Erupting up to 125 feet every 5 to 10 minutes, Strokkur’s frequency allows many do-overs if you don’t get it right the first (or second, or…) time. This year fast-changing clouds and fresh snow added a new visual dimension I was especially excited to take advantage of.
I think the best shot here is getting the geyser backlit by the setting sun, so I positioned myself accordingly and waited, adjusting my position and composition after each eruption. As the sun set and I prepared for the next eruption, I noticed that our guide Albert Dros was on the other side of the geyser, pointing the exact opposite direction my camera pointed. Normally when I see another photographer not taking what I think is the best shot, I don’t think much of it. But since Albert is such a fantastic photographer, I glanced over my shoulder to see what I was missing. Yikes.
I instantly forgot the geyser, grabbed my gear, and “raced” toward the snow-glazed trees that were now framed by electric pink clouds, and garnished with a dollop of moon. Much to my frustration, the trail was completely coated with ice—since I’d decided to forego the crampons, to avoid falling I could only move about as fast as I do in those dreams when I’m trying to run for my life in a normal speed world, but find I can only move in slow motion (I’m not the only one who has those dreams, right?).
Fortunately, Iceland twilight is slower than any slow-motion dream, and I covered the 50 feet over to this scene with plenty of time to work the composition. I already had my Sony 12 – 24 f/2.8 GM lens mounted on my Sony a7R V, which turned out to be perfect for emphasizing the snowy scene in my immediate foreground, while still maximizing the colorful clouds. Of course this shrunk the moon to almost microscopic proportions—some may disagree, but I kind of love the small moon as a delicate accent to this already magic scene.
Workshop Schedule || Purchase Prints || Instagram
Transcending the Trophy
Category: Iceland, Moon, snow, Sony 12-24 f/2.8 GM, Sony a7R V Tagged: Iceland, moon, nature photography, snow, winter
Doing the Scene Justice
Posted on January 19, 2022
Woe is me
I just returned from nearly a week in Death Valley, where I had virtually no connectivity (wifi at my hotel made the Grand Canyon North Rim feel like a Silicon Valley Starbucks). Workshop or not, I try to post something on social media every day, and a new blog article each Sunday, but with no wifi and spotty 3G cellular that struggled just to send or load a text-only e-mail, I felt virtually cut off from civilization (there was a tsunami?!). I know in the grand scheme of things these are small problems, and that I probably missed the world more than it missed me, but still….
So anyway…
Last week I wrote about creating unique perspectives of familiar scenes, and offered some ideas for achieving this. As admirable as it is to make unique images, sometimes Mother Nature delivers something so magnificent that best thing to do is just get out of the way and let the scene stand on its own.
For example
Though last month’s Yosemite Winter Moon workshop wasn’t scheduled to start until the afternoon I took this picture, I drove to Yosemite the evening before the workshop to get a few hours of morning one-on-one time with the multiple inches of snow forecast to fall overnight. And as hoped, I arrived that morning to find every square inch of exposed surface glazed white—and the snow was still falling.
The paradox of photographing Yosemite during a storm is that all of the features you came to photograph are most likely obliterated by clouds. Sometimes visibility is so poor, it’s difficult to imagine the obscured features ever existed—and quite easy to imagine the comfort and warmth of your hotel room. The key Yosemite storm success is to be there when the storm clears—but job-one for catching the clearing part of a Yosemite clearing storm, is first enduring the storm part.
So, rather than succumb to the temptation of comfort and warmth, I armored up and went to work in near zero visibility. After an hour or so of driving around, interrupted by a stop or two (or three) to photograph some of the more intimate nearby beauty, I pulled up to El Capitan Bridge and noticed the clouds starting to lift (fingers crossed). In the still-falling snow, I quickly set up my tripod, grabbed my Sony a7RIV, attached my Sony 12-24 f/2.8 GM lens, and hoped.
I digress
Without getting too preachy, let me just say that if you ever want to piss off a photographer, look at one of their images and say, “Ooooh, you must have a great camera.” While that may very well be true, the photographer’s unavoidable inference will be that the questioner means the beautiful image is a product of the photographer’s equipment, not his or her photographic vision and skill.
But…. As much as I’d like to say my equipment is irrelevant and I could achieve the same results with a pinhole camera, I’ll admit that I have images I couldn’t have created without the right camera or lens. And this is one of them.
Back on point
I’ve written before about Sony’s 12-24 lenses, and how they feel specifically designed for Yosemite’s ultra-close views of massive monoliths. El Capitan Bridge is one of those views, so close that I’ve always felt that even a 16-35 wasn’t wide enough to do the scene justice. So when Sony released its 12-24 f/4 G lens, this was one of my very first stops. My excitement was validated when I discovered that at 12mm I could indeed get all of El Capitan, plus its entire reflection, in a single vertical frame. I became so enamored of my new top-to-bottom-reflection power that pretty much every subsequent 12-24 El Capitan composition here (both with the original Sony 12-24 f/4 G, and the newer Sony 12-24 f/2.8 GM) had been vertical. My goal this morning was to change that.
While the clouds didn’t completely part for several more hours, during this stop at El Capitan Bridge they did lift just enough to reveal all of El Capitan for about 15 minutes. During that time, their swirling vestiges careened across the granite face so rapidly that the scene seemed to change by the second.
Photographically, there wasn’t really a lot I could do for this scene besides not mess it up. Mounting my camera horizontally, I widened my lens all the way out to 12mm, put the top of the frame slightly above El Capitan (to maximize the amount of reflection below it—more sky would have meant less reflection), and used the snow-covered trees on both sides to frame the scene.
Depth of field wasn’t a factor, and very little contrast made metering easy. Wanting a fast enough shutter speed to freeze the falling snowflakes, I dialed to ISO 800 and f/9, which I quickly determined centered my (pre-capture) histogram at a more than adequate 1/250 second. Then I clicked a dozen or so images to ensure a wide variety of cloud formations and falling snowflake patterns, pausing occasionally to appreciate the moment.
This scene felt like a gift that I really didn’t want to overthink. I’m just grateful for the opportunity to photograph it (and the equipment that allowed me to do it justice).
An El Capitan Gallery
Click an image for a closer look, and to view a slide show.
Category: El Capitan, Photography, reflection, snow, Sony 12-24 f/2.8 GM, Sony a7RIV, Yosemite Tagged: El Capitan, nature photography, reflection, snow, winter, Yosemite
Dare To Be Different
Posted on January 9, 2022
What does it take to make a great landscape image? The answer to that question could fill volumes (so I hope you don’t expect the final word in one blog post), but for starters, it seems pretty obvious that a great landscape image should involve some combination of beautiful scene and compelling composition. Of course it’s possible for one side of that scale to tilt so strongly that it renders the other side all but irrelevant: I’m thinking about the masterful composition that manages to extract beauty from the most ordinary scene, or the scene that’s so spectacular that it would be virtually impossible to not return with a beautiful image.
But as much as photographers should strive for the former, I’m afraid ubiquitous cameras and information have given us too much of the latter—because it’s easier. Not only can today’s photographers learn where to be and when to be there with the tap of an app (or the click of a mouse), even when unexpected beauty suddenly materializes before our eyes, we’re almost certainly armed with a tool to capture it. Add to this the power of today’s computers and software to actually manufacture beauty (don’t get me started…), and I’m concerned that the world is becoming numbed to the appreciation of photography as a craft—the ability to see the less obvious beauty and convey it by deftly controlling the scene’s framing, motion, depth, and light.
This is especially relevant to me because I make my living serving people who dream of getting “the” shot at my workshop locations. Usually they’ve seen some other photographer’s version of their “dream” shot and simply want one of their own to display and share. Whether it’s sunset light on Horsetail Fall, a lightning strike at the Grand Canyon, or fresh snow at Tunnel View, I completely understand their motivation and I do everything in my power to make it happen (I love photographing these things too). But still…
In addition to helping my workshop student get their dream image, I also encourage them to make these shots their starting point, not their goal. Photograph the icons without shame, but don’t stop there, also find your own perspective on the scene’s beauty. That could be identifying a foreground element that complements a glorious background, going vertical when the obvious composition is horizontal, introducing motion or focus blur to part of the scene, or any number of large or small compositional twists.
My own approach when photographing a scene imbued with obvious inherent beauty—such as a spectacular sunset, vivid rainbow, or breathtaking vista—is to remind myself not to settle for something I’ve already done, no matter how beautiful it might be. While that’s a relatively small challenge at new or less familiar scenes, this approach makes familiar places like Tunnel View in Yosemite (arguably the most beautiful vista on Earth, and one that I’ve photographed more times than I can count) a much higher photographic bar to clear. So high, in fact, that I rarely take out my camera at Tunnel View anymore. (Well, at least that’s the mindset when I get there—I’m a sucker for this scene and sometimes can’t resist photographing a beautiful moment here because some scenes are too beautiful to ignore—but you get the point.) Even still, these days I pretty much only photograph Tunnel View when I can include some a scecial, transient element, like the moon or a rainbow. Or fresh snow.
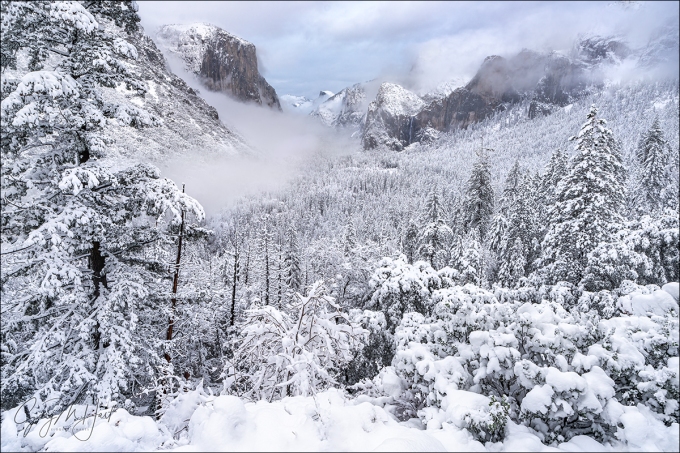
Last month my Yosemite Winter Moon workshop group had the immense good fortune to start just as a cold winter storm finished dropping 8 inches of snow on Yosemite Valley. For a couple of reasons, we started at Tunnel View—first, because it’s the best place to introduce first-timers to Yosemite’s majesty; second, it’s probably the best place in Yosemite to view a clearing storm. The scene that greeted us was as spectacular as you might imagine—and as also you might imagine, it wasn’t something I hadn’t seen before.
My original plan was to keep my camera in the car, but once I got everyone settled into their spots and was confident they were content (and wanted to be left alone), I couldn’t resist the beauty, no matter how familiar. Oh—and before I go any farther, let me make clear that I am not trying to say, nor do I in any way believe, that this image is more special than thousands of other Tunnel View images that preceded it (or even that were captured that day). I just want to use it to illustrate my approach, and the decisions that got me to something that turned out to be a little different for me. But anyway…
The first thing I usually I preach about photographing Tunnel View is to not go too wide. As beautiful as the entire view is, the real (permanent) visual action is between El Capitan on the left, and Leaning Tower (the diagonal, flat granite face angling up from Bridalveil Fall) on the right. Another problem at Tunnel View is that the sky in Yosemite is usually boring (cloudless), and the foreground trees are nothing special. So not only does the real estate left of El Capitan and right of Leaning Tower pale in comparison to the primary scene it bookends, composing wide enough to include that extra granite also means shrinking the best stuff (from left to right: El Capitan, Cloud’s Rest, Half Dome, Cathedral Rocks, Bridalveil Fall, Leaning Tower) while including more bland sky and trees. Therefore, my go-to lens for Tunnel View is my Sony 24-105 f/4 G lens. And when I want to isolate one or two of the primary features, I’ll switch to my Sony 100-400 GM lens.
But this afternoon, with the entire landscape glazed white, those scruffy foreground trees were suddenly a feature worthy of inclusion. So, rather than starting with the 24-105 on my Sony a7RIV, I reached for my Sony 16-35 f/2.8 GM lens. Going wider created another problem: that large tree on the left is a usually an obstacle, a potential distraction always that must be dealt with. My standard approach is to move to the right to completely eliminate the tree from my composition, but this afternoon the vista was so packed with gawkers and photographers that moving around without encroaching on someone else’s space was difficult-to-impossible. Because I got my group setup before grabbing a spot for myself, I’d found myself stuck farther to the left than I like, making my plan to shoot the scene extra-wide while eliminating the tree even more problematic. So, grateful once again for the snowy glaze, I decided to use my arboreal nemesis to frame the left side of my composition (if you can’t beat ’em…). For the right side of my frame, I chose to go wide enough to include a couple of more prominent trees in the middle distance, as well as the interesting clouds swirling near the rim behind them.
In any composition, the decision between sky and foreground always comes down to which is more interesting—in this case, despite some fairly interesting clouds overhead, those clouds couldn’t compete with the snowy foreground. To maximize the snowy foreground, I put the bottom of my frame in the homogeneous white snowbank at the base of the shrub line just a few feet below me—just low enough to allow me to include only the most interesting clouds.
And finally, because I know someone will ask, even with so much detail from near-to-far, at 20mm and f/9, my focus point was pretty much irrelevant (hyperfocal distance was 5 feet). As something of a control freak in my photography life (understatement), I’ve always been a manual focus evangelist, but I’m getting lazy in my old age and in this case I just hit my back-button focus button to autofocus somewhere in the scene (wherever the focus point happened to be), then clicked with the knowledge I’d be sharp throughout.
More Tunnel View Magic: One Spot, Many Takes
Click an image for a closer look, and to view a slide show.
Category: Bridalveil Fall, El Capitan, Half Dome, How-to, snow, Sony 16-35 f2.8 GM, Sony a7RIV, Tunnel View, winter, Yosemite Tagged: Bridalveil Fall, El Capitan, Half Dome, nature photography, snow, Tunnel View, winter, Yosemite
COVID Reflections
Posted on March 14, 2021
Last week marked the one year anniversary of the COVID shutdown. WOW. One year.
In hindsight I realize that I might have been a little naive when this thing started because of the way I’d spent the two weeks prior to the shutdown: first in Scottsdale, Arizona for my annual MLB Spring Training trip (go Giants!), followed immediately by a week in Anchorage, Alaska to visit my daughter. In Arizona at the beginning of March I noticed very little difference in people’s behavior (though I did have to search long and hard for hand sanitizer), but winging my way to Alaska, I was struck by how empty the airports and flights were. Hmmm….
Alaska is where I was when it started to dawn on me that a couple of my upcoming workshops might be threatened. When that realization hit, I remember thinking I’ll be fine as long as I don’t lose the New Zealand trip at the end of June. Ha! I ended up losing 12 workshops, including New Zealand in both 2020 and 2021. And the workshops I have managed to pull off (three so far since last March) have been impacted as well, both in terms of group size and COVID protocol.
But this isn’t a woe is me post, I promise. I have so much to be grateful for, starting with the flexibility of being self-employed and working from home. And of course continued good health of my family and me. Oh, and the fact that I’m still in business.
And just like that, here’s 2021, I’m fully vaccinated, with two workshops in the mirror and six queued up over the next eight weeks (maybe I should be careful what I wish for). Life’s good.
But anyway…
I started this blog with the idea of a sentence or two reflecting on the COVID anniversary before diving into some thoughts on this just-processed image from last November. But here I am, nearly 500 words later….
I don’t need to gush any more about this day, a highlight of my pandemic year—you can just go back through the many blogs I’ve already posted about it (7—I counted). What I wanted to say about this image is how it underscores the importance of not merely settling for a beautiful scene, no matter how beautiful it is (something this one irrefutably was). Creating an image that stands out from all the other pictures of inherently beautiful scenes requires understanding the difference between the way your camera sees a scene and the way you see it. Unlike your experience of the world, a still image is devoid of motion and depth, has limited dynamic range and depth of field, and is constrained by a rectangular box. Managing these differences requires the ability to control your camera’s exposure variables (f-stop, shutter speed, ISO, focal length) to create the illusion of depth and motion.
The clouds had just started to part when I arrived at this reflective bend in the Merced River. It’s easy to get walloped by the beauty of a scene like this, frame up something nice, and click. But after indulging the creative side of my brain (camera or not, this scene really was gorgeous), I forced myself to set my awe aside for a few beats to work out the best way to convey the beauty.
My first step in most scenes is to identify the most important thing—what I want the scene to be “about.” If that important thing is in the foreground, I look for a complementary background; if my subject is in the background, I try to identify a complementary foreground.
In this case my “most important thing” was the entire scene across the river, anchored of course by Half Dome, but supported by the snow-covered trees and the reflection. I wandered the riverbank and found a few things to put in my foreground. I started with a mini cove rimmed with leaves that I used to frame a horizontal composition. Then, looking for something that would be better for a vertical composition, I moved on to these floating leaves and partially submerged log just a few feet upstream. Framing everything up at eye-level, I didn’t like the empty gap between the leaves/log and Half Dome’s reflection, so I dropped my tripod as low as it would go and went to work.
While there was a fair amount of dynamic range, I knew it was well within the capabilities of my Sony a7RIV—if I exposed carefully. But exposing carefully means more than just getting the light right—it means getting the light right with a shutter speed that handles the motion, and with an f-stop that handles the depth.
With a few ripples disturbing the reflection, I wanted shutter speed long enough to smooth the water and twisted my Breakthrough 6-stop Dark Circular Polarizer onto my Sony 16-35 f/2.8 GM lens. And since sharpness from the closest leaf to Half Dome’s summit was important, I selected f/16 and focused on the log. (My hyperfocal app assured me that this would give me more than enough depth-of-field for front-to-back sharpness.) Next, with my eye on the viewfinder, I slowly turned my polarizer far enough to remove the reflection from the leaves, but not so much that I erased the primary reflection.
Finally, I was ready to meter and select the shutter speed the gave me a good histogram. At my a7RIV’s native ISO (100), the shutter speed I needed was 1-second. To double that and ensure better smoothing of the ripples, I dialed down to ISO 50. Click.
A COVID Compilation
(Images from the last 12 months)
Click an image for a closer look, and to view a slide show.
Category: fall color, Half Dome, reflection, Sony 16-35 f2.8 GM, Sony a7RIV, Yosemite Tagged: autumn, fall color, Half Dome, nature photography, reflection, snow, winter, Yosemite
Back in the Saddle Again
Posted on February 14, 2021
After losing 12 workshops to COVID since last February, today I returned to Yosemite for my Horsetail Fall workshop. To say I’m excited would be an understatement. I’m also a little apprehensive. One thing I’m not too worried about is COVID, because I’ve put in place protocol that will keep everyone in the group safely distanced: things like suspended carpooling (everyone can drive their own car), and Zoom for meetings and image review sessions, among other things. And this won’t be my first pandemic workshop because last October I was able to get one in, so I know my protocols work without significantly impacting everyone’s experience.
My anxiety is always a little elevated going into my Horsetail Fall workshop because Horsetail Fall is very important to most of the people who sign up, but many natural unknowns make it impossible to guarantee. Usually it’s the light that thwarts us, some unseen cloud on the horizon that snuffs the sunlight at the last minute. Last year the light was great, but the fall was dry. But I’m hopeful because this year there is lots of water in the fall, and the weather forecast is promising (fingers crossed).
Compounding my standard Horsetail Fall apprehension this year is some new rules put in place due to COVID, and the crowds Horsetail Fall always attracts—the most stringent Horsetail Fall viewing restrictions ever—and it’s entirely up to me to make sure these restrictions don’t affect my group.
Of course this is Yosemite, a place where things always seem to work out for photographers. But even though I have a Horsetail Fall plan that I’m pretty confident will work, and the things I worry about never happen anyway (to quote Tom Petty), I won’t breathe easily until I’ve seen exactly what form “work out” takes in this workshop.
About this image
But anyway… Rather than recycle an old Horsetail Fall image (which you can see below anyway), I’m sharing another image from my December snow day in Yosemite. This is the Three Brothers, probably Yosemite Valley’s most anonymous rock formation. Anonymous not because it’s less worthy than other Yosemite landmarks, but because there are just not that many places to view it.
To align the Three Brothers with the ribbon of autumn leaves, I had to alternately scale and boot-ski a few snow drifts to make my way to the river’s edge. To eliminate a couple of other photographers from my frame (not to mention more than a few footprints in the snow, I moved forward and extended one tripod leg into about a foot of river water. This put my viewfinder out of reach, but by bracing myself on the tripod to keep from joining it in the frigid river, I was able to get a clear enough view of my camera’s LCD to compose this frame. (It’s awkward angles like this that really help me appreciate live-view on the LCD.)
Workshop Schedule || Purchase Prints || Instagram
I like to include some kind of knowledge or insight in each blog post, but this week workshop prep has left me without a lot of time. Instead, I’m sharing my Horsetail Fall article, just updated with all the 2021 Yosemite NPS changes. You can also find this article in my Photo Tips section.

Horsetail Fall, El Capitan, Yosemite (from the Merced River south bank)
Canon EOS-1Ds Mark III
1/4 second
F/8.0
ISO 100
220 mm
2021 Horsetail Fall update
While much of the Horsetail Fall article below is still valid, crowds and COVID have led the NPS to make some fairly impactful changes.
- Access to Yosemite is by reservation only. In other words, if you don’t have a reservation, you will be turned away at the gate. The reservation system will be in effect through February at least, which means for the entire duration of the 2021 Horsetail Fall season. You can make a reservation here: https://www.recreation.gov/timed-entry/10086745. If you have lodging in Yosemite Valley, your reservation is included.
- From noon until 7 p.m., all parking on Southside Drive between the El Capitan crossover and Swinging Bridge is prohibited.
- Also between El Capitan crossover and Swinging Bridge, the entire area between the Merced River and Southside Drive side is closed. In other words, you can’t photograph Horsetail Fall from the south bank of the Merced River. This will be strictly enforced.
- All parking on Northside Drive between Yosemite Valley Lodge and the El Capitan crossover is closed. You also won’t be permitted to unload or stop on this stretch of road. To view Horsetail Fall, the NPS wants you to park in the Yosemite Falls parking area just west of Yosemite Valley Lodge, and walk to the viewing area at or near the El Capitan Picnic Area. This is about 1.5 miles each way, but it’s flat, and one lane of Northside Drive will be blocked for pedestrians.
- Here’s the NPS Yosemite Horsetail Fall page: https://www.nps.gov/yose/planyourvisit/horsetailfall.htm
Please respect these restrictions. The minority of photographers who ignore rules, or try to cut corners, reflect poorly on all photographers, which only leads to even tighter restrictions and risk complete loss of access to Horsetail Fall.
Horsetail Fall
For eleven-plus months each year, Horsetail Fall may just be Yosemite’s most anonymous waterfall. Usually dry or (at best) a wet stain, even when flowing strong this ephemeral cataract is barely visible as a thin white thread descending El Capitan’s east flank. When it’s flowing, my workshop groups can be standing directly beneath Horsetail and I still have to guide their eyes to it: “See that tall tree there? Follow it all the way to the top of El Capitan; now run your eye to the left until you get to the first tree…”. But for a couple of weeks in February, the possibility that a fortuitous confluence of snowmelt, shadow, and sunset light might, for a few minutes, turn this unassuming trickle into a molten stripe draws photographers like cats to a can-opener.
The curtain rises in the second week of February, a couple of hours before sunset, when a vertical shadow begins its eastward march across El Capitan’s south face. As the shadow advances, the sunlight warms; when the unseen sun (direct sunlight is gone from the valley floor long before it leaves towering El Capitan) reaches the horizon, the only part of El Capitan not in shadow is a narrow strip of granite that includes Horsetail Fall, and for a few minutes, when all the photography stars align, the fall is bathed in a red glow resembling flowing lava framed by dark shadow. (Some people mistakenly call the Horsetail spectacle the “Firefall,” but that altogether different, but no less breathtaking, manmade Yosemite phenomenon was terminated by the National Park Service in 1968.)
Some years Horsetail delivers sunset after sunset in February, while other years administer daily doses of February frustration. Unfortunately, it’s impossible to predict when all the tumblers will click into place: I know photographers who nailed Horsetail on their first attempt, and others who have been chasing it for years.
Don’t call it “Firefall”
One important thing before I continue. To avoid outing yourself as a Yosemite rookie, don’t make the mistake of calling Horsetail Fall the “Firefall.” Yosemite’s Firefall was a very real nightly display of burning embers pushed from Glacier Point every summer night. It was as spectacular as it sounds. The phenomenon started in 1872 and continued until the National Park Service, concerned (among other things) about the crowds it drew, terminated the Firefall in 1968.
Anyone who has witnessed or seen pictures of Horsetail Fall would agree that “Firefall” would be a great name for it, but those of us fortunate (and old) enough to have witnessed the actual Firefall know the difference between Horsetail Fall and the Firefall, and will never confuse one for the other.
(Oh yeah, and it’s Horsetail Fall, not Horsetail Falls.)
When to photograph Horsetail Fall
The “when” of Horsetail Fall depends on the convergence of three independent conditions:
- The sun’s angle is refreshingly predictable, lining up perfectly only in February (and October, when the fall is almost always dry). Common wisdom says the shadow on El Capitan most precisely targets Horsetail Fall at sunset during the third week of February, from around the 15th through the 22nd (or a little later). While I won’t dispute this, I’ve had some of my best success a week earlier, and my favorite Horsetail shot (at the top of the page) was captured February 9. I’ve also had success photographing it right up until the end of February. But the stripe of sunset light on El Capitan is thinnest (and therefore most tightly focused and photogenic) in the third week of February—the prime benefit of doing it a week earlier is light almost as good, with far fewer people.
- Water in the fall varies greatly from year to year, depending on how much show has fallen on the fall’s extremely small watershed, and how much of that snow is currently melting. A large snowpack and warm daytime temperatures are ideal. Sometimes Horsetail can be frozen solid in the morning, but afternoon warmth can be enough to get it flowing in time for the show. And a heavy rain can get it going strong for a few hours or even a day or so.
- Direct sunlight at sunset is the most fickle aspect of the Horsetail experience—for every tale of a seemingly perfect evening when the sunset light was doused by an unseen cloud on the western horizon mere seconds before showtime, there’s another story about a cloudy evening when the setting sun somehow threaded a gap in the clouds just as tripods were being collapsed.
The problem with targeting February’s third week is that it isn’t a secret: I generally prefer sacrificing Horsetail perfection in favor of Horsetail near perfection and far fewer photographers. But I’ll leave that decision up to you.
Where to photograph Horsetail Fall
It’s fun to circle Yosemite Valley on pretty much any mid- to late-February afternoon just to watch the hordes of single-minded photographers setting up camp like iPhone users on Release Day. In fact, one non-scientific way to find a spot to photograph Horsetail is to simply park where everyone else parks and follow the crowd. Unfortunately, as Horsetail’s popularity grows, so does the distance you’ll need to walk.
If Horsetail Fall is on the top of your bucket list, it’s best to pick your spot and show up early. Really early. Really, really early. The downside of this approach is that, because the best locations for Horsetail aren’t especially good for anything else, you’ll sacrifice a lot of quality Yosemite photography time waiting for something that might not happen.
And no one has commanded that you worship with the rest of the Horsetail congregation: Experienced Yosemite photographers know that any west-facing location with a view of the fall will do. If you find yourself in Yosemite with time to kill, try walking the Merced River between Cathedral and Sentinel Beaches—any place with a view to Horsetail will work. But because of their open space and relative ease of access, two spots have become the go-to Horsetail spots for most photographers.
El Capitan Picnic Area
 El Capitan Picnic Area, GPS: 37.72782N 119.61844W
The El Capitan Picnic Area, highlighted by Galen Rowell, remains the most popular Horsetail Fall vantage point. The picnic area’s advantages are that it is the closest view of Horsetail Fall, has the most parking, has the most room for photographers (by far), and has a bathroom (plug your nose). The downside is there really isn’t a lot of composition variety here, and thousands of others will have already captured something as good as or better than what you’ll get.

Horsetail Fall from the picnic area
If you like people, the El Capitan Picnic Area is the place to be—more than any other Horsetail vantage point, this one has a festive, tailgate atmosphere that can be a lot of fun. I suspect that’s because people arrive so early and there’s little else to do before the show starts. And since everyone is pointing up with a telephoto, it’s pretty much impossible for anyone to be in anyone else’s way, which eases much of the tension that often exists when shooting among large crowds.
You’ll find the parking lot, with room for twenty or so cars, on Northside Drive, about two miles west of Yosemite Lodge. In recent years the NPS has blocked a lane of Northside Drive to allow more parking (but don’t park illegally because you will be cited). You can shoot right from the parking lot, or wander a bit east to find several clearings with views of the fall.
Merced River south bank bend
 Merced River south bank bend, GPS: 37.72885N 119.60743W
Photographed from a bend on the Merced River’s south bank, El Capitan’s extreme sloping summit creates the illusion that you’re somewhere above Yosemite Valley, eye-to-eye with the top of Horsetail Fall—it’s a great perspective.
I like this location because the river greatly increases the variety of possible compositions, and also because you can pivot your view upstream to photograph Upper Yosemite Fall, and behind you toward Sentinel Rock (which also gets fantastic late light), almost directly above while you wait for Horsetail to light up. The downside to photographing here is that there’s precious little room, both to park and to photograph. This requires getting there a couple of hours early, and also can lead to a bit more tension as people jockey for position.

Horsetail Fall reflection from the Southside Drive Merced River view
Driving east on one-way Southside Drive, you’ll parallel the Merced River for most of 1.2 miles beyond the turn for Cathedral Beach. The Horsetail Fall spot is right where the road and river diverge. Parallel park right there in one of two narrow but paved parking areas on opposite sides of the road, where you’ll find room for about a dozen cars. In recent years, all parking on Southside Drive between El Capitan Crossover and Swinging Bridge has been banned, if you plan to shoot here, prepare to walk a mile or more.
Since there’s so little parking here, and Southside Drive is one-way eastbound, if you find no parking (don’t try to squeeze in where there’s no room—I’ve seen rangers doing traffic control and ticketing cars that don’t fit), it also helps to know that the spot is about a ½ mile from the 4-Mile Trail parking area and ¾ miles west of the Swinging Bridge parking area—an easy, flat walk.
Because of the potential for crowds, the best strategy here is to arrive early and forego what may be a great view from the elevated riverbank (that is sure to be blocked by late-arrivers trying to cram their way in), in favor of getting as close to the river as possible. Standing at river level gives you many more compositional choices, and nobody else can block your wide shots. (But if there are other photographers already set up on the elevated riverbank when you arrive, please don’t be the one who sets up in front of them.)
How to photograph Horsetail Fall
Regardless of where you set up to photograph Horsetail Fall, it’s pretty difficult to find something that nobody else has done. But that doesn’t mean you shouldn’t try. There are definitely other places in Yosemite Valley with view of Horsetail Fall, they just take a little hunting—I suggest walking the south bank of the Merced River, and ascending the 4 Mile Trail. And since you’ll likely be doing lots of waiting, take advantage of the downtime to experiment with compositions.
Strategy
When the light begins to warm, it’s time to shoot. Because you never know when the light will shut off, don’t wait until the light is perfect—it’s best to start early and photograph often. Until the light goes away completely, my rule of thumb is that the light now is better than the light a minute ago—just keep shooting . I’m not suggesting you hold your shutter down in burst mode until your card fills; I usually tell my workshop groups to fire a frame every minute or two until the fall turns amber, then pick up the pace as it goes (fingers crossed) pink and (if you’re lucky) red. The best light is in the final five minutes before sunset.
Composition
Viewed from the picnic area, there’s not a lot of visual interest surrounding Horsetail; your most obvious compositions will be moderate telephotos, up to 300mm or full frame. I use my Sony 24-105 and 70-200 (or more recently, my 100-400) lenses almost exclusively here. Use the trees to frame your shots and let them go black; with a telephoto you can isolate aspects of the fall and eliminate the sky and some or all of the trees.
The Merced River bend near Southside Drive is farther away from the fall, with more foreground possibilities, including the river and reflections, so you’ll be able to use a greater range of focal lengths here. Don’t get so caught up in photographing the fall that you overlook wider possibilities that include the river.
From either location I think vertical compositions work best (there’s a reason you don’t see lots of horizontal Horsetail Fall images), but that doesn’t mean there aren’t horizontal opportunities too. I like to identify a go-to composition based on the conditions, then vary between wide/tight and horizontal/vertical. If the sky is boring (cloudless), minimize or eliminate it from your composition. If there are clouds that make the sky interesting, by all means include them.
A frequent rookie mistake is cutting the waterfall off at the bottom. I’m not saying there’s never a reason to do that, but unless you consciously decide to truncate the fall because you think it’s the way to compose your frame, make sure you include the diagonal ridge that Horsetail disappears behind.
Filters
If your camera struggles with dynamic range, a graduated neutral density filter will help any shot that includes the sky—a two-stop hard GND angled across El Capitan parallel to the tree line should do the trick. This usually requires some Photoshop dodging and burning to hide the transition, but it’s the only way to darken the brightest part of the sky, which is usually in front of (not above) El Capitan. Since switching from Canon to Sony, I have no problem with the dynamic range and no longer use a GND for Horsetail Fall.
A polarizer will alter your results, so if you have one on, make sure you orient it properly. I often have a difficult time deciding between maximizing and minimizing the reflections with my polarizer, so I hedge my bets and shoot both ways. I’ve found that when Horsetail is flowing strongly, minimizing the reflection is best; when Horsetail is more of a wet or icy stain, maximizing the reflection works better. Either way, it’s best to just shoot it both ways and decide later.
Exposure
Automatic metering can be problematic in extreme dynamic range scenes when color is paramount, so I always recommend manual exposure, spot metering on Horsetail Fall or the adjacent sunlit granite. To maximize the color on the fall and El Capitan, I usually underexpose slightly. Because the trees rarely add value beyond framing, they usually work better when very dark green to black, a fact that’s completely lost on your meter (which thinks everything should be a middle tone). And monitor your RGB histogram to ensure that you haven’t washed out the red (Horsetail and El Capitan) or blue (sky) channels.
Highlight Alert (blinking highlights) is your friend. While you should never make your final exposure decision based on the highlight alert, when you see the highlights flashing, check your histogram and adjust if necessary.
And finally
And perhaps most important of all, don’t get so caught up in the photography that you forget to appreciate what you’re viewing. Just take a couple of seconds to stand back and allow yourself to appreciate the amazing spectacle unfolding before your eyes.
Join me in a Yosemite Photo Workshop
A Horsetail Fall Gallery
Click an image for a closer look and to view a slide show.
Category: fall color, Merced River, reflection, snow, Sony 12-24 f/2.8 GM, Sony a7RIV, Three Brothers, Yosemite Tagged: autumn, fall color, Horsetail Fall, nature photography, reflection, snow, Three Brothers, Yosemite
Border Patrol
Posted on January 10, 2021
A year ago Don Smith and I, with the aid of our Icelandic guide (the legendary Óli Haukur), had a blast sharing Iceland’s winter beauty with a great group of photographers. But our trip wasn’t without its challenges. One of our earliest locations was Kirkjufell, arguably Iceland’s most recognizable mountain. While proponents of Vestrahorn might debate this, no one will deny that everyone who visits Iceland wants a picture of Kirkjufell, just as everyone visiting Yosemite wants a picture of Half Dome. And even though Kirkjufellsfoss (the nearby waterfall) is gorgeous and the obvious foreground for Kirkjufell images, the mountain really is the main event here.

Frozen Sunrise, Kirkjufell, Iceland (2019)
So imagine our disappointment on the morning our workshop group visited Kirkjufell and found the mountain completely obscured by clouds. Not only that, the temperature was 25 degrees (F), and a 40 MPH wind made it feel like 5 degrees and turned the sleet into rocketing needles. In other words, it was stupid-cold. Nevertheless, our hardy group geared up, braved the short trudge out to the vista, and went to work without complaint.
While waiting for Kirkjufell to emerge (fingers crossed), I turned my attention to the tiered, multi-channel, ice-encrusted Kirkjufellsfoss. In normal conditions, while waiting for the Kirkjufell to appear it would have been natural to fire off a few oooh-that’s-pretty clicks of the waterfall. But without the distraction of Kirkjufell (or anything else more than 1/2 mile away), I set up my tripod and actually worked the scene like an actual photographer (go figure). And as often happens when I spend quality time with a scene, the longer I worked this one, the more I saw.
Border patrol
With so much going on, the trickiest part of making this image was managing all the scene’s visual elements while minding my frame’s borders. As much as we try be vigilant, sometimes the emotion of a scene overwhelms our compositional good sense—we see something that moves us, point our camera at it, and click without a lot of thought. While this approach may indeed capture the scene well enough to save memories and impress friends, it’s far from the best way to capture a scene’s full potential. So before every click, I do a little “border patrol,” a simple mnemonic that reminds me to deal with small distractions on the perimeter that can have a disproportionately large impact on the entire image. (I’d love to say that I coined the term in this context, but I think I got it from Brenda Tharp—not sure where Brenda picked it up.)
To understand the importance of securing your borders, it’s important to understand that our goal as photographers is to create an image that not only invites viewers to enter, but also persuades them to stay. And the surest way to keep viewers in your image is to help them forget the world outside the frame. Lots of factors go into crafting an inviting, persuasive image—things like compositional balance, visual motion, and relationships are all essential (and topics for another day), but nothing reminds a viewer of the world outside the frame more than an object jutting in or cut off at the edge.
When an object juts in on the edge of a frame, it often feels like part of a different scene is photobombing the image. Likewise, when an object is cut off on the edge of the frame, it can feel like part of the scene is missing. Either way, it’s a subconscious and often jarring reminder of the world beyond the frame.
And there are other potential problems on the edge of an image. Simply having something with lots of visual weight—an object with enough bulk, brightness, contrast, or anything else that pulls the eye—on the edge of the frame can throw off the balance and compete with the primary subject for the viewer’s attention.
To avoid these distractions, I remind myself of “border patrol” and slowly run my eyes around the perimeter of the frame. Sometimes border patrol is easy—a simple scene with just a small handful of objects to organize, all conveniently grouped toward the center, usually requires minimal border management. But more often than not we’re dealing with complex scenes containing multiple objects scattered throughout and beyond the frame.
In this Kirkjufellsfoss scene I had to contend with ice, rocks, snow, and flowing water. The biggest problem was an assortment of randomly dispersed rocks jutting from the snow at bottom of the frame, and a railed pathway visible just above the fall. It wasn’t too hard to eliminate the path with careful placement of the top of my frame, but if my entire focus had been on the waterfall the rocks might have been overlooked. Border patrol. Placing the bottom of my frame a little higher would have cut off the large rock near the bottom-center, an important compositional element that combines with the fall to create a virtual diagonal; placing the bottom lower would have introduced more rocks that I’d have had to cut off somewhere. Instead, I was able find a clean line of snow that traversed the entire bottom of my frame: perfect! (And lucky.)
One other important compositional element that would have been easily easy to overlook is the switchback snow-line that enters the frame at the bottom and exits at the top (or vice-versa). Diagonals like this are strong compositional elements that I love including whenever possible, so I chose a horizontal composition to allow room for each switchback to complete. The eye subconsciously follows lines like this, so cutting them off on the edge of the frame is an tacit invitation to exit the scene, something I try to check for when I execute my border patrol.
Of course nature doesn’t often cooperate and I’m usually forced to chop off parts of visual elements. When I do this, I always want it to be a conscious decision that doesn’t make my viewer think that I’ve cut off something that belongs in the scene, or that something jutting in is part of a different scene. Usually when I have to cut something on the edge (often impossible to avoid), I try to do it boldly, somewhere near the middle of the object, to signal that was my intent and not just an oversight.
I realize because these things are often only noticed on a subconscious level they may seem trivial, but every image is house of cards comprised mostly of small decisions, and you never know which one might send it crashing down.
Epilogue
I did end up photographing Kirkjufell this morning, but didn’t get anything that thrilled me.
Minding the Border
Click an image for a closer look and slide show. Refresh the window to reorder the display.











Category: Iceland, Kirkjufell, snow, Sony 24-105 f/4 G, Sony a7RIV, waterfall, winter Tagged: ice, Iceland, Kirkjufell, Kirkjufellsfoss, nature photography, snow, waterfall, winter
Natural Tension
Posted on January 3, 2021
Since the start of the pandemic, many (most?) of us have have found lots of time to catch up on books and movies (among other things). Of course that also includes me, and as a photographer I find it hard not to find parallels between my chosen creative medium and these others. The tension in books and movies, whether dramatic, comedic, or some combination of both, originates from the interaction of characters with each other and/or their surroundings, and the change that interaction spawns over time. Which of course got me thinking about whether it’s possible to create tension in a still photograph, and if so, how?
Relationships
Though we might not be conscious of it, the best photographic images do indeed convey a form of tension. It’s human nature to seek relationships, not just in our lives, but in our art as well. Every relationship has inherent tension, an invisible connecting thread that pulls tighter as the relationship strengthens.
Lacking the passing of time and the change it brings, still-photographers must create tension by setting up relationships between disparate elements in our frame. We signal these relationships, thereby dialing up the tension, through careful positioning of compositional elements (Google “rule of thirds” and “golden ratio”).
The most obvious relationships available to landscape photographers is the juxtaposing independent physical elements in the scene. For example, pairing a foreground tree or flower with a distant peak permanently creates a relationship between two formerly unrelated subjects. Reflections are an easy way to connect a nearby water feature to a distant subject. And then there are the dynamic celestial elements like the moon and stars, and ephemeral weather phenomena such as lightning and rainbows, that make powerful connections with terrestrial subjects.
But wait, there’s more…
Even though no time passes in a still frame, landscape photographers can and do signal time’s advance. Whether conscious of it or not, when we photograph the color and light of the natural boundaries separating day and night, the broken clouds and rainbows of a clearing a storm, or the juxtaposition of elements distinctive to two seasons, we signal the passage of time and the tension inherent in its inexorable march.
Lacking other features to set them apart, the cliched nature of sunrises and sunset images diminishes their power to generate tension—in other words, sunrises and sunsets are a dime a dozen, so if you’re going to photograph one, you’d better make an effort to put it with a strong scene. On the other hand, though it’s always important to seek a strong composition regardless of the conditions, the more rare the change, the better it can overcome an otherwise ordinary scene.
A clearing storm can feel like catching lightning in a bottle (a nice rainbow can elevate nearly any scene), but an even rarer opportunity to capture change is a scene with clear signs of two seasons. That’s especially true in my home state of California, where seasons tend to be more of an afterthought. But that doesn’t mean opportunities to photograph seasonal change here are nonexistent. California does get spectacular spring wildflower blooms, and our autumn color display (though maybe not as spectacular as some other places), can be very nice.
Bracketing spring and autumn on one side is summer, hands-down California’s least photographically compelling season. But on the other side of spring and autumn is winter. While most of the state doesn’t get snow, our mountains do (and lots of it)—capturing late snow on wildflowers and dogwood (an extremely rare event), and early snow on fall color, are real treats.
So maybe I should have warned you that there’d be math…
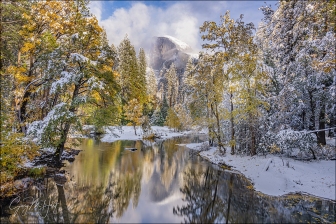
Which brings me to this image from my visit to Yosemite during an early November snowstorm. I really don’t need to go on any more about this day—if you’ve been reading my blog for the last couple of months, you’re probably well beyond sick of hearing about it. But it does illustrate the synergy of combining two seasons in one image. No one can deny that fall color is beautiful, and fresh snow is beautiful too (which of these is more beautiful is in the eye of the beholder, and a debate for another day). But if we were somehow able to quantify beauty, I suspect that we’d find the total amount of beauty (“beauty-units,” “beauty-bucks”?) in a fresh snow on fall color image would exceed the sum of the beauty derived from an image with fall color plus the beauty of an image with fresh snow.
You could attribute this synergy to the relative rarity of snow on fall color, but I think the power goes deeper than that. There’s just something about change the ups the stakes, so even though this is nothing more than a (totally unprovable) mental exercise (maybe I’ve been locked up too long), I’m sticking with the theory that the synergistic power of an image that combines the distinctive best of two seasons is the tension of change it conveys.
The Tension of Change








Category: fall color, Half Dome, Merced River, reflection, snow, Sony 24-105 f/4 G, Sony a7RIV, winter, Yosemite Tagged: autumn, fall color, Half Dome, nature photography, reflection, snow, winter, Yosemite
To the Pain
Posted on December 20, 2020
When you stop to consider all the components that have to fit into place to make a successful landscape image, it’s a wonder we don’t all just stay inside and watch TV. First there’s mastery of photography’s creative side, which requires the ability to distill our dynamic, multi-sensory, three-dimensional world into a coherent two-dimensional image. Then there’s the technical side, where we juggle our camera’s aperture, shutter speed, and ISO settings to control the scene’s depth, light, and motion. And as if meshing all these moving parts into something visually appealing weren’t daunting enough, don’t forget to factor in photography’s mental component: knowing where to be and when to be there; the foresight to recognize what might happen next and the patience to wait for for it; and finally, the fortitude to endure hunger, sleep depravation, and whatever elements Mother Nature throws our way.
Yet somehow photography happens. And like most things in life, I’ve always thought photography’s greatest joy comes from doing the hard work and overcoming difficulty. Sometimes spectacular just falls in our lap, but most of my favorite images simply those images I feel like I earned.
Nature photography’s 3 P’s
To remind myself (and others) of the photography’s mental side, many years ago I identified what I call, “The 3 P’s of nature photography.” These sacrifices, large and small, a nature photographer must make to consistently create successful images.
- Preparation is your foundation, the research that gets you in the right place at the right time, plus the vision and mastery of your camera that allows you to wring the most from the moment. It’s controlling exposure and focus, knowing your equipment, and understanding the subject. Preparation is also just having the right equipment for the moment, from the lenses in your bad to weather-appropriate clothing.
- Persistence is patience with a dash of stubbornness. It’s what keeps you going back when the first, second, or hundredth attempt has been thwarted by unexpected light, weather, or a host of other frustrations, and keeps you out there long after any sane person would have given up. And just as important, persistence is a willingness to wait as long as necessary for the moment to be right, and not just settling for “good enough.”
- Pain is suffering for your craft. I’m not suggesting that you risk your life for the sake of a coveted capture, but you do need to be able to ignore the tug of a warm fire, full stomach, sound sleep, and dry clothes, because the unfortunate truth is that the best photographs almost always seem to happen when most of the world would rather be inside.
An assignment
The truth is, you almost certainly already do it. Pick some of your favorite captures, pop them onto the screen, and try to put yourself back at that time and place. Ask yourself which of the 3 P’s you employed, and be generous with yourself and not too quick to write an image off to blind luck.
Practicing what I preach, here’s my stab at the assignment for this image:
- Preparation: Some would argue that I was lucky to be in Yosemite last month just as several inches of snow fell on peak fall color. And while my good fortune that day isn’t lost on me, the fact that I was there was no accident. I monitored the weather forecast for snow in Yosemite Valley, adjusted my schedule, and packed the right clothes for the conditions. Of course I also had an intimate familiarity of my subject, from the locations themselves to the best time to be there for the current conditions.
- Persistence: I can’t tell you the number trips I’ve taken to Yosemite and elsewhere that didn’t amount to anything. In 2013 I scheduled an entire workshop around the arrival of Comet ISON, only to have the comet disintegrate just a couple of days before the workshop. Many times I’ve made the long drive to Yosemite to photograph snow that turned out to be rain. But no matter how many times Mother Nature throws me a curve, I keep coming back and sometimes it pays off. Like this time.
- Pain: It’s not like I trekked solo across the arctic, or summited Everest without oxygen, for this image. Though this day was cold and wet, and getting to Yosemite required an 8-hour roundtrip drive in less than ideal conditions, I didn’t do anything most other people couldn’t do—I just pried myself from the recliner and hit the road. The drive was sometimes boring (I’ve done it hundreds of times), sometimes stressful (turns out my Outback needed new tires—uhhh, reference Preparation section above), and standing in the snowy cold was less comfortable than lounging inside by a fire. It’s insidious the way these small inconveniences and discomforts try to lure us into staying home, but the payoff happens enough to justify the sacrifice.
A few words about this image

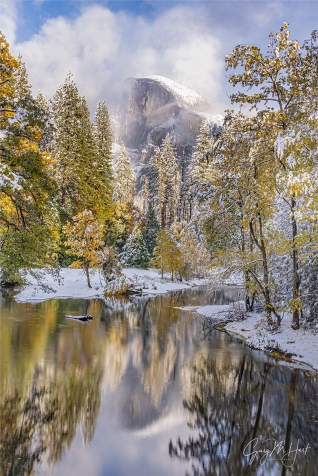
Autumn Snowfall, Half Dome Reflection, Yosemite
Sentinel Bridge is such an iconic view of Half Dome that it would be photographic malpractice not to share it with a workshop group, but when I’m in Yosemite by myself I rarely stop here because it lacks compositional variety (it’s hard to find something I don’t already have). But because the conditions on this day were spectacularly unique, I actually stopped here twice. This image was from my first stop, when a light snow still fell and storm clouds ruled the scene.
Half Dome had been swallowed by clouds for a while, but crossing the bridge I saw that it had just emerged so I whipped into the adjacent parking lot. Rather than mess with my entire kit, I just grabbed my tripod, Sony a7RIV, and Sony 24-105 f/4 G lens and jogged up to the rail (maybe 100 feet from the car).
I always do my best to position myself so the trees frame Half Dome without obscuring any of its face, not always easy at this extremely popular spot. I was lucky this time that there were only a couple of other photographers set up so I didn’t have any trouble finding a spot that worked. With the scene so perfect, I didn’t want to get too fancy and risk losing Half Dome to the clouds. I quickly identified the elements I wanted to feature—Half Dome, the upstream trees, and of course the gorgeous reflection—and went to work.
I often start with a vertical composition on Sentinel Bridge, but surveying the scene, when my eyes were drawn to the serpentine ribbon of autumn leaves clinging to the south riverbank I opted to start with a horizontal frame. That left me with a decision about what to about the trees on both sides of the river—how many to include, and whether to cut them off at the top. I finally decided that not cutting them off would give me more sky than I wanted.
With the frame’s top/bottom established, I panned left and right until I was satisfied: enough of the floating leaves—check; Half Dome properly centered (Half Dome has so much visual weight, putting it too far left or right can throw off the balance)—check; the diagonal trunk and snow-capped rock far enough from the left edge that they create compositional balancing elements for that side of the frame—check.
With a few gentle ripples ruffling the reflection, I added my Breakthrough 6-stop dark polarizer, stopped down to f/16, and dialed my ISO to 50. This gave me a 4-second exposure that smoothed the water just enough to allow the reflection to stand out nicely. Once I was satisfied that this composition was a success, I went on to shoot the scene in a variety of other ways as well: wider, tighter, and vertical. (You can see the vertical version in the gallery below.)
Returning to Sentinel Bridge a few hours later, the sun had broken through to light up Half Dome and the tops of the trees, creating a completely different, but no less beautiful, scene (that I haven’t had a chance to process yet).
Many of you no doubt recognize the reference in this post’s title; for those who don’t (inconceivable!), treat yourself to this scene from the best movie ever.
Preparation, Persistence, and Pain
Click an image for a closer look, and to view a slide show.
Category: fall color, Half Dome, How-to, Merced River, reflection, snow, Sony 24-105 f/4 G, Sony a7RIV, Yosemite Tagged: autumn, fall color, Half Dome, nature photography, reflection, snow, winter, Yosemite

Archives
Pages
- Favorites
- Gallery
- 2014 Highlights
- 2015 Highlights
- 2016 Highlights
- 2017 Highlights
- 2018 Highlights
- 2019 Highlights
- 2020 Highlights
- 2021 Highlights
- 2022 Highlights
- 2023 Highlights
- Celestial Wonders
- Clouds
- Eastern Sierra
- Grand Canyon
- Hawaii
- Iceland
- Lightning
- Milky Way
- Moon
- Moon and Stars
- Nature Intimates
- New Zealand
- Pacific Northwest
- Poppies
- Rainbows
- Reflections
- Seascapes
- Sierra Foothills
- Southwest
- Spring
- Sunrise, Sunset
- Sunstars
- Trees
- Waterfalls
- Wild Weather
- Wildflowers
- Wildflowers
- Winter
- World in Motion
- Yosemite
- Autumn
- Death Valley
- Instagram History
- Photo tips
- Antelope Canyon
- Back-button focus
- Big Moon
- Choose and use graduated neutral density filters
- Crescent moon
- Depth of Field
- Digital Metering and Exposure
- Eastern Sierra
- Exposure basics
- Fall Color How-To
- Fall Color Why and When
- Hawaii Big Island
- Histogram
- Horsetail Fall (Yosemite)
- Light
- Lightning
- Live-view Focus
- Manual Exposure Simplified
- Milky Way Photography
- Mirrorless Metering
- Moonlight
- Motion
- Photograph Grand Canyon: When, Where, How
- Polarizers
- Rainbows
- Reflections
- Selective focus
- Shoot the moon
- Starlight
- Sunrise/Sunset Color
- The Tripod Difference
- Tripod Selection
- Storytelling
- Photo Workshops
- Starlight
- Sunstars
- The Undiscovered Country
- About


