Eloquent Images by Gary Hart
Insight, information, and inspiration for the inquisitive nature photographer
Just a Dash of Rainbow
Posted on May 22, 2022

Bridalveil Rainbow, Tunnel View, Yosemite
Sony 𝛂1
Sony 24-105 G
1/60 second
F/10
ISO 100
I’ve spent the last week moving, and with my annual Grand Canyon Raft Trip for Photographers launching Tuesday, I haven’t had a lot of time for blogging (and much else). But I’m still committed to posting a new blog each week, so I’m sharing a new image from one of this spring’s Yosemite workshops, and a brief description of its capture. I also dusted off and polished up the Rainbow article from my Photo Tips tab. I’ll be off the grid until May 31, so next week’s post will likely be a little late.
It’s become a tradition to kick off my Yosemite spring workshops with a rainbow on Bridalveil Fall. Though the timing varies with the date, I’ve done it enough to narrow the rainbow’s start down to about a 2 minute window for whatever date I’m there. Not only is this little dash of rainbow a thrilling spectacle and beautiful introduction to Yosemite, it also creates an (unjustified) illusion of genius for the workshop leader.
With rain and maybe even a little snow, this year’s weather forecast for our first day looked great in many ways, but not so much for rainbows. But rainbow or not, Tunnel View is a great spot to start a workshop because it’s the most complete view of all things Yosemite. It’s also the first place Yosemite’s storms clear, so even without sunlight something special might be in store.
The storm was just starting to clear when we arrived and I almost got trampled as my group raced to set up. Between the swirling clouds and Half Dome’s appearance (not always a sure thing during a Yosemite clearing storm), things were already going pretty well when shafts of light broke through to illuminate random parts of the valley and surrounding granite.
I checked my watch and crossed my fingers when I realized that we’d be able to add a rainbow to Bridalveil if the light were to make it there. A couple of minutes later Leaning Tower (the diagonal just to the right of the fall) lit up, and a few seconds later a small patch of light hit the evergreens in front of the fall.
After telling everyone what was about to happen, I set up my composition and said a little prayer that the light would cooperate. The patches of light quickly expanded and merged and there it was. I often shoot this rainbow with a telephoto because the sky is so often blank blue, but the whole scene was so beautiful this afternoon that I went with my Sony 24-105 G lens on my (brand new!) Sony a1.
This was the very first time I’d used this camera, and while I thought I’d set it up to match my Sony a7RIV, I soon discovered that I’d missed a few things. For example, I usually shoot in single shot mode, but my a1 was in fast continuous mode, an oversight that became apparent when my first shutter press (slow and gentle, as always) fired off 6 identical frames before I released my finger. My goodness is this camera fast.
I have so many images of this rainbow that I only photographed it for a couple of minutes—just long enough to be confident that I’d captured something I didn’t have. When I finished shooting I just stood back to watch the rainbow move up the fall—and to listen to the exclamations of marvel from the group.
Fortunately none of my settings oversights were a major hindrance and were quickly corrected. Since that afternoon I’ve used my a1 enough to know that I’m going to love using it, and can’t wait to try it out in the Grand Canyon this week.
Read on to learn about rainbows, how to anticipate them, and how to photograph them…
All About Rainbows
Let there be light
Most people understand that a rainbow is light spread into various colors by airborne water drops. Though a rainbow can feel like a random, unpredictable phenomenon, the natural laws governing rainbow are actually quite specific and predictable, and understanding these laws can help photographers anticipate a rainbow and enhance its capture.
The sun’s visible wavelengths are captured by our eyes and interpreted by our brain. When our eyes take in light comprised of the full range of visible wavelengths, we perceive it as white (colorless) light. Color registers when some wavelengths are more prevalent than others. For example, when light strikes an opaque (solid) object such as a tree or rock, some of its wavelengths are absorbed; the wavelengths not absorbed are scattered (reflected). Our eyes capture this scattered light, send the information to our brains, which interprets it as a color. When light strikes water, some is absorbed, some passes through to reveal the submerged world, and some light is reflected by the surface as a reflection.

Light traveling from one medium to another (e.g., from air into water) refracts (bends). Different wavelengths refract different amounts, causing the light to split into its component colors.
To understand the interaction of water and light that creates a rainbow, it’s simplest to visualize what happens when sunlight strikes a single drop. Light entering a water drop slows and bends, with the shorter wavelengths bending more than the longer wavelengths: refraction. Refraction separates the originally homogeneous white light into the myriad colors of the spectrum: red, orange, yellow, green, blue, indigo, violet (in that order).
But simply separating the light into its component colors isn’t enough to create a rainbow. Actually seeing the rainbow spectrum caused by refracted light requires that the refracted light be reflected back to our eyes somehow.
A raindrop isn’t flat like a sheet of paper, it’s spherical, like a ball. Light that was refracted when it entered the front of the raindrop, continues through to the back of the raindrop, where some is reflected. To view a rainbow, our eyes must be in the correct position to catch this reflected spectrum of color—fortunately, this angle is very consistent and predictable.
Red light reflects at 42 degrees, violet light reflects at 40 degrees, while the other spectral colors reflect back between 42 and 40 degrees. That’s why the top color of the primary rainbow is always red, the longest visible wavelength; the bottom color is always violet, the shortest visible wavelength.
Follow your shadow
Every raindrop struck by sunlight creates a rainbow somewhere. But just as the reflection of a mountain peak on the surface of a lake is visible only when viewed from the angle the reflection bounces off the lake’s surface, a rainbow is visible only when you’re aligned with the 42 – 40 degree angle at which the raindrop reflects light’s refracted spectrum of rainbow colors.
Lucky for most of us, viewing a rainbow requires no knowledge of advanced geometry. To locate or anticipate a rainbow, put your back to the sun and picture an imaginary line originating at the sun, entering the back of your head, exiting between your eyes, and continuing into the landscape in front of you—this line points to the “anti-solar point,” an imaginary point exactly opposite the sun from your viewing position.
It helps to remember that your shadow always points toward the anti-solar point—and toward the center of the rainbow, which forms a 42 degree circle around the line connecting the sun and the anti-solar point. Unless we’re in an airplane or atop a mountain peak, we don’t usually see the entire circle because the horizon gets in the way. So when you find yourself in a mixture sunlight and rain, locating a rainbow is as simple as following your shadow and looking skyward—if there’s no rainbow, the sun’s probably too high.
High or low
Sometimes a rainbow appears as a majestic half-circle, arcing high above the distant terrain; other times it’s merely a small arc hugging the horizon. As with the direction of the rainbow, there’s nothing mysterious about its varying height. Remember, every rainbow would form a full circle if the horizon didn’t get in the way, so the amount of the rainbow’s circle you see (and therefore its height) depends on where the rainbow’s arc intersects the horizon.
While the center of the rainbow is always in the direction of the anti-solar point, the height of the rainbow is determined by the height of the anti-solar point, which will always be exactly the same number of degrees below the horizon as the sun is above the horizon. It helps to imagine the line connecting the sun and the anti-solar point as a fulcrum, with you as the pivot—picture yourself in the center of a teeter-totter: as one seat rises above you, the other drops below you. That means the lower the sun, the more of the rainbow’s circle you see and the higher it appears above the horizon; conversely, the higher the sun, the less of the rainbow’s circle is above the horizon and the flatter (and lower) the rainbow appears.

Assuming a flat, unobstructed scene (such as the ocean), when the sun is on the horizon, so is the anti-solar point (in the opposite direction), and half of the rainbow’s 360 degree circumference will be visible. But as the sun rises, the anti-solar point drops—when the sun is more than 42 degrees above the horizon, the anti-solar point is more than 42 degrees below the horizon, and the only way you’ll see a rainbow is from a perspective above the surrounding landscape (such as on a mountaintop or on a canyon rim).
Of course landscapes are rarely flat. Viewing a scene from above, such as from atop Mauna Kea in Hawaii or from the rim of the Grand Canyon, can reveal more than half of the rainbow’s circle. From an airplane, with the sun directly above you, all of the rainbow’s circle can be seen, with the plane’s shadow in the middle.
Double Your pleasure
Not all of the light careening about a raindrop goes into forming the primary rainbow. Some of the light slips out the back of the raindrop to illuminate the sky, and some is reflected inside the raindrop a second time. The refracted light that reflects a second time before exiting creates a secondary, fainter rainbow skewed 50 degrees from the anti-solar point. Since this is a reflection of a reflection, the colors of the secondary rainbow are reversed from the primary rainbow.
And if the sky between the primary and secondary rainbows appears darker than the surrounding sky, you’ve found “Alexander’s band.” It’s caused by all the light machinations I just described—instead of all the sunlight simply passing through the raindrops to illuminate the sky, some of the light was intercepted, refracted, and reflected by the raindrops to form our two rainbows, leaving less light for the sky between the rainbows.
Waterfalls are easy
Understanding the optics of a rainbow has practical applications for photographers. Not only does it help you anticipate a rainbow before it happens, it also enables you to find rainbows in waterfalls.
A rainbow caused by sunlight on rain can feel random because it’s difficult to know exactly where the rain will fall, when the sun will break through, and exactly where to position yourself to capture the incongruous convergence of rainfall and sunshine. A waterfall rainbow, on the other hand, can be predicted with clock-like precision because we know exactly where the waterfall and sun are at any give time—as long as clouds don’t get in the way, the waterfall rainbow appears with clock-like precision.


Yosemite is my location of choice for waterfall rainbows, but maybe there’s a waterfall or two near you that might deliver. Just figure out when the waterfall gets direct sunlight early or late in the day, then put yourself somewhere on the line connecting the sun and the waterfall. And if you have an elevated vantage point, you’ll find that the sun doesn’t even need to be that low in the sky.
Spring in Yosemite is waterfall rainbow season, and I know exactly where to be and when to be there for both of Yosemite Valley’s major waterfalls. In fact, given the variety of vantage points for viewing each of these falls, I can usually get two or three rainbows on each fall on any given day.
In addition to clouds, there are other variables to deal with. One is the date, because the path and timing of the sun’s arc across the sky changes with each passing week. Another thing that can throw the timing off slightly is the amount of water in the fall—following a wet winter the spring runoff increases, and with it the amount of mist. Generally, the more mist, the sooner the rainbow will appear and the longer it lasts. And finally there’s wind, which spreads the mist and usually improves the rainbow by increasing its size.
While all these variables make it difficult for me share the exact schedule of Yosemite’s waterfall rainbows from the variety of vantage points, I can give you some general guidance: look for a rainbow on Yosemite Falls in the morning, and Bridalveil Fall in the afternoon. And if you don’t mind a short but steep hike, you can also find a rainbow on Vernal Fall in the afternoon.
Moonbows
Understanding rainbow optics can even help you locate rainbows that aren’t visible to the naked eye. A “moonbow” (lunar rainbow) is a rarely witnessed and breathtaking phenomenon that follows all the natural rules of a daylight rainbow. But instead of resulting from direct sunlight, a moonbow is caused by sunlight reflected by the moon.
Moonlight isn’t bright enough to fully engage the cones in your eyes that reveal color, though in bright moonlight you can see the moonbow as an arcing monochrome band. But a camera on a sturdy tripod can use its virtually unlimited shutter duration to accumulate enough light to bring out a moonbow in full living color. Armed with this knowledge, all you need to do is put yourself in the right location at the right time.


Probably the best known moonbow is the one that appears on Yosemite Falls each spring. Usually viewed from the bridge at the base of Lower Yosemite Fall, the best months are April, May, and June, with May probably being the best combination of moonlight angle and ample water.
Unfortunately, this phenomenon isn’t a secret, and the bridge can be quite crowded on spring full moon nights—in high runoff springs, it can also be extremely wet (pack your rain gear). The base of Upper Yosemite Fall can also have a moonbow when viewed from the south side of Cook’s Meadow, especially in wet springs.
Workshop Schedule || Purchase Prints || Instagram
A Gallery of Rainbows
Click an image for a closer look, and to view a slide show.


Watch Your Weight
Posted on May 16, 2022
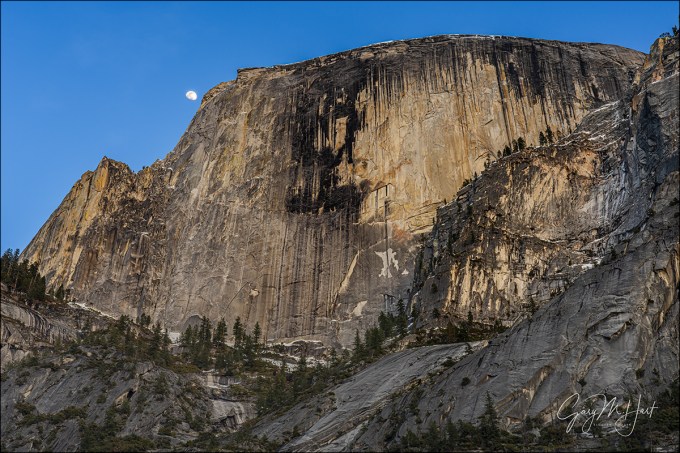
Half Dome and Moon, Mirror Lake, Yosemite
Sony a7RIV
Sony 24-105 G
1/10 second
F/10
ISO 100
Dynamic vs. static
Photographic composition is all about managing the tension between dynamic and static: the dynamic component is the way the eye moves through the frame, while the static component is the overall balance of the scene’s elements.
To synergize these two potentially conflicting factors, I think in terms the “visual weight” of my frame’s contained elements. Like gravity for the eye, visual weight is the amount each of the scene’s various elements might pull the viewer’s vision toward it. Unlike the measurable weight caused by actual gravity—a constant determined by an object’s mass (I’m talking the Earth-based, Newtonian physics that govern our daily lives)—visual weight is a more subjective quality that can be a function of many things that include the object’s size, brightness, contrast, shape, and color.
On the dynamic side, I use the way the viewers of an image subconsciously connect visually weighted objects and mentally draw virtual lines along which their eyes move. Composing a scene, I first identify the objects that possess visual weight—a rock, flower, tree, mountain, whatever—and work to position them in my frame in ways that guide my viewer’s eyes. Additionally, I generally avoid putting visually weighted objects near the edges of my frame, where they might pull my viewer out of the scene.
For the scene’s static component, visual balance, an approach that works for me to imagining my frame as a perfectly rigid print, laid flat and balanced atop a centered point (like a pencil). As I compose, I want the position of the scene’s visually weighted objects organized on my imaginary balanced print so it will rest perfectly horizontal (no tilt).
Just a dash of moon
The concept of visual weight helped me reconcile a frequent complaint of photographers (and at least one editor who used it to reject an article on moon photography) that the moon appears too small in a landscape image. At some point I realized that the moon’s visual weight, even accounting for its brightness and contrast, was greater than its size alone might suggest. That led me to an essential component of visual weight that I’d overlooked: emotional connection. There is just something about the emotional pull of the moon hovering over a landscape that draws the human eye far more than might be expected from its more tangible physical qualities.
This realization freed me to stop stressing about the size of the moon in my frame. Though I have no problem photographing the moon large when the opportunity presents itself, I also won’t hesitate to leverage a small moon’s emotional weight to elevate a relatively ordinary scene, or enhance an already beautiful scene.
For example
The short hike along Tenaya Lake to Mirror Lake is one of the most popular in Yosemite Valley. Though technically not a lake, each spring (and often in winter and early summer as well) Tenaya Creek brims with snowmelt. Rushing from the high country, Tenaya Creek pauses directly beneath Half Dome, flattening and spreading enough to deliver spectacular reflections.
Even more than the reflections, for me the best part of the Mirror Lake experience is its the neck-craning close-up of Half Dome’s face. When I started thinking about the best way to convey Half Dome’s imposing presence, it occurred to me that letting its looming face dwarf a small moon might be exactly what I need.
I write a lot about my love for photographing the moon large, the bigger the better. But sometimes the moon needs to be small. While the moon here is far from the primary subject it would be in a telephoto image, this image is all about Half Dome. Adding little dash of moon creates a balancing counterweight, helps spice up an otherwise boring sky, and creates a size contrast that emphasizes Half Dome’s massive presence.
Take a look at the images in the gallery below, paying extra attention to the moon’s relationship to Half Dome. In some images the moon is the focal point of the frame, in others it’s a balancing element, and sometimes it’s simply an accent that adds interest to a boring sky.
The Moon and Half Dome
Click an image for a closer look, and to view a slide show.


Making a Scene
Posted on May 9, 2022
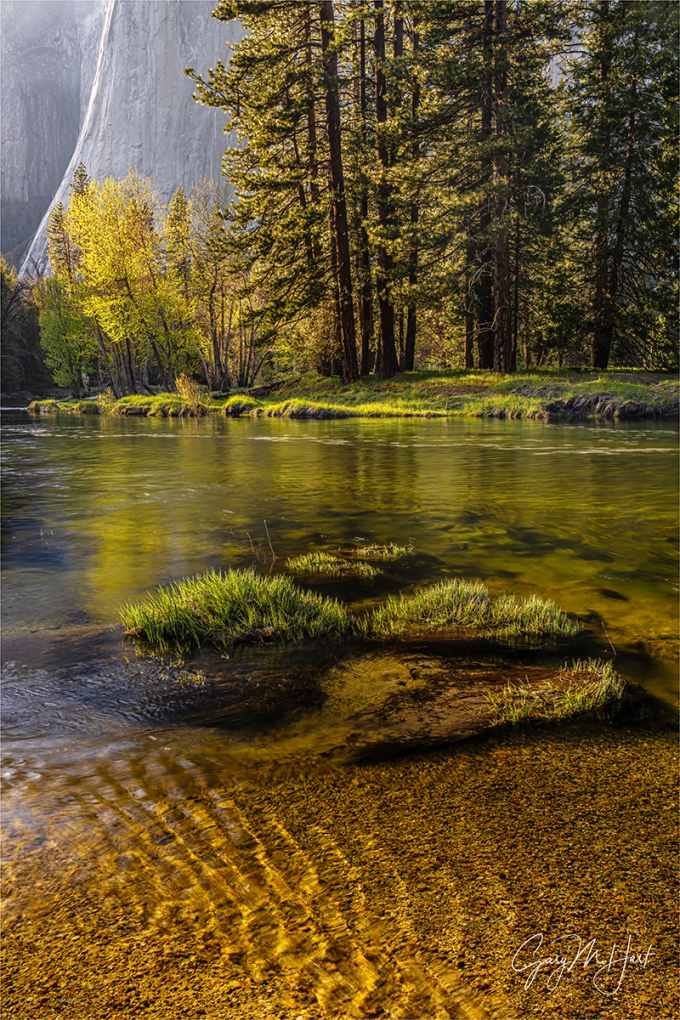
Spring Evening, Cathedral Beach, Yosemite
Sony 𝛂1
Sony 24-105 G
1/3 second
F/16
ISO 50
Think about what goes into making a landscape image. If the scenes and conditions are our raw materials, then it would be logical to say that our camera gear is our tools. But in addition to cameras, lenses, and other physical photography hardware, I’d say that our photography toolkit also includes the techniques we employ to deal with nature’s fickle whims.
And speaking of fickle whims, it’s impossible to deny that conditions make some scenes easier than others. But as much as I long for crimson sunsets, vivid rainbows, mirror reflections, and a host of other natural phenomena that can make virtually any shot feel like a slam dunk, these things are not always available when I want to make an image. For me, one of the greatest challenges is overcoming the boring (cloudless) skies that my California home is known (and loved) for. Not only do blank skies add rarely anything to a scene, they’re responsible for harsh light and the extreme dynamic range that even the best cameras struggle to handle. What’s a photographer to do?
For starters, we need to open our mind (and eyes). One of photography’s less heralded gifts is its ability, over time, to teach us to tune-in to nature’s subtleties, and how to leverage conditions that we once viewed as too difficult, into beautiful images. Fortunately, difficult doesn’t mean impossible—in fact, difficult can be downright fun. And the truth is, there are a lot of ways to overcome boring skies. Here are some suggestions:
- Shade: One of my favorite approaches to blank skies is photographing moving water, spring flowers, and fall color in full shade. While not spectacular, shade light is shadowless and easy to work with. It also makes it easy to blur water without a filter.
- Reflection: For the best reflections, look for sunlit subjects (the brighter the better) reflecting in still, shaded water.
- Sunstar: Any time the sun’s up, a sunstar is a readily available addition option for spicing up your scene. Position yourself so all but a small sliver of sun is blocked by an opaque object (such as a tree, rock, or the horizon), dial your f-stop to f/16 or smaller. Note that some lenses deliver sharper, more defined sunstars than others, and in general, wide lenses work best, especially primes and high quality zooms.
- Silhouette: Blank skies at sunrise and sunset are a great opportunity to create silhouettes that emphasize color and shape by eliminating everything in the scene except color and shape. Better still, incorporating a crescent moon (which always rises just before the sun, and sets just after the sun), can take silhouette scenes to the next level.
- Stars: Don’t forget the night sky. Often when I’m disappointed by a lack of clouds at a nice location, I just wait until dark and photograph the scene by moon- or starlight.
- Black and white and infrared: While I don’t photograph B&W and infrared, they are wonderful techniques for dealing with harsh midday light.
For example
Given their frequency, I’ve become pretty good at making the best of blue sky days in Yosemite. While last month’s Yosemite Waterfalls and Dogwood photo workshop did enjoy a few clouds, we also dealt with a fair amount of blank skies. For our first sunrise we photographed silhouettes and a rising crescent moon. And later in the workshop we spent a couple of hours photographing dogwood in the shade (mixed with a little sunlight) in the Fern Springs / Pohono Bridge area. But I think my favorite blue sky shoot came at Cathedral Beach on the workshop’s penultimate afternoon.
Cathedral Beach is an up-close view of El Capitan right on the Merced River. The low and slow flow of autumn makes a glassy reflection here, and in the months closer to the winter solstice, when the sun is farther south, all of El Capitan gets spectacular late afternoon light. But by mid-spring the river rushes and swirls with snowmelt, and the sun has moved so far north that only El Capitan’s west-facing wall gets late sunlight. But as you can see, all is not lost.
Viewing El Capitan from Cathedral Beach that afternoon, the first thing to catch my eye was the gorgeous light etching the otherwise shaded granite’s vertical plunge. No less spectacular was the brilliant backlight illuminating the cottonwood and grass across the river and reflecting color in the river.
I pulled out my (brand new!) Sony A1 and pondered my lens choice. Since capturing all of El Capitan from this location requires something wider than 24mm, I’d normally go with my Sony 16-35 GM or 12-24 GM lens here. But with no clouds and most of El Capitan in shade, I really wanted to eliminate the sky, most of the granite, and the less interesting surrounding foliage, so I reached for my Sony 24-105G lens.
This scene worked as a horizontal or vertical, but I finally zeroed in on the vertical composition because it was the best way to distill the scene down to its essentials: El Capitan’s edge light, the backlit foliage, the reflection, and the gold-flecked riverbed beneath parallel ripples. I moved along the riverbank until all this good stuff aligned with the set of grassy mounds catching light in the near foreground. I wanted front-to-back sharpness, so I stopped down to f/16 and focused on the most distant of the foreground mounds. And even though I didn’t have a mirror surface, I dialed the reflection up with my polarizer to add a little color to the river.
In Yosemite it’s hard to take a bad picture, but some are more rewarding than others. While I doubt it will be one of those images that goes viral, this image makes me especially happy because finding it and assembling all the components took a little creative effort.
Workshop Schedule || Purchase Prints || Instagram
The Cure for Blank Skies


, California")


Big Moon Rising
Posted on May 1, 2022

Big Moon Rising, Tunnel View, Yosemite
Sony a7RIV
Sony 200-600 G
Sony 2x teleconverter
ISO 100
f/13
1/10 second
It doesn’t take much time with my images to figure out that I love photographing the moon. Large or small, full or crescent, it doesn’t really matter. Almost every one of my moon images is the product of plotting the time of its arrival (or departure), then making sure I’m there to photograph it. Using astronomical tables and topo map software, I’ve been doing this for more than 15 years—long before the availability of the astronomy apps that tremendously simplify the process with pretty decent accuracy. And while I recommend these (new fangled) apps to everyone who wants to photograph anything celestial above a particular terrestrial scene, I still do it the old fashioned way for no other reason than it’s more fun. But, as much as I’d love to tell you that I plotted this moonrise from last Wednesday morning in Yosemite, I have to admit that this one was largely a matter of just happening to be in the right place at the right time (aided by just a dash of advance knowledge).
Yosemite Valley is not a great sunrise location because nearly all of its vistas face east, which means photographing towering monoliths in full shade (the sun’s behind them), against the brightest part of the sky. We always hope for clouds to add color to the sky and subdue some of the sun’s brightness, but too frequently end up with blank skies.
Nevertheless, in most of my Yosemite photo workshops I take my group to Tunnel View for our first sunrise. I choose Tunnel View for that first sunrise because when clouds aren’t present, we can still turn the distinctive outlines of El Capitan, Half Dome, and Cathedral Rocks into silhouettes. Not only does this give my students the opportunity to create something a little different than the standard Yosemite image, it’s also a good way to get them thinking about photographing the way their camera sees rather than the way their eyes see (a real point of emphasis in my workshops).
My Yosemite Waterfalls and Dogwood workshop was scheduled to (fingers crossed) coincide with the park’s peak spring runoff and dogwood bloom, which usually happens around May 1 (+/- a week or two). This year I chose the last week of April because I’d rather be a little early for the dogwood than a little late, and to avoid the weekend crowds. Though I hadn’t considered the crescent moon when I scheduled it, as the workshop approached I checked and saw that on our first morning an 11% crescent would rise nearly 90 minutes before sunrise. Unfortunately, this moon aligned poorly with all of Yosemite’s icons, and to be visible at all would need to climb above the much higher walls southeast of Tunnel View. On the other hand, I saw that the crescent would be trailing a nice planetary alignment that included Mars, Venus, and Jupiter—maybe not great to photograph, but pretty nice to see.
When we arrived the sky was dark enough to enjoy the planets, but there was no sign of the moon. As feared, there were no clouds, so after getting my group going with their silhouettes, I started thinking about the moon again. Knowing that it was almost directly beneath Jupiter, about 1 1/2 times the distance separating Venus and Jupiter, I was able to pretty closely approximate where the moon would rise. And I realized that when it did rise, the sky would still be plenty dark enough.
I let my group know what would be happening and quickly ran to my car to grab my tripod, Sony a7RIV, Sony 200-600 G lens, and Sony 2X Teleconverter. Zooming my lens all the way out to 1200mm (go big or go home), I trained it on the small tree on the far left of this image and waited. The moon actually appeared just slightly left of the target tree, close enough that I didn’t need to recompose. The ridge here was so steep that it took more than 10 minutes for the moon to completely separate, creating the illusion that it was sliding uphill. merge
The most exciting part of this otherwise serene morning came when a commercial jet zipped into the scene, contrail trailing, and someone realized it was on a collision course with the moon. What ensued was a brief scramble to photograph the collision. Thwarted by my 2-second timer (a further reminder why I don’t photograph anything that moves), I got nothing but contrail, but at least two in the group got the moon/jet convergence.
Here’s a link to my Crescent Moon article in the Photo Tips section of my blog
Workshop Schedule || Purchase Prints || Instagram
A Crescent Moon Gallery


")


")


