Eloquent Images by Gary Hart
Insight, information, and inspiration for the inquisitive nature photographer
Moon Chasing
Posted on November 24, 2025

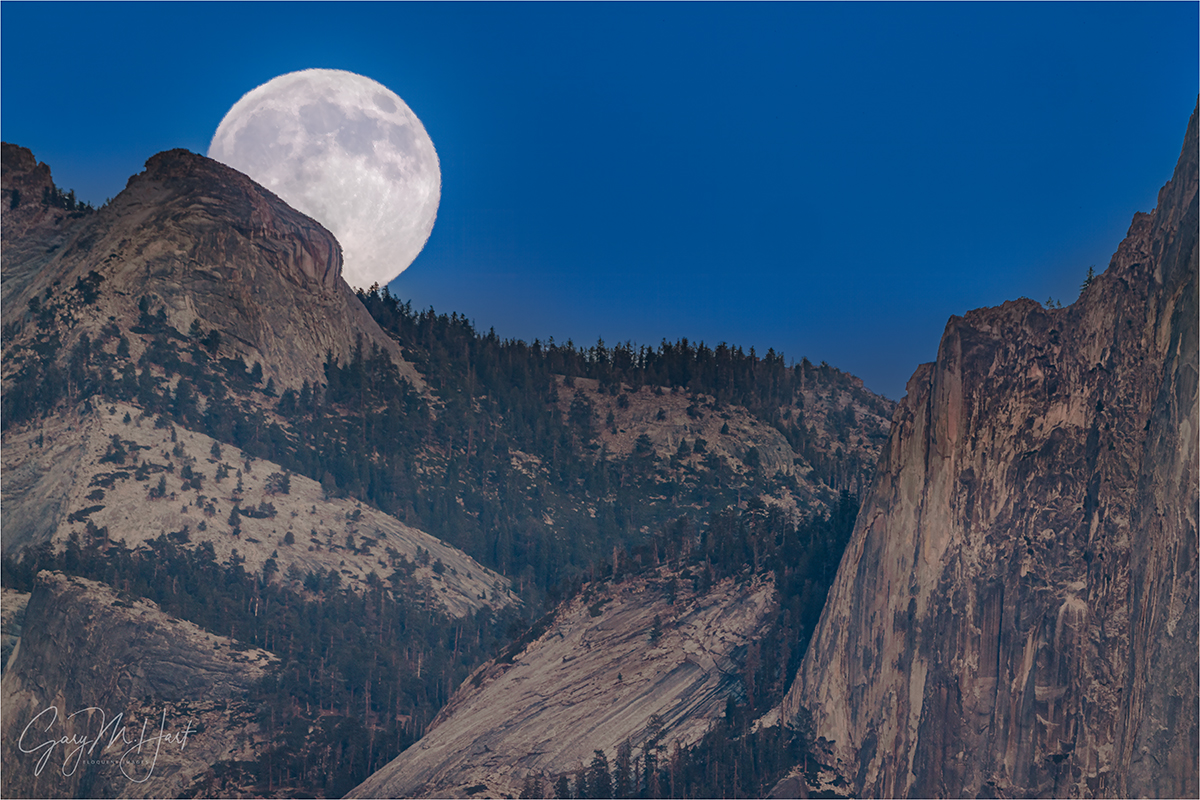
Half Dome Autumn Moonrise Reflection, Merced River, Yosemite
Sony a7R V
Sony 24-105 G
1/8 second
F/14
ISO 100
Many years ago I stood with a couple of other photographers on Sentinel Bridge in Yosemite. It was a few minutes before sunset and we were waiting, cameras poised, for the moon to ascend from behind Half Dome. As we chatted, a young woman approached and asked no one in particular what we were all waiting for. When I told her about the imminent moonrise, she laughed and advised us that we were too late, that the moon had already risen because she’d just come from watching the moonrise at Tunnel View. After several unsuccessful attempts to explain to her why the moon would in fact be arriving soon, and how the moon rises at different times depending on the viewer’s location, elevation, and nearby terrain, we finally gave up and she went on her way none the wiser.
Earlier this month my Yosemite Autumn Moon photo workshop group got the opportunity to apply this moon chasing approach firsthand, photographing a (nearly) full moon rising above Half Dome at sunset on three consecutive nights, from three different locations.
The challenge to photographing three consecutive moonrises is that, while sunset at any given location from one night to the next happens at more or less the same time, the moon rises nearly an hour later each night—in other words, if you stay put, the landscape feature that the moon rose behind last night will tonight obscure the moon until long after dark.
So, while the Sun/Moon/Earth choreography is fixed and predictable to ridiculous precision, my location for viewing this show is completely my call. Moon rising too late at one location? Just find another location that’s farther back, or higher. Or both. Of course that’s often easier said than done, but Yosemite, with its elongated east/west orientation and elevated vistas, is ideally set up for moon photography. (Not to mention its variety of world class subjects.)
(As you may have noticed) my favorite moonrise subject in Yosemite is Half Dome. And why not? Half Dome’s prominent shape stands out beautifully against open sky (rather than getting lost against a darker or more distracting terrestrial background), is viewable from countless different vantage points, and is wonderfully recognizable to the general public. But, since the moonrise location changes significantly from one month to the next, its ideal Half Dome alignment doesn’t happen most months. If I’ve learned nothing else in twenty-plus years of chasing moonrises in Yosemite, I do know that the full moon and Half Dome only align during one or two months on either side of the winter solstice—the rest of the year the moon rises either too far south (most months), which puts it behind Yosemite Valley’s towering south wall, or (maybe once or twice) too far north, putting it behind El Capitan.
Before attempting to photograph a moonrise, it’s important to understand that a location’s published sunrise/set or moonrise/set times always assumes a flat horizon. So unless you’re atop a mountain or on a ship at sea, you’ll probably see the sun disappear behind the terrain in the west before sunset, and you’ll probably need to wait until after moonrise for the moon to ascend above the terrain in the east.
In general, my goal for photographing any full moonrise is to get the moon near the horizon during the window that spans 15 minutes before to 15 minutes after the “official” (flat horizon) sunset. Earlier than that, there’s not enough contrast for the moon to stand out against still too-bright sky; later, there’s too much dynamic range to capture detail in the dark landscape and daylight-bright moon. Since the location for viewing the moon in that that sweet spot changes from night to night, so does my location.
With the sun at my back when viewing a rising full moon, I’m not too concerned about the precise timing of the sun’s disappearance—I know that once direct sunlight is off the landscape, the sky will still be bright enough to illuminate the foreground for 20 or 30 minutes. But I need to be pretty dead-on with the location and timing of the moon’s arrival.
Knowing the moon will rise about 40-60 minutes later each day, it’s easy to infer that the greater the number of days until the full moon, the earlier the moon will rise and the higher it will be at sunset. (Regrettably) I have no control over the timing of the absolute (flat horizon) sunset/moonrise, but I can control the elevation of my own personal horizon, and therefore the moon’s appearance on any given evening, by simply choosing my position relative to the point on the horizon above which the moon will rise.
To make this Yosemite workshop’s consecutive moonrises work, for our first evening I targeted a favorite riverside spot beneath Half Dome, on the east side of Yosemite Valley. For our second sunset, my original plan was to be at another spot on the Merced River near he middle of the valley, but we ended up photographing that evening’s moonrise from Glacier Point because I feared a forecast storm threatened to thwart the Glacier Point shoot I’d planned for our fourth and final night. The workshop’s main moonrise event was the Tunnel View moonrise on our third sunset, which I wrote about a couple of weeks ago. Only on that third evening was the moon the scene’s primary focal point—those first two evenings it was more of an accent to already beautiful scenes, but a wonderful accent it was.
Since this year’s autumn moon workshop started on the first day of standard time, the earlier than we’d all been accustomed to shorted our afternoon by an hour. That, combined with the fact that the spot I had in mind for that initial moonrise, while largely overlooked by tourists, is no secret to photographers. Wanting to get my group set-up before more people arrived, I passed on my usual workshop first shooting location and headed straight to my moonrise location.
Arriving an hour before sunset and finding it largely unoccupied, we had about 45 minutes to work before the moon appeared. The fall color and reflections were great, but clouds completely obscured the sky behind Half Dome to the point that it looked like the moon might be a no-show. But as we enjoyed the otherwise beautiful photography, the clouds parted just in time for the moon’s arrival.
I started with tighter telephoto shots, but quickly widened my composition as the moon separated from the ridge, trying both vertical and horizontal frames. Since I already have quite a few vertical moonrise images from here, I opted process this even wider horizontal frame and am extremely pleased with the way all the ingredients came together for an image I didn’t already have.
In defense of a small moon
Any time I share a wide angle image of the moon, I know I might hear from someone who tells me they’d prefer the image without the moon at all. And many years ago, when I proposed an article on photographing the moon to “Outdoor Photographer” magazine, the editor at the time (not the current OP editor) replied that moon photographs don’t work because the moon appears so much smaller in a photograph than people remember it.
They’re certainly entitled to their opinion, but I’ve never thought the moon needs to appear large to be an effective subject. I always look for ways to add something to an already beautiful scene that might make it stand out from the many other images of that scene, and the moon, with outsize emotional power that punches well above its weight, can dominate a disproportional segment of any frame.
And you don’t need to take my word for it. Ansel Adams certainly had this figured out long before I came on the scene, making a small moon the prime focal point of many compositions, including the image that’s arguably his most famous, “Moonrise, Hernandez, New Mexico.”
Join me in Yosemite
Workshop Schedule ||Purchase Prints || Instagram
Let’s Hear it for Small Moons
Click any image to scroll through the gallery LARGE


, Yosemite")


")


Let’s Get Vertical (Again)
Posted on November 16, 2025

New Day, Tunnel View, Yosemite
iPhone 17 Pro
(This seed of today’s blog is a post from many years ago—but the image and its story are brand new.)
What’s your orientation?
I’ve always questioned the reasoning behind labeling horizontally oriented images, “landscape,” and vertically oriented images, “portrait.” Despite my profession as a landscape (-only) photographer, nearly half of my images use “portrait” orientation. So it concerns me that this arbitrary naming bias might subconsciously encourage photographers to default to a horizontal orientation for their landscape images, even when a vertical orientation might be best.
The orientation of an image imparts implicit visual motion that’s independent of the eyes’ movement between an image’s visual elements. Photographers who understand that viewers’ eyes tend to move along the frame’s long side have an extra tool for guiding those eyes, and even to convey a mood.
For example, when orienting an image of a sunset on the coast, it’s easy to default without thinking to the same horizontal orientation that the distant horizon follows. And a waterfall image that’s oriented vertically certainly encourages the viewers’ eyes to move in the same direction as the water’s motion, so orienting the frame to match certainly seems reasonable. But, despite the natural instinct to match the frame’s orientation to the scene’s dominant flow, there is no absolute best way to orient an ocean, waterfall, or any other scene—there’s always a choice, and that choice matters. While matching the image’s orientation to the scene’s natural movement in this manner can instill a calmness to the image, a vertical ocean sunset, or horizontal waterfall, can create visual tension that can also be quite compelling.
Since I don’t need to convince most landscape photographers to take more horizontal pictures, I’m going to concentrate on the benefits of a vertical frame. One thing I especially like about orienting my landscape scenes vertically is the way it moves my viewer’s eyes through the scene from front to back, enhancing the illusion of depth that’s so important in a two-dimensional photo. And because of a vertical frame’s relative narrowness, a foreground element (that might get lost in a wider horizontal frame) instantly becomes the focal starting point that starts my viewer’s visual journey through the frame to whatever striking background I want to feature.
More than just guiding the eye through the frame, vertical orientation narrows the frame, enabling me to eliminate distractions or less compelling objects left and right of the scene’s prime subject(s). This makes vertical my preferred orientation when I want to emphasize an especially striking foreground from above (like Tunnel View), or a sky brimming with colorful clouds or a host of stars.
While a horizontally oriented scene is often the best way to convey the sweeping majesty of a broad landscape, I sometimes enjoy guiding my viewers’ eyes with vertical compositions of traditionally horizontal scenes. Tunnel View in Yosemite, where I think many photographers tend to compose too wide, is a great example. The scene to the left of El Capitan and the right of Cathedral Rocks just can’t compete with the El Capitan, Half Dome, Bridalveil Fall triumvirate, yet the world is full of Tunnel View images that shrink this trio to include (relatively) nondescript granite.
That’s why, when the foreground and sky aren’t particularly interesting, I often go for fairly tight horizontal compositions at Tunnel View. And while Tunnel View is among the most spectacular views on Earth, the foreground beneath the vista is usually quite bland, and overhead California’s chronic blue skies are frustratingly boring. So I’m afraid many of my Tunnel View images are horizontal, and rarely stray far left of El Capitan, or right of Cathedral Rocks.
Fortunately, there are exceptions. One of my favorite exceptions is those rare times when fresh snow smothers the evergreen valley floor. Another favorite is dramatic clouds, whether in the valley below or sky above. Faced with visual treats like this, vertical frames are wide enough to feature the foreground and/or sky without diluting the Tunnel View drama by including extraneous granite.
More specifically…
In Yosemite, one thing I never count on when there’s no weather in the forecast is a nice sunrise. That’s because Yosemite’s (default) blank skies, coupled with Tunnel View’s east-facing view, forces sunrise shooters to photograph fully shaded subjects (El Capitan, Half Dome, Cathedral Rocks, and Bridalveil Fall) against the brightest part of the sky. That’ why, without clouds, Tunnel View is much better late afternoon to sunset. For me, on a typical (empty sky) Yosemite morning, the real show is the first light on El Capitan, which arrives about 15 to 20 minutes after sunrise. On mornings with no clouds forecast, I usually start my groups with an El Capitan reflection of that first light—not only is this a reliably beautiful sight, everyone gets to sleep an hour longer (since going for the actual sunrise means being on location at least 30 minutes before sunrise instead of 20 minutes after).
But for whatever reason, and despite a promise of clear skies all morning (until a storm was forecast to start moving in that afternoon), I decided to hedge my bets on the final sunrise shoot of this month’s Yosemite Autumn Moon photo workshop. Normally we spend this final morning at Bridalveil Creek, arriving as soon as it’s light enough to start shooting in the dense shade there. Instead, I got everyone out about 30 minutes earlier and headed straight to Tunnel View. While this wouldn’t be early enough to shoot sunrise from start to finish, it would get us there in time for the best color in the remote chance the clouds arrived earlier than forecast. And that’s exactly what happened.
We were pulling in just as the cirrus precursors to the evening rain started lighting up. Since my group had already been up here twice, everyone was out of the cars and grabbing their gear before my seatbelt was off. Half the group beelined to the standard view with my brother (who was assisting me in this workshop), while the rest joined me on a granite ledge above the TV parking lot (a similar view, but with fewer people—also a little more physically challenging, and not the favorite spot of anyone bothered by heights).
As beautiful as the sky was, since I rarely photograph at Tunnel View anymore, my camera stayed in the car and I was content to just enjoy the show. Or so I believed. But as I stood there watching the color keep getting better and better, I started to second guess my decision to forego my camera. I knew I could be down to my car any back in less than 5 minutes, but the color was changing so rapidly, I also knew that would mean missing the best stuff. So I whipped out my iPhone 17 Pro, put it into RAW mode, and quickly framed up the scene.
With the great sky and bland foreground, I didn’t consider anything but vertical compositions. At first I went wide enough to include Bridalveil Fall, and though it was flowing nicely for autumn, it really wasn’t impressive enough to justify going that wide. So I quickly tightened my framing to include only El Capitan and Half Dome, putting in only the minimum amount of foreground so I could maximize the spectacular sky. I’d love to tell you what focal length, f-stop, and shutter speed I used, but my iPhone made all those decisions for me, and clearly did a pretty great job. What a time to be alive!
A few thoughts on iPhone image quality
Okay, seriously, as great as the iPhone (or any other current smartphone) camera is, let me remind you that smartphone image quality is nowhere near the quality of today’s full frame sensors and lenses. And I actually got a firsthand reminder of this fact while processing this image. Though I was truly blown away by the detail my iPhone captured, on the day I processed today’s image, I also prepared three large prints that had been ordered by an interior designer for the home of one of her customers. Though two of these images were captured more than 15 years ago with my Canon 1DS III (21 megapixels); the other was about 10 years old, from my Sony a7R II (42 megapixels), I was pretty confident the quality and detail this job required was all there.
-

- Stillness, South Tufa, Mono Lake
-

- First Light, Yosemite Valley
-

- Yosemite Sky, Tunnel View, Yosemite (2016)
And because maximizing this quality was the highest priority for her customer, she opted for custom prints rather than just going through my standard (much cheaper) SmugMug prints website (www.garyhartprints.com), where the images are pre-uploaded, medium resolution jpegs waiting for anyone to order (full disclosure: I’ve never had a single complaint about one of these prints). To prepare the images for printing, I returned to the original files and did extensive prep (using the latest processing technology) to ensure that the noise reduction, up-res, and sharpening got the most out of every single pixel.
I am absolutely certain I could print an iPhone image as large as these custom orders were (24×36) without apologizing. But getting up-close and personal with these three full-frame sensor prints at the same time I was processing an iPhone image, the detail captured left little doubt that, for anything much larger or more demanding than computer/web display, smartphone capture has a long way to go to catch “real” cameras. (But I’m still pretty thrilled to know that I can get useable quality any time Nature catches me without my real camera.)
Join me in Yosemite
Workshop Schedule || Purchase Prints || Instagram
Let’s Get Vertical
Click any image to scroll through the gallery LARGE
, Yosemite")


Super? Moon
Posted on November 8, 2025
November Moon, Half Dome from Tunnel View, Yosemite
Sony a7R V
Sony 200-600 G
Sony 1.4x teleconverter
ISO 200
f/9
1/80 second
This week’s full moon was a “supermoon”—or, as the media frequently proclaimed, “The biggest moon of 2025!” And while that is technically true, the size difference between a super and average moon is barely perceptible.
So, as a public service, I’ve dusted off and updated a prior article explaining the supermoon phenomenon (any hyperbole)—and what better time to share it than just days after photographing the November supermoon?
What’s the big deal?
So what exactly is so “super” about a “supermoon?” Answer: Not much. Or, maybe a better way to answer the question would be: When presented with a random series of full moon images, would you in fact be able to identify the supermoon? Doubtful. So why the media frenzy? And why do we see so many huge moon images every time there’s a supermoon? So many questions….
Celestial choreography: Supermoon explained
To understand what a supermoon is, you first have to understand that all orbiting celestial bodies travel in an ellipse, not a circle. That’s because, for two (or more) objects to have the gravitational relationship an orbit requires, each must have mass. And if they have mass, each has a gravitational influence on the other. Without getting too deep into the gravitational weeds, let’s just say that the mutual influence the earth and moon have on each other causes the moon’s orbit to deviate ever so slightly from the circle it seems to be (without precise measurement): an ellipse. And because its orbit isn’t round, as the moon circles Earth, its distance varies with the position in its orbit.
An orbiting object’s closest approach to the center of its ellipse (and the object it orbits) is at perigee; its greatest distance from the ellipse’s center is apogee. And the time it takes an object to complete one revolution of its orbit is its period. For example, earth’s orbital period around the sun is one year (365.25-ish days), while the period of our moon’s orbit is slightly more than 27 days.
But if the moon reaches perigee every 27 days, why don’t we have a supermoon every month? That’s because we’ve also added “syzygy” to the supermoon definition. In addition to being a great Scrabble word, syzygy (though it would cost you 2 blank tiles) is the alignment of celestial bodies—in this case it’s the alignment of the sun, moon, and earth (not necessarily in that order). Not only does a supermoon need to be at perigee, it must also be syzygy.
Syzygy happens twice each month, once when the moon is new (moon between the sun and Earth), and again when it’s full (Earth between the sun and moon). While technically a supermoon can also be a new moon, the full moon that gets all the press because a new moon is lost in the sun’s brightness and never visible, so no one cares. Since Earth circles the sun while the moon revolves around Earth, to achieve syzygy, with each orbit the moon has to travel a couple extra days to catch up. That’s why the moon reaches perigee evey 27 days, but syzygy comes every 29.5 days—the moon’s distance from earth is different with each syzygy because it comes at different points in the orbit.
The view from earth: Supermoon observed
While lunar perigee, apogee, and period are precise terms that can be measured to the microsecond, a supermoon is a non-scientific, media-fueled phenomenon loosely defined as a moon that happens to be at or near perigee when it’s full. To you, the viewer, a full moon at perigee (the largest possible supermoon) will appear about 14% larger and 30% brighter than a full moon at the average distance. The rather arbitrary consensus definition of the distance that qualifies a moon as a supermoon is a full moon that is within 90 percent of its closest approach to earth.
I really doubt that the average viewer could look up at even the largest possible supermoon and be certain that it’s larger than an average moon. And all those mega-moon photos that confuse people into expecting a spectacular sight when there’s a supermoon? They’re either composites—a picture of a large moon inserted into a different scene—or long telephoto images. (I don’t do composites, but they’re a creative choice that I’m fine with others doing as long as they’re clearly identified as composites.)
For an image that’s not a composite, the moon’s size in the frame is almost entirely a function of the focal length used. I have no idea whether most of the moons in the full moon gallery below were super, average, or small.
Can you identify the supermoon?
, Yosemite")

Well, if you said the big moon is a supermoon, you’d be right. But it’s kind of a trick question, because these are both images of Tuesday’s supermoon. The size difference is entirely a function of the focal length I used: around 100 mm for the small moon, more than 800 mm for the large one. What these images also make clear is that what I gain in moon size, I lose in field of view—you can’t have both. So when you see a wide angle scene with a huge moon, don’t think supermoon, think composite: a big moon dropped into a wide scene. Or worse still: AI. (Yuck.)
Every full moon is super
As far as I’m concerned, a rising or setting full moon is one of the most beautiful things in nature. But because a full moon rises around sunset and sets around sunrise, when most people are eating dinner or sleeping, seeing it is often an accident—maybe the moon catches your eye as you walk out of the store, or you spot it in near the horizon when your car rounds a bend. But viewing a moonrise or moonset doesn’t need to be an accident. There’s loads of information available online that will tell you which night to look for a full moon, and the general time and direction to look. And for people like me, who try to photograph moonrises and moonsets around an alignment with a terrestrial feature, there is also slightly more technical info that enables more precise planning.
About this image
Which brings me to this week’s image (images), captured Tuesday evening from my very favorite location to view a moonrise: Tunnel View in Yosemite. Why is Tunnel View my favorite moonrise location? Because I can’t think of a better combination beautiful subjects and distant view (nearly 9 miles to Half Dome), that allows me to photography the moon large with with a long telephoto lens and include a striking foreground subject. And if I just want to use the moon to accent a broader scene, the wide angle view at Tunnel View is not too shabby either.
As with most of my moonrise images, this one had been on my radar for over a year. And like many of my moonrise opportunities, I scheduled a workshop so I could share it with other enthusiastic nature photographers. But, since I don’t care about supermoons, I had no idea this November full moon would be a supermoon—and as I grew tired of hearing in the preceding weeks, the largest full moon of 2025! (Yawn.)
The way this month’s full moon set up, I was able to get my group a couple of practice moonrises from other Yosemite locations leading up the Tuesday moonrise—one with a reflection of Half Dome, and another from Glacier Point. Not only did they lear exposure and processing techniques that allow the capture of lunar and landscape detail with a single click, they got beautiful (albeit wider, with a small moon) moon images. I also demonstrated in a training session how I plot the moonrise (without using celestial plotting apps like Photographer’s Ephemeris and Photo Pills).
There’s often drama surrounding an impending moonrise as I stress about forecasts that promise clouds, or a sky filled with more clouds than forecast. This year, despite the threat of rain the following day, the Tuesday evening forecast was clear skies. And true to expectations, the entire afternoon was cloud free.
I got my group up to Tunnel View about a half hour before the moon’s expected arrival, so we all had plenty of time to get set up and settled in. About half of the group joined me on a granite slab above the Tunnel View parking lot, with the rest of the group setting up with my brother Jay and the hoards of other photographers at the wall in front of the parking lot (the standard Tunnel View vista).
I had two tripods set up: one with my (big and sturdy) RRS TVC-24L, with my Sony a7R V and 1.4X teleconverter; one with my Sony a1 and 100-400. My plan was to switch between the two bodies, and to switch out the 200-600 for my 24-105 once the moon separated from the landscape. In other words, I’d be using the a1 with the 100-400 for the entire shoot, and the a7R V with the 200-600 (first) and 24-105 (after a few minutes).
As we waited, I reminded my group that the moon would appear just a little left of Half Dome at around 4:45 (about 15 minutes before sunset), plus/minus 5 minutes. I also told my group that, depending on their camera and metering skills, we’d be able to continue photographing up to 15 minutes after sunset before the foreground became too dark to capture both lunar and landscape detail with one click. The moon arrived right on schedule, right around 4:44 and we were in business….
So maybe the best thing to come of the recent supermoon hype is that it’s gotten people, cameras or not, to appreciate the beauty of a full moon. If you like what you see, mark your calendar for every full moon and make it a regular part of your life—you won’t be sorry.
Join me in a Yosemite workshop
Workshop Schedule || Purchase Prints || Instagram
Tunnel View Moonrise Collection (Super and Otherwise)
Click any image to scroll through the gallery LARGE


, Yosemite")


Open Mind and Open Eyes
Posted on November 1, 2025

Splash of Rainbow, South Tufa, Mono Lake
Sony α1
Sony 16-35 GM II
6 seconds
F/11
ISO 100
As landscape photographers, it’s easy to arrive at a photo location with a preconceived idea of what we’re going to shoot. That’s often because there’s a single perspective that gets all the attention, dominating the images of the location shared online and skewing the perception of what its images should look like.

Stillness, South Tufa, Mono Lake
At Mono Lake, despite its sprawling layout with lake views that span 270 degrees, photographers (myself included) tend to gravitate the east-facing beach with a solitary tufa tower that resembles a battleship floating just a couple hundred feet offshore. I can’t deny that it’s a striking feature worthy of photographing, but certainly not to the exclusion of other opportunities at South Tufa.
Fortunately, since this spot is at the most distant corner of South Tufa, getting out there requires walking past most of the other views on the route. So each time I take a workshop group for its first visit to South Tufa, as I guide them out to this distant beach, I make a point of emphasizing all the possibilities along the way, encouraging them to stick with me all the way out to the battleship view, but to file away other scenes they might want to return to as they go.
But photography at South Tufa isn’t just about the views—equally important is the light. So another point I try to emphasize on that initial walk is understanding—given that there are photo-worthy views that include both lake and tufa facing east, north, and west—how much the scene will change with the direction of the sunlight. Since our first visit is usually a sunset shoot, I remind everyone how different the light will be when we return for sunrise the next morning. I point out where the sun will rise and encourage them to visualize the different light we’ll see that will opportunities in multiple directions, and to identify potential compositions that might work in that light.
Since we’d been there the prior evening, as soon as this year’s group arrived dark and early on this autumn morning, everyone scattered quickly. I brought up the rear, checking in with everyone on my walk out to the battleship tufa beach. As much as I like the scene at this east-facing beach, one challenge is that it’s in the midst of what might be best describes as a tufa garden—a collection of stubby shrubs and 10-15 foot high tufa towers—that makes it very difficult to see what’s happening in the other directions. But with a nice mix of clouds and sky this morning, I knew the potential existed for a nice sunrise and made a point of keeping my head on a swivel to avoid missing something in the other directions.
About 15 minutes before sunrise I noticed the clouds in the west start catching light, and shortly thereafter the Sierra peaks in the same direction lit up. I let the near me know that this might be a good time to wander over to the other side of the tufa garden and headed in that direction. The walk to the other side is probably less than 100 feet, but by the time I got there the light on the base of the clouds had intensified significantly. And much to my amazement—given that there was no sign of rain here, nor any rain at all forecast for the area that morning—realized that a splash of rainbow was perched atop the hills across the lake.
Not knowing how long the rainbow would last, I ran around hailing as many in my group as possible, and we all went straight to work trying to make a photo before it went away. I’m a strong proponent of finding compositions where all the elements work together, which is no small feat at South Tufa, given all the randomly situated tufa towers and rocks jutting from the water. Fortunately, as I moved around trying to organize all the visual elements in my scene, not only did the rainbow seem to be waiting for me to finish, it actually intensified as I did it.
It probably didn’t take more than a minute or two, but it felt like forever before I found a composition that satisfied me. As you can see, this rainbow was never destined to be the main subject—at its best it was simply a colorful accent to an already beautiful scene. But what an accent it was.
In addition to the distant rainbow and sunlit clouds, the other important elements I needed to organize were primarily in my foreground: the tufa peninsula jutting in from the left; the small tufa island at my feet, the submerged tufa stones; and (especially) the reflection.
To make all this work together, I started by centering the little island in my frame, and balancing the rainbow with the tallest spire of the peninsula. With the scene left/right balanced, I decided I need to get my boots muddy and set my tripod in shallow water to turn the foreground tufa into an actual island. Since the best clouds were fairly low, I only included enough sky to include them (by putting the top of my frame where I did, viewers can infer that the clouds stretch much farther than they did), and was careful not to put the little blip of tufa on the far right too close to the edge.
Now for the reflection. I didn’t really care for the empty water between the reflection and the little island, so I slowly dropped my tripod, keeping an eye on my LCD and stopping when the reflection filled almost all of that watery void. I put on my Breakthrough 6-stop dark polarizer to smooth the water, and it to reveal the interesting detail on the lakebed without erasing the colorful part of the reflection. Finally, I focused on the small rocks just beyond my foreground island, and clicked.
This is not a scene I’d have normally gravitated to, but I was drawn by the light (and stayed for the rainbow). Had I not seen the rainbow, I’m not even sure I’d have taken the time to build the composition I ended up with, but this is just one more reminder that if you open your mind and your eyes, things just have a way of working out.
Workshop Schedule || Purchase Prints || Instagram
Mono Views
Click any image to scroll through the gallery LARGE


