Nature is only as random as our ability to understand it
Posted on June 11, 2013

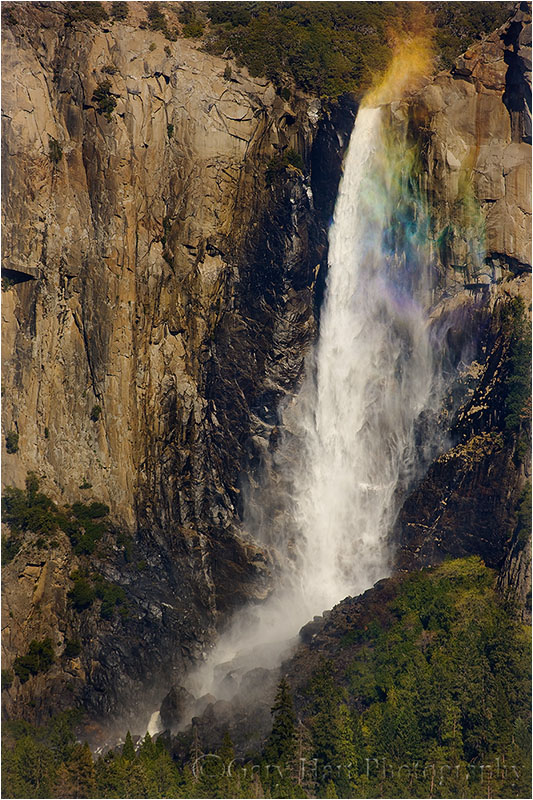
Double Rainbow, Tunnel View, Yosemite Valley
Canon EOS-1Ds Mark III
1/5 second
F/16.0
ISO 100
17 mm
Louis Pasteur said that chance favors the prepared mind. It was one of Ansel Adams’ favorite quotes. But, as appropriate as the quote is, I’m sure Adams cited Pasteur only after enduring countless “Wow, you were so lucky to be there for that” reactions.
To the casual observer, nature’s wonders do indeed feel random. Who doesn’t feel lucky when a full moon pops over the mountains just as the monotonous highway bends east, or when dirty snow and bare trees are suddenly glazed in white by an unexpected snowstorm? (Or when Yosemite Valley is suddenly framed by an arcing double rainbow?) But there’s nothing random about any of these phenomena. Some natural phenomena can be predicted with absolute precision—for example, it’s easy to pinpoint the position and phase of the moon for any location and time, past or future. And while weather can sometimes (usually?) appear random, every weather condition, from temperature to the most violent storms and purest blue skies, is a precise function of atmospheric conditions, ocean currents, and terrain; we perceive weather as random only because its complexity overwhelms our current capabilities.
Nature photographers should feel blessed by these natural wonders over which we have no control, but our good fortune is not random. By taking the time to understand our subjects and study our environment, we do our best to anticipate image-worthy events. While we can never guarantee that the sky will be clear enough to reveal the rising moon we counted on, or that the predicted convergence of moisture, temperature, and barometric pressure will manifest to transform our world from crusty brown to pristine white (or that the setting sun will find the perfect path to the falling rain), we can put ourselves in position to be there when it happens.
None of this stuff makes me unique—though we all approach our photography in our own way, most successful nature photographers do everything they can to minimize the randomness in our efforts, to maximize the chance for “special.” My own path was fairly organic. My entire life, beginning long before my first camera, I’ve been drawn to science, to the how and why of nature. As a child I devoured books by Herbert S. Zim and Isaac Azimov (he wasn’t just a science fiction writer). In school I took every possible astronomy, geology, meteorology class. I even started college as an astronomy major, then geology, before the (necessary) quantification of the concepts I loved so much threatened to sap my passion (that is, I couldn’t handle the math beyond calculus). Fortunately my passion survived and I’ve been able to find a career that rewards me for understanding and anticipating natural phenomena. (It hardly seems like work.)
About this image
Which brings me to today’s Yosemite Valley rainbow image, an incredible stroke of good fortune that I (proudly) take credit for anticipating. This was a May evening a few years ago. May is usually the beginning of California’s interminable blue sky summer, but this year a persistent low pressure system that had set up camp off the coast pumped daily impulses of moisture into Northern California. I was in Yosemite to meet a private workshop customer and his girlfriend for dinner so we could plan the following day’s photo tour of the park. That afternoon’s drive from home had been a mixture of sun and showers; I entered Yosemite Valley in the midst of a steady rain that had been splashing my windshield for at least thirty minutes. But despite clinging rainclouds that obscured the surrounding granite walls, I knew the broken sky I’d recently driven through was headed this way and would probably arrive before sunset, about two hours away—and with that clearing would come the potential for openings that could allow sunlight to reach the still falling rain. With the sun already low and dropping, and its angle pointing any Tunnel View shadow in the direction of Yosemite Valley, I had the potential for all the rainbow recipe ingredients.
But of course I had dinner plans, and no phone number to reach my customers. So I beelined to Yosemite Lodge to meet them as planned, plotting my sales pitch the entire way. I was pleased to find them waiting when I arrived—while in my mind I was jumping up and down, pointing and shouting (“Rainbow! Soon! Hurry!”), I maintained the illusion of calmness through our introductions, then explained as cooly as possible that there was a chance for a rainbow, if they were interested. Fortunately they were open to the change of plans and I wasn’t forced to resort to begging.
On the twenty minute drive back to Tunnel View I’d calmed enough to remind myself that we could very well be chasing wild geese and did my best to moderate their expectations, explaining that a rainbow is far from a sure thing, and that what we’re doing is merely putting ourselves in position in the event that does happen.
At Tunnel View the rain was still falling, but I could see signs of clearing to the west. So far, so good. I guided my customers to my favorite Tunnel View vantage point, above the parking lot and away from the crowds, where we sat on the granite in the rain and waited. Despite their positive attitude, as the cold and wet began to seep in, it dawned on me that convincing new customers to skip dinner to sit in the rain isn’t the most sound business strategy.
The view of had opened considerably from what it had been when I first pulled into the valley, so I encouraged them to go ahead and shoot, rainbow or not. I really can’t remember how long we waited—long enough to get pretty soaked—before a shaft of sunlight broke through to illuminate the rain falling along the north rim of the valley, for about five minutes painting a vivid partial double rainbow in front of El Capitan and disappearing into the clouds above Half Dome. Yay! While this wasn’t a complete rainbow (only one pot of gold), it was definitely the nicest rainbow I’d ever seen at Tunnel View and we clicked without a break until the rain stopped and the rainbow faded.
When the show was over we just sat and marveled at the view, giddy about our good fortune, completely oblivious to the dark cloud approaching from behind. As quickly as the rain had stopped a few minutes earlier, it returned, this time with a vengeance, coming down in diagonal sheets (visible across the top of the frame above). Behind us and out of sight the sun had almost completed its journey to the horizon and, rather than being blocked by clouds as it had been earlier, was able to slide its final rays beneath them to completely illuminate the rain falling across the valley’s breadth. The rainbow appeared almost immediately, intensifying to quickly become a double bow connecting Yosemite Valley’s north and south walls. It lasted so long that I actually started running out of compositions.
We had a great day the next day, but nice as it was, the photography was a bit anticlimactic. Much like starting the Fourth of July fireworks show with the “grand finale” extravaganza, I realized that it would have been nice to have arranged for the rainbow to appear at the end of our session. Back to the drawing board.
It’s geek to me
Posted on June 2, 2013
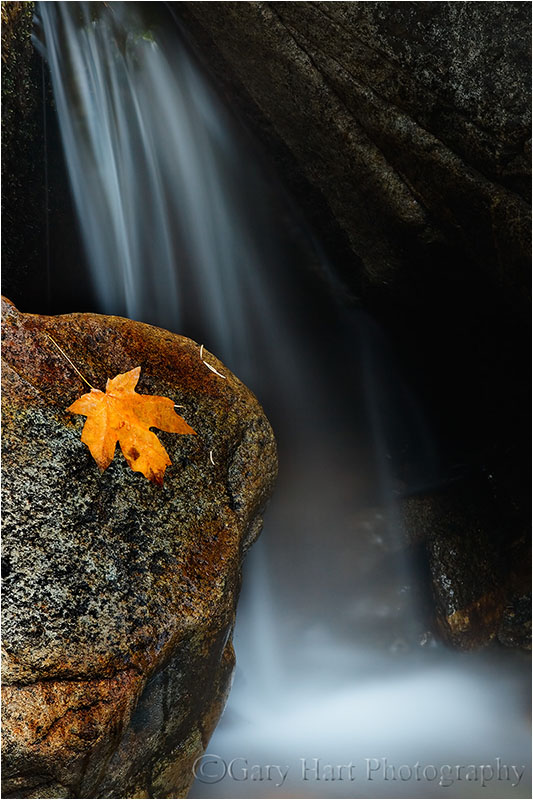
Autumn Leaf, Bridalveil Creek, Yosemite
Canon EOS-1Ds Mark II
20 seconds
F/25.0
ISO 100
168 mm
While it would be silly to pretend that digital photography hasn’t changed my photographic life, at heart I’m simply a film shooter with a digital camera. If you read my writings or have attended my workshops, you’ve no doubt heard me say that photography, at any level, must be a source of pleasure. How each of us derives our pleasure varies greatly, from what we shoot, to how we shoot, to what we do with (to) our images after we shoot them. From what I’ve observed, many photographers relish their time at the computer, scrutinizing corner sharpness, high ISO shadow noise, and working Photoshop magic to take their images to the next level. I’ve always been so much happier outside, simply enjoying, and making pictures of, the things I love—the computer, while necessary, always feels too much like work.
That’s probably because I came to photography as a career after twenty-plus years in the high-tech industry. During those twenty years my time with my camera was pure pleasure, a creative escape from the technical geek-speak of my everyday life—what would be the point of leaving a good job with a great company (Intel) only to turn my joy into just another job? So when I decided to take the full-time photography plunge, it was with the very conscious personal commitment that I’d only photograph what I want to photograph, the way I want to photograph it. For me that means the natural light, color landscapes that I’d been photographing since the first shutter click of my Olympus OM-2, over thirty years ago: no people, no wildlife—basically, nothing that moves.
Ensuring my photographic pleasure also means doing things the way I’ve always done them: in addition to all natural light (I’m probably the only pro photographer alive who doesn’t own a flash), I choose to do no multi-image (HDR, manual blending, stitching) captures. I also rarely deviate from the 35mm 2/3 aspect ratio I was weaned on. But that’s just me. And just because I don’t do it, doesn’t mean I don’t marvel at other photographers’ monochrome, HDR, and artificial light wizardry.
I’ve also grown to become a huge fan of Photoshop, and the control it gives me: After all those years envying black and white shooters for their darkroom magic, it’s nice to see the playing field leveled a bit for us color shooters. In fact, many of my most successful images wouldn’t have been possible with the color transparencies I shot in my OM-2 days. But ultimately, despite Photoshop’s power, I still want my creativity to be in my camera, not my computer. On the other hand, I have no problem with photographers who use Photoshop creatively (as long as they do it honestly).
What I do have a problem with is the people who have so thoroughly embraced photography’s technical side that not only have they lost their joy, they seem bent on sapping the joy from anyone with a different idea or approach. These are the blog posters and forum contributors who will go to the mat for Canon vs. Nikon, Nik Dfine vs. Noise Ninja, or whatever their technical pulpit might be (I once witnessed a heated online debate about how to sign a print). So here’s a tip: If you find yourself arguing with somebody about some piece of photographic minutia, step away from the computer (these things rarely happen face-to-face), grab your camera, and go take some pictures. In other words, turn off your inner geek and connect with your creative side—the world (yours and mine) will be a better place for it, I promise.
I had no illusions of making money when I snapped the autumn leaf in this post. Nor was I wringing my hands about about shadow noise or corner sharpness. I was simply doing what I love, in this case scrambling on creekside rocks in the forest beneath Bridalveil Fall on a crisp autumn morning. Completely alone among rocks, leaves, and gentle cascades, I knew I was surrounded by far more images than I’d ever be able to find. The emotion I feel at these times is closer to the pure joy of a childhood Easter-egg hunt than anything else I experience in my adult life, and it’s no different from the feeling I used to experience when I was out with my Olympus. I never want to lose that.
Yosemite Photo Workshops
Autumn in Yosemite


Roads less traveled
Posted on May 28, 2013
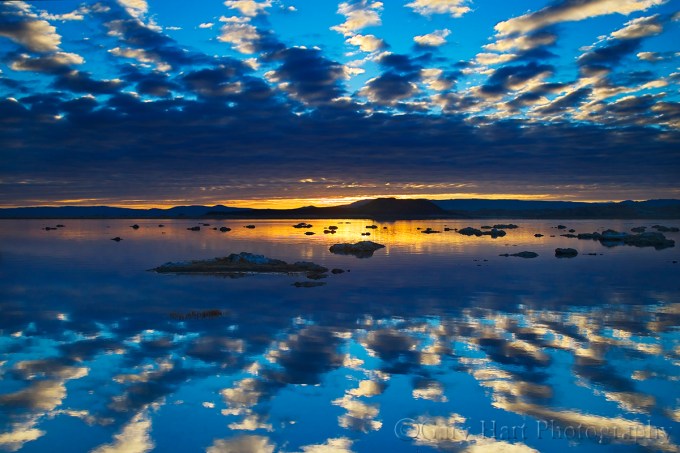
Sunrise Mirror, Mono Lake
Canon EOS-1Ds Mark II
1/60 second
F/10.0
ISO 200
32 mm
Sometimes our best opportunities arise when circumstances nudge us off our charted course.
One day earlier…
The morning before capturing this sunrise I’d been one of hundreds of photographers shoulder-to-shoulder on the beach at Mono Lake’s South Tufa. Competing with the thousands of photographers who flock to the Eastern Sierra to photograph the golden aspen each October, my brother and I were the first persons out there that morning, claiming our spots and waiting in the cold and dark for the sun. As expected, other photographers soon started accumulating—rather than finding their own scene, many simply assumed that my tripod meant I knew what I was doing and set up next to me. (Some didn’t even bother to pretend to study the surroundings first.)
By the time the sunrise started in ernest, I must have accrued thirty photographers, packed so tightly on both sides that if one had tipped over the rest would had collapsed in sequence like a row of dominos. The morning culminated with two of my newfound “companions” nearly coming to blows over a couple of square feet of lakeside real estate. Ahhh, the joys of communing with nature.
Channeling Lewis and Clark
The original plan was to return to South Tufa the following morning, our last at Mono Lake. But hoping to avoid that morning’s train wreck, Jay and I spent the afternoon exploring the tangled network of overgrown, rutted dirt roads encircling the lake, searching for other possibilities. For sunset we ended up somewhere on the north shore, traipsing about a half mile through (first) volcanic sand and (ultimately) shoe-sucking mud to an absolutely empty beach. In the days before ubiquitous GPS capability, we knew finding that very spot again, in the dark, would be nearly impossible, but it was pretty clear that the potential out there was off the charts regardless of where we landed.
So, despite a weather forecast that called for cloudless (boring) skies and temperatures in the 20s, on our final morning we rose dark and early and bounced behind my headlights through the sagebrush, in the general direction of yesterday’s discovery. When we found a spot wide enough to park we grabbed our gear and set out in the general direction of the lake, with no idea where we were or whether we’d made a mistake attempting this new location.
The eastern horizon was just starting to brighten as we slogged up to the lakeshore. Absolute calm had smoothed the lake to glass; from the Sierra crest behind us a formation of clouds had started to advance overhead. As the light came up the clouds continued their forward march, eventually spreading a herringbone pattern from horizon to horizon. Somehow we’d inadvertently stumbled upon the convergence of location and conditions photographers dream about.
The image you see here came fairly late in the shoot, after the sun crested the horizon. I used a 3-stop graduated neutral density filter to hold the brightness back to a manageable level, underexposing the sky even further to prevent the exquisite color from being washed out. This image has become one of my most popular, even gracing the cover of my book of images, “The Undiscovered Country.” But every time I look at it, I think first of that morning that never would have happened had we simply settled for the conventional choice.
Workshop Schedule || Purchase Prints
Reflections


Fire at will
Posted on May 20, 2013

Poppy Pastel, Sierra Foothills, California
Canon EOS 5D Mark III
1/125 second
F/4.0
ISO 400
100 mm with 12mm extension tube added
Maximize your investment
I clicked 54 versions of this scene (I just counted). I’m usually a pretty low volume shooter, sometimes not taking 54 pictures on an entire trip. And I have to admit, after years as a film shooter, the whole digital “fire at will” paradigm took some getting used to. But I’ve finally reached a place where I have no problem firing 54 frames in 30 minutes when the scene calls for it. The light came on for me when I realized that, while in my film days every single click cost money, with a digital camera, every click increases the return on my investment (the more images I have, the less per image my camera cost).
For example
These poppies were just a small handful of the thousands coloring a steep hillside near the Mokelumne River in California’s Gold Country. I’d been working the area for a couple of hours, using various combinations of macro, telephoto, and extension tubes to isolate and selectively focus poppies with various foreground/background relationships. I spent about an hour futzing around with compositions, occasionally stumbling upon something decent, but more often than not moving on to something else after a handful of mediocre frames. But the longer I worked, the more productive I became and the more I started seeing things the way my camera saw them.
The late afternoon sun that I’d been working with (and around) had just about left the scene when I decided to shift from one patch of poppies to similar patch about twenty feet away. I’d been concentrating on extremely close shots (inches from my subject) with at least 36mm of extension on my 100mm macro and 70-200 lenses, but when I saw this trio of poppies on (more or less) the same plane, I immediately pictured a slightly wider scene featuring this group sharp against a blurred background of poppies and grass.
Cutting back to a 12mm extension tube on my macro lens, I started with a wide aperture to limit the depth of field and spread the grass into a textured green canvas. With a slight breeze intermittently nudging the poppies, I switched to ISO 400 (in the few frames where I went smaller than f5.6, I bumped up to ISO 800). The preliminaries out of the way, I went to work refining my composition, framing the more or less centered foreground (sharp) poppies with the soft orange background poppy splashes.
Given the minuscule margin for error, I can’t imagine shooting something like this without a tripod. With my tripod I was able to use live-view to ensure precise focus, after each click evaluating everything from sharpness to exposure to composition, all with the security of knowing that the shot I’m reviewing is still sitting right there in my viewfinder, just waiting for whatever refinement I deem necessary.
Fifty-four frames later….
They don’t all have to be winners
Not only should you not be shy about shooting, your goal for each shot doesn’t necessarily need to be a “keeper” image. Often the purpose of a frame is to simply move you toward that keeper image. Sometimes that means a tangible improvement, but many times it’s just an education because nothing fosters creativity better than taking an “I wonder what happens if I do this” approach (followed by an effort to actually understand what happened). On the other hand, indiscriminate clicking (“The more I shoot, the better the chance I’ll find a keeper when I get home”) will wear out your camera faster than it improves your photography. In other words, shoot a lot, but make each shot serve a purpose.
Each frame that afternoon was a little different from the one before it: nearer, farther, up, down, left, right, more DOF, less DOF. While each wasn’t necessarily an improvement over the preceding frame, at the very least it advanced my understanding of the scene and gave me ideas for the next frame. And each gave me a variety of options from which to select when I could review and compare everything on a 27″ monitor. It was also lots of fun.
A Poppy Gallery
Click an image for a closer look and slide show. Refresh the window to reorder the display.


Photograph Yosemite’s weather
Posted on May 16, 2013

Valley Mist, Yosemite
Canon EOS 5D Mark III
1/10 second
F/11.0
ISO 100
80 mm
If you’re not prepared to miss a little sleep, get a little wet, or feel a little cold, you probably won’t make it as a Yosemite photographer. Last week Yosemite received daily doses of unusual (for May), but most welcome, rain. But those hardy few who endured the slippery rocks, soggy clothes, and wet gear, were rewarded with a variety visual treats that the comfortable masses never got to see.
When I’m shooting for myself (no scheduled workshop or personal guided tour), I only visit Yosemite when I expect something interesting in the sky. Sometimes that simply means a special moonrise, but usually it’s the promise of a storm that draws me.
Fresh snow
Yosemite is never more spectacular than it is with a coat of fresh snow draping rocks and branches. But if it’s fresh snow you’re after, you pretty have to be in Yosemite during the storm—even those who live in the Bay Area or Southern California are too late if they leave for Yosemite the second they hear Yosemite got snow. That’s because temperatures in Yosemite Valley during a snow storm are usually in the mid-30s—the melting starts as soon as the snow stops, and within hour or so of the sunlight hitting the snow, the trees have shed their white veneer. And while Yosemite Valley’s snow often remains on the ground for days, rapidly accumulating footprints and dirt quickly rob it of its pristine appeal.

Winter Reflection, El Capitan reflected in the Merced River, Yosemite
During the storm
Storms in Yosemite often submerge the entire valley in a dense, gray soup, sometimes obscuring all but the closest trees and rocks. The narrow contrast range makes this kind of photography perfect for intimate, moody scenes, more than enough to keep me occupied while I wait for the storm to clear.

Bridalveil Dogwood, Valley View, Yosemite

Elm in Blizzard, Cook’s Meadow, Yosemite
Clearing storm
A clearing storm is Yosemite’s main event. Photographers have been capturing them for as long as cameras have been in the park, long before Ansel Adams. Tunnel View’s elevated vantage point offers the best combination of easy access and photogenic scene, making it by far the most popular location to photograph Yosemite’s clearing storms. Because Yosemite’s weather clears from west to east, Tunnel View is where Yosemite Valley clears first; it’s where I usually wait out a storm. Tunnel View is also the best place to find a rainbow if you’re lucky enough to be there when the afternoon sun breaks through before the storm is done with the rest of the valley.

Double Rainbow, Tunnel View, Yosemite
The problem with starting your Yosemite clearing storm shoot at Tunnel View is that it’s so spectacular, with conditions changing by the minute, that you may never leave. And that costs you a lot of opportunities to get some equally spectacular images at other, less photographed locations. When I’m by myself, leaving Tunnel View during a clearing storm is like ripping off a bandaid—it really hurts, but I’m always glad I did it. When I’m leading a group it’s an invitation to mutiny, but they usually come around when they see what they’d have missed had I not cracked the whip.
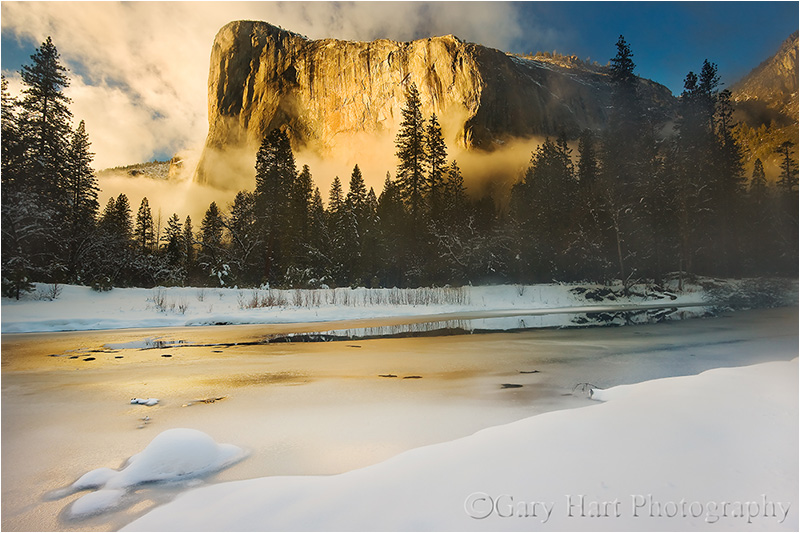
Winter Sunset, El Capitan, Yosemite
Be prepared
In the back of my car is a gym bag with all my wet weather clothing: wool gloves (wool will keep you warm even when it’s wet), a hat that covers my ears, at wide-brim waterproof hat for rain, a light rain parka (it goes over whatever jacket I’m wearing), waterproof over-pants, an umbrella, extra socks. It’s always there. With this gear and my waterproof boots, I can stay dry and cozy warm in the wettest weather.
The biggest problem photographing in weather isn’t keeping myself comfortable, it’s keeping my camera dry. While I do my best to keep my camera dry, I don’t really worry about a little rain on my camera or lens—the weather seal seems to be good enough for a light to moderate rain. And if I’m going to be standing in the rain for any period of time, I’ll put a plastic garbage bag over my camera and tripod. I usually keep a box of garbage bags in my car, but the trash liner or dry cleaning bag from the hotel room works just as well. The final piece of my wet weather ensemble is a towel, usually borrowed from my hotel room (just don’t forget to return it).
When it’s time to shoot, all of my effort goes to keeping water off the front of my lens. A lens hood helps in light, vertical rain, but I find them more trouble than they’re worth (I know this is blasphemy to some photographers, but the steps I take to eliminate lens flare are a topic for another day). Because I don’t own any kind of waterproof lens or camera cover, the umbrella I pack isn’t for me, it’s for keeping my lens dry when I’m shooting. The umbrella is usually sufficient, but when the rain is really coming down, and/or blowing in my face, I don’t even worry about water while I compose, meter, and focus. When I’m ready to shoot I dry the lens with my towel and click.
Getting to Yosemite during a storm
My favorite route into Yosemite is Highway 140, through the Arch Rock entrance. While that’s no more than personal preference most of the time, it’s downright essential when weather threatens. All the other three routes into Yosemite—41 from Fresno, 120 west from Manteca, and 120 east from Lee Vining (closed in winter)—climb over 6,500 feet and are frequently subject to ice, snow, chain requirements, and even closure. But the highest point on Highway 140 is Yosemite Valley. At only 4,000 feet, it’s much less likely to have weather problems.
Regardless of your route into the park, in winter you’re required to carry chains in Yosemite, even if you have four-wheel drive. You may be asked to show your chains when you enter the park, especially if weather threatens, and will be turned away without them. And if you’re in Yosemite Valley without chains and a chain requirement goes up, you can count on encountering a checkpoint—if that happens you’re pretty much stuck there until the requirement is lifted.
Today’s image
The image at the top of this post was captured last week, during a light rain at Tunnel View. My original sunrise plan was for a different location, but it was soon clear that we’d get no sunrise color that morning so I detoured my workshop group to Tunnel View. This was our first morning, and therefore our first opportunity to photograph a clearing storm—it turned out that we had many more opportunities during the workshop, but we were all pretty excited by what we saw as the light came up and the clouds lifted that morning.
I only clicked a handful of shots, mostly to demonstrate the composition variety Tunnel View offers. (Yosemite neophytes tend to spend too many clicks on the wide frames, and I want to show them that there are lots of tighter compositions possible too.) I don’t shoot black and white, but several people in the group had great success converting images from that shoot to black and white.
(More) Yosemite spring reflections
Posted on May 13, 2013

Dogwood and Pine, Valley View, Yosemite
Canon EOS 5D Mark III
1/20 second
F/11.0
ISO 800
131 mm
I just wrapped up two Yosemite spring workshops, four and five day visits separated by less than two weeks. What struck me most about these two workshops was, despite pretty similar conditions (maximum waterfalls, green meadows, blooming dogwood, and lots of people), how the tremendous difference in weather dictated a completely different approach to photographing Yosemite Valley.
In the first workshop our weather was fairly static, with a nice daily mix of clouds and sun that allowed me to plan shoots early in the day and pretty much stick with the plan throughout the day. We had a couple of night shoots, including one night photographing a moonbow (lunar rainbow) at the base of Lower Yosemite Fall. A particular highlight for this group was the variety of daylight rainbows on Bridalveil and Yosemite Falls. These rainbows appear with clockwork reliability at various viewpoints when the sun is out. Getting the group in position to photograph them is a particular source of personal pleasure (that makes me appear far smarter than I actually am).
Spring Rainbow, Bridalveil Fall, Yosemite
In the second workshop we received rain each day, rarely a downpour, but frequently heavy enough to cause me to alter our plans, sometimes completely ad-libbing locations at the last second based on what I saw the conditions. With rain comes clouds, to our detriment when they dropped low enough to obscure the view, and to our great advantage when they parted enough to accent Yosemite Valley and frame the soaring monoliths and plunging waterfalls everyone had traveled to photograph. And because Yosemite’s clearing storms such are a rare treat, this group made frequent (and productive!) visits to Tunnel View as wave after wave of rain and clearing passed.

Clearing Storm at Twilight, Yosemite Valley
Another, more subtle, difference between the two workshops was the state of the dogwood bloom. The April group caught the dogwood just as it started to pop out, while the May group found the dogwood far more mature. Ample sunlight allowed the April group to concentrate on backlit flowers and leaves, and the freshness of the blooms provided lots of intimate compositions featuring one or two flowers.

Solitary Dogwood Bloom, Pohono Bridge, Yosemite
In May the blooming dogwood was more widespread, but many of the flowers were a bit tattered. With heavy overcast and a persistent breeze, close portraits were difficult (but not impossible), so I encouraged the group to concentrate more on larger, more distant dogwood scenes.
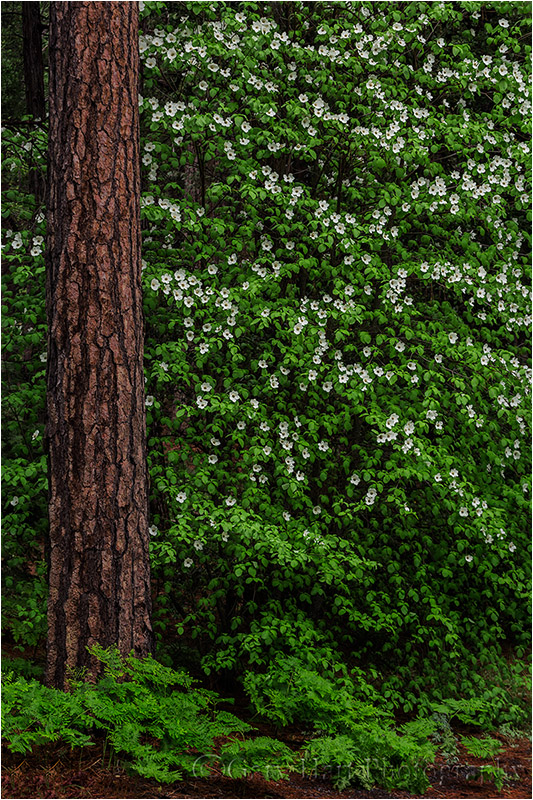
Dogwood and Pine, Valley View, Yosemite
On the drive home from the May workshop I reflected a bit on the two workshops and was glad I didn’t have to choose a favorite. With summer almost upon us, as Yosemite’s skies clear, its waterfalls dry, and the tourists swarm, I have plenty of images and memories to hold me over until fall, when my next “favorite” season will deliver an entirely different set of new opportunities.

Sunset Reflection, Half Dome and Mirror Lake, Yosemite
* * * *
I do it all over again next spring, April 11-14 and May 11-14.
A study in contrast
Posted on May 9, 2013

Clearing Storm in Twilight, Yosemite Valley
Canon EOS 5D Mark III
30 seconds
F/4.0
ISO 800
47 mm
I’d billed my just completed Yosemite spring workshop as a crescent moon workshop. The plan was (among other things) to photograph a crescent moon rising above Yosemite Valley in the pre-sunrise twilight on consecutive mornings. This spring waning crescent is one of my very favorite Yosemite phenomena, something I try not to miss each May (when it aligns best with Half Dome from the most accessible locations). But Mother Nature had other ideas. Instead of the reliably clear skies California typically enjoys in May, this year a stubborn low pressure system parked off the coast and pumped moisture into Northern California. But despite a pessimistic forecast that called for rain and lots of clouds, my hardy group rallied at 4:45 each morning to be in place in the unlikely event the moon showed.
For our first morning I’d plotted a location beside the Merced River to photograph a 12% crescent moon that would appear from behind Half Dome just before 5:15. But we pulled up to the spot to find that the clouds had swallowed Half Dome; we didn’t even get out of the cars. Instead we hightailed it to Tunnel View for the first of what would become many Yosemite Valley clearing storm experiences (that most Yosemite visitors can only dream about). By the time we arrived the sky had brightened significantly, the clouds above Half Dome had started to part, and wisps of mist swirled on the valley floor beneath Bridalveil Fall.
My plan for our second morning was to start at Tunnel View at around 5:00, exactly one hour before sunrise. I knew a 6% crescent moon would crest Sentinel Dome (between Half Dome and Cathedral Rocks) at 5:13 (+/- a minute or so), and wanted to give everyone enough time to set up in the dark. It was still quite dark when we arrived, with just enough light to know something special was happening in Yosemite Valley. I hustled everyone to the wall and assured them that their cameras would be able to accumulate enough light to reveal far more detail than our eyes could see.
To give you an idea of how dark it was when we started shooting, the image at the top of page is a 30 second exposure at f4 and ISO 800. If the sky had been clear when I clicked this frame, the moon would have been balanced atop Sentinel Dome, almost exactly as it was in May, 2008 (below). Contrast the above clearing storm exposure settings with the settings for my crescent moon image below: 5 seconds at f7 and ISO 200. Both were almost exactly 45 minutes before sunrise, but in the crescent moon image I intentionally underexposed the scene to hold the color in the sky (washed out to my eyes by the rising sun), hide foreground detail, and etch the distinctive outline of Half Dome and Sentinel Dome in silhouette. The clearing storm image, on the other hand, is actually slightly overexposed to reveal beauty hidden by the darkness in Yosemite Valley.

Lunar Kiss, Half Dome and Sentinel Dome, Yosemite
So if there’s a single takeaway from these two images, it’s that just as with our composition decisions, our exposure settings are creative choices allowing us to express the world in ways that are different, but no less true, than the human experience. Photography is most powerful when it can expand our perception of reality to reveal unseen or overlooked aspects of nature, whether it be the simple shapes of Yosemite Valley, or the hidden world before the sun.
A few words about night sky color
Before the inevitable “that color isn’t natural” comments, let me strike preemptively by addressing the common misconception that color is an inherent, exclusive quality of an object or scene. While color is indeed a defining characteristic, of equal importance is the light illuminating an object or scene. Just as the sky is blue at noon and orange at sunset, every scene in nature changes color throughout the day.
Color becomes a bit more problematic at night, when there isn’t light enough light for the cones in our eyes to register color. But that doesn’t mean the color isn’t there. Camera’s have many disadvantages compared to human vision, but one area where a camera excels is its ability to accumulate light. Using this capability, photographers can reveal a scene’s natural color by brightening the scene far beyond the human experience.
The night side of Earth is simply shadow, much like standing behind a tree (an extremely large tree). And as with the world behind a tree, all direct sunlight is blocked, leaving the shaded area illuminated solely by reflected light. Because sunlight’s shorter, violet and blue wavelengths are more easily reflected (sunlight’s longer wavelengths pass straight through to illuminate and warm Earth’s sunlit side exclusively), they’re the only wavelengths left to illuminate Earth’s night side. So, while the night sky looks black to our eyes, it is in fact quite blue. (And we have the images to prove it.)
Pictures, pictures everywhere
Posted on May 3, 2013

Single Dogwood, Pohono Bridge, Yosemite
Canon EOS 5D Mark III
1/40 second
F/9.0
ISO 400
400 mm
I’m always telling my workshop students that there are pictures everywhere, that we’re only limited by our ability to see them. How many shots have we just walked by because we were so focused on the larger world, or because we were simply distracted by life? But sometimes I need to be reminded to listen to my own words.
Last week in Yosemite I gave my group a couple of hours to explore the dogwood blooming above and beside the Merced River near the Pohono Bridge. After a brief orientation, I told everyone to be back at the cars by 5:00, then set them free. A few minutes before 5:00 I was back at my car waiting for the others to return; as I started to pack up my gear I noticed a single dogwood suspended no more than fifteen feet from the road. The breeze had eased somewhat, and I already had my 100-400 lens on my camera, so I figured, what the heck.
I started by setting up my composition, positioning myself so the branch moved diagonally from one corner of the frame to the other, and zooming as close as possible to eliminate peripheral distractions and soften background distractions. I placed the bloom in one of the rule-of-thirds “hot-spots,” and raised my tripod to allow a downward view into the flower’s still intact central cluster (older dogwood blooms tend to look raggedy at their center, but this one was still nice). I spot-metered on the bright flower, setting my exposure to one stop over a middle tone—the flower was actually a little brighter than this, so slightly underexposing like this set the bright flower against a nice dark background. With everything else in place I live-view focused on the central cluster.
I started with f5.6 (the lens’s widest aperture at that focal length), but quickly realized that focused as close as I was, the background was still nicely blurred at smaller apertures. So for the next five minutes or so I kept my composition but dialed in different apertures in (mostly) one stop increments. This is one of the things I love most about photographing with a tripod, this ability refine an earlier shot without having to reconstruct the composition each time. In this case I just counted f-stop/shutter dial clicks without even looking through my view finder before snapping the next frame: 3 clicks (one stop) less f-stop light + 3 clicks more shutter speed light. When I got concerned about the breeze, I replaced my shutter speed adjustment with an ISO adjustment. As I worked the rest of the group started to tickle in and I was able to share my process with those who were interested (I love the large LCDs and live-view for training).
When I got my images on my big screen at home I had a dozen or so versions of the same composition to select between, each with a different f-stop, shutter, ISO combination (but all with the same exposure). I selected this one because it’s sharp (a few images suffered from slight wind blur), and it has the best combination of foreground DOF and background blur. (The soft circles in the background are distant flowers and backlit leaves.)
Based on “Likes” and comments, these intimate scenes are rarely as popular as the vivid, dramatic landscapes, but in many ways the make me happier because they’re an opportunity to rally my creative and logical instincts toward an image that’s uniquely mine. And it’s these little scenes that make me wonder how many images I’ve left behind simply because I was too lazy to set up my camera, was focused elsewhere, or simply just in a hurry to move on.
Spring in Yosemite
Posted on April 30, 2013

Dogwood Branch, Pohono Bridge, Yosemite
Canon EOS 5D Mark III
1/200 second
F/5.0
ISO 400
150 mm
People ask all the time for my favorite season in Yosemite, and I really can’t give them an answer that doesn’t sound like a press conference by a waffling politician—there are things I love about each season in Yosemite, so asking me to choose is like asking me to pick a favorite child.
But what I can do is tell you what I like about each season, and I’ve always felt that spring in Yosemite is the most consistently photographable—it doesn’t really matter what the conditions are, I can always find something to photograph. In my workshop last week we had lots and lots of blue sky, nice for tourists but usually death to photographers, but we didn’t skip a beat.
Spring is when Yosemite’s waterfalls peak, and Yosemite Valley starts to green up. Many of the meadows are home to ephemeral pools that reflect Yosemite’s iconic monoliths, soaring cliffs, and plunging waterfalls. And with all the water in the falls, spring sunshine means rainbow opportunities from many spots if you know when to be there.
Maybe my favorite spring sunshine treat is the dogwood, which is great in full sun—just put the sunlit blooms against a dark background, expose for the flower, and go to town. And the translucence of backlit dogwood give them a luminosity that appears to originate from within. Either way you shoot it, front or back, dogwood in full sunlight allows shutter speeds that can largely mitigate frequent spring breezes.
My general approach to photographing dogwood is to start with a bloom, group of blooms, or entire branch, that I can isolate from surrounding distractions. Once I identify a likely candidate, I maneuver myself until I can get the subject against a complementary background—other dogwood, water, shaded (dark) evergreens. I usually opt for a shallow depth of field to eliminate or smooth distractions.
This branch of dogwood blooms was just one of many waving above the Merced River at the Pohono Bridge. I was able to isolate it against another similarly festooned branch in the background, and used a fairly large aperture to soften the background branch just enough to keep it recognizable (without making it a distraction). Exposing for the sunlit blooms darkened the Merced River in the distant background, allowing the brighter dogwood to stand out even more.
The biggest problem I had working this image was the gusting breeze, which blew quite strongly most of the time, often waving the branch completely out of my frame. But I found that by setting up my composition (on a tripod!) and exercising a little patience, the wind would eventually subside for a few seconds, allowing me to fire off a couple frames, sometimes even with enough time for quick adjustments in between.
All I want for Christmas….
Posted on April 27, 2013

Lunar Rainbow, Lower Yosemite Fall, Yosemite
Canon EOS 5D Mark III
15 seconds
F/4.0
ISO 800
26 mm
I returned late last night (well, early this morning) from my 2013 Yosemite Moonbow and Wildflowers photo workshop will lots of great new images and two fewer teeth. True story. The images I can verify; the teeth you’ll need to take my word for. Read on.
Chapter One: In the big inning
Twenty years ago I lost my two front teeth in a freak umpiring accident. Snapped off at the gum line, if you must know. (Nobody ever fouls a pitch straight back in slow pitch softball. Or so I believed.)
The visiting team was rallying in the last inning, with the tying run on second and their portly first baseman waving his bat in the box. The pitcher arced the ball homeward and with an awkward swing that somehow defied reality as defined by Newton, the batter sent the ball spinning toward my face like a yo-yo returning on a string—the picture of that stitched globe obscuring my view the instant before impacting my mouth is permanently etched in my memory. And with impact, Newton returned, imposing his second law with painful suddenness: Force equals mass times acceleration. I never did find out how the game ended.
Two emergency root canals the next morning were followed by a summer filled with trips to the dentist (I should have demanded my own parking space). By September I sported two gleaming crowns, affixed to the surviving tooth stubs (a process that involved embedded metal posts and “permanent” glue), a near perfect match that returned my smile to its original splendor.
Chapter Two: Be true to your teeth (or they’ll be false to you)
Apparently “permanent” means something different in the world of dental adhesives, because over the years (and despite my obsessive commitment to not testing them) my crowns have spontaneously detached several times: Once in the middle of a ten mile run, another time on Christmas day while snowed-in at my brother-in-law’s house in Colorado and fifteen hundred miles from my dentist. Each time I managed to avoid swallowing them, then had to endure much abuse (at the hands of the people who are supposed to love me most) until I could get back to the dentist for an application of the latest space-age cement guaranteed not to fail. Sigh.
Given the history, my biggest fear has always been that my crowns would lose purchase during a workshop (try saying ISO and shutter speed without your two front teeth), but since it only seems to happen once every three-to-five years, I felt fairly safe. I mean, what are the odds?
Chapter Three: Murphy is alive and well and living in Yosemite
After three-and-a-half days photographing waterfall rainbows, a rising full moon, a moonbow (lunar rainbow), and lots of dogwood with a group really nice (and fun!) photographers, my Yosemite spring workshop wrapped up Thursday night with a sunset shoot at one of my favorite Merced River spots. Half Dome, glowing with the warmth of the setting sun, reflected in the river as photographers contentedly crafted their own Yosemite masterpieces. What could go wrong?
I was helping one of the photographers add motion blur to his Half Dome reflection when my two front teeth (they’re connected) dropped without warning from the ceiling of my mouth. To avoid all the complications from the teeth slipping out the backdoor and down my throat, I reflexively dipped my head forward and opened my mouth, snatching them from the air before they could fall into the river. My workshop student was more than a little confused by my sudden theatrics until I flashed my toothless smile and explained that I’d just “Lotht my crownth.” I tried to deflect the inevitable (good natured) derision by telling the rest of the group that their workshop-mate slugged me for not answering his questions quickly enough, but they knew better.
Fortunately the teeth’s failure coincided with the end of the workshop, and I comforted myself with the knowledge that in the bottom of my suitcase was a tube of Polident I’d been carrying for years to mitigate (the very unlikely event of) just this calamity. After saying toothless goodbyes to the group I decided that, with nothing more than a four hour drive, requiring no more human interaction than one or two drive-thru passes, I’d wait until I was home with a mirror and clean, fully lit bathroom to temporarily reinsert my teeth. Then first thing in the morning I’d call the dentist to schedule the few minutes it would take him to “permanently” reattach my crowns. With that plan, I tenderly folded the teeth into a clean napkin from my glovebox, where they’d stay until I made it to the dentist the next morning. And that’s exactly how it would have happened….
Chapter Four: It gets worse
I pulled into the garage a little after midnight, grateful that the teeth hadn’t failed until the end of the workshop and pleased with myself for somehow not frightening the friendly barista who delivered my mocha through her sliding window. I grabbed my phone and wallet from the center console and reached for the napkin containing my teeth, which should have been right there in the cup holder. Hmmm.
A frantic search ensued, starting with all the logical places (beneath the seat) and becoming progressively more desperate (glove box, ash tray, back seat). Before dismantling the spare tire compartment I mentally reconstructed my trip home and flashed to the gas stop in Livingston (one of many generic, brightly lit exits with an assortment of gas stations and fast food selections dotting Highway 99 in the Central Valley). Slowly memories of a quick housecleaning while waiting for my gas to pump materialized—into the convenient garbage can went my Starbucks cup, fast food wrappers, a few stray napki…. Oh. Oops.
So what should have been a fifteen minute ride in the dentist’s chair turned into a two hour marathon involving Novocain, drills, goopy molds, and six hundred of my dollars while the dentist fashioned temporary crowns that will keep me from looking like I ended up on the wrong end of a pool cue until he can craft the “final solution.” In the meantime I’m instructed not to use my front teeth for anything but smiling—”Not even to tear bread,” he warned as I walked out the door. (Which I’m pretty sure means that while they’re in there, I can charge all ice cream purchases to my HSA card.)
Oh, and my dentist a$$ure$ me that ver$ion-two of my crown$ really will be permanent.
* * * *
About this image
About the only thing this image has to do with my teeth is I still had them when I took it. That and the fact that it was captured during the workshop that terminated in their demise. It’s a “moonbow,” a lunar rainbow caused by the light of a full moon. Witnesses see a shimmering silver band, but moonlight isn’t strong enough to reveal color to the naked eye. A camera, on the other hand, can accumulate light, making the scene in the image much brighter than being there.
While beautiful to photograph, the Yosemite Falls moonbow is no secret. The exposure is a piece of cake compared to the rest of the experience, which includes hundreds of photographers and point-and-shoot gawkers jostling in the dark, blowing mist. But despite the difficulties, the tailgate atmosphere at the bridge beneath lower Yosemite Fall is generally festive. Some photographers get a bit testy when a gawker (ignorantly) fires a flash, but generally a good time is had by all and those who want a picture (and are properly equipped and have some idea of what they’re doing) succeed.
The night before this I took my group out for a moonlight shoot without the moonbow (and the crowds) to get everyone comfortable with moonlight photography before braving the mayhem at the lower fall. Unfortunately, on our moonbow night unexpected clouds obscured the moon for most of window when the moon would be low enough for the moonbow. Nevertheless, the moonbow made several brief appearances (each time eliciting cheers) and most of the group got something, many that included a few moonlit clouds to enhance the sky. I spent most of my time working with the group (not the easiest thing to distinguish a dozen specific individuals from a couple of hundred strangers bundled in the dark against the elements) so this was the only moonbow I got that night.
Join me as I try to reprise this shot in my upcoming Yosemite Moonbow and Wildflowers photo workshop.
Yosemite After Dark
Click an image for a closer look, and a slide show. Refresh the screen to reorder the display.


