A lifelong love affair with comets
Posted on January 11, 2013

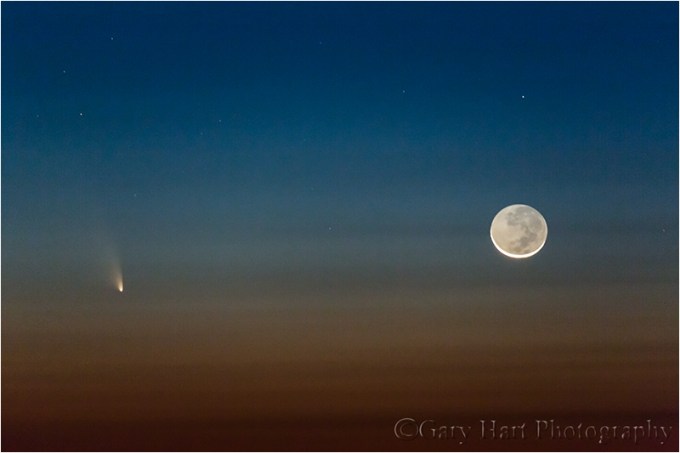
Comet McNaught in the western twilight, January, 2007
When I was ten, my best friend Rob and I spent most of our daylight hours preparing for our spy careers—crafting and trading coded messages, surreptitiously monitoring classmates, and identifying “secret passages” that would allow us to navigate our neighborhood without being observed. But after dark our attention turned skyward. That’s when we’d set up my telescope (a castoff generously gifted by an astronomer friend of my dad) on Rob’s front lawn to scan the heavens in the hope that we might discover something—a supernova, comet, black hole, it didn’t really matter.
Our celestial discoveries, while not Earth-changing, were personally significant. Through that telescope we saw Jupiter’s moons, Saturn’s rings, and the changing phases of Venus. We also learned to appreciate the vastness of the universe with the observation that, despite their immense size, stars never appeared larger than a pinpoint no matter how much magnification we threw at them.
To better understand what we saw, Rob and I turned to illustrated astronomy books. Pictures of planets, galaxies, and nebula amazed us, but we were particularly drawn to the comets: Arend-Roland, Ikeya–Seki, and of course the patriarch of comets, Halley’s Comet (which we learned was scheduled to return in 1986, an impossible wait that might as well have been infinity). With their glowing comas and sweeping tails, it was difficult to imagine that anything that beautiful could be real. When it came time to choose a subject for the annual California Science Fair, comets were an easy choice. And while we didn’t set the world on fire with our project presentation, Rob and I were awarded a ribbon of some color (it wasn’t blue), good enough to land us a spot in the San Joaquin County Fair.

Here I am with the fifth grade science project that started it all. (This is only half of the creative team—somewhere there’s a picture that includes Rob.)
The next milestone in my comet obsession occurred a few years later, after my family had moved to Berkeley and baseball had taken over my life. One chilly winter morning my dad woke me and urged me outside to view what I now know was Comet Bennett. Mesmerized, my dormant comet interest flamed instantly, expanding to include all things astronomy. It stayed with me through high school (when I wasn’t playing baseball); I actually entered college with an astronomy major that I stuck with for several semesters, until the (unavoidable) quantification of concepts sapped the joy from me.
While I went on to pursue other things, my affinity for astronomy continued, and comets in particular remained special. Of course with affection comes disappointment: In 1973 Kohoutek broke my heart, a failure that somewhat prepared me for Halley’s anticlimax in 1986. By the time Halley’s arrived, word had come down that it was poorly positioned for its typical display (“the worst viewing conditions in 2,000 years”), that it would be barely visible this time around (but just wait until 2061!). Nevertheless, venturing far from the city lights one moonless January night, I found great pleasure locating (with much effort) Halley’s faint smudge in Aquarius.
After many years with no naked-eye comets of note, 1996 arrived with the promise of two great comets. While cautiously optimistic, Kohoutek’s scars prevented me from getting sucked in by the media frenzy. So imagine my excitement when, in early 1996, Comet Hyakutake briefly approached the brightness of Saturn, with a tail stretching more than twenty degrees (forty times the apparent width of a full moon). But as beautiful as it was, Hyakutake proved to be a mere warm-up for Comet Hale-Bopp, which became visible to the naked eye in mid-1996 and remained visible until December 1997—an unprecedented eighteen months. By spring of 1997 Hale-Bopp had become brighter than Sirius (the brightest star in the sky), its tail approaching 50 degrees. I was in comet heaven.
Things quieted considerably comet-wise after Hale-Bopp. Then, in 2007, Comet McNaught caught everyone off-guard, intensifying unexpectedly to briefly outshine Sirius, trailing a thirty-five degree, fan-shaped tail. But because of its proximity to the sun, Comet McNaught had a very small window of visibility and was easily lost in the bright twilight—it didn’t become anywhere near the media event Hale-Bopp did. I only found out about it by accident on the last day it would be easily visible in the Northern Hemisphere. With little time to prepare, I grabbed my camera and headed to the foothills east of Sacramento, where I managed to capture the image at the top of this post.
Following McNaught I vowed not to be caught off guard by a comet again. After enduring the frustration of seeing others’ images of spectacular Southern Hemisphere-only comets, my heart jumped last year when I came across a website proclaiming the approach of Comet PANSTARRS (a.k.a, C/2011 L4 in less glamorous astro-nerd parlance), discovered not by an individual, but by the Pan-STARRS automated telescope array atop Haleakala on Maui. Researching further, I learned that PANSTARRS could (fingers crossed) hang low in the western sky at magnitudes brighter than Saturn, for about a week beginning around March 10, 2013 (it will rise slowly each night, remaining visible as it fades for a few more weeks). Checking my calendar to see if I had any conflicts that week, I immediately remembered why those dates sounded so familiar—I’ll be on Maui for my workshop then! In fact, my first viewing of PANSTARRS could be almost literally in the shadow of the telescope that discovered it. It’s a sign*.
Since its discovery in June of 2011, astronomers have been monitoring PANSTARRS and updating its orbit and brightness curve—so far everything remains on track (and my crossed fingers are cramping). And as I followed PANSTARRS’ progress, rumbling of another comet could be heard, a comet that may significantly outshine PANSTARRS to achieve historic proportions: In December of this year, Comet ISON (how I long for the days when comets were people and not acronyms) may rival or surpass Hale-Bopp, perhaps even becoming bright enough to be viewed in daylight. (I have to say that you must be careful about such reports—the media seem more interested in generating audience than in actually getting things right.)
Are these comets a sure thing? Of course not. So I make no promises, except that I’ll be checking for updates daily (can you say OCD?) and will keep you posted. Chances are, if they develop as promised (hoped), you won’t have any trouble keeping track on your own (just Google their names for more information than you’ll ever need). And of course if I get any images of PANSTARRS when I’m on Maui, I’ll post them here. Stay tuned….
June 7, 2013
Comet PanSTARRS turned out to be a huge thrill (click image for details):
Comet PanSTARRS and New Moon, Haleakala, Maui

Comet PanSTARRS and the Grand Canyon by Moonlight, Yavapai Point

Moonlight, Comet PanSTARRS above the Grand Canyon, Yavapai Point
* Speaking of signs, Rob and I recently reconnected after many years with no contact (sadly, he didn’t go on to become a spy or astronomer either). We’re already talking about going out to see one or both of these comets together.
Photography on the edge
Posted on January 4, 2013

Spring Reflection, Horseshoe Bend, Arizona
Renowned outdoor photographer Galen Rowell distinguished himself by photographing places nobody else could get to. A world-class climber with an insatiable appetite for adventure and a perpetual motor, Rowell pushed personal limits every time he went outside.
I won’t speak for anyone else, but my personal threshold is in fact somewhat lower than Rowell’s. When it comes to “getting the shot,” I have no problem with hard work and extreme discomfort. But for whatever reason, Horseshoe Bend’s 2,000 foot drop to the Colorado River has always stopped me about five feet from the rim (Galen Rowell I’m not), almost as if an invisible force field guarded the rim. Each visit would leave me lamenting the images left uncaptured, and vowing things would be different next time.
Well “next time” finally came last spring, when I somehow broke through the force field to inch my way to the edge. For the first time I was able to peer all the way down to the Colorado River at the bend’s midpoint to view the scene as I’d never seen it. I don’t believe I actually captured anything that hadn’t been captured at this frequently photographed location, but overcoming a personal limitation to get something new for me was a source of great personal satisfaction.
The value in this case is less in the image itself than it is in the reminder that we’re all constrained by our own (unique) self-imposed boundaries. Some of these boundaries are pretty obvious and easily addressed, like the impulse to forgo a sunrise shoot in favor of sleep and warmth. Other boundaries—like a fear of heights, or maybe financial constraints that prevent you from visiting coveted locations—are a bit more difficult to overcome, but probably not impossible.
And then there the most insidious boundaries, those imposed by our self-view and that become self-fulfilling: “I’m not artistic,” “Metering is too technical,” “I just don’t see things,” and so on. The good news is that these boundaries are an illusion: As someone who has taught photographers for nearly ten years (and technical professionals for fifteen years before that), I’ve never encountered anyone who couldn’t do more than they believed they were capable of by simply expanding their idea of what they’re capable of.
Galen Rowell died tragically about ten years ago, not climbing mountains but in a plane crash. Greater than Rowell’s legacy of memorable images is a legacy of spirit that can be an example to all of us. You don’t need to snow-camp in the Himalayas, pioneer a route up El Capitan, or befriend the Dalai Lama to achieve personal greatness—you just need to be better today than you were yesterday. So what are you waiting for?
A tale of two moons
Posted on December 24, 2012

Moonset, Badwater and Telescope Peak, Death Valley
* * * *
Going through images from earlier this year, I was struck by the difference the rendering of the moon makes in the overall effect of two images taken from different locations in Death Valley, a couple of days apart. In one, the moon is merely a garnish for a scene that’s all about the repeating patterns and harsh desolation of Death Valley’s Badwater playa; in the other, the moon is clearly the main course, enjoyed vicariously through the experience of six anonymous photographers atop a remote Death Valley ridge. In both cases, using my camera to control the moon’s size relative to the rest of the scene allowed me to emphasize the aspect of the scene I thought was most important.
Badwater moonset
Badwater is at the nadir of an expansive, paper-flat playa that spans Death Valley’s breadth between the looming Black Mountains to the immediate east and the distant Panamint Range in the distant west. At 282 feet below sea level, it’s the lowest point in North America. Centuries of flood-evaporate-repeat have spread a veneer of minerals and buckled them into a jigsaw of interlocking polygons. Some winters the playa is completely submerged beneath several inches of mountain runoff; as the shallow lake evaporates, the polygons’ protruding boundaries emerge to form interlocking reflective pools that shimmer like thousands of faceted jewels. But most of the year Badwater is a bone-dry plane that ranges from chalk white to dirty brown, depending on how long it has been exposed to Death Valley’s ubiquitous dust without a bath. To walk out onto the playa is to loose all sense of scale and distance.
On my visit last February I with a polygon that filled the immediate foreground. I went with a wide lens and dropped almost to the ground, taking care to include all of the polygon’s perimeter in my frame, a composition intended to create the sense of the endless expanse I feel when I’m out there. Including the complete polygon in the foreground (rather than cutting off a side), makes it easier to imagine the shape repeating into infinity.
A wide angle lens emphasizes the foreground and shrinks the background, in this case shrinking the moon so much that it all but disappears in the distance, just as it is about to literally disappear behind sun-kissed Telescope Peak. Making something as familiar as the moon this small enhances the illusion vastness.
A two-stop hard graduated neutral density filter kept the sky and mountain color in check at the exposure necessary to bring out Badwater’s radiant surface. And with important compositional elements near and far, I wanted lots of depth of field in this image. DOF at 28mm is pretty good, but I nevertheless stopped down to f16 and focused on a spot about six feet in front me, which gave me “acceptable” sharpness from three feet to infinity. My general rule is to bias my focus to the foreground because softness is more easily forgiven than foreground softness—on close scrutiny at 100 percent, I see that my foreground in this image is indeed perfectly sharp, while the mountains and moon are ever so slightly, but not unusably, soft (had it been the other way around, the image would have been a failure).
Moonrise silhouette
A telephoto lens compresses distance, making distant objects appear closer to the foreground than they really are. In my ridge-top moonrise, instead of shrinking the moon to emphasize the foreground as I did in the Badwater image, I stood as far back as possible and framed the photographers with an extreme telephoto, compressing the scene and magnifying the moon to make it appear closer to the silhouetted photographers (I magnified it even more later by cropping extraneous emptiness from the perimeter). And because it’s rising here, the moon’s extreme size works as a metaphor for its arrival above the landscape (contrast that with the small, departing moon in the Badwater image)—not a conscious decision, but I don’t believe it was an accident either. (Metaphor happens organically when you listen to your internal intuitive, creative muse.)

Moonrise Silhouette, Death Valley
While my right brain mused, my left brain chewed on the scene’s extreme dynamic range. The moon is always daylight bright, but here the foreground is in dark shadow—a difference between highlights and shadows far beyond a camera’s ability to capture. But my composition doesn’t require any foreground detail—in fact, foreground detail could have been a distraction. Instead I exposed for the moon, which brought out the twilight color and simplified the foreground into silhouettes that conveyed everything I needed.
“Trophy” shots
Posted on December 18, 2012

Flowers and Red Rocks, Horseshoe Bend, Colorado River, Arizona
* * * *
In my recently completed Hawaii Big Island workshop, the topic of “trophy shots” came up. (My definition of a trophy shot is a prominently displayed photograph of a scene captured previously by someone else.) Often these are “iconic” tourist scenes, places like Tunnel View in Yosemite, Old Faithful in Yellowstone, Delicate Arch in Arches, or Niagara Falls (I could go on). But with the digital-fueled photography renaissance, it seems that the number of trophy destinations has grown proportionally. For example, long an anonymous waterfall on El Capitan’s southeast flank, Horsetail Fall now draws thousands of photographers to Yosemite each February. And if you’ve ever jostled for position in front of Canyonlands’ Mesa Arch at sunrise, or at Antelope Canyon’s dazzling midday heavenly beam (below), you’ve been an active participant in a trophy hunt.
This isn’t an indictment of trophy photography—heaven knows I have my share of trophy-qualifying images. It’s more about me puzzling why so many photographers pursue them with such passion, and display them with such pride. To me the joy of photography isn’t duplicating what others have already done, it’s looking for something new, especially at frequently photographed locations. Of course these famous shots draw many photographers to my workshops, and I do my best to help them bag their trophy. Nevertheless, my challenge to workshop students is always, rather than make the trophy your goal, make it your starting point.
If the standard view is horizontal, look for something vertical; if it’s wide, try a telephoto. Chances are, if this shot is so special, there’s lots of other special views and subjects nearby. Challenge yourself to find a unique foreground, a different angle, or simply turn around and see what’s behind you.
Regrettably, some of my very favorite images, the images that give me the most satisfaction, are met with shrugs, while my trophy shots like Horsetail Fall and Antelope Canyon, compositions that are a dime a dozen, are among my most popular. Sigh. But when I decided to do landscape photography for a living, I started with a personal promise to only photograph what I want to photograph. And frankly, if someone else has done it, I just don’t get that much pleasure from re-doing it. Sometimes I’ll use the trophy compositions to warm up, but it seems the longer I do this, the more inclined I am to simply leave my lens cap on unless I see something I’ve never seen before.
Among the trophy destinations that I frequent each year is Horseshoe Bend near Page, Arizona. On my first visit I got my trophy shot, and on subsequent visits I’ve sometimes tried to upgrade that composition if I think conditions are better than I’ve had before, but with each visit I spend less time repeating previous efforts and more time looking for something new. Which is how I ended up with the image at the top of this post.
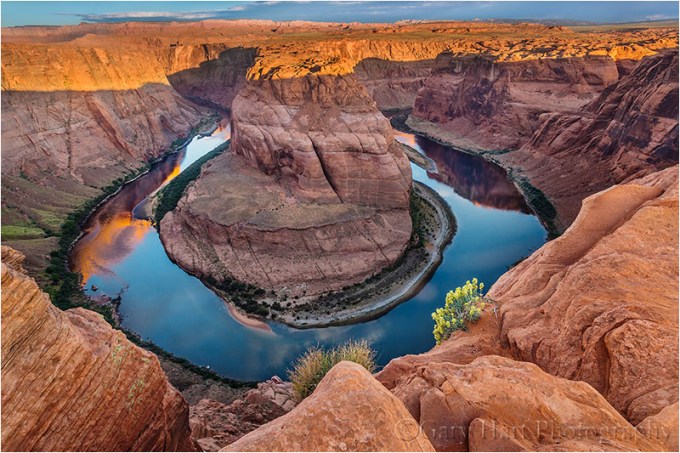
Spring Reflection, Horseshoe Bend, Arizona :: This is my Horseshoe Bend trophy shot. On this spring morning I did my best to use the broken clouds and sunlit cliffs reflecting in the Colorado River, and a solitary clump of wildflowers in the red rocks, to set my version apart from the thousands of similar compositions that preceded me.
Rather than limit myself to the “standard,” sweeping, (breathtaking) full horseshoe (Spring Reflection, above), I looked for something in the foreground to emphasize. I found a little clump of yellow flowers clinging to the cliff, 2,000 vertical feet above the Colorado River. Taking most of the bend out of the frame allowed me to use the foreground rocks to frame the flowers and guide your eye to the clouds building in the distance. Unfortunately (for sales), removing the horseshoe from Horseshoe Bend means this image won’t resonate with nearly as many people, but that’s okay.

Heavenly Beam, Antelope Canyon, Arizona :: Here’s my Antelope Canyon trophy shot. It really is an amazing scene that sells lots of prints, but there’s really nothing in it to set it apart from the thousands of others just like it.
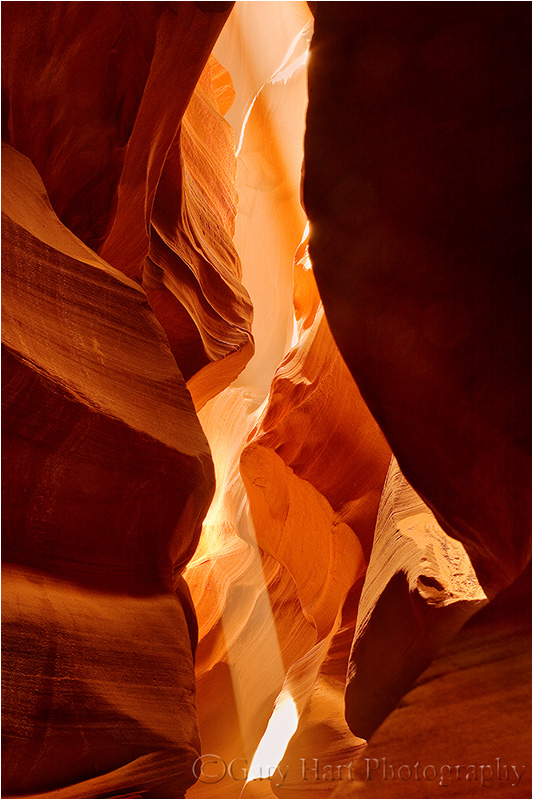
Bathed in Light, Upper Antelope Canyon, Arizona :: While not dramatically different, at least this Antelope Canyon image is my own. I found it by looking up, over the heads of hundreds of other photographers lined up to get their trophy shot.
I’m not trying to portray myself as a creative genius (call me an aspirational creative genius)—I imagine that many of my “unique” images aren’t completely unique. But at least they’re my own (if others preceded me, they did so without my knowledge). We all take pictures for different reasons, and if the trophies give you the most pleasure, go for it. But honestly, does the world need another sunset from Tunnel View (guilty)? Or salmon-catching grizzly from Katmai National Park (not guilty)? If you’re trying to set yourself apart as a photographer (and maybe even make a few dollars doing it), look beyond the trophies to show the world something it hasn’t seen before. I may not be there yet, but that’s what keeps me shooting.
Just a dash of moon…
Posted on December 11, 2012

Tree and Crescent, Sierra Foothills, California
A new moon debuts this week, and with it some nice opportunities for photographers to accent favorite scenes with a delicate crescent. This morning the diminishing vestiges of the waning moon rose in the east, a couple of hours before sunrise (did you see it?); tomorrow morning, what remains of the “old” moon will be too thin and close to the sun to be seen at all. Thursday night’s sky will be moonless, as the Earth/Moon/Sun alignment puts the moon’s dark side facing us. On Friday the (rejuvenated) moon reappears, this time in the evening twilight, a three percent crescent trailing the sun to the western horizon.
Because it frustrates me no end to see a graceful slice of moon suspended above the landscape when I’m on my way to somewhere else, I now put these lunar milestones in my calendar. When my schedule permits, I’ll schedule a trip around the sunrise or sunset crescent moon, but often I’ll just head up to the foothills east of town.
It helps to know that the more of the moon that’s illuminated, the farther in the sky from the sun it appears (a full moon is exactly opposite the sun, rising at sunset and setting at sunrise). A crescent moon is always in close proximity to the sun, hanging in the brightest part of the post-sunset/pre-sunrise sky, above a (relatively) dark landscape. A camera’s limited dynamic range makes it impossible to photograph a crescent moon against twilight color and landscape detail in a single frame. In these scenes, subtle subjects and fine detail are lost in the dark foreground. Instead, look for strong shapes to silhouette against the colorful twilight sky, or bodies of water that reflect the sky.
For my foothill forays I’ve identified a number of hilltop oaks that stand out against the sky. The best ones for a moon are those that are far enough from my vantage point to allow me to magnify the moon with a telephoto. But even without a telephoto, the moon holds so much “emotional weight” (I’ll need to write about that sometime) that even the tiniest sliver can carry a large portion of the frame.
The tree in the image at the top of this post stands on a ridge south of El Dorado Hills. I come here often, and have a variety of images from this spot that please me (one appeared on the cover of Sierra Heritage magazine a few years ago). When I arrived that evening I feared that the clouds would shut me out, but they turned out to be thin enough to let the moon shine through as the sky darkened. Just a couple of minutes later the thicker clouds rose to obscure the moon, but as they did the pink deepened to a rich crimson and I just kept shooting.
Learn more on my Crescent moon page.

Red Sky, Oak at Sunset, Sierra Foothills :: This is one of my last captures that evening, about eight minutes later than the crescent at the top of the post. To emphasize the fiery red, I slightly underexposed this frame.
A perfect end to a perfect day
Posted on December 6, 2012

Winter Twilight, Yosemite Valley
* * * *
A few weeks ago I led a one day trip to Yosemite for a class I teach two or three times a year. This class usually fills, but this time I only had six students (about half the usual size), I suspect because many people saw a storm was forecast and decided to stay home. Sigh. As much as you hear me say that the best conditions for taking pictures are usually the worst conditions for being outside, I don’t think anything will express it more clearly than a picture (or four) from that day:
<< Click the image to view a larger version and read the blog post >>
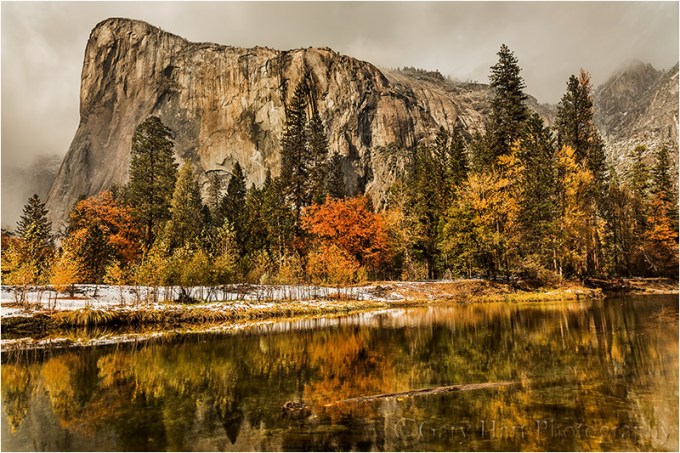
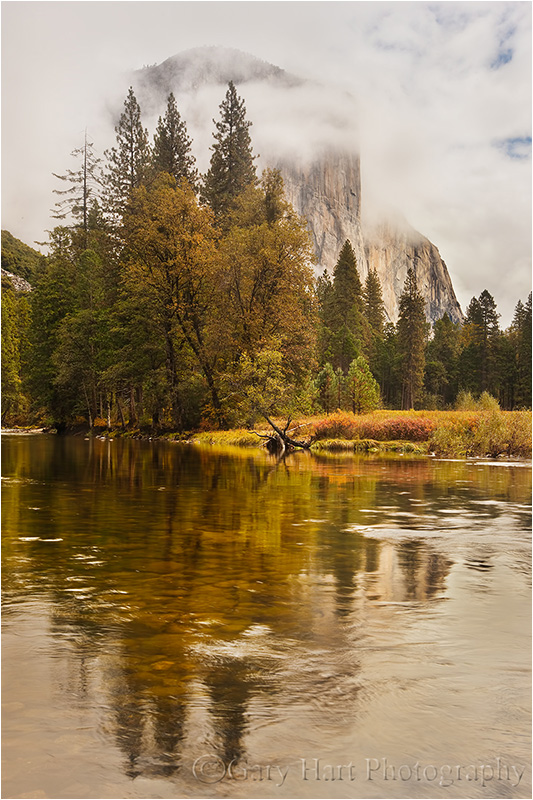
Autumn Reflection, El Capitan and the Merced River, Yosemite

El Capitan and Fresh Snow, Yosemite
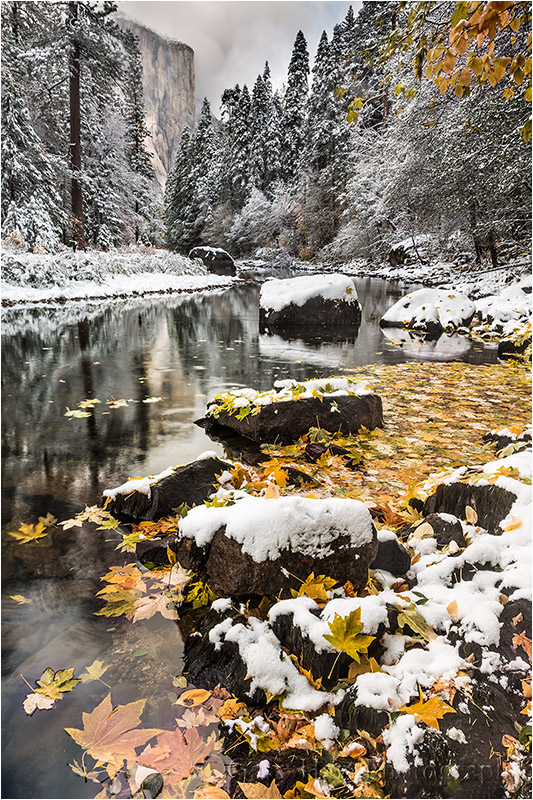
Snow on Autumn Leaves, El Capitan and the Merced River, Yosemite
About today’s image
I’m going to strike preemptively and say a few words about the image at the top of this post, mostly for those who don’t regularly read my blog. I say “preemptively” because I know I’ll get the skeptical “that doesn’t look real” comments. If you read me enough, you not only know that duplicating human reality with a camera is impossible, you know why it’s impossible. Therefore, photographers’ truth becomes their camera’s reality, a very different thing indeed.
For example, check out the exposure settings: Four seconds at f11 and ISO 400 should be a pretty good clue that it was quite dark when I captured this (about twenty minutes after sunset), much darker to my eyes than this image conveys. So while this wasn’t “real” to my experience, it was very much “real” to my camera.
The blue/pink sky is the result of a “twilight wedge,” Earth’s shadow descending on the landscape as the sun drops below the horizon behind me. The twilight wedge is missed by many casual sunset watchers because it’s opposite of the sun (at sunrise it ascends in the west, opposite the rising sun), and usually a few minutes separates the sunset color in the west and the wedges pink and blue pastels. Particularly pronounced on clear-sky evenings, a twilight wedge is never more vivid than when it follows a storm that has scoured the impurities from the air.
On this evening, my group watched late afternoon light warm El Capitan and Half Dome and, right at sunset, nicely (but unspectacularly) color the clouds above Half Dome. As this color started to fade, when the dozens of photographers shoulder-to-shoulder at the Tunnel View vista started to pack up, I told my group if they stuck around they’d be in for a treat. As we waited for the show to begin, I reminded everyone to forget what their eyes saw and simply expose enough to make El Capitan a middle(ish) tone.
We were the only ones remaining, about five minutes later, when the sky above Half Dome took on a pink cast that deepened as the light faded. As the pink started to throb (I swear, that’s how it looks), the detail in the valley floor was reduced to dark shapes. No longer receiving direct light, the entire landscape was bathed in this shadow-free, omnidirectional skylight that our eyes struggled to keep up with. But our cameras, with their ability to accumulate light, returned images that revealed a world devoid of the troublesome contrast that usually plagues photographers here, and where the highly reflective clouds, snow, and even a nearby solitary deciduous tree seem to glow with their own light.
The missing dimension
Posted on December 3, 2012

El Capitan and Fresh Snow, Yosemite
* * * *
It seems too obvious to mention, but I’ll say it anyway: Photography is a futile attempt to render a three-dimensional world through a two-dimensional medium. Unfortunately, that reality doesn’t seem to keep people from putting their eye to their viewfinder and clicking without regard for their camera’s vision. But here’s a secret: While anyone with a camera can manage the lateral (left-to-right) aspect of a scene, the photographers who separate themselves are those able to convey the illusion of depth by translating a scene’s actual depth to their camera’s virtual depth.
Creating the illusion of depth isn’t rocket science. It starts with seeking a foreground for your beautiful background, or a background for your beautiful foreground. Once you’ve figured out your foreground/background, do your best to ensure that the elements at varying depths don’t merge with each other—the more elements in your frame stand alone, the more you invite your viewers to move incrementally through the frame, hopping (subconsciously), front to back, from one visual point to the next. Getting elements to stand apart often requires some physical effort on your part (sorry). Moving left/right, up/down, foreword/backward changes the relationship between objects at varying depths, sometimes quite significantly.
With your foreground and background identified, decide whether you want the entire image in focus, or selective focus that guides your viewer to a particular point in the frame. With all your pieces in place, you’re ready to choose your f-stop and focus point.
For example
The Merced River at Valley View is a minefield of jutting rocks and branches. The above image took at least five minutes before everything was lined up to my satisfaction. Relative to the distant El Capitan, the close foreground changed significantly as I shifted position. After surveying the possibilities from a distance, I decided I wanted to be as close to the river as possible, with my tripod at its maximum height, to capture as much reflection as possible. With my camera off the tripod, I moved around on the slippery rocks at the river’s edge (easier said than done), framing shots of varying focal lengths until I had something pretty close to what I wanted. Next I brought over my tripod, affixed my camera, and made micro refinements until I was satisfied with the composition.
In this scene I wanted maximum sharpness throughout the frame. The closest rocks were about eight feet away; with the help of the depth of field app on my iPhone, I determined that at 35mm and f11 (my lens’s sharpest f-stop), I could focus about twelve feet from my camera and be sharp from six feet to infinity. Selecting a rock about twelve feet away, I switched to live-view, selected the rock, magnified the view ten times, and manually focused.
I dialed my polarizer to a point that balanced the El Capitan reflection (which I wanted) with the foreground glare (which I didn’t want) as much as possible (always a subjective exercise in compromise). To determine my exposure, I spot-metered on a bright cloud (live-view is off now) and dialed my shutter speed until the meter indicated +2.
Click.
Double your pleasure
Posted on November 29, 2012

Autumn Reflection, El Capitan and the Merced River, Yosemite
Canon EOS-5D Mark III
21 mm
1/8 seconds
F/16
ISO 100
It seems that people stay away from Yosemite in autumn because that’s when the waterfalls are at their lowest. True story. But believe it or not, Yosemite isn’t all about waterfalls. El Capitan, Half Dome, Cathedral Rocks, Sentinel Rock (I could go on), are great subjects in their own right. Subtract the waterfalls but add the yellows, oranges, and reds of Yosemite Valley’s many deciduous trees and you have what I think is a pretty a fair trade. And when the water is low, the usually turbulent Merced River smooths to a reflecting ribbon of glass and suddenly, pretty much any scene can be doubled at your feet.
These reflections add layers of creative possibilities impossible the rest of the year. Sometimes I’ll split the scene in the middle for a 50/50 mirror effect; other times I’ll photograph only the reflection. In the image above I went with a more conventional composition, emphasizing El Capitan’s bulk against clouds that were spitting small, wet snowflakes.
Autumn Shroud, El Capitan, Yosemite
In this image I split the frame 50/50, but dialed down the reflection with my polarizer. Even polarized, the bright sky’s glare washed out much of the river surface, painting the outline of El Capitan like a negative that uses the trees with a jigsaw of submerged river rocks.
* * * *

Leaves and Reflection, El Capitan, Yosemite
Here I used El Capitan’s reflection as a background for the Merced’s brilliant autumn veneer.
Want to photograph this in person? My 2014 Yosemite fall workshop filled months ago, but there’s still room in the 2015 Yosemite Autumn Moon workshop.A gallery of Yosemite autumn reflections


It isn’t easy, but it is simple
Posted on November 27, 2012
Spring Meadow, Rocky Mountain National Park, Colorado
* * * *
Easy: Achieved without great effort
Simple: Plain, basic, or uncomplicated in form, nature, or design
Photography may not be easy, but it is simple. Huh? What I mean is that the difficult part of photography is the creative stuff that by definition defies quantification, rules, logic, and reason—to be truly creative, something can’t have been done before. But before you can graduate to creative photography, you need to master the logical stuff–fortunately, that is simple.
Grasping photography’s simplicity starts with understanding that you’re only dealing with three variables: light, depth, and motion. To control them with your camera, you have shutter speed, aperture, and ISO. That’s it. Your job is to decide the combination of shutter speed, aperture, and ISO that returns the desired combination of light, motion, and depth. You could leave it to your camera to decide, but all automatic metering understands is light—your camera has no idea of the motion or depth effects that are so essential to creative results.
For landscape photographers still trying to get handle on their exposure settings, I think it’s best to start simple. I’ll start with the assumption that you’re working in a static world (generally true, but far from absolute—I’ll bring motion in later). Static requires a tripod—without one, all bets are off, as you’re adding unnecessary motion by virtue of your own unsteady hands (sorry). Don’t talk to me about high ISO performance (a compromise—why not go with your best ISO whenever possible?), a wide open aperture (another compromise that could reduce sharpness), or image stabilization (good, but never better than a rock-solid tripod).
Manual exposure made simple
ISO: So, if you’re on a tripod and your scene is static (no subject motion), you can go with your camera’s best ISO (usually 100, but 200 on some Nikon cameras). That’s one of our three variables out of the way and we haven’t even thought about exposure.
Aperture (f-stop): Landscape photographers shouldn’t use their f-stop to control light. Rather, the f-stop you choose is first determined by the depth of field you need. And if everything in your frame is at infinity and DOF isn’t a factor, go with your lens’s sharpest f-stop—because most lenses tend to be less sharp at their extreme f-stops, you should default to the middle f-stop range, usually f8 to f11, unless the scene dictates otherwise. (And in addition to optical problems, going much smaller than f11 risks diffraction that reduces your lens’s ability to resolve fine detail.) Read my “Depth of field” tips page for more info. We now have two of three variables out of the way, and we still haven’t even thought about exposure.
Shutter speed: With ISO and f-stop out of the way, only camera variable remaining to manage the light in your scene is shutter speed. At this point I simply aim my spot meter at whatever I decide is most important and dial in the amount of light I want it to have.
ISO part deux: If there’s motion in the frame (wind-blown leaves or flowers, flowing water, etc.), I’ll compromise my ISO to achieve the shutter speed that will freeze the motion or return the desired effect.
Admittedly, what I’ve outline here is a simplification—there are definitely situations where you’d want to deviate from this approach. But for someone just getting up to speed with manual exposure, this will work at least 90 percent of the time, and the more you do it, the more comfortable you’ll become making exceptions. For more on exposure and metering, read my “Exposure basics” and “Manual exposure” tips pages.
For example
These blanketflowers (gaillardia aristata) in Rocky Mountain National Park were the star of the scene. To fill my frame with the flowers and shrink the mountains to the distant background (that’s the creative part), I went to 17mm, as wide as my lens permitted and dropped down to about six inches from the closest flower.
My tripod eliminated camera shake, so the only motion in the frame I needed to worry about was the flowers’ motion in a light breeze. The relatively narrow dynamic range (difference between the lightest and darkest parts of the scene) made exposure pretty straightforward, but the potential for motion in the flowers and the extreme depth of field I needed made the way I achieved my exposure extremely important: too long a shutter speed and the flowers would blur in the breeze; not enough depth of field and the flowers wouldn’t be sharp enough.
With the closest flower only six inches from my lens, I knew it would be impossible to keep all the flowers and the mountains sharp. But I wanted the flowers sharp and felt I could live with a little softness in the distant mountains, so I stopped down to f20 and focused a little behind the closest flower, about one foot into the frame. F20 at ISO at my native (ideal) ISO 100 gave me a 1/10 second shutter speed. While I might have been able to time my exposure for a lull in the breeze that would freeze the flower at 1/10 second, I bumped my ISO to 200 and shutter speed to 1/20, just to be safe.
Click.
Uncharted territory
Posted on November 19, 2012

Fall Color, Elowah Fall, Columbia River Gorge, Oregon
Canon EOS-5D Mark III
28 mm
1/3 second
F/16
ISO 400
A few months ago I accepted an invitation to speak to the Cascade Camera Club in Bend, Oregon. With my fall workshops behind me, I decided to take the opportunity to spend a few days exploring the Columbia River Gorge, a place long on my “must see” list. I wasn’t disappointed.
Undeterred by steady rain throughout most of my visit, I found more photo opportunities than I had time to photograph. I’d only been there a couple of hours before it become clear that I’d be coming back, which caused me to change my strategy a bit. Rather than try to squeeze as many photographs as possible into my three days there, I decided to make my priority reconnaissance that would help me be more efficient on future trips.
My emphasis was on waterfalls, something the Gorge has an ample selection of. I was also pleased to find vestiges of fall color, well past prime, but quite nice nevertheless. Though I spent most of my time familiarizing myself with the area, identifying locations and the best conditions for photographing them, I still managed to find plenty of photographs.
The first waterfall I visited was Elowah Fall (about a one mile hike in a steady rain), where I was rewarded with a plethora of yellow leaves (some of which were still falling as I shot) accenting a tumbling cascade just downstream from the fall. Rather than follow the trail all the way to the bridge at the base of the fall, I scrambled about 75 feet down to McCord Creek for a perspective that would allow me to feature the leaves and cascades up close, with Elowah Fall in the background.
When the hill turned out to be a little steeper than I’d anticipated, and the footing a bit slipperier, I had visions of myself reprising Michael Douglas and Kathleen Turner’s wild ride through the Columbian jungle in “Romancing the Stone.“ But I made it to the bottom unscathed (Galen Rowell I’m not), and proceeded to work this scene to within an inch of its life. I don’t think I moved more than fifteen feet from this spot for the hour or more I was there, starting atop a rock directly above the creek and eventually working myself down closer and closer, until I finally ended up standing in the water.
Composing this was mostly a matter of organizing the leaves, rocks, and water into something coherent. By going wide and vertical, I chose to make the leaves the prime focus point, using the creek to guide your eye to the fall itself. F16 ensured depth throughout the frame, while ISO 400 gave me a 1/3 second shutter speed in the limited light, slow enough to blur the water, but fast enough that the water maintained some character. My polarizer was turned to minimize reflections, allowing the color to come through the significant sheen on the wet leaves, rock, and moss, and on the surface of the dark water.

