Eloquent Images by Gary Hart
Insight, information, and inspiration for the inquisitive nature photographer
Dynamic Juxtaposition
Posted on February 4, 2018

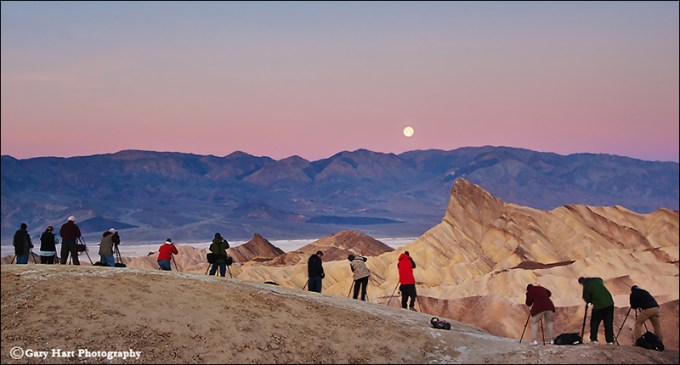
Moonset Eclipse, Zabriskie Point, Death Valley
Sony a7RII
Sony 100-400 GM
ISO 800
f/11
1/4 seconds
Much of my photography is about juxtaposition of elements with the landscape. Sometimes that’s simply combining static terrestrial features, but when possible I try to add something more dynamic, such as meteorological subjects like lightning or a rainbow, or celestial objects like the Milky Way or the Moon. The challenge with dynamic juxtapositions is timing—while the meteorological juxtapositions are usually a matter of playing the odds, celestial juxtapositions are gloriously precise.
Lunar choreography
Just as the Earth revolves around the Sun, the Moon revolves around Earth; at any point in this celestial dance, half of Earth is daylight and half is night, while half of the Moon is lit and half is dark. The amount of the Moon we see (its phase) depends on the relative position of the Sun, Moon, and Earth in this dance, and once each month all of the sunlit side of the Moon faces the dark side of Earth, and we Earthlings enjoy a full Moon.
This alignment of three or more orbiting celestial bodies necessary for a full (and new) Moon is called ‘syzygy.’ Due to the Moon’s orbit around Earth, the Sun, Earth, and Moon achieve syzygy twice each lunar month: once when the Moon is between the Sun and Earth (a new Moon), and again when Earth is between the Sun and Moon (a full Moon).
The Moon completes its trip around Earth every 27.3 days, but it takes 29.5 days to cycle through all its phases, from new to full and back to new again. The Moon’s phases need that extra 2+ days because as the Moon circles Earth, Earth also circles the Sun, taking the syzygy point with it—imagine a race with a moving finish line.
Viewed from Earth, the Sun and Moon are on opposite sides of the sky when the Moon is full, so a full Moon rises in the east at sunset and sets in the west at sunrise. We rarely see a full Moon rising exactly as the Sun sets (or setting as the Sun rises) because: 1) the point of maximum fullness (when the Sun, Earth, and Moon align perfectly) only happens at one instant on the full Moon day—at every other instant of each month’s full Moon day, the Moon is merely almost full (but still full enough to appear full); 2) published Sun/Moon rise/set times assume a flat horizon—if you have mountains between you and the horizon, your view of the true Sun/Moon rise/set is blocked; and 3) The more extreme your latitude (angular distance from the equator), the more skewed the Sun/Moon alignment appears.
Knowing this, it should make sense that the closer the Moon is to full, the longer it’s in the night sky, and a full Moon is in the sky all night long. Less intuitive but very important for lunar photographers to know, each day the Moon rises an average of 50 minutes later (between 30-70 minutes) than it rose the previous day—I usually mentally round to an hour for quick figuring.
Lunar Eclipse
If the Moon orbited Earth on the same plane Earth orbits the Sun, we’d have an eclipse with each syzygy: every new Moon, Earth would pass through the Moon’s shadow and somewhere on Earth would experience a solar eclipse; every full Moon the night side of Earth would witness a lunar eclipse as the Moon passes into Earth’s shadow. But the Moon’s orbit is tilted about 5 degrees from Earth’s orbit, making the perfect alignment an eclipse requires relatively rare.
It turns out that the alignment of the Sun, Earth, and Moon necessary for a lunar eclipse happens from two to four times each year. Of these, about one-third are total eclipses, when Earth’s shadow completely covers the Moon. At totality, most of the sunlight illuminating the Moon is blocked by Earth, and the only light to reach the Moon has passed through Earth’s atmosphere, which filters out all but the long, red wavelengths. For the same reason sunsets are red, during a total lunar eclipse we see a red or “blood” Moon.
Putting it all together
As frequent and familiar as the rise and set of the Moon is, the opportunity to witness the beauty of an eclipse is rare. But in the last six months, after being shut out by schedule or weather for many years, I’ve managed to photograph my first total solar and lunar eclipses. I wasn’t able to juxtapose the August solar eclipse with a favorite landscape, but I wasn’t going to let that happen again for last week’s lunar eclipse.
Viewed from Death Valley’s Zabriskie Point in winter, the setting full Moon’s azimuth aligns nicely with Manly Beacon, one of the park’s most recognizable features. Though this year’s alignment was particularly good, the morning of the eclipse was a day earlier than I’d normally photograph the Zabriskie Point moonset—the next day the Moon would be setting about 45 minutes later, providing ample time to photograph the landscape in the warm early light before the Moon descended behind the Panamints. Nevertheless, I decided that a total lunar eclipse trumps everything, and since Zabriskie was the best place for the eclipse, that’s where we were.
We started with telephoto compositions of the beautiful “blood Moon” phase because there wasn’t enough light to include the eclipsed Moon with the landscape without compositing two exposures. Composites are fine, but I prefer capturing scenes with one click. For wider images that included the landscape I waited until totality had passed, shortly before the Moon set, and switched to the Sony/Zeiss 24-70 with my Sony a7RIII, moving my Sony 100-400 GM to my Sony a7RII.
I captured this image about 25 minutes before sunrise, normally too early to capture landscape detail without over exposing the Moon. But this morning, following the total eclipse, the lit portion of the moon was still darkened by Earth’s penumbral shadow, which reduced the dynamic range to something my cameras could handle.
To enlarge the Moon and emphasize its juxtaposition with Manly Beacon, I went with the 100-400. With my composition and focus set, I slowly dialed up the shutter speed until I saw my a7RII’s pre-capture “zebra” highlight alert. After clicking I magnified my image preview and examined the moon to confirm that I did indeed still have detail. The foreground was quite dark on my LCD, but my histogram indicated the shadows were recoverable, something I later confirmed in Lightroom.
A Gallery of Dynamic Juxtapositions
Click an image for a closer look and slide show. Refresh the window to reorder the display.


Look Behind You
Posted on April 3, 2016

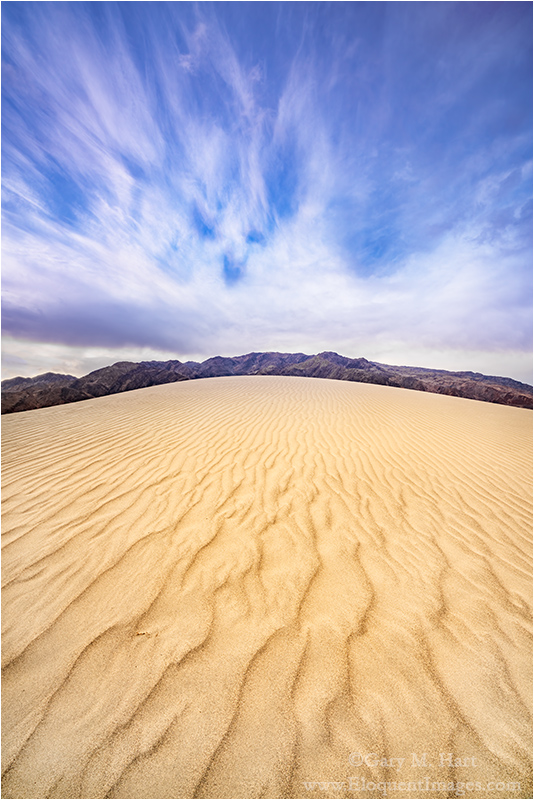
Painted Dunes, Mesquite Flat Dunes, Death Valley
Sony a7R II
Sony/Zeiss 16-35 f4
.4 seconds
F/11
ISO 100
Every once in a while we find ourselves at just the right place when Mother Nature delivers something special. When that happens, the best thing to do is stay calm and keep your head on a swivel.
In January my Death Valley workshop group had one of those moments. We’d walked almost a mile to get out to dunes that hadn’t been trampled, then waited while a sky that was solid overcast broke up just as the sun dipped below the horizon. The result was about ten minutes of horizon-to-horizon red that at its peak painted the dunes as well.
We’d been watching a hole in the clouds to our north shift in our direction, and I started to get an inkling that the ingredients were there for a vivid sunset about fifteen minutes earlier, when peaks in the northeast, then the clouds overhead, started to glow with warm, late light. I’d been using my 70-200 telephoto lens to isolate areas of the dunes, but realized that if the sky did indeed light up, I’d almost certainly want something wider and switched to my 16-35. I also encouraged everyone to do the same, and to anticipate the color and identify sunset compositions now, before it happened. Shortly thereafter we got our first hints of pink and the show was on.
That evening was a great example of something I preach in my workshops: No matter how great the scene you’re photographing, every once in a while take a few seconds to look around. On this evening I was excitedly photographing in one direction when I realized everyone in the group was photographing in the opposite direction. Turning to admonish them, I saw what they were photographing and shut up, quickly aiming my camera in that direction instead.
Read more about that evening, and see a picture of the other direction, here: Finding a new sandbox.
Sunset color
As I’ve written before, the ingredients for sunset (or sunrise) color are clouds, direct sunlight, and clean air (the cleaner the better). The idea that polluted or dusty air is good for sunset is a myth. (If that were true, Los Angeles and Beijing would be know for their sunsets, not Hawaii or the Caribbean.)
The red you see at sunset is the only color remaining after the white sunlight we see at midday has been stripped of all other wavelengths. It’s actually a rather interesting process (to me at least) that you can read more about here: Sunset Color.
Join Me in Death Valley
A gallery of sunset magic
Click an image for a closer look, and a slide show. Refresh the screen to reorder the display.


")


Tips to improve your full moon photography
Posted on March 24, 2016

Winter Moon, Zabriskie Point, Death Valley
Sony a7R II
Sony/Zeiss 24-70 f4
1/6 second
F/8
ISO 100
Have you ever seen a glowing full moon suspended above a beautiful landscape and been moved enough to grab your camera? And how many times have those pictures actually matched your memory of the moment? Not too many, I’d guess. Either your landscape was completely black, or (more likely) the moon was an ugly white blob. You’ve just experienced an example of the human eye’s vastly superior dynamic range—while you could see detail in the landscape and the moon, your camera could only see one or the other.
Lot’s of scouting and plotting goes into aligning a full moon with a terrestrial subject, as close to the horizon as possible, when the light’s just right. For me, just right means a sky dark enough for the moon to stand out (the darker the better), but not so dark that I lose foreground detail in the twilight shadow. Since I don’t blend images, I need to get the landscape and lunar detail with a single click.
I’ve found that the “right-time” sweet spot for single-click full moon photography is a window about 10 minutes on either side of sunrise/sunset. Since the published sun/moon rise/set times assume a flat-horizon—unless you’re on a boat at sea, the sun and moon will probably be below the horizon when they’re advertised to be rising and setting.
It helps to know that as the moon goes through its 29-day cycle from new to full and back, it rises a little less than an hour later each day (that’s an average that varies with several factors, but it’s a good rule-of-thumb). This generally makes the moon visible in my 20-minute exposure sweet spot the day before it’s full for a sunset moonrise, and the day after it’s full for a sunrise moonset, because there’s more foreground light to work with. But even then the landscape will be bathed in shadow, while the moon remains daylight bright, so getting myself on location in this 20 minute window is only half the battle.
In general, digital cameras have made exposure easier. Shooting film, difficult exposures meant a lot of guessing, bracketing, and (especially) hoping. Shooting digitally, not only can we instantly eyeball each image, the histogram shows us exactly how our exposure worked. Unfortunately, the histogram isn’t much help when the moon’s involved, because the moon doesn’t usually occupy enough image real estate to register on the histogram. If you’re not careful, you might find yourself reveiwing an evening’s worth of images with beautiful histograms and a hopelessly blown moon. What’s a photographer to do?
The key to exposing any high dynamic range scene is pushing the highlights as far as you can without blowning them out. For most scenes the histogram is sufficient, but exposing for the moon requires help from your camera’s Highlight Alert (blinking highlights) feature. And since most cameras allow you to view images in multiple modes (e.g., with the luminosity histogram, RGB histogram, no histogram, full capture information, no capture information, and so on), it’s also important to determine which view or views actually show the blinking highlights (not all do)—if you’re not sure, I suggest intentionally overexposing a scene and reviewing the image in the camera’s various display modes.
Moonrise
When photographing a rising full moon at sunset, simply metering for the landscape works at the outset because there’s still plenty of light to capture foreground detail without overexposing the moon. At this point the histogram tells me everything I need to know. But as the sky darkens, so does the foreground, while the moon remains unchanged.
To keep my histogram in the ideal range as twilight deepens, I add light to my image by bumping the shutter speed in 1/3 stop increments. Each time I increase the shutter speed, I check the image to ensure that the moon’s not blinking. As soon as my exposure causes the moon to blink, I know I’ve reached my highlight threshold and I’m pretty much done adding light.
Once I’ve pushed the moon to my camera’s highlight threshold, I continue shooting until the shadows are so dark that no useable data can be recovered. Because highlight and shadow recovery varies with the camera, I strongly encourage you to familiarize yourself with your camera’s shadow and highlight threshold (how far to the left and right can push the histogram and still get usable detail).
If you’re shooting raw, you can probably push your exposure until part of the moon is blinking, but if the entire lunar disk blinks, you almost certainly will need to back down your exposure. Adding a graduated neutral density filter will hold back the moon enough to buy you five or ten minutes of shooting before the moon blows out.
Moonset (an example)
Photographing a setting full moon at sunrise is the sunset process in reverse—we start with the moon glowing above a landscape much too dark to get detail without hopelessly blowing out the moon, and finish when the moon sets, or when the sky brightens to the point that the moon starts to wash out.
In January, I got my Death Valley Winter Moon workshop group out to Zabriskie Point about 45 minutes before sunrise. The moon was indeed beautiful, but far too bright to photograph with the dark foreground. But it was high enough that I was able to do long exposures without the moon while I waited for the scene to brighten.
About 20 minutes before sunrise I pulled out a 3-stop hard-transition graduated neutral density filter and started including the moon, dialing my exposure down until the moon stopped blinking—the most light I could give the scene without losing the moon. At first the foreground was still far too dark to contain usable detail, but within 5 minutes I started to feel like the scene had brightened enough to allow usable detail (albeit with a fair amount of Lightroom Shadow/Highlight work later).
From that point on, I just worked on a variety of compositions that included the moon. Monitoring my histogram, I shortened my shutter speed to reduce the exposure as the foreground brightened. Eventually the foreground brightened enough that I didn’t need the GND filter.
In a perfect world the moon reaches the horizon while it’s in the sunrise/sunset 20(-ish) minute exposure sweet-spot (sky dark enough that the moon stands out, but not so dark that I can’t get landscape and lunar detail), but this morning the moon was high enough that the contrast flattened before it set.
The above image I captured early in the sweet spot—the foreground looked quite dark on my LCD, while the moon was mostly intact, with a couple of blinking specks. But I knew my Sony a7R II well enough to be confident that simple highlight and shadow adjustments in Lightroom would recover all the necessary detail.
Photo Workshop Schedule
A Full Moon Gallery (Large and Small)


Improve your relationships
Posted on February 8, 2016
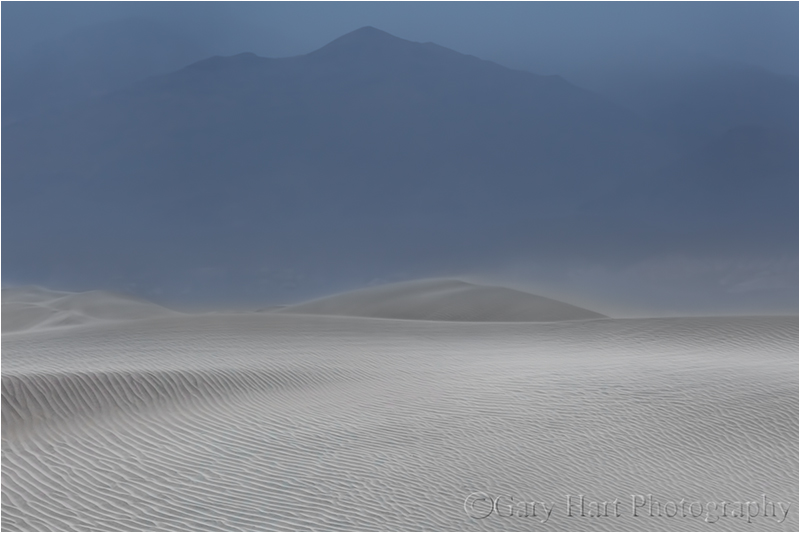
Sand and Sky, Mesquite Flat Dunes, Death Valley
Sony a7R II
Sony/Zeiss 16-35 f4
.4 seconds
F/16
ISO 100
Following a nice sunrise on the dunes, my workshop group had started the undulating trek back to the cars. While we hadn’t gotten a lot of color that morning, we’d been blessed with virgin sand beneath a translucent layer of clouds. Quite content with the soft, low contrast light for most of the morning, right toward the end the sun snuck through to deliver high contrast, light-skimming drama that provided about five minutes of completely different photo opportunities. But the sun had left and it was time to go.
Camera gear secured and backpack hefted onto my shoulders, I pivoted with my mind already on our next stop. But my plan to beeline back to the cars was interrupted when I turned and saw that fingers of cirrus clouds had snuck up behind us. It wasn’t just the clouds, it was the way their shape was mirrored by the pristine, ribbed sand that started at my feet and climbed the dune in front of me.
I quickly dropped my bag and pulled out my a7RII and 16-35. Despite my rush, before extending my tripod, I paused to study the scene. As nice as it was, I realized there were a couple of things I could do to improve it. First I circled the dune until the clouds and ripples were more closely aligned. A good start, but at eye level, the barren slope of Tucki Mountain was too prominent in the frame. I found that by dropping my tripod to about a foot above the sand, I could perfectly frame the dune with the mountain.
I composed my frame at 16mm, as wide as my lens would go, to emphasize the nearby sand, make the dune appear much larger than it really was, and give the clouds enough room to spread. To ensure sufficient depth of field, I stopped down to f16 and manually focused about two feet into the frame. While I thought a vertical orientation would be the best way to move my viewers’ eyes from front to back and to emphasize the linear nature of the parallel clouds and sand, before packing up I captured a couple of horizontal frames too.
I think the lesson here is how easy it is to miss opportunities to control the foreground/background relationships in our scenes. With my group already on its way back to the cars, I was in a hurry and could have very easily snapped off a couple of frames from where I stood when I saw the scene. Instead, I took just a little more time to align my visual elements. Despite my delay, I made it back to the cars with the rest of the group (no chance of anyone getting lost, since the cars were visible from the dunes)—I was a little more out of breath than I otherwise would have been, but that was a sacrifice I was happy to make.
Often the difference between an image that’s merely a well executed rendering of a beautiful scene, and an image that stands out for the (often missed) aspects of the natural world it reveals, are the relationships that connect the scene’s disparate elements.
In this case I only had to move a few feet to align the ridges in the sand with the clouds. But more than an alignment of sand and sky, dropping to the ground enabled me to reduce a less appealing middle-ground and replace it with much more interesting foreground and background. If I’d have dropped even lower, I could have hidden the mountain entirely, but I liked the way its outline mimicked the dune’s outline, and decided to leave in just enough mountain to frame the dune.
The next time you work on a composition, ask yourself what will change if you were to reposition yourself. And don’t forget all the different ways that can happen—not just by moving left or right and between horizontal and vertical, but also by moving up and down, and forward and backward. Not to mention all the possible combinations of those shifts.
Photo workshop schedule
A gallery of relationships in nature
(Images with a not-so-accidental positioning of elements)


Sandstorm
Posted on February 19, 2013
Sandstorm, Mesquite Flat Dunes, Death Valley
* * * *
Read my February 9 blog for more about this amazing evening on the dunes.
____________________
For nearly an hour my workshop group played in relative peace on the dunes, but about fifteen minutes before sunset the clouds dropped and our window of calm slammed shut. Just like that sand was everywhere, invading every camera, clothing, and exposed body orifice. After a few minutes of extreme photography packed up and started traipsing in the diminishing light in the general direction of the highway. Not only was the visibility limited, the tracks we’d just left and that might have guided us back to the cars had already been all but erased. But despite the difficulty it was impossible to ignore the photo opportunities brought by these new conditions and most in the group continued shooting until we were off the sand.
Looking east I saw the crest of Red Top, the tallest of the Death Valley Buttes, poking through the blowing sand, hovering like a spaceship above the dunes. I moved around a bit until I found a complementary foreground of aligned ripples and curved ridges. Wanting to ensure that the exquisite sand at my feet was sharp I closed down to f16; to capture the steady stream of sand blowing parallel to the dunes I experimented with ISO/shutter combinations before finding the effect that worked. (And said a prayer of thanks to Gitzo and Really Right Stuff for keeping everything stable.)
Contrast the color of the sand between this image and the image in my February 9 blog. The earlier image was partially warmed by rays of unfiltered sunlight breaking through gaps in the clouds; today’s image is entirely illuminated by cool, diffused light spread by the thick clouds overhead. It’s a good reminder that color isn’t simply an inherent quality of an object, but rather is a function of the object and the light illuminating it. While white balancing a scene to ensure a fixed color cast might be great for a wedding (God forbid you get Aunt Mabel’s dress wrong), it can rob landscapes of the very qualities that make them special.

Join my next Death Valley photo workshop
Pure as the driven sand
Posted on February 9, 2013

Storm Brewing, Mesquite Flat Dunes, Death Valley
Canon EOS-5D Mark III
21 mm
1/6 second
F/22
ISO 400
February 2013
Sand dunes’ graceful curves and intricate textures move and intrigue the eye, and few things better convey nature’s purity than a windswept dune. Ironically, it’s the dunes’ aesthetic magnetism that hastens their demise as photographic subjects—their fragile sand, so easily sculpted by Mother Nature’s fickle winds, is hopelessly marred by any contact with the humans drawn by their beauty.
While Death Valley has several sets of dunes, by virtue of their ease of access, the most popular by far are the Mesquite Flat Dunes near Stovepipe Wells. Every day hundreds (thousands?) of gawkers seeking a closer look trudge up and down the undulating sand—with each footstep a small amount of purity is lost. Fortunately, it’s rarely long before Mother Natures has had enough and sends in scouring winds that erase the scars like a shaken Etch-A-Sketch.
This year’s Death Valley workshops landed in the middle of an extended static without significant wind, so I knew pristine sand would be hard to find. To minimize the footprints I take my groups to a spot that’s away from the tourist foot traffic, but this time I knew that wouldn’t be enough. Nevertheless we gave it a shot and managed to find enough patches of untouched sand to isolate with a telephoto and everyone was satisfied. Except me.
So when a stiff wind kicked up the afternoon of our final full day in Death Valley I took them back out to the dunes with fingers crossed. On our drive from Furnace Creek the cars were buffeted by gusts and the entire northern horizon was obscured by dark clouds that I soon realized were in part blowing sand—a very good sign indeed. I pulled up to a spot I’d scouted a few days earlier, far removed from the paved parking area and tall dunes that draw people, and surveyed the conditions. The wind whipped anything not buttoned down and pewter clouds were rapidly overtaking the late afternoon light skimming the Cottonwood Mountains.
The group prepared for strong wind and blowing sand similar to the way we’d prepare to photograph in the rain, but in the five minutes it took to get onto the dunes the wind had mysteriously diminished to an eery calm. Before us spread pure, rippled sand for as far as the eye could see. And except for one distant photographer who quickly passed out of sight, we were the only people out there.
Fearing a shotgun approach to setting the group free would result in inadvertent footprints marring the scenes of others, I gathered everyone and suggested that we move together and agree to stay behind a predetermined imaginary line. The problem, I explained, wasn’t just staying out of everyone’s frame, it was that each step in the sand would ruin all shots in that direction. So they all followed me until I found a nice scene with a good amount variety, which we all photographed for a few minutes before I guided them to another scene. After two or three of these cycles, it seemed everyone had become comfortable enough with the environment and the ground rules that we could scatter without interfering.
I have to say that there is no kind of photography that makes me happier than what we did that evening. With virgin, textured sand and a dramatic, rapidly changing sky, the creative possibilities were off the charts. Surveying the group, it was clear that everyone was as thrilled as I was, each fully engaged in their own photographic zone. I kept telling them that they had no idea how lucky they were to be photographing these dunes without a single footprint, but I’m not sure anyone was listening at that point.
About this image
Most successful images provide a clear path for the eye to follow, or an obvious place for the eye to rest—often both. With sand dunes, so much visual motion (curves and lines) and activity (texture) makes a visual resting point particularly important. The first place I stopped the group was in front of this solitary shrub atop a low, curving ridge of sand. The scene had all the compositional elements you could ask for: elegantly arcing sand, rich texture, a dramatic sky, and a potential focal point. After pointing all this out and encouraging the group to assemble the key elements into a composition that resonates with them, I was pleased to see lenses of all focal lengths, horizontal and vertical compositions, and lots of repositioning to arrange foreground and background relationships.
Surveying the scene for myself, I noticed clouds moving in from the north painted a texture overhead that complemented the ridged sand at my feet. The filtered sunlight on the western horizon, while waning, was still sufficient to warm the scene. Finding the sand and sky equally appealing, and the shrub more interesting for its lofty perch than its inherent beauty, I tried to identify a composition that incorporated these elements.
To emphasize the foreground and sky, and to shrink the shrub, I twisted on my widest lens and dropped to about a foot above the sand. A vertical composition allied the dune’s parallel ridges with the frame’s long side to move the eye from front to back and created the impression that the entire world is converging on my little shrub. The vertical composition also narrowed the frame enough to eliminate incongruous clouds lowering on my left and right. I stopped-down to f22 and focused about three feet in front of my lens, ensuring perfect close sharpness and acceptable distant sharpness. A soft breeze swayed the shrub intermittently so I bumped to ISO 400 to allow a faster shutter speed.
In typical Death Valley fashion, it never did rain that evening. As the storm approached, all menace and bluster, our cocoon of calmness soon gave way to sand-whipping, tripod-tipping winds that lowered a cloudy shroud onto the Death Valley Buttes and Funeral Mountains to the east, cooling the light and creating an altogether different mood (that I’ll share in a future post).
Workshop Schedule || Purchase Prints
A Death Valley Gallery
Click an image for a closer look, and a slide show. Refresh your screen to reorder the display.


Death Valley Winter Moon Photo Workshop
The Road to the Racetrack, Part Deux
Posted on January 31, 2013

Last Light, The Racetrack, Death Valley
* * * *
Previously on “The Road to the Racetrack”
Racetrack Road approaches from the north and skirts the west side of Racetrack Playa in the shadow of Ubehebe (yuba-he’-be) Peak. We crested the saddle above the playa’s north perimeter and dropped out of the gray soup that had confined our world for about two hours. Before us spread the entire Racetrack Playa, its surrounding mountains draped in clouds that cascaded down their slopes like slow motion waterfalls. The light rain that had barely required windshield wipers stopped completely. Descending the saddle’s south side into the basin, our view was monopolized by the Grandstand—a cruise ship size chunk of adamellite (a dark, igneous intrusive rock similar to granite) jutting from the paper-flat playa. This is what the submerged portion of an island looks like. As we rolled past I couldn’t help thinking that the Grandstand would be a far more sought-after subject were it not for the moving rocks that take top bill here.
As much as I’d loved to have stopped to photograph the Grandstand, it was late afternoon and I was anxious to locate the main attraction before the good light came and went. The drive to the south side of the Racetrack is just one mile, but the road’s extreme washboard surface is a natural speed inhibitor; every time my speedometer nudged toward fifteen miles per hour our SUV started bouncing like an off-balance washing machine and I had to back off. Doug, Jay, and I had chuckled when the Stovepipe Wells grocery clerk told us that the rocks had mysteriously disappeared from the Racetrack, but I’ll admit to taking advantage of our slow speed to (anxiously) scrutinize the playa as we skirted its perimeter—what if it was true? Vibrating along, I saw a couple of grapefruit-size rocks trailing short tracks just west of the Grandstand, but nothing like the rocks we’d come for.
We finally stopped at the playa’s extreme south end where a couple of photographers were photographing a handful small rocks just a couple of hundred feet from the road. These rocks just didn’t seem natural to me—partly because of the nearby tire tracks marring the playa’s surface (the selfish ignorance of humans in nature never fails to disappoint me) and partly because they were so far from any rock source (these things don’t just drop from the sky). Standing there on the playa’s southwest edge, it was clear that the rocks we sought could only originate from the base of the steep mountain abutting the southeast corner. And indeed, looking more closely in that direction, we could just make out a large accumulation of black dots that could only be rocks. The playa’s utter flatness can be disorienting, but given that the Racetrack stretches one mile on its long, north-south axis, I estimated that the east side was about a half mile away. So off we set.
The playa’s color and chalky dust reminded me of a flour tortilla; its surface is a jigsaw of round polygons about three inches in diameter, separated by shallow cracks that have been filled in by the fine dust. When dry like this (there was no noticeable accumulation of the nearby rain) it’s an easy surface to walk. After ten minutes we arrived at the first rocks, toaster- to microwave-size, each with its own straight, curved, or zig-zag track. Eureka! We immediately spread out, claimed a specimen of our own, and went to work. Initially the best light was on the southwest horizon, where a hole in the clouds, obscured by Ubehebe Peak, passed enough sun to illuminate the low overcast (see the image in my previous post).
Soon our attention was drawn to the playa’s north end, toward the Grandstand, where a shaft of golden light had started skimming the dark hills and firing up the clouds there. I quickly circled the rock I was working on to swing my camera in that direction. As the shaft warmed it stretched further, eventually extending from edge to edge. As the light seemed to reach a crescendo Doug, who was set up about a hundred feet away, called out, “That almost looks like a rainbow.” I looked closer and sure enough, there was indeed a (quite faint) prism of color splashed above the sunlit hills bounding the playa’s northeast edge.
The one frame with my polarizer properly oriented for the rainbow that I managed to get off is at the top of the post. You have to look closely to see the rainbow (it’s there, I swear); careful examination reveals that the rainbow moves from green on the outside (left) to red on the inside (the shorter wavelength colors that would be left of green aren’t visible), meaning that our angle of view only gave us the fainter, outer band of a double rainbow. By the time I’d set up my next composition the light faded and with it the rainbow. Visions of a full rainbow arcing above the Racetrack dashed, we nevertheless couldn’t help feel that we’d been granted a very rare treat in this land of interminable blue sky.
The rest of our trip, though not without its moments, was anticlimax. After sunset we walked back to the car and ate dinner (soggy sandwiches for Jay and me, ramen noodles for Doug-the-chef), then went back out in the dark for a moonlight shoot without stars. By then the clouds had thickened and dropped, making it difficult to get anything that really looked like night. After a very restless night (one hour awake for every hour asleep for me), we rose for “sunrise” (or more accurately, “fogdrop”). While not quite spectacular, the low clouds swirling above the playa, spilling down the mountains in the thin light no doubt gave us unique images (that I haven’t had time to get to). And on the drive back we were able to see the terrain that had been completely obscured by clouds on our inbound trip, the highlight of which was several miles of joshua tree forest we’d been completely oblivious to earlier. In fact, despite my extreme need to be back in Furnace Creek in time for my workshop (that started at 1:00 that afternoon), at one point we encountered a scene with nearby joshua trees juxtaposed against distant, fog-wrapped mountains that we couldn’t help stopping to shoot for fifteen minutes or so.
After depositing Jay at his car in Stovepipe Wells, Doug and I made it back to Furnace Creek by 11:45 and managed to clean up, have lunch, and set up for orientation with time to spare. Piece of cake.
The Road to the Racetrack
Posted on January 28, 2013

Sliding Rock, The Racetrack, Death Valley
* * * *
A couple of weeks ago I got the bright idea to spend the twenty-four hours separating my two Death Valley workshops with a trip out to the Racetrack. While it seemed like such a good idea at the time, as my first workshop drew to a close I started longing for a bit of recharge time before the next one (it didn’t help that the first workshop’s final night was in Lone Pine near Mt. Whitney, an hour-and-a-half drive from Death Valley). But since I’d invited my brother Jay (who assisted my first workshop) and friend Doug (who would assist my second workshop), and they’d changed plans to join me, I sucked it up and made the trip (much to my ultimate delight).
You’ve probably seen pictures of the Racetrack, which, like many features in Death Valley, defies common logic. The Racetrack is a perfectly flat playa (dry lakebed) surrounded by rocky mountains that frequently shed large chunks of dolomite, many of which come to rest on the playa surface. But unlike the rocks you and I have known, the Racetrack rocks move. A lot. And as they scoot along the playa they carve tracks in the otherwise flat surface, sometimes several hundred yards long. The creepiest thing is that nobody has actually seen these rocks move. Science still doesn’t have a perfect explanation for what goes on here, but the general consensus is a combination of water, wind, and (possibly) ice is involved.
A major part of the Racetrack legend is the road out there. It’s a two hour drive on twenty-seven unpaved, unpatrolled miles of sharp rocks and jarring ruts. The road, a notorious tire eater, twists up to 5,000 feet elevation before dropping back down to 3,700 feet at the playa.
Given the time and effort it takes to get to the Racetrack, our plan was to land in time photograph sunset, wait for dark and photograph by moonlight, then throw down sleeping bags and spend the night, rising early enough to photograph sunrise. Armed with my rental SUV, if all went as planned (no flat tires), we’d make it back to Furnace Creek by noon and (fingers crossed) have time to clean up and eat lunch before starting workshop number two at 1 p.m. Piece of cake.
So, at the conclusion of workshop number one, my brother and I hustled back from Lone Pine and picked up Doug in Stovepipe Wells. Before setting out we made a quick stop in the general store, where the clerk reported that a recent Racetrack visitor had told him earlier that day that all the rocks had been stolen. Hmmm. Undeterred, we set off on our adventure with high hopes.
A light rain fell for much of the drive, quite unusual in this arid region that gets less than two inches of rain per year. And with rain comes clouds, one of which we entered not long after turning onto Racetrack Road. Instantly the visibility dropped to about one hundred feet and remained that way for much of the journey. Of course the lack of a view was of little concern to me, since my eyes strayed from the road only long enough check the dashboard tire pressure indicator.
Given the limited visibility and my targeted focus, I’m afraid I have little to report of the journey, except that it was with great relief that we somehow pulled up to the playa on schedule and without consequence. The rest of our adventure will need to wait until my next post—until then, above I offer proof that we did indeed make it, and that the trip was very much worth the effort.
Color, color everywhere
Posted on January 24, 2013

Magenta Sunrise, Zabriskie Point, Death Valley
* * * *
After three days of solid blue skies (Zzzzzzzzzzzz), yesterday morning my Death Valley workshop group was rewarded with a sunrise for the record books. I’ve seen color like this in Yosemite, Hawaii, and the Grand Canyon to name a few, but never at Death Valley.
As the group gathered at the hotel about an hour before sunrise, a deep ruby glow stained the eastern horizon. Hmmm. Second-guessing my tried and true policy of getting on location at least forty-five minutes before sunrise, I hustled everyone into the cars and we bolted for Zabriskie Point, just five (extremely long) minutes up the hill. At Zabriskie I gave a brief orientation with one eye on the expanding red that now stretched from the eastern horizon nearly to the zenith—in a matter of minutes it would reach all the way to the Panamint Mountains on the western horizon, filling the sky behind Death Valley’s most celebrated vista.
After explaining that the best place to photograph Zabriskie Point is on the dirt hilltop directly below the viewing platform, I set off with a “Follow me.” By the time I made it to the prescribed vantage point the red had indeed spilled all the way down to the Panamints. Thrilled with our good fortune I looked around—imagine my surprise to find that only two others had heeded my advice; the rest of the group had stopped well behind me to photograph in the opposite direction, lured by the electric show playing above the not-too-photogenic scene facing the sun.
Paradox alert: I spend a good deal of time teaching photographers that light trumps landscape—in other words, don’t get so locked in to the scene you came to photograph that you miss better light happening elsewhere. They had heeded my advice so well that they overlooked another truth I try to hammer home: See the world with your camera’s eye. In this case the most spectacular light was indeed behind the classic Zabriskie scene, where the eastern sky was infused with a magenta hue that was equal parts vivid and bright. On the other hand, the red sky to the west, above nearby Manly Beacon and the distant Panamints, was still quite dark to our human vision. What everyone had overlooked was that their camera’s ability to accumulate light would bring out color their eyes missed.
Fortunately, I was able to get everyone’s attention and to convince them where the real show was. We started with long exposures like the one here (30 seconds at f8 and ISO 400) that brightened the scene beyond what our eyes saw. Often sunrise color rises to a tantalizing level only to fade without warning. But this morning as the light increased, the color rose right along with it, faded briefly, then bounced back stronger than ever. At its peak the entire landscape glowed pink and the only sound was clicking shutters.
* * * *
A few words about color: I’m always amused when people question the credibility of sunrise and sunset color. I’ll grant that many people enhance their color in processing, but that doesn’t mean that every brilliant sunrise or sunset was manipulated. The truth is, there’s nothing subtle about color in nature, and when people question the color in a sunrise/sunset image, my first thought is to wonder how many sunrises/sunsets they’ve seen.
My group yesterday morning was chuckling about that problem as we packed up—we were all anticipating the inevitable doubts, some explicit, others implicit, but there was comfort in the knowledge that we all had witnesses. And for the record (I just checked), the only color work I did on this image was a slight desaturation of the blue in the sky and the magenta for the entire image.
A tale of two moons
Posted on December 24, 2012

Moonset, Badwater and Telescope Peak, Death Valley
* * * *
Going through images from earlier this year, I was struck by the difference the rendering of the moon makes in the overall effect of two images taken from different locations in Death Valley, a couple of days apart. In one, the moon is merely a garnish for a scene that’s all about the repeating patterns and harsh desolation of Death Valley’s Badwater playa; in the other, the moon is clearly the main course, enjoyed vicariously through the experience of six anonymous photographers atop a remote Death Valley ridge. In both cases, using my camera to control the moon’s size relative to the rest of the scene allowed me to emphasize the aspect of the scene I thought was most important.
Badwater moonset
Badwater is at the nadir of an expansive, paper-flat playa that spans Death Valley’s breadth between the looming Black Mountains to the immediate east and the distant Panamint Range in the distant west. At 282 feet below sea level, it’s the lowest point in North America. Centuries of flood-evaporate-repeat have spread a veneer of minerals and buckled them into a jigsaw of interlocking polygons. Some winters the playa is completely submerged beneath several inches of mountain runoff; as the shallow lake evaporates, the polygons’ protruding boundaries emerge to form interlocking reflective pools that shimmer like thousands of faceted jewels. But most of the year Badwater is a bone-dry plane that ranges from chalk white to dirty brown, depending on how long it has been exposed to Death Valley’s ubiquitous dust without a bath. To walk out onto the playa is to loose all sense of scale and distance.
On my visit last February I with a polygon that filled the immediate foreground. I went with a wide lens and dropped almost to the ground, taking care to include all of the polygon’s perimeter in my frame, a composition intended to create the sense of the endless expanse I feel when I’m out there. Including the complete polygon in the foreground (rather than cutting off a side), makes it easier to imagine the shape repeating into infinity.
A wide angle lens emphasizes the foreground and shrinks the background, in this case shrinking the moon so much that it all but disappears in the distance, just as it is about to literally disappear behind sun-kissed Telescope Peak. Making something as familiar as the moon this small enhances the illusion vastness.
A two-stop hard graduated neutral density filter kept the sky and mountain color in check at the exposure necessary to bring out Badwater’s radiant surface. And with important compositional elements near and far, I wanted lots of depth of field in this image. DOF at 28mm is pretty good, but I nevertheless stopped down to f16 and focused on a spot about six feet in front me, which gave me “acceptable” sharpness from three feet to infinity. My general rule is to bias my focus to the foreground because softness is more easily forgiven than foreground softness—on close scrutiny at 100 percent, I see that my foreground in this image is indeed perfectly sharp, while the mountains and moon are ever so slightly, but not unusably, soft (had it been the other way around, the image would have been a failure).
Moonrise silhouette
A telephoto lens compresses distance, making distant objects appear closer to the foreground than they really are. In my ridge-top moonrise, instead of shrinking the moon to emphasize the foreground as I did in the Badwater image, I stood as far back as possible and framed the photographers with an extreme telephoto, compressing the scene and magnifying the moon to make it appear closer to the silhouetted photographers (I magnified it even more later by cropping extraneous emptiness from the perimeter). And because it’s rising here, the moon’s extreme size works as a metaphor for its arrival above the landscape (contrast that with the small, departing moon in the Badwater image)—not a conscious decision, but I don’t believe it was an accident either. (Metaphor happens organically when you listen to your internal intuitive, creative muse.)

Moonrise Silhouette, Death Valley
While my right brain mused, my left brain chewed on the scene’s extreme dynamic range. The moon is always daylight bright, but here the foreground is in dark shadow—a difference between highlights and shadows far beyond a camera’s ability to capture. But my composition doesn’t require any foreground detail—in fact, foreground detail could have been a distraction. Instead I exposed for the moon, which brought out the twilight color and simplified the foreground into silhouettes that conveyed everything I needed.

