Eloquent Images by Gary Hart
Insight, information, and inspiration for the inquisitive nature photographer
The Megapixel Myth
Posted on August 9, 2020
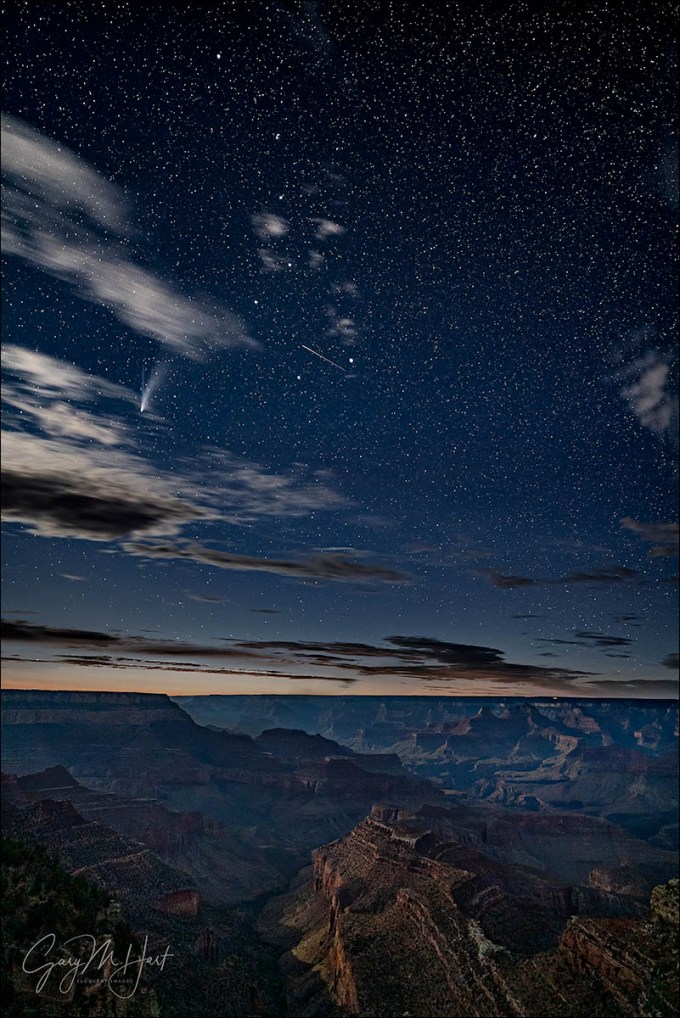
Comet NEOWISE and the Big Dipper, Grandview Point, Grand Canyon
Sony a7SII
Sony 20mm f/1.8 G
20 seconds
F/1.8
ISO 3200
I kind of have a thing for comets
As soon as I announced that I’d purchased the just-announced Sony a7SIII, people started asking why I wanted a 12 megapixel camera when I already have a 61 megapixel Sony a7RIV (two, actually). When I hear these questions, I realize the myth that megapixels are a measure of image quality is still alive. The truth is, megapixels are a reflection of image size, not image quality. In fact, for any given technology, the fewer the megapixels, the better the image quality.
Without getting too deep into the weeds of noise and clarity in a digital image, it’s safe to say the the more efficient a sensor is at capturing light, and the less heat the sensor generates, the better it will perform in these areas. How do you make a sensor more efficient? Well, you start with bigger photosites to catch more light. And how to keep the sensor cool? Give your photosites more room to breathe. But how do you make your photosites both bigger and farther apart without increasing the size of the sensor? It doesn’t take a rocket scientist to conclude that reducing the number of photosites is the only way to achieve both of these objectives.
So why do the manufacturers keep giving us more photosites? (My last rhetorical question, I promise.) Well first, advances in technology make it possible to cram more photosites onto a fixed-size sensor without compromising image quality (and in fact, often while still improving image quality). But more important that is the sad, simple truth that megapixels sell cameras.

Bridalveil Dogwood, Valley View, Yosemite
Don’t get me wrong, I think megapixel count is great and am all for as many megapixels as I can have—as long as they don’t come at the expense of image quality. The more megapixels you have, the more you can crop, and the larger you can print. While cropping is a nice safety net, goal should be to get the composition right at capture. And before chasing more megapixels, you should ask yourself how large you need to print, and how many megapixels you need to do it. Whenever this question comes up, I think about an image that I have printed 24×36 and hanging in my home. It’s an extreme close-up of a raindrop festooned dogwood flower, with Bridalveil Fall in the background. I can stand six inches from this 24×36 print and not feel like it’s missing any detail, from its delicate spider web filaments to the small dust particles suspended in the raindrops. All this was captured as a jpeg on my first DSLR, a 6 megapixel Canon 10D.
So given all this, you may be wondering why my primary camera is a 61 megapixel Sony a7RIV, with a second a7RIV as my backup. Well, like I said, all things equal, more megapixels are better than fewer megapixels, and for the vast majority of the natural light landscapes, on a tripod, that I photograph, my a7RIV bodies give me cleaner, higher resolution images than I ever dreamed possible. The dynamic range is the best I’ve ever seen, and my high ISO images are as good as any primary body I’ve ever owned. They’re so good, in fact, that last year I set aside my dedicated night camera, my 12 megapixel Sony a7SII, in favor of the a7RIV. I was getting such good results after dark with the a7RIV, I figured I could sacrifice a little low light performance to lighten my bag.
And for the most part I was satisfied—I’ve now used it enough at night to know the a7RIV is hands down the best night camera I’ve used that’s that not an a7S (original, or a7SII). But photographing Comet NEOWISE last month in Yosemite, I started to wonder if I might have been too quick to jettison the a7SII. My images were clean enough, but if I could get even less noise…
If you follow me regularly you know that I’m a one-click shooter—if I can’t get an image with one click, I don’t shoot it. That doesn’t mean I think it’s wrong to composite night images, but that approach doesn’t give me satisfaction, and I don’t like the artificial look of images that have clearly been blended. The analogy I like to use is the difference between applying a little make-up (dodging/burning and noise reduction in Photoshop), and submitting to cosmetic surgery (blending multiple exposures captured at different times, or with completely different focus and exposure settings). (There’s also a third option that’s more of a Frankenstein solution that involves assembling images from two different scenes, that I don’t even consider real photography.) My one-click approach means I have to live with more noise in my night images, but anyone viewing them knows that that truly is what my camera saw.
So anyway… For my Grand Canyon trip a couple of weeks ago, I decided to dust off the a7SII and give it a shot at Comet NEOWISE. My plan was to concentrate on the park’s east vistas to get away from the lights of Grand Canyon Village. Desert View was closed, but all the other vistas—west to east: Grandview, Moran, Lipan, and Navajo Points—were open for business. So during the day, while chased lightning out on the east end, at each stop I made a point of firing up my astronomy apps to figure out where the comet would be after dark.
Knowing that at about an hour after sunset, NEOWISE would be the northwest sky just a few degrees west of the Big Dipper (which would be dropping and rotating closer to due north as the night wore on), I decided that Grandview Point would be the best place to get it above the canyon. After it rotated farther north, I liked the way NEOWISE aligned with the canyon from the more eastern vistas. On that first night I got about 45 minutes of clear enough skies before the clouds returned.
For this trip I’d brought two tripods so I could simultaneously shoot with both the a7SII and a7RIV. On the a7SII I mounted my Sony 20mm f/1.8 G lens; on the a7RIV was the Sony 24mm f/1.4 GM lens. For both cameras I had long exposure noise reduction turned on (because with the Sonys it does make a difference for exposures measured in seconds). LENR doubles the capture time, which gave me at least 30 seconds between each shot, making it really easy to switch back and forth between cameras.
Having both cameras set up side-by-side like this, I was reminded what a nighttime monster the a7SII is—even though the a7RIV had a slightly faster lens, I could see the dark scene much better with the a7SII. I wouldn’t know how much cleaner the a7SII files would be until looked at them on my computer, but what a joy that camera is to work with in the dark.
I went with relatively few compositions, but varied my exposures for each for more processing options later. To focus, I just picked a star in my viewfinder, magnified it to the maximum, and dialed my focus ring until the star became the smallest dot possible. And even though that’s usually enough to ensure a sharp image, each time I focused I verified sharpness by magnifying the captured image in my viewfinder and checking the detail in the canyon.
I was thrilled by how much light the 20% waxing crescent moon cast on the scene. While the moonlight wasn’t noticeable to my eye, and didn’t seem to wash out the stars at all, it did cast enough light to bring out more canyon detail in my images. The small meteor that scooted through the Big Dipper during this frame was a welcome bonus that surprised me when I reviewed the image later.
When I finally got back to the room and looked at my images from that night a little more closely, the a7SII images were noticeably cleaner, so much so that when I went back out to photograph the comet the next night, I didn’t even set up the a7RIV. Is the a7RIV bad for night photography? Absolutely not. In fact, to capture 61 megapixel, high ISO, long exposure images as clean as the a7RIV does feels like cheating. But given my one-shot paradigm, and the fact that 12 megapixels is more than enough resolution for pretty much any use I can think of (for me—you need to decide for yourself how much resolution you need), for dark sky night photography, my vote goes the a7SII’s cleaner files and ease of use.
Some of my fellow Sony Artisans got to preview the a7SIII, but since it’s primarily billed as a video camera and I don’t really do video (yet), I’ll have to wait until mine arrives at the end of September (fingers crossed). But the reports from my colleagues about the a7SIII’s high ISO performance have me salivating.
Workshop Schedule || Purchase Prints
An a7S/a7SII Gallery


")


One Fine Morning
Posted on August 11, 2019
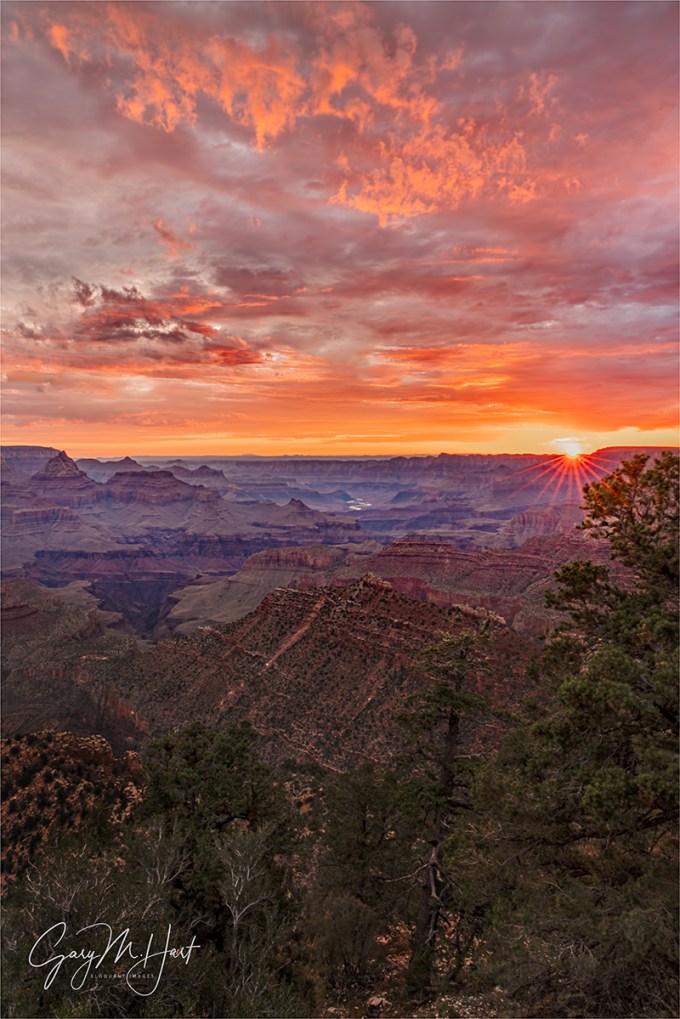
One Fine Morning, Grandview Point, Grand Canyon South Rim
Sony a7RIII
Sony 16-35 f/2.8 GM
1 second
F/18
ISO 100
Confession: 4:30 wake-ups aren’t my favorite part of being a landscape photographer. But honestly, the worst part of an early wake-up starts the instant the alarm goes off and lasts until I get out of bed, so I’ve trained myself to set my alarm with zero time to spare, which forces me to rip off the wake-up bandaid.
Though sunrise doesn’t always work out photographically, it rarely lets me down emotionally. There’s no better time of the day to be outside, when all nature’s sensory inputs are coming alive and the din of humankind is still asleep. Even in a crowded national park like Grand Canyon, it’s the best time of the day to hear the birds conversing and savor the whisper of water and wind. And with the atmosphere unfiltered by human pollutants, the spectacular sights never feel closer.
I just wrapped up two workshops at Grand Canyon. These workshops were built to maximize our lightning capture opportunities, and in that regard each workshop was a major success. But we had other memorable moments that had nothing to do with lightning, with probably most memorable being the second group’s first sunrise. (Or the first group’s first sunset, but that’s a story for a different day.)
On that morning’s eastward drive to Grandview Point, we’d passed through a couple of rain showers, but through the trees I caught a glimpse of an opening on the eastern horizon. Clouds overhead with a gap low in the east is the recipe for a colorful sunrise, but not wanting to jinx us, I kept my mouth shut until the pre-shoot orientation (a quick summary of the site—where to go and what to look for). I also suggested the possibility of a rainbow and where it would be, and gave everyone a quick refresher on how to capture a sunstar before setting them free to explore and create.
Our morning started with a deep red glow on the eastern horizon that slowly brightened and spread across the sky. With the brightening horizon behind Desert View signaling the sun’s approach, the clouds took on a shimmering pink hue. Anticipating a sunstar opportunity, I composed my scene and stopped my Sony 16-35 f/2.8 lens (my favorite sunstar lens) down to f/18. I had several minutes to spare and spent them taking in my surroundings, then snapped to action with the first brilliant rays of direct sunlight. Unlike many mornings, the color hung in there for a couple of minutes after the sun’s arrival, all the time I needed to capture this frame.
Right in the midst of my sunstar shoot someone in the group shouted “Rainbow!” and I whipped around to confirm. I’d already decided this was a pretty special sunrise, but thought the rainbow, though not complete or ideally positioned, would be the cherry on top. But the show wasn’t over—when the sun rose into the clouds and the light flattened, people started to pack up. But I noticed a few holes that would almost certainly soon send crepuscular rays (god rays) into the canyon, so we hung around long enough to add that to the morning’s checklist. Color, sunstar, rainbow, god-rays—not a bad way to start the day. (I haven’t processed the rainbow and crepuscular rays images yet—stay tuned.)
Join me for a Grand Canyon photo workshop
Memorable Sunrises


Alone on the Rim
Posted on August 5, 2019
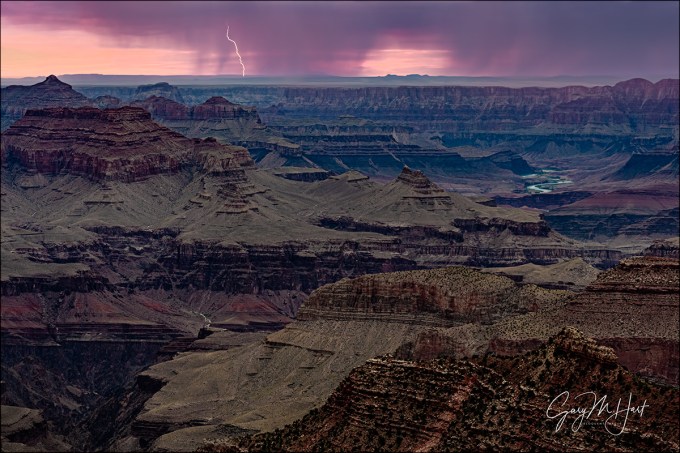
Bolt from the Pink, Grandview Point Lightning, Grand Canyon
Sony a7RII
Sony 24-105 f/4 G
Breakthrough neutral polarizer
.4 seconds
F/10
ISO 400
In a day of surprises, I think the most surprising thing was finding myself completely alone on the South Rim of the Grand Canyon—in the middle of a workshop. The sun had set, the tourists had gone to dinner, and the rest of my group, thanks to an unexpected turn of events (stay tuned), was with my workshop partner Don Smith at Desert View, about ten miles east. I love leading workshops, but the opportunity to enjoy a summer sunset alone at the Grand Canyon was too rare to not to appreciate. And as if that wasn’t enough, I was being treated to one of the most spectacular lightning displays I’d seen in all my years of photographing the Grand Canyon monsoon.
The weather gods had been messing with us since the workshop’s start two days earlier. The forecast for our first two days was so good, Don and I had virtually guaranteed everyone a lightning bolt (or ten, or 20, or…) on their memory cards by the time we headed to the South Rim on Day 3. But on Day 1 we got too much rain and not enough lightning (not unprecedented), a loss largely assuaged by a gorgeous rainbow at sunset (phew). No worries, the Day 2 lightning forecast was even more promising.
While we did see a bolt or two on the second day, we got nothing close to the classic lightning displays the North Rim frequently serves up during the Grand Canyon Monsoon. Even without any lightning photos, the day was salvaged by the night’s fantastic Milky Way shoot at Cape Royal—an evening so warm that most of us kept the jackets packed and did the whole thing in T-shirts.
But lighting is this workshop’s Holy Grail, and the pressure was building for Don and me. For a few reasons, the North Rim is usually generates about 80 percent of our lightning success. But after being shut out for our two North Rim days, now it was time to motor to the much more crowded South Rim, where the crowds are oppressive and weather forecast called for a measly 10 percent chance of thunderstorms. Suddenly my optimism was waning.
Mother Nature is fickle, and I’m pretty sure she was punishing me for being a little too cocky at the beginning of the workshop. Because on the road to the South Rim (about the time I started to admit serious doubts about our lightning chances), she started filling my windshield with billowing cumulus clouds—not friendly cotton-ball puffs, these clouds were dark, angry towers. By the time we checked into our hotel, our lightning app was showing signs of sneaking activity sneaking up from the south (behind us).
Though nothing was happening near the canyon yet, experience has taught us to be proactive when the storms are building. So rather than wait until the planned sunset departure time, Don and I herded the group to the cars and we bolted for the rim as soon as we could get everyone assembled. Turning east on Desert View Road toward our sunset destination, Desert View, we pulled over at the very first vista. We hopped out to take a look and as Don and I surveyed the view, someone spotted lightning directly across the canyon. Showtime.
This was indeed a great show, with at least one or two bolts per minute for nearly an hour. Within 15 minutes it was pretty clear that everyone had captured multiple strikes and Don and I could relax—everyone would go home with the lightning photos they came for. The storm was still active when increasing wind and threatening clouds led us to decide it would be prudent to move on.
The next stop on the way to our way to Desert View was Grandview Point, and that’s where things took an unexpected turn. First, when I went to change the precariously low battery on my Sony a7RIII, I realized my backup battery was at home on the charger (gone are my Sony a7RII days when I carried six batteries). But that crisis was soon set aside when one of the members of the group had an emergency that required her to return to the hotel. After a bit of discussion and a little math (Do we have enough seats for the rest of the group to continue to Desert View for sunset? Answer: Yes, with none to spare), I drove her back while everyone else continued on to photograph sunset.
Back at the hotel I did a bit more math and realized there was no way I could make it all the way out to Desert View in the 50 minutes remaining until sunset. But seized by FOMO*, I grabbed my a7RII, checked the battery (fully charged—yay!), and headed back to the rim with no particular plan—even if I couldn’t make it back to the group, I just wanted to be somewhere for sunset. At the junction with Desert View Road I headed east again, away from the Grand Canyon Village congestion and toward some of the less crowded vistas.
The entire sky was gray and at first I thought sunset might be a dud, but then I caught a thin layer of brightness in my rearview mirror and realized there was a hole on the horizon—when the sun drops into it, everything might just light up for a few minutes. I checked my watch and goosed the accelerator hoping to make it as far as Grandview Point. Unfortunately, in the national parks you can only go as fast as the next Winnebago, and sunset was less than 10 minutes away when I dove into my Grandview parking space. I grabbed my camera bag and dashed down the trail to my favorite view atop an exposed rock outcrop, not realizing until headed off-trail that I was still in my flip-flops. But with no time to go back for more sane footwear, I continued slip-sliding my way down to my destination and (barely) made it with all limbs intact.
The color was starting but as soon as my camera was set up, but I took a few seconds to get my adrenalin under control. The first thing that struck me was the quiet, most unusual for a Grand Canyon summer sunset. I attributed it to the storm, which had just moved on from here, and the fact that Grandview isn’t heralded as a sunset location (because most non-photographers like their sunset views to face west, and there are better spots at Grand Canyon for that).
As expected, there was indeed great color that evening, but even more exciting was all the lightning in the east: Cloud to ground, cloud to cloud, cloud flashes, multiple bolts, extreme zig-zags—pretty much a who’s who of lightning, several times per minute. Most of the lightning was firing somewhere in the empty desert beyond Desert View, but it looked far enough away that the group was safe. From my perspective there was no canyon or anything else interesting in the direction of extreme activity, so I pointed my camera at a somewhat promising curtain of rain that aligned better with my view of the canyon—and hoped.
Photographing lightning is more thrilling than I can describe, and I can think of no better place for it than Grand Canyon. The distance of the views here relieves (most of) the anxiety that comes with viewing lightning—so far on this trip I’ve captured 116 frames with lightning (yes, I count them) and still haven’t been close enough to any of them to have heard their thunder. And Grand Canyon puts the actual lightning experience on steroids because during the long peaceful periods between strikes you’re gazing upon one of the most breathtaking views on Earth. When a bolt explodes from the clouds, its metaphorical jolt to my psyche seems to match it’s actual 50,000 (ish) volt electrostatic jolt.
I only captured a half-dozen or so strikes over the canyon that evening, but all I need is one. This one touched down several minutes after sunset, about 30 miles away. It came right at the peak of the color and couldn’t have been more perfectly timed or placed. And as I waited for the next bolt to trigger my camera, I got to enjoy this view the same, infinitely more spectacular, light show the rest of the group was enjoying—in glorious, absolute quiet.
* FOMO: fear of missing out
My Approach to Photographing Lightning || Join My Next Grand Canyon Workshop
Workshop Schedule || Purchase Prints
Highlights of (nearly) a Decade Chasing Lightning


A National Park Secret
Posted on August 10, 2017
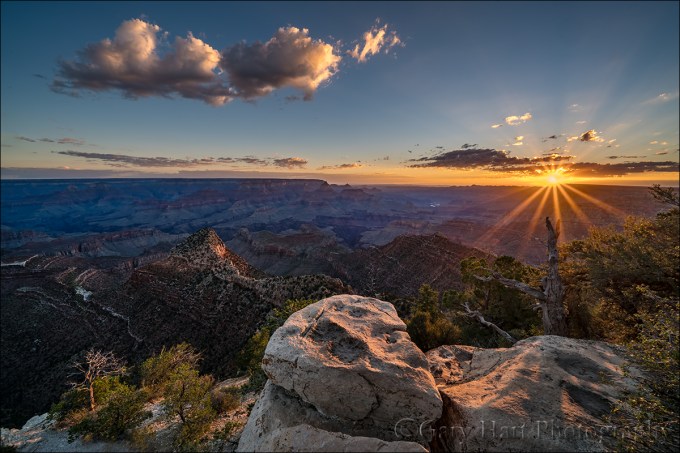
New Day, Grandview Point Sunstar, Grand Canyon
Sony a7R II
Sony 12-24 f4 G
12mm
1/8 second
F/18
ISO 100
America’s National Parks have always been busy in the summer, but in recent years the summer crowds have virtually overwhelmed many of our parks. Between gridlock on the roads, more cars than parking places, and hip-to-hip tourists at the vista rails, what was once an opportunity to commune with nature has become a survival of the fittest endurance test.
My solution has been to avoid the national parks in summer, but for many summer is the only time to visit the special locations they’ve longed to see for their entire lives. And the only thing worse than visiting Yosemite or Grand Canyon in summer, is never visiting them at all.
Though I can’t make the crowds go away, let me offer an experience-based suggestion that is guaranteed to enhance your national park experience: Sunrise. Or more accurately, the morning hours from about thirty minutes before sunrise until around two hours after sunrise.
For most people the idea of rising before the sun on a vacation is laughable, but therein lies the genius. If you can overcome the urge to be most people, you can enjoy America’s most crowded national parks, at the height of the summer rush, in glorious peace. You won’t be alone, but you’ll be savoring the day’s first rays with a microscopic subset of the park’s total visitors, kindred spirits who relish nature and solitude as much as you do, who speak softly, stroll slowly, and respect personal space.
About this image
As much as I try to leave the national parks to the tourists in summer, my desire to photograph the lightning and rainbows of the Grand Canyon’s summer monsoon leaves me no choice. A couple of days ago, Don Smith and I guided our photo workshop group out to photograph sunrise at Grandview Point on the always crowded South Rim. Grandview is one of Grand Canyon’s most popular spots, but leaving our hotel about 45 minutes before sunrise got us out there about a half hour before the sun, and long before the tourists had even hit their snooze button the first time.
There were just a couple of other cars in the parking lot, the same lot that in just a few hours people will be circling in vain for five, ten, even fifteen minutes. Having Grandview virtually to ourselves, the group was able to spread out and find their own view of the canyon without competing with the teaming midday hordes that most people experience there.
Along with a few other people in the group, I set up in front a concave sandstone rock with a view across the canyon to where the sun would soon appear. Because this is my first trip with my new Sony 12-24 f/4 G lens, I’ve been making a point to familiarize myself with it, so I twisted it on and went wide. With a clear horizon and relative dearth of clouds, I dialed my f-stop to f/18 to ensure a good sunstar when the sun crested the horizon, and composed a frame.
When photographing a sunrise, the advancing light makes it impossible to set the exposure very far in advance. In these rapidly changing conditions, I love my mirrorless Sony a7RII’s pre-capture histogram in my viewfinder—I just kept my eye on the histogram, dropped the shutter speed in 1/3-stop increments as the horizon brightened, and was ready to hit the ground clicking the second the sun appeared.
Grand Canyon Monsoon Photo Workshops
Workshop Schedule || Purchase Prints
A Grand Canyon Gallery
Click an image for a closer look and slide show. Refresh the window to reorder the display.


