Eloquent Images by Gary Hart
Insight, information, and inspiration for the inquisitive nature photographer
Distilling the Essence
Posted on April 2, 2023

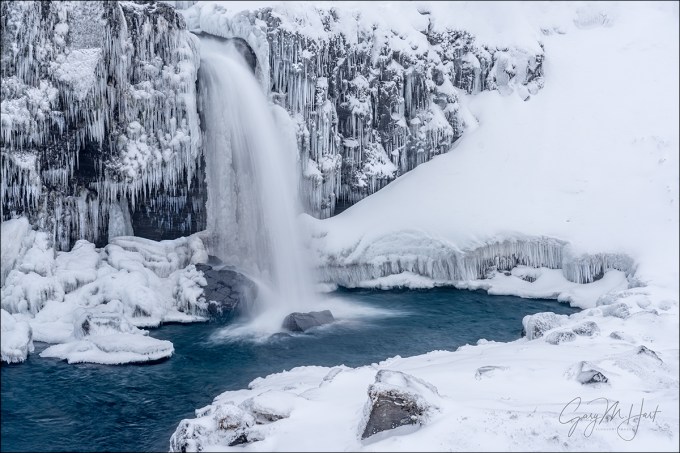
Frozen, Skógafoss, Iceland
Sony a7R V
Sony 100-400 GM
ISO 100
f/10
1/13 second
The art of subtraction
Presented with a complex world, the nature photographer’s job is to identify a scene’s visually interesting elements and figure out how to use them in an image. While most photographers have no problem seeing what to include in their images, many struggle with what to leave out. But the best pictures usually work at least as much for what’s not in them as for what’s in them.
That’s because, as much as we seek beauty to add to our images, photography is ultimately an art of subtraction. Our ability to ruthlessly subtract elements that, despite their inherent visual appeal, don’t serve the image is an important skill that’s worth cultivating.
When I look back at old images that somehow ended up pleasing me less than the scene excited me when I photographed it (we’ve all been there, right?), I see now that often the problem was that I included too much. The product of my failure was an image with visual busyness that distracted from the main point, or that completely lacked a point, and confused viewers: “What am I supposed to be looking at here?”
As my photography evolved, I started identifying ways to distill complex scenes. One approach is through careful use of exposure variables to manage what I call photography’s “creative triad”: motion, depth, and light—motion blur to smooth turbulent or choppy water; focus blur to soften background and foreground distractions; and silhouette or high key exposure to erase unwanted elements and simplify the scene to just color and shape.
But even before working the creative triad, distilling a scene to its essence requires ruthless (there’s that word again) cropping—simply knowing what to put in, what to leave out, and the confidence (courage) to do it. Start by identifying the elements in the scene that draw the eye. Think in terms of implicit connecting lines that define their relationship to each other. Move around—forward/backward, left/right, up/down—until your prime elements feel organized.
If you’re still not feeling a connection between all of your prime elements, it’s time to start eliminating things—you can always return to that beautiful subject you composed out and feature it in another composition. And if you’re still not finding visual coherence, don’t be afraid to just click an image, stand back and evaluate it on your camera’s LCD screen, and adjust. Then repeat as necessary.
Try this
One simple way to exercise this skill is with the Crop tool in Photoshop or Lightroom. Start with any image (your own or someone else’s—the goal is to train your eye, not to create an image you’ll use), open it in your image processing software of choice (I use Photoshop for this exercise), set the Crop tool to 2/3 aspect ratio (or whatever your camera uses), and see how many new images you can find in the original. Whether the source image was horizontal or vertical, use both orientations of the Crop tool. Again, this is an exercise to train your eye, not to create a usable image, but I’m confident that you’ll find this new vision translates to your viewfinder when you’re in the field.
You can do the same thing on location with a telephoto lens. After you feel like you’ve exhausted all of a scene’s wide options, remove the camera from the tripod, increase your focal length by zooming tighter or switching to a longer lens, and slowly pan with your eye to the viewfinder. Closely monitor your reaction to what you see and honor any urge to stop. The goal isn’t to forgo wide angle compositions, it’s to help identify the scene’s essence, those visual aspects of the scene that matter most. I think you’ll be surprised by what you find (what your eyes originally missed).
For example

Winter Rainbow, Skógafoss, Iceland
Too often we get so caught up in a scene’s grandeur and miss the details that make it special. Most nature photographers when presented with a grand scene go straight to a wide angle lens—a perfectly valid way to start. The problem is, once we feel like we’ve nailed the wide shot, we move on—even if not physically, then at least mentally.
After a long drive from Iceland’s Snæfellsnes Peninsula, still basking in the thrill of the previous night’s aurora show (and oblivious to the show we’d enjoy that night), the Iceland workshop group wasn’t really thinking about much but getting comfortable at our hotel in Vik. But anyone arriving at Skógafoss near Iceland’s South Coast on this January afternoon couldn’t help being excited by the scene’s beauty.
Always an impressive waterfall for the massive amounts of water it dispenses, recent extreme cold (even for Iceland) had turned the abundant mist saturating the surrounding rocks into an icicle convention. But the real eye candy that grabbed everyone’s instant attention was the rainbow ebbing and flowing with the wind above the fall—one second it was there, the next it was gone.
Reinvigorated, we all charged from the bus and “rushed” as fast as our crampons could navigate the frozen path. Wanting to capture all this scene’s beauty, I instantly reached for my Sony α1 which was preloaded with my Sony 16 – 35 f/2.8 GM lens. Each time the rainbow appeared I clicked like crazy, trying a variety of wide compositions and continuing until shadow overtook the fall and the rainbow disappeared for good.
It would have been so easy to be satisfied with my bounty and retreat to the comfortable warmth of the bus. But before leaving I took a few seconds to scrutinize the surrounding ice more closely. And the longer I looked, the more I realized that I was seeing something truly special. I grabbed my Sony a7R V, attached my Sony 100-400 GM lens, and started panning the scene, finally stopping on this beautiful natural ice sculpture.
After attaching my camera to my tripod, I spent the next 20 minutes repositioning, then deliberately clicking and refining, until I was satisfied that I’d found the right location and framing. In the wider image with the rainbow, this section of ice was still illuminated by low, warm sunlight that created deep shadows and bright highlights. But by the time I landed on this composition, the sunlight was gone and all the ice was bathed in cool, soft shadow with minimal contrast.
This is another one of those simple images that probably won’t generate a swarm of social media attention, but it makes me happy because it taps one of the prime reasons I’m a photographer: to reveal Nature’s exquisite intricacies that are often overlooked in favor of more in-your-face beauty.
Workshop Schedule || Purchase Prints || Instagram
Essence Distilled
Click any image to scroll through the gallery LARGE


, California")


Nature’s Gifts: Reflections
Posted on January 2, 2023

Autumn on Ice, El Capitan Reflection, Yosemite
Sony α1
Sony 16 – 35 f/2.8 GM
1/4 second
F/18
ISO 100
Sometimes Nature delivers us something that’s so beautiful, it just has to be a gift. When we think of Nature’s gifts, it’s often in terms of locations, like Yosemite or Grand Canyon (gifts indeed!). But today I’m thinking about Nature’s transient beauty: the perfect arc and vivid colors of a rainbow, a brilliant crimson sunrise or sunset, or an aurora dancing among the stars (I could go on)—beauty that can simultaneously surprise and wow us.
Underrated on Nature’s list of gifts are reflections. Doubling the scene, reflections signal tranquility. And like a metaphor that engages the brain in ways different than we’re accustomed, a reflection is an indirect representation that can be more powerful than its literal double. Rather than allowing us to process the scene directly, a reflection challenges us to mentally reassemble its reverse world, and in the process perhaps see the scene a little differently.
Reflections can feel like a fortuitous gift that we just stumbled upon. But given that reflections are entirely beholden to the laws of physics, they’re far more predictable than many of the natural phenomena we photograph. Taking a little time to understand the nature of reflections and how they’re revealed by a camera enables photographers to anticipate their appearance and craft their relationship to the surrounding landscape in an image.
Without getting too far into the physics of light, it’s important to understand that every object we see (and photograph) that doesn’t generate its own light, comes to us courtesy of reflected light. In other words, what we call a reflection is in fact re-reflected light (reflected first from the object itself, then by the water).
For example, when sunlight strikes El Capitan in Yosemite, some of the sun’s photons bounce back into our eyes, and there it is. But other photons head off in different directions—some to be captured by different sets of eyes, while others land on the surface of the Merced River far below. A few of these photons penetrate the water, illuminating leaves and rocks on the submerged riverbed, while others carom off the water at the same angle at which they struck—only in the other direction, much the way a pool ball ricochets off the pool table’s cushion. When our eyes are in the path of these bounced photons, we see a reflection.
The recipe for a mirror reflection
Water reflections come in many forms, from a mirror-sharp inverted mountain peak glistening atop a still pool, to an abstract shuffle of color and texture on an undulating lake. Both have their place in creative photography.

Autumn Reflection, El Capitan and Three Brothers, Yosemite
The ideal recipe for a mirror reflection is pretty simple: still water, a sunlit subject that’s much brighter than the water’s surface (the greater the contrast the better), and a view angle that matches the angle at which the sunlight struck the water’s surface. And while a sunlit subject and shaded surface aren’t essential, the more photons striking the reflected subject, and the fewer non-reflected photons (ambient light) striking the reflective surface, the greater the contrast that helps the reflection stand out.
El Capitan Autumn Leaves, Yosemite: With El Capitan getting direct sunlight and the slow moving Merced River still shaded, I had the sharp reflection I hoped for. With just a little bit of searching, I positioned myself to include nearby floating autumn leaves.
Playing the angles
Just because you don’t see a reflection in the still water in front of you, doesn’t mean there’s no reflection—it just means you’re viewing from the wrong angle.
Understanding that reflected photons leave the water’s surface at the same angle at which they arrive—imagine the way a tennis player anticipates the ball’s bounce to get in position—allows us to position ourselves to photograph the reflection we want. For example, if the angle from your subject to the water is 40 degrees, its reflection will bounce off the water at 40 degrees in the other direction.

Sunset Palette, Half Dome from Sentinel Dome, Yosemite
To locate the reflection, set your camera aside and move up/down, backward/forward, and left/right until you see find it. Then bring your camera back in and position it exactly where your eyes were when you saw the reflection.
Half Dome from Sentinel Dome, Yosemite: One summer evening I found myself atop Sentinel Dome shortly after an intense rain shower had turned indentations in the granite into small, reflective pools. Seeing the potential for a spectacular sunset above Half Dome, I wanted to include the colorful clouds reflected in the pools. At eye-level the pools reflected nothing but empty sky, so I dropped my tripod almost to granite level until my lens found the angle that intercepted the red clouds just above Half Dome bouncing off the still water.
When the water’s in motion
As spectacular as a crisp, still water mirror reflection is, it’s easy to overlook the visual potential of a reflection that’s not crisp, and to forget your camera’s ability to render a soft or abstract reflection much better than your eyes view it.

Before the Sun, South Tufa, Mono Lake
While a crisp reflection can dominate an image, a splash of reflected color or shape can beautifully accent a striking primary subject. And a reflection that’s lost to the continuously varying angles of rippled or choppy water, magically appears as a soft outline when a long exposure smooths the water’s surface into a gauzy haze.
South Tufa, Mono Lake: In this sunrise image, all the ingredients were in place for a special reflection. Just as the color arrived, a light breeze stirred the lake’s surface with gentle undulations. I used a 6-stop neutral density filter to enable a multi-second exposure that completely smoothed the lake’s surface. While not a perfect mirror, the resulting reflection has a very pleasing soft, gauzy look.

Autumn Reflection, El Capitan, Yosemite
Where to focus
An often misunderstood aspect of reflection photography is where to focus. Though counterintuitive to some, the focus point of a reflection is the reflection’s subject, not the surface it reflects on. This isn’t a big deal when the focus point of everything of visual significance is infinity, but it’s a very big deal when you want both your distant subject’s reflection and the nearby rocks or leaves on or in the water surface to be sharp.
Photographing a distant subject reflecting in a pool of leaves requires the same hyperfocal depth of field approach you’d use for any other close-to-distant image: small aperture and a focus point slightly beyond the closest thing that needs to be sharp.
El Capitan Reflection, Yosemite: Photographing autumn leaves atop El Capitan’s reflection required impossible depth of field to capture sharpness throughout. Even though the leaves and reflection were just a few feet in front of me, focusing for a sharp reflection would have softened the leaves. To increase my depth of field, I stopped down to f/18 and focused toward the back of the closest group of leaves, then magnified the image on my LCD to verify that all of the leaves were sharp. Though El Capitan’s reflection is slightly soft, a soft reflection is almost always more forgivable than a soft foreground.
Polarizer

Reflection on the Rocks, Lake Wanaka, New Zealand
Put simply, a polarizer cuts reflections. Most photographers use a polarizer to darken the sky, and while that can be a nice effect, the polarizer’s value is far greater than that. More than to darken the sky, polarizers remove subtle reflective sheen that washes out color on foliage and rocks.
An underappreciated polarizer use is to erase a reflection to reveal submerged rocks, leaves, and texture. After photographing a reflection with no polarizer or polarization minimized (maximum reflection), rotate the polarizer to minimize the reflection (maximum polarization) and capture submerged features hidden by the reflection. You might be surprised by how different the two images are, and how much you like both versions.
Lake Wanaka, New Zealand: But a polarizer isn’t an all or nothing tool. When photographing the solitary willow tree in Lake Wanaka, I carefully watched the reflection in my viewfinder while rotating my polarizer, stopping when I reached a polarization midpoint that included some reflection, while still revealing the mosaic of stones just beneath the lake’s surface.
Rainbows
Rainbows are a very special kind of reflection that happens when light is refracted (separated into its colorful wavelengths) upon entering airborne water droplets. This refracted light reflects off the back of the droplet to create a rainbow.
Because the laws of physics apply to all reflections, we know that a rainbow would actually form a full, 42 degree circle if it didn’t encounter the horizon. The center of this circle is at the anti-solar point—the point exactly opposite the sun (with your back to the sun, imagine a line from the sun through the back of your head and exiting between your eyes). That means that your shadow will always point at the rainbow’s apex. And the lower the sun, the higher the apex will be. Read more about rainbows.

Rainbow Bridge, Colorado River, Grand Canyon
Double Rainbow, Colorado River, Grand Canyon: Understanding rainbow physics allowed me to anticipate a rainbow despite a black cloud blocking the sun and drenching everyone in my raft trip group. When I saw that the sun was about to pop out of the cloud and into a large patch of blue sky, I rallied my group and pointed to where the rainbow would appear. A few minutes later their skepticism turned to ecstasy when we all started capturing images of a double rainbow bridging the Grand Canyon.
Outside the box
Reflections also provide wonderful creative opportunities. An often overlooked opportunity is the potential found in reflections that aren’t mirror-like. And, in addition to the more conventional reflection composition that’s split somewhere near the middle to give more or less equal frame real estate to the subject and its reflection, some of the most creative reflection images concentrate entirely, or almost entirely, on the reflection.

Autumn on Ice, El Capitan Reflection, Yosemite
I found this El Capitan reflection at Cathedral Beach on the final afternoon of last month’s Yosemite Winter Moon photo workshop. After capturing a crisp, top-to-bottom El Capitan reflection, I repositioned myself to juxtapose much of El Capitan against the faceted veneer of ice topping the river. An added bonus of water still enough for ice to form was that it allowed drifting, recently fallen autumn leaves to settle and accumulate on the river-bottom here.
Finding the best spot combine the reflection, ice, and leaves in a single frame, I dropped low enough to get a sharp reflection El Capitan’s nose in the still, iceless water close to the shore. To ensure sharpness in the ice and the reflection (as well as the distant trees and El Capitan), I stopped down to f/18 and focused midway into the ice.
Almost all of the foreground was shaded, but with bright, direct sunlight brightening the clouds and El Capitan, this scene’s dynamic range was a real factor. But my reflection-centric composition eliminated the clouds brightest granite, making the exposure much easier. Finally, I tried multiple polarizer positions until I found the one with the best combination of reflection and submerged leaves.

Sunset Mirror, Yosemit
I was so focused on the other visual elements in this scene, I didn’t fully appreciate the bare trees across the river. But when I started processing the image and viewed it on my large monitor, I was pleased by how much they add to the wintry feel of this image.
Double your pleasure
Whether it’s a shimmering mirror, a gauzy haze of color and shape, or a colorful rainbow, reflections are a gift from Nature—camera or not. By doubling the beauty surrounding us, reflections have the power to elevate ordinary to beautiful, and beautiful to extraordinary.
For photographers, reflections provide boundless creative opportunities. When exploring outdoors with a camera, some reflections seem to jump out and grab us by the eyeballs, while others require a little more work. Either way, when properly conceived and executed, a reflection image possesses a visual synergy, conveying beauty that more than doubles the scene’s two halves.
Workshop Schedule || Purchase Prints || Instagram
El Capitan Reflections
Click any image to scroll through the gallery LARGE


, Yosemite")


Border Patrol
Posted on January 10, 2021
Frozen, Kirkjufellsfoss, Iceland (2020)
Sony a7RIV
Sony 24-105 G
1/2 second
F/9
ISO 200
A year ago Don Smith and I, with the aid of our Icelandic guide (the legendary Óli Haukur), had a blast sharing Iceland’s winter beauty with a great group of photographers. But our trip wasn’t without its challenges. One of our earliest locations was Kirkjufell, arguably Iceland’s most recognizable mountain. While proponents of Vestrahorn might debate this, no one will deny that everyone who visits Iceland wants a picture of Kirkjufell, just as everyone visiting Yosemite wants a picture of Half Dome. And even though Kirkjufellsfoss (the nearby waterfall) is gorgeous and the obvious foreground for Kirkjufell images, the mountain really is the main event here.

Frozen Sunrise, Kirkjufell, Iceland (2019)
So imagine our disappointment on the morning our workshop group visited Kirkjufell and found the mountain completely obscured by clouds. Not only that, the temperature was 25 degrees (F), and a 40 MPH wind made it feel like 5 degrees and turned the sleet into rocketing needles. In other words, it was stupid-cold. Nevertheless, our hardy group geared up, braved the short trudge out to the vista, and went to work without complaint.
While waiting for Kirkjufell to emerge (fingers crossed), I turned my attention to the tiered, multi-channel, ice-encrusted Kirkjufellsfoss. In normal conditions, while waiting for the Kirkjufell to appear it would have been natural to fire off a few oooh-that’s-pretty clicks of the waterfall. But without the distraction of Kirkjufell (or anything else more than 1/2 mile away), I set up my tripod and actually worked the scene like an actual photographer (go figure). And as often happens when I spend quality time with a scene, the longer I worked this one, the more I saw.
Border patrol
With so much going on, the trickiest part of making this image was managing all the scene’s visual elements while minding my frame’s borders. As much as we try be vigilant, sometimes the emotion of a scene overwhelms our compositional good sense—we see something that moves us, point our camera at it, and click without a lot of thought. While this approach may indeed capture the scene well enough to save memories and impress friends, it’s far from the best way to capture a scene’s full potential. So before every click, I do a little “border patrol,” a simple mnemonic that reminds me to deal with small distractions on the perimeter that can have a disproportionately large impact on the entire image. (I’d love to say that I coined the term in this context, but I think I got it from Brenda Tharp—not sure where Brenda picked it up.)
To understand the importance of securing your borders, it’s important to understand that our goal as photographers is to create an image that not only invites viewers to enter, but also persuades them to stay. And the surest way to keep viewers in your image is to help them forget the world outside the frame. Lots of factors go into crafting an inviting, persuasive image—things like compositional balance, visual motion, and relationships are all essential (and topics for another day), but nothing reminds a viewer of the world outside the frame more than an object jutting in or cut off at the edge.
When an object juts in on the edge of a frame, it often feels like part of a different scene is photobombing the image. Likewise, when an object is cut off on the edge of the frame, it can feel like part of the scene is missing. Either way, it’s a subconscious and often jarring reminder of the world beyond the frame.
And there are other potential problems on the edge of an image. Simply having something with lots of visual weight—an object with enough bulk, brightness, contrast, or anything else that pulls the eye—on the edge of the frame can throw off the balance and compete with the primary subject for the viewer’s attention.
To avoid these distractions, I remind myself of “border patrol” and slowly run my eyes around the perimeter of the frame. Sometimes border patrol is easy—a simple scene with just a small handful of objects to organize, all conveniently grouped toward the center, usually requires minimal border management. But more often than not we’re dealing with complex scenes containing multiple objects scattered throughout and beyond the frame.
In this Kirkjufellsfoss scene I had to contend with ice, rocks, snow, and flowing water. The biggest problem was an assortment of randomly dispersed rocks jutting from the snow at bottom of the frame, and a railed pathway visible just above the fall. It wasn’t too hard to eliminate the path with careful placement of the top of my frame, but if my entire focus had been on the waterfall the rocks might have been overlooked. Border patrol. Placing the bottom of my frame a little higher would have cut off the large rock near the bottom-center, an important compositional element that combines with the fall to create a virtual diagonal; placing the bottom lower would have introduced more rocks that I’d have had to cut off somewhere. Instead, I was able find a clean line of snow that traversed the entire bottom of my frame: perfect! (And lucky.)
One other important compositional element that would have been easily easy to overlook is the switchback snow-line that enters the frame at the bottom and exits at the top (or vice-versa). Diagonals like this are strong compositional elements that I love including whenever possible, so I chose a horizontal composition to allow room for each switchback to complete. The eye subconsciously follows lines like this, so cutting them off on the edge of the frame is an tacit invitation to exit the scene, something I try to check for when I execute my border patrol.
Of course nature doesn’t often cooperate and I’m usually forced to chop off parts of visual elements. When I do this, I always want it to be a conscious decision that doesn’t make my viewer think that I’ve cut off something that belongs in the scene, or that something jutting in is part of a different scene. Usually when I have to cut something on the edge (often impossible to avoid), I try to do it boldly, somewhere near the middle of the object, to signal that was my intent and not just an oversight.
I realize because these things are often only noticed on a subconscious level they may seem trivial, but every image is house of cards comprised mostly of small decisions, and you never know which one might send it crashing down.
Epilogue
I did end up photographing Kirkjufell this morning, but didn’t get anything that thrilled me.
Minding the Border
Click an image for a closer look and slide show. Refresh the window to reorder the display.


