Eloquent Images by Gary Hart
Insight, information, and inspiration for the inquisitive nature photographer
To Polarize, or Not to Polarize
Posted on March 3, 2020
One of my most frequently asked questions during a workshop shoot is, “Should I use my polarizer here?” Of course that’s an impossible question to answer absolutely because as a creative choice, the polarizer decision is rarely absolute.
While many people believe the sole purpose of a polarizer is to make the sky darker (deeper blue), blue sky is just a byproduct of the polarizer’s function: to cut reflections. In fact, if someone could design a polarizer that only worked on the landscape and did nothing to the sky, that’s the one I’d be using because: 1) I generally don’t care for blue sky in my images, and 2) a polarizer doesn’t usually darken the sky uniformly.
Before going any farther, I should probably explain a little about what a polarizer does, and how it does it.
Put simply
A polarizer cuts reflections. It’s a piece of glass mounted on a threaded ring—the threaded ring screws onto a lens, while the glass part of the polarizer rotates independently, allowing the photographer to rotate the glass 360 degrees on the front of the lens. (Contrary to popular belief, a polarizer is a single piece of rotating glass, not one piece of glass rotating atop a second stationary piece of glass.) The polarizer is designed to rotate because its greatest (reflection cutting) effect is at 90 degrees to the light source; at all other angles polarization decreases as the angle moves away from 90 degrees; it becomes nonexistent at 0 and 180 degrees. By watching the scene through the viewfinder as you rotate the glass, you can see the polarization effect change.
On the surface, cutting reflections might not seem so desirable for someone who likes photographing reflections as much as I do, but reflections are a much bigger part of our visual experience than most people realize. Virtually every object reflects at least a little, and many things reflect a lot more than we’re aware. Worse still, these reflections often hide the very surface features and color we most want to photograph.
When reflections hide an object’s underlying beauty, a polarizer can restore some of that beauty. I use a polarizer when I want to capture the submerged rocks or sand hidden by the reflection atop a river or lake, the rich color overwhelmed by glare reflecting from foliage, and sometimes even the sky’s deep blue that has been washed out by light scattered by atmospheric molecules.
Put a little less simply…
In reality, reflections are merely collateral damage to your polarizer. What a polarizer really does is eliminate light that’s already been polarized. To understand what’s really going on with a polarizer, read on….
Essential terminology
- Oscillation is motion relative to a fixed point. For example, when you snap a whip, the whip “oscillates” along its length. Without external interference (e.g., friction from the atmosphere or other objects), motion in one direction along the whip will have an identical motion in the opposite direction (e.g., up=down, left right, and so on), and that motion will move forward along the whip.
- A wave is oscillation along or through a medium (such as air, water, or space). The bulge that moves up and down (oscillates) along a cracked whip is a wave. For the liberal arts folks, (in this context) wave is a noun, oscillate is a verb. A wave is measured by its wavelength and frequency—the higher the frequency, the shorter the wavelength.
- Frequency is the number of times a wave peak passes a discrete point in a given unit of time (usually one second: “per second”).
- Wavelength is the distance from one wave peak to the next at any instant frozen in time.
- A transverse wave oscillates perpendicular (90°) to its direction of motion. To imagine the motion of a transverse wave, picture an ocean wave, which oscillates up and down as it advances through the water. Now think about a bottle floating in the open ocean—bobbing up and down with each wave, its up/down motion is perpendicular to the wave’s forward motion, but when that wave has passed, the bottle is in the same place it was before the wave arrived. (Waves don’t move bobbing bottles across the ocean, wind and currents do.)
- Visible light is electromagnetic radiation that reaches our eyes as a transverse wave somewhere in the wavelength range the human eye can register, about 380 to 740 nanometers (really small).
- Sunlight (or more accurately, solar energy) reaches earth as a transverse wave with a very broad and continuous spectrum of wavelengths that include, among others, the visible spectrum (lucky for photographers), infrared (lucky for everyone), and ultraviolet (lucky for sunscreen vendors). The oscillation of solar energy’s transverse wave is infinitely more complicated than an ocean wave because light oscillates in an infinite number of directions perpendicular to its direction of motion. Huh? Think about the blades of a propeller—each is perpendicular to the shaft upon which the propeller rotates, so in theory you can have an infinite number of propeller blades pointing in an infinite number of directions, each perpendicular to the shaft. So a light wave oscillates not just up/down, but also left/right, and every other (perpendicular) angle in between.
Polarization
While an unpolarized light wave oscillates on every plane perpendicular to the wave’s motion, polarized light only oscillates on one perpendicular plane (up/down or left/right or 45°/225° and so on).
Polarization can be induced many ways, but photographers are most interested in light that has already been polarized by reflection from a nonmetallic surface (such as water or foliage), or light that has been scattered by molecules in our atmosphere. Light scattered by a reflective surface is polarized parallel to the reflective surface; light scattered by molecules in the atmosphere is polarized perpendicular to the direction of the light.
Polarization can also be induced artificially with a polarizing filter (“polarizer”), a filter coated with a material whose molecular structure allows most light to pass, but blocks light waves oscillating in a specific direction. When unpolarized light (most of the light that illuminates our lives) passes through a polarizer, the light that enters the lens to which it’s attached has been stripped of the waves oscillating in a certain direction and we (through the viewfinder) see a uniform darkening of the entire scene (usually one to two stops).
But that uniform darkening is not usually what we use a polarizer for. (I say usually because sometimes we use a polarizer to reduce light and stretch the shutter speed in lieu of a neutral density filter.) Photographers are most interested in their polarizers’ ability to eliminate reflective glare and darken the sky, which occurs when their polarizer’s rotating glass element matches the oscillation direction of light that has already been polarized by reflection or scattering, cancelling that light. By watching the scene as we rotate the filter’s polarizing element, photographers know that we’ve achieved maximum polarization (reflection reduction) when we rotate the polarizer until maximum darkening is achieved—voila!
The exception that proves the rule
Most photographers know that a polarizer has its greatest effect on the sky when it’s at right angles (90°) to the sun, and least effective when pointed directly into or away from the sun (0º or 180°). We also know that a rainbow, which is always centered on the “anti-solar point” (a line drawn from the sun through the back of your head and out between your eyes points to the anti-solar point) exactly 180° from the sun, can be erased by a polarizer. But how can it be that a polarizer is most effective at 90° to the sun, and a rainbow is 180° from the sun? To test your understanding of polarization, try to reason out why a rainbow is eliminated by a polarizer.
Did you figure it out? I won’t keep you in suspense: light entering a raindrop is split into its component colors by refraction; that light is reflected off the back of the raindrop and back to your eyes (there’s a little more bouncing around going on inside the raindrop, but this is the end result). Because a rainbow is reflected light, it’s polarized, which means that it can be eliminated by a properly oriented polarizer.
But back to the original question
Should I use a polarizer? I’m still not going to answer. What I will tell you is that I carry a polarizer for every lens in my bag, and when the sun’s out I virtually always have a polarizer on my lens. But my approach comes with some caveats:
- A polarizer cuts the amount of light reaching your sensor by 1 to 2 stops, which means if don’t use a tripod (shame on you), a polarizer requires a faster shutter speed.
- You must get in the habit of orienting the polarizer with each composition, or risk doing more harm than good to your image
While I use a polarizer on pretty much all of my daylight images, there are times I remove it:
- At night (duh), or whenever the scene is so dark that the polarizer’s cost to my exposure settings exceeds its benefit.
- On a wide lens with lots of blue sky, the polarizer’s effect on different areas of the sky can be both obvious and uncorrectable (I can dodge/burn minor differences). On the other hand, I almost always avoid wide shots with lots of blue sky, so this is rarely a consideration.
- When the sun is in my frame—for example, when I’m going for a sunstar—the extra glass a polarizer adds increases the likelihood of unsightly reflections.
- Photographing a full rainbow with a wide lens, a polarizer can eliminate or diminish part of the rainbow.
- When I put on a neutral density filter, my polarizer comes off because stacking filters causes vignetting, the less glass between my subject and sensor the better, and nature abhors stacked filters (every time you stack filters, the photography gods fuse them until you’ve learned your lesson).
- Any time I absolutely need the fastest shutter speed possible without increasing my ISO further, the polarizer comes off.
- I should probably add that I don’t have a polarizer for my Sony 12-24 lens because ultra-wide lenses like this aren’t threaded for filters. Using a polarizer on an ultra-wide lens requires an awkward, expensive system that provides minimal benefit due to the wide field of view.
One time when I absolutely, without exception, always (have I made my point?) use a polarizer is when there’s no sky in my frame. These are the times I’m using diffuse light to capture the color and texture of leaves, flowers, water, and rocks. All of these things reflect, sometimes subtly and sometimes not so subtly, and that reflection is rarely beneficial.
And finally, a common misconception about polarizers is that their use is either all or nothing (full polarization or minimal polarization). The amount of polarization I dial in depends on the effect I’m going for. For example, each of the four images at the top of this post was captured with the polarizer oriented at a point between maximum and minimum effect by watching the scene as I turned the polarizer, then waiting until I had the combination of reflection/no-reflection I wanted. This allowed me to reveal submerged nearby features while saving the reflection of the more distant subject.
So, when should you use a polarizer? I still can’t tell you, but at least now you have the knowledge to make the decision for yourself.
Managing Reflections With a Polarizer
Click an image for a closer look and to view a slide show.


Getting ahead of the shot
Posted on November 28, 2015
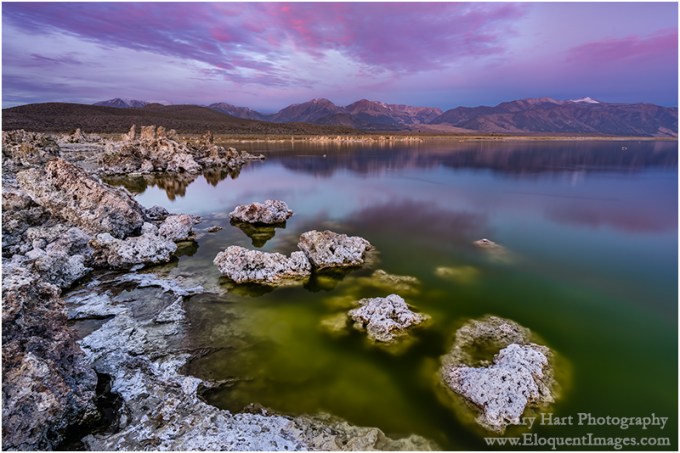
Dawn, Mono Lake and the Sierra Crest
Sony a7R II
Sony/Zeiss 16-35 f4
8 seconds
F/10
ISO 100
I hate arriving at a photo destination for the first time and having to immediately hit the ground running. Over the years I’ve come to appreciate the value of advance knowledge of landscape and light, and always try to factor in ample scouting time before getting down to serious shooting.
On the other hand, a prime reason people sign up for a photo workshop is to shortcut the scouting process, and for the most part this works pretty well. I (like any other experienced workshop leader) can share my knowledge of a location’s terrain and light to put my groups in the right place at the right time, and to provide insights into what’s in store and how they might want to approach it.
But sometimes there’s no substitute for firsthand exposure to a location before the good stuff happens. This is particularly true for sunrise spots, because the good shooting usually starts before it’s light enough to see the landscape. Unfortunately, a photo workshop’s tight schedule doesn’t always provide the luxury of exposing my groups to a location before it’s time to photograph it, but I do my best.
Mono Lake is a perfect example. The serpentine shoreline of South Tufa, the lake’s most photographed location, is a series of points and coves that offer lake views to the east, north, and west, depending on where you stand. Often nice at sunset, sunrise at South Tufa can be downright world class in any one of these compass directions. The best sunrise photography frequently cycles through (and sometimes overlaps) all three directions as the sunrise progresses. Overlaying South Tufa’s directional light are the vivid sunrise hues that can paint the sky in any direction at any time, and glassy reflections that double the visual overload.
After many years photographing South Tufa, I’ve established a fairly reliable sunrise workflow that helps me deal with these shifting factors. I usually start with tufa tower silhouettes facing east, into the early twilight glow in the east, then do a 180 to capture the magenta alpenglow on the Sierra crest in the west, and finally pivot northward as sidelight warms the tufa towers once the sun’s first rays skim the lake.
But just knowing the direction to point the camera is only part of the Mono Lake equation. In fact, with so many composition possibilities, South Tufa can overwhelm the first time visitor. Not only is there a lot going on here, on most mornings you need to contend with photographers that swarm the shore like the lake’s ubiquitous black flies.
Because of these difficulties, I make a point of getting my Eastern Sierra workshop group out to South Tufa for the sunset preceding the sunrise shoot. In my pre-shoot orientation, I strongly encourage my students to walk around before setting up their cameras, to identify compositions in each direction, and to envision the sunrise light.
It turns out, this year’s South Tufa sunset shoot was beneficial to me as well. With the lake level lower than I’ve ever seen it, the shoreline was virtually unrecognizable—many familiar lake features were now high and dry, and a number of new features had materialized. As alarming as it was to see the lake this low, the photographer in me couldn’t help but feel excited about the fresh compositions the new shoreline offered.
While showing the group around South Tufa’s various nooks and crannies, I spotted a stepping stone set of newly exposed tufa mounds on a north- and west-facing section. I pointed out to those still with me the way tufa could lead the eye through the bottom of the frame to the distant Sierra peaks, and made a mental bookmark of the spot. Sunset that night, with nice color a glassy reflection that’s more typical of sunrise than sunset, that everyone was a little dubious when I told them sunrise could be even better.
The next morning, all the conditions were in place for something special: a mix of clouds and sky, an opening on the eastern horizon to let the light through, calm winds to quiet the lake. Armed with knowledge from the night before, the group quickly dispersed to their pre-planned spots and I found myself mostly alone.
I’ve photographed Mono Lake so many times that I had no plans to shoot that morning, so I wandered around checking on everyone. As often happens when the photography is good (especially late in the workshop, when people have become pretty comfortable handling difficult light and extreme depth of field), I felt like my presence was more distraction than benefit, so I headed over to the spot I’d spied the previous evening (it had the added benefit of being pretty centrally located and well within earshot of my distributed students).
By the time I got there the show was well underway in the east and quickly moving west. It would have been easy to slip into panic-shooting mode and try to find something where things were good right now, but I’ve learned (for me at least) that it’s best to anticipate than react. Instead, because I’d already mentally worked this scene, I knew the composition I wanted and was ready for the color when it arrived.
The extra sixty seconds this bought me was enough to refine my composition, find the f-stop and focus point that would maximize sharpness throughout the scene, meter the scene and set my exposure, and orient my polarizer for the best balance between reflection and lakebed. It turns out that this anticipation was a difference-maker, as the vivid color peaked and faded in about 30 seconds.
Join my next Eastern Sierra Fall Color photo workshop
A Mono Lake Gallery
Click an image for a closer look, and a slide show. Refresh the screen to reorder the display.


Reflection season
Posted on October 26, 2015
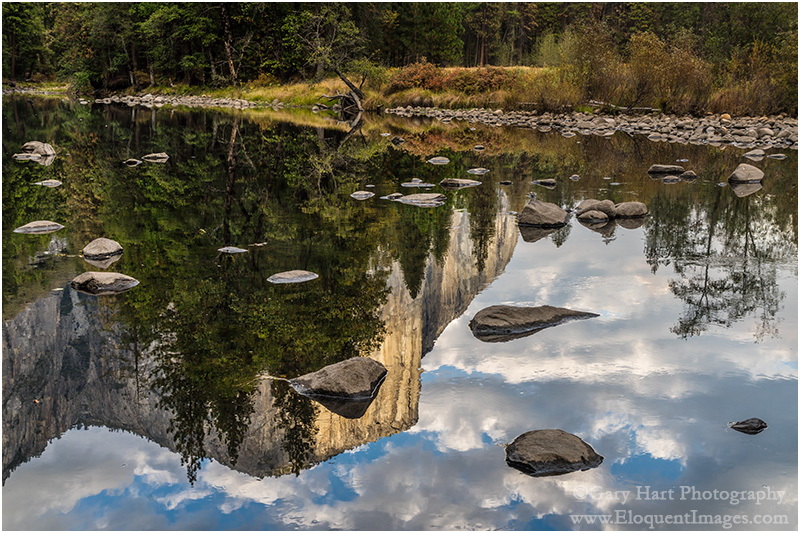
Reflection on the Rocks, El Capitan, Yosemite
Sony a7R II
Sony/Zeiss 24-70 f4
1/40 second
F/11
ISO 400
It’s reflection season in Yosemite, that time of year when the falls are dry and the Merced River slows to a glassy crawl. Plugging in the golds and reds of autumn makes this my favorite time for creative photography in Yosemite, and explains the volume of Yosemite autumn images in my portfolio.
It also explains why I’ve been to Yosemite three times this month. The month’s first visit, with my Eastern Sierra workshop group, we photographed high Sierra reflections and a Half Dome sunset from Olmsted Point—we’d had lots yellow and orange aspen in the canyons above Bishop and Lee Vining, but it was a little early for Yosemite color. The next two trips were primarily focused on Yosemite Valley, ground-zero for autumn reflections. On both Yosemite Valley trips, the Merced River, always low and slow in autumn, was down far enough that I saw places I could have rock-hopped from one side to the other without getting wet.
Today’s image, from about a week and a half ago, almost didn’t happen. I’d been looking forward to this visit (to guide a couple from Sweden) for several months, but a bike accident two days earlier had cracked a rib, torn a muscle in my shoulder, removed copious amounts of skin from my arm, and pretty much prevented me from doing anything requiring movement (or breathing, for that matter).
When I left home that morning I knew I was going to be sore, but I was actually a little surprised by just how uncomfortable I was. Somehow, bolstered by liberal quantities of ibuprofen, I managed to survive the day, quite content to limit my activity to driving, narrating, and and answering questions. Even getting in and out of the car was an ordeal, and photography seemed out of the question. But when we pulled into the parking lot at Valley View for the day’s final stop, the reflection drew me to the rocks like the Sirens of Greek mythology.
Rather than grab my camera bag and sling it over my shoulder as I normally would (the mere thought makes me flinch), I gingerly extracted my tripod, camera, and 16-35 lens, and assembled them them at my car’s tailgate. Given my level of pain and the precarious footing on the rocks by the river, I knew wouldn’t be able to move around as much as I’m accustomed to (or at all), so scanned the route and I very carefully selected my destination before departing on the 20 foot journey. In a perfect world I’d have been able to shuffle slowly, but the route to the river was over a disorganized jumble of granite rocks that made each step feel like a knife had been thrust into my ribcage.
At the river I found a flat granite platform just large enough for both my feet, and a solid rock for each tripod leg. Using the tripod for support, I found that if I moved slowly enough, I could keep the pain to a manageable minimum. Nevertheless, I was even more deliberate than I usually am, strategizing and executing each movement. Soon I developed a workflow that allowed me to do pretty much all I needed to do by only moving my arms from the elbow down.
There were a lot of moving parts to consider as I crafted this image. Since the focus point of a reflection is the focus point of the reflective subject, not the reflective surface, I needed DOF that went from the nearby rocks, just a few feet away, all the way out to El Capitan at infinity. But I couldn’t make DOF decisions until I composed and decided on a focal length. And as I tried to compose, I found that even the slight adjustment in focal length and framing introduced new problems—rocks cut off or jutting in from the side, or even worse, introducing bright sky at the top of the frame.
At one point I thought I finally had it, only to realize that the top rock of the foreground triangle intersected El Capitan. Moving my tripod a few inches to the left solved that problem, but also made it impossible to use my viewfinder without repositioning myself. Rather than destabilize my precarious perch, I decided to forego the viewfinder in favor of the LCD (thank you Sony for the articulating viewfinder).
With a little work I finally found a composition that achieved my framing objectives: balanced foreground, clean borders, and no sky. Now for my exposure variables. I estimated that foreground rocks were about 10 feet away—according to my hyperfocal app, at 40mm and f11, the hyperfocal distance was a little less than 16 feet. I picked a rock about that distance and carefully focused there, thus ensuring acceptable sharpness from about 8 feet to infinity. I decided to go with ISO 400 to mitigate the light breeze that moved the leaves just a little.
The shadows were quite dark, while the cloud reflections contained some hot spots, but I was confident that my Sony a7R II could handle the dynamic range if I was careful. Watching my histogram, I increased my shutter speed until the highlights were right up to the point of clipping.
Finally ready, I realized that my remote cable was in the car. Since there was no way I was going to put myself through an extra roundtrip, I engaged my camera’s 2-second timer and clicked. After reviewing the image on my viewfinder I made a couple of small adjustments and clicked again. I repeated this click/review/click cycle a couple more times, until I was satisfied that I’d achieved my vision.
Photograph reflections like this in my next Yosemite Autumn Moon photo workshop
A gallery of reflections
Click an image for a closer look, and a slide show. Refresh the screen to reorder the display.


Channeling Wile E. Coyote
Posted on March 6, 2015
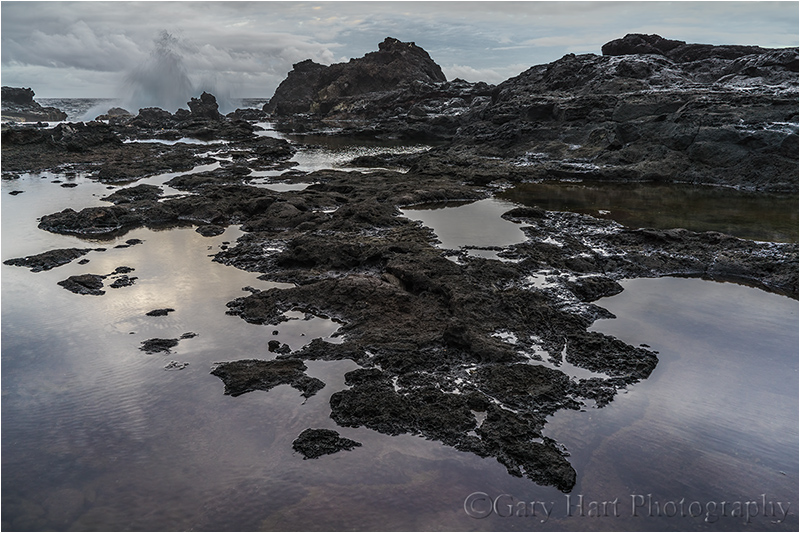
Maui Reflection, West Maui, Hawaii
Sony a7R
Sony/Zeiss 16-35
1/5 second
F/11
ISO 100
“When you want something badly enough, a few mishaps are no deterrent.” Wile E. Coyote
Discovery (September 2012)
Scouting locations for my Maui workshop, I scrambled cross-country down the rugged flank of West Maui’s north side, trying to make my way to a series of lava-rock, reflective tide pools. Once I’d descended to ocean level, reaching the pools still required hopscotching across wet basalt that was a disconcerting hybrid of banana peel slippery and razor sharp. As beautiful as the scene was, I decided access was far too dangerous for a group.
Rather than return the way I came, I continued picking my way along the rugged shoreline, eventually finding another group of connected pools elevated above the surf on a lava shelf. Even more varied and beautiful than the original location, I initially thought this spot wouldn’t be suitable for a group either. But climbing back to my car I stumbled upon an overgrown, unpaved “road” (maybe once upon a time used by vehicles) through the jungle and in the general direction of the main road (up).
After hiking a couple of hundred yards, I parted a branch blocking my progress and found myself back at the highway (“highway” in this case is the one to one-and-a-half lane, mostly-paved Highway 340 circling West Maui), not too far from my car. So, maybe these tide pools could be accessed by a group. Fearing I’d miss this obscure spur from the highway, I saved its position on my GPS and made a mental note to return.
Fool on a hill (March 2013)
The day before my next Maui workshop started, I picked up my friend and fellow photographer Don Smith at the airport. I was particularly excited to share the West Maui tide pools I’d “discovered” (it’s not as if I’m the Edmund Hillary of landscape photography—there are signs down there that indicate the spot is known to locals) and off we went.
Highway 340 circling West Maui will void most rental contracts, even on the best of days. This day the steady rain that had been falling all afternoon seemed to increase with the road’s remoteness, and I found myself wishing for another speed on the windshield wipers as we slalomed around boulders dislodged from the surrounding cliffs by the downpour—at one point we passed a car waylaid by a grapefruit-size rock embedded in its windshield.
Undeterred, we soldiered on. This was Don’s first Maui visit, so I narrated the tour with vigor, enthusiastically pointing out the island’s scenic highlights as we sloshed past, occasionally pausing my narrative long enough to reassure him that the highway was indeed navigable despite increasing evidence to the contrary, promising a worthy payoff at the promised destination.
Closely monitoring my GPS (almost as if I had a brain), at the point of the hidden intersection I veered left into a gap in the trees with surgical precision. Between rapidly oscillating wipers the narrow track at first unfolded just as I’d remembered it, before suddenly narrowing, dropping, and twisting to the right. Dense foliage scraped both sides of the car, which by now was clearly losing purchase in the mud—before Don could finish a sentence that started, “Are you sure…,” it dawned on me that I’d never intended to actually drive this road, that my plan when I marked it six months earlier had been to park at the top and walk down. Oops.
Propelled by momentum, and without the benefit of traction, gravity was now in charge (remember the jungle slide scene from “Romancing the Stone“?). Steering seemed to have less influence on our direction of travel than it did on the direction we faced, so I quickly gave that up. If it weren’t for the road’s deep ruts, I’m sure we’d have careened into the jungle. I held my breath as we approached a bowling ball size boulder and exhaled when the undercarriage passed above unscathed. After the longest hundred yards of my life, the slope moderated somewhat and the car slid to a stop.
After a few seconds of cathartic expletives, Don and I scanned our surroundings. With the car pointing in the the wrong direction (down), I knew getting out started with somehow turning around. A little farther down the slope I spotted a flat, clear space with a short Y-spur that, if we could reach it, might enable us to backup and turn around. I scrutinized the dash for the switch that would engage the 4-wheel drive (I swear the guy at rental agency promised my SUV had 4WD). When we didn’t find it, Don dug the manual from the glovebox—apparently 4WD is an option the powers-that-be at Alamo deem unnecessary on Maui SUVs.
With crossed fingers I gave the car some gas and felt the tires spin with no effect. More expletives. Don and I exited into the rain to evaluate our predicament—we were stuck on a road that was soon to become a creek, supported by four mud disks where the tires used to be. Hmmm—that would explain the whole no traction thing. Scraping the tires clean would have been of little value because the next revolution would simply reapply a new layer.
With Don pushing, I found that cranking the wheels 90 degrees gained just enough traction to free us and I gingerly rolled the car further downhill and into the open space and down into the Y’s left spur. Yay! With only a little bit of slip/slide drama, I backed slowly and pivoted into the Y’s other spur until the car was turned around and pointed back up the slope we’d just descended.
Now for the hard part. Looking for the first time in the direction of freedom, we came to grips with the chute that had deposited us: Not only was it steep, at the steepest point it curved hard-left but banked steep-right—not exactly a design that would be embraced at Daytona.
I inhaled and goosed the gas and we shot upward, fishtailing like a hooked marlin before losing momentum and coming to a stop no more than fifty feet up the road. This time the car was skewed 45-degrees, its left-front fender in the shrubs on one side, its right-rear fender in the shrubs on the other. When I gave the car gas, the tires spun hopelessly.
More stuck than ever, we started strategizing Plan B—with an hour of daylight remaining and no cell service, we’d need to walk up to the highway and hope to flag down, in the rain, a good samaritan willing to drive two disheveled, mud-caked strangers back to civilization (about 45 minutes away), then hope to summon a tow truck that would extricate us.
While Don trudged up the road to implement that plan, I stayed with the waylaid car, licking my wounds and feeling pretty foolish. Surveying things more closely, it occurred to me that since the road was quite narrow, and the distance and tight curve would make winching difficult, even a tow truck wouldn’t guarantee freedom. If I’d only remembered my Acme Rocket Skates….
With nothing else to do, I decided to take rescue into my hands one last time. Rather than apply the brute force, gas pedal to the floor approach, I put the car in reverse, gave it just a little gas, and cranked the steering wheel back and forth violently until the tires broke free and returned more or less back in the ruts. I applied a little more gas to get it rolling, then let gravity and the rutted road roll me back to the level clearing. Without allowing it to lose momentum, I added a little more gas and rolled all the way to the far back end of the clearing, where I found a small section that was less mud and more gravel.
I’d given myself about 30 feet of relative flat for momentum before reaching the hill. With a small prayer I slipped the transmission into in first and eased the accelerator down, adding gas just slowly enough to avoid losing traction. By the time I reached the hill the pedal was all the way to the floor and I had enough forward speed to avoid much of the fishtailing I’d experienced earlier. Past the crumpled shrubs and protruding rock I shot—as the road steepened my speed dropped and I could feel the wheels spinning but I just kept my foot to the floor. Approaching the curve I felt the car start to tilt right and slow almost to zero but somehow the tires maintained just enough grip to avoid a complete stop. I rounded the curve and surprised Don, who sprinted ahead and turned to cheer me forward.
By now the fishtailing exceeded the forward motion but I didn’t care as long as there was still forward motion. About 20 yards beyond the curve the road leveled and I felt the tires grip rock—freedom! Not wanting to stop until my tires kissed actual pavement, I lowered my window and high-fived Don as I rocketed past and onto the highway. At the top we just couldn’t stop laughing, both at the foolish predicament I’d created, and our utter disbelief that we’d made it out.
If at first you don’t succeed (March 2015)
Despite the traumatic memories, I’ve added this location to my Maui workshop rotation (but now we walk down, thank-you-very-much). Nevertheless, for various reasons this location has managed to thwart me—I’d never captured an image that completely satisfied me. The first year our shoot here was washed out by a deluge that made the road impassible even on foot. Last year we were inhibited by persistent showers that were compounded by camera problems.
But this year I gave it another shot, leading the group here at the end of a long day that started with a 3:30 a.m. departure for Haleakala. Dark gray clouds hung low and delivered tangible flecks of moisture, and I feared they’d let loose before the group had a chance to get established. The road was muddy and a little slippery, not like it was for my misadventure, but enough that a few people bailed and called it a day.
The handful who stayed were rewarded with mirror-calm tide pools surrounded by exploding surf. The clouds didn’t permit enough sunlight to color sky, but they retained enough definition and texture to be photogenic. As I moved around to work with each of the workshop participants, I fired a few frames of my own, eventually landing in the spot you see here.
I decided to go with my 16-35 lens to exaggerate the pool at my feet. Following my general policy to place the horizon line separating foreground and sky on the part of the scene with the most visual interest, I gave almost all my frame to the foreground. I rotated my polarizer to a midway point that reflected the sky but still revealed the submerged basalt. Satisfied with my composition, I stood back and watched the surf, timing each click with the most violent collisions.
I captured several more “keeper” images—enough, I think, to more than make up for previous failures (and mishaps) here. Sleep was no problem that night.
A Maui Gallery


Seeing the light
Posted on February 16, 2015

Sunset Reflection, El Capitan, Yosemite
Sony a7R
Sony/Zeiss 24-70
2.5 seconds
F/11
ISO 100
On the first night of this year’s Yosemite Horsetail Fall photo workshop I’m pretty confident that my group got to photograph what will turn out to be Horsetail’s only truly red display of the year. I’d love to say that this was due to particular genius on my part, but mostly it was just plain good luck (with maybe just a little bit of experience tossed in). But for me the evening’s highlight was the sunset that followed (above), and particularly the ease with which my new Sony a7R captured the scene’s tremendous dynamic range.
But first, a few words about Horsetail Fall…
I generally schedule my Yosemite Horsetail Fall photo workshop early in the window for capturing the red sunset light that (when all the stars align) kisses the narrow strip of El Capitan granite occupied by Horsetail Fall. Later in February the stripe of color is even thinner and more precisely focused on the fall, but I prefer avoiding the crowds and all the drama they bring (especially important when leading a group), and sacrifice a small iota of perfection for a significant chunk of flexibility and peace of mind.
But in addition to a clear western horizon and very specific angle of sunset light, getting The shot also requires water in the fall—no sure thing even in the wettest of years, but especially problematic in a drought year. This year Horsetail Fall was completely dry until the weekend before my workshop. Then, miracle of miracles, a drenching rain recharged all of Yosemite’s falls and Horsetail Fall suddenly sprang to life.
The flow was best on Monday, the day before my workshop started and the first day the clearing storm allowed the sunlight to reach El Capitan, but while Horsetail received nice light that evening, it was more amber than the red that photographers covet. By my group’s first shoot on Tuesday evening, the water had diminished significantly, but still flowed enough to etch a discernible white stripe on the gray granite, and send occasional wisps of mist swirling skyward.
Of the two prime Horsetail Fall locations, the picnic area on Northside Drive is usually a better place for a group because there’s more parking, and room for hundreds of photographers to work without getting in anyone’s way. But because the Horsetail throng was still a week or so away, I was able to squeeze my entire group into my favorite Horsetail location, the much less accommodating Southside Drive vantage point that provides a better angle and more compositional variety.
We arrived to find the waterfall fully lit—a good sign. I made sure everyone had a good vantage point, and while we waited (fingers crossed) for the show I suggested a variety of wide and tight compositions, and emphasized the importance of capturing the extreme highlights.
Watching the shadow’s slow advance toward the fall, we endured the standard fickle light that always seems to torment Horsetail Fall photographers: “Looking good so far… Here come the clouds—not a chance tonight…. Oh wait, it’s going to happen!… No, there it goes… Look! It’s coming back!” About five minutes before sunset, with no light on the fall and a thin layer of clouds dulling most of the visible sky, a few nearby photographers packed up and headed to dinner. But I know better and told my group sit tight. Sure enough, just two minutes after the exodus a faint pink glow appeared on Horsetail, and within 30 seconds the fall was throbbing red. The show lasted about three minutes, long enough for everyone to get their Horsetail Fall shot, and for me to breathe a sigh of relief. The rest of my workshop just became a lot easier.
With a Horsetail success in our pocket, I was able to concentrate the remainder of our workshop evenings on Yosemite’s other sunset marvels, but that didn’t keep me from checking the fall each time it was within eyeshot. The next day it was no more than a wet stain on El Capitan, and by Friday it was bone dry. And with no storms forecast for at least a week (and probably through the end of February), I think this year’s Horsetail Fall window has already slammed shut.
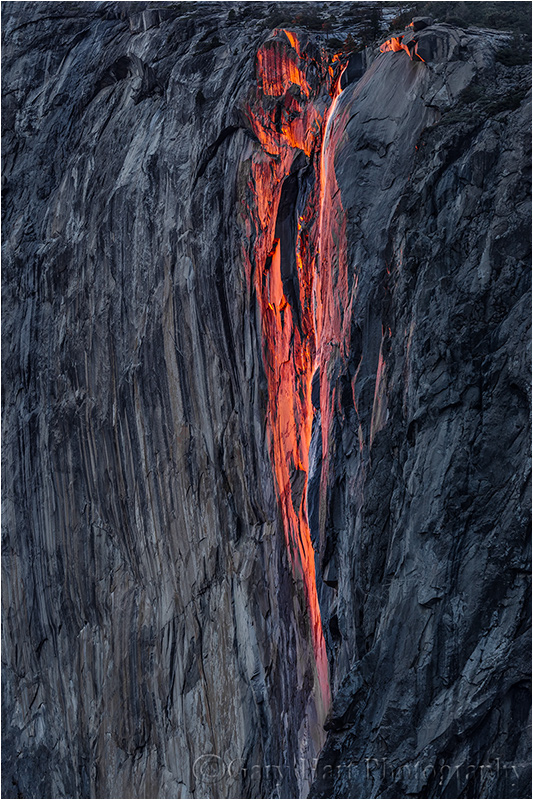
Horsetail Fall, El Capitan, Yosemite (February 2015)
The rest of the story
As someone who has photographed Horsetail Fall many times, and as nice as the fall was, my personal highlight this evening was the sunset that followed, when the clouds on the western horizon glowed bright red and spread their color in the Merced River. The first hint that something nice was in store was a soft pink glow above Yosemite Falls up-river and behind us. Many turned their cameras in that direction, but I kept my eye on the deepening red behind El Capitan. Beautiful, but a difficult capture. With the sky still quite bright but the entire foreground in full shade, the dynamic range would have been nearly unmanageable for my Canon cameras (without using a graduated neutral density filter or HDR blending). To be safe I could have tried a GND, but darkening the sky would have also meant darkening El Capitan (and more work in Photoshop). So I decided to give the scene a try without aid to see how the Sony a7R would handle the extreme contrast.
Exposing to make the highlights as bright as possible without clipping them, the shadowed foreground appeared nearly black on my LCD. But remembering that I constantly admonish my workshop students to trust their histogram and never make exposure decisions based on the picture in the LCD, I found hope in a histogram that skewed dark but still indicated detail in the shadows.
In my room that night I uploaded my card to my laptop and immediately went to the sunset images. Not only did the Shadows slider bring out the detail my histogram had promised, the shadow detail was unbelievably noise free. The rest of the processing was refreshingly straightforward. The result was this El Capitan image from a perspective I’ve never attempted without emphasizing Horsetail Fall.
I’m still getting used to the extra dynamic range of the a7R, and have yet to find its limit (but I’m pretty sure it’s less than infinity). Having this much dynamic range opens so many doors to landscape photographers, who have no control over the light Mother Nature delivers. In addition to the sunrise/sunset possibilities, I’m particularly excited about the opportunities extra dynamic range opens for my full moonrise and moonset image. I’ve always felt that the window for capturing usable detail in both the moon and foreground opened no more than fifteen minutes before sunrise, and closed no more than fifteen minutes after sunset.
As much as I embrace the creative possibilities brought by limited dynamic range (silhouettes, hiding distractions the shadows, high-key backgrounds), I guess the point is that more dynamic range means greater creative flexibility. With the processing control available from Lightroom and Photoshop, it’s much easier to return an extreme dynamic range capture to the kind of limited dynamic range image we’ve learned to deal with in camera, than it is to stretch more dynamic range from a camera that isn’t inherently capable of it. It’s a whole new world….
An El Capitan Gallery
Click an image for a closer look, and a slide show. Refresh your screen to reorder the display.


Yosemite Horsetail Fall Photo Workshop

Learn the when, where, and how of photographing Horsetail Fall
Roads less traveled
Posted on May 28, 2013
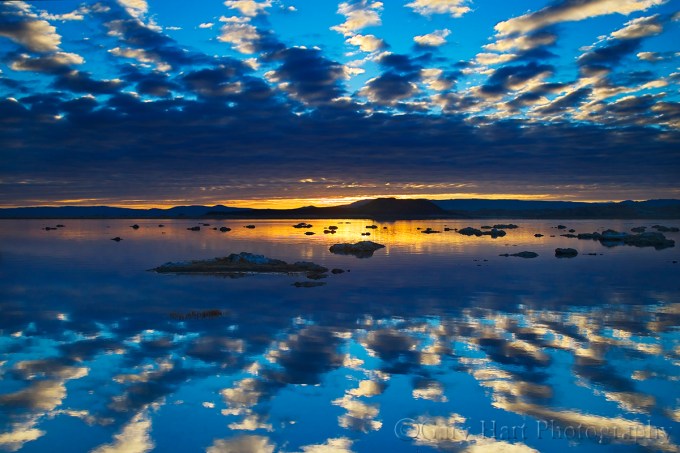
Sunrise Mirror, Mono Lake
Canon EOS-1Ds Mark II
1/60 second
F/10.0
ISO 200
32 mm
Sometimes our best opportunities arise when circumstances nudge us off our charted course.
One day earlier…
The morning before capturing this sunrise I’d been one of hundreds of photographers shoulder-to-shoulder on the beach at Mono Lake’s South Tufa. Competing with the thousands of photographers who flock to the Eastern Sierra to photograph the golden aspen each October, my brother and I were the first persons out there that morning, claiming our spots and waiting in the cold and dark for the sun. As expected, other photographers soon started accumulating—rather than finding their own scene, many simply assumed that my tripod meant I knew what I was doing and set up next to me. (Some didn’t even bother to pretend to study the surroundings first.)
By the time the sunrise started in ernest, I must have accrued thirty photographers, packed so tightly on both sides that if one had tipped over the rest would had collapsed in sequence like a row of dominos. The morning culminated with two of my newfound “companions” nearly coming to blows over a couple of square feet of lakeside real estate. Ahhh, the joys of communing with nature.
Channeling Lewis and Clark
The original plan was to return to South Tufa the following morning, our last at Mono Lake. But hoping to avoid that morning’s train wreck, Jay and I spent the afternoon exploring the tangled network of overgrown, rutted dirt roads encircling the lake, searching for other possibilities. For sunset we ended up somewhere on the north shore, traipsing about a half mile through (first) volcanic sand and (ultimately) shoe-sucking mud to an absolutely empty beach. In the days before ubiquitous GPS capability, we knew finding that very spot again, in the dark, would be nearly impossible, but it was pretty clear that the potential out there was off the charts regardless of where we landed.
So, despite a weather forecast that called for cloudless (boring) skies and temperatures in the 20s, on our final morning we rose dark and early and bounced behind my headlights through the sagebrush, in the general direction of yesterday’s discovery. When we found a spot wide enough to park we grabbed our gear and set out in the general direction of the lake, with no idea where we were or whether we’d made a mistake attempting this new location.
The eastern horizon was just starting to brighten as we slogged up to the lakeshore. Absolute calm had smoothed the lake to glass; from the Sierra crest behind us a formation of clouds had started to advance overhead. As the light came up the clouds continued their forward march, eventually spreading a herringbone pattern from horizon to horizon. Somehow we’d inadvertently stumbled upon the convergence of location and conditions photographers dream about.
The image you see here came fairly late in the shoot, after the sun crested the horizon. I used a 3-stop graduated neutral density filter to hold the brightness back to a manageable level, underexposing the sky even further to prevent the exquisite color from being washed out. This image has become one of my most popular, even gracing the cover of my book of images, “The Undiscovered Country.” But every time I look at it, I think first of that morning that never would have happened had we simply settled for the conventional choice.
Workshop Schedule || Purchase Prints
Reflections


