Eloquent Images by Gary Hart
Insight, information, and inspiration for the inquisitive nature photographer
Addition by Subraction
Posted on August 28, 2018

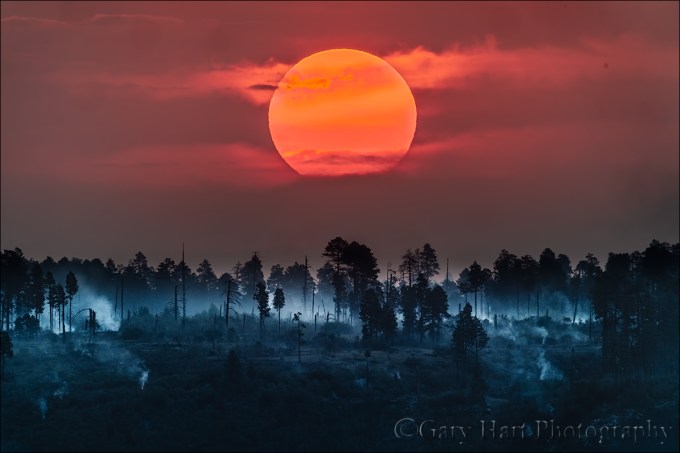
Big Sun, Bright Angel Point, Grand Canyon
Sony a6300
Sony 100-400 GM
Sony 2x teleconverter
ISO 200
f/11
1/160 second
Sometimes making a good photo is as much about what you leave out as it is about what you put in. The downfall of many images, both mine and others’, is the inclusion of too much visual activity—sometimes that activity is simply unappealing visual busyness, but often it’s elements that are visually appealing in their own right, but nevertheless distract from the main point of the image, that need to be removed.
Distraction subtraction starts with proper cropping—simply knowing what to put in and what to leave out. But because nature rarely cooperates, we usually end up having to include stuff we really don’t want. Whether it’s smoothing choppy water, softening a busy background, or banishing distracting terrain to blackened shadows, subtracting unwanted detail usually requires managing the exposure variables (shutter speed, ISO, and aperture) that control photography’s “creativity triad” (motion, light, and depth).
For example
Each summer, Don Smith and I do back-to-back Grand Canyon Monsoon photo workshops. One of the small perks of two workshops is do-overs—the opportunity to re-shoot something that didn’t work out the first time. This year for me that was the sunrise shoot from Bright Angel Point. We do this shoot on each group’s final morning on the North Rim and it’s a workshop highlight. Because the sun rises hot and white above the flat and bland (compared to its surroundings) Kaibab Plateau in the east, the better shot from Bright Angel Point is usually the low angled light brushing the canyon walls opposite the sun.
This year, smoke from nearby fires dulled the “good” light in the canyon, but transformed the sun into a mesmerizing orange ball. Instead of something to be avoided, the sun became a feature I wanted to highlight in the best way possible. But how? I wasn’t crazy about the hillside above which the sun would appear, but simply attaching a telephoto and photographing a big sun by itself would have been boring. Instead, I planned to eliminate all foreground detail with a silhouette of the ridge-top evergreens whose shape and contrast would provide the sun the very emphasis I was looking for. To further ramp-up the drama, I decided to shoot the scene as long as possible, adding the Sony 2X teleconverter to my Sony 100-400 GM lens—on my full frame Sony a7RIII, that gave me 800mm.
Sun and Smoke, Bright Angel Point, Grand Canyon
But…. In photography, plans can be much better in theory than they are in execution, which was exactly what happened on my first Bright Angel Point sunrise attempt. The low-hanging smoke was so dense that morning that we didn’t see the sun until it was too far above the trees for the silhouette I wanted, forcing me to quickly improvise Plan B: forego the silhouette and give the scene enough light to bring out detail in the hillside. And since the hillside was now an actual subject, I also went with a wider composition.
Largely because of the smoke, I like the image I shot that morning. But it wasn’t what I had in mind and I was thankful for a second chance a few days later. Guiding the second workshop group out to Bright Angel Point in the dark, I kept checking the east horizon to get a read on the smoke. As the sky brightened it looked like the smoke would be just right—dense enough to redden the sun without completely obscuring it. I was in business.
This morning’s silhouette composition was going to be even tighter than the failed first one because a day or two earlier while rummaging through my suitcase and I discovered that at the last minute I must have tossed in my 1.5-crop Sony a6300 body (I don’t remember doing this, but there it was)—that meant I could shoot a 1200mm (full frame) equivalent focal length.
A successful silhouette, especially an ultra-long silhouette, requires careful selection of the silhouette subject—you can’t just plop down the tripod and accept whatever you end up with. So I did my best to figure out where the sun would appear, identified the best silhouette subjects in that direction, then riveted my eyes on the horizon for the first sign of the sun. While waiting I took meticulous care to focus—1200mm is extremely unforgiving, so even something that looks sharp on the LCD can be soft when viewed at 100%. I clicked several test frames, both using autofocus and manual focus, magnifying each in my viewfinder (I love mirrorless) and studying it closely until I was satisfied that I had the focus as sharp as it could be.
The instant the sun’s first glow peeked up behind the trees I grabbed my tripod and ran about 100 feet up the trail to align the sun with my chosen foreground. I used the zebra highlight alert to determine my exposure, pushing my shutter speed a couple of clicks longer once the zebras appeared. This exposure gave me enough contrast between the sun and the trees for the trees to stand out, but without losing color in the sun or including detail in the foreground.
As with many situations nature photographers encounter, this one presented difficult conditions that became a creative opportunity with the application of simple exposure technique to subtract unwanted detail. The next time you’re out in nature with your camera, challenge yourself to use your exposure variables to do something creative with your scene’s motion, light, or depth—not only will your photography improve, I think you’ll have a lot of fun.
Grand Canyon Photo Workshops
Workshop Schedule || Purchase Prints
Managing Motion, Light, and Depth


, California")


Some Advice for Nikon Shooters (from a Sony Shooter)
Posted on August 24, 2018

Spring Reflection, El Capitan and Three Brothers, Yosemite
Sony a7R II
Canon 11-24 f/4L with Metabones IV adapter @11mm
1/60 second
F/8
ISO 100
Yesterday Nikon finally jumped into the mirrorless game with its Z6 and Z7 announcement, a welcome development that can only keep pushing everyone’s mirrorless technology forward.
I made the switch to mirrorless about four years ago and haven’t looked back. At the beginning mirrorless was touted for its compactness, and while mirrorless bodies (and to a lesser extent, lenses) are more compact, it turns out that, for me at least, it’s the mirrorless viewfinder that has hooked me: with real-time exposure simulation, focus assist (peaking), highlight alert (zebras), and a pre-capture histogram, I don’t think I could go back to a DSLR.
While I shoot with the Sony a7RIII and am very much committed to the Sony mirrorless universe, I’m not going to get into the “my camera can beat up your camera” debate—Nikon makes great cameras and I’m sure their mirrorless bodies will be no exception. In fact, the Z7 looks like it compares very closely to the Sony a7RII, which is a fantastic camera that I still carry as a backup and don’t hesitate to use when the situation calls for it.
As happy as I am with my mirrorless conversion, I do have some insights that might spare Nikon shooters of some of the transition pains I went through when I switched from Canon DSLRs (1DSIII and 5DIII) to the Sony a7R series of mirrorless bodies.
- The mirrorless viewfinder is different than a DSLR viewfinder and it will take some getting used to. I don’t know what the Nikon viewfinder will be like, but I’m sure it will be quite good—large, bright, and everything you’d want in an electronic viewfinder (EVF). Even so, you might be surprised at how long it takes you to get used to it (but you will). It just feels different to view a video of the world. The cool thing is, EVF technology is relatively new and will only continue to improve, while there’s not a lot more that can be done for a conventional DSLR viewfinder.
- Beware of lens adapter hype. My original conversion plan was to use the Sony mirrorless body to supplement my Canon system, to continue using my Canon glass on the Sony body with a Metabones adapter, and gradually convert my lenses as my budget allowed. And while my adapted Canon lenses did indeed do the job, the experience was far from painless (not all that was advertised) and I wasn’t really satisfied until I was using 100% native Sony glass. Some of the problems are a function of the lens—generally the better (and newer) the lens, the closer to native performance it delivers. But as a landscape shooter, autofocus speed isn’t as big a deal to me as it is to anyone whose subjects are in motion, so sluggishness might even be a bigger problem for others. On the other hand, I suspect that since it’s Nikon making an adapter for their lenses to work with their bodies, it will be pretty good from the get-go—but I wouldn’t bet my house on it. And adapter performance likely won’t be as good as using native glass—best case scenario will be that some won’t notice a difference, but those for whom focus responsiveness and autofocus speed is essential should prepare for some frustration. (And I won’t begin to speculate about worst-case.)
- You’ll miss that second card slot more than you might imagine. Making my living from my images, having two memory card slots for instant image backups saved me a couple of times, and gave me tremendous peace of mind all the time. If your DSLR doesn’t have a second slot, the missing slot might not be a big deal to you, but if you’re as failsafe-obsessed as I am, you might be surprised by how much you’ll long for that second slot. All it takes is one corrupted, damaged, or lost card to make you a convert to the second card slot paradigm.
- The battery life will drive you crazy. Looking at the specs, the Z7 battery life is about the same as the a7R and a7RII, and nowhere near the Nikon full frame and Sony a7RIII (or the a7III or a9) battery life. I was willing to live with burning through multiple batteries in a single day because of all the other mirrorless benefits, and because the Sony batteries were small enough that carrying four or five at all times (I mean on my person, not just in the car or hotel) wasn’t a big deal. But it looks like the Nikon batteries are twice the size of the original Sony batteries, so there goes your size/weight benefit. I predict this will be the biggest complaint we hear about these cameras (as it was with the early a7 bodies)—that is, assuming the adapter is good.
- Learn how to clean your sensor. Without a mirror to protect it, your naked mirrorless sensor will be exposed to the elements each time you change a lens. Fortunately, sensor cleaning is simple and not nearly as dangerous is many try to make you believe.
None of these points is a reason to not get a Nikon Z6 or Z7, but for me it would be a reason not to pre-order. Instead, if it were me, I’d wait and let others discover the frustrations so I could go into the non-trivial transition from DSLR to mirrorless with realistic expectations.
I’m guessing that current Nikon shooters will probably endure fewer frustrations than I had with my first mirrorless body, the Sony a7R—Sony was still trying to figure out the whole interface thing that Nikon has nailed (I’ve never been a fan of Nikon’s interface, but Nikon shooters like it and that’s what matters). On the other hand, I was probably more forgiving than Nikon shooters might be because the a7R image quality was so much better for my needs than the Canon 5DIII it replaced. Dynamic range is king in the landscape world, and the a7R gave me 2-3 stops more dynamic range than my 5DIII—slow transition plan notwithstanding, I literally didn’t click another frame after my first a7R shoot.
While I expect the Z6/Z7 bodies will be ergonomically more mature than my original a7R, Nikon’s full frame bodies already deliver exceptional image quality, so most Nikon full-frame DSLR shooters transitioning from the D800/810/850 won’t have the euphoria of much better image quality that sustained me until the release of Sony’s a7RII and (especially) a7RIII.
On the other hand…
(Full disclosure: I’m a Sony Artisan of Imagery)
These Nikon mirrorless cameras are great for committed Nikon shooters who are completely invested in the Nikon ecosystem and have no plans to completely replace their lens lineup. But for any photographer planning to make the full jump to mirrorless that includes all native lenses, I think Sony is (at least) several years ahead of Nikon, and given their resources and commitment, will remain at least that far ahead for many years.
One of the early complaints about the Sony mirrorless system was its lack of lenses compared to Nikon and Canon, but valid as that criticism was, that disadvantage has shrunk to virtually the point of irrelevance, and Sony is already very far along on many more native Sony FE-mount lenses. Sony is several laps ahead of everyone else in the mirrorless world—with deep pockets and its foot hard on the mirrorless pedal, I don’t see that lead shrinking muchsoon.
As good as it is for a first generation offering, the Nikon Z7 is much closer to the 3-year old Sony a7RII than it is to the (already 1-year old) a7RIII, and for sports and wildlife (and anything else that moves), it isn’t even in the same league as the (more than 1-year old) Sony a9.
I have no idea how or when Sony will respond to the mirrorless offerings from Nikon and (soon) Canon, but I’m guessing it won’t be long, and am pretty confident that will be a great day to be a Sony shooter. Competition is great for all of us, and Nikon just gave the mirrorless wave a huge boost that I’m looking forward to riding as far as it takes me.
A few words about this image
I can’t tell you that this is my favorite Sony mirrorless image, but it would definitely be on the list. I chose it for this post because it’s one of the few Sony images I have that used a Canon lens with the Metabones adapter.
Leading a workshop in Yosemite a few years ago, I guided the group to a meadow flooded by the Merced River during a particularly extreme spring runoff year. My widest lens at the time was my Sony/Zeiss 16-35 f/4 (which I love, BTW), but the scene called for something wider. When he photographer assisting me offered to let me use his Canon 11-24 f/4 with my Metabones adapter, I snatched it before he could change his mind. Given that everything in the scene was stationary, I was able to bypass any adapter-induced autofocus frustration and take the time to manually focus (it didn’t hurt that depth of field at 11mm is extremely forgiving).
I’d never used a lens that wide and was so excited by the extra field of view that I returned from Yosemite fully prepared to purchase the Canon lens, adapter or not. Fortunate for my budget (and my back), I let the lens sit in my shopping cart long enough for sanity to prevail. Not only was the Canon lens quite expensive, it weighed a ton, and I had a feeling it wouldn’t be long before Sony offered something similar. Those instincts were rewarded a year later when Sony released a 12-24 f/4 G lens that is just as sharp and half the size (and much less money).
A Sony Mirrorless Gallery
Click an image for a closer look and slide show. Refresh the window to reorder the display.


Stop Being So Negative!
Posted on August 18, 2018

Sunset Lightning, Grand Canyon
Sony a7R III
Sony 24-105 f/4 G
1/5 second
F/9
ISO 400
Lightning (at a safe distance) is pretty cool. It has always fascinated me, partly for the ephemeral power that can explode a tree and disappear before my brain can register its existence, but also because lightning is a rare sight for these California eyes. What what exactly is going on in a lightning bolt? I thought you’d never ask….
The shocking truth about lightning
Lightning is an electrostatic discharge that equalizes negative/positive polarization between two objects. For example, when you get shocked touching the doorknob in your bedroom, you’ve been struck by your own personal lightning bolt. You got zapped because, courtesy of that carpet you just dragged your fuzzy slippers across, you picked up a few extra electrons that the doorknob was more than happy to relieve you of.
While the polarization process that happens in an electrical storm isn’t as thoroughly understood as the one in your bedroom, it’s generally accepted that a thunderstorm’s vertical, convective air motion shuffles electrons in the atmosphere. To jar your high school science memories, convection occurs when a fluid substance heats, becomes less dense, and rises until it cools and becomes dense enough to sink. (You initiate convection when you boil water.)
The is up/down circular flow of atmospheric convection happens when air near the ground warms, expands, and rises. The rising air carries water vapor; since cooler air can’t hold as much moisture as warm air, the ascending water vapor eventually condenses into clouds. The convective motion jostling the water and ice molecules inside the clouds strips the molecules of electrons. Electrons are negatively charged and more dense than the surrounding air; freed of their conventional bonds, these electrons fall earthward. Overhead, the clouds relieved of many electrons are suddenly positively charged, while the ground below has been rendered negatively charged by virtue of its new electron surplus.
Because nature abhors any imbalance, these opposite charges attract each other. The extreme polarization in a thunderstorm—positive charge at the top of the cloud, negative charge near the ground—is quickly (and violently) equalized: lightning! So I guess you could say that lightning is God’s way of telling Earth, “Stop being so negative!”
With lightning comes other atmospheric changes. The sudden infusion of a 50,000 degree electric charge displaces the surrounding air very suddenly, creating an audible compression wave that we know as thunder.
The visual component of the lightning bolt that caused the thunder travels to you at the speed of light, over 186,000 miles per second. But lightning’s aural component, thunder, only travels at the speed of sound, a mere 750 miles per hour (or so)—a million times slower than light.
Because lightning and its thunder are simultaneous, and we know how fast each travels, we can compute the lightning’s approximate distance. (Thunder’s speed varies slightly with atmospheric conditions; light’s speed is non-negotiable.) From our human perspective the lightning arrives instantaneously, but moving at 750 miles per hour, thunder takes around five seconds to travel a mile. So, dividing by five the number of seconds to elapse between the lightning’s flash and its thunder’s crash gives you the lightning’s distance in miles (divide the interval by three for the approximate distance in kilometers). For example, if ten seconds pass between the lightning and the thunder, the lightning struck about two miles away, fifteen seconds elapsed means it’s about three miles away, and so on.
This speed difference also explains why lightning comes and goes in milliseconds, while its thunder can rumble and roll for several seconds. Because a lightning bolt can travel many miles, the thunder from its nearest portions reaches you much sooner than its most distant components.
About this image
Each summer moisture from the Gulf of Mexico makes its way up into the American Southwest. The combination of moist air and extreme heat (to kick off convection) makes August ripe for thunderstorms at the Grand Canyon. For the last six years, Don Smith and I have scheduled two photo workshops hoping to photograph these thunderstorms and their effects (clouds, rainbows, and especially lightning).
Bit with unseasonably dry air in place, the forecast at the start of this year’s first Grand Canyon Monsoon workshop wasn’t especially favorable for lightning. I told the group during the orientation that I wasn’t concerned, that I’ve often seen forecasts like this change suddenly—then anxiously monitored every subsequent NWS forecast update with crossed fingers. In the meantime, we were all quite content photographing incredible smoke effects, courtesy of three nearby wildfires.
By the end of our second day I started seeing hints of moisture returning to the forecast toward the end of the workshop, with each forecast looking a little more promising than the one prior. By day four, the workshop’s final full day, I was downright optimistic.
We’ve always had better lightning success on the North Rim. Partly because the view faces south, the direction from which the storms tend to arrive, and partly because our cabins at Grand Canyon Lodge are right on the rim. Grand Canyon Lodge also has a pair of view decks, shielded by lightning rods, that are ideal for photographing lightning.
The lightning started firing early on our final evening. We all rushed to the rim, attached our Lightning Triggers, and pointed toward the most promising clouds. Much to my relief, it wasn’t long before everyone in the group had at least one lightning image, and most had many more than just one.
But feeling a bit greedy, with nice clouds overhead, and the smoke that had set up camp in the canyon for most of the week suddenly scoured by heavy rain, I realized that all we needed to ignite a sunset lightshow was a little sunlight. I glanced westward and saw signs of clearing. Dare I hope for a sunset to go with this lightning? As if by divine intervention, the sun emerged from the clouds just a few minutes before sunset, infusing the canyon and its diaphanous rain bands with light that started amber and reddened with each passing minute.
When the choice is between a (relatively) bland scene most likely to get lightning, and better a composition with just a slight chance for lighting, I usually take my chances and opt for the better composition. In this case the lightning had shifted a little north of the canyon, but I pointed my camera toward the better light over the canyon and crossed my fingers. So irresistible was the light that while waiting (and not wanting to change my composition and miss a lightning strike), I pulled my a7RII from my bag and clicked a couple of handheld frames due south, where no lightning was possible but the light was especially sweet. (Anyone who knows me will be shocked to hear that I took a picture without a tripod.)
Though several bolts fired during the five or so minutes before the sun disappeared, the one in this image was the only lightning I captured with the great sunset light. But all I wanted was one sunset strike, and I felt extremely lucky that it arrived just as the magenta glow reached its crescendo.
The lightning waxed and waned for several more hours. With the sun down the sky soon darkened enough for me to remove my Lightning Trigger and switch to long exposures in Bulb mode. I stayed until after 10:00, wrapping up with a couple of 20+ minute exposures that captured more than a dozen strikes each.
Grand Canyon Photo Workshops
A Lightning Gallery


Something’s Burning
Posted on August 11, 2018
Sun and Smoke, Bright Angel Point, Grand CanyonSony a7RIII
Sony 100-400 GM
Sony 2x teleconverter
ISO 200
f/11
1/50 second
Tom Petty has a line that goes, “Most of the things I worry about, never happen anyway.” And one of the things I worry about most is, what if I schedule a workshop and the conditions are so lousy that no one gets any good pictures?
Every year Don Smith and I do two Grand Canyon Monsoon photo workshops. The plan is to photograph the always beautiful Grand Canyon with the spectacular lightning and rainbows of the (normally reliable) Southwest summer monsoon. But with smoke from a large fire filling the beautiful canyon, and a weather forecast that promised blank skies, Don and I were afraid our first workshop group wouldn’t have anything to photograph. Compounding our anxiety, the fire closed the Cape Royal Road, a highlight of the North Rim, and two other fires eliminated our backup photo locations, leaving us with only Point Imperial and Bright Angel Point as North Rim photo locations.
Instead of what I feared would be my first complete swing-and-miss workshop in over 12 years of leading workshops (you’d think I’d learn), this group enjoyed what has to be the most unique (and enjoyable!) photography I’ve ever experienced at the Grand Canyon. The smoke has turn every sunrise and sunset sun some version of a glowing red, orange, or yellow ball. And at times, the fire has even accented our photos with orange flames and black plumes of smoke.
We got an inkling of what was in store on the workshop’s first full day. That morning we pulled up to Grandview Point for our first sunrise and found the peaks of the canyon’s temples and mesas floating atop a sea of smoke. And that evening at Desert View, the smoke had lifted from the canyon, hanging above the rim to color the setting sun. So beautiful, diverse, and rapidly changing were the conditions that to save time I often had both my Sony a7RII and Sony a7RIII bodies out, one with a wide lens and the other a telephoto.
Since that first day we’ve had a consistent run of beautiful sunrises and sunsets, all courtesy of the fires. We even enjoyed a night shoot at Mather Point, photographing the flames across the canyon beneath a layer of fire-reddened smoke, capped by the Milky Way and a sky full of stars.
The workshop wrapped up yesterday morning with a sunrise shoot at Bright Angel Point on the North Rim. As seems to happen most mornings, the ever-present smoke filled the canyon, giving the scene an ethereal quality. My attention that morning turned to the Walhalla Plateau, ground zero for the fire, just across Bright Angel Canyon. Our vantage point provided a clear view of the smoldering trees lining the plateau, accented by a few patches of flames.
With the sun soon rising in that direction, it was certain to be reddened by the thick smoke hugging the horizon. Wanting a tight composition that was all about the smoldering fire and sun, I twisted my Sony 2X teleconverter onto my Sony 100-400 GM lens, giving me 800mm of reach.
To figure out where the sun was going to appear, I tried a little trick that has worked for me in the past: with the sun well below the horizon, I point in its general direction and intentionally overexpose a frame. Then I display my overexposed image on my LCD and check the blinking highlights. The “blinkies” will form a semicircle on the horizon—the apex of the semicircle will be above the point of the sun’s arrival.
Knowing where the sun would arrive allowed me to lock in my composition and focus well in advance. Often when everything in my frame is at infinity I simply autofocus, but since the margin of error at 800mm is so tiny, for this scene I magnified my view and manually focused on one of the prominent trees. I also bumped my ISO to 200 for a slightly faster shutter speed as insurance against micro-vibration at the extremely unforgiving 800mm.
The real trick was going to be the exposure. A high dynamic range scene (large difference between the darkest shadows and brightest highlights) like this is always a challenge. But dynamic range is the very reason I switched to Sony nearly four years ago. Even though my current Sony body, the a7RIII, is the dynamic range champion, shooting directly into the sun, even a sun partially obscured by smoke, leaves little margin for error.
The sun’s appearance instantly ramped up the dynamic range—a lot. I quickly dialed down my shutter speed, monitoring my a7RIII’s “zebra” warning (diagonal black and white stripes) that tells me in my viewfinder when parts of a scene are overexposed. When the zebras disappeared, I switched my attention to the histogram and made small shutter speed adjustments, pushing the histogram’s right (highlights) side as far as I could without blowing out the highlights in the sun.
The processing I did to this image was minimal: In Lightroom I brought down the highlights to recover the sun, and brought up the shadows to recover the smoky slope. In Photoshop I slightly desaturated the red and yellow and shifted the yellow sun a little more toward orange (but not nearly as red as what I saw).
Maybe someday I’ll learn to stop worrying about things I can’t control—they really do always seem to work out. Oh, and as a matter of fact, on our final afternoon we got a spectacular electrical display that lasted well into the night, and we all got the lightning images we’d been hoping for. (Check today’s Instagram for a preview of that show: @garyhartphoto.)
Join me for a Grand Canyon Adventure
Workshop Schedule || Purchase Prints
Here Comes the Sun


Anchor Management
Posted on August 5, 2018
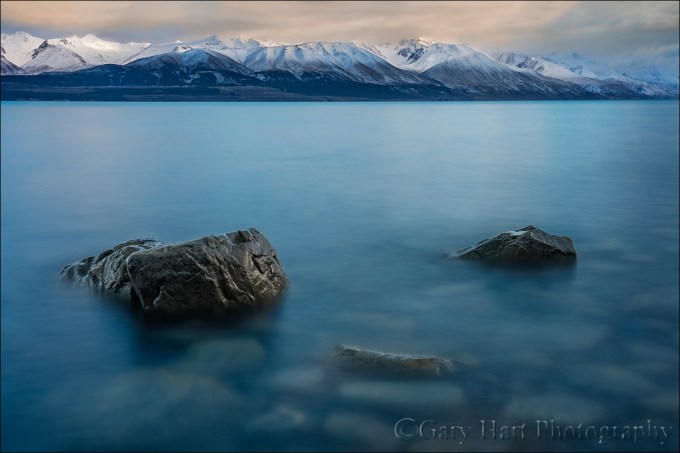
Dawn on the Rocks, Lake Pukaki, New Zealand
Sony a7R III
Sony 24-105 f/4 G
15 seconds
F/18
ISO 50
Virtually every scene I approach with a camera is beautiful, but a beautiful scene is rarely enough for a great image. Human experience of the world differs greatly from what the camera captures—the photographer’s job is to understand and use those differences.
I’ve always felt that viewers of an image are more comfortable exploring the frame—and therefore tend to linger longer with the image—when they have a starting and return place. So the first thing I do when trying to turn a beautiful scene into a beautiful picture is create that place by finding something to anchor my frame. Sometimes this anchor is an object that’s beautiful in its own right (such as a reflection, a flower, or the moon), but often it’s just a grounding element that aligns with the scene’s more striking features.
When I approached this scene on the shore of Lake Pukaki in New Zealand, I was struck first by the rich glacial turquoise water (I’ve seen a few lakes with similar color, but none that were nearly as big as Lake Pukaki), and second by the snowcapped peaks lining the distant shore. And in the pre-sunrise gloaming I could see that the sky was very nice too—maybe not spectacular, but with lots of character in the clouds plus the potential for soft, warm light when the sun finally arrived. Given all the scene had going for it, I probably could have raised my camera and composed something decent from any spot with a view of the lake, but a scene like this deserves something more than decent.
So before advancing any further, I performed my standard scan for something to anchor my frame, a visual element to surround with the scene’s inherent beauty. I was instantly drawn to an area of the beach where a few rocks protruded from the lake and quickly made my way down to the water. At the shore, in addition to the rocks that drew me I found a striking mosaic of rocks submerged beneath the clear water. A bonus for sure, but as beautiful as these submerged rocks were, as I tried to get all the visual pieces to fit together I quickly realized that they introduced a layer of complication as well.
For the next 10 or 15 minutes I wandered the lakeshore experimenting with compositions that used a variety of foreground rock combinations, but couldn’t really find anything that thrilled me. I’d click a frame or two, evaluate the result, but just couldn’t seem to organize all the foreground rocks with the mountains and sky to form something coherent.
But this wasn’t the time to become discouraged. I knew something was here and continued experimenting, hoping to find it before the light changed. As the sky brightened, I settled on the trio of rocks you see in this image. They aligned nicely with the mountains, better than anything else I’d found so far. But they were also orbited by a disorganized arrangement of satellite rocks that competed with the simple foreground I sought. I moved closer, extending my tripod as far into the water as I could, then dropped low and composed a fairly tight frame.
Eliminating the superfluous rocks made my foreground all about the rock trio, and with a few tweaks (preliminary frames followed by adjustments) arrived at the composition you see here. At this point the rocks were just a few feet from my camera, making depth of field a concern. Assisted by my hyperfocal app, I stopped down to f/18 and focused at the back of the farthest rock, taking only a couple of frames before I was confident my hyperfocal distance was dialed in.
The final piece of the puzzle was dealing with the chop in the water. Sometimes water motion can be a feature and I try to find a middle ground that softens it while retaining a bit of shape or texture. In this case I wanted simplicity, and felt that anything that wasn’t mountains, rocks, or color would be a distraction. The solution was to smooth the water as much as possible with a 15-second shutter speed.
There’s nothing inherently special about the rocks I used to anchor this image. The scene’s true beauty lies in the water and mountains, but if I’d have settled for an image that was just water and mountains, there would have been nowhere for your eye to land. Adding a simple foreground element to anchor my frame serves as a visual launching pad from which you’re free to explore the rest of this beautiful scene.
Join Don Smith and Me in New Zealand
Visual Anchors
Click an image for a closer look and slide show. Refresh the window to reorder the display.


