A Dose of Perspective
Posted on December 6, 2023

Celestial Reflection, Milky Way Over the Colorado River, Grand Canyon
Sony a7SIII
Sony 20mm f/1.8 G
ISO 12800
f/1.8
30 seconds
Nothing in my life delivers a more potent dose of perspective than viewing the world from the bottom of the Grand Canyon. Days are spent at the mercy of the Colorado River, alternately drifting and hurtling beneath mile-high rock layers that reveal more than a billion years of Earth story. And when the sun goes down, the ceiling transforms into a cosmological light show, each stellar pinpoint representing a different instant in our galaxy’s past.
I’ve done this raft trip eight times now—long enough to know that when I stop doing it, the night sky is what I’ll miss most. To ensure the darkest skies (and the most stars), each trip is timed around the lunar minimum when the moon’s only appearance is a thin crescent is shortly before sunrise or after sunset. For most of my rafters, these are the darkest skies they’ll ever see—so dark that the Milky Way actually casts a faint shadow.
While cloudless nights down here always deliver a seemingly impossible display of stars, viewing the glowing core of our Milky Way galaxy is never assured. In the Northern Hemisphere, even when the galactic core reaches its highest point, it’s still relatively low in the southern sky. So, given the Grand Canyon’s general east/west orientation (high walls north and south), the best Milky Way views are usually blocked by the canyon’s towering walls. But these trips spend the first two nights in the north/south-trending Marble Canyon stretch of Grand Canyon, where we can enjoy open views of the north and south sky. And even after the canyon’s westward bend just downstream from the Little Colorado River confluence, a few fortuitous twists in the river open more nice southern views.
Campsites along the Colorado River are all first-come, first-served—if you set your sights on a Milky Way spot and arrive to find it occupied, there’s no option but to continue downstream. Over the years my (incomparable) guides and I have become pretty adept at identifying and (equally important) securing the best sites for Milky Way views—if the weather cooperates, we always score one or (usually) more quality Milky Way shoots.
One more Grand Canyon Milky Way obstacle I should mention is that even in the most favorable locations, the galactic core doesn’t rotate into the slot between the canyon walls until around 1:00 or 2:00 in the morning. Often rafters go to bed with every intention of rising to photograph it, but when the time comes to rise and shoot, their resolve has burrowed somewhere deep in the cozy folds of their sleeping bags. The best antidote for this is willpower, bolstered by bedtime preparation. To assist my rafters, I prescribe at the very least:
- Pick your campsite strategically, with the Milky Way in mind. (The first thing I do when we land is let everyone know where the Milky Way will appear.) That means either setting up your cot or tent with a good view of the southern sky, or at a place with easy access (in pitch darkness) to your desired shooting spot.
- Before going to bed, identify your composition, set up your camera, lens, and tripod, set your exposure (a relative constant that I’m able to help with), and focus at infinity.
- Have your camera ready atop the tripod and beside your cot (or outside your tent) when you go to bed. Some people just wake and shoot from their campsite (sometimes not even leaving their cot), but I usually prefer walking down to the river for the best possible foreground.
- Better still, if it can be done without risk of someone stumbling over it in the dark, leave the camera composed and focused at your predetermined shooting spot. But if this spot happens to be beside the river, check with the guides because the river level fluctuates on a known schedule (based on releases from Glen Canyon Dam timed for peak flow during peak electricity demand, and distance downstream).
I’ve learned that it isn’t practical to plan a group shoot for the wee hours of the morning, so I let people know when I plan to be up and where I’ll be, then let them decide whether to join me, choose their own time or place, or just stay in bed.
Regardless of the night’s Milky Way plan, I always forego the available but optional tent in favor of the unrivaled celestial ceiling. At home I’m a read-until-the-book-drops-to-my-chest guy, but down here I just lie flat on my back with my eyes locked heavenward, scanning for meteors, constellations, and satellites until my eyelids fail me. Here’s a sample of the mind-boggling thoughts that crowd my mind as I gaze:
- The light from every single pinpoint up there was created at a different time, and took many, sometimes thousands of, years to reach us—I really am peering back into the past.
- That streaking meteor was no larger than a pea and had probably been drifting around the solar system for millions, or billions, of years.
- Many of these stars host planets capable of hosting life.
- Our Milky Way galaxy is home to 10 times as many stars as there are people on Earth.
- For each star in the Milky Way, there are at least 20, and possibly as many as 200, galaxies in the Universe—many with trillions of stars.
Mind sufficiently boggled, I’ll eventually drift off to sleep (resistance is futile), but am fortunate that I don’t usually need to set an alarm to wake up—at bedtime I just tell myself what time I want to be up and trust my body’s clock. Then I psych myself into getting up by thinking I’m just going to fire off a dozen or so frames and then go back to bed. Of course I usually end up staying out much longer—always when there are others up and needing help, but often just because once I’m awake, the sky is just too beautiful to go back to sleep.
Rising for the galactic core’s arrival gives a good two or three hours of quality Milky Way time before the sky starts to brighten noticeably in the camera, sometime around 4:00 a.m. (the eyes don’t see the brightening for another half hour or so). I use all that dark time to work on a variety of compositions and exposure settings, sometimes moving around, but often staying put and just letting the Milky Way do the moving across the scene, from one side of the canyon to the other.
Since the “star” of the Grand Canyon night images is the sky, and vertical orientation gives me more of the vertically oriented Milky Way framed by the canyon’s vertical walls, my initial compositions are usually vertical. But the longer I do this, the more I’ve tried to lean into horizontal compositions as well, giving the canyon walls billing equal to the Milky Way.
Today I’m sharing a newly processed image from my 2021 raft trip—you can read the story of this night, and see a vertical version of the scene, here. This spot has become one of my favorite campsites because of the way, when the flow is just right, the water here spreads and pools at an extreme bend in the river. The reflection this night was spectacular, probably the best I’ve ever seen here, and (needless to say) I got very little sleep.
FYI
This image (like all of my images) is a single click (no compositing of multiple frames) with no artificial light added (no light painting or any other light besides stars and skylight). I was using my 20mm f/1.8 lens, which was wide enough, but I sure wish I’d have had the 14mm f/1.8 that was on order but didn’t arrive on time.
I had to skip the 2023 Grand Canyon raft trip, but am excited to be returning in May of 2024—and I just scheduled my 2025 trip.
Milky Way Favorites (one click—no blending)
Click any image to scroll through the gallery LARGE


Dark and Early
Posted on November 29, 2023

Autumn Chill, North Lake Reflection, Eastern Sierra
Sony α1
Sony 16-35 f/2.8 GM
ISO 50
f/18
20 seconds
The key to successful sunrise photography is arriving early—dark and early. Not just to photograph the early morning twilight, but to familiarize yourself with the surroundings to be ready for whatever the rapidly changing morning light delivers.
Exactly how early is “dark and early”? Well, another way of looking at it would be, if you can navigate without a flashlight, you’re too late. I know, I know, you’re sleepy, hungry, and it’s cold, but it shouldn’t take more than one or two mad sprints beneath fading crimson skies to motivate you to pull back those covers and plop your bare feet onto the bedroom floor just a few minutes earlier. And guess what—when you arrive early enough to savor the sunrise rather than rush through it, you’ll soon appreciate the simple purity of air, sound, and light that just can’t be found at any other time of day. Not to mention the sky-spanning transition of color and light that precedes the sun’s arrival.
At popular sunrise spots like North Lake (west of Bishop in the Eastern Sierra), arriving at least forty-five minutes before sunrise has the added advantage of beating most of the people with whom you’ll soon be competing for choice photography real estate. Arriving this early, the chilly air at North Lake is often graveyard-still and the lake a perfect mirror—already worth the sacrifice. And though the sky is so dark to that a few stars still burn overhead, you’re not too early to start photographing. Long exposures in the pre-sunrise darkness reveal even more of the remaining stars, unveil invisible color in the aspen surrounding the lake, and smooth any ripples disturbing the lake’s surface.
The image here was captured a couple of months ago, during the second sunrise shoot of this year’s Eastern Sierra Fall Color photo workshop. In our brief parking lot orientation before taking the short walk to the lake, I’d advised everyone to be very careful about the place they choose to set up because soon there won’t be enough room on the lakeshore to move anywhere else. And since experience here has shown me that people don’t always appreciate how well today’s digital sensors perform in low light, my job once we got out there and everyone had set up was to move around encouraging my group to take advantage of the shadowless early light their eyes couldn’t yet register.
As predicted, the crowd soon increased to the point where we all had to live with the foreground we’d chosen. So when the scene’s features started to reveal themselves to our eyes, my attention turned to helping my group incorporate into their compositions whatever foreground was in front of them. By the time the sun kissed the highest peaks, I still hadn’t taken any pictures of my own. But when small clouds began to form in invisible updrafts playing among the peaks, I was grateful to have claimed my own spot before the masses had arrived.
Surveying the scene this morning, I thought about the iconic autumn Maroon Bells in Maroon Lake (near Aspen, Colorado) that I know only by reputation (Google it—I’d be very surprised if you’ve never seen an autumn image from here). And while the autumn sunrise crowds at North Lake can be a challenge, from what I hear, they’re nothing compared to the Maroon Bells morning mayhem.
I won’t try to claim that this North Lake view is better than Maroon Lake’s, but one thing I do think is better (based on the images I’ve seen of the Maroon Bells reflected in Maroon Lake) is North Lake’s foreground possibilities that enable a tremendous variety of compositions. Not only are there lots of great foreground features that vary significantly depending on where you set up, they also vary from year-to-year, as even very small changes in the lake level make a big difference in the rocks, both exposed and submerged, that are visible.
An added bonus this morning was the frost glazing the grass that lined the lake. With the clouds and light changing quickly, I went to work trying to find the best way to feature all of this morning’s best elements: sunlit peaks, wispy clouds, golden aspen, rippled reflection, frosted grass, and protruding granite rocks. That’s a lot to deal with.
Having allowed my group to claim their own turf before staking mine, I’d ended up at the far end of the line (so I was in no one’s way), then rock-hopping out to a flat rock a couple of feet into the lake and actually extending one tripod leg into the water. Being essentially in the water gave me the cleanest view of the entire reflection and the best control over the rocks/reflection relationship. This morning I dropped my tripod a couple of feet to minimize the empty space between the rocks and the peaks’ reflection. And since the sky above the peaks was (boring) blank blue, I included the absolute minimum amount of blue I thought I could get away with.
The downside of getting started so late was the glassy reflection that we’d enjoyed much of the morning was gone, so I added my Breakthrough Filters 6-Stop Dark Polarizer for a water-smoothing long exposure. By dialing to ISO 50 and stopping down to f/18, with the filter I was able to stretch my shutter speed all the way out to 20 seconds. I turned the polarizer only enough to cut the reflection around the rocks without erasing the rest of the reflection.
Often the seeds of an image are planted long before the shutter is clicked. This image was captured well after the morning’s darkness had left, but as with many of my favorite sunrise images, it wouldn’t have been possible if I hadn’t been out there dark and early to claim my spot and familiarize myself with the scene’s many variables.
We’ll return to North Lake in my next Eastern Sierra photo workshop
Workshop Schedule || Purchase Prints || Instagram
The Joy of Sunrise
Click any image to scroll through the gallery LARGE


Playing the Odds
Posted on November 21, 2023

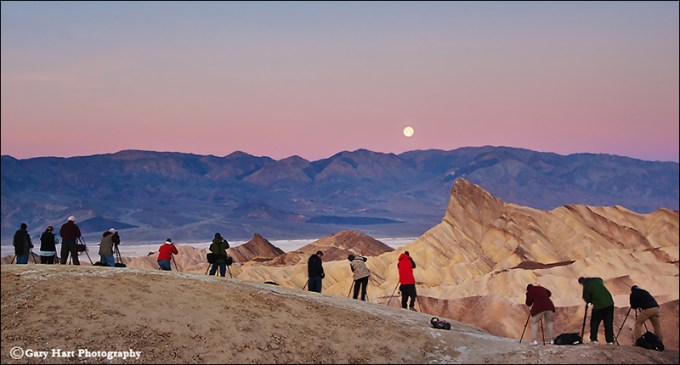
Twilight Moon, Zabriskie Point, Death Valley
Sony a7R V
Sony 24-105 f/4 G
ISO 100
f/10
1/13 second
First and foremost, a good landscape image usually requires…, well…, a good landscape. But merely getting yourself to the good landscapes is only half the image success equation, because good landscape photography also requires good conditions: colorful sky, dramatic clouds, complementary light, a striking celestial object, or some other natural quality that elevates the scene to special.
One way to include these ephemeral variables is to monitor conditions closely enough to respond in time to photograph them. Which of course also requires being relatively nearby when the conditions become favorable. Not necessarily a problem when my desired subject is close to home and the only affected schedule is my own, but my photo workshops need be planned more than a year in advance, so the proximity and react quickly approach doesn’t really work. Instead, the best I can do is schedule workshops to maximize the odds for ideal light, interesting skies, and other photogenic conditions—then cross my fingers.
For example, visiting Iceland in January or February increases the odds for the northern lights and low angle all-day sunlight; June in New Zealand provides the best chance for snowy peaks, and it’s the month when the core of the Milky Way up all night; and early August (+/- a week or so) at the Grand Canyon is generally the peak of the Southwest monsoon’s spectacular lightning and rainbows. While each of these features can be thwarted by uncooperative weather, at least we’re close enough to be there when the good stuff happens.
My annual Death Valley / Mt. Whitney photo workshop is another example of playing the odds. I love clouds and Death Valley. But because Death Valley only gets about an inch of rain each year, it suffers from chronic blue skies. To maximize the possibility of clouds for my DV/Whitney workshop groups, I schedule the workshop from mid-January through early February, when temperatures are farthest from summer’s intolerable heat, and the (still remote) chance for rainfall and (more likely) clouds is highest.
While I always wish for clouds in my workshops, cloudless skies in Death Valley don’t mean lousy photography. Places like Mosaic Canyon and Artist’s Palette are nice in the soft shade of early morning and late afternoon. And few sights are more dramatic than the sun’s first or last rays on the curves and lines of the undulating Mesquite Flat Dunes. Another benefit of cloudless skies is the beautiful pink and blue pastels that hover above the horizon opposite the sun before sunrise and after sunset.
To further hedge my bets, in Death Valley I always give myself one more blank-sky card to play: the moon. Scheduling this workshop around a full moon opens moonlight opportunities, and gives my groups at least two mornings to photograph the setting moon in the pre-sunrise twilight pastels: first at Zabriskie Point, where it aligns beautifully with Manly Beacon, then in Alabama Hills, where we can photograph it slipping behind the alpenglow enriched Sierra Crest, bookended by 14,000 feet-plus Mt. Whitney and Mt. Williamson.
This year’s DV/Whitney workshop, last February, had more clouds than usual—great for our daytime photography, but a source of stress f0r the workshop leader as the Zabriskie Point sunrise moonset approached. But instead of thwarting my Zabriskie moonset plan, I woke this morning to find that most of the clouds had departed overnight, leaving behind just a handful of ideally placed cotton balls for the moon to play with.
Zabriskie Point is an extremely popular sunrise location, so I got my group out there nearly 45 minutes before sunrise. We ended up being the first ones out there (better to be 10 minutes early than 1 minute late)—too early, in the pre-dawn darkness, to capture detail in the daylight-bright moon and the rest of the scene in a single image, but since the moon was still fairly high, I suggested to everyone that they compose it out (shoot beneath the moon) and just concentrate on revealing the foreground in the sweet, shadowless light.
While waiting for the foreground to brighten, I enjoyed watching the clouds dance around the moon, alternating between obscuring, revealing, and framing. The darker the sky, the better the moon stands out, but when the sky is too dark, an exposure that captures detail in the moon also has an unrecoverably dark foreground (either its completely black, or there’s too much noise in the processing-recovered darkness). As the sun approaches the horizon behind us, the lighter the sky gets and the easier it becomes to get detail in both the moon and the landscape. But soon the sky becomes so bright, contrast between the moon (which isn’t getting any brighter) and sky is lost and the moon becomes less and less prominent.
My window for photographing a full moon is from 15 minutes before sunrise/sunset to 15 minutes after sunrise/sunset (maybe a few minutes earlier/later if I’m extremely careful with my exposure). At sunrise, the best moon photography is on the earliest side of this window, when the moon/sky contrast is highest; the easiest exposure (greatest margin for exposure error) is toward the end of the window. And of course this unfolds in reverse at sunset.
To ensure that I don’t miss any of the best photography when the moon exposure window opens, I always start a few minutes before my 15 minute window opens so I can identify later in Lightroom the earliest usable image. The image I’m sharing today wasn’t my very first usable click that morning, but it did come 14 minutes before sunrise, when the contrast was still high. I chose this one because it came shortly after the pink hues of the sun’s longest rays started pushing the Earth’s shadow toward the horizon, absolutely my favorite part of sunrise. For me, capturing the moon in this night/day transition is the Holy Grail of full moon photography.
Locations like Death Valley are always great to photograph, regardless of the conditions, so it always feels like I’m playing with house money there. But looking back at all the things I bet on when scheduling this workshop, I can see that this year most of them paid off. Thanks to the (long shot) clouds, we got beautiful sunset color at Dante’s View one evening, and on the dunes another. One morning the clouds cleared enough to paint the dunes in beautiful sunrise light (one reason we do sunrise and sunset there), and another morning just enough hung around to enhance, without obscuring, our beautiful moonset. We all felt like winners.
I actually have a couple of openings in my upcoming Death Valley workshop
Moons Over Death Valley and the Alabama Hills
Click any image to scroll through the gallery LARGE


One Morning in Middle Earth
Posted on November 15, 2023

Middle Earth Morning, Matagouri Trees Near Glenorchy, New Zealand
Sony a7R V
Sony 24-105 f/4 G
ISO 100
f/16
1/40 second
Having reached a much anticipated break in my workshop schedule, I’m excited for the opportunity to carve out a little time to process images from past trips. For as long as I’ve been doing this photo workshop thing, I’ll return from a workshop, take a cursory trip through my captures, process one or two (maybe a couple more if time permits), make a mental note of the images I want to return to, then get to work on the business stuff that has to take priority. But about 80 percent of those “return to” images just seem to languish on my hard drive like the books on my Kindle that I always plan to get to later.
With no illusions of making a significant dent in this multi-year image accumulation, I started browsing my 2023 trips with no particular agenda, finally landing on the folder from the New Zealand workshop Don Smith and I do each June (winter Down Under). I got no farther than the images from our first morning…
Journey With Me
After leaving Queenstown (FYI, without a doubt the most beautiful city I’ve ever laid eyes on) dark and early, our sunrise stop is a sheltered cove on shore of Lake Wakatipu. Despite dense, low clouds obscuring the cross-lake mountain views Don and I love so much about this spot, our group enjoys nice reflections in the always crystal clear water (people actually drink from the lakes in New Zealand!)—not spectacular, but a lovely start to a day that will soon get much better.
I love the drive along Lake Wakatipu’s northeast shore. I’ve made it more times than I can count, and each time I like to imagine I’m being transported back to Middle Earth. This morning is no different.
A few miles beyond our sunrise spot, the clouds start teasing us with ephemeral views of the Thomson Mountains’ snowy summits across the lake, but the overcast’s overall persistence only adds to the drive’s ethereal feel. With clouds still ruling the sky as we enter the tiny village of Glenorchy at the top of the lake, we stop at Mrs. Wholly’s General Store for warm greetings, hot coffee, and tasty treats (not to mention handmade New Zealand wool goods), and to allow the overcast time to clear for the journey’s next leg. Clouds or not, this stop has become something of a workshop tradition.
The world really starts changing after putting Lake Wakatipu, Glenorchy, and the paved road in the mirror—a transformation enhanced this morning by patches of blue sky and a brightening landscape that hints at the sun’s imminent arrival. Despite the missing pavement, the road is quite smooth as we approach tiny Paradise, known in Middle Earth as Parth Galen and Lothlórien. Just beyond is Mt. Aspiring National Park—Isengard and more Lothlórien.
Now the undulating terrain is punctuated by native matagouri trees; in the distance, the highest peaks of the Humboldt and Richardson Mountains are starting to emerge in all their snowcapped glory and our transition to Middle Earth feels complete. The view is spectacular and the group wants to stop to photograph, but Don and I know this route well and ask our driver to continue to a spot that will allow us to add a foreground of matagouris to our dramatic mountain background. In a couple of minutes we round a bend and pull to a stop in front of a stand of twisted matagouri trees jutting from a frosty pasture.
Seeing the trees and the distant mountains haloed by the last vestiges of the diaphanous clouds, I barely avoid getting trampled as the group rushes out to capture the scene. As beautiful as the mountains are, I’m especially thrilled by the trees and want to find the best way to feature them without diminishing the peaks.
I digress
Rendering our three dimensional world in a two-dimensional medium requires a paradigm shift for photographers accustomed to capturing the world as it appears to their eyes. But while it’s impossible to create a true three-dimensional image, it is possible to create the illusion of that missing dimension.
Creating illusion of depth starts with of a couple of simple principles. First, never settle for your primary subject. When your primary subject is in the distance, look for a complementary element nearby. Conversely, when your subject is in the nearby, pay special attention to the image’s background.
While leading lines, like a fence, road, creek, or lakeshore, can guide the eye through the frame, you can also create virtual leading lines with a prominent rock, shrub, or tree that your viewers can subconsciously connect to other visual elements. Your complementary subjects don’t need to be especially compelling, they just needs to provide a brief stopping point that starts your viewer on a visual journey between the scene’s near and distant elements. When possible, I try to connect my complementary elements diagonally to move my viewers simultaneously across both of my (2-dimensional) image’s planes.
An easily overlooked flaw that can rob a scene of depth is merged visual elements on different front-to-back planes. For example, even though to your eye that distant rock is clearly behind the tree right in front of you, unless the two are completely separated horizontally (left/right, up/down), in the camera’s two-dimensional world they’ll appear at first glance to be a single object. Often the solution is as simple as moving left/right, forward/backward, or up/down.
Meanwhile, Back in Middle Earth
I start by scanning the scene to identify the most striking tree, then position myself to put the tree front-and-center in my frame. Once there I realize that I can actually frame the tallest peaks with the tree’s most prominent branches and set up at a spot that puts the other nearby trees along a more or less diagonal line that recedes from the primary tree. I compose the scene as tightly as I can to minimize the now empty sky and relatively bland grass at my feet.
While the exposure itself isn’t particularly difficult for my camera, the way I achieve it is important—given the need for front to back sharpness, I start by stopping down to f/16. With no wind this morning, I just go with ISO 100 and dial my shutter speed until the histogram looks good.
The final critical decision I need to make is exactly where to focus. The closest tree is about 10 feet away; at f/16, my hyperfocal app gives me a hyperfocal distance of about 13 feet. But those numbers are never precise and in fact vary depending on many variables, so I always like leaving myself some hyperfocal wiggle room. Focusing on the tree itself will soften the mountains, and focusing right at the hyperfocal distance will still give me nearly 4 feet of sharpness in front of the tree that I don’t need (since focusing on the hyperfocal point gives “acceptable” sharpness from half that distance to infinity). So I focus a little farther back—using that small piece of wood about 3/4 of the way to the second tree—to ensure distant sharpness. Click.
After leaving here we continue into the dense forest of Mount Aspiring National Park. No Elves or Hobbits this time, but it’s only our first day…
Don and I still have a couple of openings for New Zealand 2024
Workshop Schedule || Purchase Prints || Instagram
The Illusion of Depth


, Yosemite")


Back in My Happy Place
Posted on November 7, 2023
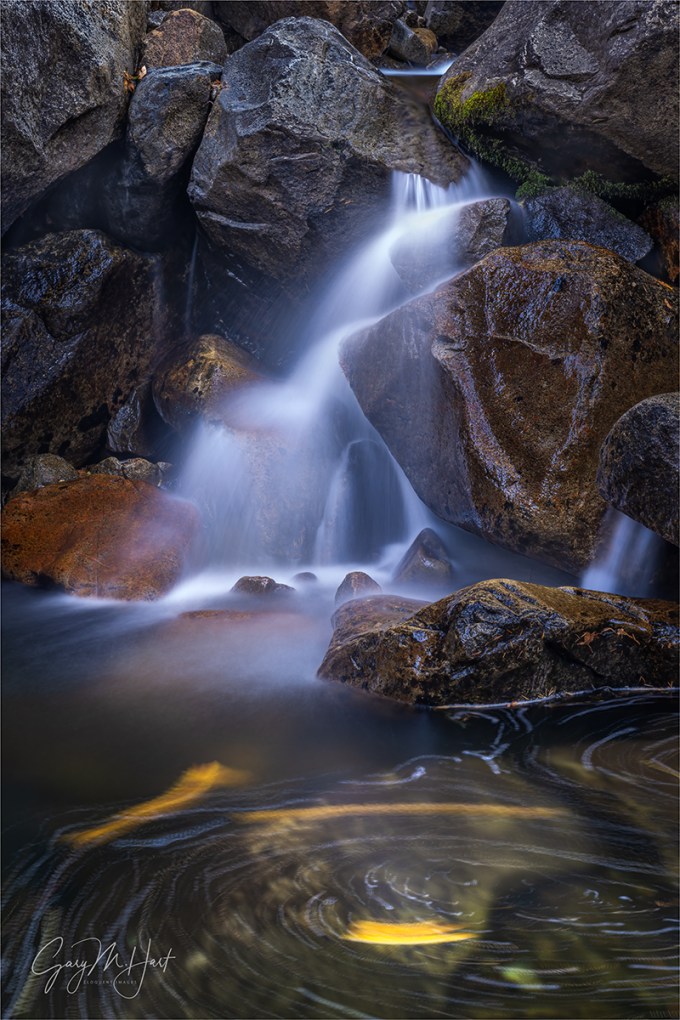
Autumn Spiral, Bridalveil Creek, Yosemite
Sony a7R V
Sony 24-105 f/4 G
ISO 50
f/16
13 seconds
Auroras, lightning, and a volcanic eruption—anyone viewing this year’s images might think my camera and I are most drawn to Nature’s purest drama. But as breathtaking as these phenomena are (they are!), I think I’m happiest with a camera in my hand when I’m working to extract subtle beauty from Nature’s quiet places. Rare, dramatic beauty is an instant stimulant that grabs your eyes and pretty much demands to be photographed. Not so much for the peaceful scenes that subtly soothe, but that doesn’t mean their beauty can’t compete—you just have to work for it.
Extracting photographs from these quiet places combines observation, position, and subtraction: observing to identify the scene’s essential elements; positioning to create relationships between these elements and the camera; subtraction of all that’s not essential through careful framing and/or management of the exposure variables. It’s rarely quick work, but I’m never happier than when I feel like I’ve created a synergy between these components.
My Yosemite Valley happy place has to be Bridalveil Creek. I’m not talking about the nearby view of the fall itself, I’m talking about the area just beneath the fall, where the creek tumbles and pools among granite and maples. Rather than feasting on views of Yosemite’s magnificent monoliths and waterfalls, I come to Bridalveil Creek to meditate and create in Nature’s more understated beauty.
Lacking the most photographed views of Yosemite’s icons, the Bridalveil Creek area probably shouldn’t be the starting point for a first-time visitor. On the other hand, when timed right, this (relatively) peaceful spot does provide a wonderful respite from Yosemite’s teeming masses, as well as ample opportunities to stretch your creative muscles.
Bridalveil Fall is the only Yosemite Valley waterfall that reliably flows year-round, but its volume varies tremendously depending on the season, the prior winter’s snowpack, and the amount of recent rainfall. In spring, Bridalveil Creek is an angry torrent that splits into three distinct channels just beneath the fall, each spanned by its own stone footbridge that provides an excellent platform for photography. In wet years all three channels run year round; in the driest years, by late summer two are nothing but dusty, rounded boulders, with only the east-most bridge offering views of flowing water.
I visit here each time I visit Yosemite, but my favorite season by far is autumn. Whether one, two, or three channels are flowing, by autumn the remaining water has lost the urgency of spring, pausing to rest in still pools before descending the next cascade. And autumn is when the suddenly yellow maples shed a seemingly infinite number of leaves that settle briefly atop rocks, accumulate in nooks and crannies, blanket the forest floor, and drift atop the swirling pools.
I always start my workshops’ final day at Bridalveil Creek, setting my groups free to roam the trail and its bridges, clamber down to the still pools, and rock-hop the cascades in search of inspiration. Early in the workshop many students are still battling their cameras and personal vision, but waiting until workshop’s end to bring my groups here gives everyone three-plus days to settle into the photographic zone that’s necessary to get most of their time here.
I never considered that I might lose this spot until 2019, when the NPS started work on a much anticipated overhaul of the whole Bridalveil Fall area. To speed the work, they decided to close everything (parking lot, toilets, trails, and creek access) while they rerouted the trails, reconfigured the parking lot, and (my favorite upgrade) replaced the aromatic vault toilets with actual flush-toilet bathrooms. Though I was disappointed that I’d have to forego my happy place for a year or (God forbid) two, I rationalized that the promised improvements would be worth the sacrifice. When COVID happened, I resigned myself to maybe another year of waiting.
When the park reopened after the pandemic, and on every visit since, Bridalveil Creek has my first Yosemite Valley stop. And while it always looked like an active worksite (barricades, equipment, and stacked construction material), progress seemed to be frustratingly slow. In fact, despite those signs of activity, I rarely saw any actual activity underway. Even my NPS contact couldn’t give me a date for reopening.
It was more of the same in 2021, 2022, and for my winter and spring workshops earlier this year. So, after seeing no announcement online or in my daily Yosemite news e-mail, I approached this year’s Yosemite Fall Color and Reflections workshop resigned to another year of Bridalveil disappointment. That pessimism was confirmed when I drove by the Bridalveil Fall parking lot Tuesday morning (on my pre-workshop scouting run) and saw it still locked tight with no sign of activity. Sigh.
This was my first trip to Yosemite since early May (I don’t visit Yosemite in summer), and while I was aware of some traffic-flow improvements made to the valley’s east side since my last visit, I had no idea how extensive they’d been. So I decided to make another loop around the park to reset my bearings (it’s never a good look when the workshop leader gets lost), which took me past the Bridalveil Fall area one more time. This time I decided to park and check out the short hike to the creek from the other side—I’ve done this many times, as recently as my previous visit last spring, and have always found the trail fenced off and signage making it very clear they want no one back there. So imagine my surprise (not to mention delight), when I found this side open with full access to the creek! The parking lot and bathrooms were still closed, but I found the trails and all of the bridges open.
On Friday, for the first time in four years, I guided a workshop group back to Bridalveil Creek. As much as I wanted to explore my favorite Bridalveil Creek haunts, I remained on the trail and bridges where most of my workshop group had gone to work. But, as often happens here, one-by-one they set out to explore farther afield, until with about a half-hour before I’d instructed them to be back at the cars, I found myself completely alone on the middle bridge. Though 30 minutes is hardly enough to time do any quality work here, I couldn’t help beelining back to one of my favorite spots—upstream, around a motorhome-size rock, and a quick scramble over rocks and a log down to the water. The last few years before the shutdown this spot had been partially largely by fallen trees, but I was very pleased to see that part of the improvement process had been dead tree removal.
I’d told the group about this spot before we started and thought one or two might still be there, but they’d all moved on and I found myself alone with maybe 20 minutes to work. I’m very familiar with the little cascade back here, and the pool it lands in, but depending on the amount of water and the timing of the fall color, the scene is different each time I visit. Sometimes the leaves form a mosaic on the pool’s surface, but this time I found most of the leaves huddled at the far end and out of the composition that came to me first.
Since speed was essential, I just went with that first composition, which was some version of the cascade tumbling over the rocks and into the pool. (For scale, I estimate that this cascade, from top to bottom, is at least 6 feet and no more than 8 feet high.) I knew that even an exposure of just a second or two would render the cascade as a gauzy veil, and that in the deep early-morning shadow of Yosemite Valley’s south wall, not to mention the trees and an overcast sky, a multi-second exposure would be nearly impossible to avoid. Seeing little flecks of floating foam, I decided to just lean into the long exposure to streak the foam and emphasize swirling motion on the pool’s surface. (I didn’t need a neutral density filter because I was satisfied being in the 10-15 second range by just stopping down to f/16 at ISO 50.)
There was so much sheen on the rocks and glare on the water that a polarizer was essential (and even with polarization maximized, I couldn’t eliminate all of it). The polarizer had the added benefit of revealing submerged rocks that would have been exposed in drier years. As I worked, an occasional leaf would ride the cascade into the pool, or drift down from overhead, to take a couple of laps in the pool before sinking or exiting stage left. No problem—their yellow swirl lasted just long enough to add a final touch to my happy little scene.
Join me for a Yosemite photo workshop
Autumn at Bridalveil Creek
Click any image to scroll through the gallery LARGE


Rise and Shine
Posted on October 30, 2023
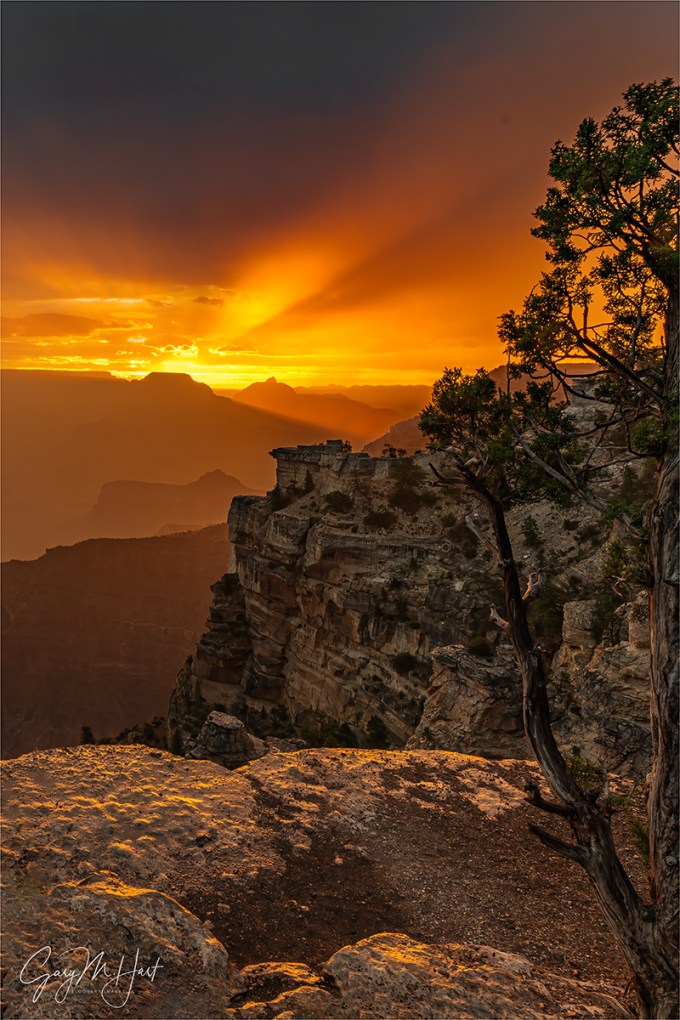
Rise and Shine, Mather Point, Grand Canyon
Sony α1
Sony 16-35 f/2.8 GM
ISO 100
f/14
2.5 seconds
Imagine a world unmarred by the din of civilization, a world so quiet you can hear nature’s every stirring, where each breath carries a pristine bouquet of subtle fragrances and the sky is a continuously shifting kaleidoscope of indigo, blue, yellow, orange, and pink. Not a fantasy dreamscape or a garden planet in a galaxy far, far away, I’m describing the world just beyond your front door, before the sunlight and warmth have enticed the noisy, dirty, oblivious masses.
The morning magic begins when a crack of light brightens on the eastern horizon and a few stars still burn overhead. It’s still too dark for the eye to register detail and color, and nearby objects loom as vague shapes. Lacking enough light for the eyes to do their thing, the pre-sunrise experience amplifies the non-visual senses, allowing the sounds like gentle breezes, flowing water, and stirring creatures to mingle with the fresh aroma of dew-laden plants.
For the next 30 minutes, the eastern horizon brightens faster than the rest of the scene. Prodded by the advancing day, the shrinking Earth’s shadow pushes toward the opposite horizon and the sun’s longest wavelengths battle through the atmosphere to color the western sky pink.
Photographing this pre-sunrise show can begin earlier than your eyes might tell you. In fact, the camera’s ability to capture aspects of the natural world that differ from the human perspective might just be my favorite thing about photography, and these sunrise moments provide a wonderful opportunity to engage one of the camera’s greatest strengths. Experienced photographers understand that what we perceive as darkness is just our eyes’ relatively limited ability to gather light, combined with the brain’s insistence on processing this limited input instantaneously. But a camera’s sensor accumulates light, capturing every photon to strike it, stretching the “instant” of perception for whatever duration the shutter speed prescribes.
Another advantage a digital sensor has over the human eye is its ability to extract color from apparent darkness. The human eye uses rods and cones to collect light, with the rods doing the heavy lifting in low light, pulling enough monochrome information to discern vague shapes and detail, but providing little help with color and depth. The cones can’t complete the scene’s color and depth information until much more light has arrived. A digital sensor, though blind to depth, captures photons without discrimination, enabling it to “see” color in very low light.
One particularly special sunrise

Rise and Shine, Mather Point, Grand Canyon
There are a lot of excuses to skip sunrise, but I rarely hear anyone who overcomes the urge to stay in bed express regret after they’ve actually gone out for sunrise. That said, the reasons to miss this morning’s sunrise were both many and strong. In addition to the always popular, “You want us to leave at what time?” (in this case, 4:45 a.m.) and a weather forecast calling for rain, lightning, and thunder, my Grand Canyon workshop group was still basking in the glow of the previous evening’s spectacularly productive lightning shoot at Desert View. How can we top that?
Nevertheless, everyone showed up dark-and-early at the designated meeting spot and by 5:00 a.m. we were setting up our camera gear on the rim near Mather Point. But just about the same time we became aware of lightning brightening the clouds south of us. There was no rain yet, and we weren’t hearing thunder, but these storms moving up from from the south can advance quickly and are easy to miss until it’s too late because we’re all looking in the other direction.
Speaking of the other direction, as portentous as the weather behind us was, the sunrise approaching behind Wotan’s Throne (the flat monolith in the upper left of my image), looked especially promising. Though still not quite ready for primetime, the view just kept getting better. With the arrival of thunder with the lightning, a clear indication that the storm was getting closer, I checked my watch and started counting the seconds: 10 miles, 8 miles, 5 miles… When few splats of rain turned to sheets and stiff wind kicked up, I gave the approaching sunrise scene a (regretful) parting glance and told my group it was time time to retreat to the cars for safety. By the time we were safely sheltered, everyone was soaked and the lightning was within 2 miles.
The actual sunrise was still 15 minutes away. Even though I couldn’t actually see the horizon, I could tell by the light in that direction that it was really ramping up. When I realized the thunder had faded and the lightning seemed less frequent, I checked my lightning app and saw that the threatening cell had taken a sudden eastward detour away from our position. After pausing a minute or so just to be sure, I hustled everyone out of the cars and back to the rim (nearly getting trampled in the process).
Rather than take the time to head to the more conventional view, I stopped at a spot closer to the cars that I’d noted earlier, making it just as shafting light shot skyward from behind Wotan’s Throne. Working quickly, I went with both horizontal and vertical compositions. Because a nearby tree and the textured rock ledge supporting me featured prominently in my composition, I stopped down to f/14 and focused at the far edge of the ledge.
I underexposed the brilliant gold sunlight enough to hold the color, keeping an eye on the shadows side of my histogram to ensure that I didn’t darken them beyond the point of no return. It helped that thick, moisture-laden air in the canyon obscured most of the detail down there anyway, and that the rocky ledge at my feet was a reflective whitish-tan that was easily recovered in post. Turns out, aside from darkening the highlights and brightening the shadows, this image required very little processing.
In hindsight, I shudder to think how close we came to missing this sunrise altogether. Of course if the lightning had persisted, we’d have had no choice, but as wet as we all were it would have been very easy to just motor back to the hotel to warm up and fill our tummies. But we stuck it out, and were rewarded with one of my most memorable Grand Canyon sunrises.
Morning Glory
Click any image to scroll through the gallery LARGE


A Peek Behind the Curtain
Posted on October 24, 2023

Aspen and Ferns, Bishop Creek Canyon, Eastern Sierra
Sony α1
Sony 16-35 f/2.8 GM
ISO 400
f/16
.8 seconds
A particular highlight of my annual Eastern Sierra photo workshop is our sunrise shoot at North Lake. Made famous as the default desktop image for macOS High Sierra, North Lake is a small lake in the shadow of snow-capped Eastern Sierra peaks, near the top of Bishop Creek Canyon a little west of Bishop. It’s encircled by aspen, and reflections in its sheltered bowl are quite common. More than once my groups have been fortunate enough to enjoy a light dusting of snow along the lakeshore.

Autumn Morning, North Lake, Eastern Sierra
Depending on the conditions, we’ll stay at North Lake for at least an hour—often longer. But the photography isn’t over when we do finally leave, because just down the mountain from the lake are some of my favorite Sierra fall color spots. In the two miles between North Lake and Lake Sabrina (Pro Tip: it’s pronounced with a long “i,” like China) at the top of the canyon, we can choose between mountain vistas, dense aspen groves, views of aspen lined Bishop Creek, and several small reflective ponds also accented by aspen.
The conditions determine our stops. When it’s cloudy (low contrast light), we can shoot anywhere for hours; when the sky is clear, the best photography is done before the sun arrives, forcing me to be a little more selective to get the most of our limited time.
This year, with few clouds and morning light rapidly descending the mountainsides, after North Lake I took my group to the deep shade at the canyon’s bottom, stopping first to photograph the gold and (a few) red aspen framing Bishop Creek, then moving a half-mile or so upstream for reflections in a couple of pools formed by wide spots in the creek. There’s so much to photograph at both of these locations that the group always scatters quickly—when that happens, I know we’ll enjoy a wonderful variety of images at the next workshop image review.
Always on the lookout for something new, familiar locations like Bishop Creek kick-in my natural urge to explore. But when I lead a workshop, I’m well aware that no one pays their hard earned money only to spend their days (and nights) following the leader to places he’s never been. So, despite the obvious beauty here, I’m usually content to simply step back and take it all in.
Nevertheless, I try not to let that inhibit my explorer’s mindset. As I walk about checking on my workshop students, or simply while taking in the surroundings, I often find myself silently asking, “I wonder what’s over there.” Though circumstances don’t usually allow me to actually find out on that visit, I mentally file the spot away for a time when no one depends on me. But every once in a while an opportunity to explore surprises me in the moment.
I knew the sun this morning would reach us at around 9:00 a.m., so around 8:30 I started making my way around to everyone to let them know that we had about 30 more quality minutes before we’ll head back down the mountain for breakfast. The creek here parallels the road, with all the standard photo spots between the road and the creek. While waiting for people to wrap up after I made my rounds, I thought I might have just enough time to find out what’s on the other side of the creek and crossed the bridge, where I found a barely discernible path into the woods.
This was just a quick reconnoissance mission, so my camera bag remained in the car. At first the path was so overgrown that in spots I had trouble following it, but after about 50 yards it opened into a sublime fern garden, walled by aspen and sprinkled with golden leaves. I knew instantly it was too small and fragile to bring a group to, but I also knew I had to photograph it. So I raced back to my car, grabbed my camera bag and tripod, and was back in business in just a few minutes.
I only had about 5 minutes to photograph, but that was enough to drop low, compose wide, meter and focus, and capture a half-dozen or so horizontal and vertical frames. The treetops were already getting washed out by the advancing sun, so I emphasized the foreground ferns with all my compositions, cutting off the sunlit parts of the aspen—an effect that creates the illusion of infinite depth in this relatively compact space.
When I first arrived back here, the dense forest on all sides made me feel completely isolated. But as I worked my scene, I became aware of people in my group laughing and chatting as they worked their own scenes, and realized that I was only a few feet from the creek. That got me thinking about all the intimate beauty underlying the larger scenes that first draw our attention. In this natural garden this morning, it felt as if I’d peeked behind a curtain and discovered an entirely new world.
This is a reminder to me that even the most in-your-face beauty is comprised of easily overlooked subtleties, and that no matter how beautiful the first thing you see in a scene, there’s always more there. The best photography doesn’t show us the world we already know, it pulls back a curtain to expand our understanding of the unseen world.
Workshop Schedule || Purchase Prints || Instagram
Off the Beaten Path
Click any image to scroll through the gallery LARGE


")


, California")
Older Than History
Posted on October 17, 2023

Last Light on the Bristlecones, Schulman Grove, White Mountains (California)
Sony a7R V
Sony 24-105 f/4 G
ISO 100
f/16
1/4 seconds
Ask people to name California’s state tree and I’m afraid most would go strait to the palm tree—which isn’t even native to the Golden State. And though the correct answer is the redwood, those of us born and raised in California might argue that the stately oaks that dominate the foothills throughout most of the state conjure the strongest feelings of home.
But without diminishing the other trees, let me give our ancient bristlecone pines some much deserved love. Lacking the ubiquity of California’s palms and oaks, and the mind-boggling stature of our redwoods, bristlecones are largely unknown to California residents and visitors alike. But, not only do these twisting, gnarled trees look specifically designed for photography, for me it’s their fascinating natural history that truly sets bristlecones apart.
All varieties of bristlecone pines can live for millennia, but today I’m referring specifically to the Great Basin bristlecones, which have earned the distinction of being among the oldest living organisms on Earth. Earned being the operative word there.
Slow growth, a shallow and extensively branched root system, dense wood, and extreme drought tolerance contribute to the bristlecone pine’s longevity. How old are they? Well, many predate Christ, and at 4850 years old, the Methuselah tree (whose location somewhere near the Schulman Grove of the Inyo National Forest is a closely guarded secret) had already lived more than three centuries when the Egyptians broke ground on the first pyramid.
My favorite fact about these trees is that the more harsh a bristlecone pine’s environment, the longer it lives—a wonderful metaphor for perseverance that might bolster anyone battling the headwinds of life. Also found at the most extreme elevations of Nevada and Utah, Great Basin bristlecones especially thrive in the high elevation (low oxygen), extremely arid and rocky conditions above 9500 feet in the rain-shadowed White Mountains, just across the Owens Valley from the Sierra Nevada.
In the oldest bristlecones the majority of the wood is actually dead, with only a small area of living tissue connecting the roots to a few surviving branches. Having a relatively small amount of living tissue allows a bristlecone to sustain itself with minimal resources, while the extreme density of its dead wood serves as armor against harsh conditions. And once a bristlecone pine does die, with wood so hard and roots so robust, they can remain standing for centuries.
I visit these amazing trees each autumn in my Eastern Sierra Fall Color workshop. And though they’re technically not in the Eastern Sierra (but do provide spectacular views of it), and are completely devoid of fall color, so far no one has complained. On each visit I send my group up the Schulman Grove Discovery Trail loop, a short (one mile) hike starting at 10,000 feet with a 300 foot elevation gain that tests the fitness of all who attempt it. Compensation for all this effort is the opportunity to stroll among dozens of truly photogenic trees, each with its own unique character, that predate most human history.
All of the climbing happens in the first half mile—just about the time everyone is ready to turn around (or string-up the leader on the nearest bristlecone), the trail levels, then mercifully drops for the remainder of the hike. I’ve been doing this hike for more than 15 years, sometimes multiple times in a year, and if I’ve learned nothing else, I know to give everyone enough time to actually enjoy it.
It helps that most of the best trees are on the first half of the trail, as are 2 or 3 strategically placed benches. The ultimate payoff is a pair of striking bristlecones standing by themselves on a west-facing slope a little beyond the trail’s halfway point and just after the trail starts descending.
Because we start hiking about 90 minutes before sunset, and there’s no chance anyone will get lost, I let each person go at whatever pace makes them comfortable. And before setting everyone free, I remind them that there’s plenty of time to stop and take pictures (or pretend to take pictures) whenever they need to catch their breath.
I’ve visited these trees so many times, I rarely photograph them anymore—and when I do, few shots ever get processed. But as I got people started this year, I suspected things might be different because we’d been gifted with nice clouds—a welcome sight indeed.
I always let everyone in my group start up the trail before me, then wait at least 5 more minutes, so I can check on each person after they’ve had a a few minutes to experience the grade and thin air. In more than a few prior years I’ve had to race to the target trees, drop my gear, and double-back to check-on/assist others who might be struggling, but that wasn’t necessary this year—everyone made it to the trees by sunset without any trouble, albeit some much sooner than others.
When I first started coming here there were no posted requirements to stay on the trail, and photographers didn’t hesitate to clamor about the base of the trees in search of the best angle. But all this activity threatened to damage the trees’ shallow roots, so in recent years signs have been posted making it very clear not to leave the trail.
This new edict has actually made my job easier, as I no longer need to choreograph an assortment of photographers with conflicting agendas (even just one person scrambling up to the trees can ruin everyone else’s frames). Now we all just line up along the trail on either side of the trees, then shuffle positions when it’s time to change angles.
Clouds dominated when we arrived, but they moved swiftly, shuffling small patches of blue in the southern sky behind the trees. Though the clouds farther west were thick enough to completely block the sun, I was excited to see a small strip of blue just above the ridge that would ultimately swallow the sun for the day—if it held, we’d get nice late light, and maybe even some sunset color. Fingers crossed.
The trail almost completely loops around this pair of trees, providing more than 300 degrees of potential vantage points—some above, some below. My first frames this evening were at the far back of the loop, facing south and maybe 100 feet from the trees, allowing me to include the Sierra Crest and compress the distance between the trees and the peaks with a little bit of telephoto. As the clouds improved, I worked my way closer, shooting more beneath the trees to include more sky as well as well as a few patches of foreground snow.
So focused on the trees and sky, I forgot about the promising blue patch until the uphill treen suddenly lit up like it had been hit with a spotlight. Seeing the downhill had remained completely shaded except for its highest branches, I glanced westward and knew we’d only have a few minutes before the sun disappeared for good—fortunately I was in a perfect position to include the spotlit tree with the best clouds and could just stay put.
This turned into one of those situations where I simply worked as rapidly as I could without descending into actual panic-shooting. I started by checking my my histogram to ensure that I wasn’t clipping the essential highlights on the tree. With visual elements near and far, I had to be careful about depth of field, so I stopped down to f/16 and focused a little in front of the trees, and started shooting a range of compositions, horizontal and vertical, with a variety of sky and foreground (quickly refocusing each time I changed my focal length), firing continuously until the sun left—no more than five minutes.
The sunset color I’d hoped for never quite materialized, but no one complained. The evening’s combination of clouds and light, combined with the patches of snow, made this one of my favorite shoots at this most special of locations.
I will return next year
Trees Near and Far
Click any image to scroll through the gallery LARGE


")


")


Fire and Rainbow
Posted on October 10, 2023

Fire and Rainbow, Kilauea, Hawaii
Sony a7R V
Sony 100-400 GM
ISO 250
f/11
1/200 second
One concern about returning to the same location, at the same time, in the same workshop, is finding something new to photograph. But last month’s Hawaii workshop group was so excited about our first shoot of the Kilauea eruption, going back on the workshop’s final night was a no-brainer. Not only were we looking forward viewing the fountaining lava one more time, we all wanted to apply some of the lessons learned from the Tuesday shoot. And Mother Nature delivered a surprise that guaranteed something new for everyone.
Surprise or not, many in the group returned with plans for different exposure or focal length choices; I want to use the knowledge gained in the first visit to position my group better, because the eruption had been so new on that first visit, I’d arrived at Kilauea with no idea of what we’d encounter and how we’d access it. I knew enough this second time to arrive with an actual strategy.
The first night we had to park in the overflow parking lot and walk about a mile along the caldera rim to reach the best vantage points; this time we arrived nearly 90 minutes earlier and drove directly to Kilauea Overlook, our favorite vantage point from the earlier visit. Even arriving that much earlier, we ended up snagging the last three parking spaces in the lot—one more kiss of good fortune to bless this especially fortunate workshop group.
Though the eruption was still going strong, we found the shooting conditions this second evening much different. The first time it was dry, with a mix of sky and clouds; this time we found ourselves surrounded by low clouds that dampened every surface and filled the caldera with a heavy mist. By the end of the evening I’d labeled this a “stealth” rain—microscopic drops that couldn’t really be felt as they landed, but somehow managed to saturate our clothes and accumulate on our lenses. But at first it just seemed a little damp.
As early as we were, the sun still hadn’t set behind Mauna Loa. As we unloaded our gear from the cars, I noticed blue sky visible above Mauna Loa and pointed out to the group that there may actually be enough moisture in the air to create a rainbow if the sun came out. And it wasn’t long after making our way to the rim that the sun did indeed pop out enough to create a fuzzy rainbow far to the left of the lava.
The rainbow’s location was close enough to the eruption that we could include both in the same frame without going too wide, but I wanted to get it even closer to minimize the (not especially appealing) brown caldera floor separating them. This is where understanding basic rainbow science pays off. A rainbow forms a 42 degree circle around the anti-solar point: the point in the sky at the other end of an imaginary, infinitely long line starting at the sun, passing through the back of the viewer’s head, and exiting between the eyes. Since we each have our own anti-solar point (and therefore our own rainbow), which is entirely a function of our position relative to the sun, we can change the location of any rainbow (relative to the landscape) by simply repositioning. In this case I knew I could move about 300 yards to my right before the trail (and eruption view) curved out of view of the eruption and rainbow.
Since this was the workshop’s final evening, and we’d all photographed the eruption from here before, everyone was pretty comfortable scattering (rather than sticking close to me for guidance)—which is exactly what they’d done. I hailed as many as I could and explained what I was doing and why, encouraged them to join me, then rushed up the trail.
Not knowing how long the rainbow would last, on the way I stopped a couple of times to fire a frame or two. Turns out I needn’t have worried because the rainbow lasted, in one form or another, for at least 30 minutes. Once I reached the vantage point that positioned the rainbow closest to the eruption, I set up and went to work. The rainbow seemed most intense near the lava, but at times I could make out a faint full arc, and once even pulled out my 12-24 lens to capture a few frames of it. But for the most park I was interested in the tighter, brighter compositions.
Finally working in one spot long enough to get settled, I started to fully comprehend how wet it was. I was wearing a thin rain shell, but could tell that it was already soaking through to my flannel. (Flannel in Hawaii? Indeed—here at 4,000 feet conditions were both wet and windy, with temps in the low 50s.) The wind made my umbrella pointless, so the mist/rain also assaulted my front lens element enough that I had to wipe it clear every few frames.
The difficult problem was getting focus. I’ve come to trust the autofocus on my Sony mirrorless cameras so much, the only time I manually focus anymore is when I have a critical focus point requirement—in 100% infinity scenes like this, I just autofocus anywhere in the scene (wherever my focus point happens to be positioned) and call it good. But the mist this evening was so dense, I could rarely get a focus confirmation—and even when I did, I wasn’t completely confident of it. So I scanned my surroundings and spied a couple hundred yards behind me one of the volcano observatory buildings (near the now shuttered Jagger Museum) to auto-focus on.
This worked well, especially since I use back-button focus and didn’t need to switch between auto and manual focus each time I refocused. Of course each time I changed my focal length I had to pop my camera off my tripod and turn around to refocus, but this became second nature soon enough.
We stayed until dark, battling the wetness and chill to add to our already brimming Kilauea eruption collections. Once darkness fell, the eruption didn’t look much different than it had the first time, so as soon everyone felt like they’d had enough success and addressed whatever problems they’d identified in their prior images, we retreated to the cars and headed back down to Hilo.
Who wants to find out what we’ll see in Hawaii next year?
Workshop Schedule || Purchase Prints || Instagram
Lots More Rainbows
Click any image to scroll through the gallery LARGE


Let It Rain
Posted on October 5, 2023
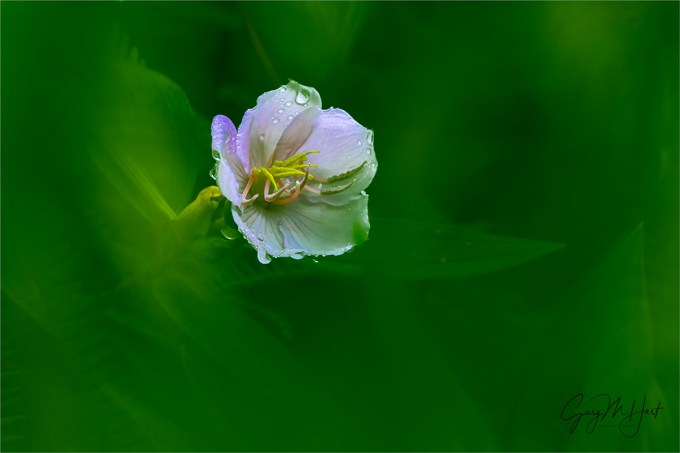
Secret Bloom, Rhododendron in Lava Tree State Park, Hawaii
Sony a7R V
Sony 100-400 GM
2 extension tubes (26mm total)
ISO 800
f/5.6
1/50 second
From sleep depravation to empty stomachs, nature photographers will endure lots of discomfort to get their shots. Another source of photographic misery is extreme weather—in fact, one way to distinguish photographers from tourists is their response to rain: while the tourist packs up and races for shelter when the rain starts, the photographer grabs a camera and bolts outside. This isn’t simply some pointless masochistic appetite, there are actual reasons we love photographing in the rain. Off the top of my head…
Seven reasons photographers love rain
- Smooth, (virtually) shadowless light that eliminates the extreme contrast cameras struggle to handle, and enhances color saturation
- Clouds are vastly more interesting than blue skies
- The best stuff happens in the rain: rainbows, lightning, clinging water droplets
- Rain-scoured air creates more vivid sunrises and sunsets
- Replenished rivers, streams, and waterfalls
- Cloud-filtered light enables the long shutter speeds necessary to smooth moving water
- And last, but not least, everyone else is inside, leaving the landscape to us photographers
Case in point

Though the hands-down highlight of this year’s Hawaii workshop was Kilauea’s fiery eruption, that doesn’t mean we lacked for other great subjects. My group also enjoyed the vivid sunrise/sunset color, rugged volcanic coastline, and plunging waterfalls Hawaii is known for. We also found great pleasure exploring the dense, colorful foliage of Akaka Falls State Park, the Hawaii Tropical Botanical Garden, and Lava Tree State Park.
Akaka Falls and the botanical garden are more known (and frequently visited), but this year, largely thanks to the rain, my favorite rainforest shoot came at Lava Tree. A heavy downpour had fallen just prior to our arrival, bejeweling the lush foliage with glistening water droplets, and light rain continued falling as I guided my group along the 1/2 mile loop through the park.
I was especially anxious to get to the back side of the loop, where I hoped to find orchids still decorated with raindrops. Unfortunately, this year the orchids weren’t blooming yet (or they were already done), so I turned my attention to the numerous rhododendron blooms that seemed to be trying to compensate for the missing orchids.
While these rainforest scenes usually start as a hodgepodge of disorganized color and shapes, it usually doesn’t take long for the individual elements to start manifesting. And the longer I stay, the more (and finer) detail I see, until even the smallest thing stands out so clearly that I can’t believe it had been there all along.
On this day I’d chosen to use my 100-400 lens, with two extension tubes totaling 26mm. This setup gave me extra reach to probe the more inaccessible areas, while also allowing me to focus closer and soften everything that’s not my primary subject.
I started at the 100-400’s wider range, gradually working tighter as the surroundings became more familiar. As I walked and scanned, a single rhododendron bloom deep in the dense vegetation stopped me. About 15 feet from the trail, it seemed to float by itself in a sea of green, obscured by so much foliage that I nearly missed it.
When I spy something interesting like this, it’s easy to crash through the forest like an angry elephant, but because I was extremely concerned about dislodging the fragile raindrops, I found myself deliberately stalking my prey—more like a stealthy cougar. (I could have just as easily compared my advance to a slithering snake, but for some reason this cougar analog resonated with me. Go figure.) I set up on the jungle’s edge, about 10 feet away, using the extra reach of my telephoto lens to isolate the flower and its accumulated raindrops.
My umbrella kept my camera and lens dry, another advantage to using a tripod (keeping a hand free to operate my camera). I used a polarizer to reduce the ubiquitous, color-sapping reflections on the wet flower and leaves.
A narrow depth of field that enhances background bokeh is a great way to isolate the primary subject in scenes like this—you can see this in the image’s distinct but soft leaves. Less commonly used is the “shoot-through” technique I applied. By positioning myself so the flower was partially obscured by foliage in front of it, I was able to soften those nearby leaves so extremely that all definition was lost, giving the appearance that the flower is floating in a green fog.
Staying dry
Any time I travel to photograph someplace with even the slightest chance of rain, I make sure I’m armed with basic rain gear:
- A thin, waterproof shell that fits over whatever else I’m wearing (shirt, jacket, or whatever the temperature calls for)
- Waterproof pants that fit over my regular pants—I have an unlined pair for moderate temperatures, and a lined pair what I think it could get cold, and decide between when I pack
- Waterproof hiking boots
- Waterproof hat
- Wool or synthetic shirts, pants, and socks that will keep me comfortable when my rain gear causes me to perspire (no cotton!)
- Umbrella for my camera—because I’m dry (see above), I can dedicate the umbrella 100 percent to keeping the rain off my lens
- Towel to dry things (especially my lens!) when they get wet—I often borrow one from my hotel, which isn’t a problem as long as I remember to return it
- Plastic garbage bag to drape over my camera when it’s on the tripod waiting for me to do something productive—if I forget a garbage bag, the hotel’s laundry or trash liner bags work fine
- And don’t forget your hot-shoe cover. The hot-shoe is exposed electronics, and I’ve seen multiple photo trips ruined because someone tried to photograph in wet conditions without one. And if you don’t realize that your hot-shoe is exposed until you’re already out in the rain or snow (or just away from home, you can dummy-up temporary protection with a strip of tape or (as one of my workshop participants did), cutting a piece of plastic from a disposable container to fit the slot.
Join Me In Hawaii
Workshop Schedule || Purchase Prints || Instagram
Let It Rain
Click any image to scroll through the gallery LARGE


