Inside the Grand Canyon: Are you a cook or a chef?
Posted on June 20, 2014

Water and Time, Colorado River, Grand Canyon
Canon EOS-5D Mark III
70 mm
.6 seconds
F/16
ISO 125
Last week I went to see Jon Favreau’s “Chef.”* As someone whose relationship with food is decidedly skewed to the consumption side, I was surprised by how much this film activated my artistic instincts. (In hindsight: “Duh.”) A line that particularly resonated was advice from Favreau’s character to his 11 year-old son (federal copyright laws that forbid me from employing a recording device in a movie theater force me to paraphrase here): “First you choose your ingredients, then you decide what to cook.” Not only does that simple statement beautifully define the difference between a cook and a chef (a cook duplicates, a chef creates), I think it applies equally well to photography.
Do you approach your shoots with a “recipe,” a preconceived notion of what you’ll find and how you want to photograph it? Unless you’re content to photograph only what others have before you have photographed, this is the wrong approach. The longer I do this, the more convinced I become that best photographers examine the ingredients at hand, identify what’s best, and only then decide the most appealing way to prepare them.
For example
All of us rafters came to our Grand Canyon raft trip with ideas of what we’d find, and the photographs we wanted to return with. But because a tight schedule, National Park Service regulations, and the needs of a large group trumped all personal wishes, our campsites were rarely selected with photography as the prime consideration. Each evening I’d have several people ask some form of, “What should I photograph here?” I soon realized that what I needed to do was to help them overcome their photographic expectations and desires, to tear up the “recipe” they brought to the Grand Canyon “kitchen,” and concentrate the ingredients available right now. It wasn’t as if we didn’t have wonderful ingredients, it was just that the ingredients didn’t really work with the meal they’d planned to prepare.
Our third campsite was in a narrow gap between vertical, river-carved walls. Beautiful as it was, the scene was rather confined and lacking the broad views that lend themselves to the expansive majesty we’d grown so accustomed to. While the outer canyon walls, in places, jutted above the steep inner walls confining us, I quickly decided that these views didn’t really compete with some of the wide views we’d already photographed, and were sure to encounter as we continued downriver. I walked along the riverbank with my camera, examining the elements at hand.
What struck me first was horizontal banding on the shear inner wall and the Colorado River’s deep jade hue. I walked a little upstream to a spot where the smooth river was disturbed by section of gentle rapids, hoping that a little whitewater would help the green stand out. Not only did the white and green work wonderfully together, a shutter speed of about 1/2 second blurred the rapids into horizontal bands that beautifully complemented the banding on the inner canyon wall. Nice, but I still needed a foreground. Widening my composition with my polarizer dialed to remove reflections, I found that river rocks beneath the smoother water near the bank stood out enough to add visual interest to my foreground.
I could have stopped here, but I still thought the foreground could use a little more weight. I moved a little farther upstream to where a group of river-smoothed rocks protruded from the river. It took a little doing to fit them into my composition without including other nearby distractions, but I finally found something that worked. Nevertheless, I thought my first couple of frames had too much empty space between the visual weight of my foreground rocks and the visual motion of the blurred rapids, so I shrunk this space and further emphasized my foreground rocks by dropping my tripod to about 18 inches above the ground.
Delicious.
*Great movie, BTW.
I’m doing it all over again in 2015 (May 11-18)—contact me if you’d like to join me.
Inside the Grand Canyon: Beneath the dynamic sky
Posted on June 17, 2014
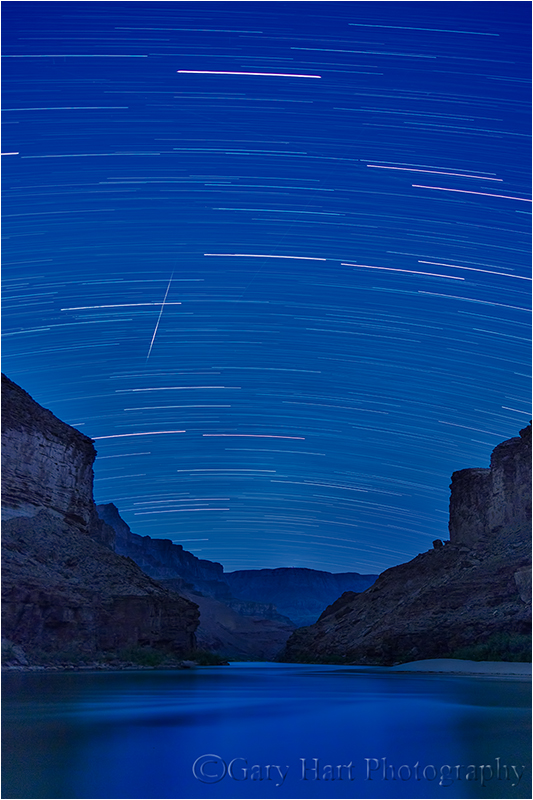
Sky in Motion, Colorado River and the Grand Canyon, Arizona
Canon EOS-5D Mark III
28 mm
39 minutes
F/2
ISO 100
Imagine Earth before electricity, vehicles, and pollution, when merely stepping outside on a moonless light was a humbling reminder of our tiny place in the Universe. Today there are people who have never seen the Milky Way, Little Dipper, or a meteor (shooting star), and as our cities expand and our atmosphere absorbs more sludge, the opportunities to witness these things shrink each day.
I’ve been a camper and backpacker my entire life, so the Grand Canyon sky was less of a revelation to me than it might have been for others. Nevertheless, each night I made a point of lying on my back and observing the show as if it was my first time. To the casual observer, the person who merely steps outside and may (or may not) make a cursory glance skyward that registers only a handful of the brightest stars (and maybe the moon and a planet or two), the night sky is a static ceiling. But spend a few focused minutes on your back beneath a remote, black sky and it’s impossible to appreciate how static it isn’t.
The first thing that stands out against the clear, dark backdrop of a Grand Canyon night is the impossible volume of stars. In that much darkness even the faintest shooting star will catch your eye, sparking suddenly and flashing across your view faster than you can make a wish. Occasionally a large meteor will flash and lumber more slowly, leaving a faint glowing trail in its wake. You’re hooked. As you wait for the next meteor, your eye might detect a hint of motion on the fringe of your peripheral vision—turning your focus in that direction reveals nothing at first, then you realize that a small star you thought was stationary is actually drifting slowly across the starry background. You’ve found a satellite, one of thousands of orbiting chunks of metal and electronics that monitor the Earth’s surface, relay communications, and position our GPS devices (among many other things).
Lie still a little longer and you start to realize that the brilliant star just above the horizon a little while ago has shifted right and a little higher, and that the Big Dipper has started to tip slightly and will soon risk emptying its contents. While it appears that the stars are rotating overhead, it’s actually the Earth’s motion that you’re detecting—the actors are stationary and your stage is rotating around them. But return to the same place at the same time the next night—at first glance it appears that you’re in for a duplicate performance, until you realize that the bright “star” you’d seen hovering above Orion last night has shifted its position against the stellar matrix—a planet!
When I can keep my eyes open no longer, my final thoughts before sleep are of my insignificance in the Universal scheme: To paraphrase A. Whitney Brown, on Earth, even if I’m a one in a million kind of guy, there are still 7,000 people exactly like me. And as if that weren’t humbling enough, the Sun, that ordinary little star that’s at the center of the show we see each night, is just one of 500 billion or so suns in our Milky Way galaxy. Feeling small yet? Then it probably won’t help to know that there may be as many as 500 billion galaxies in our universe. Sigh.
About this image
Photographing this celestial choreography is both rewarding and challenging. Because composing and finding focus in extremely low light is always an exercise in frustration, I had the raft trip group set up before sunset on a south-facing beach adjacent to our campsite (if you look extremely closely, you can just make out the Desert View Watchtower atop the South Rim, slightly right of center). As the sky darkened we all took practice shots to test composition and focus, then graduated to pinpoint star images when the darkness became complete. Rendering stars as pinpoints requires freezing the Earth’s rotation that’s responsible for the nightly carousel of stars—to achieve this while allowing enough light for a usable image we used extremely high ISOs and the widest possible apertures.
While I enjoy these pinpoint star images, particularly when they include the always breathtaking view to Milky Way’s core, my prime objective this night was an extremely long exposure that allowed enough light to reveal foreground detail at a low ISO that doesn’t introduce noise. A long exposure like this displays the stars as parallel arcs—not anything like the human experience, but a great way to convey the sky’s dynamic nature. To further reduce my image’s noise I turned on my camera’s “Long Exposure Noise Reduction”—this doubles the time until my image pops up on my LCD (a thirty minute exposure becomes 60 minutes), but I’d done enough of the high ISO fast exposure images to be comfortable enough with my composition and focus that I didn’t expect the need for any do-overs. Satisfied that always ready, with my camera in bulb mode I clicked my shutter, locked it open on my remote release, and set my timer (in this case for 30 minutes, though I ended up keeping the exposure going for nearly ten minutes after the timer finished).
One additional benefit of these long exposures is the opportunity to lounge, chat, and laugh beneath a dazzling sky with a great group of people, serenaded by the music of the Colorado River. These group star trail shoots always become a highlight of my trips, and this night was no exception. As a bonus, on this night a meteor bright enough to register on my sensor streaked across my frame in the midst of my exposure. I just love happy endings.
I’m doing it all over again in 2015 (May 11-18)—contact me if you’d like to join me.
Inside the Grand Canyon: By the light of a billion stars
Posted on June 11, 2014

Milky Way, Grand Canyon (Tyndall Dome, Wallace Butte, Mt. Huethawali)
Canon EOS-5D Mark III
28 mm
30 seconds
F/2
ISO 6400
It occurs to me sharing the full story of this image will require me to share delicate details not normally seen in a photo blog.
(So consider yourself warned.)
But before getting to the details of this image, let me just say that among a very long list of life-highlights and personal firsts, probably my very favorite thing about spending a week at the bottom of the Grand Canyon was going to sleep to the beneath a sky brimming with more stars than I’d ever seen in my life.
After dark, day one
(Foolishly) imagining that my home bedtime reading habit would transfer seamlessly to the Grand Canyon, I’d packed several books to drift off to sleep to. But just five minutes into the first night I discarded that folly and simply basked in starlight, utterly mesmerized by the volume and variety of stars, constellations, planets, meteors, and satellites overhead. I fought sleep like a two-year-old at nap time—if I would have had access to duct tape I’d have considered taping my eyelids to my forehead.
After dark, day two
Topping off a long but relatively quiet day on the river, on our second night Wiley navigated our rafts into a fantastic campsite with a wide downriver view that opened to the southern sky. Immediately after dinner (before the darkness made composing and focusing extremely difficult) I had everyone line up along the river to set up their shots and focus. I gave a little orientation to everyone who was new to night photography, then we all just kicked back and waited for nightfall.
When the sky darkened and the stars popped out, we had a blast photographing star trails and pinpoint stars above the river. By 11:00 or so, long before the Milky Way rotated into view, everyone was ready for sleep. When I told the group that the best time to photograph the Milky Way would be between 2:00 and 4:00 a.m., there wasn’t a lot of interest. Following a long day in the sun that had started at around 5:00 a.m., the sleep was indeed as wonderful as you might imagine, but the next morning those of us who woke fully rested started having second thoughts when we saw the images captured by the few who rose at 2:00 for the Milky Way. Oh well.
After dark, day three
Day three was all about the rapids, which seemed to come fast and furious all day, rarely allowing more than a few minutes of calm water before we had to hold on tight and “suck rubber” for the next one. Unkar, Hance, Crystal, the gem series, to name just a few, were equal parts thrilling and chilling to us whitewater novices. And also physically draining.
At about 5:00 p.m., equal parts exhilarated and exhausted, we staggered into camp near the canyon’s 110-milestone. Despite my fatigue, I couldn’t help notice that while southern horizon was partially obstructed by the canyon walls, there just might be enough sky there for some of the Milky Way’s brilliant core to appear. Even so, not even another fantastic dinner could completely recharge the group, and for most the visions of another night photography marathon quickly succumbed to the gravitational pull of cot and sleeping bag. Nevertheless, I was one night smarter.
(Now for the delicate part.) I’ll start by going back to the orientation delivered by Wiley, our lead river guide, as it pertains to the evacuation of, uh, personal liquid waste: Peeing. Contrary to everything I’d learned from a lifetime of camping and backpacking, Wiley gave us very explicit instructions to pee nowhere but in the river. That’s right. Apparently the Colorado River’s volume will sufficiently dilute the pee of the several hundred people enjoying the Grand Canyon from the river any given time; the alternative, we learned, would be all these visitors targeting riverside rocks and trees to turn each campsite and trail into a giant litter-box. To achieve this goal the women were issued handy little buckets that allowed them to evacuate their bladders wherever they felt comfortable, then discreetly deposit the contents in the river; the guys, on the other hand, were expected to simply apply the tried and true ready-aim-fire approach.
Wiley had also admonished the group about the hazards of dehydration, imploring us to consume copious amounts of water day and night. While this strategy achieved the desired effect (no one in the group succumbed to dehydration), an unfortunate byproduct was nature’s inevitable call in the, uh, “wee” hours of the morning.
But what could all this possibly have to do with photographing the Milky Way?
Knowing that there was a pretty good chance I’d be trekking down to the river at around two or three in the morning, the last thing I did before crawling into my sleeping bag that night was mount my camera on my tripod, attach my 28mm Zeiss f2 (my night lens), focus it at infinity, and dial in all the exposure settings necessary for a Milky Way shoot. Genius!
When I woke at around two o’clock the next morning, I hopped from my sleeping bag, grabbed my tripod/camera, and made my way down the river. (You’d be amazed at the amount of light cast starlight in a deep canyon with no other light source.) At the river I quickly set up my shot, clicked my shutter (a 30 second exposure), and went about the rest of my business. As a life-long Northern Californian I’m accustomed to sharing delicious fresh water with parched and thirsty Los Angeles—standing there, I couldn’t help find comfort in the knowledge of the ultimate destination of my current contribution.
I’m doing it all over again in 2015 (May 11-18)—contact me if you’d like to join me.
Inside the Grand Canyon: A new perspective
Posted on June 5, 2014

Slot Cascade, Matkatamiba Canyon, Arizona
Canon EOS-5D Mark III
16 mm
2 seconds
F/16
ISO 200
Until last week, when I thought “Grand Canyon,” mental images of rim-top panoramas, plunging cliffs, and sculpted red layers came up. With no firsthand history to instruct me, my mental picture of the Grand Canyon from the bottom was an inverted version of my experience from the rim. But last week I finally had the opportunity strike the Grand Canyon raft trip from my bucket list, six days of complete canyon immersion that completely reset not only all preconceived biases of the down-up experience of the Grand Canyon, but also of my place in the Universe.
Descending into the Grand Canyon is like plunging into a serious relationship—it’s not long before you start understanding that the view from the outside, as compelling as it might be, is the superficial view. Floating on the Colorado River’s smooth jade, careening through its churning whitewater, slipping from brilliant sunlight to cool shade cast by the towering remnants of ancient oceans, reveals intimate details impossible to comprehend from the outside. And falling asleep beneath an impossible starlight blizzard is equal parts breathtaking and humbling.
The whims of the Colorado River and the practicalities of keeping two rafts and 28 photographers on a six-day, 188 mile schedule meant photography wasn’t the trip’s top priority. Often we’d arrive at a breathtaking location in the absolute worst light for photography, but so awed were we by the majesty of our surroundings that the quality of the light rarely seemed to matter—among the many lessons the group learned on this trip was that our experience as humans transcends our needs as photographers. Additionally, I’m guessing that most of the group would say the relationships and memories we formed trumped the photography as well (I know they did for me). That said, I think everyone was pretty thrilled by the images they returned with, and I came home with a plan to ensure more photo opportunities in the next trip (yes, there will be a next trip).
About the trip
For the next few weeks I’ll be sharing some of my images from this trip that started as a lifelong dream and came to fruition with the help my good friend and fellow photographer Mark Zablotsky. Mark (wisely) identified Western River Expeditions as the best candidate to handle our unique needs—they came through with flying colors, offering suggestions, being flexible at every opportunity, and providing the best guides in the world (no exaggeration). Since this would be my first time in the canyon, I wasn’t comfortable treating the trip as one of my workshops and didn’t advertise it anywhere (it turns out I didn’t need to), nor did I attempt to profit from it. Nevertheless, I was a little concerned that the cost would make it difficult to fill two rafts, but after sending an e-mail invitation to past workshop participants (exclusively) last September, within 48 hours all 28 spots were filled, with five on the waiting list.
Twenty-eight people meant we’d have two full rafts, plus our own cadre of four river guides, allowing us to customize the trip to our needs as much as the conditions, river, and National Park Service regulations allowed. For example, WRE was able to accommodate our photography needs by arranging space for and easy access to serious camera gear. My F-stop Guru bag included my Canon 5D Mark III body and my 16-35, 24-105, 70-200 and Zeiss 28 prime (for night photography) lenses, plus a Gitzo 1530 tripod and Really Right Stuff BH-30 ball head. Most people in the group had a similar setup—some with a little more, some a little less. Hike, photo stop, and campsite choices emphasized photo opportunities over things like Grand Canyon history, geology, and what was most convenient for the guides.
About this image
The above image is from Matkatamiba Canyon, a narrow (!) slot canyon, carved in 500 million year-old limestone, that we were told is rarely visited on the “conventional” raft trips. All week Wiley, our trip’s lead guide, had been telling me how much we’d love Matkatamiba Canyon (I listened to the guides pronounce the name all week but it wasn’t until I got home and looked it up that I was completely sure what they were saying), and I have to tell you that it disappointed no one. But I also understand why most trips skip it.
The challenge at Matkatamiba is access—the first 100 yards or so was navigable by everyone, but continuing beyond that involved some pretty technical (for climbing novices lugging photo gear) scrambling. Reaching this spot required teamwork to scale a five-foot waterfall that blocked access to the canyon’s narrowest upper reaches. The waterfall barrier didn’t look too difficult from beneath, but water-smoothed limestone spread with wet moss made footholds impossible. Instead, each of us temporarily shed our gear and handed it up to the person preceding us, then wedged our bodies between the narrow walls, back pressed to one wall and feet planted on the other (so our bodies were horizontal, spanning the creek), then “walked” parallel to the ground up the walls to the top of the fall.
Beyond the fall the canyon’s twists and turns added intrigue, as it seemed like the scene around each corner was even better than the previous scene. Occupied refereeing the photo needs of those below the fall meant I was among the last to ascend to scale the waterfall. While that meant I didn’t advance quite as far as most of the others, it also gave me more alone time with the scenes I found.
I composed this image with the cascade nearest the frame’s top, bottom, left, right, and center, ultimately choosing the symmetry of this centered version. Often symmetrical images can feel static, but I felt in this case that the arc of the creek adds a dynamic that cancels any static concerns. Though my extreme wide focal length gave me lots of depth of field, I was careful to favor the focus on the right wall, where I thought the sharpness was most important. Polarizing the scene removed glare from the rocks and creek, and helped the color of the submerged stones stand out.
I’m doing it all over again in 2015 (May 11-18)—contact me if you’d like to join me.

Rocks, Matkatamiba Canyon, Grand Canyon
The farther up the canyon I climbed, the narrower it became.
Feeding a growing photographer
Posted on May 25, 2014

Meadow Dewdrop, Yosemite Valley
Canon EOS-5D Mark III
100 mm
1/15 seconds
F/4
ISO 800
Uniqueness
When I started photographing nature, I couldn’t really identify (nor did I think about) what exactly it was that I wanted to show people—I just knew that I wanted to enjoy and record beautiful scenes. This was good enough for me, and the fact that thousands (millions?) of other photographers were capturing similar images, of similarly beautiful scenes, was no concern to me.
But when I decided to make nature photography my livelihood, I realized that merely capturing beautiful scenes, no matter how beautiful, wouldn’t be enough—to truly succeed as a nature photographer meant distinguishing myself from the countless other photographers also capturing beautiful images. Uniqueness.
Striving for uniqueness doesn’t mean I don’t photograph the clichés (I mean, if it’s beautiful sometimes I just can’t help myself), it just means that I never set out to photograph something that’s already been photographed, in a way that it’s already been photographed. And I’m not satisfied if I’m merely duplicating something that’s been done before.
Of course uniqueness is in the eye of the beholder. But this isn’t really about whether or not I’ve succeeded in creating uniqueness—it’s about the realization that simply striving for uniqueness has helped me see nature better, and has made me a better photographer.
Getting personal
Another insight that has influenced my photography is the understanding that my favorite moments with nature are the private ones. This insight has led me to photograph only scenes that allow me to imagine a world untouched by the hand of Man. Browse my galleries and you’ll get a pretty good idea of the places and things that make me happiest: the moon and stars, water, weather pull me with or without a camera. My connection to Yosemite predates my memories. And Hawaii is simply heaven on Earth. I could go on.
And eliminating the hand of Man is why some of my previously best-selling images, scenes that include skylines, bridges, roads, and people are no longer in my portfolio. While I enjoy viewing others’ images of these scenes, they’re just not what I do.
Expanding reality
Something else I’ve come to recognize is the desire to use my camera to reveal aspects of nature that exist beyond human vision, to help people see (and to remind myself) that “reality” is not limited to human experience.
In my May 20 post I shared a colorful moonbow—quite “real” despite being invisible to the human eye—that is a great reminder of the universe beyond our narrow human senses. And the dewdrop in today’s image—smaller than a match head, clinging to a blade of grass no larger than a matchstick—is a reminder that not only is our universe infinitely large, it’s also infinitely small.
Today’s image
This little scene was just one blade of grass, one dewdrop, among millions in a meadow beside Yosemite’s Merced River. I was helping a workshop student who was struggling for inspiration in a much larger Yosemite scene that included Cathedral Rocks, El Capitan, the Three Brothers, and a reflection. We’d been talking about ideas when I turned to answer a quick question from another student; when I turned back around she was on the ground about ten feet away, examining the tiny dewdrops everyone in the group (myself included) had ignored all morning.
I dropped down to the ground beside her to see what she had found and immediately forgot the larger scene. Because I’d photographed that large scene so many times, I’d arrived already knowing that I’d wrung all the uniqueness potential from this spot years ago. But getting eye-level with a blade of grass exposed a world that may as well have been invisible for the amount of attention it had received, a world that had been there all along, with this and every previous visit, in one form or another. I suddenly saw that each blade of grass, each dewdrop, had its own personality—relationships and idiosyncrasies that distinguished it from every other blade of grass and dewdrop.
Sprawled on the ground, as close as I was to my subjects, I was still in the realm of my own limited human vision. But I had my camera, with its very own reality. I replaced the ultra-wide lens (that pretty much automatically goes on each time I visit this spot) with my 100mm macro and got even closer—but why stop there? Stacking all three of my extension tubes (68 mm of extension) between my camera and macro, I had essentially shrunk myself enough to be granted insight to the previously unseen world within the dewdrop. Here we go, I thought as the inverted scene within my dewdrop snapped into focus, this is is what my camera is really for.
Just like the moonbow, this was an opportunity to reveal an aspect of nature to which most of us are completely oblivious. And I hope the next time I walk across a lawn and lament the wetness that has seeped through though my shoes and into my socks, maybe my irritation will be eased by the memory of the beauty of those dewdrops and the world they contained.
Moonbow: Nature’s little secret
Posted on May 20, 2014

Moonbow and Big Dipper, Lower Yosemite Fall, Yosemite
Canon EOS-1Ds Mark III
22 mm
30 seconds
F/4
ISO 800
Rainbows demystified
A rainbow forms when sunlight strikes airborne water droplets and is separated into its component spectral colors by characteristics of the water. The separated light is reflected back to our eyes when it strikes the backside of the droplets: Voila!—a rainbow.
Despite their seemingly random advent and location in the sky, rainbows follow very specific rules of nature—there’s nothing random about a rainbow. Draw an imaginary line from the sun, through the back of your head, and exiting between your eyes; the rainbow will form a full circle at 42 degrees surrounding that line (this won’t be on the test). Normally, because the horizon almost always gets in the way, we usually see no more than half of the rainbow’s circle (otherwise it would be called a “raincircle”). The lower the sun is, the higher the rainbow and the more of it we see; once the sun is higher than 42 degrees (assuming a flat horizon), we don’t see the rainbow at all unless we’re at a vantage point that allows us to look down (for example, at the rim of the Grand Canyon).
Read more about rainbows on my Photo Tips Rainbows Demystified page.
Moonbows
Moonlight is nothing more than reflected sunlight—like all reflections, moonlight retains a dimmer version of most of the qualities of its source (the sun). So it stands to reason that moonlight would cause a less bright rainbow under the same conditions that sunlight causes a rainbow. And guess what—it does! So why have so few people heard of moonbows? I thought you’d never ask.
Color vision isn’t nearly as important to survival in the wild as the ability to see shapes, so human vision evolved to bias shape over color in low-light conditions. In other words, colorful moonbows have been there all along, we just haven’t be able to see them. But cameras, with their ability to dial up sensitivity to light (high ISO) and accumulate light (long exposures), “see” much better in low light than you and I do.
While it’s entirely possible for a moonbow to form when moonlight strikes rain, the vast majority of moonbow photographs are waterfall-based. I suspect that’s because waterfall moonbows are so predictable—unlike a sunlight rainbow, which doesn’t require any special photo gear (a smartphone snap will do it), capturing a lunar rainbow requires at the very least enough foresight to carry a tripod, and enough knowledge to know where to look.
Nevertheless, even though we can’t see a moonbow’s color with the unaided eye, it’s not completely invisible. In fact, even without color, there’s nothing at all subtle about a bright moonbow—it may not jump out at you the way a sunlight rainbow does, but if you know where to look, you can’t miss a moonbow’s shimmering silver band arcing across the water source.
Yosemite Falls moonbow
Despite frequent claims to the contrary, moonbows can be seen on many, many waterfalls. Among the more heralded moonbow waterfalls are Victoria Falls in Africa, Cumberland Fall in Kentucky, and (of course) Yosemite Falls in Yosemite National Park.
Yosemite Falls is separated into three connected components: Upper Yosemite Fall plummets about 1400 feet from the north rim of Yosemite Valley; the middle section is a series of cascades dropping more than 600 feet to connect the upper and lower falls; Lower Yosemite Fall drops over 300 feet to the valley floor. While there are many locations from which to photograph the moonbow on Upper Yosemite Fall, the most popular spot to photograph it is from the bridge at the base of Lower Yosemite Fall.
The Lower Yosemite Fall moonbow is not a secret. Arrive at the bridge shortly after sunset on a full moon night in April, May, and (usually) June, and you’ll find yourself in an atmosphere of tailgate-party-like reverie. By all means come with your camera and tripod, but leave your photography expectations at home or risk appreciating the majesty of this natural wonder. In springs following a typical winter the mist and wind (the fall generates its own wind) on and near the bridge will drench revelers and cameras alike. After a particularly wet winter, the airborne water and long exposures can completely obscure your lens’s view during the necessarily long exposures. And if the wet conditions aren’t enough, if you can find a suitable vantage point, expect to find yourself constantly jostled by a densely packed contingent of photographers and gawkers stumbling about in limited light. Oh yeah, and then there are the frequent flashes and flashlights that will inevitably intrude upon your long exposures.
But, if you still have visions of a moonbow image, it’s best to come prepared:
- A tripod and digital SLR camera are must (a film camera will work too, but it adds complications I won’t get into here)
- Wear head-to-toe rain gear so you can concentrate on keeping your camera dry
- Bring a chamois or bath towel—you’ll be using it frequently
- An umbrella can help keep water off your lens during a long exposure
- Practice moonlight photography (you’ll find my how-to of moonlight photography, including exposure settings and focus techniques, in the link) before you get there—trust me when I say that you don’t want to be learning how to photograph by moonlight while you’re trying to capture a moonbow.
- Don’t have time to practice before your visit? Stop at the top of the Lower Yosemite Falls trail, where you can see the entire fall from top-to-bottom, and practice there—the conditions are much easier, and moonbow or not, these could turn out to be your favorite images of the night.
About this image
I’d taken my May workshop group to Glacier Point on this night, so we didn’t arrive at Yosemite Falls until nearly an hour after the moonbow started. This late arrival was intentional on my part because California’s severe drought has severely curtailed the mist at the base of the lower fall. In a normal year the mist rises so high that the moonbow starts when the moon is quite low (remember, the lower the sun or moon, the higher the bow); this year, I knew that the best moonbow wouldn’t appear until the moon rose and the bow dropped into the heaviest mist.
I’d given the group a talk on moonlight photography that afternoon, but we stopped at the top of the trail to practice for about 20 minutes, using the exquisite, tree-framed view of the entire fall. When everyone had had a success, we took the short walk up to the bridge and got to work.
We found conditions that night were remarkably manageable—by the time we arrived at the bridge, at around 9:45, some of the crowd had thinned, and our dry winter meant virtually no mist on the bridge to contend with. I started with couple of frames to get more precise exposure values to share with the group (moonlight exposures can vary by a stop or so, based on the fullness of the moon, its size that month, and atmospheric conditions), then spent most of my time was spent assisting everyone and negotiating locations for them to shoot (basically, wedging my tripod into an opening then inviting someone in the group to take my spot).
This image is one of my early test exposures—I went just wide enough to include the Big Dipper (just because it’s a test doesn’t mean I’ll ignore my composition). In wetter years I’ve captured move vivid double moonbows and complete arcs that stretch all the way across the frame, but I kind of like the simplicity of this year’s image. I’ve been including the Big Dipper in my moonbow images for many years because I just can’t resist it. I’ve found that May is the best month to capture it in a position that makes it appear to be pouring in the fall.
Join me as we do it all over again in next year’s Yosemite Moonbow and Wildflowers photo workshop or Yosemite Moonbow and Dogwood photo workshop
Another day, another moonrise
Posted on May 16, 2014
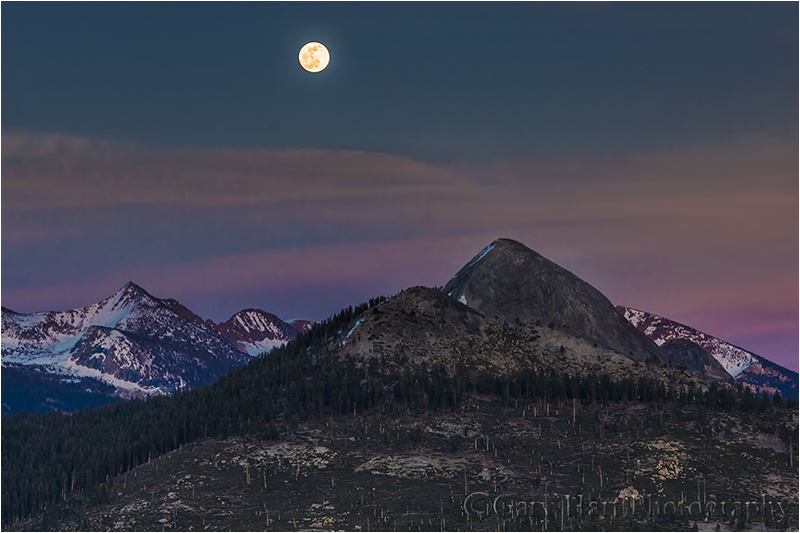
Moonrise, Mt. Starr King, Yosemite
Canon EOS-1Ds Mark III
Canon 100-400L
1/10 second
F/8
ISO 400
* * * * *
Previously on Eloquent Nature

Moonrise, Glacier Point, Yosemite
* * * * *
May 13, 2014
After seeing the images captured by the people in my group followed me on Monday evening, during the next day’s image review session a few in my workshop group asked if we could go back up to Glacier Point for sunset that night. I did a quick-and-dirty plotting and showed them about where the moon would be at sunset (I usually tend to be more OCD about precision when plotting the moon, but “about” was good enough for our purposes), explaining that I’d planned to photograph the moonrise from a different spot that night, but I’d be willing to forego that shoot in favor of a Glacier Point reprise if that’s what everyone preferred. But, I warned, tonight would also be our only opportunity to photograph the Lower Yosemite Fall moonbow—if we drive up to Glacier Point, we probably won’t make it back down to the valley for the moonbow shoot until after 9:00. While that would be plenty early enough for the moonbow, it would mean we’d have been going from before 6:00 a.m. until about 11:00 p.m. But the vote was unanimous, so back up we went.
I love plotting a moonrise. I’ve been doing it for a long time—when done right there’s no mystery to the time and location of the moon’s arrival, but there’s just something thrilling about the watching the moon peek above the horizon. (Not to mention the (unjustified) awe my workshop groups express when it happens exactly when and where I’d predicted.) When we considering altering the schedule I’d them that we’d see the at around 7:40, give or take five minutes, just a little to the left of Mt. Starr King. And sure enough, at 7:36 there it was, a white wafer poking from behind the left flank of Gray Peak (the left-most peak in the above image).
Full disclosure
Before you decide that my moon prediction makes me some kind of photography savant, I should probably explain why the camera I used to photograph this scene was my backup, 1DS Mark III, and not my primary, 5D Mark III. (The 1DS III is still a great camera, it’s just seven-year old technology.) That would be because, genius that I am, my camera bag, complete with camera, lenses, tripod, and filters was still back at the hotel. Fortunately, knowing the way workshops force me out of my routine (leading to a long history of forgotten tripods and cameras abandoned by the roadside), I always have a backup tripod and camera bag with my backup camera and a lens or two in the back of my car. Which is how my 1DS III and 100-400 lens (which I find too bulky and awkward for everyday use) were back there and ready for action. What I didn’t have was my remote release and graduated neutral density filters, essential to my twilight moonrise workflow. Fortunately, one of the workshop students took pity on me and loaned me a GND she wouldn’t be using (thanks, Lynda!); I turned on the 2-second timer to eliminate shutter-press vibrations.
But anyway…
As cool as the moon’s appearance was, the best full moonrise photography doesn’t come until a little later. From about five minutes before sunset, when the sky has darkened enough for the daylight-bright moon stand out, until about ten minutes after sunrise, when the foreground has darkened too much to be captured with a single frame (even with the use of a GND), is my moonrise “prime time.”
But even though the best stuff wouldn’t come until later, I photographed the moonrise from its first appearance, varying my composition as much as the 100-400 lens would allow—getting Half Dome in the frame was out of the question, but since I’d already covered that the night before, this was going to be more of a telephoto shoot anyway. Everything was at infinity, but in this case I opted for f8 (f11 is my usual “default” f-stop) and ISO 400 because, given the weight of the 1DSIII and 100-400 lens, I was a little concerned about my tripod’s ability to dampen completely after 2-seconds. By the time the light got really good and the sky started to pink-up, I was quite familiar with all the compositions and was able to cycle through them very efficiently.
By about 8:15 we were hustling back down the mountain to our date with the moonbow. But that’s a story for a different day….
Join me as we do it all over again in next year’s Yosemite Moonbow and Dogwood photo workshop
Glacier Point moonrise
Posted on May 13, 2014

Moonrise, Glacier Point, Yosemite
Canon EOS 5D Mark III
1.3 seconds
21 mm
ISO 100
F11
May 12, 2014
I’ve been in Yosemite for my annual Moonbow and Dogwood photo workshop. Monday night I took the group to Glacier Point for sunset—an unexpected benefit of California’s drought that allowed Glacier Point Road to open weeks earlier than normal. I knew a nearly full moon would be rising above the Sierra crest that evening, but figured that since it would be so far south, we wouldn’t be able to do a lot with it. But when I arrived Glacier Point and saw the moon rising above Mt. Starr King, I realized that shifting slightly south, away from the popular Glacier Point View, might just allow us to include the moon and Half Dome in a wide shot. Hmmm. But because we had people in the group who had never been to Glacier Point, I decided now was not the time for exploration.
As always happens at Glacier Point on these predominantly clear evenings, the light on Half Dome warmed beautifully as the sun dropped to the horizon behind us. Organizing an expansive landscape into a coherent image can be difficult, especially for first timer visitors. But as I moved between the students positioned along the rail, it seemed that all were doing fine and realized that my greatest value at the moment was to stay out of the way. Appreciating the view, I just couldn’t get that moon, blocked by trees from our vantage point, out of my mind.
When a couple of people in the group asked why I wasn’t shooting (it always makes them nervous when the leader is looking at the same view they’re photographing but shows no interest in shooting), I told them I was simply enjoying the view (quite true). But when someone asked if I had any suggestions for something different, my ears perked up. I told them if I were to be shooting, I’d go back up the trail a hundred yards or so to see if I could get around the trees and find something that included the moon.
When several people sounded interested, I warned them that there’s no guarantee we’d find anything photo-worthy, and relocating so close to sunset would risk missing the show entirely. Much to my delight, a couple of people said, “Let’s do it,” and that was all I needed to hear. I told Don (Don Smith, who’s assisting this workshop—for those who haven’t been paying attention, Don assists some of my workshops, I assist some of Don’s, and we do a few workshops as equal collaborations) that I was taking a few people back up the trail and off we went.
I ended up with five (nearly half the group) at the view just below the Glacier Point geology exhibit. I chose this spot for its open view, and for the way it allowed us to frame the scene with Half Dome on the left, triangular Mt. Starr King and the moon on the right, and Nevada and Vernal Falls in the center. With a couple of trees and dark granite for the foreground, the scene couldn’t have been more ideal if I’d have assembled it myself.
I took out my 16-35 and composed this scene that pretty much seemed to frame itself. Even though I had subjects ranging from the fairly close foreground the the extremely distant background, at 21mm I knew I’d have enough depth of field at f11. I used live view to focus on the foreground tree, more than distant enough to ensure sharpness throughout my frame.
While I almost always rely on my RGB histogram to check my exposure, my general exposure technique when photographing a full moon in twilight is to forego the histogram and concentrate on the moon. As far as I’m concerned, a shot is a failure if the moon’s highlights are blown (a white disk), but since the moon is such a tiny part of the frame, it barely (if at all) registers on the histogram. What does register is the blinking highlight alert that signals overexposed highlights. When the foreground is dark, I’ll continue pushing my exposure up until the moon just starts to blink (not the entire disk, just the brightest spots). I know from experience that I can recover these blown highlights in post processing. I also know that this is the most light I can give the scene, because the moon’s brightness won’t change as the foreground darkens. (While I don’t blend images, for anyone so inclined it’s quite simple to take two frames, one exposed for the foreground and the other exposed for the moon, and combine the two in Photoshop.) In this case I spot metered on the foreground to ensure enough light to retain color and detail in the rapidly darkening shadows, then used a Singh-Ray 2-stop hard graduated neutral density filter to hold back the sky and (especially) protect against blowing the moon.
* * * *
About this scene
This is the view looking east from near Glacier Point. From left to right: Cloud’s Rest (just behind Half Dome), Half Dome, Vernal Fall (below—the white water beneath Vernal Fall is cascades on the Merced River), Nevada Fall (above), Mt. Starr King (triangle shaped peak).
Join me as we do it all over again in next year’s Yosemite Moonbow and Dogwood photo workshop
Visualize, pursue, execute, enjoy
Posted on May 5, 2014

Bridalveil Raindrop, Yosemite
Canon EOS 5D Mark III
1/30 second
100 mm
ISO 1600
F22
I probably worked harder capturing this image than any other image I’ve ever photographed. Worked hard not in terms of physical exertion, but rather in patient pursuit over several years and painstaking execution in difficult conditions. Photographed late last month in Yosemite, this image is something I’ve visualized and actively sought for years. While I have no illusion that this image will be as popular as some of my more conventional images, it makes me so happy that I just have to share everything that went into its capture.
Visualize: The world in a raindrop
I can trace this image back to a spring afternoon a few years ago, when I was doing macro photography in a light rain. My subject was poppies, and peering through my viewfinder I particularly loved the clarity of the raindrops when they snapped into focus. At home on my monitor I magnified one of the images to something like 400% and saw the entire scene surrounding me was inverted in that tiny droplet. The fact of this wasn’t new to me, but actually seeing it up close planted a small seed that bloomed into an obsession I’ve been chasing ever since. I realized that getting even closer to a raindrop might allow me to enlarge its internal scene enough to make it visible without magnification. From that thought it was a short jump to the idea of finding a raindrop that contained a scene others would recognize.
Pursue: If at first you don’t succeed…
Unfortunately, the onset of my raindrop quest coincided with a drought that severely limited my access to raindrops (and if you know anything about me, you know it has to be an actual raindrop—no spray bottles for me). And then there are the daily distractions of running a business, and the fact that many of my trips to prime locations are for workshops, when the time and attention a shot like this requires precludes me from trying it.
Nevertheless, over the last several years I’ve played with my idea when opportunities presented themselves. These experiences allowed me to determine that 100mm macro wouldn’t get me close enough, that I’d need to add multiple extension tubes. And the extremely narrow depth of field that comes with focusing this close would require a very small aperture to get enough of the frame sharp.
These early attempts also enabled me to identify and practice overcoming a few physical challenges: low light, caused not only by the overcast skies, but also by the extension tubes (extension reduces the amount of light reaching the sensor); wind, almost always present in a rain; and a tissue-thin focus plane (even at a small aperture) that severely shrinks my margin for error. I knew going in that it would be difficult, but with each attempt I had to admit that this shot might be even harder than I’d decided it would be the last time I tried it. Of course that’s half the fun.
A couple of weeks ago the (always reliable) weatherman called for an all-day rain in Yosemite. Perfect. Knowing the dogwood were blooming, I freed my schedule and made the 7+ hour roundtrip to Yosemite, leaving early in the morning and returning that night. The raindrop shot wasn’t my sole objective, but it was up there on my list. Unfortunately, while I ended up having a pretty good day, my “all-day” rain stopped about an hour into my visit and I was left to pursue other opportunities.
Undeterred, when the (almost always reliable) weatherman promised more rain a couple of days later, back I went, this time meeting friends Don Smith and Mike Hall. Did I mention that I wanted rain? Well, rain it did. Hard. All day. Donning head-to-toe rain gear, I managed to stay dry, but my equipment wasn’t quite so lucky—without a third arm my umbrella wasn’t much use during the compose/meter/focus phase and the small towel I’d brought to dry things off was completely saturated by the end of our first stop (I should have known better). After that I pretty much contented myself with drying my my lens element just before shooting, trusting (hoping) that my reasonably water-resistant gear would survive—if I wanted to keep shooting, I had no other choice.
As good as the shooting was, by mid-afternoon the three of us were ready to submit to the weather and head for home. But, with my raindrop shot gnawing at the back of my mind, on the way out I suggested a quick stop at the view of Bridalveil Fall on Northside Drive. I’d stopped here on Tuesday and knew the dogwood that hadn’t been quite ready for primetime then would be just about right now. So stop we did (it didn’t take lots of arm twisting).
Execute: Cruel and unusual
While Don and Mike (why does this sound like a drive-time radio program?) went off in search of their own vision, I bee-lined to the “perfect” dogwood I’d identified on Tuesday. But getting a shot like this isn’t just a matter of going out in the rain at a beautiful location. (Full disclosure: there was a time when I believed it might just be.) And in my zealous pursuit, I’d conveniently discounted the difficulties I’d need to deal with:
- Rain (of course I knew it was raining, but I always forget what a pain it is to deal with, even if I just dealt with it fifteen minutes ago)
- My “perfect” tree was on an embankment with a 45-degree slope
- A light but persistent breeze (I never notice a light breeze until I try to do macro)
- Rain (in case you forgot)
Okay, so maybe this won’t be such a quick stop.
After taking stock of the physical difficulties, I attached all three of my extension tubes (72 mm total) to my 100 mm macro lens and scanned the flowers, branches, and leaves for a raindrop that was both large enough to hold the scene (without extreme distortion) and whose long axis (the wide side) was perpendicular to my line of view to Bridalveil Fall. No small feat.
The frustration started immediately: When I did indeed find the “perfect” drop, I realized getting to it without touching the tree (thereby rearranging all its drops) would require powers far beyond my superhero grade. And so it happened that once I navigated “inside” the tree’s canopy to my raindrop, the raindrop was long gone and I had to start over.
Okay, at least I was inside the tree—progress. I ran my eyes along the nearby branches until suddenly, there it was—another perfect (there’s that word again) raindrop dangling from a diagonal branch about 18 inches in front of me. I very carefully maneuvered in its direction, using contortions that might best be described as a hybrid of moves from the party games Twister and Limbo, moves I hadn’t broken out since my (far more limber) college days. (Picture a heist movie where the cat-burglar has to avoid a matrix of electric eye beams to get to the jewels.)
This particular raindrop was about eight inches above my head. Fortunately my new (and wonderfully tall) tripod was up to the task—I extended its legs until my lens was just an inch or two from the drop and began the painstaking process of composing and focusing. With my viewfinder higher than my eye could reach, this part would have been impossible without live-view; with live-view it was a pain but doable.
I found my basic composition fairly quickly, but my ridiculously thin focus plane shifted every time the breeze or nearby raindrop-strike jostled “my” raindrop. Focusing not on the raindrop, but the scene within the raindrop, I waited for a brief lull in the breeze and nudged my focus ring until the equilibrium point around which the drop vibrates was sharp. Then I magnified the drop and waited for the next lull to confirm sharpness. After several attempts I was reasonably confident I was ready to proceed.
Stopping down to f22 with three extension tubes forced me to bump my ISO to 1600 to reach the 1/30 second shutter speed I thought I could get away with. Even this would require timing my shutter for another lull in the breeze, but the alternatives—a larger aperture which would reduce my DOF, or higher ISO that would increase the noise—I wasn’t crazy about.
You’d think after all this I’d be ready to shoot. You’d think. But by now (in case you forgot, it’s still raining) my front lens element was festooned with raindrops. And wiping the lens dry did little good because the slightly upward angle of view oriented my lens ideally for capturing more raindrops. So I extracted the collapsed umbrella I’d proactively jammed in a jacket pocket and carefully threaded it skyward, carefully negotiating the network of overhanging branches without disturbing my raindrop, until the umbrella was in a open space wide enough to unfurl. Open umbrella in my right hand, with my left hand I was able to dry with a small, dry lens cloth I’d also had the foresight stuff in a pocket.
One of the downsides of the “perfect” raindrop is its large size, which gives it a rather inconvenient relationship with gravity. So. After all this preparation and just as I raised my remote release for my first click, my raindrop grew tired of waiting and plunged groundward. True story. Fortunately, an advantage of getting intimate with raindrops is the insight that they tend to reform in the same place. I took a deep breath—with my composition, focus, and exposure already set, I decided to wait (still contorted between branches beneath my umbrella) for the next drop to form. And sure enough, within a couple of minutes I was back in business.
I clicked a dozen or so frames, checking the focus after each, refining the composition slightly, and occasionally varying my exposure settings until I was confident that I had enough frames to give me a pretty good chance of at least one successful image. I probably would have worked on it even longer, but my muscles really were starting to cramp and I figured Don and Mike were ready to move on anyway. Back at the car a cursory run through my images on my LCD was enough to give me hope that I’d achieved my goal, but it wasn’t until I got them home on my large monitor that I was ready to proclaim success.
Enjoy: All’s well that ends well
Most of the images had very slight but nevertheless fatal focus problems—slight motion blur or barely missed focus point—all I needed was one. And this is it.
So what did I end up with? The white stripe on the left is Bridalveil Fall in full spring flow. The branch belongs to my young dogwood tree; behind it are dogwood leaves and new (still greenish) flowers. And inside the raindrop is Bridalveil Fall, Cathedral Rocks, and Leaning Tower. But wait, there’s more: I’d actually had been working on the image a little while before looking closely at the black shape above Bridalveil Fall and realizing that a raven had flashed into my scene at the instant I clicked (it’s in no other frame). Pretty cool.
Do your homework
Posted on May 1, 2014

Sunrise Reflection, Mt. Adams and Trout Lake, Washington
Canon EOS 5D Mark III
1/2 second
22 mm
ISO 100
F13
One of the questions I’m most frequently asked is, how do you find these locations? Sometimes I feel like the questioner is convinced that there’s a secret pro photographer society where we share prime photo locations (and scoff at outsiders), or perhaps I’ve inherited a comprehensive tome containing the coordinates of every photo-worthy scene on Earth. Uh…, not so much.
The reality is far less interesting. First, it doesn’t hurt to have been born and raised in California—being within relatively easy driving distance of places Yosemite, the Eastern Sierra, and Death Valley gives me a lifetime of experience from which to draw. But as my workshop offerings expand, I find myself venturing into areas I don’t know nearly so well. Of course the people who spend good money to attend a workshop, not to mention their vacation time and travel expense, expect no less than expert location knowledge from their workshop leaders. Not only do they want to be taken to the “iconic” spots, they want to be shown special, less known, scenes. And they want to know they’re going to be at these locations at the best time.
So here it is—the pro photographer’s secret to finding the best photo locations is…
… wait for it…
… lots of homework and very long days.
Sorry—no secret society or comprehensive resource, I swear. Just a lot of research and hard work. The long days part of the equation is up to you—it’s mostly a matter of sucking it up and setting the alarm for 5:00 or 4:00 or whatever ridiculous AM gets the job done, rain or shine, and covering as many miles as possible until it gets too dark to see. (How bad do you want it?)
On the other hand, the homework part I might be able to help with. It pretty much comes down to four things: Research, Inquire, Explore, Experience. But rather than elaborate in general terms, I’ll give you an example. I just returned last night from four days in Oregon and Washington, scouting the area in and around the Columbia River Gorge with Don Smith for a workshop we plan to add next spring. Don and I had both been there before, spending enough time to know that it’s ripe with possibility, but not so much that we we’re comfortable asking others to pay us money to show it to them. So we flew into Portland Sunday afternoon, rented a car and drove to Hood River, which would be our base of operations for the next few days.
Research
For many the research part of the scouting equation begins and ends with one or two sites the Internet. While the Internet is great, it’s not everything (and not always accurate). I usually start by scrutinizing topo maps to get a feel for the terrain, and road maps to better understand access and relative location (what’s near what). In this case, Don and I had done our map research before our earlier trips, but we definitely revisited the maps before returning this time. REI is a good place to start for topo maps, but sometimes you can find what you’re looking for online or in the vast selection of topo map apps available for tablets and smartphones. As much as I love my GPS for getting from here to there, for road research I prefer the old fashion, fold-out maps that I can spread out on a table. AAA is my go-to roadmap resource.
Once I get a general idea of the lay of the land, I’m ready to drill down to specifics. Not only are books are more reliable and complete than the Internet, they’re also more portable. I try to find one or two books on my location—because most books include information that’s not pertinent to my objectives, I may not read them from cover-to-cover, but I do at least scan each page for info on the areas that might interest me. They also come with me, keep me company on the plane, and are rarely more than an arm’s length away for the duration of my visit. For my first Gorge trip I used “Day Hiking Columbia River Gorge,” by Craig Romano, which gave me lots of insights that carried over to this trip.
By the time I’m done with the maps and books, I’m ready to start Googling. Sometimes a search like “Columbia River Gorge photo locations” turns up everything I need, but I usually end up finding spots that require more info, or sometimes I see possible spots on the maps or in the books that don’t show up in the more general Google search. In that case I’ll Google for something like “Images of Mt. Hood” (or whatever) and try to determine where they were captured. (For Columbia River Gorge waterfalls, and West Coast waterfalls in general, there’s no better online resource than Leon Turnbull’s waterfallswest.com. )
Following this approach, Don and I had a real good idea of what to check out on this trip. We felt pretty good about our knowledge of the Gorge’s waterfalls (which we’d already explored—thanks, Leon), so this time we concentrated on non-waterfall opportunities, particularly views that would be good for sunrise and sunset. We came up with a framework itinerary that would allow us to cover all of the general areas and specific locations we’d identified.
Inquire
As beneficial as the research is, there’s no substitute for pestering locals. Don and I started at check-in didn’t let up until we got on our planes home: hostesses, servers, baristas, sales clerks, joggers, hikers, park rangers—no local was safe. If the person had a tripod, we’d ask something like, “Where did you shoot sunrise?” or “What’s a good sunset spot?” But most locals don’t have a photographer’s mindset—they usually respond better to questions like, “What are your favorite views?” or even better, “What’s a good view of Mt. Hood?”
Some of the best spots (including Trout Lake, pictured above) we found as the direct result these, uh, inquiries (interrogations). In scenic areas like the Columbia River Gorge, most people are very proud of their home and enjoy sharing their knowledge. Not only were the local experts good resources for finding the best photo spots, they were able to steer us away from less exciting places we’d planned to visit, in one case saving us what would have been an afternoon-long wild goose chase.
Explore
No matter how much research and inquiry I do, I never turn up everything. Some of my favorite spots have resulted from just checking out a road that looks interesting, or wandering down a trail to see whether the view opens up around the corner. This trip was no exception. For our first sunrise Don and I got up at 5:00 a.m. and just started driving up Highway 35 toward Mt. Hood and ended up finding a beautiful view of Mount Hood above the cascading Hood River. And on our drive back, rather than stay on the main highway, we detoured into the countryside and found some spectacular views of Mt. Hood above rolling farmland and blooming apple and pear orchards.
Experience
It’s great to have knowledge of an area’s photo locations, but until you actually get out there and photograph your spots at the time you think they’ll be best, you’ll never know for sure (it’s one thing to make a wrong call on a spot when it’s just you, and something altogether different when you’re guiding a workshop group out to a spot at a time you’ve never photographed there). So after a long day of exploration, Don and I would decide what location would be best for the upcoming sunset and sunrise, then return.
One of our inquiries at the hotel turned up Trout Lake as a nice view of Mt. Adams (Mt. Adams wasn’t even on our radar when we arrived because on our previous visits it was engulfed in clouds). We drove up there one afternoon, and even though Mt. Adams was again cloud-shrouded and completely invisible, we thought this would be a great sunrise spot if the mountain did come out. So the next morning, with clearing skies in the forecast, Don and I rose at 5:00 and drove up there in the dark.
The color was just starting as we arrived (another reason we run locations ourselves first—now we know we need to leave earlier when we’re guiding our workshop group), but because we’d been there the day before, we were able to set up and start shooting just in time for the good stuff. The mountain was about 2/3 visible, its top third hidden by clouds that started pink soon became crimson, with the entire scene reflected in the exquisitely calm lake.
The image here came a little before the sun crested the ridge to the south, when the sun was high enough to illuminate the herringbone clouds overhead without washing out the reflection in Trout Lake (which hung in there for the duration of our shoot, a real bonus). To bring out the reflection of the bright sky on the shaded lake surface, I used a 2-stop hard-transition Singh-Ray graduated neutral density filter. This made my reflection slightly brighter than my sky (defying the laws of physics), a problem I was able to fix pretty easily in Lightroom/Photoshop.
But wait, there’s more
We’re still not done exploring the Columbia River Gorge. Before next year’s workshop we’ll be making at least one more trip up there. Even though we feel extremely confident that we have more than enough to keep a workshop group busy and happy, it’s important to have options and backup locations. For example, on this trip the wildflowers were exploding (more on that later), and we spent a lot of our time checking out and photographing the prime wildflower spots. But wildflower blooms are notoriously unreliable—if next year’s trip misses the bloom, we’ll need to find other spots. And we’ll need to be able to handle whatever weather weather Mother Nature throws at us: rain, snow, sunshine—in spring it’s all possible.
Will I mind doing more homework? What do you think?

