Oops
Posted on December 17, 2013

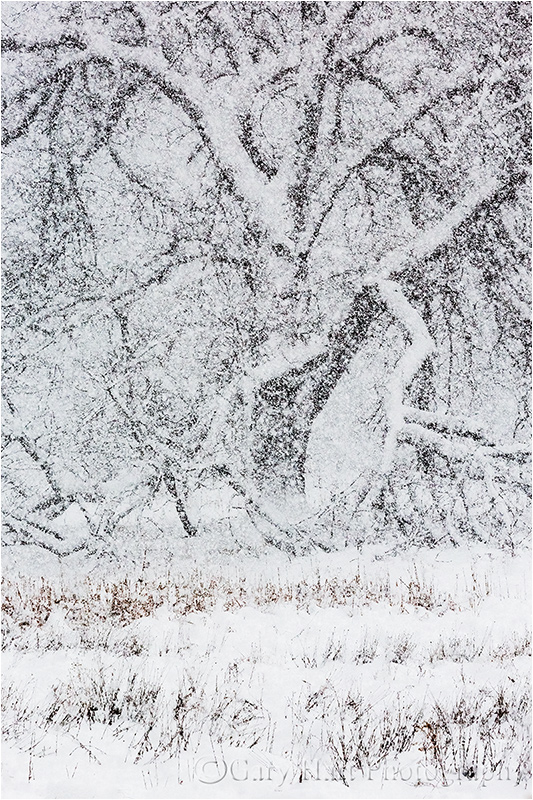
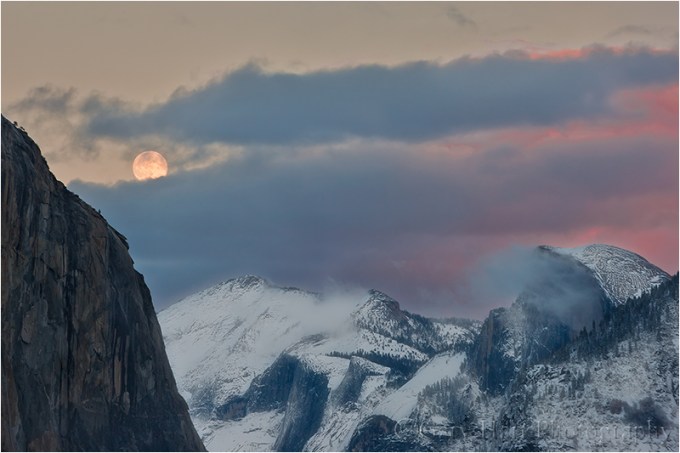
Winter Moonrise, Merced River, Yosemite
Canon EOS 5D Mark III
1/10 second
40mm
ISO 800
F16
Last Friday evening, this professional photographer I know spent several hours photographing an assortment of beautiful Yosemite winter scenes at ISO 800. Apparently, he had increased his ISO earlier in the day while photographing a macro scene with three extension tubes—needing a faster shutter speed to freeze his subject in a light breeze, he’d bumped his ISO to 800. Wise decision. But, rushing to escape to the warmth of his car, rather than reset the camera to his default ISO 100 the instant he finished shooting, he packed up his camera with a personal promise to adjust it later, when his fingers were warmer—surely, he rationalized, removing the extension tubes and macro lens would remind him to reset the ISO too. (You’d think.) But, despite shutter speeds nowhere near what they should have been given the light and f-stop, he just kept shooting beautiful scene after beautiful scene, as happy as if he had a brain.
I happen to know for a fact that this very same photographer has done other stupid things. Let’s see…. There was that time, while chasing a sunset at Mono Lake, that he drove his truck into a creek and had to be towed out. And the two (two!) times he left his $8,000 camera beside the road as he motored off to the next spot. And you should see his collection of out-of-focus finger and thumb close-ups (a side effect of hand-holding his graduated neutral density filters). Of course this photographer’s identity isn’t important—what is important is dispelling the myth that professional photographers aren’t immune to amateur mistakes.
And on a completely unrelated note…
Let’s take a look at this image from, coincidentally, last Friday evening. Also completely coincidentally, it too was photographed at ISO 800 (go figure)—not because I made a mistake (after all, I am a trained professional), but, uhhh, but because I think there are just too many low noise Yosemite images. So anyway….
This was night-two of what was originally my Yosemite ISON workshop—but, after the unfortunate demise of Comet ISON and a week of frigid temperatures in Yosemite, became my Yosemite ice-on workshop. That’s because, to the delight of the workshop students (and the immense relief of their leader), much of the one foot of snow that had fallen the Saturday before the workshop’s Thursday start had been frozen into a state of suspended animation by a week of temperatures in the teens and low-twenties.
Each day we rose to find nearly every shaded surface in Yosemite sheathed in a white veneer of snow and ice. (Valley locations that received any sunlight were largely brown and bare.) And the Merced River, particularly low and slow following two years of drought, was covered in ice in an assortment of textures and shapes from frosted glass to blooming flowers. Adding to all this terrestrial beauty was a waxing moon, nearly full, ascending our otherwise boring blue skies and illuminating our nightscapes.
On Friday night I guided my group to this spot just downstream from Leidig Meadow. There we found the moon, still several days from full, glowing high above the valley floor, and Half Dome reflected by a watery window in the ice. I captured many versions of this scene, from tight isolations of the reflections to wide renderings of the entire display. It’s too soon to say which I like best, but I’m starting with this one because it most clearly conveys what we saw that evening.
I chose a vertical composition because including the moon in a horizontal frame would have shrunk Half Dome and the moon, and introduced elements on the right and left that weren’t as strong as Half Dome, its reflection, and the snowy Merced River. (Sentinel Rock is just out of the frame on the right—as striking as it is, I wanted to make this image all about Half Dome.)
My f16 choice was to ensure sharpness throughout the frame, from the ice flowers blooming in the foreground, to Half Dome and its reflection. As you may or may not know, the focus point for a reflection is the focus point of the reflective subject, not the reflective surface. That means when photographing a reflection surrounded by leaves, ice, rocks, or whatever, you need to ensure adequate DOF or risk having either the reflection or its surrounding elements out of focus. Here I probably could have gotten away with f11, but my iPhone and its DOF app were buried beneath several layers of clothes, and using it would have require removing two pair of gloves.
I’d love to say that I chose ISO 800 to freeze the rapids, but I’m not sure you’d buy it. So I’m sticking with my too many low noise Yosemite images story and moving on. (A few cameras ago, ISO 800 would have meant death to this image, but today, thankfully, it’s mostly just a lesson in humility.)
A Yosemite Winter Gallery
Click an image for a closer look, and a slide show. Refresh the screen to reorder the display.


There’s a draft in here
Posted on December 13, 2013
Elm in Blizzard, Cook’s Meadow, Yosemite
Canon EOS 5D Mark III
1/200 second
220mm
ISO 800
F16
Drafting an image
Few writers create a polished piece of writing in a single pass—most start with a draft that gets refined and tightened until it’s ready for publication. It’s an incremental process that builds upon what’s already been done. As somebody who has been writing and taking pictures for a long time, I’ve found a real connection between the creation process of each craft. The most successful photographers aren’t afraid to create “draft” images that move them forward without necessarily delivering them all the way where they want to be.
When I write a blog, I start with an idea and just go with it. But before clicking Publish (or Delete), I read, revise, then re-read and re-revise more times than I can count. Likewise, when I find a scene that might be photo-worthy, I expose, compose, and click without a lot of hand wringing and analysis. But I’m not done after that first click, and I don’t particularly care if it’s not perfect. When my initial (draft) frame is ready, I pop the image up on my LCD, evaluate it, make adjustments, and click again, repeating this cycle until I’m satisfied, or until I decide there’s not an image there. (In the days before digital, the same evaluation process took place through the viewfinder with my camera on a tripod.)
Another tripod plug
It’s the tripod that makes this shoot/critique/refine process work. Much the way a computer allows writers to save, review, and improve what they’ve written (a vast improvement over the paper/pen or typewriter days), a tripod holds your scene while you decide how to make it better. Photographing sans tripod, I have to exactly recreate the previous composition before making my adjustments. But using a tripod, when I’m finished evaluating the image, the composition I just scrutinized is waiting for me right there atop my tripod, allowing each frame to improve on the previous frame.
About this image
Composition isn’t limited to the arrangement and framing of elements in a scene—it can also be the way the image handles depth and motion. For example, living in California, I just don’t get that much opportunity to photograph falling snow. So, on last week’s visit to Yosemite, when I saw the Cook’s Meadow elm tree partially obscured by heavy snowfall, I knew an image was in there, but wasn’t quite sure how to best render the millions of fluttering snowflakes between me and the tree. What shutter speed would freeze (pun unavoidable) the falling flakes, and what depth of field would best convey the falling snow? Would too much DOF be too cluttered? Would not enough DOF be too muddy?
But before solving those problems, I needed a composition. I started with my original vision, a tight, horizontal frame of the tree’s heavy interior—my “draft” image. With my camera on my tripod I tried several successively wider frames, each a slight improvement of the previous one, before jettisoning my tight horizontal plan in favor of a wider vertical composition. Though I knew right away I was on the right track, it still took a half dozen or so incrementally better frames before finally arriving at the composition you see here.
With my composition established, I set to work on the depth and shutter speed question. As good as the LCD on my camera is, I didn’t want to be making those decisions based on what I saw on a credit card size screen, but my tripod enabled me to capture a series of identically framed images, each with a different f-stop and shutter speed. Back home on my computer, I was able compare them all to one and other without being distracted by minor framing differences. I finally decided I like the version with lots of depth field.
Dashing to the snow
Posted on December 9, 2013

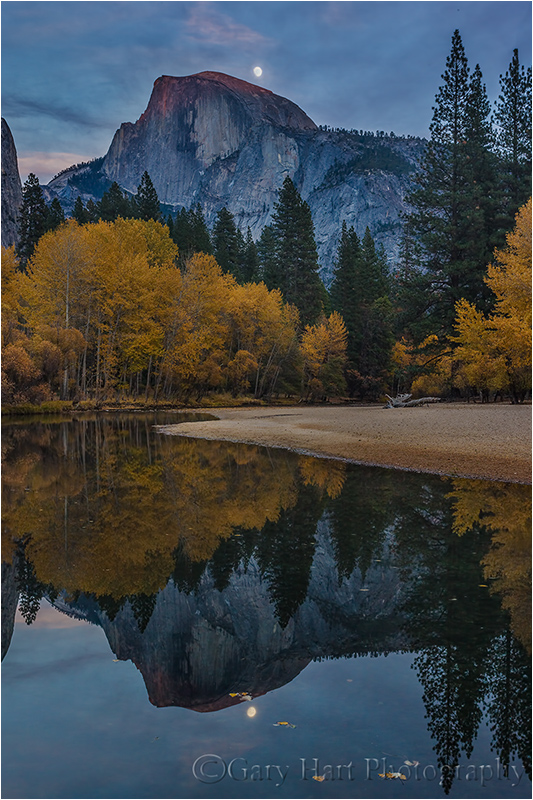
Winter Reflection, Half Dome and the Merced River, Yosemite
Canon EOS 5D Mark III
1/13 second
16mm
ISO 100
F16
If there’s anything on Earth more magical than Yosemite with fresh snow, I haven’t seen it. The problem is, Yosemite Valley doesn’t get tons of snow—its relatively low elevation (about 4,000 feet) means the valley often gets rain when most of the Sierra gets snow. And when snow does fall here, it doesn’t stay on the trees for more than a few hours (if you’re lucky). Which is why I’ve always said the secret to photographing snow in Yosemite is to monitor the weather reports and time your visit to arrive before the storm. This strategy gives photographers within relatively easy driving distance, especially those of us without day job, a distinct advantage—from my home in Sacramento I can be in Yosemite Valley in less than four hours (that’s factoring a Starbucks stop in Merced and a fill-up in Mariposa), and I have no problem using darkness to make the roundtrip on the same day.
So last week, when the National Weather Service promised lots of snow in Yosemite for the weekend, I quickly freed up my Saturday. I usually stay just outside the park in El Portal, but because I didn’t want to risk being turned away by a (rare but not unprecedented) weather related park closure, I booked Friday and Saturday nights at Yosemite Lodge, right in the heart of Yosemite Valley—even if the roads shut down, from there I’d be able to walk to enough views to keep me happy all day.
I arrived in the dark to find lots of ice and patches of crusty old snow; I woke dark-and-early Saturday morning to about ten inches of fresh snow. Yippie! The snow fell intermittently throughout the day, with conditions ranging from nearly opaque to classic Yosemite clearing storm drama. Since I was by myself, I was able to deemphasize many of the most frequently photographed spots my workshop expect to photograph and explore random scenes along the Merced. In the morning I concentrated on El Capitan scenes; the afternoon was more about Half Dome.
Of course the classic views are that way for a reason, so, as you can see in this image, I gave them some attention to. Despite not being much of a tourist location, many photographers know about this scene just upstream from Sentinel Bridge. It’s a little hard to find, but usually fairly accessible. But this time getting there forced me to employ a creative parking strategy and to soil about one hundred yards of virgin powder. At this spot a couple of weeks ago I used a telephoto to isolate a single tree clinging to its fall color and reflecting in the river; this visit was my widest lens that got all the work.
The January issue of Outdoor Photographer will include my Yosemite El Capitan Winter Reflection image and a paragraph explaining how to photograph snow in Yosemite Valley. Here’s pretty much what I say there, with a little elaboration:
- Arrive in Yosemite Valley before the storm and plan to stay until it’s over. Getting there before the snow starts makes your life so much simpler; staying until the storm passes not only gets you the coveted “clearing storm” images, it also allows you to photograph all of Yosemite’s iconic features above a snow-covered landscape.
- Despite what Google Maps, your GPS, or your brother-in-law tell you, don’t even think about any route that doesn’t take you through Mariposa and up the Merced River Canyon on Highway 140. The highest point on 140 is Yosemite Valley; all other routes into the park go over 6,000 feet and are much more likely to be icy, closed, or require chains. For people coming from the north that means 99 to Merced and east on 140. Coming from the south, you can either take 99 to Merced (easier) and 140, or 41 to Oakhurst and 49 to Mariposa (faster).
- Carry chains. While you’re rarely asked unless weather threatens, every car entering Yosemite in winter is required to carry them, even 4WD. While 4WD is usually enough to avoid putting chains on, that’s not a sure thing. And if you get caught in a chain check without them, you’re parked right there until the requirement is lifted. If you’re driving your own car to Yosemite, bite the bullet and purchase chains. If you’re flying into California and renting a car, try to get 4WD and keep your fingers crossed that you don’t get asked. Some people will purchase chains and try to return them if they didn’t use them, but that can be risky so check the store’s chain return policy.
- Don’t hole-up in your room while it’s snowing. I generally circle the valley looking for scenes (about a 30 minute roundtrip). If the low ceiling has obscured all the views and you tire of photographing close scenes, park at Tunnel View and wait. Not only is Tunnel View the location of some of Yosemite’s most spectacular clearing storm images, it’s also the first place storms clear. And because you’ll be stunned by how fast conditions in Yosemite can change, waiting at Tunnel View is the best way to avoid missing anything. Another advantage Tunnel View offers is its panoramic view of the entire valley that helps you to decide where to go next. For example, from Tunnel View you can see if Half Dome is emerging from the clouds and there are probably nice images to be had on the east side, or if your best bet will be to stay on the west side and concentrate on El Capitan, Bridalveil Fall, and Cathedral Rocks.
- No matter how spectacular the view is where you are now, force yourself to move on after a while because it’s just as spectacular somewhere else. Trust me.
Seeing the trees for the forest
Posted on December 6, 2013
-

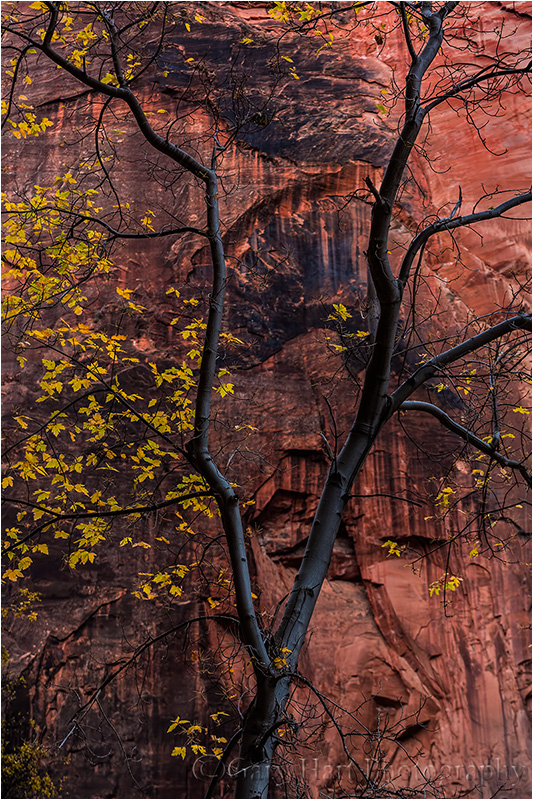
Tree and Sandstone, Virgin River Canyon, Zion National Park
Canon EOS 5D Mark III
1/3 second
F/11
ISO 400
109 mm
I’ve spent a lot of the last few months photographing “big picture” locations: Hawaii, the Grand Canyon, Bryce/Zion, Arches/Canyonlands, Yosemite. Visiting these spots, it’s impossible to not be sucked in by the grandeur, often at the expense of more intimate beauty right in front of you. But because nature’s beauty doesn’t need to shout, I make a conscious effort to mix intimate photo opportunities in with the grand stuff, and am always on the lookout for the subtle qualities that make a location special.
In early November, while Don Smith guided half of his workshop group to photograph Zion’s Watchman at sunset, I took the other half of the group (those who already had their Watchman shot, or who were just more interested in something less frequently photographed), up the canyon to the Temple of Sinawava. Meandering the trail up toward the Narrows, I demonstrated to those who stayed with me how I identify and photograph narrow depth of field, telephoto isolations of autumn leaves. As darkness fell, a few of us found ourselves more than a half mile up the trail with less than ten minutes to get back to the cars. Hustling back, I wasn’t even looking for photos when something about this tree against the red canyon walls stopped me. Even though I didn’t really have time, I quickly set up my tripod and composed, squeezing off three quick frames before jogging the rest of the way back to the waiting group with seconds to spare.

Leaves on Water, Yosemite
On the way back to the car after a particularly productive Bridalveil Creek shoot, I spied this group of leaves beside the trail, floating atop a small pool in the granite. People had been walking past it all morning, but I took a few seconds to compose this sweet little scene.

Rocks and Reflection, Valley View, Yosemite
The big picture at Valley View is El Capitan, Cathedral Rock, and Bridalveil Fall reflected in the Merced River. But I’ve always enjoyed the view downstream, away from the primary scene. Here I found one tree, clinging to its fall color, reflecting in the glassy Merced River. I positioned myself so the foreground rocks were more or less evenly distributed and turned my polarizer slightly, removing just enough reflection to reveal the rocky riverbed. (Here’s the Valley View big picture scene from a few days earlier.)

Forest Wildflowers, North Rim, Grand Canyon
Grand Canyon. Lightning. Rainbows. What were we doing traipsing around in a forest? Having a blast photographing a daisy carpeted aspen grove, that’s what.
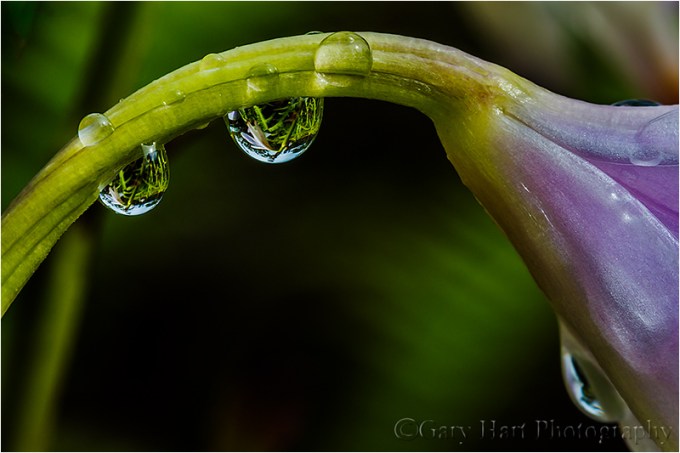
Raindrops, Orchid in Lava Tree State Park, Hawaii
The night before photographing this raindrop-laden orchid, I’d photographed the Milky Way above the Kilauea Caldera. For me this little scene was a reminder that not only is the Universe infinitely large, it’s also infinitely small.

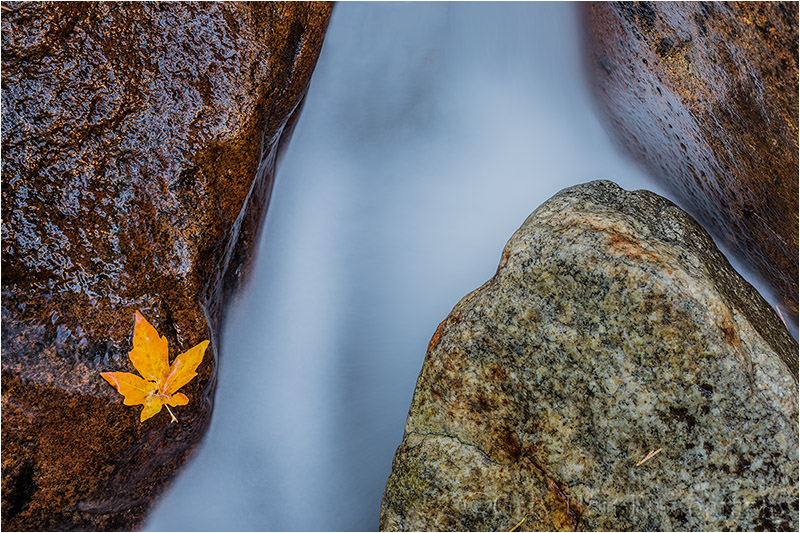
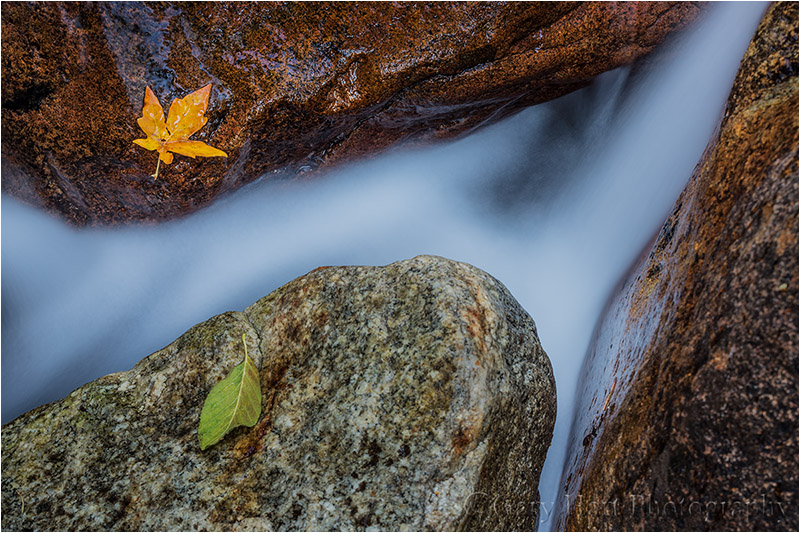
Leaf, Bridalveil Creek, Yosemite
The simplicity of a single, rock-hugging leaf above a rushing channel of Bridalveil Creek made it an instant personal favorite. As I blogged last month, I worked this one scene for at least an hour.
Made in the shade
Posted on December 2, 2013

Cascade in Autumn, Bridalveil Creek, Yosemite
Canon EOS 5D Mark III
15 seconds
F/22
ISO 50
60 mm
Imagine that you want to send an eight-inch fruitcake to your nephew for Christmas (and forget for a moment that you’ve been come that relative), but only have a six-inch box. You could cut off one end or the other, squish it, or get a bigger box. If the fruitcake represents the light in a scene you want to photograph, your camera’s narrow dynamic range is the box. Of course the analogy starts to fall apart here unless you can also imagine a world where box technology hasn’t caught up with fruitcake recipes, but the point I’m trying to make is that whether it’s fruitcake or light, when you have too much of something, compromises must be made.
So, forgetting about fruitcakes for a moment, let’s look at this image of Bridalveil Creek in Yosemite. In full daylight on a sunny day the creek would have been a mix of sunlight and shade far beyond a camera’s ability to capture in a single frame—photographing it would have forced me to choose between capturing the highlights and allowing the shadows to go black, or capturing the shadows and allowing the highlights to go white. But photographing the scene in full shade compressed the dynamic range naturally, to something my camera could handle—suddenly everything was in shadow, and all I needed to do was keep my camera steady enough for the duration of the shutter speed necessary to expose the scene at the f-stop and ISO I chose.
This illustrates why “photographer’s light” is so different from “tourist’s light.” It also explains why your family gets so irritated when you base your vacation stops on when the light will be “right.” (Or, if you (wisely) defer to your family’s wishes, you get so frustrated that your vacation photos don’t look like the photos that show-off in your camera club submits for every competition.)
I love photographing a colorful sunset as much as the next person, but I’m never happier as a photographer than when I’m able to play with a pretty scene in full shade. Overcast skies are great because they allow me to photograph all day, but because clouds are never a sure thing, at every location I photograph I try to have weather-independent spots that will allow me to photograph when clear skies fill the rest of the landscape with sunlight. For example, Bridalveil Creek—nestled against Yosemite Valley’s shear south wall, much of the year Bridalveil Creek is in full shade until at least mid-morning, and then again by mid-afternoon. I never have to worry about what the light is here because I know exactly when I’ll find it in wonderful, (easy) low contrast shade.
The morning I captured this image was one of those blue sky days that can shut a photographer down, but I knew exactly where I needed to be. Arriving at about 8 a.m., I had several hours of shooting in easily manageable, constant light. As I scrambled up the creek toward the fall, I fired off a few frames but nothing stopped me until I came across this small pool swarming with recently fallen leaves. A couple of “rough draft” frames were enough to know that there was an image in here—I just needed to find it.
I suspected I needed to be closer, but between the large, slippery rocks and frigid creek, movement was quite difficult. Nevertheless, with each composition I seemed to manage to work my way a little closer, until I finally found myself at water’s edge. I started my composition at eye level, but that gave me too much water. To better balance the background cascade, middle-ground pool, and foreground leaves, I dropped down to about a foot above water level—this allowed me to include the foreground leaves with a telephoto that brought the cascade closer and shrunk the water separating the two.
Framing the scene this way required zooming to 60mm; because I wanted as much sharpness throughout the frame as possible, I stopped all the way down to f22 (an extreme I try to avoid). While the dense shade made the scene’s dynamic range manageable, it also made it quite dark; adding a polarizer to cut the glare subtracted two more stops. Sometimes I can increase my ISO enough to achieve a shutter speed that gives a little definition in the water, but given all the other exposure factors I just cited, my water was going to be blurred no matter what ISO I chose. So I decided to go the other direction and maximize my shutter speed to emphasize the motion of the leaves swirling on the pool’s surface.
* * *
FYI, your nephew would probably prefer an Amazon gift card. And if you must send a fruitcake, this one looks good (feel free to try it and send a sample).
Day’s End, Ke’e Beach, Hawaii
Posted on November 29, 2013

Day’s End, Ke’e Beach, Hawaii
Canon EOS-1Ds Mark III
3/5 seconds
F/16.0
ISO 200
17 mm
Is there ever a bad sunset in Hawaii? My preliminary investigation seems to indicate that the answer is probably no, but I think a definitive answer requires more research—a task for which I’m more than happy to volunteer (that’s just the kind of guy I am). As far as I can determine, most every day in Hawaii seems to include some combination of clouds and sunlight—enough clouds to make gorgeous skies, and enough sunlight to make spectacular color. In other words, a photographer’s paradise.
In case you missed it, I recently returned from Hawaii where I assisted Don Smith’s Kauai workshop. Each day we’d rise before the sun, head to some east-facing beach (either by car or simply by taking the 50 yard stroll to the beach behind our room), pick a composition, and wait for the inevitable show to begin. Color, shafts of light, rainbows–we saw it all, and while each was different, it was pretty difficult to say any one was better than any other. In the evening we’d repeat the process at a west-facing beach, then go to dinner. Not a bad gig.
Ke’e Beach is a sunset destination, literally the end of the road, a spectacular exclamation point punctuating Hawaii’s State Highway 560 on the northwest side of Kauai. Just beyond, accessible only by foot, water, or air, the sheer Nā Pali cliffs jut from the Pacific and disappear into the clouds. A coral reef protects the beach, calming the surf and creating an ideal environment for swimming, snorkeling, and fishing. Many visitors forego those activities in favor of simply sitting on the beach waiting for the sun to disappear.
This was the evening before the workshop began, my first visit here. Scanning the scene for composition options I decided frames including the bay and cliffs would require working around too many people, so I turned my attention the beautiful sky around the sun. As nice as the sky was, I still wanted something in the foreground for depth. The pristine sand was a good start, but wanting more I chose this flat rock outcrop as my foreground anchor. I set up my tripod close enough to the surf that an occasional wave would swirl about my ankles, etching ephemeral arcs in the sand. I went with my 17-40 lens, dialing it wide to exaggerate the beach and give the background an expansive feel.
While waiting for the sun to drop to the horizon I readied my graduated neutral density filters, set my camera to f16 to ensure a sunburst, and determined that ISO 200 would give me the shutter speed with just the right amount of motion blur. Next I played with compositions, deciding that (despite “rules” to the contrary), I wanted the horizon in the middle and the sun bullseyed. With everything ready, I was able just stand and enjoy the view.
When the sun popped from the clouds I started clicking, timing my exposures with the waves, some with the surf flat and others with of motion around the rock. After a few frames I’d adjust the composition, keeping the scene centered but playing with variations between horizontal, vertical, wide, and tight. I ended up with several I like, and who knows, maybe tomorrow I’ll decide I like the vertical version better.
Workshop Schedule || Purchase Prints || Instagram
More Hawaii
Click an image for a closer look, and to view a slide show.


Moon chasing: The rest of the story
Posted on November 19, 2013
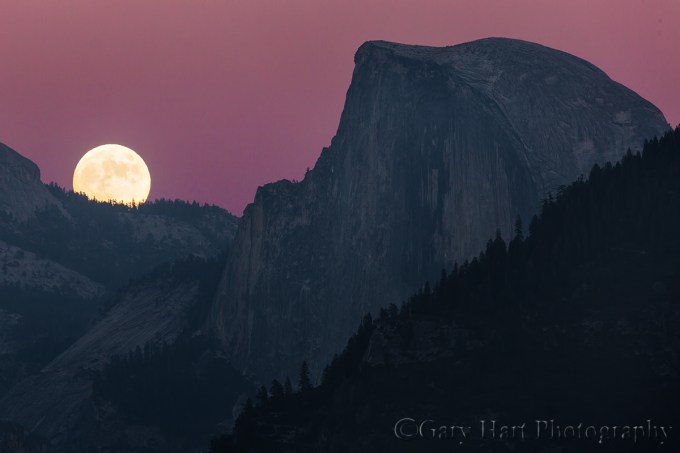
Moon!, Half Dome, Yosemite
Canon EOS 5D Mark III
1/13 second
F/11
ISO 200
400 mm (slightly cropped)
Wow, it seems like only yesterday that the moon was just tiny dot hovering above Half Dome.

Moonrise Reflection, Half Dome and the Merced River, Yosemite
What happened?
No, the moon didn’t magically expand, nor did I enlarge it digitally and plop it into this image. What happened is that I waited two days and moved back; what happened is the difference between 40mm and 400mm; what happened is a perfect illustration of the photographer’s power to influence viewers’ reaction to a scene through understanding and execution of the camera’s unique view of the world.
The rest of the story
My workshop group captured the “small” moon at sunset on Thursday, when it was 93% full and the “official” (assumes a flat, unobstructed horizon) moonrise was 3:09 p.m (an hour and 40 minutes before sunset). That night the moon didn’t rise to 16 degrees above the horizon, the angle to Half Dome’s summit as viewed from our location beside the Merced River, until almost exactly sunset. Because it’s so much higher than anything to the west, Half Dome gets light pretty much right up until sunset—look closely and you can see the day’s last rays kissing Half Dome’s summit.
Flat horizon moonrise on Saturday, when the moon was 100% full, was at 4:24 p.m., only about twenty minutes before sunset. But Tunnel View is nearly 500 feet above Yosemite Valley; it’s also 5 1/2 miles farther than Half Dome than Thursday’s location—this increased elevation and distance reduces the angle to the top of Half Dome to just 6 degrees. So, despite rising over an hour later, when viewed from Tunnel View, the moon peeked above the ridge behind Half Dome just a couple of minutes after sunset (if we’d stayed at Thursday night’s location, in addition to being hungry and cold, by Saturday we’ have had to wait until after 6:00 for the moon to appear).
Exposure
My objective for full moon photography is always to get the detail in the moon and the foreground. As I mentioned in yesterday’s post, these were workshop shoots, and experience has shown me that the most frequent failure when photographing a rising moon in fading twilight is getting the exposure right—the tendency is to perfectly expose the foreground, which overexposes the daylight-bright moon (leaving a pure white disk). This problem is magnified when the moon catches everyone unprepared.
So, both evenings I had my group on location about 30 minutes before the moon. While we waited I made sure everyone had their blinking highlights (highlight alert) turned on, and understood that their top priority would be capturing detail in the moon. I warned them that an exposure without a blinking (overexposed) moon would slightly underexpose the foreground. And I told them that once they had the moon properly exposed (as bright as possible without significant blinking highlights), they shouldn’t adjust their exposure because the moon’s brightness wouldn’t change and they’d already made it as bright as they could. This meant that as we shot, the foreground would get continually darker until it just became too dark to photograph.
(A graduated neutral density filter would have extended the time we could have photographed the scene, but the vertical component of Yosemite’s horizon made a GND pretty useless. A composite of two frames, one exposed for the moon and one exposed for the landscape would have been a better way to overcome the scene’s increasing dynamic range.)
Compare and contrast
Winter Moonrise, Half Dome, Yosemite
Thursday night’s scene, which would have been beautiful by itself, was simply accented by the (nearly) full moon. Contrast that with my visit a few years ago, when I photographed a full moon rising slightly to the left of its position last Saturday’s night. But more significant than the moon’s position that evening was the rest of the scene, which was so spectacular that it called for a somewhat wider composition that included the pink sky and fresh snow. And then there’s the above image, from last Saturday night—because the sky was cloudless (boring), and snow was nowhere to be seen, I opted for a maximum telephoto composition that was all about the moon and Half Dome.
The wide angle perspective I chose Thursday night emphasized the foreground by exaggerating the distance separating me, Half Dome, and the moon; the snowy moonrise image found a middle ground that went as tight as possible while still conveying the rest of the scene’s beauty. Saturday night’s telephoto perspective compressed that distance, bringing the moon front and center. Same moon, same primary subject: If Thursday night’s moon was a garnish, Saturday’s was the main course.
Learn more about photographing a full moon
Join me next fall as we do this all over again
A gallery of Yosemite moons
Click an image for a closer look and slide show. Refresh the window to reorder the display.


Chasing the moon in Yosemite
Posted on November 18, 2013
Moonrise Reflection, Half Dome and the Merced River, Yosemite
Canon EOS-1Ds Mark III
1.3 seconds
F/16.0
ISO 200
40 mm
The highlight of my just completed Yosemite Autumn Moon photo workshop was a full moon rising above Half Dome at sunset. But rather than settle for just one Half Dome sunset moonrise, I’d “arranged for” three. Clouds shut us out on sunset-moonrise number two, but sunset-moonrise number one was a huge success. (And sunset-moonrise number three, from Tunnel View, was so special that I’ll dedicate a whole blog post to it.)
Any location’s “official” sun and moon rise/set times assume a flat horizon—if you read that today’s moonrise is at 5:00 p.m., you need to account for the time it takes for the moon to rise above whatever obstacles (mountains, hills, trees) are between you and the flat horizon. And due to the same motion around Earth that causes the moon’s phases, anyone planted in the same location night after night would see the moon rise about fifty minutes later each day (this is an average—the nightly lag varies with many factors). For example, a moon that hovered right on the horizon at sunset last night will rise too late to photograph tonight.
While you can’t do anything about the moon’s absolute position in the sky, you can control the elevation of your horizon simply by changing your location. In other words, careful positioning makes it possible to photograph a moonrise at sunset on multiple nights—move lower and/or closer to the horizon to delay the moon’s appearance, higher and/or farther to view the moon sooner.
The earlier the moon will rise, the closer to your subject (for example, Half Dome) you should be to increase the angle of view; the later the moonrise, the farther back and higher you should be. So, positioning ourselves on the valley floor, close to Half Dome, provided a steep angle of view that delayed the moon’s appearance on Thursday night, when it rose (above a flat horizon) several hours before sunset. Conversely, standing at elevated Tunnel View a couple of nights later decreased our angle of view, enabling us to see the moon sooner when official moonrise is closer to sunset.
Last Saturday night, from Tunnel View on Yosemite Valley’s west side (farthest from Half Dome) the moon was “scheduled” to appear about five minutes after sunset—that would put it in the magenta, post-sunset band with just enough light for about ten minutes of shooting before the dynamic range (the brightness difference between the sunlit moon and darkening foreground) shut us down. While that was the shoot we were most looking forward to, for Friday night I’d picked a mid-valley spot by the Merced River that would put the moon above Half Dome just about sunset. And for our initial sunset on Thursday evening, I took the group to a riverside spot on Yosemite Valley’s east side, much closer to Half Dome.
Clouds obscured the moon Friday night, but Thursday night was a real treat. Not only did we find the fall color in the cottonwood trees upriver still hanging in there (despite a fairly early autumn in most of Yosemite Valley), the clouds parted just in time for the moon’s arrival. In addition to Half Dome, the trees, and the moon in the distance, we were able to get a mirror image of the scene reflected on the glassy surface of the Merced River at our feet.
While the downside of moving closer to Half Dome (or whatever your subject is) is that the wider focal length necessary to include the entire scene also shrinks the moon, I’ve always believed a small moon adds a powerful accent that makes an already beautiful scene even more special. But what if you prefer your moon big? Simple: just wait a day or two, and move back as far as possible. Stay tuned….
Join me next fall as we do this all over again.
* * *
One final point: Notice the cool (blue) color cast of this scene. This is an indication of not just the rapidly advancing twilight, but also the depth of the shade there in the shadow of the steep valley walls and dense evergreens. An image’s color temperature is a creative choice made during processing by photographers capturing in raw (unprocessed) mode. While warming the light would have made the trees more yellow, I decided that the coolness adds a soothing calmness that is lost in the warmth of a daylight scene.
A Yosemite Autumn Moon Gallery


Up a creek…
Posted on November 13, 2013

Rapids in Autumn, The Narrows, Zion National Park
Canon EOS 5D Mark III
3.2 seconds
F/16
ISO 100
16 mm
(Okay, so technically it’s a river.)
Spending last week co-leading Don Smith’s Bryce/Zion workshop, I got a taste of my own medicine: the first opportunity to photograph something I’ve long wanted to photograph (usually I’m the one showing others something for the first time). In this case it was Zion’s (aptly named) Narrows, a deep gouge carved in red sandstone by millions of years of Virgin River flow and flood. So vertical and narrow is the canyon that most of the route is wall-to-wall river that requires spending about eighty percent of your time walking through the river rather than beside it. Unfortunately, this hardship appears to be no deterrent to swarms of hikers of all ages, shapes, and fitness levels.
I’ve wanted to photograph the Narrows for a long time, but didn’t think this would be the year because Don and I usually head home immediately after a fall workshop (to allow time to recover before the next workshop—starting Thursday we’ll be in Yosemite for my Yosemite Autumn Moon workshop). But when several of our long-time workshop participants (now as much friends as customers) invited Don and me to join them on their post-workshop hike up the Narrows, we couldn’t resist.
So, when the workshop ended mid-morning Friday, seven of us donned our rented “waterproof” (ish) socks, shoes, and pants and headed upstream from the Temple of Sinawava. I’d been to Zion a few years ago, but on that visit only walked up as far as the entrance to the Narrows before time and equipment limitations (I wasn’t dressed for hiking through cold, hip-deep water) forced me to turn back. While the paved, one-mile trail to the start of the Narrows is quite beautiful as well, I was able to resist the temptation to pull out my camera. But from the instant I put my feet in the water and started upstream at trail’s end, I found myself overwhelmed both by nature’s ability to amaze, and its power to impose its will. Taking in the magnificence of time’s handiwork, I was also reminded of nature’s ability to do pretty much whatever it wants—it took about a half hour to adjust to the river’s inexorable push and overcome the feeling that the next step would be the one that would douse me from head to toe. But adjust I did, eventually reaching the point where the relatively short detours onto dry land felt unnatural.
We stayed more or less together for a short distance before separating to appreciate and photograph this wonder at a more personal pace. With frequent stops to photograph and gape, plus a short detour into a side canyon, I made it partway through Wall Street, a stretch of canyon where the walls squeeze the river like towering high-rises, before turning around.
About a mile downstream from Wall Street, the river bends abruptly and the canyon widens enough to allow a few deciduous trees to take root. After working this scene from across the river for a few minutes, it became pretty clear that the shots I most wanted would require getting as close as possible to the rapids slithering through a bed of river-rounded rocks that are no doubt completely submerged in spring.
Camera and tripod raised high, I forded at a shallower place just downstream and slowly navigated into a deeper channel in front of the rocks, eventually finding myself hip deep on a sloping, sandy bank. Perfect. I set up my tripod and commenced composing, until a vague sense of disorientation alerted me to the fact that I was sinking like Tarzan in quicksand. Yikes. While I didn’t need to worry about a crocodiles and blow-gun wielding natives, the rapid current and unstable riverbed made keeping my tripod steady quite difficult. I found that it was possible to plant the tripod securely enough, but after each exposure I needed to reposition myself or risk sliding into the chest-deep water behind me (which wouldn’t have swept me to my death, but it would certainly have gotten me and my gear far wetter than I preferred).
Epilogue
Stage two of our adventure was to take place the next day, when Don, Don’s wife Beri (who’d flown out to join our hikes following the workshop), and me were to join some of the Narrows’ group on their hike to the Subway. Zion limits the Subway hike to eighty hikers per day, but we navigated the permit process without complication. Or so we thought.
Arriving, permits in hand, at the trailhead in the pre-sunrise darkness, we found a ranger waiting to accuse Don of running a commercial venture in a restricted area. No amount of reasoning could get him to comprehend that this hike was not part of Don’s workshop (Don recently had knee replacement surgery and wasn’t even sure how far he’d be able to go), that absolutely no money (or other financial considerations) was involved (an e-mail from Don making that clear didn’t sway him), that we were actually just tagging along on the other guys’ hike, and that we were all planning to go at our own pace (in addition to Don’s recent surgery, we represented a pretty wide age and fitness range).
Since we truly were doing nothing wrong, Don could have made things difficult and insisted on his right to continue, but taking the high road, he and Beri simply opted out. And despite the fact that I’m a pro photographer who guides my own workshops, for some reason the ranger would have allowed me to go, but I chose to stick with Don and Beri.
While I’m all for stronger enforcement of the National Parks permit process (something we seriously need given some of the behavior I’ve observed), I found this particular action a little overzealous. While I completely understand why the ranger had questions, and his right to ask them, this kind of blind enforcement of the good guys who follow the rules risks a National Park system with photo workshops guided only by rule breakers who know how to fly under the radar. Nevertheless, in this case I’ll give the ranger a pass because he was quite young and clearly lacked the either experience (or wisdom) to recognize that we weren’t breaking any rules, or the authority to use his better judgment. And as it turns out, we three outlaws ended up having a very nice (albeit more leisurely) day that included a far less strenuous hike up to the Emerald Pools.
Variations on a stream
Posted on November 7, 2013
Leaf and Rocks, Bridalveil Creek, Yosemite
Canon EOS 5D Mark III
5 seconds
F/11
ISO 200
100 mm
In my November 4 post, I wrote at length about a recent morning spent photographing a single leaf I found plastered to a rock beside Bridalveil Creek in Yosemite (and my feelings about staged scenes). While my entire shoot that morning was all about one found leaf, it was just the latest in a long succession of focused visits to Bridalveil Creek. Each time I visit here the creek is different: In spring Bridalveil Creek spills into three distinct branches, each bulging with rushing snowmelt; most autumns, the creek has shrunk one branch, a trickle of its former self, decorated with yellow leaves; in winter the banks are lined with snow and ice crusts the surface. On each visit I usually choose a scene and work it to within an inch of its life. On this most recent morning I spent an hour photographing this one leaf, making sure I left no shot un-shot: Multiple lenses, a range of focal lengths, horizontal and vertical orientation, and a variety of perspectives.
Here are more samples:

Here’s the version of the leaf I featured in my November 4 post. I started with wider compositions and gradually moved to tighter frames like this one. (If I were one to arrange leaves in my scenes, I might have been tempted to place one about where the pine needle sits on the rock opposite the leaf.)
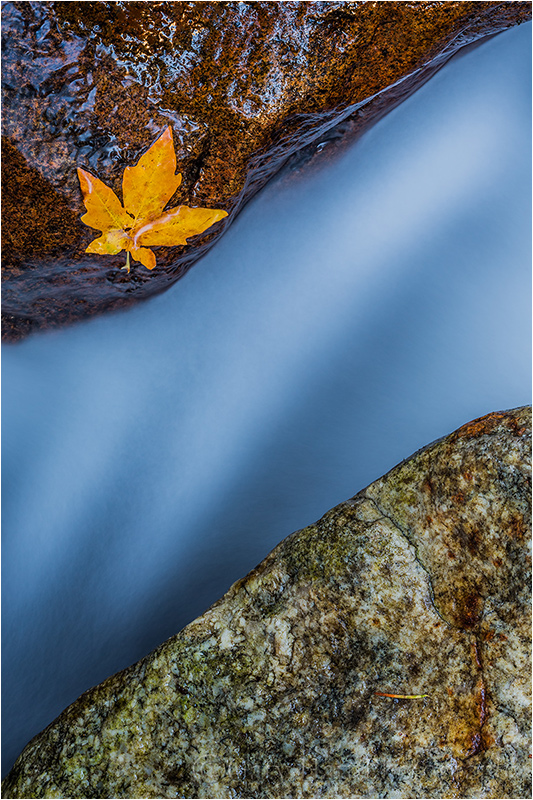
Here’s the same image rotated into a vertical. Whenever possible, I like to horizontal and vertical version of each scene I photography, but rarely do they come out identical because each orientation requires its own crop. But an advantage of photographing a scene from directly above is that there’s no top or bottom to the scene. To make the horizontal scene into a vertical, I could have rotated my camera 90 degrees and re-shot, but it was much easier to simply rotate the image in Photoshop.
Shortly after I started working on the scene, a breeze kicked up and deposited a green leaf right on top of the pine needle mentioned above. Not only was it a not particularly photogenic leaf, it was upside-down (clearly I need to work on my powers of telepathic manifestation). But rather than knock the rogue leaf into the creek, I included it in my composition, capturing several frames before the breeze returned and did the dirty work for me.

